
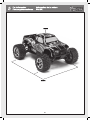
1
Instruction Manual
En
Bauanleitung
De
Fr
Manuel de montage
De
Fr

2
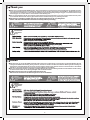
Danke
De
Thank you
En
Thank you for selecting this HPI RACING product ! This kit is designed to be fun to drive and uses top quality parts for durability and perfor-
mance. The instruction manual you are reading was designed to be easy to follow yet thorough in its explanations. HPI Racing wants you to
enjoy driving your new R/C kit. If you come across any problems or need some help getting through a step, give us a call and we will do our very
best to help you. You can also contact us on the internet at www.HPIracing.com.
This is a high performance R/C kit, and it requires regular maintenance for best performance. If you don’t do regular maintenance the perfor-
mance will suffer. HPI has all the necessary parts and accessories available to keep your car performing at its best.
The caution or attention symbols will warn you about steps that can be very dangerous.
Please read and understand the instructions carefully before proceeding.
●
●
●
Attention
Achtung
Attention
注 意
Cautions
Warnhinweise
Précautions
警 告
Cautions
Warnhinweise
Précautions
警 告
Vielen Dank, dass Sie sich für HPI RACING entschieden haben! Dieses Auto soll Spaß machen und verwendet nur hochwertige Materialien für beste
Leistungen und Haltbarkeit. Die Anleitung, die Sie gerade lesen, ist einfach zu verstehen und dabei sehr ausführlich. HPI Racing will, dass Sie Erfolg und
Spaß mit Ihrem neuen Modell haben! Falls es dennoch einmal zu Problemen kommen sollte, melden Sie sich bei uns. Wir werden alles in unserer Macht
stehende tun, um zu helfen. Sie können uns auch gerne unter www.HPIracing.com kontaktieren.
Dies ist ein hochleistungs RC-Auto und benötigt regelmäßige Wartung. Wenn Sie diese Wartungsarbeiten nicht durchführen wird die Leistung
des Autos darunter leiden. Alle zur Wartung benötigten Teile sind bei HPI erhältlich.
Die Warnsymbole weisen Sie auf gefährliche Bauabschnitte hin.
Bitte lesen und verstehen Sie die Anweisungen bevor Sie sie durchführen.
●
●
●
Attention
Achtung
Attention
注 意
Cautions
Warnhinweise
Précautions
警 告
Cautions
Warnhinweise
Précautions
警 告
Seite wird geladen ...

4
De
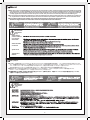
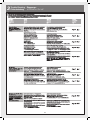
Contents
En
Section Contents Page
1 Overview 6
2 Start Up Guide 7
2-2 Setup Before Starting 7
2-3 Radio Control Car Operating Procedures 9
3 Trouble Shooting 13
4 Maintenance 14
4-1 Chassis Maintenance 14
4-2 Wheel Maintenance 15
4-3
Transmission Maintenance 15
4-4 Shock Maintenance 18
4-5 Radio Maintenance 20
5 Parts Reference 25
6 Exploded View 26
7 Parts List 27
Abschnitt Inhalt Seite
1 Übersicht 6
2 Die ersten Schritte 7
2-1 Einstellungen vor dem Start 7
2-2 Umgang mit Ferngesteuerten Modellautos 9
3 Fehlerbehebung 13
4 Wartung 14
4-1 Wartung des Chassis 14
4-2 Wartung der Reifen 15
4-3
Wartung des Getriebes
15
4-4 Stoßdämpfer 18
4-5 RC-Anlage 20
5 Übersicht aller Teile 25
6 Explosionszeichnung 26
7 Ersatzteilliste 27
Seite wird geladen ...
Seite wird geladen ...

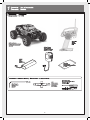
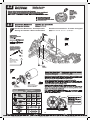
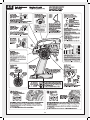
7
6121
Body Pin (Small)
Clip Carrosserie (Petit)
Karosseriesplinte klein
ボディピン小
2
-
1
2
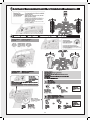
Preparing The Chassis Vorbereitung des Chassis Préparation du châssis シャーシの準備
1
Retrait de la carrosserie
ボディを取り外します
Removing the Body
Demontage der Karosserie
Mise en place de l’antenne du récepteur
受信機用アンテナを取り付けます
Receiver Antenna Installation
Montage der Empfängerantenne

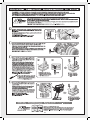
8
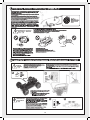
Charging The Drive Battery Laden des Fahrakkus Recharge de la batterie motrice 走行用バッテリーの充電
2

9
3
Transmitter Preparation Vorbereitung des Senders Préparation de l’émetteur 送信機の準備
Seite wird geladen ...

11
Volant de direction
ステアリングホイール
Steering Wheel
Lenkrad
Brake / Reverse
Bremse / Rückwärts
Frein/Marche arrière
ブレーキ / バック

12
Cautions・Attention
Warnhinweise
・Achtung
Précautions
・Attention
警 告・注 意
Attention
Achtung
Attention
注 意
1
Cautions
Warnhinweise
Précautions
警 告
2
1

13
3
Trouble Shooting
Fehlerbehebung
Dépannage
トラブルシューティング
Seite wird geladen ...

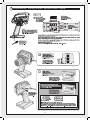
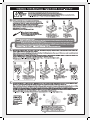
15
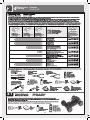
4-2
4-3
105508
M2.5x6mm
105508
M2.5x6mm
1
2
Z700
Set Screw M3x3mm
Madenschraube M3x3mm
Vis sans tête M3x3mm
1. 5
mm
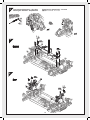
Transmission Maintenance - Gear Replacement
Wartung des Getriebes - Motors und des Ritzels
Entretien de la transmission - du moteur et du pignon
駆動系のメンテナンス - モーター、ピニオンギア
1. 5
mm
Z901
Allen Wrench 1.5mm
Inbusschlüssel 1.5mm
Clé Allen 1.5mm
六角レンチ 1.5mm
#1
#0
105508
M3x6mm

16
105508
M2x14mm
#1
#0
#1
#0
#1
#0
#1
#0
3
4
Transmission Maintenance - Spur Gear
Wartung des Getriebes - Hauptzahnrad
Entretien de la transmission - couronne
駆動系のメンテナンス - スパーギア
5
105508
M2x6mm
#1
#0

17
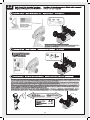
105511
Ball Bearing 8x12x3.5mm
Kugellager 8x12x3.5mm
Roulement a billes 8x12x3.5mm
105511
Ball Bearing 4x8x3mm
Kugellager 4x8x3mm
Roulement 4x8x3mm ZZ
6
8
7
Transmission Maintenance - Diff Gear
Wartung des Getriebes - Kegeldifferential
Entretien de la transmission - différentiel
駆動系のメンテナンス - デフギア
This step same for front and rear.
Diese Schritte sind für vorne und hinten identisch durchzuführen.
Même étape pour l’avant et l’arrière.
図を参考にフロント、リヤ側を同様に作業してください。
105513
1. 5
mm
Z901
Allen Wrench 1.5mm
Inbusschlüssel 1.5mm
Clé Allen 1.5mm
六角レンチ 1.5mm

18
Needle Nosed Pliers
Spitzzange
Pinces à becs longs
85717
Ball Diff (Assembled)
Kugeldifferential (Montiert)
Differentiel A Bille (Monte)
105511
8x12x3.5mm
105511
8x12x3.5mm
85717
Ball Diff (Assembled)
Kugeldifferential (Montiert)
Differentiel A Bille (Monte)
9
Installation is reverse of removal.
Der Einbau erfolgt in umgekehrter Reihenfolge zum Ausbau.
L’ordre d’installation est inverse de l’ordre de démontage.
組み立ては逆の手順で図を参考にしてください。
1
This step same for front and rear.
Diese Schritte sind für vorne und hinten identisch durchzuführen.
Même étape pour l’avant et l’arrière.
図を参考にフロント、リヤ側を同様に作業してください。
Screwdriver
Schlitzschraubenzieher
Tournevis
105511
Ball Bearing 8x12x3.5mm
Kugellager 8x12x3.5mm
Roulement a billes 8x12x3.5mm
85717
Ball Diff (Assembled)
Kugeldifferential (Montiert)
Differentiel A Bille (Monte)
1. 5
mm

19
1
2
3
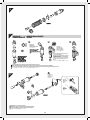
Shock Oil
Dämpferöl
Huile d’amortisseur
ショックオイル
Use a Rag.
Verwenden Sie
einen Putzlappen.
Utilisez un chiffon.
オイルを拭き取ります。
Move the shaft up and down slowly to
remove all air bubbles.
Bewegen Sie die Kolbenstange langsam
nach oben und unten, damit Luftblasen
entweichen können.
Déplacez l’axe vers le haut et vers le bas
doucement pour faire partir toutes les
bulles.
ゆっくりピストンを動かし空気を抜いてください。
If shock shaft is bent, replace shock shaft and silicone O-rings.
Wenn die Kolbenstange verbogen sein sollte, tauschen Sie sie und ersetzen Sie die O-Ringe.
Si l’axe de l’amortisseur présente un gauchissement, remplacez l’axe ainsi que les joints toriques silicone.
シャフトが曲がっている時は、シリコンOリングと合わせて交換してください。
3
Remove
Demontage
Retrait
Install
Montage
Installation
2
4
Installation is reverse of removal.
Der Einbau erfolgt in umgekehrter Reihenfolge zum Ausbau.
L’ordre d’installation est inverse de l’ordre de démontage.
組み立ては逆の手順で図を参考にしてください。
Z115
E Clip E-1.5
E-clip E-1.5
Circlip E-1.5
Seite wird geladen ...
Seite wird geladen ...
Seite wird geladen ...
Seite wird geladen ...
Seite wird geladen ...
Seite wird geladen ...
Seite wird geladen ...
Seite wird geladen ...
Seite wird geladen ...
Seite wird geladen ...
Seite wird geladen ...
Seite wird geladen ...
Seite wird geladen ...
-
 1
1
-
 2
2
-
 3
3
-
 4
4
-
 5
5
-
 6
6
-
 7
7
-
 8
8
-
 9
9
-
 10
10
-
 11
11
-
 12
12
-
 13
13
-
 14
14
-
 15
15
-
 16
16
-
 17
17
-
 18
18
-
 19
19
-
 20
20
-
 21
21
-
 22
22
-
 23
23
-
 24
24
-
 25
25
-
 26
26
-
 27
27
-
 28
28
-
 29
29
-
 30
30
-
 31
31
-
 32
32


in anderen Sprachen
- English: HPI Racing Mini Recon User manual
- français: HPI Racing Mini Recon Manuel utilisateur
- 日本語: HPI Racing Mini Recon ユーザーマニュアル
Verwandte Artikel
-
HPI Racing Jumpshot MT Benutzerhandbuch
-
-
-
-
-
-