
ref. 054233
3 I+J
3 I+J
3 H+J
3 H+J
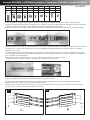
A B C D E F G H I J
M8x30 M8x12 M8 M6x12 M6 M5x10 M5 M4x6 M4x12 M4
2 18 20 38 38 8 8 30 6 36
1
1bis
• Ouvrir la glissière au maximum / Open the slide to its maximum / Öffnen Sie die Schiene bis zum Maximum / Aprire il cassetto al massimo
• Déverrouiller la glissière à l’aide du levier en plastique et ouvrir la glissière au maximum / Unlock the slide with the plastic lever and open the slide to
its maximum/ Entriegeln Sie die Schiene mit dem Plastikhebel und öffnen Sie die Schiene auf das Maximum.
(voir photo ci-dessous / see photo below / siehe Foto unten) / Sbloccare il cassetto con l’aiuto di una leva in plastica e aprire il cassetto al massimo.
• Présenter la glissière sur le support / Start to place the slide on the support / Legen Sie die Schiene auf das Blech. / Introdurre il cassetto sul supporto
• Prévisser la vis I + l’écrou J / Pre-screw the screw I + the nut I / Befestigen Sie die Schiene auf dem Blech mit der Schraube I + der Mutter J /
Avvitare la vite I + il dado J
• Coulisser la glissière et faire correspondre le trou de la glissière avec le trou de xation / Run the slide and match the slide hole with the xing
hole / Verschieben Sie die Schiene so, dass das Befestigungsloch sich über dem Schienenloch bendet. / Far scorrere il cassetto e far corrispondere
il foro del cassetto con il foro di ssaggio.
• Visser la vis H + l’écrou J / Screw the screw H + the nut J / Schrauben Sie die Schraube H + die Mutter J fest.
(voir photos ci-dessous / voir photos ci-dessous / siehe Foto unten ) / Avvitare la vite H + il dado J
• Finir le vissage de la vis I / Tighten the screw I / Schrauben Sie die Schraube I fest. / Finire di avvitare la vite I
• Refermer la glissière / Close the slide / Die Schiene zurückschieben. / Richiudere il cassetto
• 1 bis : Répéter l’opération de montage pour l’autre coté / Repeat the assembly operation for the other side / Wiederholen Sie die Montage auf
der anderen Seite. / Ripetere l’operazione di montaggio per l’altro anco
• Monter les deux autres glissières de la même façon / Assemble the other two slides the same way / Die beiden anderen Schienen auf die
gleiche Weise montieren. / Montare gli altri due cassetti nella stessa facciata
1
2 3
I+J
H+J
H+J
1
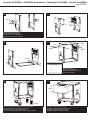
Servante GYSPRESS / GYSPRESS workstation / Fahrwagen GYSPRESS / Carrello GYSPRESS

8 D+E
2 A+C
6 D+E
2 B+C
16 B+C
5 D+E
8 F+G
12 D+E
32
4 5
6
7
OPTION : Support riveteuse (cf. p.4)
OPTION : Riveting machine support (cf. p.4)
OPTIONAL: Träger Nietgerät (s. Seite 4)
OPZIONE: Supporto rivettatrice (cf. p.4)
Les roues pivotantes doivent être du coté de la poignée.
The swivel wheels are on the side of the handle.
Die Lenkrollen sind auf der Seite des Griffs.
Le ruote con rotelle devono trovarsi sul lato dell’impugnatura.
Attention au sens!
Attention to the direction!
Aufmerksamkeit auf die Richtung!
Attenti ai vostri sensi!
Plier les pièces avant montage.
Fold the parts before assembly.
Falten Sie die Teile vor der Montage.
Piegare le parti prima del montaggio.
Vue de dessus de la servante
Avant / Front / vor den
Arrière / Back of
2
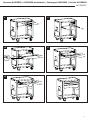
Servante GYSPRESS / GYSPRESS workstation / Fahrwagen GYSPRESS / Carrello GYSPRESS
ref. 054233

8 H+J
3 D+E
8 H+J
8 H+J
8
11
9
12
10
Matière :
Épaisseur : mm
Servante GYSPRESS / GYSPRESS workstation / Fahrwagen GYSPRESS / Carrello GYSPRESS
ref. 054233
3

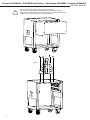
Servante GYSPRESS / GYSPRESS workstation / Fahrwagen GYSPRESS / Carrello GYSPRESS
OPTION. 054158
Retirer la face arrière avant de xer le support riveteuse.
Pull out the rear panel before attaching the riveting machine support.
Entfernen Sie die Rückseite, bevor Sie den Träger für das Nietgerät xieren.
Togliere il retro prima di ssare il supporto rivettatrice.
!
4 D+E
4
-
 1
1
-
 2
2
-
 3
3
-
 4
4


GYS SERVANTE GYSPRESS 8T/10T Bedienungsanleitung
- Typ
- Bedienungsanleitung
- Dieses Handbuch eignet sich auch für
in anderen Sprachen
Verwandte Artikel
-
GYS GYSPRESS PRESSURE SENSOR Datenblatt
-
-
-
-
-
GYS GYSPRESS 10T RIVETING TOOL Datenblatt
-
-
GYS SERVANTE GYSPRESS 8T/10T Datenblatt
-
-