


Table of Contents
Precautions ................................................................ 4
Introduction ............................................................... 5
Welcome!.........................................................................5
Main features ...................................................................5
Front and rear panel .................................................. 5
Front panel.......................................................................5
Rear panel .......................................................................6
Setup ......................................................................... 6
Installing batteries .............................................................6
Basic connections..............................................................7
Example of a connection to a guitar amp............................7
Example of a connection to a mixer or recorder .................. 7
Program mode........................................................... 7
Selecting a program..........................................................8
Creating your sound (Edit mode) ................................. 8
Signal flow .......................................................................8
Selecting effects and adjusting the main parameters ............8
Selecting and adjusting sub-parameters and [TONE] param-
eters ................................................................................9
Saving a program (Write mode) ........................................9
Checking the values saved in a program (Original Value) ..10
Bypass and Mute ..................................................... 10
Bypassing the AX3A .......................................................10
Muting the AX3A ............................................................10
Tuner ....................................................................... 10
Tuning procedure ............................................................10
Adjusting the tuner calibration .........................................11
Restoring the factory preset programs....................... 11
Troubleshooting........................................................ 11
Specifications ........................................................... 12

4
Precautions
Location
Using the unit in the following locations can result in a malfunction.
• In direct sunlight
• Locations of extreme temperature or humidity
• Excessively dusty or dirty locations
• Locations of excessive vibration
• Close to magnetic fields
Power supply
Please connect the designated AC adapter to an AC outlet of the correct
voltage. Do not connect it to an AC outlet of voltage other than that for which
your unit is intended.
Interference with other electrical devices
Radios and televisions placed nearby may experience reception interference.
Operate this unit at a suitable distance from radios and televisions.
Handling
To avoid breakage, do not apply excessive force to the switches or controls.
Care
If the exterior becomes dirty, wipe it with a clean, dry cloth. Do not use liquid
cleaners such as benzene or thinner, or cleaning compounds or flammable
polishes.
Keep this manual
After reading this manual, please keep it for later reference.
Keeping foreign matter out of your equipment
Never set any container with liquid in it near this equipment. If liquid gets into
the equipment, it could cause a breakdown, fire, or electrical shock.
Be careful not to let metal objects get into the equipment. If something does slip
into the equipment, unplug the AC adapter from the wall outlet. Then contact your
nearest Korg dealer or the store where the equipment was purchased.
THE FCC REGULATION WARNING (for U.S.A.)
This equipment has been tested and found to comply with the limits for a Class
B digital device, pursuant to Part 15 of the FCC Rules. These limits are de-
signed to provide reasonable protection against harmful interference in a resi-
dential installation. This equipment generates, uses, and can radiate radio fre-
quency energy and, if not installed and used in accordance with the instruc-
tions, may cause harmful interference to radio communications. However, there
is no guarantee that interference will not occur in a particular installation. If this
equipment does cause harmful interference to radio or television reception,
which can be determined by turning the equipment off and on, the user is
encouraged to try to correct the interference by one or more of the following
measures:
• Reorient or relocate the receiving antenna.
• Increase the separation between the equipment and receiver.
• Connect the equipment into an outlet on a circuit different from that to
which the receiver is connected.
• Consult the dealer or an experienced radio/TV technician for help.
Unauthorized changes or modification to this system can void the user’s
authority to operate this equipment.
CE mark for European Harmonized Standards
CE mark which is attached to our company’s products of AC mains operated
apparatus until December 31, 1996 means it conforms to EMC Directive (89/
336/EEC) and CE mark Directive (93/68/EEC).
And, CE mark which is attached after January 1, 1997 means it conforms to
EMC Directive (89/336/EEC), CE mark Directive (93/68/EEC) and Low Volt-
age Directive (73/23/EEC).
Also, CE mark which is attached to our company’s products of Battery oper-
ated apparatus means it conforms to EMC Directive (89/336/EEC) and CE
mark Directive (93/68/EEC).
IMPORTANT NOTICE TO CONSUMERS
This product has been manufactured according to strict specifications and
voltage requirements that are applicable in the country in which it is intended
that this product should be used. If you have purchased this product via the
internet, through mail order, and/or via a telephone sale, you must verify that
this product is intended to be used in the country in which you reside.
WARNING: Use of this product in any country other than that for which it is
intended could be dangerous and could invalidate the manufacturer’s or
distributor’s warranty.
Please also retain your receipt as proof of purchase otherwise your product
may be disqualified from the manufacturer’s or distributor’s warranty.
Company names, product names, and names of formats etc. are the trade-
marks or registered trademarks of their respective owners.
* Company names, product names, and names of formats etc. are the trade-
marks or registered trademarks of their respective owners.

5
AX3A Owner’s manual
Introduction
Welcome!
Thank you for adding the TONEWORKS AX3A Modeling Signal Proces-
sor to your r ig. Whether you’re playing live or in the studio, or practicing
with headphones, the AX3A will give you countless hours of great sounds!
To ensure a long and trouble-free relationship with your AX3A, please
read this manual carefully, and use it as directed. When you’ve finished
reading this manual, please keep it for future reference.
Main features
❑ Detailed and powerful modeling sounds delivered by Korg’s
modeling technology.
What is
?
(Resonant Structure and Electronic circuit Modeling System)
is Korg’s proprietary sound modeling technology which digitally simu-
lates a wide range of factors that affect the sound, including the
sound-producing mechanism of acoustic, electric, and electronic in-
struments, the body and cabinet resonances of these sounds, their
acoustical sound field, the electrical and electronic response of the
mics and speakers that propagate, these sounds, and even elec-
tronic circuit components such as vacuum tubes and transistors.
❑ 43 different modeling effect variations are built-in, and you can use
up to seven different effects simultaneously (including noise reduc-
tion and notch filter).
❑ All parameters of the effects in the five effect categories (pre-effect,
mic & body, tone, modulation, delay/reverb) can be fully edited.
❑ Use these modeling effects to create your own sounds and store
them in internal memory as one of 40 user programs. In addition, 40
more programs are provided as presets for immediate use.
❑ The built-in notch filter lets you eliminate unwanted acoustic feed-
back.
❑ Connect an optional Korg EXP-2 foot controller or XVP-10 expres-
sion/volume pedal, and use it as a wah pedal or volume pedal.
❑ The delay sound is preserved when you switch between programs
that have the same delay type and TIME parameter [P1] setting. Simi-
larly, the reverberation is preserved when switching between pro-
grams that have the same reverb type.
❑ A built-in auto chromatic tuner lets you tune while bypassed or muted.
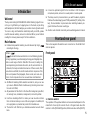
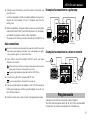
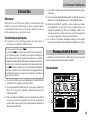
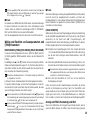
Front and rear panel
This section explains the switches and connectors on the AX3A’s front
and rear panels.
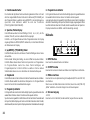
Front panel
1
2
3
4
5
6
1. Function selector
The operation of the up/down buttons and value knob will depend on the
mode that’s chosen by this selector. You’re in Program mode when this
selector is at the [PROGRAM] position, Write mode when at the [WRITE]

6
position, and Edit mode when at the [PRE FX]–[DELAY/REV-PARAM]
positions.
2. Program/Value display
In Edit mode, this display indicates the effect type (F0–F9, LE, nr, nF),
the parameter (P1–P4) or its setting (value).
In Write mode or Program mode, the display indicates the program num-
ber. When BYPASS/MUTE is active, the display indicates the name of
the note you’re tuning.
3. [▲(WRITE)], [▼(CANCEL)] buttons
In Effect mode, use these buttons to switch effect types or parameters.
By pressing the two buttons simultaneously, you can turn each effect
on/off. In Write mode, use these buttons to write a program.
In Program mode, you can press these buttons to increment or decre-
ment the program number in steps of 10. When you’re using the tuner,
use these buttons to adjust the calibration setting.
4. Value knob
In Edit mode, use this knob to adjust the value of a parameter. In Write
mode, you can use this knob to specify the writing-destination for the
program. In Program mode, this knob acts as the master volume.
5. Program Up switch
In Program mode, use this to select programs. The program number will
increase each time you press the switch. In Edit mode, press this to
make the parameter value appear in the program/value display. In this
case, the LED above the pedal will light, indicating that the program/
value display is showing the value of the effect parameter.
6. Program Down switch
In Program mode, use this to select programs. The program number will
decrease each time you press the switch. In Edit mode, press this to
make the effect or parameter type appear in the program/value display.
In this case, the LED above the pedal will light, indicating that the pro-
gram/value display is showing the type of effect or parameter.
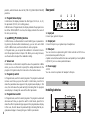
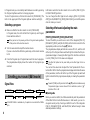
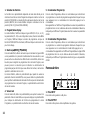
Rear panel
1234
1. Input jack
Connect your guitar to this jack.
2. Output jack
Connect this jack to your guitar amp or headphones.
3. Pedal jack
You can connect an optional Korg EXP-2 foot controller or XVP-10 ex-
pression/volume pedal to this jack.
A pedal connected here will function as a wah pedal if you’re using WAH
in [PRE FX], or as a volume pedal otherwise.
4. Power supply
~DC9V
You can connect an optional AC adapter to this jack.
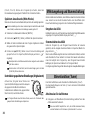
Setup
Installing batteries

7
AX3A Owner’s manual
1.
Slide the cover of the battery case in the direction of the arrow, and
open the cover.
Insert four separately sold AA-size alkaline batteries, being sure to
observe the correct polarity (“+” and “-” markings), and close the
battery case.
2.
When using batteries, the power will turn on when you insert a guitar
cable into the AX3A’s INPUT jack. While the power is on, the display
will indicate the program number or other information.
The power will turn off when you remove the cable from the INPUT jack.
Basic connections
Be sure to make all connections with the power turned off. If you fail to
use caution when making connections, you could damage your guitar
amp or speaker system, or cause malfunctions.
1.
Use a cable to connect the AX3A’s OUTPUT jack to your guitar
amp,mixer or recorder.
When making connections or turning on the power, lower the volume
of your amp or mixer so that you don’t hear noise
If you’re using headphones, plug them into the OUTPUT jack.
2.
Connect your guitar to the rear panel INPUT jack.
If you’re using batteries, this will turn the power on.
3.
If you’re using the optional AC adapter, connect it to the rear panel
DC9V power supply jack, and then plug the adapter into an AC out-
let to turn the power on.
4.
Raise the volume of your amp or mixer to the appropriate volume.
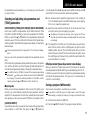
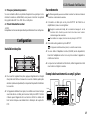
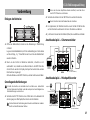
Example of a connection to a guitar amp
Guitar amp
Pedal
AC adaptor
to an AC outlet
Guitar
INPUT
OUTPUT
PEDAL
DC9V
Input
AX3A
Example of a connection to a mixer or recorder
Headphones
Digital recorder
AC adaptor
to an AC outlet
Guitar
INPUT
OUTPUT
DC9V
InputPhones
AX3A
Program mode
Settings for each effect are collectively called a “program.”
The AX3A has 80 programs which 40 (01–40) of them are rewritable.
Programs 41–80 contain preset programs for immediate use.

8
In Program mode you can instantly switch between sounds by pressing
the Program Up/Down switches to change programs.
To enter Program mode, set the function selector to [PROGRAM]. (The
LEDs in the upper part of the Program Up/Down switches will light.)
Selecting a program
1.
Make sure that the function selector is set to [PROGRAM].
In Program mode, the LEDs of both the Program Up and Program
Down switches will be lit.
When you turn on the power, you’ll be in Program mode regardless
of the position of the function selector.
2.
Turn the value knob to adjust the master volume.
If you've connected the AX3A to a guitar amp, set the master volume
to 50.
3.
Press the Program Up or Program Down switch to select a program.
The program/value display shows the number of the program you
selected.
Creating your sound (Edit mode)
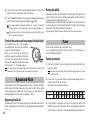
Signal flow
MIC&BODY
PRE FX
TONE
NOTCH
VOLUME PEDAL
MOD
DELAY/REVERB
NR
VOLUME PEDAL is available only if a pedal is connected to the PEDAL
jack.
Edit mode is when the function selector is in one of the [PRE FX]–[DE-
LAY/REV PARAM] positions.
You can change the effect type for each category ([PRE FX], [DRIVE/
AMP], [LEVEL/NR/NOTCH], [MOD], [DELAY/REV]), and edit the param-
eters to create your sound.
Selecting effects and adjusting the main
parameters
[PRE FX], [MIC&BODY],[MOD], [DELAY/REV]
To select the effect you want to use in each of the categories [PRE FX],
[MIC&BODY], [MOD], and [DELAY/REV], set the function selector to the
appropriate position and use the [▲][▼] buttons.
The program/value display will indicate a value of F0–F9, and the LED
at the top of the Program Down switch will light to indicate that the pro-
gram/value display is showing the effect type.If the function select knob
is set to [TONE], the P1-P4 values are displayed.
The effect list printed on the panel tells you the effect type that is se-
lected.
You can turn the value knob to adjust the “main” parameter for the se-
lected effect. At this time the program/value display will indicate the value
of the parameter, and the LED at the top of the Program Up switch will
light to indicate that the program/value display is showing the parameter
value.
To switch [TONE] on/off, press both of the [▲][▼] switches simultaneously.
The parameter type or value is shown if this is switched on, and an “ ”
indication if this is off.
■ Quick guide
When you select an effect, the AX3A automatically sets the parameters
of that effect to their most effective values. In other words, you can cre-
ate great sounds just by choosing an effect for each of the categories
PRE FX, MIC&BODY, MOD, and DELAY/REV, without having to make
detailed parameter settings.

9
AX3A Owner’s manual
By adjusting the main parameters, you can tweak your sound to what
you have in mind.
Selecting and adjusting sub-parameters and
[TONE] parameters
[PRE FX-PARAM], [TONE], [MOD-PARAM], [DELAY/REV-PARAM]
Here's how to edit the sub-parameters for the effect selected in [PRE
FX], [MOD], and [DELAY/REV], as well as the parameters for [TONE].
When you press the [▲] or [▼] buttons, the program/value display will
indicate a value of P1–P4, and the LED at the top of the Program Down
switch will light to indicate that the program/value display is showing the
parameter type.
For the sub-parameters that correspond to P1–P4, refer to p.44 “Appen-
dices”.
Now you can use the value knob to adjust each sub-parameter to your
taste.
At this time, the program/value display indicates the value of the param-
eter, and the LED at the top of the Program Up switch will light to indi-
cate that the program/value display is showing the parameter value.
If an effect other than [TONE] is turned off, the program/value display
will indicate “
” when you turn the function select knob to [PARAM] for
that category. If you want to edit the parameters of that effect, simulta-
neously press both [▲] and [▼] buttons to turn the effect on.
■ Quick guide
When you want to make adjustments to the sound of the effect you've
selected, you should start by adjusting the main parameter, and then
adjust the P1 sub-parameter. In most cases, adjusting these two param-
eters will give you the sound you want. ([TONE] is an exception to this.)
[LEVEL/NR/NOTCH]
Select this position when you want to select or adjust the program level,
noise reduction, or notch filter. Then press the [▲] or [▼] buttons to
cycle the display through LE (program level), nr (NR sensitivity), and nF
(notch filter). Use the value knob to adjust each parameter.
LE: Use the value knob to adjust the program level (0–10). A setting of
7.0 is the standard value. Some effect settings may cause clipping.
If this occurs, lower the program level.
nr: Adjust the noise reduction sensitivity (0–10) so that you don’t hear
noise (hiss) when you’re not playing your guitar.
Depending on the guitar you’re using, notes may be cut off if you
raise the noise reduction value excessively. Adjust this so notes ring
out naturally.
nF: This adjusts the notch filter (oF, 1-63) that reduces acoustic feed-
back. Turn the knob to set the cutoff frequency at which acoustic
feedback will be reduced. The notch filter will be off if you turn the
knob all the way to the left. Turn the knob toward the right to move
the cutoff frequency from low to high, and find the point at which the
acoustic feedback is occurring.
Effect/parameter type and parameter value display
When you press the Program Down switch in Edit mode, the program/
value display will indicate the effect type or parameter type (F0–F9, P1–
P4). When you press the Program Up switch, the program/value display
will indicate the parameter value. This gives you a convenient way to
check the current settings.
Saving a program (Write mode)
Here’s how to save (write) a sound that you’ve created.
If you switch to a different program in Program mode or turn off the power
without writing your settings into memory, the changes you made will be lost.
1.
Set the function selector to [WRITE].
2.
Press the [▲(WRITE)] button. The program number will blink.

10
3.
Use the value knob or the Program Up/Down switches to select the
program in which you want to save your settings.
4.
Press the [▲(WRITE)] button once again. The program will be saved,
and the program/value display will indicate “
” briefly.
The newly saved program will overwrite (i.e., replace) the existing
settings, so that the previous program in that location will be lost.
If you decide not to save the new program, press the [CANCEL] but-
ton to cancel the operation.
Checking the values saved in a program (Original Value)
Muting the AX3A
Simultaneously press and hold down the Program Up and Program Down
switches for about one second and the output will be muted. At this time,
the program/value display will indicate “
”.
When bypassed or muted, the Auto Chromatic Tuner will be active. To
cancel the bypass or mute function, press the Program Up or Program
Down switch (this will not change the program).
In the bypassed state, the value knob acts as the master volume.
Tuner
The AX3A has a built-in Auto Chromatic Tuner.
You can calibrate the reference pitch (the note “A”) of the tuner in a
range of A438 Hz–A445 Hz.
Tuning procedure
1.
The Auto Chromatic Tuner will be activated when the AX3A is by-
passed or muted.
If you want to tune silently, such as during a live performance, simply
mute the AX3A.
2.
Play a note on your guitar and the program/value display will indi-
cate the name of the closest note.
Note names are indicated as follows.
CC#DD#EFF#GG# AA#B
Note name
Display
3.
If your guitar is sharp (pitch too high), the Program Up switch LED
will blink. If your guitar is flat (pitch too low), the Program Down switch
LED will blink. In either case, more rapid blinking indicates that your
The Original Value LED in the program/
value display lets you check the parameter
values of a saved program.
When you use the knob or switches to
modify the value of a parameter, the Origi-
nal Value LED will light when that value
matches the value that’s already been saved
in the program (i.e., the original value).
In Program mode, the Original Value LED will light if the values of all
parameters match the values that are saved in the program.
Bypass and Mute
Bypass (which turns off all effects including noise reduction) and Mute
(which mutes the AX3As output) are convenient functions for use while
you’re adjusting your guitar amp, tuning during a live performance, or
switching guitars. Here’s how to use Bypass or Mute.
Bypassing the AX3A
Simultaneously press the Program Up and Program Down switches; all
effects will be bypassed. At this time, the program/value display will indi-
cate “
”.

11
AX3A Owner’s manual
guitar is farther from the correct pitch.
When in tune, both the Program Up and Down LEDs will light.
Adjusting the tuner calibration
When you turn on the power, the built-in tuner is set to a reference pitch
of A 440 Hz (concert pitch). You can calibrate this reference pitch in a
range of 438 Hz–445 Hz. You can use the [▲]/[▼] buttons to calibrate
this in the range of 438 Hz–445 Hz. When doing so, the program/value
display will indicate a value of 38–45.
When you turn off the power, the calibration adjustment you made will
be discarded and the AX3A will automatically be set to 440 Hz.
Restoring the factory preset programs
Here’s how to restore (reload) the AX3A’s programs back to factory pre-
set programs.
When you execute this operation, all the programs you created and stored
inside the AX3A will be erased, and replaced by the factory programs.
1.
While holding down both the Program Up and Down switches as
well as the [▼(CANCEL)] button, turn on the power. The program/
value display will indicate “
”, and the LEDs in the upper part of
the Program Up/Down switches will blink. Take your hand off both
switches and the button you had been pressing.
2.
If you decide to cancel the reload operation at this point, press the
[▼(CANCEL)] button.
3.
If you wish to reload the factory settings press the [▲(WRITE)] but-
ton. The program/value display will indicate “
” and reloading will
begin. When reloading is completed, the program/value display will
indicate “
”, and the AX3A will automatically enter Program mode.
Never turn off the power while reloading.
Troubleshooting
If you suspect a malfunction, please check the following points. If this
does not resolve the problem, please contact a nearby dealer.
1. Power does not turn on
❑ Have the batteries have run down? When the batteries run low,
the display will blink “
”. We recommend that you replace the
batteries as soon as possible. If batteries become unusable, re-
move them immediately. Leaving drained batteries in the unit can
cause malfunctions (such as battery leakage). You should also
remove the batteries if you won’t be using the AX3A for an ex-
tended time.
❑ Have you have inserted a stereo cable into the INPUT jack?
When operating the AX3A on batteries, the power will not turn
on if you insert a stereo cable. Be sure to use a mono cable.
❑ Is the AC adapter connected to the rear panel DC9V jack?
❑ Is the AC adapter plugged into an AC outlet?
❑ Could the AC adapter be damaged?
2. No sound
❑ Is the volume of your guitar turned down?
❑ Is your guitar cable connected correctly?
❑ Is your guitar cable broken?
❑ Are the TONE or PROGRAM LEVEL (LEVEL/NR/NOTCH) pa-
rameters be turned to a low value?
❑ Is the volume turned down for another effect?
❑ If an expression pedal is connected, is it turned down?
❑ Is the Mute function activated? Refer to “Bypass and Mute” (p.10)
and cancel the Mute function.

12
❑ Is the master volume turned down? Set the function selector to
[PROGRAM], and turn the value knob to adjust the master vol-
ume.
3. Effects don’t apply
❑ Could an effect be bypassed?
❑ Is the modulation “DEPTH” or the delay/reverb “MIX” set to a low
value?
❑ Could the [MIC&BODY] DEPTH be set to 0?
❑ Is the AX3A in Bypass mode? Refer to “Bypass and Mute” (p.10)
and cancel the Bypass function.
4.
High frequencies are distorted when using [MIC&BODY]
❑ Depending on the guitar you're using, the high frequencies may
distort if the [TONE] TREBLE or XCITER effect parameter val-
ues are raised excessively. If this occurs, lower the settings.
5.
Sound connected to the guitar amp is distorted, or sounds
wrong
❑ Could the [TONE] values or the PROGRAM LEVEL (LEVEL/NR/
NOTCH) be excessively high?
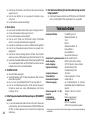
Specifications
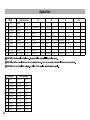
Number of effects: Pre-effect types: 10
Mic&Body Model types: 10
Tone: 1
Notch Filter: 1
Modulation Effect types: 10
Delay Effect types: 5
Reverb Effect types: 5
Noise Reduction: 1
Number of programs: 80 (40 user/40 preset)
Audio input: INPUT (mono)
Audio output: OUTPUT (stereo)
Signal processing: A/D conversion: 24 bit
D/A conversion: 24-bit
Sampling frequency: 31.25 kHz
Tuner: Detection range : C1–E6
Calibration: A=438–445 Hz
Power supply: Four alkaline AA batteries (continuous use
of eight hours) or DC9V (separately sold)
AC adapter
Dimensions (W ✕ D ✕ H): 178 ✕ 142 ✕ 43 mm /
7.0 ✕ 5.6 ✕ 1.7 inches
Weight: 340 g / 11.99 oz.
Included items: Owner’s manual
Options (separately sold):
DC9V AC adapter
EXP-2 foot controller
XVP-10 expression/volume pedal
* Specifications and appearance are subject to change without notice for improve-
ment.

Sommaire
Précautions.............................................................. 14
Introduction ............................................................. 15
Bienvenue! .....................................................................15
Caractéristiques principales ............................................15
Panneau Avant et Arrière......................................... 15
Panneau Avant...............................................................15
Panneau Arrière.............................................................16
Configuration .......................................................... 17
Installation des piles .......................................................17
Raccordements ...............................................................17
Exemple de branchement à un ampli guitare ...................17
Exemple de branchement à une console de mixage ou d’un
enregistreur....................................................................18
Jouer (Mode Programme)......................................... 18
Selectionner un programme ............................................18
Créez votre son (Mode Edit) ..................................... 18
Flux du Signal ................................................................18
Selectionner les effets et adjuster les paramètres principaux....
18
Sélection et réglage des sous-paramètres et des paramètres
[TONE] ..........................................................................19
Sauvegarde d’un programme(Write mode)......................20
Vérifiez les valeurs sauvées dans un programme (Valeur
originale) .......................................................................20
Bypass et Mute ........................................................ 20
Bypasser l’AX3A ............................................................20
Muter l’AX3A................................................................. 20
Accordeur................................................................ 21
Procédure pour l’accord .................................................21
Ajustez le calibrage de l’accord ......................................21
Retour aux réglages d’usine .................................... 21
Troubles de fonctionnement...................................... 21
Caractéristiques ....................................................... 22

14
Précautions
Emplacement
L’utilisation de cet instrument dans les endroits suivants peut en entraîner le
mauvais fonctionnement.
• En plein soleil
• Endroits très chauds ou très humides
• Endroits sales ou fort poussiéreux
• Endroits soumis à de fortes vibrations
•A proximité de champs magnétiques
Alimentation
Veuillez brancher l’adaptateur secteur spécifié sur une prise secteur à la ten-
sion appropriée. Ne branchez pas l’adaptateur sur une prise de courant dont
la tension ne correspond pas à celle pour laquelle l’appareil a été conçu.
Interférences avec d’autres appareils électriques
Les postes de radio et de télévision situés à proximité peuvent souffrir
d’interférences à la réception. Faites fonctionner cet appareil à une distance
raisonnable des postes de radio et de télévision.
Maniement
Pour éviter de les endommager, manipulez les commandes et les boutons de
cet instrument sans appliquer de force excessive.
Entretien
Lorsque l’extérieur est sale, essuyez-le avec un chiffon propre et sec. Ne
vous servez pas d’agents de nettoyage liquides comme du benzène ou du
diluant, des produits de nettoyage ou des vernis inflammables.
Conservez ce manuel
Après avoir lu ce manuel, veuillez le conserver soigneusement pour référence
ultérieure.
Évitez toute intrusion d’objets ou de liquide
Ne placez jamais de récipient contenant du liquide près de l’instrument. Si le
liquide pénètre dans l’appareil, il risque de provoquer des dommages, un
incendie ou une électrocution.
Veillez à ne pas laisser tomber d’objets métalliques dans le boîtier. Si cela se
produisait, débranchez l’adaptateur secteur de la prise de courant et contactez
votre revendeur Korg le plus proche ou le magasin où vous avez acheté
l’instrument.
Marque CE pour les normes européennes harmonisées
La marque CE apposée sur tous les produits de notre firme fonctionnant
sur secteur jusqu’au 31 décembre 1996 signifie que ces appareils répondent
à la Directive EMC (89/336/CEE) et à la Directive concernant la marque
CE (93/68/CEE).
La marque CE apposée après le 1 janvier 1997 signifie que ces appareils
sont conformes à la Directive EMC (89/336/CEE), à la Directive concernant
la marque CE (93/68/CEE) ainsi qu’à la Directive Basse Tension (73/23/
CEE).
La marque CE apposée sur tous les produits de notre firme fonctionnant
sur piles signifie que ces appareils répondent à la Directive EMC (89/336/
CEE) et à la Directive concernant la marque CE (93/68/CEE).
REMARQUE IMPORTANTE POUR LES CLIENTS
Ce produit a été fabriqué suivant des spécifications sévères et des besoins
en tension applicables dans le pays où ce produit doit être utilisé. Si vous
avez acheté ce produit sur internet, par correspondance ou/et au téléphone,
vous devez vérifier que ce produit est bien utilisable dans votre pays de
résidence.
ATTENTION: L’utilisation de ce produit dans un pays autre que celui pour
lequel il a été conçu peut être dangereuse et annulera la garantie du
fabricant ou du distributeur.
Veuillez aussi conserver votre récépissé qui est la preuve de votre achat,
faute de quoi votre produit risque de ne plus être couvert par la garantie du
fabricant ou du distributeur.
* Les noms de societes, nomsm de produits et noms de formats, etc. dans
ce manuel sont des marques de fabrique ou des mar-ques deposees de
leurs proprietaires respectifs.

15
AX3A Manuel d’utilisation
Introduction
Bienvenue!
Merci d’avoir choisi l’AX3A. pour garantir un fonctionnement sans
problèmes, veuillez lire attentivement ce manuel et utiliser l’appareil
comme expliqué. Quand vous aurez fini de lire le manuel, conservez-le
de façon à pouvoir vous y reporter par la suite.
Caractéristiques principales
❑ Production des sons modélisés puissants et précis grâce à la
technologie de modélisation “REMS” de Korg
Qu’est-ce que la technologie
?
Le système
(de l’anglais Resonant Structure and Electronic
circuit Modeling System) constitue une technique de modelage du
son déposée par Korg qui reproduit avec précision le caractère
complexe et la nature tant des instruments acoustiques qu’électriques
ainsi que des circuits électroniques dans des environnements réels.
Le
émule une vaste gamme des caractéristiques de génération
des sons y compris des corps d’instruments, des haut-parleurs et des
enceintes des champs acoustiques, des microphones, des tubes à
vide, des transistors, etc.
❑ 43 variations d’effets, vous pouvez utiliser jusqu’à six effets différents
simultanément (y compris la réduction de bruit).
❑ Tous les paramètres des effets dans les cinq catégories d'effets (pre-
effect, mic & body, tone, modulation, delay/reverb) peuvent être
entièrement édités.
❑ Utilisez les effets de modélisation pour créer vos propres sonorités et
vous pouvez ensuite les sauvegarder sous forme de programme. La
mémoire interne peut contenir jusqu’à 40 programmes utilisateurs et
40 programmes prédéfinis.
❑ Le filtre Notch intégré vous permet d’éliminer la rétroaction acoustique
indésirable.
❑ Si vous raccordez la pédale optionnelle Korg EXP-2 ou XVP-10, vous pouvez
utiliser celle-ci comme pédale wah-wah ou comme pédale de volume.
❑ L’éffet de retard “DELAY” peut être conservé lorsque vous passez
d’un programme à un autre dès lors que le type de Delay et les
réglages du paramètre [P1] TME sont semblables. L’effet de “Re-
verb” peut aussi être conservé lorsque vous passez d’un programme
à un autre comportant le même type de réverbération.
❑ Un accordeur chromatique automatique intégré vous permettant
d’accorder votre guitare en désactivant tous les effets ou en silence.
Panneau Avant et Arrière
Ce chapitre a pour but de présenter les différents touches et commandes
situés sur les panneaux avant et arrière de l’AX3A.
Panneau Avant
1
2
3
4
5
6

16
1. Sélecteur de fonction
La fonction de ce potentiomètre dépendra du mode sélectionné par le
sélecteur. Vous êtes en mode Programme lorsque le sélecteur est sur la
position (PROGRAM), en mode d’écriture lorsque le sélecteur est sur la
position (WRITE) et en mode d’édition lorsque le sélecteur est sur la
position [PRE FX]–[DELAY/REV-PARAM].
2. Program/Value display
En mode d’édition, l’afficheur indique le type d’effet (F0–F9, LE, nr, nF),
les paramètres (P1–P4) ou la configuration (value). Dans le mode Write
ou Program, l’afficheur indique le numéro de programme. Lorsque la
fonction BYPASS/MUTE est activée, l’afficheur indique le nom de la note
pour l’accordage.
3. Boutons [▲(WRITE)], [▼(CANCEL)]
Dans le mode Effect, utilisez ces boutons pour commuter les types d’effet
ou les paramètres. En pressant simultanément les deux boutons, vous
pouvez activer ou désactiver les effets. Dans le mode Write, utilisez ces
boutons pour enregistrer un programme. Dans le mode Program, vous
pouvez presser ces boutons pour incrémenter ou décrémenter le
programme par pas de 10. lorsque vous utilisez l’accordeur, ces boutons
ajustent la calibration de l’accord.
En mode d’édition, utilisez le potentiomètre pour ajuster la valeur du
paramètre. Dans le mode WRITE, vous pouvez utiliser ce potentiomètre
pour spécifier la destination de mémoire d’écritures pour la mémorisation
du programme. Dans le mode Program, ce potentiomètre a la fonction
de master volume.
4. Value knob
Dans le mode Edit, utilisez ce potentiomètre pour ajuster la valeur d’un
paramètre. Dans le mode Write, vous pouvez employer ce potentiomètre
pour indiquer la destination de l’écriture du programme. En mode
Programme, ce potentiomètre a la fonction de master volume.
5. Commutateur Program Up
Dans le mode Programme, utilisez ce commutateur pour sélectionner
un programme. Le numéro de programme augmentera chaque fois que
vous appuierez sur ce commutateur. En mode Edit, appuyer sur ce
commutateur
fera apparaître sur l’afficheur Program/Value la valeur du paramètre du
programme. Dans ce cas, la diode au-dessus du commutateur s’allumera,
indiquant que l’afficheur Program/Value montre la valeur du paramètre
d’effet.
6. Commutateur Program Down
Dans le mode Programme, utilisez ce commutateur pour sélectionner
un programme. Le numéro de programme diminuera chaque fois que
vous appuierez sur ce commutateur. En mode Edit, appuyer sur ce
commutateur fera apparaître sur l’afficheur Program/Value le type d’effet
du programme. Dans ce cas, la diode au-dessus du switch s’allumera,
indiquant que l’afficheur Program/Value montre le type ou le paramètre
d’effet.
Panneau Arrière
1234
1. Prise INPUT
Raccordez votre guitare à cette prise.
2. Prise OUTPUT
Raccordez cette prise à votre amplificateur de guitare.

17
AX3A Manuel d’utilisation
3. Prise pour pédale d’expression
Si vous souhaitez utiliser une pédale d’expression au pied pour com-
mander le volume ou le Wah-Wah, vous pouvez connecter une pédale
Korg optionnelle EXP-2 ou XVP-10 sur cette prise.
4. Prise d’alimentation secteur
~DC9V
L’adaptateur secteur vendu séparément peut être branché sur cette prise.
Configuration
Installation des piles
1.
Pour ouvrir le logement des piles, appuyez légèrement sur l’onglet
situé près de la flèche et soulevez le couvercle. Intallez quatre piles
alcalines (vendues séparément) en respectant la polarité et refermez
le couvercle.
2.
Si l’appareil est allimenté sur piles, il se mettra sous tension lorsque
vous brancherez un câble jack monosur cette prise INPUT. L’écran
s’allume quand l’appareil est sous tension. L’AX3A se metse met
hors tension lorsque vous débranchez le câble jack de la prise IN-
PUT.
Raccordements
Mettre les appareils que vous souhaitez raccorder hors tension et baissez
toutes les commandes de volume.
1.
Connectez un câble jack sur la prise OUTPUT de l’AX3A à un
amplificateur, mixeur ou enregistreur.
Reglez le volume de l'ampli, de la console de mixage etc. sur le
minimum afin d'eviter que les bruits de mise sous tension
n'endommagent les enceintes.
Pour utiliser un casque, branchez-le a la prise jack OUTPUT.
2.
Raccordez votre guitare à la prise INPUT.
Si l’appareil est allimenté sur piles, il se mettra sous tension.
3.
Si vous utilisez l’adaptateur secteur (KA181) vendu séparément,
branchez l’adaptateur secteur sur une prise secteur. L’appareil se
mettra sous tension.
4.
Lorsque les raccordement sont terminés, mettez l’appareil raccordé
sous tension et réglez le volume.
Exemple de branchement à un ampli guitare
INPUT
OUTPUT
PEDAL
DC9V
AX3A
Guitare
Bloc d'alimentation
secteur á connecter
sur le secteur
Ampli guitare
pédale
Entrée

18
Exemple de branchement à une console de mixage
ou d’un enregistreur
INPUT
OUTPUT
DC9V
AX3A
Ecouteurs
Enregistreur numérique
Guitare
EntréeCasque
Bloc d'alimentation
secteur á connecter
sur le secteur
Jouer (Mode Programme)
Les réglages de chaque effet est communément appelés programme.
L’ AX3A possède 80 programmes. Les programmes 01–40 sont
réinscriptibles. Les programmes 41–80 contiennent des programmes
présélectionnés pour une utilisation immédiate.
En mode Programme vous pouvez immédiatement passer d'un son à l'autre
en appuyant sur les pédales de changement de programme up/down.
En mode Programme vous pouvez immédiatement passer d'un son à
l'autre en appuyant sur les commutateurs Program Up/Down.
Pour entrer dans le mode Programme, réglez le sélecteur de fonction
sur [PROGRAM]. (Les diodes au-dessus des commutateurs Program
Up/Down s’allumeront )
Selectionner un programme
1.
Veillez à ce que le sélecteur de fonction soit réglé sur [PROGRAM].
En mode Programme, Les diodes au-dessus des commutateurs Pro-
gram Up/Down seront allumées.
Quand vous allumez l’appareil, vous serez en mode Programme
suivant la position du selecteur de fonctions.
2.
Tournez le bouton de valeur pour ajuster le volume général.
Si vous connectez l'AX3A à un amplificateur pour guitare, réglez le
volume général à 50.
3.
Appuyez sur le commutateur Program Up ou Down pour sélectionner un
programme.
L’afficheur Program/Value indiquera le numéro du programme.
Créez votre son (Mode Edit)
Flux du Signal
MIC&BODY
PRE FX
TONE
NOTCH
VOLUME PEDAL
MOD
DELAY/REVERB
NR
VOLUME PEDAL est utilisable uniquement si une pédale est connecté à
l’entrée PEDAL.
Le mode Edit est quand le sélecteur de fonction est en position [PRE
FX]–[DELAY/REV PARAM].
Vous pouvez changer de type d’effets pour chaque catégorie([PRE FX],
[MIC&BODY], [TONE], [LEVEL/NR/NOTCH], [MOD], [DELAY/REV]), et
éditer les paramètres pour créer votre son en détail.
Selectionner les effets et adjuster les paramètres
principaux
[PRE FX], [MIC&BODY], [MOD], [DELAY/REV]
Pour sélectionner les effets souhaités, dans chaque catégorie [PRE FX],
[MIC&BODY], [MOD], et [DELAY/REV], Réglez le sélecteur de fonction
sur la position appropriée, et utilisez le bouton [▲][▼].

19
AX3A Manuel d’utilisation
L’afficheur Program/Value indiquera une valeur F0–F9 et la diode au
dessus du commutateur Program Down s’allumera, indiquant que
l’afficheur Program/Value montre le type d’effet.
La liste d’effets imprimée sur le panneau avant vous indique le type d’effet
sélectionné.
Vous pouvez tourner le bouton Value pour régler le paramètre principal
pour l’effet sélectionné. L’afficheur Program/Value indiquera alors la valeur
du paramètre et la diode au dessus du commutateur Program Up s’allumera,
indiquant que l’afficheur Program/Value montre la valeur du paramètre.
Pour désactiver l’effet sélectionné, pressez simultanément les boutons
[▲] et [▼] . Quand l’effet est actif, le type d’effet est indiqué et quand il
est inactif, l’écran affiche“
”.
■ Guide rapide
Quand vous sélectionnez un effet, l’AX3A sélectionne automatiquement
les paramètres de cet effet à leurs valeurs optimales. En d’autres termes,
vous pouvez créer des gros sons juste en choisissant un effet dans
chaque catégorie PRE FX, MIC&BODY, MOD, et DELAY/REV, sans avoir
besoisn de régler des paramètres détaillés.
En ajustant les paramètres principaux, vous pouvez amener votre son
au plus prêt de ce que vous pensez.
Sélection et réglage des sous-paramètres et des
paramètres [TONE]
[PRE FX-PARAM], [TONE], [MOD-PARAM], [DELAY/REV-PARAM]
Vous trouverez ici des explications sur la façon d’éditer les sous-
paramètres pour l'effet sélectionné dans [PRE FX], [MOD] et [DELAY/
REV], ainsi que les paramètres pour [TONE].
Si vous appuyez sur les touches [▲] ou [▼], l’afficheur Program/Value
indiquera une valeur P1–P4, et la diode au dessus du commutateur
Program Down s’allumera, indiquant que l’afficheur Program/Value
montre le type de paramètre.
Pour les sous paramètres correspondant à P1–P4, referez vous à “Ap-
pendices”.
Maintenand, vous pouvez utiliser le bouton de valeur pour ajuster chaque
sous paramètre.
L’afficheur program/value indiquera alors la valeur du paramètre et la
diode au dessus du commutateur Program Up s’allumera, indiquant que
l’afficheur Program/Value montre la valeur du paramètre.
Pour activer/désactiver [TONE], appuyez simultanément sur les touches
[▲][▼]. Le type ou la valeur du paramètre sera affiché si l’effet est activé
et l’indication “
” apparaîtra s’il est désactivé.
Si un effet autre que [TONE] est désactivé, l’affichage de programme/valeur
indiquera “
” quand vous règlerez le sélecteur de fonction sur [PARAM]
pour cette catégorie. Si vous voulez éditer les paramètres de chaque effet,
pressez simultanément les boutons [▲] et [▼] pour réactiver l’effet.
■ Guide rapide
Si vous souhaitez modifier le son de l'effet sélectionné, vous pouvez
commencer par régler le paramètre principal, puis régler le sous-
paramètre P1. Dans la plupart des cas, régler ces deux paramètres vous
permettra d'obtenir le son voulu. ([TONE] est une exception à la règle.)
[LEVEL/NR/NOTCH]
Sélectionnez cette position quand vous souhaitez sélectionner ou régler
le niveau de programme, la réduction de bruit ou le filtre Notch. Pressez
les switchs [▲] ou [▼]pour amener l’écran à LE (program level), nr (NR
sensitivity), et nF (notch filter). utilisez le bouton de valeur pour ajuster
chaque paramètre.
LE: utilisez le bouton de valeur pour ajuster le niveau de programme
(0–10). 7.0 est la valeur standard. En cas de distorsion dans le son,
diminuez le volume de l’effet.
nr: Adjustez la réduction de bruit (0–10)afin de ne pas entendre de
bruit quand vous ne jouez pas de guitare.
Selon la guitare que vous utilisez, le son peut être interrompu et des
notes peuvent être retardées si vous réglez la réduction de bruit trop fort.

20
nF: Ce bouton permet de régler le filtre Notch (oF, 1-63) de réduction
de la rétroaction acoustique. Tournez le bouton pour spécifier la
fréquence de coupure minimisant la rétroaction acoustique. Le filtre
Notch sera désactivé si vous tournez le bouton complètement à
gauche. Tournez ce bouton vers la droite pour déplacer la fréquence
de coupure vers le haut et trouver le point où la rétroaction
acoustique survient.
Types de paramètres d’effets et écran de valeur
Si vous appuyez sur le commutateur Program Down en mode Edit,
l’afficheur Program/Value indiquera le type d’effet ou le type de
paramètre.(F0–F9, P1–P4). Si vous appuyez sur le commutateur Pro-
gram Up, l’afficheur program/value indiquera la valeur du paramètre.
Vous pourrez ainsi facilement vérifier les réglages actuels.
Sauvegarde d’un programme(Write mode)
Voici comment sauver un son programmé.
Si vous sortez du programme édité ou si vous eteignez l’appareil sans
sauvegarder, les réglages que vous avez effectué seront effacés.
1.
Réglez le selecteur de fonction sur [WRITE].
2.
Pressez sur le bouton [▲(WRITE)]. Le numéro du programme va clignoter.
3.
Utilisez le bouton Value ou les commutateurs Program Up/Down pour
sélectionner le programme dont vous souhaitez sauvegarder les réglages.
4
. Pressez le bouton [s(WRITE)] de nouveau. Le programme sera
sauvé, et l’écran indiquera brievement “
”.
Le nouveau programme écrase l’ancien.
Si vous décidez de ne pas sauvegarder le nouveau programme, pressez
le bouton [CANCEL] pour arrêter l’opération.
Vérifiez les valeurs sauvées dans un programme
(Valeur originale)
La Led de valeur originale de l’écran program/
value vous permet de vérifier la valeur du
programme sauvegardé.
Quand vous utilisez des boutons ou switchs pour
modifier la valeur des paramètres, la Led de
valeur originale s’allumera quand la valeur
atteindra celle du programme d’origine.
Dans le mode programme, cette Led s’éclairera quand les valeurs de
tous les paramètres atteindront celles sauvées dans le programme.
Bypass et Mute
Bypass (désactive tous les effets y compris la réduction de bruit) et
Mute sont des fonctions très pratiques quand vous voulez ajuster votre
ampli, accorder votre guitare, ou changer de guitare. Voici comment
utiliser ces deux fonction.
Bypasser l’AX3A
Pressez simultanément les switchs Program Up et Program Down ;tous
les effets seront desactivés. A ce moment, l’écran indiquera “
”.
Muter l’AX3A
Quand l’AX3A est en bypass ou mute, l’accordeur chromatique
automatique sera activé. Pour les désactiver, pressez les switchs Pro-
gram Up ou Program Down (celà ne changera pas le programme).
Quand vous appuyez simultanément sur les commutateurs Program Up/
Down en mode Edit pendant environ une seconde le son sera coupé.
L’afficheur Program/Value indiquera “
”.
Quand l’AX3A est contourné ou sa sortie coupée, l’accordeur
chromatique automatique est activé. Pour désactiver ces fonctions
appuyez sur le commutateur Program Up ou Down (le programme ne
changera pas).
Quand les effets sont contournés, le bouton VALUE fonctionne comme
commande de volume générale.
Seite laden ...
Seite laden ...
Seite laden ...
Seite laden ...
Seite laden ...
Seite laden ...
Seite laden ...
Seite laden ...
Seite laden ...
Seite laden ...
Seite laden ...
Seite laden ...
Seite laden ...
Seite laden ...
Seite laden ...
Seite laden ...
-
 1
1
-
 2
2
-
 3
3
-
 4
4
-
 5
5
-
 6
6
-
 7
7
-
 8
8
-
 9
9
-
 10
10
-
 11
11
-
 12
12
-
 13
13
-
 14
14
-
 15
15
-
 16
16
-
 17
17
-
 18
18
-
 19
19
-
 20
20
-
 21
21
-
 22
22
-
 23
23
-
 24
24
-
 25
25
-
 26
26
-
 27
27
-
 28
28
-
 29
29
-
 30
30
-
 31
31
-
 32
32
-
 33
33
-
 34
34
-
 35
35
-
 36
36


Korg TONEWORKS AX3A Benutzerhandbuch
- Typ
- Benutzerhandbuch
- Dieses Handbuch ist auch geeignet für
in anderen Sprachen
- English: Korg TONEWORKS AX3A User manual
- français: Korg TONEWORKS AX3A Manuel utilisateur