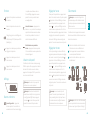
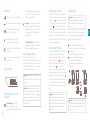
Duux DXCH05 Bedienungsanleitung
- Kategorie
- Raumheizungen
- Typ
- Bedienungsanleitung
Dieses Handbuch eignet sich auch für

1
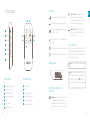
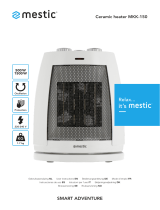
Slim 1000/1500
Convector heater
user manual | gebruikershandleiding | manuel d’utilisation
manual de usuario | Bedienungsanleitung

32
Thank you for
choosing Duux.
We’re so glad you decided to read the instructions to your new Duux convector heater! Many users
casually dismiss instructions and seek to gure it out on their own. But studies show that people who read
instructions will get up to speed more quickly and eciently than those who poke around with trial and
error.
At Duux we believe in the importance of a comfortable and healthy living environment. Enhancing your
wellbeing by designing appealing, functional and eective products is the passion that drives us every day.
With our range of innovative air treatment products we aim to provide you the best possible indoor air
quality.
Slim maximizes your comfort with its powerful heating performance. It draws cold air through the heating
element, eectively increasing the amount of warm air in the room to raise the temperature. There’s no
shortage of features either. The LED display with temperature indicator always keeps you informed while
the adjustable digital thermostat with 1⁰C accuracy and 3 heating programs provide full control. And
thanks to it’s IP24 classication, Slim can also be used in damp spaces.
Read this manual carefully to get the most out of your Slim convector heater.
1. Product overview 4
2. Installation & use 5
3. Functions 8
4. Maintenance 13
5. Technical specications 15
6. FAQ 16
Table of
contents
EN

54
or similar oor covering. Arrange the power cord
away from trac area’s to prevent tripping.
• Do not operate the heater with a damaged power
cord or plug, after malfunctions or after it has
been dropped or damaged in any manner.
• If the power cord is damaged, it must be replaced
by the manufacturer, an authorized service agent
or a qualied person in order to avoid a hazard.
• Avoid the use of extension cords as this may
overheat and cause a risk of re.
• Use the heater in a well-ventilated area. Do not
insert or allow objects to enter the ventilation or
exhaust opening. To prevent re, do not block air
inlets or exhaust openings in any manner. Do not
use on soft surfaces, like a bed, where openings
may become blocked. Use the heater on at, dry
surfaces only.
• Do not place the heater near ammable
materials, surfaces or substances, as there may
be a risk of re. Keep them at least 1m from the
front of the device and keep them away from the
sides and rear.
• Do not use the heater in any areas where petrol,
paint or other ammable liquids are stored such
as garages or workshops.
• Do not use this heater in the immediate
surroundings of baths, showers or swimming
pools. Never place the heater on a surface where
it may fall into a bathtub or other water container.
1. Product overview 2. Installation and use
Note: Please take notice of below instructions
and the separately included warning sheet before
using the product.
WARNING: This product is for household use
only. Connect the appliance to single-phase AC
power that matches the voltage specied on the
rating label.
WARNING: In order to avoid overheating, do
not cover the heater.
Installation
• The symbol meaning is “DO NOT COVER”.
• The symbol meaning is “DO NOT INSERT
FINGER IN”.
• The symbol meaning is “CAUTION HIGH
TEMPERATURE”.
• Never leave the heater unattended while it is in
use. Always turn the power switch to OFF position
and unplug from the wall outlet when not in use.
• Extreme caution is necessary when any heater
is used by or near children, disabled or elderly
persons and whenever the heater is left
operating unattended. Keep children away from
the heater when in use.
• Do not place the heater below an electrical outlet.
• Do not distribute the power cord under carpeting
EN
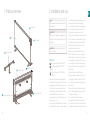
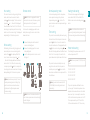
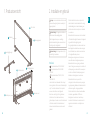
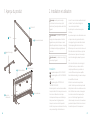
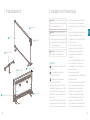
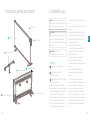
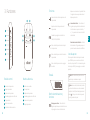
Body
LED display
Control panel
Mounting holes
Ventilation grille
Standby power button
1
2
3
5
6
4
Aluminum oorstand
7
Mounting bracket
8

76
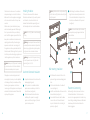
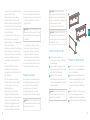
Note: Pay attention to the correct position of the
feet. The short side of the feet should be on the front
side of the product.
Wall mounting installation
Drill 4 holes with a diameter of 8mm at the
positions in gure A and add wall plugs into 4
holes.
Fix the horizontal bracket on the wall with
screws (see gure B).
Install the vertical bracket with screws onto the
horizontal bracket (see gure C)
Once installed the bracket, add the rubber
case onto the end of the vertical bracket
to protect the bracket from scratching the
product (see gure D)
• This heater is hot when in use. To avoid burns
and personal injury, do not touch hot surfaces.
• Make sure that no other appliances are plugged
in the same electrical outlet as this may cause
overload.
• Children under 3 years should be kept away
unless continuously supervised. Children aged
from 3 years and less than 8 years shall only
switch on/o the appliance provided that it has
been placed or installed in its intended normal
operating position and they have been given
supervision or instruction concerning use of
the appliance in a safe way and understand the
hazards involved. Children aged from 3 years and
less than 8 years should not plug in, regulate and
clean the appliance or perform maintenance.
Caution: Some parts of this product can become
very hot and cause burns. Particular attention to
children and vulnerable persons is required.
• This appliance can be used by persons with
reduced physical, sensory or mental capabilities
or children aged from 8 years and above if they
have been given supervision or instruction
concerning use of the appliance in a safe way and
understand the hazards involved. Children shall
not play with the appliance.
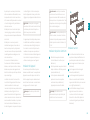
Installing the device
This heater can be used with the aluminum
oorstand or wall mounted, If you use the product
on a at surface, it must be attached to the
aluminum oorstand before operating the unit.
Both assembly instructions can be found below.
Note: This unit is for oor use or wall mounting
use only.
Warning: Do not operate the device without the
aluminum oorstand or wall bracket. Operate the
heater only in upright position. Any other position
or angle could create a hazardous situation.
Warning: Do not install this product vertically,
or it will stop work or cause risk of re. Install
product as gure A, B, C, D, E.
Aluminum oorstand installation
Unpack both aluminum feet and take out the
rubber plug (see gure A)
Put the product on a suitable and stable
position and use an allen key to attach the
feet with screws (see gure B)
After the aluminum oorstand has been
installed, put the product in an upright
position on the oor (see gure C). Now the
product can be operated.
1
2
3
4
After nishing the installation of the bracket,
align the holes on back of product and click
the horizontal bracket into the product. Once
attached, move leftwards to x the product
(see gure E)
Note: To remove the heater from the bracket,
please operate by moving to opposite directions
from installation.
Placement & connecting
Before using the heater, make sure that it is on
a at and stable surface. The heater must be
connected to an appropriate electrical outlet. Keep
loose clothing or bedding, furniture and ammable
material away from the wall outlet where the
heater is plugged in.
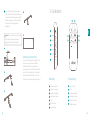
1
2
3
5
A
B
C
A
B
C D
E

98
Light intensity - Press the button for
5 seconds to adjust the intensity of the
standby light by pressing the ‘+ or –‘ button.
In total 3 intensities can be selected.
Factory reset - Press the button for 20
seconds to return the product back to its
factory setting.
Using the device
First switch the red mechanical button “POWER”
to ON by pressing the button on the right side of
heater. Hereafter press the ON/OFF switch to start
to turn the product on or o.
Note: This unit is for oor use or wall mounting
use only.
Note: Current time (hour/minutes) need to be
set before entering into one of the heating modes
(Home/Oce/Cabin) by pressing button. The
current date and time can be set according to below
steps:
Functions
Increase the value of temperature or timer
Decrease the value of temperature or timer
Change heating program between HOME,
OFFICE, or CABIN
Press this button to enter the temperature
setting
Press this button to activate the timer mode
Press this button to switch the unit on or o
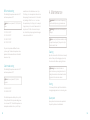
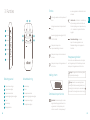
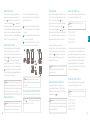
Display layout
Combination button and
functions
Child lock - Press the button for 5 seconds
to lock all program functions. The lock
symbol lights on display with light on. Press
for 5 seconds again to deactivate the child
lock.
3. Functions
Increase temperature
Decrease temperature
Temperature setting
Change heating program
Timer
Power button
Operating indicator
Power button
Timer
Temperature setting
Change heating program
Increase temperature
Decrease temperature
1
8
2
9
4
11
3
10
5
12
1
2
3
4
5
6
7
10
12
11
13
8 9
6
13
7
Control panel Remote control
EN

1110
Heating mode setting
This heater is also equipped with 3 intelligent
modes called HOME, OFFICE and CABIN. The
dierent modes can be activated by pressing
button.
Note: Current date and time need to be set
before using the intelligent heating modes. Please set
the time according above Date/Hour/Minute setting
steps.
Home mode setting
The default high temperature value is set at 23°C
and low temperature at 18°C.
Note: There are 4 periods (P1,P2,P3,P4) in this
mode:
P1: 08:00-16:00 18°C
P2: 16:00-23:00 23°C
P3: 23:00-06:00 18°C
P4: 06:00-08:00 23°C
The pre-set temperature will follow the same
cycle every day. The desired temperature can be
adjusted at all times but will return to the default
value in next cycle. For example; the current time
is 9:00 and the desired temperature is set to 20°C.
The temperature will stay in 20°C from 9:00 to
16:00 and will return back to 18°C the next day.
Remote control
Note: This heater is equipped with a remote
control, which can be used in the same way as the
control panel on the side of the product.
First remove the insulating paper which covers
battery before using the remote control. Follow
below instructions:
Remove the battery bracket from back of
remote control like gure A.
Remove the insulating paper that covered
battery like gure B.
Insert the battery bracket into remote control
like gure C.
Note: Please use this remote control within 6
meters distance, please make sure the control angle
is within 30 degrees.
Hour setting
The current hour can be set by pressing the timer
button, which shows the number 23 and the
symbol will blink on display. The time can be set
by pressing and , after which the display will
show the dierent hours from 00 to 23. When the
hour setting is completed, press the timer setting
button to enter the minute settings. The display will
keep blinking for 7s if no button is pressed.
Minute setting
After nishing the hour setting, the program will
automatically enter into minute setting and the
number 30 and on the display will ash. The
correct minute can be set by pressing and
, after which the display will show the dierent
minutes from 01 to 59. When the minute setting
is completed, press the button to complete the
time setting and to enter normal mode. The display
will keep blinking for 7s if no button is pressed.
Note: If no buttons are pressed for 7 seconds
then the product will go back to its setting. Only
when the correct hour and minute have been
conrmed, will the dierent operation modes
function accordingly.
EN
Normal operating mode
In the normal operating mode the temperature
can be adjusted according to the preferred
temperature by pressing or button. The
product can be used with a temperature will range
of 15°C to 36°C.
Timer setting
The product can automatically shut down by using
the timer function. When the product is turned on,
press the button for 3 seconds to activate the
timer shut down function. The display will show 00
and . The time can be set by pressing and ,
after which the display will show the dierent hours
from 00 to 23. For example; 02 means that the
product will automatically shut down after 2 hours.
The product can also automatically turn on by
using the timer function. When the product is
in standby mode, press the button to set the
desired timer and follow to same steps as with the
timer shutdown.
Note: If you switch to other modes (HOME/
OFFICE/CABIN), the timer setting will be cleared
automatically.
1
2
3
A
B C

1312
Oce mode setting
The default high temperature value is set at 23°C
and low temperature is 18°C.
Note: There are 4 periods (P1,P2,P3,P4) in this
mode:
P1: 07:00-12:00 23°C
P2: 12:00-14:00 23°C
P3: 14:00-17:00 23°C
P4: 17:00-07:00 18°C
The pre-set temperature will follow the same
cycle every day. The desired temperature can be
adjusted at all times but will return to the default
value in next cycle.
Cabin mode setting
The default high temperature value is set at 23°C
and low temperature is 18°C.
Note: There are 2 periods (P1,P2) in this
program:
P1: 08:00-23:00 23°C
P2: 23:00-08:00 18°C
The default temperature will stay on for a cycle of
30 days, after which the temperature will go down
to a continuous 18°C. The default temperature can
be adjusted and will last of one cycle of 30 days
Important: Be sure to remove the power plug
from the outlet before carrying out maintenance.
Warning: Allow the heater to cool down before
cleaning it.
Note: In case of malfunction or doubt, do not try
to repair the heater yourself, it may result in a re
hazard or electric shock.
Cleaning
Wipe the exterior surface of the heater occasionally
with a soft damp cloth (not dripping wet) and dry
the exterior surface before operating the heater.
Warning: Do not immerse the heater in
water. Do not use any cleaning chemicals such as
detergents and abrasives. Do not allow the interior
to get wet as this could create a hazard.
Storing
To store away the heater, put the heater back into
its original package and store it in a clean dry place.
Spare parts
Spare parts and accessories can be requested at
the point of purchase or local distributor.
4. Maintenance
and will return to the default value in next cycle.
The 30 days cycle can be adjusted to a shorter time
frame pressing the timer button for 5s. The default
day 1 will begin to ash. Press + or – to increase
the requested day in the 30 day cycle. For example;
change the day to 14 to run the Cabin mode for 16
days instead of 30. When the desired start day is
set, conrm this by the pressing timer button again
or leave it untouched for 3s.

1514
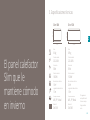
The slim heating
panel that keeps
you cozy in winter.
5. Technical specications
The appearance
and specication of
the device may be
changed without
notice.
EN
Model no.:
DXCH03
Model no.:
DXCH05
Rated voltage:
220-240V
Rated voltage:
220-240V
Weight:
6.6kg
Weight:
8.9kg
Frequency:
50Hz
Frequency:
50Hz
Main materials:
ABS, PP, Metal
Main materials:
ABS, PP, Metal
Rated power:
1000W
Rated power:
1500W
Power cord length:
1.5m
Power cord length:
1.5m
Eective area:
15m²
Eective area:
25m²
40 cm
74 cm 102 cm
40 cm
Slim 1000
Slim 1500

1716
6. FAQ
Error code E0 shows on the display. What’s
wrong?
This product has an automatic shutdown
function if temperature decreased by 5 degrees
in 10 minutes. Please restart the product by
pressing the standby power button.
Error code E1 or E2 shows on the display.
What’s wrong?
There is a short circuit or open circuit may
have occurred. Please return the product to
the point of purchase or contact the after sales
department ([email protected]) for repair.
I smell a strange odor. Is this normal?
This smell is generated by the heating element
when rst time use. This is normal and will be
reduced gradually during use.
Q.
Q.
A.
A.
Q.
A.
Notes
EN

1918
Bedankt dat je voor
Duux hebt gekozen.
We zijn blij dat je hebt besloten de handleiding bij je nieuwe convectorkachel van Duux door te lezen!
Veel gebruikers laten de handleiding links liggen en proberen er zelf achter te komen. Uit onderzoek
blijkt echter dat mensen die de handleiding lezen sneller en beter snappen hoe een apparaat werkt dan
mensen die er met vallen en opstaan achterkomen.
Bij Duux geloven we in het belang van een comfortabele, gezonde leefomgeving. Jouw welzijn verhogen
door aantrekkelijke, functionele en eectieve producten te ontwikkelen: dat is de passie die ons iedere
dag opnieuw drijft. Met ons aanbod aan innovatieve luchtbehandelingsproducten willen we je de best
denkbare luchtkwaliteit binnenshuis bieden.
Slim zorgt met zijn krachtige prestaties voor optimaal warmtecomfort. Hij zuigt koude lucht aan door het
verwarmingselement, waardoor de hoeveelheid warme lucht in de kamer eectief wordt vergroot om de
temperatuur te verhogen. Daarnaast heeft hij tal van functies. Het LED-scherm met temperatuurindicator
houdt je altijd op de hoogte, en met de regelbare digitale thermostaat - tot op één graad nauwkeurig - en
drie verwarmingsprogramma’s heb je altijd de touwtjes in handen. Dankzij de IP24-classicatie is Slim ook
geschikt voor gebruik in vochtige ruimtes.
Lees deze handleiding goed door om alles uit je Slim convectorkachel te halen.
1. Productoverzicht 20
2. Installatie en gebruik 21
3. Functies 24
4. Onderhoud 29
5. Technische specicaties 31
6.Veelgestelde vragen 32
Table of
contents
NL

2120
• Plaats de kachel niet onder een stopcontact.
• Leid de kabel niet onder vloerkleden of overige
vloerbedekking door. Houd de kabel weg van
plaatsen waar veel mensen lopen om struikelen
te voorkomen.
• Gebruik de kachel niet wanneer de stroomkabel
of stekker beschadigd is of wanneer het apparaat
is gevallen of beschadigd is geraakt.
• Om gevaarlijke situaties te voorkomen dient een
beschadigde stroomkabel te worden vervangen
door de fabrikant, een erkende servicemonteur
of een gekwaliceerde persoon.
• Gebruik geen verlengsnoeren. Deze kunnen
oververhit raken en brandgevaar opleveren.
• Gebruik de kachel in een goed geventileerde
ruimte. Steek geen voorwerpen in de ventilatie- of
uitlaatopening en voorkom dat hier voorwerpen
in vallen. Luchtinlaten of uitlaatopeningen niet
blokkeren om brandgevaar te voorkomen.
Gebruik de kachel niet op een zachte
ondergrond, zoals een bed, waar de openingen
mogelijk worden geblokkeerd. Gebruik de kachel
uitsluitend op platte, droge oppervlakken.
• Plaats de kachel niet in de buurt van brandbare
materialen, oppervlakken of stoen om
brandgevaar te voorkomen. Houd deze op
minimaal 1m afstand van de voorkant van het
apparaat en uit de buurt van de zijkanten en
achterkant.
1. Productoverzicht 2. Installatie en gebruik
Let op: Lees de onderstaande instructies en het
losse waarschuwingsvel goed door voordat je dit
apparaat gebruikt.
Waarschuwing: Dit apparaat is uitsluitend
bedoeld voor huishoudelijk gebruik.
Sluit het apparaat aan op een eenfasige
wisselstroomaansluiting die overeenkomt met
het voltage op het voltagelabel.
Waarschuwing: Dek het apparaat niet af om
oververhitting te voorkomen.
Installatie
• Dit symbool betekent ‘NIET AFDEKKEN’.
• Dit symbool betekent ‘GEEN VINGER
INSTEKEN’.
• Dit symbool betekent ‘PAS OP, HOGE
TEMPERATUUR’.
• Laat de kachel nooit onbewaakt achter terwijl
deze in gebruik is. Zet de aan/uit-schakelaar altijd
op UIT en trek de stekker uit het stopcontact
wanneer de kachel niet wordt gebruikt.
• Wees zeer voorzichtig met het gebruik van
kachels door of in de buurt van kinderen,
gehandicapten of ouderen en met het onbeheerd
achterlaten van kachels. Houd kinderen uit
de buurt van de kachel wanneer deze wordt
gebruikt.
Behuizing
LED-scherm
Bedieningspaneel
Bevestigingsgaten
Ventilatierooster
Stand-byknop
1
2
3
5
6
4
Aluminium voet
7
Bevestigingsbeugel
8
NL

2322
Zet het apparaat op een geschikte, stabiele
ondergrond en bevestig de voeten met
schroeven en een inbussleutel (guur B).
Zet het apparaat na bevestiging van de
aluminium voet rechtop op de vloer (zie
guur C). Het apparaat is nu klaar voor
gebruik.
Let op: Controleer of de voeten goed zijn
geplaatst. De korte kant van de voeten dient zich
aan de voorzijde van het apparaat te bevinden.
Installatie wandbevestiging
Boor vier gaten met een doorsnede van 8mm
op de posities in guur A en stop pluggen in de
vier gaten.
Bevestig de horizontale beugel met schroeven
aan de muur (guur B).
Installeer de verticale beugel met schroeven op
de horizontale beugel (guur C).
• Gebruik de kachel niet in ruimtes waar benzine,
verf of overige brandbare vloeistoen liggen
opgeslagen, zoals garages of werkplaatsen.
• Gebruik de kachel niet in de directe omgeving van
een bad, douche of zwembad. Plaats de kachel
nooit op een oppervlak waar hij in een bad of
ander waterreservoir kan vallen.
• Deze kachel is heet wanneer hij in gebruik is. Raak
geen hete oppervlakken aan om brandwonden
en letsel te voorkomen.
• Zorg dat er geen andere apparaten op hetzelfde
stopcontact zijn aangesloten om overbelasting te
voorkomen.
• Houd kinderen jonger dan drie jaar uit de buurt
van de kachel tenzij er voortdurend toezicht is.
Kinderen ouder dan drie en jonger dan acht
mogen de kachel alleen aan- en uitzetten indien
deze op zijn normale, beoogde bedrijfspositie
staat, indien er toezicht is op de kinderen of
indien ze zijn geïnstrueerd over het veilige
gebruik van de kachel en de bijbehorende risico’s.
Kinderen ouder dan drie en jonger dan acht jaar
mogen het apparaat niet aansluiten, instellen of
onderhoud uitvoeren.
Voorzichtig: Sommige onderdelen van dit
apparaat kunnen zeer heet worden en brandwonden
veroorzaken. Let vooral goed op wanneer er
kinderen en kwetsbare personen aanwezig zijn.
• Dit apparaat kan door mensen met verminderde
fysieke, sensorische of mentale vermogens of
kinderen vanaf acht jaar worden gebruikt indien
er toezicht is of indien zij zijn geïnstrueerd
over het veilige gebruik van de kachel en de
bijbehorende risico’s. Laat kinderen niet met het
apparaat spelen.
Installatie
Deze kachel kan staand met de aluminium voet
worden gebruikt of aan de muur worden bevestigd.
Gebruik je de kachel op een vlakke ondergrond,
bevestig deze dan op de aluminium voet voordat
je hem gaat gebruiken. Beide montage-instructies
staan hieronder beschreven.
Let op: Dit apparaat is uitsluitend bedoeld voor
op de grond of aan de muur.
Waarschuwing: Gebruik het apparaat niet
zonder de aluminium voet of muurbeugel. Gebruik
de kachel uitsluitend rechtop. Elke andere positie of
hoek kan een gevaarlijke situatie veroorzaken.
Waarschuwing: Installeer dit apparaat
niet verticaal om te voorkomen dat het stopt
of brandrisico veroorzaakt. Installeer zoals
weergegeven in guur A, B, C, D en E.
Installatie aluminium voet
Pak de beide aluminium voeten uit en haal de
rubberen plug eruit (guur A).
1
2
3
4
Plaats na installatie van de beugel de rubberen
hoes op het uiteinde van de verticale beugel
om te voorkomen dat de beugel het apparaat
beschadigt (guur D).
Breng de gaten achter op het apparaat op één
lijn met de beugel en klik de horizontale beugel
in het apparaat. Beweeg het apparaat naar
links om vast te klikken (guur E).
Let op: Je kunt de kachel uit de beugel
verwijderen door deze in de tegenovergestelde
richting te bewegen.
Plaatsing en verbinding
Zorg voordat je de kachel gebruikt dat deze op een
vlakke, stabiele ondergrond staat. Sluit de kachel
aan op een geschikt stopcontact. Houd losliggende
kleding of beddengoed, meubels en brandbaar
materiaal uit de buurt van het stopcontact waarop
de kachel is aangesloten.
1
2
3
5
A
B
C
A
B
C D
E
NL

2524
seconden ingedrukt om het kinderslot uit te
schakelen.
Lichtsterkte - Lichtsterkte – Houd de knop
vijf seconden ingedrukt om de sterkte van
het stand-by lampje aan te passen door op
+ of – te drukken. Er zijn drie lichtsterktes
mogelijk.
Fabrieksinstellingen - Houd de
knop 20 seconden ingedrukt om de
fabrieksinstellingen van het apparaat te
herstellen.
Het apparaat gebruiken
Zet eerst de rode schakelaar aan de rechterzijde
van het apparaat op AAN. Druk hierna op de aan/
uit-knop om het apparaat aan of uit te zetten.
Let op: Dit apparaat is uitsluitend voor gebruik
op de grond of wandmontage.
Let op: Voordat er een verwarmingsmodus
(Home/Oce/Cabin) kan worden gekozen, dien je
de huidige tijd (uur/minuten) in te voeren door op
te drukken. Stel de huidige datum en tijd als volgt in:
Functies
Verhoog de waarde van de temperatuur of
timer
Verlaag de waarde van de temperatuur of
timer
Verwarmingsprogramma wijzigen: HOME,
OFFICE of CABIN
Druk op deze knop om de
temperatuurinstelling te activeren
Druk op deze knop om de timermodus te
activeren
Druk op deze knop om het apparaat aan of
uit te zetten
Indeling scherm
Combinatie knop en functies
Kinderslot - Houd de knop vijf seconden
ingedrukt om alle programmafuncties te
vergrendelen. Het slotsymbool op het
scherm is nu verlicht. Houd opnieuw vijf
3. Functies
Temperatuur verhogen
Temperatuur verlagen
Temperatuur instellen
Verwarmingsprogramma wijzigen
Timer
Aan/uit-knop
Werkingsindicator
Aan/uit-knop
Timer
Temperatuur instellen
Verwarmingsprogramma wijzigen
Temperatuur verhogen
Temperatuur verlagen
1
8
2
9
4
11
3
10
5
12
1
2
3
4
5
6
7
10
12
11
13
8 9
6
13
7
Bedieningspaneel Afstandsbediening
NL

2726
Let op: De huidige datum en tijd dienen te zijn
ingesteld voordat de intelligente verwarmingsmodi
kunnen worden gebruikt. Stel de tijd in volgens de
bovenstaande stappen voor het instellen van de
datum en tijd.
Home-modus instellen
De temperatuur is standaard ingesteld op
maximaal 23 °C en minimaal 18 °C.
Let op: Deze modus bestaat uit 4 periodes (P1,
P2, P3, P4):
P1: 08:00-16:00 18°C
P2: 16:00-23:00 23°C
P3: 23:00-06:00 18°C
P4: 06:00-08:00 23°C
De vooraf ingestelde temperatuur volgt elke dag
dezelfde cyclus. De gewenste temperatuur kan
op elk moment worden aangepast maar zal in de
volgende cyclus terugkeren naar de standaard
instellingen. Bijvoorbeeld: de huidige tijd is 9.00 uur
en de gewenste temperatuur is ingesteld op 20 °C.
De temperatuur blijft op 20 °C van 9.00 tot 16.00
uur en keert de volgende dag terug naar 18 °C.
Afstandsbediening
Let op: De afstandsbediening bij deze kachel
kan op dezelfde manier worden gebruikt als het
bedieningspaneel op de zijkant van het apparaat.
Verwijder het isolatiepapier op de batterij voordat
je de afstandsbediening gebruikt. Voer de volgende
stappen uit:
Verwijder de batterijhouder achter op de
afstandsbediening (guur A).
Verwijder het isolatiepapier op de batterij
(guur B).
Plaats de batterijhouder in de
afstandsbediening (guur C).
Let op: Gebruik de afstandsbediening binnen zes
meter van het apparaat en richt hem in een hoek
van maximaal 30 graden.
Uur instellen
Stel het huidige uur in door op de timerknop te
drukken, waarna 23 verschijnt en het symbool
op het scherm begint te knipperen. Stel de
tijd in door op en te drukken, waarna op
het scherm de verschillende uren van 00 tot 23
verschijnen. Druk nadat het juiste uur is ingesteld
op de timerknop om de minuten te activeren. Het
scherm blijft 7 seconden knipperen als er niet op
een knop wordt gedrukt.
Minuten instellen
Nadat het uur is bevestigd, opent het programma
automatisch de instelling voor de minuten.
Het getal 30 en op het scherm beginnen te
knipperen. Stel de minuten in door op en
te drukken, waarna op het scherm de
verschillende minuten van 01 tot 59 verschijnen.
Druk zodra de minuten zijn ingesteld op om het
instellingenmenu te verlaten en terug te keren naar
de normale modus. Het scherm blijft 7 seconden
knipperen als er niet op een knop wordt gedrukt.
Let op: Indien er gedurende 7 seconden niet
op een knop wordt gedrukt, keert het apparaat
terug naar de huidige instelling. De verschillende
bedrijfsmodi werken pas naar behoren zodra het
uur en de minuten zijn bevestigd.
Normale bedrijfsmodus
In de normale bedrijfsmodus kan de temperatuur
worden aangepast door op of te drukken. Het
apparaat heeft een temperatuurbereik van 15°C
tot 36°C.
Timer instellen
Het apparaat kan automatisch worden
uitgeschakeld met de timerfunctie. Zet het
apparaat aan en druk gedurende drie seconden
op om de uitschakelfunctie te activeren. Op het
scherm verschijnen 00 en . Stel de timer in door
op en , waarna op het scherm de verschillende
uren van 00 tot 23 verschijnen. Bijvoorbeeld: 02
betekent dat het apparaat automatisch na 2 uur
wordt uitgeschakeld.
Het apparaat kan door middel van de timerfunctie
ook automatisch worden aangezet. Druk wanneer
het apparaat in stand-bymodus staat op om de
timer in te stellen en voer dezelfde stappen uit als
bij de uitschakelfunctie.
Let op: Zodra je overschakelt naar een
andere modus (HOME/OFFICE/CABIN) wordt de
timerinstelling automatisch geannuleerd.
Verwarmingsmodus instellen
Deze kachel is voorzien van drie intelligente modi:
HOME, OFFICE en CABIN. Je kunt de verschillende
modi activeren door op te drukken.
1
2
3
A
B C
NL

2928
Oce-modus instellen
The default high temperature value is set at 23°C
and low temperature is 18°C.
Let op: Deze modus bestaat uit 4 periodes (P1,
P2, P3, P4):
P1: 07:00-12:00 23°C
P2: 12:00-14:00 23°C
P3: 14:00-17:00 23°C
P4: 17:00-07:00 18°C
De vooraf ingestelde temperatuur volgt elke dag
dezelfde cyclus. De gewenste temperatuur kan
op elk moment worden aangepast maar zal in de
volgende cyclus terugkeren naar de standaard
instellingen.
Cabin-modus instellen
De temperatuur staat standaard ingesteld op
maximaal 23°C en minimaal 18°C.
Let op: Deze modus bestaat uit 2 periodes (P1,
P2):
P1: 08:00-23:00 23°C
P2: 23:00-08:00 18°C
De standaard temperatuur blijft gedurende een
cyclus van 30 dagen actief, waarna de temperatuur
daalt naar constant 18°C. De standaard
Belangrijk: Verwijder vóór ieder onderhoud de
stekker uit het stopcontact.
Waarschuwing: Laat de kachel afkoelen
alvorens deze te reinigen.
Let op: Repareer de kachel bij storingen of
bij twijfel niet zelf. Dit kan brandgevaar of een
elektrische schok veroorzaken.
Reinigen
Neem de buitenkant van de kachel incidenteel
af met een zachte vochtige doek (niet druipend)
en droog de buitenkant af voordat je hem gaat
gebruiken.
Waarschuwing: Dompel de kachel niet onder
in water. Gebruik geen reinigingschemicaliën,
zoals schoonmaak- en schuurmiddelen. Laat
de binnenkant niet nat worden, dit kan gevaar
veroorzaken.
Opslag
Plaats de kachel terug in de oorspronkelijke
verpakking en zet hem op een schone, droge plek.
4. Onderhoud
Reserveonderdelen
Reserveonderdelen en accessoires kunnen worden
aangeschaft bij het verkooppunt of de plaatselijke
distributeur.
temperatuur kan worden aangepast en blijft
gedurende één cyclus van 30 dagen actief, waarna
hij in de volgende cyclus zal terugkeren naar de
standaard waarde.
De 30 dagen-cyclus kan worden verkort door
gedurende vijf seconden op de timerknop te
drukken. De standaard dag 1 begint te knipperen.
Druk op + of – om het gewenste aantal dagen in
te stellen. Bijvoorbeeld: verander de dag in dag 14
om de Cabin-modus 16 dagen te laten draaien in
plaats van 30. Bevestig het gewenste aantal dagen
door opnieuw op de timerknop te drukken of door
gedurende drie seconden niets te doen.
NL

3130
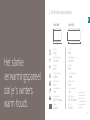
Het slanke
verwarmingspaneel
dat je ‘s winters
warm houdt.
5. Technische specicaties
Het uiterlijk en de
specicaties van het
apparaat kunnen
zonder voorafgaande
kennisgeving worden
gewijzigd.
Modelnr.:
DXCH03
Modelnr.:
DXCH05
Nominale spanning:
220-240V
Nominale spanning:
220-240V
Gewicht:
6.6kg
Gewicht:
8.9kg
Frequentie:
50Hz
Frequentie:
50Hz
Hoofdmaterialen:
ABS, PP, Metaal
Hoofdmaterialen:
ABS, PP, Metaal
Nominaal vermogen:
1000W
Nominaal vermogen:
1500W
Lengte stroomkabel:
1.5m
Lengte stroomkabel:
1.5m
Eectieve ruimte:
15m²
Eectieve ruimte:
25m²
40 cm
74 cm 102 cm
40 cm
Slim 1000
Slim 1500
NL

3332
6. Veelgestelde vragen
Op het scherm verschijnt de foutcode E0.
Wat is er mis?
Dit apparaat slaat automatisch af indien de
temperatuur binnen tien minuten vijf graden
is gedaald. Zet het apparaat opnieuw aan door
op de stand-byknop te drukken.
Op het scherm verschijnt de foutcode E1
of E2. Wat is er mis?
Er is mogelijk sprake van kortsluiting of een
open circuit. Breng het apparaat terug naar
het verkooppunt of neem contact op met de
aftersalesafdeling ([email protected]) voor
reparatie.
Ik ruik een vreemde geur. Is dit normaal?
Deze geur wordt veroorzaakt door het
verwarmingselement wanneer de kachel voor
het eerst wordt gebruikt. Dit is normaal en
neemt geleidelijk af tijdens het gebruik.
V.
V.
A.
A.
V.
A.
Notities
NL

3534
Merci d’avoir
choisi Duux.
Nous sommes très heureux de votre décision de lire les instructions de votre nouveau convecteur Duux
! De nombreux utilisateurs ne prêtent pas attention aux instructions et veulent trouver eux-mêmes
comment fonctionne l’appareil. Cependant, des études démontrent que les personnes qui lisent les
instructions pourront se familiariser avec l’appareil plus rapidement et plus ecacement que celles qui
procèdent par tâtonnement.
Chez Duux, nous sommes convaincus de l’importance d’un environnement de vie confortable et sain.
La passion qui nous anime jour après jour est d’améliorer votre bien-être en concevant des produits
attrayants, fonctionnels et ecaces. Grâce à notre gamme d’appareils de traitement de l’air innovants,
nous visons à vous fournir la meilleure qualité d’air intérieur possible.
Slim optimise votre bien-être grâce à sa puissance de chauage. Il aspire de l’air froid par l’élément
chauant, augmentant ainsi la quantité d’air chaud dans la pièce pour faire monter la température. Les
fonctionnalités ne manquent pas non plus. L’achage à LED avec indicateur de température vous informe
en permanence, tandis que le thermostat numérique réglable avec une précision de 1°C et 3 programmes
de chauage vous ore un contrôle total. Grâce à sa classication IP24, Slim peut également être utilisé
dans des espaces humides.
Lisez attentivement ce manuel de façon à tirer le maximum de votre convecteur Slim.
1. Aperçu du produit 36
2. Installation et utilisation 37
3. Fonctions 41
4. Entretien 46
5. Caractéristiques techniques 49
6. FAQ 50
Table des
matières
FR

3736
moment le convecteur sans surveillance lorsqu’il
est allumé. Tenez les enfants éloignés du
convecteur lorsqu’il est allumé.
• Ne placez pas le convecteur sous une prise
électrique.
• Ne positionnez pas le cordon d’alimentation sous
un tapis ou tout autre type de revêtement de
sol analogue. Rangez le cordon d’alimentation à
l’écart du passage an d’éviter toute chute.
• N’allumez pas votre convecteur si le cordon ou la
che d’alimentation sont défectueux, après tout
dysfonctionnement, après une chute ou après
avoir été endommagé de quelque façon que ce
soit.
• Si le cordon d’alimentation est endommagé et
an d’éviter tout risque, ce dernier doit être
remplacé par le fabricant, un prestataire de
services ociel ou toute personne qualiée.
• Évitez d’utiliser des rallonges à cause des risques
de surchaue et d’incendie.
• Utilisez le convecteur dans une pièce bien
ventilée. N’insérez pas ou ne laissez pas tomber
d’objets dans les orices de ventilation ou sorties
d’air. An d’éviter tout incendie, ne bloquez pas
les entrées ou sorties d’air de quelque façon
que ce soit. N’utilisez pas l’appareil sur des
surfaces souples, comme un lit, où les ouvertures
pourraient se bloquer. Utilisez le convecteur sur
des surfaces planes et sèches uniquement.
1. Aperçu du produit 2. Installation et utilisation
Remarque: veuillez prendre en compte
les instructions ci-dessous ainsi que la feuille
d’avertissement fournie séparément avant d’utiliser
l’appareil.
Avertissement: ce produit est conçu pour
un usage domestique uniquement. Branchez
l’appareil sur une prise électrique en courant
alternatif monophasé dont la tension correspond
à celle indiquée sur la plaque signalétique du
convecteur.
Avertissement: an d’éviter toute surchaue,
ne couvrez pas l’appareil.
Installation
• Ce symbole indique de ‘NE PAS COUVRIR’.
• Ce symbole signie de ‘NE PAS INTRODUIRE
VOS DOIGTS’.
• Ce symbole signie ‘ATTENTION AUX
TEMPÉRATURES ÉLEVÉES’.
• Ne laissez jamais le convecteur sans surveillance
lorsqu’il est allumé. Mettez toujours le convecteur
hors tension et débranchez-le de la prise
électrique murale lorsque vous ne l’utilisez pas.
• Faites preuve d’une très grande prudence
lorsque le convecteur est utilisé à proximité
d’enfants, de personnes en situation de handicap
ou de personnes âgées. Ne laissez à aucun
Corps
Écran à LED
Panneau de commande
Trous de xation
Grille de ventilation
Bouton de
veille/marche
1
2
3
5
6
4
Pied en aluminium
7
Support de montage
8
FR

3938
Installation au mur
Percez 4 trous d’un diamètre de 8mm aux
emplacements indiqués sur l’illustration A et
ajoutez des prises murales dans les 4 trous.
Fixez le support au mur à l’aide de vis (voir
illustration B).
Vissez le support vertical sur le support
horizontal (voir illustration C)
Une fois le support installé, repositionnez
l’embout en caoutchouc sur l’extrémité du
support vertical an d’éviter que le convecteur
ne soit grié (voir illustration D)
Une fois l’installation du support terminée,
alignez les trous sur la face arrière du
convecteur et enfoncez-le sur le support
horizontal. Une fois enchâssé, déplacez le
convecteur sur la gauche pour le xer (voir
illustration E)
Avertissement: ne mettez pas le convecteur
sous tension sans l’avoir installé au mur ou sur
son pied en aluminium. Mettez le convecteur sous
tension que si celui-ci est en position verticale. Toute
autre position ou tout autre angle est susceptible de
créer une situation dangereuse.
Avertissement: si vous ne positionnez pas ce
produit à la verticale, soit ce dernier s’arrêtera de
fonctionner soit il pourrait provoquer un incendie.
Installez le produit en suivant les illustrations A, B,
C, D et E
Installation du pied en aluminium
Déballez les deux pieds en aluminium
et retirez l’embout en caoutchouc (voir
illustration A)
Mettez le produit dans une position stable et
adaptée et utilisez une clef Allen pour visser
le pied (voir illustration B)
Une fois le pied en aluminium installé,
positionnez le convecteur en position
verticale sur le sol (voir illustration C).
L’appareil peut maintenant être utilisé.
• Ne placez pas le convecteur près de matières,
surfaces ou substances inammables, à cause
du risque d’incendie. Tenez-les à une distance
d’1m minimum de la façade avant du convecteur
et tenez-les éloignées des façades latérales et
arrière du convecteur.
• N’utilisez pas le convecteur dans tout espace,
comme des garages ou ateliers, où de l’essence,
de la peinture ou d’autres liquides inammables
sont stockés.
• N’utilisez pas ce convecteur à proximité
immédiate d’une baignoire, d’une cabine de
douche ou d’une piscine. Ne placez jamais le
convecteur sur une surface qui risquerait de faire
tomber l’appareil dans une baignoire ou tout
autre contenant d’eau.
• Ce convecteur est chaud lorsqu’il est en
fonctionnement. An d’éviter toute brûlure et
blessure, ne touchez pas les surfaces chaudes.
• Assurez-vous qu’aucun autre appareil ne soit
branché sur la même prise électrique du fait du
risque de surcharge.
• Les enfants de moins de 3 ans doivent être
tenus à l’écart de l’appareil, sauf s’ils sont sous
constante surveillance. À condition que le
convecteur soit placé dans une position normale
d’utilisation, les enfants âgés de 3 à 8 ans
peuvent être autorisés à mettre l’appareil sous
ou hors tension dans le cas où ces derniers sont
sous la surveillance d’un adulte, ont reçu toutes
les instructions relatives à l’utilisation en toute
sécurité de l’appareil et comprennent les risques.
Les enfants âgés de 3 à 8 ans ne doivent pas
brancher l’appareil sur secteur, procéder à des
réglages, nettoyer l’appareil ou réaliser l’entretien.
Attention: certaines pièces de cet appareil
peuvent devenir très chaudes et causer des brûlures.
Une attention particulière doit être portée aux
enfants et aux personnes vulnérables.
• Cet appareil peut être utilisé par des personnes
à mobilité réduite ou à décience sensorielle ou
mentale ainsi que des enfants âgés de plus de
8 ans dans le cas où ils ont été placés sous la
surveillance d’une personne responsable, ont
été informés de la manière d’utiliser l’appareil en
toute sécurité et comprennent les risques. Les
enfants ne doivent pas jouer avec l’appareil.
Installation de l’appareil
Ce convecteur peut être installé sur le pied en
aluminium ou installé au mur. Si vous positionnez
l’appareil sur une surface plane, celui-ci doit être
attaché au support sur pied en aluminium avant
de mettre l’unité sous tension. Les instructions de
montage peuvent être trouvées ci-après.
Remarque: cette unité ne peut être installée
qu’au sol ou au mur.
1
2
3
1
2
3
5
4
A
B
C
Remarque: prêtez attention au bon
positionnement des pieds. Le petit côté des pieds
doit être situé sur l’avant du convecteur.
FR
Seite wird geladen ...
Seite wird geladen ...
Seite wird geladen ...
Seite wird geladen ...
Seite wird geladen ...
Seite wird geladen ...
Seite wird geladen ...
Seite wird geladen ...
Seite wird geladen ...
Seite wird geladen ...
Seite wird geladen ...
Seite wird geladen ...
Seite wird geladen ...
Seite wird geladen ...
Seite wird geladen ...
Seite wird geladen ...
Seite wird geladen ...
Seite wird geladen ...
Seite wird geladen ...
Seite wird geladen ...
Seite wird geladen ...
Seite wird geladen ...
Seite wird geladen ...
Seite wird geladen ...
Seite wird geladen ...
Seite wird geladen ...
-
 1
1
-
 2
2
-
 3
3
-
 4
4
-
 5
5
-
 6
6
-
 7
7
-
 8
8
-
 9
9
-
 10
10
-
 11
11
-
 12
12
-
 13
13
-
 14
14
-
 15
15
-
 16
16
-
 17
17
-
 18
18
-
 19
19
-
 20
20
-
 21
21
-
 22
22
-
 23
23
-
 24
24
-
 25
25
-
 26
26
-
 27
27
-
 28
28
-
 29
29
-
 30
30
-
 31
31
-
 32
32
-
 33
33
-
 34
34
-
 35
35
-
 36
36
-
 37
37
-
 38
38
-
 39
39
-
 40
40
-
 41
41
-
 42
42
-
 43
43
-
 44
44
-
 45
45
-
 46
46


Duux DXCH05 Bedienungsanleitung
- Kategorie
- Raumheizungen
- Typ
- Bedienungsanleitung
- Dieses Handbuch eignet sich auch für
in anderen Sprachen
- English: Duux DXCH05 Owner's manual
- français: Duux DXCH05 Le manuel du propriétaire
- español: Duux DXCH05 El manual del propietario
- Nederlands: Duux DXCH05 de handleiding
Verwandte Artikel
-
Duux Edge 1500 Bedienungsanleitung
-
Duux GLOBE Benutzerhandbuch
-
-
-
-
-
-
Duux Sphere Bedienungsanleitung
Andere Dokumente
-
VENTEO Fast Heater Bedienungsanleitung
-
Mestic MQK-200 Benutzerhandbuch
-
Mestic MKK-230 Benutzerhandbuch
-
Tomado THC2003W Bedienungsanleitung
-
Tristar KA-5860 Series Benutzerhandbuch
-
 Mestic MKK-150 Benutzerhandbuch
-
Silvercrest SHLF 2000 C1 Operating Instructions And Safety Instructions
-
Alpina FW-001 FOTVARMER, MØRKEGRÅ Bedienungsanleitung
-
 Mestic MKK-150 Benutzerhandbuch
-
Tristar KA 5819 Benutzerhandbuch

