Parkside PBH 1100 A1 Operation and Safety Notes
- Kategorie
- Drehhämmer
- Typ
- Operation and Safety Notes

PBH 1100 A1
SDS-PLUS-HAMMER DRILL
Operation and Safety Notes
Original operating instructions
PORA- JA TALTTAVASARA
Käyttö- ja turvaohjeet
Alkuperäiskäyttöohje
BORR- OCH MEJSELHAMMARE
Bruksanvisning och säkerhetsanvisningar
Original-bruksanvisning
BOHR- UND MEISSELHAMMER
Bedienungs- und Sicherheitshinweise
Originalbetriebsanleitung
BORE- OG MEJSELHAMMER
Brugs- og sikkerhedsanvisninger
Original betjeningsvejledning
Anleitung_4258375_FI_DK:_ 14.10.2011 12:20 Uhr Seite 1

2
Before reading, unfold the page containing the illustrations and familiarise yourself with all functions of
the device.
Käännä ennen lukemista kuvallinen sivu esiin ja tutustu seuraavaksi laitteen kaikkiin toimintoihin.
Vik ut bildsidan och ha den till hands när du läser igenom anvisningarna och gör dig bekant med
apparatens / maskinens funktioner.
Før du læser, vend siden med billeder frem og bliv bekendt med alle apparatets funktioner.
Klappen Sie vor dem Lesen die Seite mit den Abbildungen aus und machen Sie sich anschließend mit
allen Funktionen des Gerätes vertraut.
GB/IE Operation and Safety Notes Page 6
FI Käyttö- ja turvaohjeet Sivu 18
SE Bruksanvisning och säkerhetsanvisningar Sidan 30
DK Brugs- og sikkerhedsanvisninger Side 42
DE/AT/CH Bedienungs- und Sicherheitshinweise Seite 54
SDS-PLUS-HAMMER DRILL PORA- JA TALTTAVASARA
BORR- OCH MEJSELHAMMARE
BOHR- UND MEISSELHAMMER
BORE- OG MEJSELHAMMER
Anleitung_4258375_FI_DK:_ 14.10.2011 12:20 Uhr Seite 2

3
SDS-PLUS-HAMMER DRILL PORA- JA TALTTAVASARA
BORR- OCH MEJSELHAMMARE
BOHR- UND MEISSELHAMMER
BORE- OG MEJSELHAMMER
1
2
3
3
13
3
4
7
8
9
10
6
1
2
4
5
11
12
14 13
15
Anleitung_4258375_FI_DK:_ 14.10.2011 12:20 Uhr Seite 3

4
4
6
2
14
14
1.
2.
8 9
15
7
10
9
8
5
2
14
7
14
1.
2.
Anleitung_4258375_FI_DK:_ 14.10.2011 12:20 Uhr Seite 4

5
10
A
5
C
E
D
B
Anleitung_4258375_FI_DK:_ 14.10.2011 12:21 Uhr Seite 5

6
GB
Table of contents: Page
1. Introduction.............................................................................8
2. Safety regulations...................................................................8-10
3. Layout.....................................................................................11
4. Items supplied.........................................................................11
5. Proper use..............................................................................11
6. Technical data ........................................................................11-12
7. Before starting the equipment.................................................12-13
8. Starting up...............................................................................13-14
9. Replacing the power cable ....................................................14
10.Cleaning, maintenance and ordering of spare parts...............15
11.Disposal and recycling............................................................15
12.Declaration of conformity........................................................16
13.Guarantee Certificate .............................................................17
The reprinting or reproduction by any other
means, in whole or in part, of documentation
and papers accompanying products is
permitted only with the express consent of ISC
GmbH.
Technical changes subject to change
Anleitung_4258375_FI_DK:_ 14.10.2011 12:21 Uhr Seite 6

7
GB
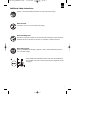
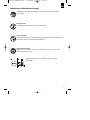
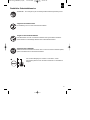
Additional safety instructions
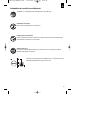
Select between the individual functions only when the equipment is
at a standstill. If you fail to observe this point, the equipment may be
damaged.
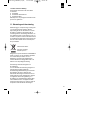
“Caution - Read the operating instructions to reduce the risk of inquiry”
Wear ear-muffs.
The impact of noise can cause damage to hearing.
Wear a breathing mask.
Dust which is injurious to health can be generated when working on wood and other
materials. Never use the device to work on any materials containing asbestos!
Wear safety goggles.
Sparks generated during working or splinters, chips and dust emitted by the device
can cause loss of sight.
Anleitung_4258375_FI_DK:_ 14.10.2011 12:21 Uhr Seite 7

8
GB
1. Introduction
Important!
When using equipment, a few safety
precautions must be observed to avoid injuries
and damage. Please read the complete
operating manual with due care. Keep this
manual in a safe place, so that the information
is available at all times. If you give the
equipment to any other person, give them
these operating instructions as well.
We accept no liability for damage or accidents
which arise due to non-observance of these
instructions and the safety information.
2. Safety regulations
CAUTION!
Read all safety regulations and
instructions.
Any errors made in following the safety
regulations and instructions may result in an
electric shock, fire and/or serious injury.
Keep all safety regulations and instructions
in a safe place for future use.
The term “electric tool” used in the safety
regulations refers to electric tools operated from
the mains power supply (with a power cable)
and to battery operated electric tools (without a
power cable).
1. Workplace safety
Keep your work area clean and well
illuminated. Untidy or unlit work areas can
result in accidents.
Do not use this tool in a potentially
explosive environment containing
combustible liquids, gases or dust.
Electric tools generate sparks, which can in
turn ignite dust or vapors.
Keep children and other persons away
from the electric tool while it is being
used.
Allowing yourself to get distracted can
cause you to lose control of the tool.
2. ELECTRICAL SAFETY
The tool’s connector plug must be able
to fit into the socket outlet. Do not
modify the plug in any way! Do not use
adapter plugs in conjunction with
electrically grounded tools.
Unmodified plugs and matching socket
outlets reduce the risk of an electric shock.
Avoid touching grounded surfaces, such
as those of pipes/tubes, heaters,
cookers and refrigerators.
There is an increased risk of getting an
electric shock if you are electrically
grounded.
Keep the tool away from rain and
moisture/wet conditions.
Penetration of water into an electric tool
increases the risk of an electric shock.
Do not use the cable to carry the tool,
hang it up or pull the plug out of the
socket. Keep the cable away from
sources of heat, oil, sharp edges and
moving tool parts.
Damaged or tangled cable increases the
risk of an electric shock.
If you intend to use an electric tool
outdoors, ensure that you only use
extension cable that is approved for
outdoor applications.
Using extension cable that is approved for
outdoor applications reduces the risk of an
electric shock.
If operation of the electric tool in a damp
environment can not be avoided, use a
earth-leakage circuit-breaker.
The earth-leakage circuit-breaker reduces
the risk of an electric shock.
3. PERSONAL SAFETY
Be alert, work conscientiously and
exercise appropriate caution when using
the electric tool. Do not use the tool if
you are tired or are under the influence
of drugs/medication or alcohol.
One moment of carelessness or lack of
attention when using the electric tool can
cause serious bodily injury!
Always wear personal protective
equipment (PPE), including safety
goggles.
Anleitung_4258375_FI_DK:_ 14.10.2011 12:21 Uhr Seite 8

Wearing personal protective equipment
such as a dust mask, non-slip footwear,
protective headgear and ear muffs
(depending upon the type of electric tool
and the particular application) reduces the
risk of sustaining injury.
Make sure that the tool cannot start up
accidentally. Ensure that the electric
tool is switched off before you connect
the tool to the power supply and/or
insert the battery, or pick up or carry the
tool.
Physically touching the switch with your
finger when carrying the tool or connecting
the tool to the power supply switched on
can lead to accidents.
Remove adjusting tools/wrench(es) prior
to switching on the power tool.
A tool or wrench that is positioned inside a
rotating power tool part can cause injury.
Avoid abnormal working postures. Make
sure you stand squarely and keep your
balance at all times.
This way, you will be able to have better
control over the tool in unexpected
situations.
Wear suitable clothes. Never wear loose
fitting clothes or jewelry. Keep hair,
clothes and gloves away from moving
parts.
Loose clothing, dangling jewelry and long
hair can be caught by moving parts.
If dust extraction and dust collection
devices can be mounted, ensure that
these are connected and are properly
used.
The use of a dust extraction system can
reduce the danger posed by dust.
4. Using the treatment of electric tools
Do not overload your tool. Only use
suitable electric tools to perform your
work.
Using the right electric tool allows you to
work better and safer within the tool’s
quoted capacity range.
Do not use an electric tool whose switch
is defective.
An electric tool that no longer can be
switched on or off is dangerous and must
be repaired.
Pull the plug out of the socket and/or
remove the battery before making any
adjustments to the tool, changing
accessories or put the tool down.
This precaution eliminates the possibility of
inadvertently starting the tool.
When not in use, store electric tools out
of the reach of children. Do not allow
those persons to use this tool who are
unfamiliar with it or who have not read
these instructions.
Electric tools are dangerous when they are
used by inexperienced persons.
Take good care of your tool. Check that
moving parts properly function and do
not jam, that parts are not broken off or
damaged in any way and that the tool
can be used to its full capacity. Have
damaged parts repaired prior to using
the tool.
The cause of many accidents can be traced
back to poorly maintained electric tools.
Keep your blades sharp and clean.
Properly maintained blades with sharp
edges jam less frequently and are easier to
use.
Make sure to use electric tools,
accessories, attachments, etc. in
accordance with these instructions.
Take the conditions in your work area
and the job in hand into account.
Using electric tools for applications other
than those intended can lead to dangerous
situations.
5. SERVICE
Have your tool repaired only by
authorized specialists using original
replacement parts.
This will ensure that your tool remains safe
to use.
GB
9
Anleitung_4258375_FI_DK:_ 14.10.2011 12:21 Uhr Seite 9

10
GB
Safety information for hammers
Wear ear protection. The impact of noise
can cause damage to hearing.
Use the additional handles supplied with
the tool. Losing control of the tool can
cause injuries.
Hold the equipment by the insulated
handles when carrying out work during
which the plug-in tool could strike
concealed power cables or its own
mains lead. Contact with a live cable can
also make the metal parts of the equipment
live and will cause an electric shock.
Additional Safety rules for SDS-Plus-
Hammer Drill
Check that your mains voltage is the same
as that marked on the rating plate.
If you use a cable reel, run all the cable off
the reel. The minimum conductor cross
section used should be 1.5 mm
2
.
Make sure of your footing, particularly when
working free-handed on ladders or
scaffolding.
Use a detector to localize pipes and/or
cables in walls with concealed electric,
water or gas lines. Avoid any contact with
conducting electrical parts or lines.
Wear ear-muffs to protect your hearing:
Risk of progressive loss of hearing!
Wear goggles and use a breathing mask on
dusty jobs.
Never use the machine near vapors or
combustible liquids.
Always unplug the machine before cleaning
it or changing drill bits etc.
Keep the power cable safe from damage.
Oil and acids can damage cables.
Never overload the machine.
Important!
Follow all safety regulations in your country
appli cable to the installation, use and
maintenance of the machine.
Chisel bits and drill bits can be inadvertently
thrown out from the machine and cause
serious injury:
- Always check that the chisel bit or drill bit
is firmly locked in the chuck before you start
work.
- Check the chuck for wear or damage at
regular intervals.
Do not start a hammering tool until it is
pressed against a workpiece (wall, ceiling,
etc.).
Always unplug the hammer drill when you
have finished working and remove the
chisel bit or drill bit from the tool.
Always unplug the machine before
changing chisel bits or drill bits etc.
Protect eyes and assistants from small
flying parts and splinters. Wear a helmet!
Erect a screen wall!
Work gloves protect you against skin
abrasions.
Vibrations can be harmful to the hand-arm
system: Keep the impact time of vibrations
to a minimum.
Always keep the power cable away from
where you want to drill.
Keep the machine out of children’s reach.
Always hold the machine with two hands
when it is running and make sure of your
footing.
Make sure that the switch on the machine is
set to the correct position for the work you
want to perform before you put the machine
into operation. If the switch is not in the
correct position you risk suffering bodily
injury when the machine starts to run.
Save this instructions.
Anleitung_4258375_FI_DK:_ 14.10.2011 12:21 Uhr Seite 10

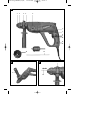
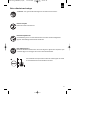
3. Layout (Fig. 1)
1. Dust guard
2. Locking sleeve
3. Additional handle
4. Locking screw for depth stop
5. Selector switch for drill/hammer drill/chisel
6. Handle
7. Clockwise/counter-clockwise switch
8. Locking button
9. Speed controller
10. ON/OFF switch
11.Operating status indicator
12.Indicator for carbon brush wear
13. Depth stop
14.Additional quick-change drill chuck
15.Dust absorption device
4. Items supplied
Take all the parts out of the packaging.
Check that nothing is missing.
PBH 1100 A1 SDS-Plus-Hammer Drill
Additional handle
Depth stop
Drill bits for stone (6, 8, 10 mm)
Pointed chisel / flat chisel
Additional quick-change drill chuck
Dust absorption device
Operating instructions
5. Proper use
The tool is designed for drilling with hammer
action in concrete, rock and brick, as well as
for chiseling work, always using the respective
correct drill or chisel bit.
The equipment is to be used only for its
prescribed purpose. Any other use is deemed
to be a case of misuse. The user / operator
and not the manufacturer will be liable for any
damage or injuries of any kind caused as a
result of this.
Please note that our equipment has not been
designed for use in commercial, trade or
industrial applications. Our warranty will be
voided if the machine is used in commercial,
trade or industrial businesses or for equivalent
purposes.
6. Technical data
Mains voltage: 230-240 V ~ 50 Hz
Power input: 1050 W
Idling speed: 0-1100 rpm
Blow rate: 0-5100 rpm
Drilling capacity in
concrete/stone (max.): Ø 26 mm
Protection class: II / 쓑
Weight: 3.6 kg
Sound and vibration
Sound and vibration values were measured in
accordance with EN 60745.
L
pA
sound pressure level 91.8 dB(A)
K
pA
uncertainty 3 dB
L
WA
sound power level 102.8 dB(A)
K
WA
uncertainty 3 dB
11
GB
Anleitung_4258375_FI_DK:_ 14.10.2011 12:21 Uhr Seite 11

The hammer drill is not designed for outdoors
use as specified I Article 3 of Directive
2000/14/EC_2005/88/EC.
Wear ear-muffs.
The impact of noise can cause damage to
hearing.
Total vibration values (vector sum of three
directions) determined in accordance with EN
60745.
Hammer drilling in concrete
Vibration emission value a
h
= 15.81 m/s
2
K uncertainty = 1.5 m/s
2
Chiseling
Vibration emission value a
h
= 15.668 m/s
2
K uncertainty = 1.5 m/s
2
Warning!
The specified vibration value was established in
accordance with a standardized testing
method. It may change according to how the
electric equipment is used and may exceed the
specified value in exceptional circumstances.
The specified vibration value can be used to
compare the equipment with other electric
power tools.
The specified vibration value can be used for
initial assessment of a harmful effect.
Keep the noise emissions and vibrations to
a minimum.
Only use appliances which are in perfect
working order.
Service and clean the appliance regularly.
Adapt your working style to suit the
appliance.
Do not overload the appliance.
Have the appliance serviced whenever
necessary.
Switch the appliance off when it is not in
use.
Wear protective gloves.
7. Before starting the equipment
Important!
Before you connect the equipment to the
mains supply make sure that the data on the
rating plate are identical to the mains data.
Always pull the power plug before making
adjustments to the equipment.
Check the drilling point for concealed electrical
cables, gas and water pipes using a cable/pipe
detector.
7.1 Additional handle (Fig. 2 – Item 3)
For safety reasons you must only use the
hammer drill with the additional handle.
The additional handle (3) enables you to
achieve better stability whilst using the
equipment. Do not use the equipment without
the additional handle (3). The additional handle
(3) is secured to the equipment by a clamp.
Turning the additional handle (3) clockwise
tightens this clamp. Turning it anti-clockwise will
release the clamp.
The supplied additional handle (3) must first
be fitted. To do this, turn the additional
handle (3) until the clamp is opened wide
enough for you to slide the additional handle
(3) onto the equipment.
After you have mounted the additional
handle (3), swivel it to the most comfortable
working position for yourself.
Now turn the additional handle (3) in the
opposite direction again until the additional
handle (3) is secure.
The additional handle (3) is suitable for both
left-handed and right-handed users.
7.2 Depth stop (Fig. 3 – Item 13)
The depth stop (13) is held in place by
clamping with the locking screw (4) on the
additional handle (3).
Release the locking screw (4) and insert the
depth stop (13).
Set the depth stop (13) to the same level as
the drill bit.
Pull the depth stop (13) back by the
required drilling depth.
12
GB
Anleitung_4258375_FI_DK:_ 14.10.2011 12:21 Uhr Seite 12

Tighten the locking screw (4) again.
Now drill the hole until the depth stop (13)
touches the workpiece.
The depth stop (13) is notched to prevent it
from shifting when in use.
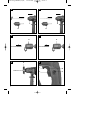
7.3. Tool insertion (Fig. 4)
Clean the tool before insertion and apply a
thin coating of drill bit grease to the shaft of
the tool.
Pull back and hold the locking sleeve (2).
Turn and push the dust-free tool into the tool
mounting as far as it will go. The tool will
lock automatically, after the locking sleeve
is released.
Check that it is properly secure by pulling
the tool.
7.4. Tool removal (Fig. 5)
Pull back and hold the locking sleeve (2) and
remove the tool.
7.5 Dust collection device (Fig. 8)
Slide the dust collection device (15) over the
drill bit before carrying out any hammer drilling
vertically above your head.
7.6 Fitting the quick-change drill chuck
(Fig. 4)
Clean the quick-change drill chuck (14)
before fitting it and apply a thin coating of
drill bit grease to the quick-change drill
chuck shaft.
Pull back and hold the locking sleeve (2).
Turn and push the dust-free quick-change
drill chuck (14) into the tool mounting as far
as it will go. The quick-change drill chuck
(14) will lock automatically after the locking
sleeve is released.
Check that it is secure by pulling the quick-
change drill chuck (14).
7.7 Removing the additional quick-change
drill chuck (Fig. 5)
Pull back and hold the locking sleeve (2) and
remove the quick-change drill chuck.
7.8 Inserting the bit into the quick-change
drill chuck (Figure 6-7)
Important.
Always pull the power plug before making
adjustments to the equipment.
Release the depth stop (13) as described in
7.2 and push it towards the drill handle. This
provides free access to the chuck (14).
Open the chuck (14). The drill bit opening
must be large enough to hold the drill bit.
Select a suitable drill bit. Push the tool as far
as possible into the chuck opening.
Close the chuck (14). Check that the drill bit
is secure in the chuck (14).
Check at regular intervals that the drill bit or
tool is secure (pull the mains plug).
8. Starting up
Important!
To prevent all danger, the machine must
only be held using the two handles (3/6).
Otherwise there may be a risk of suffering an
electric shock if you drill into cables.
8.1 Status indicator (Fig. 1/Item 11)
The status indicator (11) lights up when the
power plug is connected.
8.2 ON/OFF switch (Fig. 9/Item 10)
First fit a suitable drill bit into the tool (see
7.3).
Connect the mains plug to a suitable
socket.
Position the drill in the position you wish to
drill.
To switch on:
Press the ON/OFF switch (10)
To switch off:
Release the ON/OFF switch (10)
Switching on continuous operation:
Secure the ON/OFF switch (10) with the
locking button (8).Important. It may only be
locked if the drill is set to rotate clockwise.
13
GB
Anleitung_4258375_FI_DK:_ 14.10.2011 12:21 Uhr Seite 13

Switching off continuous operation:
Press the ON/OFF switch (10) briefly.
8.3 Adjusting the speed (Fig. 9/Item 10)
You can infinitely vary the speed whilst
using the tool.
Select the speed by applying a greater or
lesser pressure to the ON/OFF switch (10).
Select the correct speed: The most suitable
speed depends on the workpiece, the type
of use and the drill bit used.
Low pressure on the ON/OFF switch (10):
Lower speed
Greater pressure on the ON/OFF switch
(10): Higher speed
Tip: Start drilling holes at low speed. Then
increase the speed in stages.
Benefits:
The drill bit is easier to control when
starting the hole and will not slide away.
You avoid drilling messy holes (for example
in tiles).
8.4 Preselecting the speed (Fig. 9/Item 9)
Do not attempt to make this setting whilst
the drill is in use.
The speed setting ring (9) enables you to
define the maximum speed. The ON/OFF
switch (10) can only be pressed to the
defined maximum speed setting.
Set the speed using the setting ring (9) on
the ON/OFF switch (10).
8.5 Clockwise/Counter-clockwise switch
(Fig. 9/Item 7)
Change switch position only when the
drill is at a standstill!
Switch the direction of the hammer drill
using the clockwise/counter-clockwise
switch (7):
Direction Switch position
Clockwise Push in to the left
(forwards and drill)
Counter-clockwise Push in to the right
(reverse)
8.6 Drill / Hammer drill / Chisel selector
switch (Fig. 10)
Important. If the additional quick-change
drill chuck (14) is mounted, the hammer
drill and chisel functions will not be
available.
For drilling, press the button (E) on the
selector switch (5) and simultaneously turn
the selector switch (5) to position A.
For hammer drilling, press the button (E) on
the selector switch (5) and simultaneously
turn the selector switch (5) to position B.
For chiseling, press the button (E) on the
selector switch (5) and simultaneously turn
the selector switch (5) to position C. In
switch position C the chisel is not locked.
For chiseling, press the button (E) on the
selector switch (5) and simultaneously turn
the selector switch (5) to position D. The
chisel is locked in position D.
Important.
You only require slight contact pressure for
hammer drilling. Excessive contact pressure
will place an unnecessary strain on the motor.
Check bitsl at regular intervals. Sharpen or
replace blunt bits.
9. Replacing the power cable
If the power cable for this equipment is
damaged, it must be replaced by the
manufacturer or its after-sales service or
similarly trained personnel to avoid danger.
14
GB
Anleitung_4258375_FI_DK:_ 14.10.2011 12:21 Uhr Seite 14

15
GB
10. Cleaning, maintenance and
ordering of spare parts
Important.
Always pull out the mains power plug before
starting any cleaning work.
10.1 Cleaning
Keep all safety devices, air vents and the
motor housing free of dirt and dust as far as
possible. Wipe the equipment with a clean
cloth or blow it with compressed air at low
pressure.
We recommend that you clean the device
immediately each time you have finished
using it.
Clean the equipment regularly with a moist
cloth and some soft soap. Do not use
cleaning agents or solvents; these could
attack the plastic parts of the equipment.
Ensure that no water can seep into the
device.
10.2 Carbon brushes
In case of excessive sparking or if the status
indicator for carbon brush wear (12) lights up,
have the carbon brushes checked by a qualified
electrician.
10.3 Maintenance
There are no parts inside the equipment which
require additional maintenance.
10.4 Ordering replacement parts:
Please quote the following data when ordering
replacement parts:
Type of machine
Article number of the machine
Identification number of the machine
For our latest prices and information please go
to www.isc-gmbh.info
11. Disposal and recycling
The unit is supplied in packaging to prevent its
being damaged in transit. This packaging is
raw material and can therefore be reused or
can be returned to the raw material system.
The unit and its accessories are made of
various types of material, such as metal and
plastic. Defective components must be
disposed of as special waste. Ask your dealer
or your local council.
For EU countries only
Never place any electric tools in
your household refuse.
To comply with European Directive
2002/96/EC concerning old electric and
electronic equipment and its
implementation in national laws, old electric
tools have to be separated from other waste
and disposed of in an environment-friendly
fashion, e.g. by taking to a recycling depot.
Recycling alternative to the demand to return
electrical devices:
As an alternative to returning the electrical
device, the owner is obliged to cooperate in
ensuring that the device is properly recycled if
ownership is relinquished. This can also be
done by handing over the used
device to a returns center, which will dispose of
it in accordance with national commercial and
industrial waste management legislation. This
does not apply to the accessories and auxiliary
equipment without any electrical components
which are included with the used device.
Anleitung_4258375_FI_DK:_ 14.10.2011 12:21 Uhr Seite 15

16
GB
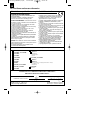
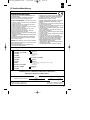
12. Declaration of conformity
k erklärt folgende Konformität gemäß EU-Richtlinie und
Normen für Artikel
t explains the following conformity according to EU
directives and norms for the following product
p déclare la conformité suivante selon la directive CE et les
normes concernant l’article
C dichiara la seguente conformità secondo la direttiva UE e
le norme per l’articolo
N verklaart de volgende overeenstemming conform EU
richtlijn en normen voor het product
m declara la siguiente conformidad a tenor de la directiva y
normas de la UE para el artículo
O declara a seguinte conformidade, de acordo com a
directiva CE e normas para o artigo
l attesterer følgende overensstemmelse i medfør af
EU-direktiv samt standarder for artikel
U förklarar följande överensstämmelse enl. EU-direktiv och
standarder för artikeln
q vakuuttaa, että tuote täyttää EU-direktiivin ja standardien
vaatimukset
. tõendab toote vastavust EL direktiivile ja standarditele
j vydává následující prohlášení o shodě podle směrnice
EU a norem pro výrobek
X potrjuje sledečo skladnost s smernico EU in standardi za
izdelek
W vydáva nasledujúce prehlásenie o zhode podľa smernice
EÚ a noriem pre výrobok
A a cikkekhez az EU-irányvonal és Normák szerint a
következő konformitást jelenti ki
P deklaruje zgodność wymienionego poniżej artykułu z
następującymi normami na podstawie dyrektywy WE.
e декларира съответното съответствие съгласно
Директива на ЕС и норми за артикул
H paskaidro šādu atbilstību ES direktīvai un standartiem
G apibūdina šį atitikimą EU reikalavimams ir prekės
normoms
Q declară următoarea conformitate conform directivei UE
şi normelor pentru articolul
z δηλώνει την ακόλουθη συμμόρφωση σύμφωνα με την
Οδηγία ΕΚ και τα πρότυπα για το προϊόν
B potvrđuje sljedeću usklađenost prema smjernicama EU
i normama za artikl
Izjava o sukladnosti za ovaj proizvod dostupna je na
internet stranici www.lidl.hr.
f potvrđuje sljedeću usklađenost prema smjernicama EU
i normama za artikl
4 potvrđuje sledeću usklađenost prema smernicama EZ i
normama za artikal
T следующим удостоверяется, что следующие
продукты соответствуют директивам и нормам ЕС
1 проголошує про зазначену нижче відповідність
виробу директивам та стандартам ЄС на виріб
Z Ürünü ile ilgili AB direktifleri ve normları gereğince
aşağıda açıklanan uygunluğu belirtir
L erklærer følgende samsvar i henhold til EU-direktivet
og standarder for artikkel
E Lýsir uppfyllingu EU-reglna og annarra staðla vöru
Konformitätserklärung
Einhell Germany AG · Wiesenweg 22 · D-94405 Landau/Isar
Bohrhammer PBH 1100 A1 (Parkside)
Standard references: EN 60745-1; EN 60745-2-6; EN 55014-1;
EN 55014-2; EN 61000-3-2; EN 61000-3-3
Landau/Isar, den 21.09.2011
First CE: 08 Archive-File/Record: NAPR004729
Art.-No.: 42.583.75 I.-No.: 11021 Documents registrar: Georg Riedel
Subject to change without notice Wiesenweg 22, D-94405 Landau/Isar
Weichselgartner/General-Manager Unger/Product-Management
x
2006/42/EC
2004/26/EC
Emission No.:
2000/14/EC_2005/88/EC
Annex IV
Notified Body:
Notified Body No.:
Reg. No.:
Annex V
Annex VI
Noise: measured L
WA
= dB (A); guaranteed L
WA
= dB (A)
P = KW; L/Ø = cm
Notified Body:
x
x
87/404/EC_2009/105/EC
2005/32/EC_2009/125/EC
2006/95/EC
2006/28/EC
2004/108/EC
2004/22/EC
1999/5/EC
97/23/EC
90/396/EC_2009/142/EC
89/686/EC_96/58/EC
2011/65/EC
Anleitung_4258375_FI_DK:_ 14.10.2011 12:21 Uhr Seite 16

17
GB
13. GUARANTEE CERTIFICATE
Dear Customer,
All of our products undergo strict quality checks to ensure that they reach you in perfect condition. In the unlikely
event that your device develops a fault, please contact our service department at the address shown on this
guarantee card. Of course, if you would prefer to call us then we are also happy to offer our assistance under
the service number printed below. Please note the following terms under which guarantee claims can be made:
1. These guarantee terms cover additional guarantee rights and do not affect your statutory warranty rights.
We do not charge you for this guarantee.
2. Our guarantee only covers problems caused by material or manufacturing defects, and it is restricted to the
rectification of these defects or replacement of the device. Please note that our devices have not been
designed for use in commercial, trade or industrial applications. Consequently, the guarantee is invalidated
if the equipment is used in commercial, trade or industrial applications or for other equivalent activities. The
following are also excluded from our guarantee: compensation for transport damage, damage caused by
failure to comply with the installation/assembly instructions or damage caused by unprofessional
installation, failure to comply with the operating instructions (e.g. connection to the wrong mains voltage or
current type), misuse or inappropriate use (such as overloading of the device or use of non-approved tools
or accessories), failure to comply with the maintenance and safety regulations, ingress of foreign bodies
into the device (e.g. sand, stones or dust), effects of force or external influences (e.g. damage caused by
the device being dropped) and normal wear resulting from proper operation of the device. This applies in
particular to rechargeable batteries for which we nevertheless issue a guarantee period of 12 months.
The guarantee is rendered null and void if any attempt is made to tamper with the device.
3. The guarantee is valid for a period of 3 years starting from the purchase date of the device. Guarantee
claims should be submitted before the end of the guarantee period within two weeks of the defect being
noticed. No guarantee claims will be accepted after the end of the guarantee period. The original guarantee
period remains applicable to the device even if repairs are carried out or parts are replaced. In such cases,
the work performed or parts fitted will not result in an extension of the guarantee period, and no new
guarantee will become active for the work performed or parts fitted. This also applies when an on-site
service is used.
4. In order to assert your guarantee claim, please send your defective device postage-free to the address
shown below. Please enclose either the original or a copy of your sales receipt or another dated proof of
purchase. Please keep your sales receipt in a safe place, as it is your proof of purchase. It would help us if
you could describe the nature of the problem in as much detail as possible. If the defect is covered by our
guarantee then your device will either be repaired immediately and returned to you, or we will send you a
new device.
Of course, we are also happy offer a chargeable repair service for any defects which are not covered by the
scope of this guarantee or for units which are no longer covered. To take advantage of this service, please send
the device to our service address.
Anleitung_4258375_FI_DK:_ 14.10.2011 12:21 Uhr Seite 17

18
FI
Tuotedokumentaation ja tuotteen mukana
toimitettujen papereiden osittainenkin kopiointi
tai muu monistaminen on sallittu ainoastaan
ISC GmbH:n nimenomaisella luvalla.
Oikeus teknisiin muutoksiin pidätetään
Sisällysluettelo Sivu
1. Johdanto ................................................................................20
2. Turvallisuusmääräykset .........................................................20-22
3. Laitteen kuvaus ......................................................................23
4. Toimituksen laajuus ...............................................................23
5. Määräysten mukainen käyttö .................................................23
6. Tekniset tiedot ........................................................................23-24
7. Ennen käyttöönottoa ..............................................................24-25
8. Käyttöönotto ...........................................................................25-26
9. Verkkoliitäntäjohdon vaihtaminen ...........................................26
10. Puhdistus, huolto ja varaosatilaus ..........................................27
11. Hävittäminen ja uudelleenkäyttö ............................................27
12. Standardinmukaisuustodistus ................................................28
13. Takuutodistus ........................................................................29
Anleitung_4258375_FI_DK:_ 14.10.2011 12:21 Uhr Seite 18

19
FI
Jotta laitteen vahingoittumiselta vältytään, tulee eri toimintojen väliset
vaihtokytkennät tehdä vain koneen seistessä.
„VAROITUS – Tapaturmavaaran vähentämiseksi lue käyttöohje“
Käytä kuulosuojuksia.
Melu saattaa aiheuttaa kuulon menetyksen.
Käytä pölynsuojanaamaria.
Puuta tai muita materiaaleja työstettäessä saattaa syntyä terveydelle haitallista pölyä.
Asbestipitoista materiaalia ei saa työstää!
Käytä suojalaseja.
Työn aikana syntyvät kipinät tai laitteesta sinkoilevat sirut, lastut ja pölyt saattavat
aiheuttaa näkökyvyn menetyksen.
Laitekohtaiset turvallisuusmääräykset
Anleitung_4258375_FI_DK:_ 14.10.2011 12:21 Uhr Seite 19

1. Johdanto
Huomio!
Laitteita käytettäessä tulee noudattaa tiettyjä
turvallisuusvarotoimia tapaturmien ja vaurioiden
välttämiseksi. Lue sen vuoksi tämä käyttöohje /
nämä turvallisuusmääräykset huolellisesti läpi.
Säilytä ne hyvin, jotta niissä olevat tiedot ovat
myöhemminkin milloin vain käytettävissäsi. Jos
luovutat laitteen muille henkilöille, ole hyvä ja
anna heille myös tämä käyttöohje / nämä
turvallisuusmääräykset laitteen mukana. Emme
ota mitään vastuuta tapaturmista tai vaurioista,
jotka ovat aiheutuneet tämän käyttöohjeen tai
turvallisuusohjeiden noudattamisen
laiminlyönnistä.
2. Turvallisuusmääräykset
VAROITUS
Lue kaikki turvallisuusmääräykset ja ohjeet. Jos
turvallisuusmääräyksiä tai muita ohjeita ei
noudateta, saattaa tästä aiheutua sähköiskuja,
tulipaloja ja/tai vaikeita vammoja. Säilytä
kaikki turvallisuusmääräykset ja ohjeet
myöhempää tarvetta varten.
Turvallisuusmääräyksissä käytetyllä käsitteellä
„sähkötyökalu“ tarkoitetaan
verkkovirtakäyttöisiä sähkötyökaluja (varustettu
verkkojohdolla) sekä akkukäyttöisiä
sähkötyökaluja (ilman verkkojohtoa).
1. Työpaikan turvallisuus
Pidä työalueesi siistinä ja hyvin
valaistuna. Työalueella vallitsevasta
epäjärjestyksestä tai huonosta
valaistuksesta voi aiheutua tapaturmia.
Älä käytä sähkötyökalua
räjähdysalttiissa ympäristössä, jossa on
tulenarkoja nesteitä, kaasuja tai pölyjä.
Sähkötyökalut kehittävät kipinöitä, jotka
saattavat sytyttää pölyn tai höyryt
palamaan.
Pidä lapset ja muut henkilöt poissa
työalueelta sähkötyökalua käyttäessäsi.
Voit menettää laitteen hallinnan häirinnän
vuoksi.
2. Sähköturvallisuus
Sähkötyökalun liitäntäpistokkeen tulee
sopia pistorasiaan. Pistoketta ei saa
muuttaa millään tavalla. Älä käytä
sovitinpistokkeita yhdessä
suojamaadoitettujen sähkötyökalujen
kanssa.
Muuttamattomat pistokkeet ja sopivat
pistorasiat vähentävät sähköiskun vaaraa.
Vältä koskemasta vartalollasi
maadoitettuihin osiin, esim. putkiin,
lämmittimiin, liesiin ja jääkaappeihin.
Jos vartalosi on maadoitettu, aiheutuu tästä
suurempi sähköiskun vaara.
Suojaa sähkötyökalut sateelta tai
kosteudelta.
Veden tunkeutuminen sähkötyökaluun lisää
sähköiskun vaaraa.
Älä käytä liitäntäjohtoa väärin esim.
kantamalla sähkötyökalua sen avulla,
ripustamalla sähkötyökalu siitä tai
vetämällä pistoke pistorasiasta johtoa
käyttäen. Suojaa johtoa kuumuudelta,
öljyltä, teräviltä reunoilta tai liikkuvilta
laitteen osilta.
Vahingoittuneet tai mutkille kiertyneet johdot
lisäävät sähköiskun vaaraa.
Kun käytät sähkötyökalua ulkona, käytä
ainoastaan sellaisia jatkojohtoja, jotka
ovat sallittuja ulkokäyttöön.
Ulkokäyttöä varten soveliaan jatkojohdon
käyttö vähentää sähköiskun vaaraa.
Jos sähkötyökalun käyttö kosteassa
ympäristössä on välttämätöntä, käytä
vuotovirtasuojakatkaisinta.
Vuotovirtasuojakatkaisimen käyttö vähentää
sähköiskun vaaraa.
3. Ihmisten turvallisuus
Ole tarkkaavainen, keskity siihen, mitä
teet, ja käytä järkeäsi työskennellessäsi
sähkötyökaluja käyttäen. Älä käytä
sähkötyökalua ollessasi väsynyt tai
huumeiden, päihteiden tai
lääkeaineiden vaikutuksen alainen.
Hetkisenkin hajamielisyys sähkötyökalua
käytettäessa saattaa aiheuttaa vakavia
vammoja.
Käytä henkilökohtaisia suojavarusteita
sekä aina suojalaseja.
20
FI
Anleitung_4258375_FI_DK:_ 14.10.2011 12:21 Uhr Seite 20
Seite laden ...
Seite laden ...
Seite laden ...
Seite laden ...
Seite laden ...
Seite laden ...
Seite laden ...
Seite laden ...
Seite laden ...
Seite laden ...
Seite laden ...
Seite laden ...
Seite laden ...
Seite laden ...
Seite laden ...
Seite laden ...
Seite laden ...
Seite laden ...
Seite laden ...
Seite laden ...
Seite laden ...
Seite laden ...
Seite laden ...
Seite laden ...
Seite laden ...
Seite laden ...
Seite laden ...
Seite laden ...
Seite laden ...
Seite laden ...
Seite laden ...
Seite laden ...
Seite laden ...
Seite laden ...
Seite laden ...
Seite laden ...
Seite laden ...
Seite laden ...
Seite laden ...
Seite laden ...
Seite laden ...
Seite laden ...
Seite laden ...
Seite laden ...
Seite laden ...
Seite laden ...
Seite laden ...
Seite laden ...
-
 1
1
-
 2
2
-
 3
3
-
 4
4
-
 5
5
-
 6
6
-
 7
7
-
 8
8
-
 9
9
-
 10
10
-
 11
11
-
 12
12
-
 13
13
-
 14
14
-
 15
15
-
 16
16
-
 17
17
-
 18
18
-
 19
19
-
 20
20
-
 21
21
-
 22
22
-
 23
23
-
 24
24
-
 25
25
-
 26
26
-
 27
27
-
 28
28
-
 29
29
-
 30
30
-
 31
31
-
 32
32
-
 33
33
-
 34
34
-
 35
35
-
 36
36
-
 37
37
-
 38
38
-
 39
39
-
 40
40
-
 41
41
-
 42
42
-
 43
43
-
 44
44
-
 45
45
-
 46
46
-
 47
47
-
 48
48
-
 49
49
-
 50
50
-
 51
51
-
 52
52
-
 53
53
-
 54
54
-
 55
55
-
 56
56
-
 57
57
-
 58
58
-
 59
59
-
 60
60
-
 61
61
-
 62
62
-
 63
63
-
 64
64
-
 65
65
-
 66
66
-
 67
67
-
 68
68


Parkside PBH 1100 A1 Operation and Safety Notes
- Kategorie
- Drehhämmer
- Typ
- Operation and Safety Notes
in anderen Sprachen
- English: Parkside PBH 1100 A1
- dansk: Parkside PBH 1100 A1
- svenska: Parkside PBH 1100 A1
- suomi: Parkside PBH 1100 A1
Verwandte Papiere
-
Parkside BMR 1400 Bedienungsanleitung
-
-
-
-
-
-
Kompernass PSBM 1100 Bedienungsanleitung
-
-
-
Sonstige Unterlagen
-
Scheppach DH1200MAX Benutzerhandbuch
-
Maestro MID 650 E Bedienungsanleitung
-
Max 55240 Benutzerhandbuch
-
Bosch GBH Professional Bedienungsanleitung
-
Hilti TE 76-ATC Operating Instructions Manual
-
EINHELL BT-ID 550 E Bedienungsanleitung
-
-
Toolson PRO-SB 750 Bedienungsanleitung
-
EINHELL TH-RH 900/ Bedienungsanleitung
-
JET JBM-5 Benutzerhandbuch