ESSENTIAL EDI 24 Induction Hob Benutzerhandbuch
- Typ
- Benutzerhandbuch


DESCRIPTION OF THE APPLIANCE
Technical characteristics
Type
EDI24
Total power
3700 W
Energy consumption for the hob EChob**
172.9 Wh/kg
Front heating zone
170 x 170 mm
Minimum detection
Nominal power*
Booster power*
Standardised cookware category**
Energy consumption ECcw**
Ø 90 mm
1100 W
1400 W
B
177.3 Wh/kg
Rear heating zone
210 x 210 mm
Minimum detection
Ø 100 mm
Nominal power*
2300 W
Booster power*
3000 W
Standardised cookware category**
C
Energy consumption ECcw**
168.4 Wh/kg
*The given power may change according to the dimensions and material of the pan.
** calculated according to the method of measuring performance (EN 60350-2).
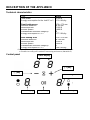
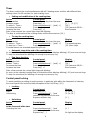
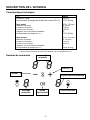
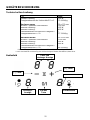
Control panel
[ - ] key
Timer display
Power display
On/off key
Selection key
Control light timer
[ + ] key

2
USE OF THE APPLIANCE
Display
Display Designation Function
0 Zero The heating zone is activated.
1…9 Power level Selection of the cooking level.
U Pan detection No pan or inadequate pan.
E Error message Electronic failure.
H Residual heat The heating zone is hot.
P Booster The boosted power is activated.
L Locking Control panel locking.
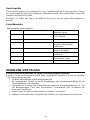
Ventilation
The cooling system is fully automatic. The cooling fan starts with a low speed when the calories
brought out by the electronic system reach a certain level. The ventilation starts his high speed
when the hob is intensively used. The cooling fan reduces his speed and stops automatically
when the electronic circuit is cooled enough.
STARTING-UP AND APPLIANCE MANAGEMENT
Before the first use
Clean your hob with a damp cloth, and then dry the surface thoroughly. Do not use detergent
which risks causing blue-tinted colour on the glass surface.
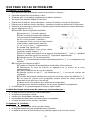
Induction principle
An induction coil is located under each heating zone. When it is engaged, it produces a variable
electromagnetic field which produces inductive currents in the ferromagnetic bottom plate of the
pan. The result is a heating-up of the pan located on the heating zone.
Of course the pan has to be adapted:
•All ferromagnetic pans are recommended (please verify it thanks a little magnet): cast iron
and steel pans, enamelled pans, stainless-steel pans with ferromagnetic bottoms…
•Are excluded: cupper, pure stainless-steel, aluminium, glass, wood, ceramic, stoneware…
The induction heating zone adapts automatically the size of the pan. With a too small diameter
the pan doesn’t work. This diameter is varying in function of the heating zone diameter.
If the pan is not adapted to the induction hob the display will show [ U ].
Sensitive touch
Your ceramic hob is equipped with electronic controls with sensitive touch keys. When your finger
presses the key, the corresponding command is activated. This activation is validated by a
control light, a letter or a number in the display and/or a “beep” sound.
In the case of a general use press only one key at the same time.

3
Starting-up
You must first switching on the hob, then the heating zone:
•Start-up/ switch off the hob:
Action Control panel Display
To start Press key [ 0/I ] [ 0 ]
Touch the key Press key [ 0/I ] Nothing or [ H ]
•Start-up/ switch off a heating zone:
Action Control panel Display
Zone selection Press selection key from the zone [ 0 ]
Increase power Press key [ + ] [ 1 ] to [ 9 ]
Decrease power Press key [ - ] [ 9 ] to [ 1 ]
Stop Press key [ - ] [ 0 ] or [ H ]
If no action is made within 20 second the electronics returns in waiting position.
Pan detection
The pan detection ensures a perfect safety. The induction doesn’t work:
•If there is no pan on the heating zone or if this pan is not adapted to the induction. In this
case it is impossible to increase the power and the display shows [ U ]. This symbol
disappears when a pan is put on the heating zone.
•If the pan is removed from the heating zone the operation is stopped. The display shows
[ U ]. The symbol [ U ] disappears when the pan is put back to the heating zone. The
cooking continues with the power level setted before.
After use, switch the heat element off: don’t let the pan detection [ U ] active.
Residual heat indication
After the switch off of a heating zone or the complete stop of the hob, the heating zones are still
hot and indicates [ H ] on the display.
The symbol [ H ] disappears when the heating zones may be touched without danger.
As far as the residual heat indicators are on light, don’t touch the heating zones and don’t put any
heat sensitive object on them. There are risks of burn and fire.
Booster function
The booster function [ P ] grants a boost of power to the selected heating zone.
If this function is activated the heating zones works during 5 minutes with an ultra high power.
The booster is foreseen for example to heat up rapidly big quantities of water, like nuddles cooking.
•Start up / Stop the booster function:
Action Control panel Display
Zone selection Press selection key from the zone [ 0 ]
Increase power Press key [ + ] [ 1 ] to [ 9 ]
Start up the booster Press key [ + ] [ P ] during 5 min
Stop the booster Press key [ - ] [ 9 ]
•Power management :
The hole cooking hob is equipped by a maximum of power. When the booster function is
activated, and not to exceed the maximum power, the electronic system orders to reduce
automatically the power level of an other heating zone. The display is blinking on [ 9 ] during a
few seconds and then shows the maximum of power allowed ( [ 6 ] or [ 8 ] ).
Heating zone selected The other heating zone: (example: power level 9)
[ P ] is displayed [ 9 ] goes to [ 7 ] depending the type of zone

4
Timer
The timer is able to be used simultaneous with all 2 heating zones and this with different time
settings (from 0 to 99 minutes) for each heating zone.
•Setting and modification of the cooking time:
Action Control panel Display
Zone selection Press selection key from the zone [ 0 ]
Increase power Press key [ + ] [ 1 ] … [ 9 ] [ P ]
To select « Timer » Press simultaneously [ - ] and [ + ] [ 00 ]
Decrease the time Press key [ - ] [ 00 ] wents to 30,29….
Increase the time Press key [ + ] time increase
After a few seconds the control light stops with blinking.
The time is confirmed and the cooking starts until the time reaches [ 00 ].
•To stop the cooking time:
Action Control panel Display
Zone selection Press selection key from the zone [ 0 ]
To select « Timer » Press simultaneously [ - ] and [ + ] The remaining time
To stop the « Timer » Press key [ - ] [ 00 ] then stops
If several timers are activated repeat the process.
•Automatic stop at the end of the cooking time:
As soon as the selected cooking time is finished the timer displays blinking [ 00 ] and a sound rings.
To stop the sound and the blinking it is enough to press any key.
•Egg timer function:
Action Control panel Display
Activate the hob Press key [ 0/I ] [ 0 ] or [ H ]
Select« Timer » Press simultaneously [ - ] and [ + ] [ 00 ]
Decrease the time Press key [ - ] [ 00 ] wents to 30,29….
Increase the time Press key [ + ] time increase
After a few seconds the control light stops with blinking.
As soon as the selected cooking time is finished the timer displays blinking [ 00 ] and a sound rings.
To stop the sound and the blinking it is enough to press any key.
Control panel locking
To avoid modifying a setting of cooking zones, in particular with within the framework of cleaning
the control panel can be locked (with exception to the On/Off key [ 0/I ]).
•Locking:
Action Control panel Display
Start Press key [ 0/I ] [ 0 ] or [ H ]
Hob locking Press simultaneously [ - ] and [ 0 ] or [ H ]
selection key from the front zone
Repress selection key [ L ]
•Unlocking:
Action Control panel Display
Start Press key [ 0/I ] [ L ]
In the 5 seconds after start:
Unlocking the hob Press simultaneously [ - ] and [ L ]
selection key from the front zone
Repress key [ - ] No light on the display

5
COOKING ADVICES
Pan quality
Adapted materials: steel, enamelled steel, cast iron, ferromagnetic stainless-steel,
aluminium with ferromagnetic bottom.
Not adapted materials: aluminium and stainless-steel without ferromagnetic bottom, cupper,
brass, glass, ceramic, porcelain.
The manufacturers specify if their products are compatible induction.
To check if pans are compatibles:
Put a littler water in a pan placed on an induction heating zone set at level [ 9 ].This water
must heat in a few seconds.
A magnet stuck on the bottom of the pan.
Some pans can make noise when they are placed on an induction cooking zone. This noise
doesn’t mean any failure on the appliance and doesn’t influence the cooking operating.
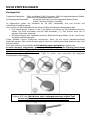
The pans must be certified by the manufacturer as compatible with induction hobs.
However, it is possible that certain pans, even though declared compatible, may have
characteristics which are not adapted to be used with induction hobs.
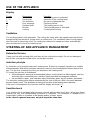
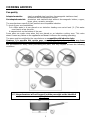
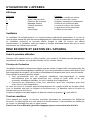
We recommend to verify, when purchasing the pans, that they respect at least the following
conditions:
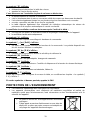
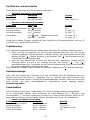
If the bottom of the pan (Ød) is significantly smaller than the diemeter of the body
(ØD) the performance will not be good, and the pan might not be identified
by the plate

6
Pan dimension
The cooking zones are, until a certain limit, automatically adapted to the diameter of the pan.
However the bottom of this pan must have a minimum of diameter according to the
corresponding cooking zone.
To obtain the best efficiency of your hob, please place the pan well in the centre of the cooking
zone.
Examples of cooking power setting
(the values below are indicative)
1 to 2
Melting
Reheating
Sauces, butter, chocolate, gelatine
Dishes prepared beforehand
2 to 3
Simmering
Defrosting
Rice, pudding, sugar syrup
Dried vegetables, fish, frozen products
3 to 4
Steam
Vegetables, fish, meat
4 to 5
Water
Steamed potatoes, soups, pasta,
fresh vegetables
6 to 7
Medium cooking
Simmering
Meat, lever, eggs, sausages
Goulash, roulade, tripe
7 to 8
Cooking
Potatoes, fritters, wafers
9
Frying, roosting, boiling water
Steaks, omelettes, fried dishes, water
P
Frying, roosting
Boiling water
scallops, steaks
Boiling significant quantities of water
MAINTENANCE AND CLEANING
Switch-off the appliance before cleaning.
Do not clean the hob if the glass is too hot because they are risk of burn.
•Remove light marks with a damp cloth with washing up liquid diluted in a little water. Then
rinse with cold water and dry the surface thoroughly.
•Highly corrosive or abrasive detergents and cleaning equipment likely to cause scratches
must be absolutely avoided.
•Do not ever use any steam-driven or pressure appliance.
•Do not use any object that may scratch the ceramic glass.
•Ensure that the pan is dry and clean. Ensure that there are no grains of dust on your
ceramic hob or on the pan. Sliding rough saucepans will scratch the surface.
•Spillages of sugar, jam, jelly, etc. must be removed immediately. You will thus prevent the
surface being damaged.

7
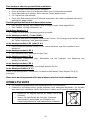
WHAT TO DO IN CASE OF A PROBLEM
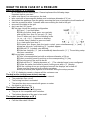
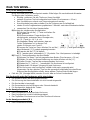
When the symbol [ E 4 ] appears:
I) The table must be reconfigured. Please implement the following steps:
Important: before you start:
•make sure there is no more pot on the hob
•take a pot with a ferromagnetic bottom and a minimum diameter of 16 cm
•disconnect the appliance from the grid by removing the fuse or turning the circuit breaker off
•start the procedure within 2 minutes after reconnecting the hob to the grid
•reconnect the table to the grid
•don’t use the [ 0/I ] touch
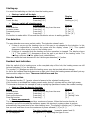
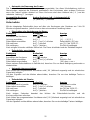
II) First step: cancel the existing configuration
1) Press [ - ] and hold down
2) With your other hand, press successively
and quickly (less than 2s) on each [ O ] key.
Press 2 times each key in the following order
(a -> a -> b -> b). [ - ] appears on displays.
A double "beep" means an error occurred.
If so, start again from item 1).
3) Remove your fingers from the touch control, press simultaneously [ + ] and [ - ]
during few seconds, until blinking [ E ] symbols appear.
4) Wait until [ E ] symbols stop blinking.
5) After few seconds, [ E ] are automatically transformed in [ C ]. The existing setup
has been cancelled.
III) Second step: new setup
1) Take a ferromagnetical pot with a minimum diameter of 16 cm
2) Select a cooking zone by pushing on the corresponding [ O ] key
3) Place the pot on the area to be set
4) Wait until the [ C ] display becomes a [ - ]. The selected zone is now configured.
5) Follow the same procedure for each cooking zone with a [ C ] display.
6) All the cooking zones are configured once all the displays are turned off.
Please use the same pot for the whole procedure.
Never put several pots together on the zones during the setup-process.
•If [ E 4 ] displaying remains, please call the customer care
The hob or the cooking zone doesn’t start-up:
•The hob is badly connected on the electrical network.
•The protection fuse cut-off.
•The locking function is activated.
•The sensitive keys are covered with grease or water.
•An object is put on a key.
The control panel displays [ U ]:
•There is no pan on the cooking zone.
•The pan is not compatible with induction.
•The bottom diameter of the pan is too small.
The control panel displays or [ E ]:
•Disconnect and replug the hob.
•Call the After-sales Service.
a
b

8
One or all cooking zone cut-off:
•The safety system functioned.
•You forgot to cut-off the cooking zone for a long time.
•One or more sensitive keys are covered.
•The pan is empty and its bottom overheated.
•The hob also has an automatic reduction of power level and breaking Automatic overheating
Continuous ventilation after cutting off the hob:
•This is not a failure, the fan continuous to protect the electronic device.
•The fan cooling stops automatically.
The control panel displays [ L ]:
•Refer to the chapter control panel locking page.
The control panel displays [ ] or [ Er03 ] :
•An object or liquid covers the control keys. The symbol disappear as soon as the key is
released or cleaned.
The control panel displays [ E2 ] or [ E H ] :
•The hob is overheated, let it cool and then turn it onagain.
The control panel displays [ E3 ] :
•The pan is not adapted, change the pan.
The control panel displays [ E6 ] :
•Defective network. Control the frequency and voltage of the electrical network.
The control panel displays [ E8 ] :
•The air inlet of the ventilator is obstructed, release it.
The control panel displays [ E C ] :
Configuration error. Set the table again, referring to the chapter "The [E 4] appears."
If one of the symbols above persists, call the After sales-services.
ENVIRONMENT PRESERVATION
•The materials of packing are ecological and recyclable.
•The electronic appliances are composed of recyclable, and sometimes harmful materials
for the environment, but necessary to the good running and the safety of the appliance.
•Don't throw your appliance with the household refuses
•Get in touch with the waste collection centre of your
commune that is adapted to the recycling of
the household appliances.

9
INSTALLATION INSTRUCTIONS
The installation comes under the exclusive responsibility of specialists.
The installer is held to respect the legislation and the standards enforce in his home country.
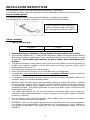
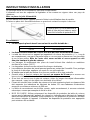
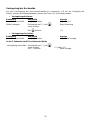
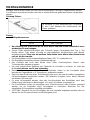
How to stick the gasket:
The gasket supplied with the hob avoids all infiltration of liquids in the cabinet.
His installation has to be done carefully, in conformity of the following drawing.
Fitting - installing:
•The cut out sizes are:
Reference
Cut-size
EDI24
280 x 490 mm
•Ensure that there is a distance of 50 mm between the hob and the wall or sides.
•The hobs are classified as “Y” class for heat protection. Ideally the hob should be installed
with plenty of space on either side. There may be a wall at the rear and tall units or a wall
at one side. On the other side, however, no unit or divider must stand higher than
the hob.
•The piece of furniture or the support in which the hob is to be fitted, as well as the edges of
furniture, the laminate coatings and the glue used to fix them, must be able to resist
temperatures of up to 100 °C.
•The mural rods of edge must be heat-resisting.
•Not to install the hob to the top of a not ventilated oven or a dishwasher.
•To guarantee under the bottom of the hob casing a space of 20 mm to ensure a good air
circulation of the electronic device.
•If a drawer is placed under the work, avoid to put into this drawer flammable objects (for
example: sprays) or not heat-resistant objects.
•Materials which are often used to make worktops expand on contact with water. To protect
the cut out edge, apply a coat of varnish or special sealant. Particular care must be given
to applying the adhesive joint supplied with the hob to prevent any leakage into the
supporting furniture. This gasket guaranties a correct seal when used in conjunction with
smooth work top surfaces.
•The safety gap between the hob and the cooker hood placed above must respect the
indications of the hood manufacturer. In case of absence of instructions respect a distance
minimum of 500 mm.
•The connection cord should be subjected, after building, with no mechanical constraint,
such for example of the fact of the drawer.
•WARNING: Use only hob guards designed by the manufacturer of the cooking appliance
or indicated by the manufacturer of the appliance in the instructions for use as suitable or
hob guards incorporated in the appliance. The use of inappropriate guards can cause
accidents.
Stick the gasket (2) two millimeters
from the external edge of the glass,
after removing the protection sheet (3).

10
ELECTRICAL CONNECTION
•The installation of this appliance and the connection to the electrical network should be
entrusted only to an electrician perfectly to the fact of the normative regulations and which
respects them scrupulously.
•Protection against the parts under tension must be ensured after the building-in.
•The data of connection necessary are on the stickers place on the hob casing near the
connection box.
•The connection to the main must be made using an earthed plug or via an omnipolar
circuit breaking device with a contact opening of at least 3 mm.
•The electrical circuit must be separated from the network by adapted devices, for example:
circuit breakers, fuses or contactors.
•If the appliance is not fitted with an accessible plug, disconnecting means must be
incorporated in the fixed installation, in accordance with the installation regulations.
•The inlet hose must be positioned so that it does not touch any of the hot parts of the hob
or even.
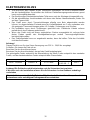
Caution!
This appliance has only to be connected to a network 230 V~ 50/60 Hz
Connect always the earth wire.
Respect the connection diagram.
Use the connecting cable that is attached to the device.
The green / yellow wire correspond to the earth wire, the blue wire correspond neutral wire and
the brown wire correspond to the phase.
* calculated with the simultaneous factor following the standard EN 60 335-2-6
Caution! Ensure that the cables are correctly inserted and tightly screwed down.
4 weeks after installation, be sure to tighten again the screws in the terminal block.
Mains
Connection
Cable diameter
Cable
Protection calibre
230V~ 50/60Hz
1 Phase + N
3 x 1,5 mm²
H 05 VV - F
H 05 RR - F
16 A *
We cannot be held responsible for any incident resulting from incorrect connection or
which could arise from the use of an appliance which has not been earthed or has been
equipped with a faulty earth connection.

11
DESCRIPTION DE L’APPAREIL
Caractéristiques techniques
Type
EDI24
Puissance Totale
3700 W
Consommation d’énergie de la table de cuisson EChob**
172.9 Wh/kg
Foyer avant
170 x 170 mm
Détection minimum
Puissance nominale*
Puissance du booster*
Catégorie de la casserole standard**
Consommation d’énergie ECcw**
Ø 90 mm
1100 W
1400 W
B
177.3 Wh/kg
Foyer arrière
210 x 210 mm
Détection minimum
Ø 100 mm
Puissance nominale*
2300 W
Puissance du booster*
3000 W
Catégorie de la casserole standard**
C
Consommation d’énergie ECcw**
168.4 Wh/kg
* la puissance peut varier en fonction des dimensions et des matériaux des casseroles.
** calculé selon la méthode de mesure de l’aptitude à la fonction (EN 60350-2).
Bandeau de commande
Touche [ - ]
Touche
Marche/Arrêt
Touche sélection
Affichage
minuterie
Voyant sélection minuterie
Affichage
puissance
Touche [ + ]

12
UTILISATION DE L’APPAREIL
Affichage
Affichage Désignation Fonction
0 Zéro La zone de chauffe est activée.
1…9 Niveau de puissance Choix du niveau de cuisson.
U Détection de casserole Récipient manquant ou inapproprié.
E Message d’erreur Défaut de circuit électronique.
H Chaleur résiduelle La zone de cuisson est chaude.
P Booster La puissance turbo est activée.
L Verrouillage La table est sécurisée.
Ventilation
Le ventilateur de refroidissement a un fonctionnement entièrement automatique. Il se met en
route à petite vitesse dès que les calories dégagées par l’électronique dépassent un certain seuil.
La ventilation enclenche sa seconde vitesse lorsque la table de cuisson est utilisée
intensivement. Le ventilateur réduit sa vitesse et s’arrête automatiquement dès que le circuit
électronique est suffisamment refroidi.
MISE EN ROUTE ET GESTION DE L’APPAREIL
Avant la première utilisation
Nettoyez votre appareil avec un chiffon humide, puis séchez-le. N’utilisez pas de détergent qui
risquerait de provoquer une coloration bleutée sur les surfaces vitrées.
Principe de l’induction
Une bobine d’induction se trouve sous chaque foyer de cuisson. Lorsque celle-ci est enclenchée, elle
produit un champ électromagnétique variable qui, à son tour produit des courants induits dans le fond
ferro-magnétique du récipient. Il en résulte un échauffement du récipient placé sur la zone de chauffe.
Bien entendu le récipient doit être adapté :
•Sont recommandés tous les récipients métalliques ferro-magnétiques (à vérifier
éventuellement avec un petit aimant) tels que : cocotte en fonte, poêle en fer noir,
casseroles métalliques émaillées, en inox à semelle ferro-magnétique…
•Sont exclus les récipients en cuivre, inox, aluminium, verre, bois, céramique, grès, terre
cuite, inox non ferro-magnétique…
La zone de cuisson à induction prend automatiquement en compte la taille du récipient utilisé.
Avec un diamètre trop petit, le récipient ne fonctionne pas. Ce diamètre varie en fonction du
diamètre de la zone de cuisson.
Lorsque le récipient n’est pas adapté à la table de cuisson le symbole [ U ] reste affiché.
Touches sensitives
Votre appareil est équipé de touches sensitives permettant de commander les différentes
fonctions. Un effleurage de la touche active leur fonctionnement. Cette activation est validée par
un voyant, un affichage et/ou par un signal sonore.
Dans le cas d’une utilisation générale n’appuyez que sur une seule touche à la fois.

13
Mise en route
•Enclencher / arrêter la table de cuisson :
Action Bandeau de commande Afficheur
Enclencher appuyer sur [ 0/I ] [ 0 ]
Arrêter appuyer sur [ 0/I ] aucun ou [ H ]
•Enclencher / arrêter une zone de chauffe :
Action Bandeau de commande Afficheur
Sélectionner appuyer sur la touche sélection de la zone [ 0 ]
Augmenter appuyer sur [ + ] [ 1 ] jusqu’à [ 9 ]
Diminuer appuyer sur [ - ] [ 9 ] jusqu’à [ 1 ]
Arrêter appuyer sur [ - ] [ 0 ] ou [ H ]
Si aucun réglage n’est fait dans un délai de 20 secondes l’électronique revient en position d’attente.
Détection de récipient
La détection de récipient assure une sécurité parfaite. L’induction ne fonctionne pas :
•Lorsqu’il n’y a pas de récipient sur la zone de cuisson ou lorsque ce récipient est inadapté à
l’induction. Dans ce cas il est impossible d’augmenter la puissance et dans l’afficheur le
symbole [ U ] apparaît. Le [ U ] disparaît lorsqu’une casserole est posée sur le foyer de cuisson.
•Si en cours de cuisson le récipient est enlevé de la zone de cuisson, le fonctionnement est
interrompu. Dans l’afficheur le symbole [ U ] apparaît. Le [ U ] disparaît lorsque le récipient est remis
sur le foyer de cuisson. La cuisson reprend au niveau de puissance sélectionnée au préalable.
Après utilisation, éteignez la zone de chauffe. Ne laissez pas la détection de casserole [ U ] active.
Indicateur de chaleur résiduelle
Après l’arrêt des zones de cuisson ou l’arrêt complet de la table, les zones de cuissons sont
encore chaudes et sont signalées par le symbole [ H ].
Le symbole [ H ] s’éteint lorsque les zones de cuisson peuvent être touchées sans danger.
Tant que les témoins de chaleur résiduelle sont allumés, ne touchez pas les zones de cuisson et
ne posez aucun objet sensible à la chaleur. Risque de brûlure et d’incendie !

14
Fonction booster
La fonction booster [ P ] octroie un renforcement de puissance à la zone de cuisson sélectionnée.
Si cette fonction est activée, ces zones de cuisson fonctionnent pendant 5 minutes avec une
puissance nettement plus élevée.
Le booster est conçu par exemple pour faire chauffer rapidement de grandes quantités d’eau,
comme pour la cuisson des pâtes.
•Enclencher / arrêter la fonction booster :
Action Bandeau de commande Afficheur
Sélectionner appuyer sur la touche sélection de la zone [ 0 ]
Augmenter appuyer sur [ + ] [ 1 ] jusqu’à [ 9 ]
Enclencher le booster appuyer sur [ + ] [ P ] pendant 5 min
Stopper le booster appuyer sur [ - ] [ 9 ]
•Gestion de la puissance maximale :
L’ensemble de la table de cuisson est doté d’une puissance maximale. Lorsque la fonction
booster est activée, et pour ne pas excéder cette puissance maximale, la commande
électronique réduit automatiquement le niveau de cuisson d’une autre zone de chauffe.
Durant quelques secondes, l’afficheur de cette zone de cuisson en clignotant [ 9 ] puis affiche le
niveau de cuisson maximum possible :
Zone de cuisson sélectionnée Autre zone de cuisson (par ex.: cuisson de niveau 9)
[ P ] est affiché [ 9 ] passe à [ 7 ] suivant le type de foyer
Fonction minuterie
La minuterie peut être affectée simultanément aux 2 foyers de cuisson et ceci avec des réglages
de temps de minuterie différents (de 0 à 99 minutes) pour chacune des zones.
•Réglage ou modification de la durée de cuisson :
Action Bandeau de commande Afficheur
Sélectionner appuyer sur la touche sélection de la zone afficheur allumé
Augmenter appuyer sur [ + ] ou [ - ] [ 1 ]…[ 9 ] [ P ]
Sélectionner « Minuterie » appuyer simultanément sur [ - ] et [ + ] [ 00 ]
Diminuer la durée Appuyer sur [ - ] [00] passe à
30,29,28,…
Augmenter la durée Appuyer sur [ + ] le temps augmente
Apres quelques secondes le voyant de contrôle passe de « clignotement » à « fixe ».
La durée est sélectionnée et le décompte démarre.
•Arrêter la fonction minuterie cuisson :
Action Bandeau de commande Afficheur
Sélectionner appuyer sur la touche sélection de la zone le voyant de la
zone s’allume
Sélectionner « Minuterie » appuyer simultanément sur [ - ] et [ + ] temps restant
Désactiver « Minuterie » appuyer sur [ - ] passe à [ 00 ]
puis s’éteint
Lorsque plusieurs minuteries sont activées il suffit de répéter l’opération.
•Arrêt automatique en fin de cuisson :
Dès que le temps de cuisson sélectionné est écoulé la minuterie affiche en clignotant [ 00 ] et un
signal sonore retentit.
Pour stopper le son et le clignotement, il suffit d’appuyer sur une touche.

15
•Minuterie utilisée hors cuisson :
Action Bandeau de commande Afficheur
Activer la table de cuisson appuyer sur [ 0/I ] voyants de zone allumes
Sélectionner « Minuterie » appuyer simultanément [ 00 ]
sur [ - ] et [ + ]
Diminuer la durée Appuyer sur [ - ] [00] passe à 30,29,28…
Augmenter la durée Appuyer sur [ + ] le temps augmente
Après 20 secondes les afficheurs s’éteignent mais la minuterie continue.
Dès que le temps de cuisson sélectionné est écoulé la minuterie affiche en clignotant [ 00 ] et un
signal sonore retentit.
Pour stopper le son et le clignotement, il suffit d’appuyer sur une touche. La table s’éteint.
Verrouillage du bandeau de commande
Pour éviter de modifier une sélection de la table de cuisson, notamment dans le cadre du
nettoyage de la vitre, le bandeau de commande (à l’exception de la touche marche/arrêt [ 0/I ])
peut être verrouillé.
•Verrouillage :
Action Bandeau de commande Afficheur
Mise en route appuyer sur [ 0/I ] [ 0 ] ou [ H ]
Verrouiller la table appuyer simultanément [ 0 ] ou [ H ]
sur [ - ] et la touche sélection
de la zone avant
ré-appuyer sur la touche de [ L ]
sélection de la zone avant
•Déverrouillage :
Action Bandeau de commande Afficheur
Mise en route appuyer sur [ 0/I ] [ L ]
Dans les 5 secondes après la mise en route :
Déverrouiller la table appuyer simultanément [ L ]
sur [ - ] et la touche sélection
de la zone avant
ré-appuyer [ - ] les afficheurs sont éteints

16
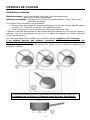
CONSEILS DE CUISSON
Qualité des casseroles
Matériaux adaptés : acier, acier émaillé, fonte, inox à fond ferromagnétique,
aluminium à fond ferromagnétique.
Matériaux non adaptés : aluminium et inox à fond non ferromagnétique, cuivre, laiton, verre,
céramique, porcelaine.
Pour vérifier si des casseroles sont compatibles :
•Placez un peu d’eau dans une casserole placée sur une zone de cuisson induction réglée
au niveau [ 9 ]. Cette eau doit chauffer en quelques secondes.
•Placez un aimant sur le fond externe de la casserole, il doit rester collé.
Certaines casseroles peuvent faire du bruit lorsqu’elles sont placées sur une zone de cuisson à
induction. Ces bruits ne traduisent en aucun cas un défaut de l’appareil et n’influent nullement
sur son fonctionnement.
Les casseroles doivent être certifiées par le fabricant comme compatible avec l’induction.
Il est toutefois possible que certaines casseroles certifiées aient en réalité des
caractéristiques non adaptées.
Nous recommandons de vérifier au moment de l’achat que les casseroles respectent les
conditions suivantes :
Si le fond de la casserole (Ød) est significativement plus petit que son corps (ØD)
le rendement en est affecté et la casserole risque de ne pas être détectée.

17
Dimension des casseroles
Les zones de cuisson s’adaptent automatiquement à la dimension du fond de la casserole
jusqu’à une certaine limite. Le fond de cette casserole doit cependant avoir un diamètre minimum
en fonction du diamètre de la zone de cuisson correspondante.
Afin d’obtenir le rendement maximum de votre table de cuisson, veuillez placer la casserole bien
au centre de la zone de cuisson.
Exemples de réglage des puissances de cuisson
(Les valeurs ci-dessous sont indicatives)
1 à 2
Faire fondre
Réchauffer
Sauces, beurre, chocolat, gélatine
Plats pré-cuisinés
2 à 3
Gonfler
Décongélation
Riz, pudding et plats cuisinés
Légumes, poisson, produits congelés
3 à 4
Vapeur
Légumes, poissons, viande
4 à 5
Eau
Pommes de terre à l’eau, soupes, pâtes
Légumes frais
6 à 7
Cuire à feu doux
Viandes, foie, œufs, saucisses
Goulasch, roulades, tripes
7 à 8
Cuire
Frire
Pommes de terre, beignets, galettes
9
Frire,
Porter à ébullition
Steaks, omelettes
Eau
P
Frire, Porter à ébullition
Porter à ébullition des quantités importantes d’eau
ENTRETIEN ET NETTOYAGE
Pour nettoyer il faut mettre l’appareil hors fonctionnement.
Laissez refroidir l’appareil, car risques de brûlures.
•Nettoyez les restes de cuisson avec de l’eau additionnée de produit vaisselle ou un
produit du commerce conseillé pour la vitrocéramique.
•N’utilisez en aucun cas d’appareils « à vapeur » ou « à pression ».
•Ne pas utiliser d’objets qui risqueraient de rayer la vitrocéramique (tel que tampon abrasifs
ou pointe de couteau…).
•N’utilisez pas de produits de nettoyage abrasifs qui pourraient endommager l’appareil.
•Séchez l’appareil avec un chiffon propre.
•Enlevez immédiatement le sucre et les mets contenant du sucre.

18
QUE FAIRE EN CAS DE PROBLEME
Le symbole [ E 4 ] s’affiche :
I) La table doit être reconfigurée suivant la procédure ci-dessous :
•Avant de commencer la procédure, il faut :
•S’assurer qu’il n’y ait pas de récipients sur la table à induction.
•Se munir d’un récipient adapté à l’induction.
•Débrancher la table du réseau électrique : enlever le fusible ou couper le disjoncteur.
•Rebrancher la table au réseau électrique : remettre le fusible ou rebrancher le disjoncteur.
•Démarrer la procédure en moins de 2 minutes après le branchement au réseau électrique.
•Ne pas appuyer sur [ O/I ].
II) Annulation de la configuration existante
1) Appuyer sur [ - ] et rester appuyé.
2) Avec un doigt de l'autre main appuyer
successivement et rapidement (en moins
de 2s) sur les touches « sélection ».
En appuyant 2 fois sur chacune des touches
et en suivant l’ordre décrit ci-dessous
(a -> a-> b-> b). Des [ - ] apparaissent.
Un double "bip" signifie une
erreur de manipulation. Dans ce cas, refaire
l'opération depuis l'étape n° 1.
3) Oter les doigts des touches et ré appuyer simultanément [ - ] et le [ + ] pendant
quelques secondes jusqu'à ce que les [ E ] clignotants apparaissent.
4) Attendre que les [ E ] deviennent fixes.
5) Les [ E ] se transforment ensuite automatiquement en [ C ]. La configuration est
annulée.
III) Comment reconfigurer la table ?
1) Prendre un récipient ferromagnétique de diamètre 16cm minimum.
2) Sélectionner la zone de cuisson en appuyant sur la touche de la zone
correspondante.
3) Poser le récipient sur la zone à configurer.
4) Attendre jusqu'à ce que [ C ] se transforme en [ - ]. La zone de cuisson est
configurée.
5) Procéder de la même manière pour toutes les zones de cuisson qui affichent [ C ].
6) Les zones de cuisson sont configurées lorsque toutes les zones auront été
détectées et que plus rien n'est affiché.
N'utilisez qu'un seul récipient pour effectuer la configuration.
Ne jamais poser plusieurs récipients sur les foyers pendant la configuration.
•si l’affichage [ E 4 ] persiste appelez le Service Après-ventes.
La table de cuisson ou les zones de cuisson ne s’enclenchent pas :
•la table est mal connectée au réseau électrique
•le fusible de protection a sauté
•vérifiez si le verrouillage n’est pas activé
•les touches sensitives sont couvertes d’eau ou de graisse
•un objet est posé sur les touches sensitives
Le symbole [ U ] s’affiche :
•il n’y a pas de casserole sur la zone de cuisson
•le récipient utilisé n’est pas compatible avec l’induction
•le diamètre du fond de casserole est trop petit par rapport à la zone de cuisson
a
b
Seite wird geladen ...
Seite wird geladen ...
Seite wird geladen ...
Seite wird geladen ...
Seite wird geladen ...
Seite wird geladen ...
Seite wird geladen ...
Seite wird geladen ...
Seite wird geladen ...
Seite wird geladen ...
Seite wird geladen ...
Seite wird geladen ...
Seite wird geladen ...
Seite wird geladen ...
Seite wird geladen ...
Seite wird geladen ...
-
 1
1
-
 2
2
-
 3
3
-
 4
4
-
 5
5
-
 6
6
-
 7
7
-
 8
8
-
 9
9
-
 10
10
-
 11
11
-
 12
12
-
 13
13
-
 14
14
-
 15
15
-
 16
16
-
 17
17
-
 18
18
-
 19
19
-
 20
20
-
 21
21
-
 22
22
-
 23
23
-
 24
24
-
 25
25
-
 26
26
-
 27
27
-
 28
28
-
 29
29
-
 30
30
-
 31
31
-
 32
32
-
 33
33
-
 34
34
-
 35
35
-
 36
36


