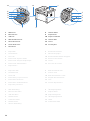
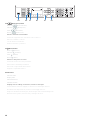
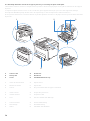
Dell E525w Color Multifunction Printer Schnellstartanleitung
- Kategorie
- Multifunktionale
- Typ
- Schnellstartanleitung

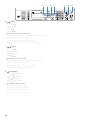
Dell™ Color Multifunction Printer | E525w
Setup Guide
Guide d'installation
Guida di configurazione
Konfigurationshandbuch
Guía de configuración

2
Thank you
for choosing Dell
Merci d'avoir choisi Dell
Grazie per aver scelto Dell
Vielen Dank, dass Sie sich für Dell entschieden haben
Gracias por elegir Dell

3
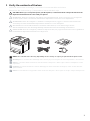
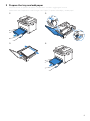
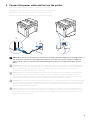
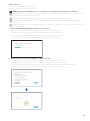
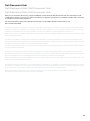
1 Verify the contents of the box
Vérifiez le contenu de l'emballage | Controllare il contenuto della confezione
Überprüfen des Lieferumfangs | Compruebe el contenido de la caja
CAUTION: Before you set up and operate your Dell printer, read and follow the safety instructions in the
Important Information that comes with your printer.
ATTENTION : Avant de configurer et d'utiliser votre imprimante Dell, lisez et respectez les consignes de
sécurité reprises dans le document Informations importantes fourni avec votre imprimante.
ATTENZIONE: Prima di configurare e utilizzare la stampante Dell, leggere e attenersi alle istruzioni di
sicurezza presenti in Informazioni importanti in dotazione con la stampante.
ACHTUNG: Bevor Sie den Dell-Drucker einrichten und bedienen, lesen und befolgen Sie die
Sicherheitshinweise in der Anleitung Wichtige Informationen im Lieferumfang des Druckers.
PRECAUCIÓN: Antes de configurar y utilizar su impresora Dell, lea y siga las instrucciones de seguridad en
la Información importante incluida con la impresora.
NOTE: The contents of the box vary depending on the country or region you purchased the printer from.
REMARQUE : Le contenu de l'emballage varie selon le pays ou la région où votre imprimante a été achetée.
NOTA: Il contenuto della confezione varia in funzione del paese o della regione dove la stampante è stata
acquistata.
HINWEIS: Der Inhalt des Kartons variiert abhängig von dem Land oder der Region, in der Sie den Drucker
gekauft haben.
NOTA: El contenido de la caja puede variar en función del país o de la región en la que compre la impresora.

4
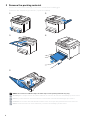
2 Remove the packing material
Retirez le matériau d'emballage | Eliminare il materiale di imballaggio
Entfernen des Verpackungsmaterials | Quite el embalaje
NOTE: The location of adhesive tapes and the shape of the packing material may vary.
REMARQUE : L'emplacement des rubans adhésifs et la forme du matériau d'emballage peuvent varier.
NOTA: Il posizionamento dei nastri adesivi e la forma del materiale di imballaggio può variare.
HINWEIS: Die Position der Klebebänder und die Form des Verpackungsmaterials können variieren.
NOTA: La ubicación de las cintas adhesivas y la forma del embalaje pueden variar.

5
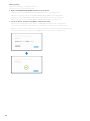
3 Prepare the tray and add paper
Préparez le bac et ajoutez du papier | Preparare il vassoio e aggiungere la carta
Vorbereiten des Papierfachs und Einlegen von Papier | Prepare la bandeja y añada papel

6
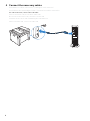
4 Connect the necessary cables
Raccordez les câbles nécessaires | Collegare i cavi necessari
Anschließen der notwendigen Kabel | Conecte los cables necesarios
For USB connection, connect the USB cable
Pour la connexion USB, raccordez le câble USB
Nel caso di connessione USB, connettere il cavo USB
Schließen Sie bei einer USB-Verbindung das USB-Kabel an
Para la conexión USB, conecte el cable USB

7
For Ethernet connection, connect the ethernet cable
Pour la connexion Ethernet, raccordez le câble Ethernet
Nel caso di connessione ethernet, connettere il cavo ethernet
Schließen Sie bei einer Ethernet-Verbindung das Ethernet-Kabel an
Para la conexión Ethernet, conecte el cable Ethernet

8
For Fax connection, connect the telephone cable
Pour la connexion du fax, raccordez le câble téléphonique
Nel caso di connessione Fax, connettere il cavo del telefono
Schließen Sie bei einer Faxverbindung das Telefonkabel an
Para la conexión de fax, conecte el cable de teléfono
NOTE: If the phone communication is serial in your country (such as Germany, Sweden, Denmark, Austria,
Belgium, Italy, France and Switzerland), and you are supplied with a yellow terminator, insert the yellow
terminator into the phone connector.
REMARQUE : Si la communication téléphonique est de type série dans votre pays (c'est le cas en Allemagne,
en Suède, au Danemark, en Autriche, en Belgique, en Italie, en France et en Suisse) et que vous disposez
d'une terminaison jaune, insérez la terminaison jaune dans le connecteur de ligne téléphonique.
NOTA: Se nel paese di utilizzo è presente una comunicazione seriale (ad esempio Germania, Svezia,
Danimarca, Austria, Belgio, Italia, Francia e Svizzera), e si dispone di un terminatore giallo, inserire il
terminatore giallo nel connettore telefonico.
HINWEIS: Falls in Ihrem Land die serielle Telefonkommunikation verwendet wird (z. B. in Deutschland,
Schweden, Dänemark, Österreich, Belgien, Italien, Frankreich und in der Schweiz) und Ihnen ein "gelber"
Abschlusswiderstand geliefert wurde, stecken Sie diesen in den Telefonanschluss ein.
NOTA: Si la comunicación telefónica es de tipo en serie en su país (como Alemania, Suecia, Dinamarca,
Austria, Bélgica, Italia, Francia y Suiza), y posee un terminador amarillo, inserte el terminador amarillo en el
conector del teléfono.

9
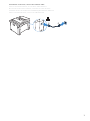
5 Connect the power cable and turn on the printer
Branchez le câble d'alimentation et allumez l'imprimante
Connettere il cavo di alimentazione e accendere la stampante
Anschließen des Netzkabels und Einschalten des Druckers
Conecte el cable de alimentación y encienda la impresora
NOTE: When you turn on the printer for the first time, the initial setup wizard appears on the display panel. If
you do not proceed with the setup within three minutes, the status of the printer changes to
Ready to
Copy
. You can choose to run the initial setup wizard again at a later time if required using the operator
panel.
REMARQUE : Lorsque vous allumez l'imprimante pour la première fois, l'assistant de configuration initiale
apparaît à l'écran. Si vous ne procédez pas à la configuration dans les trois minutes, l'état de l'imprimante
devient
Prêt à copier
. Vous pouvez, si vous le souhaitez, réexécuter ultérieurement l'assistant de
configuration à l'aide du panneau de commande.
NOTA: Quando si accende la stampante per la prima volta, sul display sarà visualizzata la configurazione
guidata iniziale. Se non si procede con l'installazione entro tre minuti, lo stato della stampante passa a
Pronto per la copia
. È possibile scegliere di eseguire la procedura guidata di configurazione iniziale di
nuovo in un secondo momento, se necessario durante l'utilizzo del pannello operatore.
HINWEIS: Wenn Sie den Drucker zum ersten Mal einschalten, erscheint der Assistent für die Ersteinrichtung
im Display. Wenn Sie nicht innerhalb von drei Minuten mit der Einrichtung fortfahren, wechselt der Status
des Druckers zu
Kopierbereit
. Sie können den Assistenten für die Ersteinrichtung später bei Bedarf erneut
über die Bedienerkonsole ausführen.
NOTA: Cuando encienda la impresora por primera vez, aparecerá el asistente para la configuración en el
panel. Si transcurren tres minutos sin continuar con el asistente, el estado de la impresora cambia a
Lista
para copiar
. Puede seleccionar ejecutar el asistente de configuración inicial más tarde si fuera necesario
mediante el panel del operador.

10
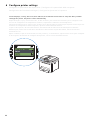
6 Configure printer settings
Configurez les paramètres de l'imprimante | Configurare le impostazioni della stampante
Konfigurieren der Druckereinstellungen | Configure los ajustes de la impresora
Set the language, country, time zone, date and time, then follow the instructions to setup fax. After you finish
setting up the printer, the printer restarts automatically.
Réglez la langue, le pays, le fuseau horaire, la date et l'heure, puis suivez les instructions pour configurer le fax.
Une fois la configuration de l'imprimante terminée, l'imprimante redémarre automatiquement.
Impostare la lingua, il paese, il fuso orario, la data e l'ora, quindi seguire le istruzioni per impostare il fax. Dopo aver
terminato la configurazione della stampante, questa si riavvia automaticamente.
Legen Sie die Sprache, das Land, die Zeitzone, das Datum und die Uhrzeit fest und befolgen Sie dann die
Anweisungen, um das Fax einzurichten. Nachdem Sie den Drucker eingerichtet haben, startet der Drucker
automatisch neu.
Ajuste el idioma, el país, la zona horaria, la fecha y la hora y, a continuación, siga las instrucciones para configurar
el fax. Después de terminar de configurar la impresora, esta se reinicia automáticamente.

11
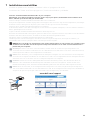
7 Install drivers and utilities
Installez les pilotes et les utilitaires | Installare i driver e i programmi di utilità
Installieren der Treiber und Dienstprogramme | Instale controladores y utilidades
Insert the
Software and Documentation
disc in your computer.
Alternatively, go to dell.com/support, enter the Service Tag of your printer, download the latest software and
driver, and then open the file that you downloaded.
Insérez le disque
Software and Documentation
dans votre ordinateur.
Vous pouvez également consulter la page dell.com/support, saisir le Service Tag de votre imprimante, télécharger
la dernière version du logiciel et du pilote, puis ouvrir le fichier que vous avez téléchargé.
Inserire il disco
Software and Documentation
nel computer.
In alternativa, visitare il sito dell.com/support, inserire il Service Tag della stampante, scaricare l'ultimo software e
driver, quindi aprire il file scaricato.
Legen Sie die CD
Software and Documentation
in den Computer ein.
Besuchen Sie alternativ dell.com/support, geben Sie das Service-Tag Ihres Druckers ein, laden Sie sich die aktuelle
Software und den Treiber herunter, und öffnen Sie dann die heruntergeladene Datei.
Introduzca el disco
Software and Documentation
en el ordenador.
También puede ir a dell.com/support, introducir la Service Tag de la impresora, descargar el software y el
controlador más recientes y después abrir el archivo que ha descargado.
NOTE: Before you begin, for wired printer setup ensure that the printer is connected to your computer using
an Ethernet or USB cable. For wireless printer setup ensure that there is no cable connected between the
printer and your computer.
REMARQUE : Dans le cas d'une connexion filaire, vérifiez avant de commencer que l'imprimante est
correctement raccordée à l'ordinateur avec un câble Ethernet ou USB. Dans le cas d'une connexion sans fil,
vérifiez qu'aucun câble ne relie l'imprimante à l'ordinateur.
NOTA: Prima di iniziare, per la configurazione di stampanti collegate con cavo assicurarsi che la stampante
sia connessa al computer mediante un cavo Ethernet o USB. Per la configurazione di una stampante wireless
assicurarsi che non ci sia alcun cavo che collega la stampante e il computer.
HINWEIS: Stellen Sie bei einer kabelgebundenen Druckereinrichtung sicher, dass der Drucker über ein
Ethernet- oder USB-Kabel mit dem Computer verbunden ist, bevor Sie beginnen. Stellen Sie bei einer
Drahtlosverbindung sicher, dass keine Kabelverbindung zwischen dem Drucker und Computer besteht.
NOTA: Antes de comenzar, en la configuración de la impresora con cable, asegúrese de que la impresora
esté conectada al ordenador con un cable Ethernet o USB. En la configuración de la impresora inalámbrica,
asegúrese de que no hay ningún cable conectado entre la impresora y el ordenador.
www.dell.com/support

12
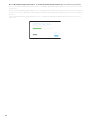
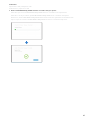
On the Dell Printer Easy Install window, click Next. Dell Printer Easy Install begins to search for your printer.
Sur la fenêtre Dell Printer Easy Install, cliquez sur Suivant. Dell Printer Easy Install lance la recherche de cette
imprimante.
Nella finestra Dell Printer Easy Install fare clic su Avanti. Dell Printer Easy Install avvia la ricerca della stampante.
Klicken Sie im Fenster Dell Printer Easy Install auf Weiter. Dell Printer Easy Install beginnt die Suche nach dem
Drucker.
En la ventana Dell Printer Easy Install, haga clic en Siguiente. Dell Printer Easy Install empieza a buscar esta
impresora.

13
Wireless Printer
Imprimante sans fil | Stampante wireless
Drahtlos-Drucker | Impresora inalámbrica
NOTE: Supported on 802.11b/g/n over 2.4 GHz but not compatible with 802.11n/ac over 5.0 GHz.
REMARQUE : Prise en charge sur les réseaux 802.11b/g/n via la bande 2,4 GHz, mais non compatible avec les
réseaux 802.11n/ac via la bande 5,0 GHz.
NOTA: Supportato 802.11b/g/n su 2,4 GHz ma non compatibile con 802.11n/ac su 5,0 GHz.
HINWEIS: Wird bei 802.11b/g/n über 2,4 GHz unterstützt, ist aber nicht kompatibel mit 802.11n/ac über
5,0 GHz.
NOTA: Compatible con el estándar 802.11b/g/n en la banda 2,4 GHz pero no compatible con 802.11n/ac en
la banda 5,0 GHz.
1 Wait for
Dell Printer Easy Install
wizard to find your printer.
Attendez que l'assistant Dell Printer Easy Install détecte votre imprimante.
Attendere che la procedura guidata Dell Printer Easy Install trovi la stampante.
Warten Sie, bis der Dell Printer Easy Install-Assistent den Drucker gefunden hat.
Espere a que el asistente de Dell Printer Easy Install encuentre la impresora.
2 When the printer is found, click
Install
to complete the setup.
Si l'imprimante a été trouvée, cliquez sur Installer pour terminer la configuration.
Se la stampante viene trovata fare clic su Installa per completare la configurazione.
Wenn der Drucker gefunden wurde, klicken Sie auf Installieren, um die Einrichtung abzuschließen.
Si se encuentra la impresora, haga clic en Instalar para completar la configuración.

14
Ethernet Printer
Imprimante Ethernet | Stampante Ethernet
Ethernet-Drucker | Impresora Ethernet
1 Wait for
Dell Printer Easy Install
wizard to find your printer.
Attendez que l'assistant Dell Printer Easy Install détecte votre imprimante.
Attendere che la procedura guidata Dell Printer Easy Install trovi la stampante.
Warten Sie, bis der Dell Printer Easy Install-Assistent den Drucker gefunden hat.
Espere a que el asistente de Dell Printer Easy Install encuentre la impresora.
2 Select the printer, and then click
Next
to complete the setup.
Sélectionnez l'imprimante, puis cliquez sur Suivant pour terminer la configuration.
Selezionare la stampante, quindi fare clic su Avanti per completare la configurazione.
Wählen Sie den Drucker und klicken Sie dann auf Weiter, um die Einrichtung abzuschließen.
Seleccione la impresora y haga clic en Siguiente para completar la configuración.

15
USB Printer
Imprimante USB | Stampante USB
USB-Drucker | Impresora USB
1 Wait for
Dell Printer Easy Install
wizard to find and install your printer.
Attendez que l'assistant Dell Printer Easy Install détecte et installe votre imprimante.
Attendere che la procedura guidata Dell Printer Easy Install trovi e installi la stampante.
Warten Sie, bis der Dell Printer Easy Install-Assistent den Drucker gefunden und installiert hat.
Espere a que el asistente de Dell Printer Easy Install encuentre e instale la impresora.

16
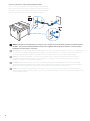
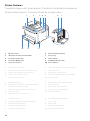
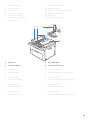
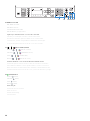
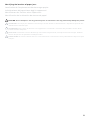
Printer Features
Caractéristiques de l'imprimante | Caratteristiche della stampante
Druckerfunktionen | Características de la impresora
1 Operator Panel 6 Print Head Cleaning Rod
2 Automatic Document Feeder (ADF) 7 Service Tag
3 Document Feeder Tray 8 Power Switch
4 Document Output Tray 9 Standard 150-Sheet Tray
5 Toner Access Cover 10 Front USB Port
1 Panneau de commande 6 Tête d'impression de la tige de nettoyage
2 Chargeur de document automatique (ADF) 7 Numéro de série
3 Plateau d'alimentation en documents 8 Interrupteur d'alimentation
4 Bac de sortie des documents 9 Bac pour 150 feuilles de papier standard
5 Capot d'accès au toner 10 Port USB avant
1 Pannello operatore 6 Asta di pulizia della testina di stampa
2 Alimentatore automatico di documenti (ADF,
Automatic Document Feeder)
7 Codice Servizio
8 Interruttore di alimentazione
3 Vassoio di alimentazione dei documenti 9 Vassoio standard da 150 fogli
4 Vassoio di uscita 10 Porta USB anteriore
5 Coperchio di accesso al toner
1 Bedienerkonsole 6 Druckkopfreinigungsstäbchen
2 Automatischer Dokumenteneinzug (ADF) 7 Service-Tag
3 Dokumenteneinzugsfach 8 Netzschalter
4 Dokumentenausgabefach 9 150-Blatt-Standardfach
5 Tonerbereichsabdeckung 10 Vorderer USB-Anschluss
1
89
6 75234
10

17
1 Panel del operador 6 Varilla de limpieza del cabezal de impresión
2 Alimentador automático de documentos (ADF) 7 Etiqueta de Servicio
3 Bandeja del alimentador de documentos 8 Interruptor principal
4 Bandeja de salida de los documentos 9 Bandeja estándar de 150 hojas
5 Cubierta de acceso al tóner 10 Puerto USB frontal

18
1 ADF Cover 8 Transfer Roller
2 Ethernet Port 9 Paper Chute
3 USB Port 10 Paper Feed Roller
4 Wall Jack Connector 11 Transfer Belt
5 Phone Connector 12 Levers
6 Power Connector 13 Security Slot
7 Rear Cover
1 Capot ADF 8 Rouleau de transfert
2 Port Ethernet 9 Glissière de papier
3 Port USB 10 Rouleau d'alimentation du papier
4 Connecteur de prise murale 11 Courroie de transfert
5 Connecteur de ligne téléphonique 12 Leviers
6 Connecteur d'alimentation 13 Encoche de sécurité
7 Capot arrière
1 Coperchio ADF 8 Rullo di trasferimento
2 Porta Ethernet 9 Scarico carta
3 Porta USB 10 Rullo alimentazione carta
4 Connettore per presa a muro 11 Cinghia di trasferimento
5 Connettore telefonico 12 Leve
6 Connettore di alimentazione 13 Fessura di protezione
7 Coperchio posteriore
1 ADF-Abdeckung 8 Übertragungswalze
2 Ethernet-Anschluss 9 Papierschütte
3 USB-Anschluss 10 Papiereinzugsrolle
4 Netzanschluss 11 Übertragungsriemen
5 Telefonanschluss 12 Hebel
6 Netzanschluss 13 Sicherheitsschlitz
7 Hintere Abdeckung
7
8
9
10
11
12 1
2
3
6
4
5
13

19
1 Cubierta del ADF 8 Rodillo de transferencia
2 Puerto Ethernet 9 Entrada de papel
3 Puerto USB 10 Rodillo de alimentación del papel
4 Conector de la pared 11 Cinta de transferencia
5 Conector del teléfono 12 Palancas
6 Conector de alimentación 13 Ranura de seguridad
7 Cubierta trasera
1 ADF Cover 3 Document Glass
2 Document Guides 4 Document Feeder Tray
1 Capot ADF 3 Vitre d'exposition
2 Guides du papier 4 Plateau d'alimentation en documents
1 Coperchio ADF 3 Vetro documenti
2 Guide dei documenti 4 Vassoio di alimentazione dei documenti
1 ADF-Abdeckung 3 Dokumentenglas
2 Dokumentführungen 4 Dokumenteneinzugsfach
1 Cubierta del ADF 3 Cristal del escáner
2 Guías de documentos 4 Bandeja del alimentador de documentos
1 23
4

20
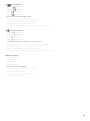
Operator Panel
Panneau de commande | Pannello operatore
Bedienerkonsole | Panel del operador
1One Touch Dial button
Bouton rotatif à touche unique
Pulsante di selezione diretta
One-Touch-Wähltaste
Botón de marcado con una pulsación
Calls up the stored fax number registered in the Phone Book. The first four fax numbers in the Phone Book are assigned to
the buttons in row order, starting from the top corner.
Permet de rappeler les numéros de fax enregistrés dans le Répertoire. Les quatre premiers numéros de fax enregistrés dans
le répertoire sont attribués aux boutons alignés, à partir du coin supérieur gauche.
Chiama il numero fax memorizzato registrato nella rubrica. I primi quattro numeri fax nella rubrica vengono assegnati ai
pulsanti iniziando, nell'ordine, dall'angolo in alto a sinistra.
Ruft die im Telefonbuch gespeicherten Faxnummern auf. Ausgehend von der oberen Ecke sind die ersten vier
Faxnummern im Telefonbuch der Reihe nach den Tasten zugeordnet.
Recupera el número de fax almacenado registrado en la libreta de teléfonos. Los cuatro primeros números de fax de la
libreta de teléfonos se asignan a los botones por orden de fila, empezando por la esquina superior.
2 (
Copy
) button
Bouton (
Copy
)
Pulsante (
Copy
)
Taste (
Copy
)
Botón (
Copy
)
Displays the Copy menu.
Affiche le menu Copie.
Visualizza il menu Copia.
Zeigt das Kopieren-Menü an.
Muestra el menú Copia.
3 (Fax) button
Bouton (Fax)
Pulsante (Fax)
Taste (Fax)
Botón (Fax)
Displays the Fax menu.
Affiche le menu Fax.
Visualizza il menu Fax.
Zeigt das Fax-Menü an.
Muestra el menú Fax.
12 3 45
Seite wird geladen ...
Seite wird geladen ...
Seite wird geladen ...
Seite wird geladen ...
Seite wird geladen ...
Seite wird geladen ...
Seite wird geladen ...
Seite wird geladen ...
Seite wird geladen ...
Seite wird geladen ...
Seite wird geladen ...
Seite wird geladen ...
Seite wird geladen ...
Seite wird geladen ...
Seite wird geladen ...
Seite wird geladen ...
Seite wird geladen ...
Seite wird geladen ...
Seite wird geladen ...
Seite wird geladen ...
-
 1
1
-
 2
2
-
 3
3
-
 4
4
-
 5
5
-
 6
6
-
 7
7
-
 8
8
-
 9
9
-
 10
10
-
 11
11
-
 12
12
-
 13
13
-
 14
14
-
 15
15
-
 16
16
-
 17
17
-
 18
18
-
 19
19
-
 20
20
-
 21
21
-
 22
22
-
 23
23
-
 24
24
-
 25
25
-
 26
26
-
 27
27
-
 28
28
-
 29
29
-
 30
30
-
 31
31
-
 32
32
-
 33
33
-
 34
34
-
 35
35
-
 36
36
-
 37
37
-
 38
38
-
 39
39
-
 40
40


Dell E525w Color Multifunction Printer Schnellstartanleitung
- Kategorie
- Multifunktionale
- Typ
- Schnellstartanleitung
