
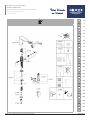
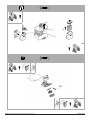
Mizu Silk Shower Mixer
Plumbing Socket Set
Wrench
Tools Required
Page 01
Tools Required
Main Body x1 Cover Plate x1 Handle x1
A B C D E F
Screw x2 Anchor x2 Allen Key x1
F
Allen Key x1
Main Body x1 Cover Plate x1 Handle x1 Screw x2 Anchor x2 Allen Key x1
A B C D E F
Wrench Plumbing Socket Set
TBA
Number Part
MIZU SILK SHOWER MIXER - 9510746
Quantity Chrome Matte
Black
Brushed
Nickel
Brushed
Gun
Metal
1-3
4
5
6-8
9
Mixer Handle Set Complete 2265003
2265020
2265024
2265016
2265002
2265019
2265023
2265015
2265001
2265018
2265022
2265014
2265000
2265017
2265021
2265013
1
Concealed Wall Mixer Cap
Concealed Wall Mixer Cartridge Sleeve
Concealed Shower Mixer Plate Set
Allen Key 2.5mm
1
1
1
1
x
x
x
x
x
x
xxx
x
x
x
x
x
x
x
x
x
x
x
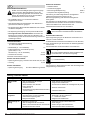
• Product must be installed in accordance with AS/NZS 3500 series of standards
• The hot water temperature must be controlled by a Watermark certified
tempering valve, or other suitable certified thermostatic mixing valve
WITH VALVE INSTALLED
• In closed position, increase water pressure to maximum 1600 kPa (Or 1500 kPa in accordance with
AS/NZS 3500)
• Test for a minimum of 30 minutes, and a maximum of 60 minutes.
• Inspect product for any leaks or deformations (If cartridge leaks, replace full cartridge immediately and re-
test for leaks)
• Reduce pressure down to 500 kPa
WITH VALVE BYPASSED OR REMOVED
• Follow standard process as outlines in accordance with AS/NZS 3500 series of standards
Technical Information
www.grohe.com
Static Pressure Testing Instruction
The hot water temperature must be controlled by a Watermark certified tempering valve, or other
suitable certified thermostatic mixing valve.
Product must be installed in accordance with AS/NZS 3500 series of standards.
IMPORTANT NOTE – IF STATIC PRESSURE TESTING THE OUTLET PIPE TO THE SHOWER HEAD IS
REQUIRED, MIXER MUST BE ISOLATED (in closed position) AND BYPASSED FOR THE DURATION
OF THE TEST – failure to do so will void warranty.
• . Maximum hot water temperature – 70c (Nominal Temperature 60c)
• Maximum pressure – 500 kPa (Install pressure limiting valve to ensure max. 500 kPa).
• Minimum Pressure – 50 kPa.
• In closed position, increase water pressure to maximum 1600 kPa (Or 1500 kPa in accordance
with AS/NZS 3500).
• Test for a minimum of 30 minutes, and a maximum of 60 minutes.
• Inspect product for any leaks or deformations (If cartridge leaks, replace full cartridge immediately and
re-test for leaks).
• Reduce pressure down to 500 kPa.
• Follow standard process as outlined in accordance with AS/NZS 3500 series of standards.
WITH VALVE BYPASSED OR REMOVED
WITH VALVE INSTALLED
Bau Cosmopolitan E Sensor Hob Tap Chrome (6 Star)
99.1097.231/ÄM 251298/07.21
DESIGN + ENGINEERING
GROHE GERMANY
DESIGN + ENGINEERING
GROHE GERMANY
www.grohe.com
D
......6
GB
......7
F
......8
E
......9
I
....10
NL
....11
S
....12
DK
....13
N
....14
FIN
....15
PL
....16
UAE
....17
GR
....18
CZ
....19
H
....20
P
....21
TR
....22
SK
....23
SLO
....24
HR
....25
BG
....26
EST
....27
LV
....28
LT
....29
RO
....30
CN
....31
RUS
....32
AUS
....34
99.1097.231/ÄM 251298/07.21
Bau Cosmopolitan E Sensor Hob Tap Chrome (6 Star)
Bau Cosmopolitan E Sensor Hob Tap Chrome (6 Star)
99.1097.231/ÄM 251298/07.21
Grohe - Bau Cosmopolitan E Sensor Hob Tap Chrome (6 Star) of 09

Grohe - Bau Cosmopolitan E Sensor Hob Tap Chrome (6 Star) of 09
I
2b
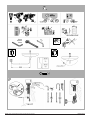
99.0438.XXX
2mm
2,5mm
3mm
T10
13mm
*19 017
1
2b
Page 02

Grohe - Bau Cosmopolitan E Sensor Hob Tap Chrome (6 Star) of 09
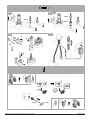
10
11
19mm
2. 3.
Ø6
1. 1. 2.
1.
3a
5.
4.
3b
2a
19mm
22mm
2b
2mm
2,5mm
2b
Page 03

Grohe - Bau Cosmopolitan E Sensor Hob Tap Chrome (6 Star) of 09
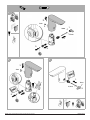
2.
3mm
2mm
2,5mm
1.
3.
6.
5.
4.
2b
1
2
3.
3mm
4.
1.
2.
3
1.
2.
2,5mm
2mm
Page 04

Grohe - Bau Cosmopolitan E Sensor Hob Tap Chrome (6 Star) of 09
2b
T10
4.
3.
1.
2.
Page 05

Grohe - Bau Cosmopolitan E Sensor Hob Tap Chrome (6 Star) of 09
D
Sicherheitsinformationen
Gefahr durch beschädigte Spannungsversorgungs-
kabel vermeiden. Bei Beschädigung muss das
Spannungsversorgungskabel vom Hersteller oder
dessen Kundendienst oder einer gleichermaßen
qualifizierten Person ersetzt werden.
• Die Installation darf nur in frostsicheren Räumen
vorgenommen werden.
• Das Steckernetzteil ist ausschließlich zum Gebrauch in
geschlossenen Räumen geeignet.
• Bei der Reinigung Steckverbinder nicht direkt oder indirekt
mit Wasser abspritzen.
• Die Spannungsversorgung muss separat schaltbar sein.
•Nur Originalersatz- und Zubehörteile verwenden. Die
Benutzung von anderen Teilen führt zum Erlöschen der
Gewährleistung sowie der CE-Kennzeichnung und kann zu
Verletzungen führen.
Technische Daten
• Automatische Sicherheitsabschaltung: 60 s
(6 - 420 s einstellbar)
• Nachlaufzeit (0 - 19 s einstellbar): 1 s
• Erfassungsbereich mit Kodak Gray Card,
graue Seite, 8 x 10”,
Querformat (7 - 20 cm einstellbar): 12 cm
• Schutzart der Armatur: IP 59K
Thermische Desinfektion möglich.
Armatur mit Steckernetzteil:
• Spannungsversorgung: 100-240 V AC 50-60 Hz/6,75 V DC
• Leistung: 2,4 W
Armatur mit Batterie:
• Spannungsversorgung: 6V-Lithium Batterie Typ CR-P2
Elektrische Prüfdaten
• Software-Klasse A
• Verschmutzungsgrad 2
• Bemessungs-Stoßspannung 2500 V
• Temperatur der Kugeldruckprüfung 100 °C
Die Prüfung zur elektromagnetischen Verträglichkeit
(Störaussendungsprüfung) wurde mit der
Bemessungsspannung und dem Bemessungsstrom
durchgeführt.
Zur Einhaltung der Geräuschwerte nach DIN 4109 ist bei
Ruhedrücken über 0,5 MPa ein Druckminderer einzubauen.
Höhere Druckdifferenzen zwischen Kalt- und
Warmwasseranschluss sind zu vermeiden!
Bedienung und Einstellungen,
siehe technische Produktinformation 99.0438.xxx.
Einstellmodus aktivieren
Spannungsversorgung an der Elektronik unterbrechen und
nach 10 s wieder herstellen.
Im Einstellmodus leuchtet die Kontrollleuchte in der Sensorik,
wenn bei Annäherung an die Armatur der Erfassungsbereich
erreicht wird.
Der Einstellmodus endet automatisch nach 3 Minuten.
Wartung
Eine fast entladene Batterie wird durch Blinken der
Kontrollleuchte in der Sensorik angezeigt.
Ersatzteile,
(* = Sonderzubehör)
Pflege
Die Hinweise zur Pflege dieser Armatur sind der beiliegenden
Pflegeanleitung zu entnehmen.
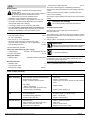
Störung / Ursache / Abhilfe
Störung Ursache Abhilfe
Wasser fließt
nicht
• Sieb vor Magnetventil verstopft
• Magnetventil defekt
• Steckverbinder ohne Kontakt
• Keine Spannung
- Batterie leer
(Kontrollleuchte signalisiert Dauerleuchten)
- Netzteil defekt
- Sieb reinigen oder austauschen
- Magnetventil austauschen
- Steckverbinder Elektronik und Magnetventil prüfen
- Batterie austauschen
- Netzteil austauschen
Wasser fließt
ungewollt
• Erfassungsbereich der Sensorik für örtliche
Gegebenheiten zu groß eingestellt
• Automatische Spülung aktiv
• Magnetventil defekt
- Reichweite mit Fernbedienung (Sonderzubehör,
Bestell-Nr.: 36 407) reduzieren
- 1 - 10 Minuten warten
- Magnetventil austauschen
Wassermenge zu
gering
• Mousseur verschmutzt
• Sieb vor Magnetventil verschmutzt
• Siebe in Anschlussschläuchen verschmutzt
• Rückflussverhinderer defekt
- Mousseur reinigen oder austauschen
- Sieb reinigen
- Siebe reinigen oder austauschen
- Rückflussverhinderer austauschen
Page 06

Grohe - Bau Cosmopolitan E Sensor Hob Tap Chrome (6 Star) of 09
Неисправность/Причина/Устранение
Неисправность Причина Устранение
Вода не течет •Фильтр перед электромагнитным
клапаном засорен
•Электромагнитный клапан неисправен
•Отсутствует контакт в штекерном
разъеме
•Напряжение отсутствует
- Батарея разрядилась
(контрольная лампа светится
непрерывно)
- Блок питания неисправен
-Очистить фильтр
-Заменить электромагнитный клапан
-Проверить аппаратный промежуточный
штепсель
-Заменить батарею
-Заменить блок питания
Вода течет не
по желанию
•Диапазон действия сенсорного
оборудования для местных условий
установлен на слишком большое
значение
•Активирована автоматическая
промывка
•Электромагнитный клапан неисправен
-Уменьшить диапазон восприятия с
дистанционным управлением (специальные
принадлежности, артикул №: 36 407) /
приложением
-Подождать в течение 1 - 10 минут
-Заменить электромагнитный клапан
Количество воды
слишком мало
•Аэратор засорен
•Фильтр перед электромагнитным
клапаном загрязнен
•См. раздел «Соединительные шланги
загрязнены»
•Обратный клапан имеет дефект
-Очистить или заменить аэратор
-Очистить фильтр
-Очистка или замена фильтра
-Заменить обратный клапан
Page 07

Grohe - Bau Cosmopolitan E Sensor Hob Tap Chrome (6 Star) of 09
AUS
Safety notes
Prevent danger resulting from damaged voltage
supply cables.
If damaged, the voltage supply cable must be replaced
by the manufacturer or his customer service
department or an equally qualified person.
• Installation is only possible in frost-free rooms.
• The plug-in voltage supply is only suitable for indoor use.
• The plug-in connectors must not be directly or indirectly
sprayed with water when cleaning.
• The voltage supply must be separately switchable.
• Use only genuine replacement parts and accessories.
The use of other parts will result in voiding of the warranty
and the CE identification, and could lead to injuries.
Technical data
• Automatic safety shut-off: 60 s
(6 - 420 s adjustable)
• Run-on time (0 - 19 s adjustable): 1 s
• Reception range according to Kodak Gray Card,
grey side, 8x10", landscape (7 - 20 cm adjustable): 12 cm
• Type of fitting protection: IP 59K
Thermal disinfection possible.
Fitting with switched-mode power supply:
• Voltage supply: 100-240 V AC 50-60 Hz/6.75 V DC
• Power consumption: 2.4 W
Fitting with battery:
• Voltage supply: 6V lithium battery type CR-P2
Electrical test data
• Software class A
• Contamination class 2
• Rated surge voltage 2500 V
• Temperature of ball impact test 100 °C
The test for electromagnetic compatibility (interference
emission test) was performed at the rated voltage and rated
current.
If static pressures exceed 0.5 MPa, a pressure-reducing
valve must be installed.
Avoid major pressure differences between hot and cold water
supply!
Operation and settings,
see technical product information 99.0438.xxx
Activating setting mode
Disconnect the power supply to the electronics and
reconnect after 10 s.
The indicator lamp in the sensor system illuminates in setting
mode when the detection zone of the fitting is reached by an
approaching user.
Setting mode is automatically terminated after 3 minutes.
Maintenance
Batteries which are almost discharged are displayed
by a flashing indicator lamp in the sensor system.
Replacement parts
(* = special accessories)
Care
For directions on the care of this fitting, please refer to the
accompanying Care Instructions.
This product must be installed in conformance with local
codes e.g. AS/NZS 3500 series of standard!
Fault / Cause / Remedy
Fault Cause Remedy
Water not flowing • Filter upstream of solenoid valve blocked
• Solenoid valve defective
• Plug-in connector without contact
• No voltage
- Battery discharged
(indicator lamp lights up continuously)
- Power supply unit defective
- Clean filter
- Replace solenoid valve
- Check plug-in connector electronics and solenoid
valve
- Replace battery
- Replace power supply unit
Undesired water
flow
• Sensor system detection zone set too high
for local conditions
• Automatic flushing activated
• Solenoid valve defective
- Reduce range using remote control (special
accessory, prod. no.: 36 407) / app
- Wait 1 - 10 minutes
- Replace solenoid valve
Flow rate too low • Mousseur dirty
• Filter upstream of solenoid valve dirty
• Filters in connection hose dirty
• Non-return valve defective
- Clean or replace mousseur
- Clean filter
- Clean or replace filters
- Replace the non-return valve
Page 08

Grohe - Bau Cosmopolitan E Sensor Hob Tap Chrome (6 Star) of 09
2020/06/09
www.grohe.com
D
&+49 571 39 89 333
A
&+43 1 6 80 60
AUS
&1800 080 055
customer[email protected]
B
&+32 (0)2 899 3077
https://www.grohe.be/nl_be/
onze-service/contact.html
BG
&+359 2 971 99 59
BR
&0800 770 1222
CAU
&+99 412 497 09 74
CDN
&+1 888 6447643
CH
&+41 44 877 73 00
CN
&+86 4008811698
info.cn@grohe.com
CZ
&+420 277 004 193
DK
&+45 44 65 68 00
E
&+34 93 / 3 36 88 50
EST LT
LV
&+372 661 6354
F
&+33 1 49 97 29 00
FIN
&+358 (09)42451390
GB
&+44 208 283 2840
GR
&+302102712908
service-gr@grohe.com
H
&+36 (06)1 238-8045
info-hu@grohe.com
HK
&+852 2969 7067
I
&+39 2 959401
info-it@grohe.com
IND
&18001024475
customercare.in@grohe.com
IS
&+354 515 400
J
&+81-3-5775-7500
info_grohe@blisspajapan.jp
KZ
&+7 775 007 05 27
service-kz@grohe.com
MAL
&1800 80 6570
customerservice.m[email protected]
MX
&01 800 839 1200
N
&+47 22 07 20 70
NL
&+31(0) 88-0030700
https://www.grohe.nl/nl_nl/
onze-service/contact.html
NZ
&+64 09 573 0490
P
&+351 234529620
comercial-pt@grohe.com
PL
&+48 (22) 5432640
RI
& 0800-1-047-643
customercare-
RO
&+40 021 212 50 50
ROK
&+82 2 1588 5903
RP
&+63 2 89288000
RUS
&8 800 200 00 49
S
&+46 771 14 13 14
SGP RC
&+65 6311 3611
grohe@connectcentre.sg
SK
&+421 948 119 343
T
&+6629014455
TR AZ
TM TJ
&+90 216 441 23 70
service.turkey@grohe.com
UA
&+380 (44) 5375273
USA
&+1 800 4447643
Grohetechcare@lixil.com
VN
&(+84) 1800 6624
BiH
AL HR KS
ME MK SLO SRB
&+385 1 2911470
CY MT
IL
&+357 22465200
service.cyprus@grohe.com
KWT
UAE BHR
OM PK
&+971 4 421 4556
service.UAE@grohe.com
KSA LBN
JOR
IRQ QAT
&+961 76868616
service.lebanon@grohe.com
SUD
EGY LBY
&+202 26147988
service.egypt@grohe.com
DZ
MA TN NGR
GH
BJ CI SN
&+202 26147988
service.morocco@grohe.com
Far East Area Sales Office:
&+65 6311 3600
Latin America:
&+52 818 3050626
Published 04/09/2023
Plumbers, please ensure a copy of the installation
instruction is left with the end user for future reference.
Page 09
-
 1
1
-
 2
2
-
 3
3
-
 4
4
-
 5
5
-
 6
6
-
 7
7
-
 8
8
-
 9
9


Verwandte Artikel
-
GROHE EUROPLUS E 34197 Schnellstartanleitung
-
-
-
-
-
-
-
-
-
