Samsung PS50C490B3W Benutzerhandbuch

Kategorie
LCD-Fernseher
Typ
Benutzerhandbuch

Dieses Handbuch ist auch geeignet für

© 2010 Samsung Electronics Co., Ltd. All rights reserved.
BN68-03141A-00
Plasma TV
user manual
imagine the possibilities
Thank you for purchasing this Samsung product.
To receive more complete service, please register
your product at
www.samsung.com/register
Model _____________ Serial No. _____________
Plasma TV user manual
Contact SAMSUNG WORLDWIDE
If you have any questions or comments relating to Samsung products, please contact the SAMSUNG customer care centre.
Country
Customer Care Centre
Web Site
AUSTRIA 0810 - SAMSUNG (7267864, € 0.07/min) www.samsung.com/at
BELGIUM 02-201-24-18 www.samsung.com/be (Dutch)
www.samsung.com/be_fr (French)
CZECH 800 - SAMSUNG (800-726786) www.samsung.com/cz
Samsung Zrt., česká organizační složka, Oasis Florenc, Sokolovská394/17, 180 00, Praha 8
DENMARK 70 70 19 70 www.samsung.com/dk
FINLAND 030 - 6227 515 www.samsung.com/
FRANCE 01 48 63 00 00 www.samsung.com/fr
GERMANY 01805 - SAMSUNG (726-7864 € 0,14/Min) www.samsung.de
HUNGARY 06-80-SAMSUNG (726-7864) www.samsung.com/hu
ITALIA 800-SAMSUNG (726-7864) www.samsung.com/it
LUXEMBURG 261 03 710 www.samsung.com/lu
NETHERLANDS 0900-SAMSUNG (0900-7267864) (€ 0,10/Min) www.samsung.com/nl
NORWAY 815-56 480 www.samsung.com/no
POLAND 0 801 1SAMSUNG (172678)
022-607-93-33
www.samsung.com/pl
PORTUGAL 80820-SAMSUNG (726-7864) www.samsung.com/pt
SLOVAKIA 0800-SAMSUNG (726-7864) www.samsung.com/sk
SPAIN 902 - 1 - SAMSUNG (902 172 678) www.samsung.com/es
SWEDEN 0771 726 7864 (SAMSUNG) www.samsung.com/se
TURKEY 444 77 11 www.samsung.com/tr
U.K 0845 SAMSUNG (7267864) www.samsung.com/uk
EIRE 0818 717100 www.samsung.com/ie
SWITZERLAND 0848 - SAMSUNG (7267864, CHF 0.08/min) www.samsung.com/ch
www.samsung.com/ch_fr/(French)
LITHUANIA 8-800-77777 www.samsung.com/lt
LATVIA 8000-7267 www.samsung.com/lv
ESTONIA 800-7267 www.samsung.com/ee
사본 - 0_BN68-03141A-00L09-Cover.indd 1 2010-07-12 오전 11:44:39
3
ENGLISH
English
Contents
Getting Started
4
4 Accessories
5 Viewing the Control Panel
6 Viewing the Remote Control
7 Connecting to an Antenna
7 Plug & Play (Initial Setup)
Connections
8
8 Connecting to an AV Device
9 Connecting to an Audio Device
10 Changing the Input Source
Basic Features
10
10 How to Navigate Menus
11 Using the INFO button (Now & Next guide)
11 Planning Your Viewing
12 Channel Menu
14 Picture Menu
19 Sound Menu
21 Setup Menu
23 Support Menu
Advanced Features
25
25 Connecting to a PC
26 Media Play
32 Anynet+
Other Information
35
35 Analogue Channel Teletext Feature
36 Installing the Wall Mount
37 Securing the TV to the wall
38 Troubleshooting
41 Specifications
42 Securing the Installation Space
43 Index
Check the Symbol!
This function can be used by pressing the
TOOLS button on the remote control.
Note One -Touch Button
Indicates additional information. Check here for instructions on how to open
the relevant submenu within the OSD (on
screen display).
사본 - [PC490-XC]BN68-03141G-00L09.indb 3 2010-07-12 오전 11:28:46
4
English
Getting Started
Accessories
Please make sure the following items are included with your PDP TV. If any items are missing, contact your dealer.
The items’ colours and shapes may vary depending on the models.
Cables not included in the package contents can be purchased separately.
Do not insert your fingers into the stand base slot of the TV when installing the stand base.
y Remote Control & Batteries (AAA x 2)
y Owner’s Instructions
y Cleaning Cloth
y Power Cord
y Warranty Card / Safety Guide (Not available in some locations)
y Blanking Bracket y Ferrite Core (1EA)
(depending on the country)
See separate guide for installing the stand.
y Stand (1EA) y Guide Stand (1EA) y Screws (8EA)
Ferrite Core: The ferrite cores are used to shield the cables from interference. When connecting a cable, open the ferrite
core and clip it around the cable near the plug as shown in the figure.
x
Distance between the ferrite core and one end of the cord put into the TV set
A
B
B
D
y A : below 50 mm y B : 100 ~ 150 mm
(Switzerland only)
4EA (M4 X L10)
4EA (M4 X L12)
사본 - [PC490-XC]BN68-03141G-00L09.indb 4 2010-07-12 오전 11:28:48
5
01 Getting Started
English
Viewing the Control Panel
The product colour and shape may vary depending on the model.
SOURCE
Toggles between all the available input sources. In the on-screen menu, use this
button as you would use the ENTER
button on the remote control.
MENU Displays an on-screen menu, the OSD (on screen display) of your TV’s features.
Adjusts the volume. In the OSD, use the
buttons as you would use the
and buttons on the remote control.

Changes the channels. In the OSD, use the
buttons as you would use the
and buttons on the remote control.
Power Indicator Blinks and turns off when the power is on and lights up in standby mode.
(Power)
Turns the TV on or off.
Remote control sensor Aim the remote control towards this spot on the TV.
Standby mode
Do not leave your TV in standby mode for long periods of time (when you are away on a holiday, for example). A small amount
of electric power is still consumed even when the power button is turned off. It is best to unplug the power cord.
Speakers
Power Indicator
Remote control sensor
사본 - [PC490-XC]BN68-03141G-00L09.indb 5 2010-07-12 오전 11:28:48
6
Getting Started
English
Viewing the Remote Control
Installing batteries (Battery size: AAA)
NOTE
x
Use the remote control within 23 feet from TV.
x
Bright light may affect the performance of the remote
control. Avoid using nearby special fluorescent light or neon
sign.
x
The colour and shape may vary depending on the model.
Turns the TV on and off.
Returns to the previous channel.
To mute all TV output sound.
Displays channel lists on the screen
(p. 12).
Changes channels.
Displays and selects the available video
sources (p. 10).
Displays the EPG (Electronic Programme
Guide) (p. 11).
Displays information on the TV screen.
Exits the menu.
Selects the on-screen menu items and
changes the values seen on the menu.
P.MODE: Press to select the picture
mode (p. 14).
DUAL -: Sound effect selection
(p. 20).
3D: Activate 3D mode/menu (p. 17).
AD: Turns the audio description on
and off (not available in some locations)
(p. 20).
P.SIZE: Selects the picture size (p. 15).
SUBT.: Displays digital subtitles (p. 22).
Have direct access to channels.
Adjusts the volume.
Opens the OSD.
Quickly select frequently used functions.
Returns to the previous menu.
Alternately select Teletext ON, Double,
Mix or OFF.
Displays Media Play (USB) (p. 26).
These buttons are for the
Channel Manager, Media Play (USB)
menu, etc.
Use these buttons in Media Play (USB)
and Anynet+ (HDMI-CEC) modes
(p. 26, 32).
(
: Controls recording for Samsung
recorders that have the Anynet+ feature)
P.MODE
MEDIA.P
RETURN
ΕΧΙΤ
INFO
DUAL
SUBT.
AD P.SIZE
SOURCE
CH LIST
A B C D
TTX/MIX
사본 - [PC490-XC]BN68-03141G-00L09.indb 6 2010-07-12 오전 11:28:49
8
English
Connections
Connecting to an AV Device
Using an HDMI or HDMI/DVI cable: HD connection (up to 720p/1080i)
Available devices: DVD, Blu-ray player, HD cable box, HD STB (Set-Top-Box) satellite receiver, cable box, STB satellite receiver
HDMI IN 1(DVI), 2, 3, PC/DVI AUDIO IN
x
When using an HDMI/DVI cable connection, you must use the HDMI IN 1(DVI) jack. For the DVI cable
connection, use a DVI to HDMI cable or DVI-HDMI (DVI to HDMI) adapter for video connection and the
PC/DVI AUDIO IN jacks for audio.
x
If an external device such as a DVD / Blu-ray player / cable box / STB satellite receiver supporting a HDMI
versions older than 1.3 is connected, the TV may operate abnormally (e.g. no screen display / no sound /
annoying flicker / abnormal colour).
x
If there is no sound after connecting an HDMI cable, check the HDMI version of the external device. If you
suspect the version is older than 1.3, contact the provider of the device to confirm the HDMI version and
request an upgrade.
x
It is recommended you purchase an HDMI-certified cable. Otherwise, the screen may appear blank or a
connection error may occur.
Using a Component (up to 720p/1080i) or Audio/Video (480i only) and Scart Cable
Available devices: DVD, Blu-ray player, cable box, STB satellite receiver, VCR
In Ext. mode, DTV Out supports MPEG SD Video and Audio only.
To obtain the best picture quality, the Component connection is recommended over the A/V connection.
HDMI OUT
DVI OUT
W
R
W R
AUDIO OUT
R-AUDIO-L
DVD / Blu-ray
player
DVD / Blu-ray
player
Red White
VIDEO OUT
AUDIO OUT
R-AUDIO-L
EXT
PR PB Y
COMPONENT OUT
AUDIO OUT
R-AUDIO-L
Y
W
R
R
G
B W R
Y
Y
W
R
W
R
W
RRG
B
R
G
B
W
R
VCR
RedRed WhiteBlueGreen
VCR / DVD
DVD /
Blu-ray player
RedWhiteYellow
사본 - [PC490-XC]BN68-03141G-00L09.indb 8 2010-07-12 오전 11:28:53
11
English
03 Basic Features
Using the INFO button (Now & Next guide)
The display identifies the current channel and
the status of certain audio-video settings.
The Now & Next guide shows daily TV
programme information for each channel
according to the broadcasting time.
y Scroll , to view information for a
desired programme while watching the
current channel.
y Scroll , to view information for other channels. If you
want to move to the currently selected channel, press
the ENTER
button.
Planning Your Viewing
Guide
The EPG (Electronic Programme Guide)
information is provided by broadcasters.
Using programme schedules provided by
broadcasters, you can specify programmes
you want to watch in advance so that the
channel automatically changes to the selected
programme channel at the specified time.
Programme entries may appear blank or out of date
depending on a channel status.
Using Channel View
Using Scheduled View
1 Red (View Mode): View the list of programmes that
are playing now or coming up.
2 Yellow (+24 Hours): Viewing the list of programmes to
be broadcasted after 24 hours.
3 Blue (Ch. Mode): Select the type of channels you
want to display on the Channel View window. (All, TV,
Radio, Data/Other, My Channel 1~4)
4 Information: Displays details of the selected
programme.
5
(Page): Move to next or previous page.
6 ENTER
button
When selecting the current programme, you can
watch the selected programme.
When selecting the future programme, you can
reserve to watch the selected programme. To cancel
the schedule, press the ENTER
button again and
select Cancel Schedules.
Seeing Channels
Channel Manager
Delete or set favourite channels and use the programme
guide for digital broadcasts. Select a channel in the
Channels, My Channels or Scheduled screen.
GUIDE
DTV Air
15
DEF
18:00 ~ 6:00
Life On Venus Avenue
Unclassified
No Detaild Information
E
18:11 Thu 6 Jan
Watch
Information
INFO
DTV Air 800 five
Home and Away
18:00 - 18:30
Drama
Dani is devastated when scott makes clear his views on marriage...
27
28
800
24
16
6
Discovery
DiscoveryH&L
five
price-drop.tv
QVC
R4DTT
American Chopper
Programmes resume at 06:00
Home and...
No Information
QVC Selection
No Information
Tine Team
Fiv...
18:00 - 19:00 19:00 - 20:00
)
Family Affairs
)
Dark Angel
800 five
View Mode +24 Hours Ch. Mode Information
Page

Watch
2:10 Tue 1 Jun
Guide
Channel View - TV
1 2 3 4 5 6
Today
DTV Air 800 five
Family Affairs
18:00 - 18:30
Drama
Tanya confesses all to a stunned Babs. Conrad is anxious to hear...
18:30
19:15
)
Family Affairs
)
Dark Angel
800
800
five
five
800 five
View Mode Information

Cancel
2:10 Tue 1 Jun
Guide
Scheduled View
1 4 6
Today
Today
c 1 1futech
2 * 24ore.tv
15 abc1
3 BBC World
23 bid-up.tv
33 Boonerang
32 Cartoon Nwk
5 Class News
4 \ Coming Soon
27 Discovery
r
Air Antenna
B
Zoom Select Sort
Page

Tools
Channels
All
TV
Radio
Data/Other
Analogue
사본 - [PC490-XC]BN68-03141G-00L09.indb 11 2010-07-12 오전 11:28:59
18
English
Basic Features
3D Auto View (Off / On): If 3D Auto View is set to On,
a “Side by Side” format HDMI signal with one of the
resolutions below is automatically switched to 3D. Here,
correct 3D information must be sent from the Standard
HDMI 3D Format.
If a 3D failure occurs due to a 3D information error,
set 3D Auto View to Off and manually select a
3D Mode using the 3D button or corresponding
menu.
Support resolution (16:9 only)
Resolution Frequency (Hz)
1280 x 720p 50 / 60 Hz
1920 x 1080i 50 / 60 Hz
1920 x 1080p 24 / 30 / 50 / 60 Hz
Resolution supported for HDMI PC mode
The resolution for HDMI PC mode is optimized to 1920 x
1080 input.
An input resolution other than 1920 x 1080 may not be
displayed properly in 3D display or full screen mode.
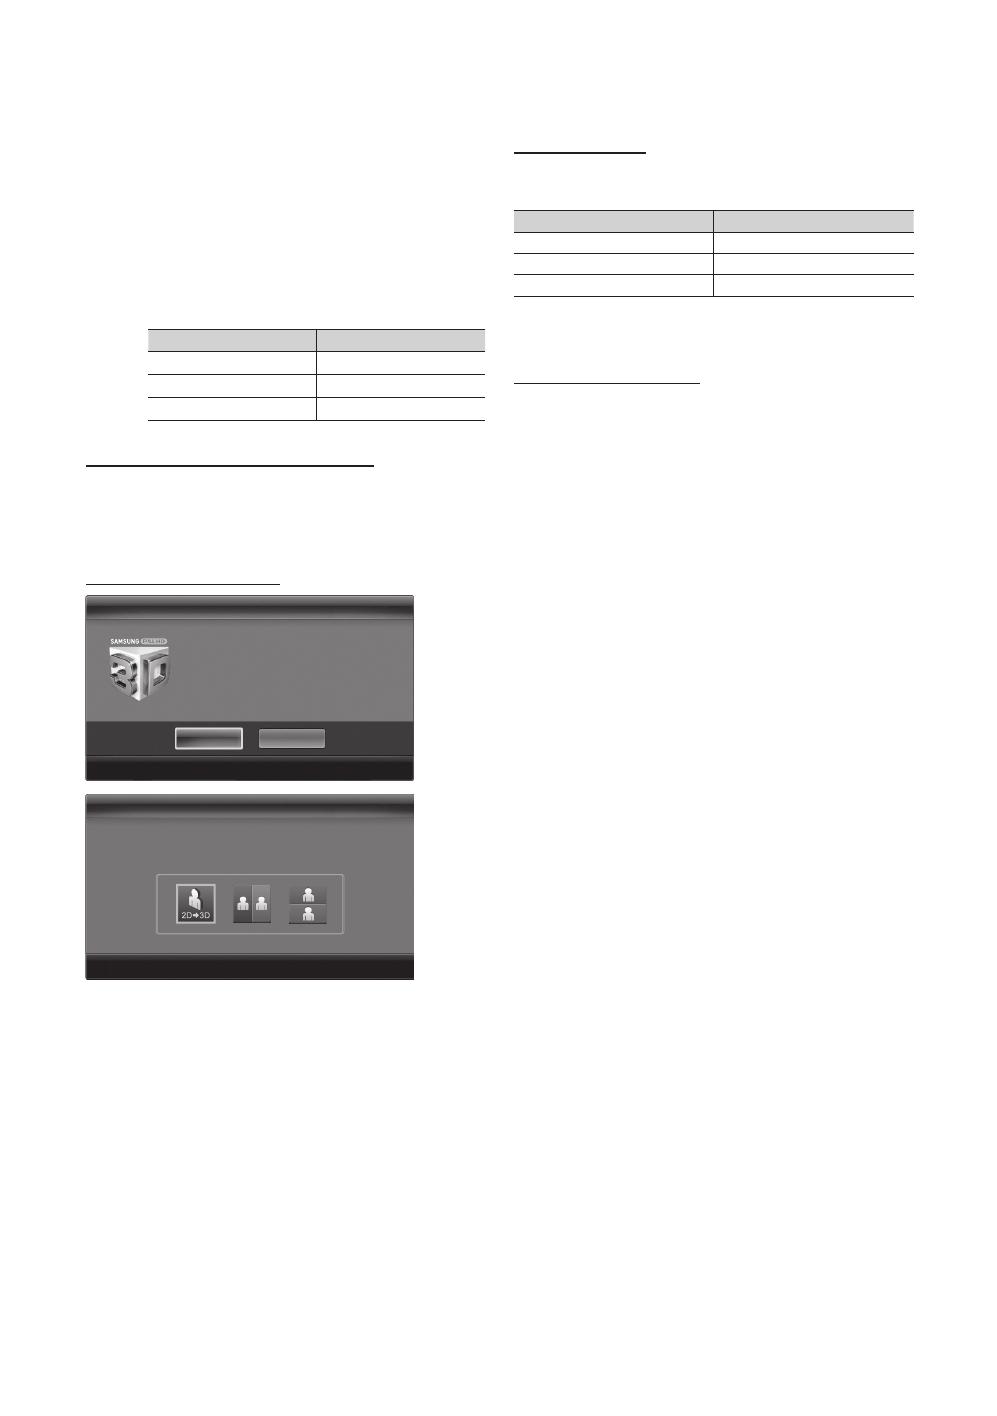
How to watch the 3D image
1. Press the 3D button.
To watch in 3D, wear 3D Active Glasses and press the
power button on the glasses.
2. Select OK, then press the ENTER
button.
3. Using the or buttons on your remote control,
selects the 3D Mode of the image you want to view.
Some 3D modes may not be available depending
on the format of the image source.
Supported formats and operating specifications for
Standard HDMI 3D
The 3D formats indicated below are recommended by
the HDMI association and must be supported.
Source signal format Standard HDMI 1.4 3D
1920x1080p@24Hz x 2 1920x2205p@24Hz
1280x720p@60Hz x 2 1280x1470p@60Hz
1280x720p@50Hz x 2 1280x1470p@50Hz
The mode is automatically switched to 3D mode for the 3D
video input in one of the formats above.
Before using 3D function...
NOTE
x
You may notice a small amount of screen flickering
when watching 3D images in poor light conditions
(from a strobe light, etc.), or under a fluorescent lamp
(50Hz ~ 60Hz) or 3 wavelength lamp. If so, dim the
light or turn the lamp off.
x
3D mode is automatically disabled in following cases:
when changing a channel or the input source, or
accessing Media Play or Internet@TV.
x
Some Picture functions are disabled in 3D mode.
x
PIP and Data broadcasts (MHEG / MHP) are not
supported in 3D mode.
x
3D Active Glasses from other manufacturers may not
be supported.
x
When the TV is initially powered on, may take some
time until the 3D display is optimized.
x
The 3D Active Glasses may not work properly if there
is any other 3D product or electronic devices turned
on near the glasses or TV. If there is a problem, keep
other electronic devices as far away as possible from
the 3D Active Glasses.
x
When watching pictures from a 50Hz 3D source with
its Game mode On, visually-sensitive viewers may
see some flicker on bright images.
x
Photos of Media Play are shown in “2D 3D”
mode only.
x
If you lie on your side while watching TV with 3D
active glasses, the picture may look dark or may not
be visible.
x
Be sure to stay within the viewing angle and optimum
TV viewing distance when watching 3D pictures.
Otherwise, you may not be able to enjoy proper 3D
effects.
x
The ideal viewing distance should be three times
or more the height of the screen. We recommend
sitting with viewer’s eyes on a level with the screen.
3D
OK
To watch in 3D, wear 3D glasses and
press the power button on the glasses.
Viewing 3D TV motion pictures for long
periods may cause eye fatigue and/or
dizziness.
Cancel
Move

Enter

Exit
3D3D
Using the LEFT / RIGHT keys on the remote control,
select the icon suitable for the picture on screen.
Using the LEFT / RIGHT keys on the remote control,
select the icon suitable for the picture on screen.
Move

Enter

Exit
Move

Enter

Exit
사본 - [PC490-XC]BN68-03141G-00L09.indb 18 2010-07-12 오전 11:29:11
23
English
03 Basic Features
Common Interface
CI Menu: This enables the user to select from the CAM-
provided menu. Select the CI Menu based on the menu
PC Card.
Application Info: View information on the CAM inserted
into the CI slot and on the “CI (CI+) CARD” which is
inserted into the CAM. You can install the CAM anytime
whether the TV is on or off.
1. Purchase a CI CAM module at your nearest dealer or by
phone.
2. Firmly insert the “CI (CI+) CARD” into the CAM in the
direction of the arrow.
3. Insert the CAM with the “CI (CI+) CARD” into the
common interface slot, in the direction of the arrow so
that it aligns parallel with the slot.
4. Check if you can see a picture on a scrambled signal
channel.
Picture In Picture (PIP)
PIP
You can watch the TV tuner and one external video source
simultaneously. PIP (Picture-in-Picture) does not function in
the same mode.
NOTE
x
For PIP sound, refer to the Sound Select
instructions.
x
If you turn the TV off while watching in PIP mode, the
PIP window will disappear.
x
You may notice that the picture in the PIP window
becomes slightly unnatural when you use the main
screen to view a game or karaoke.
x
PIP settings
Main picture Sub picture
Component, HDMI1/DVI,
HDMI2, HDMI3, PC
TV
PIP (Off / On): Activate or deactivate the PIP function.
Channel: Select the channel for the sub-screen.
Size (
/
): Select a size for the sub-picture.
Position (
/
/
/
): Select a position for the
sub-picture.
Sound Select (Main / Sub): You can choose the
desired sound (Main / Sub) in PIP mode.
Support Menu
Self Diagnosis
Self Diagnostic might take few seconds, this is part of
the normal operation of the TV.
Picture Test (Yes / No): Use to check for picture
problems.
Sound Test (Yes / No): Use the built-in melody sound to
check for sound problems.
If you hear no sound from the TV’s speakers,
before performing the sound test, make sure
Speaker Select is set to TV Speaker in the
Sound menu.
The melody will be heard during the test even if
Speaker Select is set to External Speaker or the
sound is muted by pressing the MUTE button.
Signal Information: (digital channels only) HDTV
channel’s reception quality is either perfect or the
channels are unavailable. Adjust your antenna to
increase signal strength.
Troubleshooting: If the TV seems to have a problem,
refer to this description.
If none of these troubleshooting tips apply, contact
the Samsung customer service centre.
사본 - [PC490-XC]BN68-03141G-00L09.indb 23 2010-07-12 오전 11:29:20
25
English
04 Advanced Features
Advanced Features
Connecting to a PC
Using an HDMI/DVI cable / a D-sub Cable
AUDIO OUT
DVI OUT
AUDIO OUT
PC OUT
Display Modes (D-Sub and HDMI/DVI Input)
Optimal resolution: 1360 X 768 @ 60Hz
Mode Resolution
Horizontal Frequency
(KHz)
Vertical Frequency
(Hz)
Pixel Clock
Frequency
(MHz)
Sync Polarity
(H / V)
IBM
640 x 350
720 x 400
31.469
31.469
70.086
70.087
25.175
28.322
+/-
-/+
MAC
640 x 480
832 x 624
35.000
49.726
66.667
74.551
30.240
57.284
-/-
-/-
VESA CVT
720 x 576
1280 x 720
35.910
56.456
59.950
74.777
32.750
95.750
-/+
-/+
VESA DMT
640 x 480
640 x 480
640 x 480
800 x 600
800 x 600
800 x 600
1024 x 768
1024 x 768
1024 x 768
1280 x 720
1360 x 768
31.469
37.500
37.861
37.879
46.875
48.077
48.363
56.476
60.023
45.000
47.712
59.940
75.000
72.809
60.317
75.000
72.188
60.004
70.069
75.029
60.000
60.015
25.175
31.500
31.500
40.000
49.500
50.000
65.000
75.000
78.750
74.250
85.500
-/-
-/-
-/-
+/+
+/+
+/+
-/-
-/-
+/+
+/+
+/+
VESA GTF
1280 x 720 52.500 70.000 89.040 -/+
NOTE
x
For HDMI/DVI cable connection, you must use the HDMI IN 1(DVI) jack.
x
The interlace mode is not supported.
x
The set may operate abnormally if a non-standard video format is selected.
x
Separate and Composite modes are supported. SOG(Sync On Green) is not supported.
사본 - [PC490-XC]BN68-03141G-00L09.indb 25 2010-07-12 오전 11:29:23
26
English
Advanced Features
Media Play
Connecting a USB Device
1. Turn on your TV.
2. Connect a USB device containing photo, music and/or movie files to the USB
port on the back or side panel of the TV.
3. When USB is connected to the TV, popup window appears. Then you can select
Media Play.
It might not work properly with unlicenced multimedia files.
Need-to-Know List before using Media Play (USB)
x
MTP (Media Transfer Protocol) is not supported.
x
The file system supports FAT16, FAT32 and NTFS.
x
Certain types of USB Digital camera and audio devices may not be compatible with this TV.
x
Media Play only supports USB Mass Storage Class (MSC) devices. MSC is a Mass Storage Class Bulk-Only
Transport device. Examples of MSC are Thumb drives, Flash Card Readers and USB HDD (USB HUB are not
supported). Devices should be connected directly to the TV’s USB port.
x
Before connecting your device to the TV, please back up your files to prevent them from damage or loss of data.
SAMSUNG is not responsible for any data file damage or data loss.
x
Connect a USB HDD to the dedicated port, USB port.
x
Do not disconnect the USB device while it is loading.
x
The higher the resolution of the image, the longer it takes to display on the screen.
x
The maximum supported JPEG resolution is 15360X8640 pixels.
x
For unsupported or corrupted files, the “Not Supported File Format” message is displayed.
x
If the files are sorted by Basic View, up to 1000 files can be displayed in each folder.
x
MP3 files with DRM that have been downloaded from a non-free site cannot be played. Digital Rights Management
(DRM) is a technology that supports the creation of content, the distribution and management of the content in an
integrated and comprehensive way, including the protection of the rights and interests of the content providers, the
prevention of the illegal copying of contents, as well as managing billings and settlements.
x
If more than 2 PTP devices are connected, you can only use one at a time.
x
If more than two MSC devices are connected, some of them may not be recognized. A USB device that requires high
power (more than 500mA or 5V) may not be supported.
Enjoy photos, music and/or movie files saved on a
USB Mass Storage Class (MSC) device.
MEDIA.P
USB Drive
TV Side Panel
SUM
Change Device
View Devices

Enter

Return
MediaPlay
Videos
사본 - [PC490-XC]BN68-03141G-00L09.indb 26 2010-07-12 오전 11:29:25
27
English
04 Advanced Features
x
If an over-power warning message is displayed while you are connecting or using a USB device, the device may not
be recognized or may malfunction.
x
If the TV has been no input during time set in Auto Protection Time, the Screensaver will run.
x
The power-saving mode of some external hard disk drives may be released automatically when connected to the TV.
x
If a USB extension cable is used, the USB device may not be recognized or the files on the device may not be read.
x
If a USB device connected to the TV is not recognized, the list of files on the device is corrupted or a file in the list is
not played, connect the USB device to the PC, format the device and check the connection.
x
If a file deleted from the PC is still found when Media Play is run, use the “Empty the Recycle Bin” function on the PC
to permanently delete the file.
Screen Display
Move to the file you desired using the up/down/right/left buttons and then press the ENTER
or
(Play) button. The file is
played.
Supports the View Devices and Home in Media Play homepage.
Jan.10.2010
Jan.10.2010
Jan.10.2010
Jan.10.2010
Jan.10.2010
Jan.10.2010
Jan.10.2010
Jan.10.2010
Jan.10.2010
Jan.10.2010
/Movie 01.avi 1/1
Movie 01.avi
SUM
Movie 03.avi
Movie 05.avi
Movie 07.avi
Movie 09.avi
Movie 02.avi
Movie 04.avi
Movie 06.avi
Movie 08.avi
Movie 10.avi
Select
Sorting

Tools
Information:
You can ascertain the selected
file name and the number of files
and page.
Sort List Section:
Displays sorting standard.
Sorting standard is
different depending on the
contents.
Operation Buttons
Red (Change Device): Selects a connected device.
B
Green (Preference): Sets the file preference. (not supported in Basic view)
Yellow (Select): Selects multiple files from file list. Selected files are marked with a symbol.
Blue (Sorting): Selects the sort list.
Tools: Displays the option menu.
Using the
(REW) or
(FF) button, file list can move to next or previous page.
File List Section:
You can confirm the files
and groups that is sorted by
each category.
Videos
Page
Change Device
사본 - [PC490-XC]BN68-03141G-00L09.indb 27 2010-07-12 오전 11:29:27
28
English
Advanced Features
Videos
Playing Video
1. Press the or button to select Videos, then press the ENTER
button in the Media Play menu.
2. Press the /// button to select the desired file in the file list.
3. Press the ENTER
button or
(Play) button.
The selected file is displayed on the top with its playing time.
If video time information is unknown, play time and progress bar are not displayed.
During playing the video, you can search using the and button.
In this mode, you can enjoy movie clips contained on a Game,
but you cannot play the Game itself.
y Supported Subtitle Formats
Name File extension Format
MPEG-4 time-based text .ttxt XML
SAMI .smi HTML
SubRip .srt string-based
SubViewer .sub string-based
Micro DVD .sub or .txt string-based
y Supported Video Formats
File Extension Container Video Codec Resolution
Frame rate
(fps)
Bit rate
(Mbps)
Audio Codec
*.avi
*.mkv
AVI
MKV
Divx 3.11 / 4.x / 5.1 / 6.0 1920x1080 6 ~ 30 8
MP3 / AC3 / LPCM /
ADPCM / DTS Core
XviD 1920x1080 6 ~ 30 8
H.264 BP / MP / HP 1920x1080 6 ~ 30 25
MPEG4 SP / ASP 1920x1080 6 ~ 30 8
*.asf ASF
Divx 3.11 / 4.x / 5.1 / 6.0 1920x1080 6 ~ 30 8
MP3 / AC3 / LPCM /
ADPCM / WMA
XviD 1920x1080 6 ~ 30 8
H.264 BP / MP / HP 1920x1080 6 ~ 30 25
MPEG4 SP / ASP 1920x1080 6 ~ 30 8
*.wmv ASF Window Media Video v9 1920x1080 6 ~ 30 25 WMA
*.mp4 MP4
H.264 BP / MP / HP 1920x1080 6 ~ 30 25
MP3 / ADPCM / AACMPEG4 SP / ASP 1920x1080 6 ~ 30 8
XVID 1920x1080 6 ~ 30 8
*.3gp 3GPP
H.264 BP / MP / HP 1920x1080 6 ~ 30 25
ADPCM / AAC / HE-AAC
MPEG4 SP / ASP 1920x1080 6 ~ 30 8
*.vro
VRO
VOB
MPEG1 1920x1080 24 / 25 / 30 30
AC3 / MPEG / LPCM
MPEG2 1920x1080 24 / 25 / 30 30
*.mpg
*.mpeg
PS
MPEG1 1920x1080 24 / 25 / 30 30
AC3 / MPEG / LPCM / AACMPEG2 1920x1080 24 / 25 / 30 30
H.264 1920x1080 6 ~ 30 25
*.ts
*.tp
*.trp
TS
MPEG2 1920x1080 24 / 25 / 30 30
AC3 / AAC / MP3 / DD+ /
HE-AAC
H.264 1920x1080 6 ~ 30 25
VC1 1920x1080 6 ~ 30 25
Movie 01.avi
00:04:03 / 00:07:38 1/1
SUM
Pause

Jump

Tools

Return
사본 - [PC490-XC]BN68-03141G-00L09.indb 28 2010-07-12 오전 11:29:29
29
English
04 Advanced Features
Other Restrictions
NOTE
x
If there are problems with the contents of a codec, the codec will not be supported.
x
If the information for a Container is incorrect and the file is in error, the Container will not be able to play
correctly.
x
Sound or video may not work if the contents have a standard bitrate/frame rate above the compatible Frame/sec
listed in the table above.
x
If the Index Table is in error, the Seek (Jump) function is not supported.
Video Decoder Audio Decoder
Supports up to H.264, Level 4.1
H.264 FMO / ASO / RS, VC1 SP / MP / AP L4 and AVCHD are not
supported.
GMC is not supported.
H.263 is not supported.
Supports up to WMA 7, 8, 9, STD
WMA 9 PRO does not support 2 channel excess multi channel or
lossless audio.
WMA sampling rate 22050Hz mono is not supported.
Playing movie file continuously (Resume Play)
If you exit the playing videos function, it can be played later from the point where it was stopped.
1. Select the movie file you want to play continuously by pressing
the or button to select it from the file list section.
2. Press the
(Play) / ENTER
button.
3. Select Play Continuously (Resume Play) by pressing the Blue
button. The Movie will begin to play from where it was stopped.
The Blue button is available when resuming play.
If the Cont. movie play help function is set to On in the
Settings menu, a pop-up message will appear when you
resume play a movie file.
Music
Playing Music
1. Press the or button to select Music, then press the
ENTER
button in the Media Play menu.
2. Press the /// button to select the desired file in the file
list.
3. Press the ENTER
button or
(Play) button.
During playing the music, you can search using the and
button.
(REW) and
(FF) buttons do not function during play.
Only displays the files with MP3 and PCM file extension. Other
file extensions are not displayed, even if they are saved on the
same USB device.
If the sound is strange when playing MP3 files, adjust the
Equalizer in the Sound menu. (An over-modulated MP3 file
may cause a sound problem.)
3/15
I Love you
Jhon
Music 1
No Singer
Music 2
No Singer
Music 3
No Singer
Music 4
No Singer
Music 5
No Singer
I Love You
Jhon
1st Album
Pop
2010
4.2MB
01:10 / 04:02
SUM
Pause

Jump

Tools

Return
Playlist
Movie 01.avi
00:04:03 / 00:07:38 1/1
SUM
Play continuously

Pause

Jump

Tools

Return
Resumes playing from the last viewed
scene.
Play continuously
사본 - [PC490-XC]BN68-03141G-00L09.indb 29 2010-07-12 오전 11:29:31
31
English
04 Advanced Features
Videos/Music/Photos Play Option menu
During playing a file, press the TOOLS button.
Category Operations Videos Music Photos
Title You can move the other file directly.
Repeat Mode You can play movie and music files repeatedly.
Picture Size You can adjust the picture size for preference.
Picture Setting You can adjust the picture setting. (p. 14 ~ 19)
Sound Setting You can adjust the sound setting. (p. 19, 20)
Subtitle Setting You can play the video file with subtitles. This function only works if the subtitles are the same
file name as the video file.
Stop Slide Show /
Start Slide Show
You can start or stop a slide show.
Slide Show Speed You can select the slide show speed during the slide show.
Background Music You can set and select background music when watching a slide show.
Zoom You can zoom into images in full screen mode.
Rotate You can rotate images in full screen mode.
Information You can see detailed information about the played file.
Settings
Using the Setup Menu
Cont. movie play help (Resume Play) (On / Off): Select to display the help pop-up message for continuous movie
playback.
Get the DivX® VOD registration code: Shows the registration code authorized for the TV. If you connect to the DivX web
site and register the registration code with a personal account, you can download VOD registration file. If you play the VOD
registration using Media Play, the registration is completed.
For more information on DivX® VOD, visit “www.DivX.com.
Get the DivX® VOD deactivation code: When DivX® VOD is not registered, the registration deactivation code is
displayed. If you execute this function when DivX® VOD is registered, the current DivX® VOD registration is deactivated.
Information: Select to view information about the connected device.
사본 - [PC490-XC]BN68-03141G-00L09.indb 31 2010-07-12 오전 11:29:36
41
English
05 Other Information
Specifications
Dispaly Resolution 1360 X 768
Environmental Considerations
Operating Temperature
Operating Humidity
Storage Temperature
Storage Humidity
10°C to 40°C (50°F to 104°F)
10% to 80%, non-condensing
-20°C to 45°C (-4°F to 113°F)
5% to 95%, non-condensing
TV System Analogue: B/G, D/K, L, I (Depending on your country selection)
Digital: DVB-T/DVB-C
Colour/video system Analogue: PAL, SECAM, NTSC-4.43, NTSC-3.58, PAL60
Digital: MPEG-2 MP@ML, MPEG-4, H.264/AVC MP@L3, [email protected], [email protected]
Sound System BG. OK NICAM. MPEGl
HDMI IN 1 ~ 3 Video: 1080 24p, 1080p, 1080i, 720p, 576p, 576i, 480p, 480i
Audio: 2Ch Linear PCM 32/44.1/48kHz, 16/20/24bits.
Analogue audio input (HDMI IN1 only)
PC input (HDMI IN1 only)
Stand Swivel (Left / Right) -20˚ ~ 20˚
Model Name PS50C490
Screen Size 50 inches
Sound
(Output) 10W x 2
Dimensions (WxDxH)
Body
With stand
1202.5 x 69.5 x 720.5 mm
1202.5 x 302.8 x 720.2 mm
Weight
Without Stand
With Stand
23.5 kg
25.5 kg
Design and specifications are subject to change without prior notice.
For information about power supply, and more about power consumption, refer to the label attached to the product.
사본 - [PC490-XC]BN68-03141G-00L09.indb 41 2010-07-12 오전 11:29:47
42
English
Other Information
Licence
TheaterSound, SRS and the symbol are trademarks of SRS Labs, Inc.
TheaterSound technology is incorporated under licence from SRS Labs, Inc.
Manufactured under licence from Dolby Laboratories. Dolby and the double-D symbol are
trademarks of Dolby Laboratories.
Manufactured under licence under U.S. Patent #’s: 5,451,942; 5,956,674; 5,974,380; 5,978,762;
6,487,535 & other U.S. and worldwide patents issued & pending. DTS and the Symbol are
registered trademarks. & DTS 2.0+ Digital Out and the DTS logos are trademarks of DTS, Inc.
Product Includes software. © DTS, Inc. All Rights Reserved.
DivX Certified to play DivX video up to HD 1080p, including premium content.
ABOUT DIVX VIDEO: DivX® is a digital video format created by DivX,Inc. This is an official DivX Certified device that plays DivX video. Visit www.divx.
com for more information and software tools to convert your files into DivX video.
ABOUT DIVX VIDEO-ON-DEMAND: This DivX Certified® device must be registered in order to play DivX Video-on-Demand (VOD) content.
To generate the registration code, locate the DivX VOD section in the device setup menu.
Go to vod.divx.com with this code to complete the registration process and learn more about DivX VOD. Pat. 7,295,673; 7,460,688; 7,519,274
Open Source Licence Notice
In the case of using open source software, Open Source Licences are available on the product menu.
Open Source Licence Notice is written only English.
Securing the Installation Space
Keep the required distance between the product and other objects (e.g. walls) to ensure proper ventilation.
Failing to do so may result in fire or a problem with the product due to an increase in the internal temperature of the product.
When using a stand or wall-mount, use parts provided by Samsung Electronics only.
x
If you use parts provided by another manufacturer, it may result in a problem with the product or an injury due to the
product falling.
The appearance may differ depending on the product.
Installation with a stand. Installation with a wall-mount.
10 cm
10 cm
10 cm
10 cm
10 cm
10 cm
10 cm
사본 - [PC490-XC]BN68-03141G-00L09.indb 42 2010-07-12 오전 11:29:48
43
English
05 Other Information
Index
A
Amplify 19
Antenna 12
Anynet+ 32
Auto Adjustment 19
Auto Volume 20
B
Background Music 31
Balance L/R 19
Basic View 30
Batteries 6
Black Tone 15
Blanking Bracket 36
Brightness 14
C
Change PIN 22
Channel Manager 11
Channel Menu 12
Clock 21
Colour Tone 15
Component 8
Connecting to a PC 25
Connecting to an Audio Device 9
D
DIGITAL AUDIO OUT 9, 32
DivX® VOD 31
D-sub 25
Dynamic 14
Dynamic Contrast 15
E
Eco Sensor 14
Edit Name 10
Editing Channels 13
Energy Saving 14
EPG
(Electronic Programme Guide) 11
Equalizer 19
External Speaker 20
F
Favourite Channel 12
Film Mode 16
Fine Tune 14
Flesh Tone 15
Frequency 25
H
HDMI 8, 32
Home Theatre 9, 32
I
Installation Space 42
L
Language 22
Licence 42
Lock 13
M
Media Play 26
Melody 22
Menu Transparency 22
Music 29
N
Navigate 10
Now & Next guide 11
O
Optimal resolution 25
P
Photos 30
Picture Size 15, 31
PIP (Picture in Picture) 23
Plug & Play 7
Power Indicator 5
R
Receiver 34
Recording 33
Remote Control 6
Repeat Mode 31
RGB Only Mode 15
Rotate 31
S
Select All 13
Self Diagnosis 23
Sharpness 14
Signal Information 23
Sleep Timer 21
Slide Show 30
Software Upgrade 24
Source List 10
Speaker Select 20
Specifications 41
Standby mode 5
Subtitle 22
Symbol 3
T
Timer 21
Title 30
Tools 3
Troubleshooting 38
TV Speaker 20
U
USB Drive 24, 26
Using Channel View 11
Using the Favourite Channels 12
Using Scheduled View 11
V
VCR 8
Video Formats 28
Videos 28
Volume 5
W
Wall Mount 36
Warm 15
White Balance 15
사본 - [PC490-XC]BN68-03141G-00L09.indb 43 2010-07-12 오전 11:29:49
3
FRANÇAIS
Français
Contenu
Mise en route
4
4 Accessoires
5 Présentation du panneau de configuration
6 Présentation de la télécommande
7 Raccordement à une antenne
7 Plug & Play (configuration initiale)
Connexions
8
8 Connexion à un périphérique AV
9 Connexion à un système audio
10 Changement de la source d'entrée
Fonctions de base
10
10 Navigation dans les menus
11 Utilisation du bouton INFO (Guide Now & Next)
11 Planification des émissions à regarder
12 Menu Canal
14 Menu Image
19 Menu Son
21 Menu Configuration
23 Menu Assistance
Fonctions avancées
25
25 Connexion à un ordinateur
26 Media Play
32 Anynet+
Informations supplémentaires
35
35 Fonction Télétexte de chaîne analogique
36 Installation du support mural
37 Fixation du téléviseur au mur
38 Dépannage
41 Caractéristiques techniques
42 Sécurisation de l'espace d'installation
43 Index
Vérifiez la présence du symbole!
Cette fonction peut être utilisée lorsque
vous appuyez sur le bouton TOOLS de la
télécommande.
Remarque Bouton tactile
Indique des informations supplémentaires. Vous trouverez ici les instructions pour
ouvrir le sous-menu correspondant dans
l'affichage à l'écran.
사본 - [PC490-XC]BN68-03141G-00L09.indb 3 2010-07-12 오전 11:29:52
6
Mise en route
Français
Présentation de la télécommande
Installation des piles (type de pile: AAA)
REMARQUE
x
Utilisez la télécommande à une distance maximale de
7mètres du téléviseur
x
Une lumière intense peut affecter le bon fonctionnement de
la télécommande. Evitez de l'utiliser à proximité d'une lampe
fluorescente spéciale ou d'une enseigne au néon.
x
La couleur et la forme peuvent varier en fonction du modèle.
Permet d'allumer et d'éteindre le
téléviseur.
Permet de revenir à la chaîne précédente.
Pour mettre en sourdine tout son de
sortie du téléviseur.
Permet d'afficher les listes de chaînes à
l'écran (p. 12).
Permet de changer de chaîne.
Permet d'afficher et de sélectionner les
sources vidéo disponibles (p.10).
Permet d'afficher le Guide des
programmes électronique (EPG) (p.11).
Permet d'afficher des informations à
l'écran.
Permet de quitter le menu.
Permettent de sélectionner les éléments
des menus à l'écran et de modifier les
valeurs des menus.
P.MODE: permet de sélectionner le
mode Image (p.14).
DUAL -: sélection d'effets sonores
(p. 20).
3D: activation du mode/menu 3D (p. 17).
AD: permet d'activer ou de désactiver la
description audio (non disponible pour
tous les pays) (p. 20).
P.SIZE: permet de sélectionner la taille
de l’image (p.15).
SUBT.: permet d'afficher des sous-titres
numériques (p.22).
Donne un accès direct aux chaînes.
Règle le volume.
Permet d'ouvrir l'affichage à l'écran.
Permet de sélectionner rapidement les
fonctions fréquemment utilisées.
Permet de revenir au menu précédent.
Choisissez Télétexte activé, double, mix
ou désactivé.
Permet d'afficher Media Play (USB) (p.26).
Ces boutons sont utilisés dans les
menus Gestion chaînes,
Media Play (USB), etc
Utilisez ces boutons avec les modes
Media Play (USB) et
Anynet+ (HDMI-CEC) (p.26, 32).
(
: permet de contrôler les
enregistreurs Samsung disposant de la
fonction Anynet+)
P.MODE
MEDIA.P
RETURN
ΕΧΙΤ
INFO
DUAL
SUBT.
AD P.SIZE
SOURCE
CH LIST
A B C D
TTX/MIX
사본 - [PC490-XC]BN68-03141G-00L09.indb 6 2010-07-12 오전 11:29:55
  • Page 1 1
  • Page 2 2
  • Page 3 3
  • Page 4 4
  • Page 5 5
  • Page 6 6
  • Page 7 7
  • Page 8 8
  • Page 9 9
  • Page 10 10
  • Page 11 11
  • Page 12 12
  • Page 13 13
  • Page 14 14
  • Page 15 15
  • Page 16 16
  • Page 17 17
  • Page 18 18
  • Page 19 19
  • Page 20 20
  • Page 21 21
  • Page 22 22
  • Page 23 23
  • Page 24 24
  • Page 25 25
  • Page 26 26
  • Page 27 27
  • Page 28 28
  • Page 29 29
  • Page 30 30
  • Page 31 31
  • Page 32 32
  • Page 33 33
  • Page 34 34
  • Page 35 35
  • Page 36 36
  • Page 37 37
  • Page 38 38
  • Page 39 39
  • Page 40 40
  • Page 41 41
  • Page 42 42
  • Page 43 43
  • Page 44 44
  • Page 45 45
  • Page 46 46
  • Page 47 47
  • Page 48 48
  • Page 49 49
  • Page 50 50
  • Page 51 51
  • Page 52 52
  • Page 53 53
  • Page 54 54
  • Page 55 55
  • Page 56 56
  • Page 57 57
  • Page 58 58
  • Page 59 59
  • Page 60 60
  • Page 61 61
  • Page 62 62
  • Page 63 63
  • Page 64 64
  • Page 65 65
  • Page 66 66
  • Page 67 67
  • Page 68 68
  • Page 69 69
  • Page 70 70
  • Page 71 71
  • Page 72 72
  • Page 73 73
  • Page 74 74
  • Page 75 75
  • Page 76 76
  • Page 77 77
  • Page 78 78
  • Page 79 79
  • Page 80 80
  • Page 81 81
  • Page 82 82
  • Page 83 83
  • Page 84 84
  • Page 85 85
  • Page 86 86
  • Page 87 87
  • Page 88 88
  • Page 89 89
  • Page 90 90
  • Page 91 91
  • Page 92 92
  • Page 93 93
  • Page 94 94
  • Page 95 95
  • Page 96 96
  • Page 97 97
  • Page 98 98
  • Page 99 99
  • Page 100 100
  • Page 101 101
  • Page 102 102
  • Page 103 103
  • Page 104 104
  • Page 105 105
  • Page 106 106
  • Page 107 107
  • Page 108 108
  • Page 109 109
  • Page 110 110
  • Page 111 111
  • Page 112 112
  • Page 113 113
  • Page 114 114
  • Page 115 115
  • Page 116 116
  • Page 117 117
  • Page 118 118
  • Page 119 119
  • Page 120 120
  • Page 121 121
  • Page 122 122
  • Page 123 123
  • Page 124 124
  • Page 125 125
  • Page 126 126
  • Page 127 127
  • Page 128 128
  • Page 129 129
  • Page 130 130
  • Page 131 131
  • Page 132 132
  • Page 133 133
  • Page 134 134
  • Page 135 135
  • Page 136 136
  • Page 137 137
  • Page 138 138
  • Page 139 139
  • Page 140 140
  • Page 141 141
  • Page 142 142
  • Page 143 143
  • Page 144 144
  • Page 145 145
  • Page 146 146
  • Page 147 147
  • Page 148 148
  • Page 149 149
  • Page 150 150
  • Page 151 151
  • Page 152 152
  • Page 153 153
  • Page 154 154
  • Page 155 155
  • Page 156 156
  • Page 157 157
  • Page 158 158
  • Page 159 159
  • Page 160 160
  • Page 161 161
  • Page 162 162
  • Page 163 163
  • Page 164 164
  • Page 165 165
  • Page 166 166
  • Page 167 167
  • Page 168 168
  • Page 169 169
  • Page 170 170
  • Page 171 171
  • Page 172 172
  • Page 173 173
  • Page 174 174
  • Page 175 175
  • Page 176 176
  • Page 177 177
  • Page 178 178
  • Page 179 179
  • Page 180 180
  • Page 181 181
  • Page 182 182
  • Page 183 183
  • Page 184 184
  • Page 185 185
  • Page 186 186
  • Page 187 187
  • Page 188 188
  • Page 189 189
  • Page 190 190
  • Page 191 191
  • Page 192 192
  • Page 193 193
  • Page 194 194
  • Page 195 195
  • Page 196 196
  • Page 197 197
  • Page 198 198
  • Page 199 199
  • Page 200 200
  • Page 201 201
  • Page 202 202
  • Page 203 203
  • Page 204 204
  • Page 205 205
  • Page 206 206
  • Page 207 207
  • Page 208 208
  • Page 209 209
  • Page 210 210
  • Page 211 211
  • Page 212 212
  • Page 213 213
  • Page 214 214
  • Page 215 215
  • Page 216 216
  • Page 217 217
  • Page 218 218
  • Page 219 219
  • Page 220 220
  • Page 221 221
  • Page 222 222
  • Page 223 223
  • Page 224 224
  • Page 225 225
  • Page 226 226
  • Page 227 227
  • Page 228 228
  • Page 229 229
  • Page 230 230
  • Page 231 231
  • Page 232 232
  • Page 233 233
  • Page 234 234
  • Page 235 235
  • Page 236 236
  • Page 237 237
  • Page 238 238
  • Page 239 239
  • Page 240 240
  • Page 241 241
  • Page 242 242
  • Page 243 243
  • Page 244 244
  • Page 245 245
  • Page 246 246
  • Page 247 247
  • Page 248 248
  • Page 249 249
  • Page 250 250
  • Page 251 251
  • Page 252 252
  • Page 253 253
  • Page 254 254
  • Page 255 255
  • Page 256 256
  • Page 257 257
  • Page 258 258
  • Page 259 259
  • Page 260 260
  • Page 261 261
  • Page 262 262
  • Page 263 263
  • Page 264 264
  • Page 265 265
  • Page 266 266
  • Page 267 267
  • Page 268 268
  • Page 269 269
  • Page 270 270
  • Page 271 271
  • Page 272 272
  • Page 273 273
  • Page 274 274
  • Page 275 275
  • Page 276 276
  • Page 277 277
  • Page 278 278
  • Page 279 279
  • Page 280 280
  • Page 281 281
  • Page 282 282
  • Page 283 283
  • Page 284 284
  • Page 285 285
  • Page 286 286
  • Page 287 287
  • Page 288 288
  • Page 289 289
  • Page 290 290
  • Page 291 291
  • Page 292 292
  • Page 293 293
  • Page 294 294
  • Page 295 295
  • Page 296 296
  • Page 297 297
  • Page 298 298
  • Page 299 299
  • Page 300 300
  • Page 301 301
  • Page 302 302
  • Page 303 303
  • Page 304 304
  • Page 305 305
  • Page 306 306
  • Page 307 307
  • Page 308 308
  • Page 309 309
  • Page 310 310
  • Page 311 311
  • Page 312 312
  • Page 313 313
  • Page 314 314
  • Page 315 315
  • Page 316 316
  • Page 317 317
  • Page 318 318
  • Page 319 319
  • Page 320 320
  • Page 321 321
  • Page 322 322
  • Page 323 323
  • Page 324 324
  • Page 325 325
  • Page 326 326
  • Page 327 327
  • Page 328 328
  • Page 329 329
  • Page 330 330
  • Page 331 331
  • Page 332 332
  • Page 333 333
  • Page 334 334
  • Page 335 335
  • Page 336 336
  • Page 337 337
  • Page 338 338
  • Page 339 339
  • Page 340 340
  • Page 341 341
  • Page 342 342
  • Page 343 343
  • Page 344 344
  • Page 345 345
  • Page 346 346
  • Page 347 347
  • Page 348 348
  • Page 349 349
  • Page 350 350
  • Page 351 351
  • Page 352 352
  • Page 353 353
  • Page 354 354
  • Page 355 355
  • Page 356 356
  • Page 357 357
  • Page 358 358
  • Page 359 359
  • Page 360 360
  • Page 361 361
  • Page 362 362
  • Page 363 363
  • Page 364 364
  • Page 365 365
  • Page 366 366
  • Page 367 367
  • Page 368 368
  • Page 369 369
  • Page 370 370
  • Page 371 371
  • Page 372 372
  • Page 373 373
  • Page 374 374
  • Page 375 375
  • Page 376 376
  • Page 377 377
  • Page 378 378
  • Page 379 379
  • Page 380 380
  • Page 381 381
  • Page 382 382

Samsung PS50C490B3W Benutzerhandbuch

Kategorie
LCD-Fernseher
Typ
Benutzerhandbuch
Dieses Handbuch ist auch geeignet für