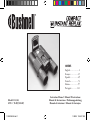
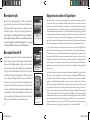
Bushnell 11-8323 Benutzerhandbuch
- Kategorie
- Fernglas
- Typ
- Benutzerhandbuch

Model: 11-8323
LIT. #: 98-0535/02-05
CONTENTS
English ......................2
Français ...................25
Español ...................49
Deutsch ...................73
Italiano .................... 97
Português ..............121
Instruction Manual • Manuel D’instructions
Manual de Instrucciones • Bedienungsanleitung
Manuale di istruzioni • Manual de Instruções
11-8323 6LIM.indd 1 1/28/05 10:45:27 AM

Congratulations on your purchase of the Bushnell
®
Compact Instant Replay
™
! The Compact
Instant Replay is ideal for all sporting events and nature observation, as it combines a high
quality 8 power compact binocular with a versatile 3.2 megapixel digital camera featuring
amazing video capability. The Compact Instant Replay has a “dual personality”, capable of
taking high resolution digital still photos as well as shooting video clips that automatically
“loop”, or refresh, every 8 to 60 seconds (depending on quality settings). This ensures that
you will always capture the peak of the action. The photos and videos are both automatically
stored in the internal memory, or on an optional SD (Secure Digital) card, and can be
instantly reviewed on the flip-up LCD, played back on a TV set, or downloaded to your
computer without the need to install any special software (With Windows 2000, XP or Mac.
Software is provided for Windows 98/98SE).
Before using your new Compact Instant Replay, please read the instructions contained in
this manual and take time to familiarize yourself with the camera’s operation and many great
features.
QUICK GUIDE: BUSHNELL COMPACT INSTANT REPLAY 11-8323
1
Install Batteries
& (optional) SD
Card
Insert 2 AAA batteries (see “Specifications”) into the battery compartment on the bottom of the camera
pod (Note polarity indication inside). An SD memory card (optional) for increased photo storage capac-
ity may also be installed in the card slot, located at the back of the camera pod (Pull the rubber card slot
cover down. Insert card with label side facing down until it clicks, and replace the rubber cover).
2
Turn On the
Camera
Raise the LCD display, using the tab at the rear. Press and release the POWER button. The display
start screen will flash on, then go out, and the red power LED stays on. Press “LCD/Mode” to turn the
display back on -you will see a “live” preview of the image from the camera lens, located between the
binocular objective lenses. The display will automatically turn off after 2 minutes to conserve battery
power when the camera is inactive. You can also manually turn the display off by pressing the LCD/
Mode button-it does not need to be on to take a photo. The entire camera will automatically turn off
after 5 minutes if it has been inactive (no buttons pressed). To turn power off manually, press and release
the POWER button. The default camera settings will provide optimum quality under most conditions.
However, we recommend reading the full manual to take advantage of the many available options available
in the various menus for different photographic situations and personal preferences.
3
Format the SD
Card (optional)
If you inserted an SD card earlier, format it before using the camera. Press the Menu/OK button in the
center of the silver keypad. Press the Down arrow key 4 times to select “Format”. Press the Right arrow
key, then Left arrow key to select “Yes”. Press Menu/OK, you will see a warning that all images will be
deleted, select “Yes” and press OK again. Use the Down arrow key to select “Exit” and press OK.
4
Set the
Binocular
Optics for Your
Eyes
Roll down the rubber eyecups if you are wearing glasses. Adjust the spacing between the left and right
binocular tubes while looking through the binocular until the view appears as a single circular image.
Then, find a distant object with fine detail, and adjust the center focus knob until the object appears
sharp through the left eyepiece . Now look through the right eyepiece only. If the object does not ap-
pear equally sharp, rotate the right eyepiece (diopter adjustment) until it is also sharp. Once set, you no
longer need to move this diopter adjustment, and may simply focus using the center focus knob.
2
3
11-8323 6LIM.indd 2-3 1/28/05 10:45:27 AM

QUICK GUIDE: BUSHNELL COMPACT INSTANT REPLAY 11-8323
5
Take A Photo
or Shoot A
Video Clip
Hold the camera steady with both hands and press the SNAP button to take a still photo. You will hear
a “beep” (this can be turned off), followed by a brief pause (file icon displayed) as the camera stores the
photo in memory. To shoot a video, press Menu/OK once, then the Right arrow key, to see the Camera
menu video options. Use the Up & Down keys to select either Replay (loop) or Normal (continuous)
video, then press Menu/OK. You will be back to the live preview display, and can start shooting the
video at any time by pressing SNAP. To stop recording video, press SNAP again. Please read the section
“Video Modes” for a detailed explanation of how Normal and Replay video modes differ, including how the
video recording time is determined.
6
Review and
Delete Photos/
Videos
To review or playback a still photo or video, press the LCD/Mode button (press twice if the display was
not already active). You will see the most recent still photo or video (first frame). To review previous
photos or videos one at a time, press the Left arrow key. The icon at the bottom right corner of the
display will indicate whether the current review file is a still photo, normal or “instant replay” video.
The numbers above this icon show the current file number/total files (2 of 3, etc). To play back a stored
video, press the Down arrow key (press again to stop playback). To see “thumbnail” images of several
stored photos/videos at once, press the Up arrow key after entering review mode. Use the arrow keys to
select an individual file, then press up again to see it full frame. To delete a photos/videos, press Menu/
OK, then the Down arrow once (Trash icon). Press the Right arrow key, select Delete One or Delete All,
then press the Right key and select Yes. Go back to the Menu column, select Exit and press Menu/OK
to return to the Review display.
7
Connect To
A Computer
& Transfer
Photos
Before connecting the camera, install the driver from the CD-ROM if you use Windows 98/98SE, and
install PhotoSuite if you do not already have photo editing software. Connect the supplied USB cable
from the camera’s USB socket (on the back of the camera pod) to a USB port on your PC. If you have
Windows XP, just follow the onscreen directions/options that automatically appear. If you have Win
98 or 2000, open “My Computer” on your PC. The camera is identified as a “Removable Disk” -your
photos are in the folders inside, simply drag them or copy/paste into any folder on your hard drive. Refer
to the “Transferring Photos” section of this manual.
Technical Specifications
Magnification 8x Still Photo File Size (Resolution) 2048x1536, 1600x1200, 640x480
Objective
Diameter
30mm F
ile Compression Ratio (Quality) 1:4 (FQ), 1:8 (NQ), 1:16 (EQ)
Exit Pupil 3.75 I
nternal Memory 16MB Flash Memory
Field of View 320 ft @ 1000 yds Memory Expansion Secure Digital Card , up to 1 GB capacity
Eye Relief 13mm F
ile Format (Still/Video) JPEG /MJPEG (.AVI)
Lens Coating F
ully Coated File Management DCF (version 1.0), FAT 16 Format
Prism Type Roof, BK-7 LCD 1.5” TFT, 120,480 pixels
Focusing Range
(binocular)
18’ ~ infinity V
ideo Resolution/Frame Rate 620x480 or 320x240 pixels per frame / 30 or 15 fps. Replay
mode loop length: 8/15/30/60 seconds (per resolution/fps
selected)
Weight 14.3 oz / 406.5 g V
ideo Out NTSC/PAL, via 8-pin USB port with special cable (included)
Sensor Type CMOS E
xposure Value Range +/- 2 EV in 0.5 EV steps
Effective Pixels 3.2 Megapixels White Balance Options Auto, Daylight, Cloudy, Fluorescent, Incandescent
Color 24-bit color P
reset Scenes Program, Sports, Landscape, Portrait, Night
Shutter Electronic, 1/16 to
1/1000 seconds
M
enu Languages English, Spanish, French, German, Italian, Portuguese, Japanese
Focusing Range
(camera)
F
ixed, approx 60’ ~
infinity
Auto Power Off (after inactivity) LCD Display: 2 Min. / All Power Off: 5 Min.
Lens Aperture f/5.6 P
ower Supply 2xAAA Batteries, Alkaline/Lithium/NiMh type
4
5
11-8323 6LIM.indd 4-5 1/28/05 10:45:28 AM

LCD Preview Display Icons
# Icon
1 Battery Indicator (2/3 power shown)
2 # of P
hotos Remaining (based on available memory)
3 S
till Photo Mode
4 Q
uality (File Compression) Fine/Normal/Economy
5 Resolution (File Size) Large/Medium/Small
6 White Balance Not displayed unless changed from default “Auto” in Exposure
7 Scene Not displayed unless changed from default “Program” in Mode menu
8 Sequence Shooting Mode Not displayed unless selected in Mode menu
Still Photo Preview Display
Movie (Video)Display
# Icon
1 Battery Indicator (full)
2 T
otal Seconds of Video
Available (based on
available memory)
3 M
ovie Mode
4 R
esolution (FQ=640x480/
NQ=320x240)
5 F
rame Rate (30 or 15 fps)
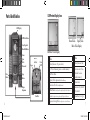
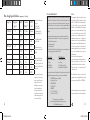
Parts Identifi cation
LCD/Mode Button
LCD Display
5-way Keypad w/
Menu/OK Button
Power
Button
Snap
Button
Center
F
ocus
Knob
(Binocular)
Diopter
Adjustment
LCD Display
USB Port/
Video Out
Power
LED
Beeper
SD Card Slot
Beeper
345
8 7
6
1
2
Normal Video
Replay Video
1
2
345
Replay Video
6
7
11-8323 6LIM.indd 6-7 1/28/05 10:45:29 AM

Loading Batteries
Inserting An SD Card
Turn the Compact Instant Replay over, and slide open the battery cover in the
direction as shown on the right. Insert 2 AAA Alkaline or Lithium batteries into
the compartment in the direction indicated by the diagrams inside, then slide the
battery cover back in place until it clicks. Note: Rechargeable NiMh type batteries
may also be used, but some models may not deliver adequate current to power
the Instant Replay. NiMh batteries with a current rating of 2300 mAh or higher
are recommended.
The camera can store from about 15 up to 642 photos in the 16 MB internal
memory, depending on resolution and quality settings (refer to the chart at the back
of this manual). To expand the available storage, you may add an optional Secure
Digital (SD) type memory card, with any capacity up to 1 GB. The card is inserted
into the slot on the back of the camera pod, as shown in the last diagram. Insert
the SD card with the label side facing down. Note: be sure the power is turned off
before inserting or removing cards to prevent possible loss of fi les or damage to the
card. A new card will not require formatting, but a card that has been previously used
in
other devices should be formatted by the Compact Instant Replay before storing
photos on it (See “Setup Menu” in the following section). Note that this will erase all
fi les previously stored on the card, so be sure they have been downloaded or copied
fi rst if you wish to keep them.
Basic Binocular and Camera Setup
Before taking photos or videos, take a few moments to set up the Compact Instant Replay for your individual eyesight and user prefer-
ences. Leave the rubber eyecups in their “up”position if you are not wearing glasses, or roll them down if you are. Grasp the left and
right sides of the binocular, and pull them apart or push them together while looking through the binocular to adjust the eyepiece
spacing until your view is a single circular image. Find a distant object with fi ne detail (tree, sign, brick wall, etc), and adjust the center
focus knob until the object appears sharp when viewed through the left binocular eyepiece only. Then, looking at the same object
through just the right side of the binocular, simply rotate the right eyepiece until the image is equally sharp for your right eye. This is
called the diopter adjustment, and compensates for any difference in sight between your left and right eyes. Once set by following this
initial procedure, you may leave the diopter adjustment alone and just use the center focus knob to bring objects at any distance into
sharp focus through the binoculars (the minimum focus distance is about 16 feet).
Your digital photos and videos are not affected by the center focus knob, as the camera lens located between the binocular objective
lenses does not require focusing. It is preset so that objects ranging from approximately 60 feet to infi nity will be in focus. Note that
the binocular is capable of focusing closer than the camera. Check the live preview image on the LCD display to make sure you are
far enough away to ensure sharp photos. The camera lens provides 8x magnifi cation, which is the same as the binocular’s optics, and is
aligned so that and object centered in the binocular’s view will also be centered in your photos or videos. Therefore, it is not necessary
to have the LCD turned on or even raised while you are shooting photos or videos. Reducing use of the LCD will extend battery life
signifi cantly.
You may want to go into the camera’s menu and set the correct date before using the camera for the fi rst time. Raise the LCD display
and press the power button. After the red power light is on, press LCD/Mode to turn on the display. Press the Menu/OK button in
the center of the keypad, then press the Down arrow 3 times to get to the “Setup” menu. Press the Right arrow once, followed by the
Down arrow to get to “Date”. Then press the Right arrow key twice to enter the Date setup. Use the Left/Right arrow keys to select the
part of the date you want to change, then press Up or Down to change it. To change the date format so Month, Day, and Year are in the
desired order, move to the “arrows” icon on the upper left of the date display and press the Up/Down keys. Set the time (24 hr format)
with the 4 numbers at the bottom of the date display, so that the date will automatically change at midnight for your location. Once
date & time are set, press the Menu/OK button once, then again to save your setting and exit. You can then press the Down arrow key
and chose whether you want the date to appear on the display and your photos or not (“Show Date On/Off”). Then keep pressing the
Left arrow until you are back to “Setup”, move down to “Exit” and press Menu/OK.
Battery Compartment
Cover
Batteries Installed
Card Slot
(lift cover)
8
9
11-8323 6LIM.indd 8-9 1/28/05 10:45:30 AM

Taking Still Photos
After following the initial setup as described in the previous pages, you are ready to take a photo:
1) Raise the LCD and press the Power button briefly (red LED lights). Press the LCD/Mode button to turn on the LCD display if you
want to see a preview of the image or check menu settings, battery condition, etc.
2) The Compact Instant Replay will default to the highest resolution and quality settings, as well as “everything on automatic” when
it
is turned on for the first time, so you can take excellent photos right away. If you prefer to use different settings, refer to the section
“Using the Main Menu” for directions regarding how to find and change settings such as resolution and exposure, using scene presets
for common subjects and other options.
3)You may compose your photo while looking through the binocular (the LCD does not need to be on to take a photo). However, for
the most accurate framing, checking the L
CD preview is recommended.
4) Be sure you are not closer than approximately 60 feet from your subject. The binocular optics will focus closer than this, but the
camera focus is preset for best results with distant subjects (no focusing is necessary for the camera). The LCD may be used to verify
that the subject is not too close for sharp results.
5) Hold the camera as steady as possible with both hands and slowly squeeze the SNAP button. The display will go dark briefly while
the file is stored (folder icon is displayed), then you are ready to take another photo. The counter in the lower right corner will change
to display the remaining photo capacity, which depends on the amount of internal or card memory available, as well as the resolution
and quality settings (you may switch to lower settings at any time to “fit” more photos in the remaining memory). Note: the counter
will not always go down by one number after each photo is taken, depending on these settings and actual file content per photo. When the
counter reaches “000”, you are out of memory (storage space) and should download photos you wish to keep so they may be deleted, or you may
remove and install another SD card.
6) Digital zoom up to 6x is available. Press the Right arrow key to zoom in (you will see the result on the LCD). Press the Left arrow
key to zoom back out.
7) Press the LCD/Mode button if you wish to check the photo after you take it, then press it again to return to a live preview. See the
section “Review Menu” for more regarding reviewing and deleting previously taken photos.
Shooting Normal or “Instant Replay” Videos
1) Follow steps 1-4 on the previous page, “Taking Still Photos”
2) To change from still photo to either video mode, press the Menu/OK button. The first menu group is “Camera”-press the Right ar-
row key, the use the Up or Down arrow keys to select Normal or Replay video mode (the camera will return to the live preview display
after selecting a video mode, so you are ready to shoot immediately. In either mode, press SNAP to start recording a new video clip, and
press it again to stop recording and store the video in memory. Here is how the two video modes differ:
Normal video mode will simply shoot a continuous video clip beginning when you press the Snap button, and ending when you press
it again. The recording time is limited only by the amount of internal or card memory currently available. You may record a single long
video until you run out of memory, or multiple shorter videos by stopping and starting recording whenever you wish by pressing Snap.
The counter shows the aproximate available remaining recording time (in seconds) when stopped, and counts down the remaining
time when a Normal video recording is started.
Replay video mode operates differently-at the end of a predetermined time limit (determined by the video resolution and frame rate
set in the Setup menu), the video clip begins to “loop”, or re-record, erasing and replacing the previous events. This is ideal for captur-
ing sports action, as you may begin recording at anytime, then just stop recording right after a touchdown, goal or other highlight.
You’ll be sure you got the peak moment, and won’t have to search through a lot of previous video or keep rewinding to see it again and
again. The available loop lengths are 8, 15, 30 or 60 seconds-the higher the resolution and frames per second, the shorter the loop. In
Replay mode, the counter shows available total recording time (in seconds) when stopped, and counts up from zero to the end of the
loop time limit when recording starts. At the end of the loop, when re-recording begins, the counter automatically resets and starts
over at zero again. Note that if you stop recording part way through a “fresh” loop, your video will contain the last part of the previous
loop segment and the first part of the new one- the camera always saves a full 8, 15, 30 or 60 seconds worth of the most recent events.
Practice a little and experiment with the replay mode to get the feel of how this works before you go to the big game.
3) Press the LCD/Mode button if you wish to check a video after you shoot it. Press the Down arrow key to begin playback, press it
again to stop playback. Press the Left or Right arrow keys to review your previous video or still photo files. Pressing the top arrow key
will display a “thumbnail” review of multiple files-use the arrow keys to highlight the file you wish to review, then press Menu/OK
to select and view it. When you are ready to return to the live preview display to shoot more videos (or stills), press the LCD/Mode
button.
4) See the section “Review Menu” for more regarding reviewing and deleting previously taken videos.
10
11
11-8323 6LIM.indd 10-11 1/28/05 10:45:31 AM

Using The Main Menu
As mentioned earlier in this manual, the Compact Instant Replay is already set for its highest available resolution and
quality right out of the box. Exposure, white balance, and other variables are set automaticallly. This means that you
will get good results for most subjects and lighting without the need to go into the menus and change any settings.
However, we recommend that you become familiar with the available options so that you can improve your photos
if, for example, you decide they are coming out too dark (common for snow scenes with most cameras), or too green
(under some fl uorescent lights). The main, or recording, menu is organized into six groups. Press the “Menu/OK”
button to see these groups. Use the up and down arrow buttons to select a group, then use the Right arrow key and
Up/Down keys to see the items or options that are available within the group. Here is a general description of the
menu groups and their functions:
Using The Main Menu continued
Menu Group Icon Purpose
Setup Provides options for setting: Resolution (fi le size), Quality (fi le compression),
EV (exposure value), WB (white balance), and ISO (light sensitivity).
Format Prepares a new or previously used SD memory card for use. Erases (deletes)
all fi les contained on the card. Can also be used to quickly delete all internal
memory contents if an SD card has not been inserted.
Exit Exits the main menu and returns to the live preview image.
The next few pages provide a complete list of all the items and settings available in the Main Menu groups, along with
descriptions of their function. Follow the same procedures you used in the example above to move around in the menu
screens to highlight and change any of these settings to suit your personal preferences or needs. The Review menu is
different, but simpler, with only four groups (Slide Show, Delete, Editor, and Exit). See the “Review Menu” section
later in this manual for a complete description.
Menu Group Icon Purpose
Camera Mode Allows you to select still photo or one of two video (movie) modes of opera-
tion. The menu options here always show the two modes that are not currently
being used. For example, if you are already in “Replay” video mode, the other
options will be displayed in the Camera menu: Still Photo mode (camera icon)
or Normal Video mode (movie camera w/straight arrow icon).
Exposure Provides options for setting WB (White Balance) and EV (Exposure Value) to
fi ne tune color rendition and exposure for different conditions if the standard
automatic settings do not produce the desired quality or results.
Mode Allows choice of preset “Scenes” which optimize camera settings for sports ac-
tion, landscape and other common photo subjects. Self Timer and Rapid Se-
quence still photo options are also provided in this menu group.
12
13
11-8323 6LIM.indd 12-13 1/28/05 10:45:32 AM

Main Menu System (Default Settings in Bold)
Group Settings Description
CAMERA Still Photo Camera Icon Photographs 3.2 megapixel still frames
Video Clip Normal Video
(Movie icon w/
straight arrow)
Shoots standard continuous video, with time limited only by avail-
able r
emaining internal or SD card memory
Replay Video (Movie
icon w/circling
arrow
Shoots video “loops”, rerecording over earlier video. Loops are fixed
length (from 8 to 60 seconds), as determined by video resolution
and frame rate (FPS).
EXPOSURE WB (
White
Balance)
Auto White Balance is automatically set for correct color reproduction
Daylight Manual setting for outdoor sunny conditions
Light B
ulb Manual setting for indoor tungsten (light bulb) lighting
Fluorescent Manual setting for indoor fluorescent lighting
Cloudy M
anual setting for outdoor overcast or shade conditions
EV -2.0 ~ +2.0 P
rovides manual under/over exposure adjustment in 0.5 EV steps.
Minus values produce darker photos, plus values lighter.
*Scene and Sequence settings in “Mode” are not available when “Camera” is set for Normal or Replay Video
Main Menu System continued
Group Item Settings Description
MODE Scene * Program Standard auto exposure for most subjects or general purpose
Sports Uses higher shutter speeds to help freeze motion
Landscape Deeper zone of focus for extended sharpness from foreground to background
Portrait Shallow zone of focus for photos of people-helps isolate subject from background
Night Uses lower shutter speeds for better low light exposures
Self Timer Yes / No Photo taken after a delay time when Snap button is pressed
Sequence * 3 or 5 Shot 3 or 5 frames taken in rapid sequence when Snap is pressed
SETUP S
ize/
Quality
(Still Photo)
Image Size
(Resolution)
3 options for image size: L(2048x1536 pixels), M (1600x1200 pixels), or S (640x480 pixels)
Higher resolution settings produce sharper/larger prints but reduce total storage space available.
Use lower settings to store more in memory, or for email,etc. L=3.1MP / M=2.1MP / S=0.35MP
Quality
(File Compres-
sion Ratio)
S
ets amount of jpg file compression. Settings are: Fine-FQ (1:4 compression), Normal-NQ (1:8)
and Economy-EQ (1:16). This can be used independently of Image Size to help store more photos
in exchange for slightly reduced quality.
In Normal
Video Mode
only
Quality
(Resolution
& FPS
640x480 pix
els per frame (Resolution)> at 30 or 15 frames per second (Frame Rate)
320x240 pixels per frame >at 30 or 15 frames per second
(After selecting resolution, press Right arrow key to select frame rate (fps))
In Replay Video
Mode only
Quality
(Resolution
& FPS
640x480 pix
els per frame (Resolution)> at 30 or 15 frames per second (Frame Rate)
320x240 pixels per frame >at 30 or 15 frames per second
8, 15, 30 or 60 seconds loop duration dependant on resolution/fps
14
15
11-8323 6LIM.indd 14-15 1/28/05 10:45:32 AM

Group Item Settings Description
Date Setup,
On/Off
Allows setting the correct date/time for your area. If “On” is selected, the date
will appear on the display and be imprinted on all photos.
S
torage Auto Files are stored on SD card if inserted, internal RAM if not
SD F
iles are stored on the SD card only (must be inserted)
Internal Files are stored in internal memory only, never on card
Language 7 av
ailable Selects preferred language for all menu display screens
Rec View Off/1~3 sec Selects time limit of automatic review display after photo is taken
File Name Reset/Series Sets fi le numbering system. If Reset is selected, after all fi les in internal or card
memory are deleted, fi le numbers for new photos will start over at “000”. If
Series is selected, the fi le numbers for new photos will resume at the next number
after the last number used for previous fi les.
Beep On / Off Turns beep alert sound on or off
Reset All Yes / No Selecting “Yes” restores all settings to original defaults (shown in Bold)
FORMAT Format Yes / No Formats card for Compact Instant Replay fi les. Erases all contents.
EXIT E
xits menu system and returns to live preview
Review Menu
Reviewing and Deleting Your Photos and Videos
Main Menu System continued
Group Item Settings Description
SLIDE
SHOW
Yes / No Selecting “Yes” will begin to show a review of all images currently
in the internal or card memory, automatically changing to the next
image every few seconds.
Press “LCD/Mode” to enter Review mode. Use the Left/Right arrow buttons to cycle through the stored photos/vid-
eos. Once you are in review mode , pressing the Menu/OK button will enter the review set of menus. These operate
in the same way previously described in the main menu system instructions (use the arrow keypad to navigate to the
desired menu group and options, press OK to confi rm a setting), but with different menu items as shown here:
# Icon
1 Date of photo or video fi le (Date feature must be setup and turned on)
2 Location of curr
ent review fi le (INternal memory or SD Card)
3 R
esolution of current review fi le
4 Q
uality (File Compression) of current review fi le
5 C
urrent fi le number (left numeral) : Total fi les in memory (right numeral)
6 I
ndicates fi le type (Still Photo, Normal Video, Replay Video)
7 B
attery Indicator
Review Display Icons
1
2
3
4
5
6
7
16
17
11-8323 6LIM.indd 16-17 1/28/05 10:45:33 AM

Group Item Setting Description
DELETE Delete
One
Yes / No Deletes the currently displayed photo or video from memory. Use
Up/Down arrows to find the file you want to delete. To delete, high-
light the “Delete One” icon and press “OK”. Then highlight “Yes”
and press “OK” to delete the file.
Delete
All
Yes / No Deletes all stored files. To delete all files, (except locked-see below)
highlight the “Delete All” icon and press “OK”. Then highlight
“Yes” and press “OK” to delete all files currently in memory.
EDITOR Protect Lock /
Unlock
Locking a photo or video file prevents accidental erasure. Can be
used together with “Delete All” to quickly delete all but one or two
photos. To lock the currently displayed photo or video, highlight
the “Lock” icon and press “OK”. To unlock a previously locked file,
select it using the Up/Down arrows, highlight the “Lock” icon again,
and press “OK”.
Rotate -90 Degree
or +90
D
egree
Rotates view of the current image by 90 degrees in either direction.
EXIT Exit Exits the review menu and returns to the last selected review image.
System Requirements (Minimum)
Software Installation
Transferring The Photos & Videos to Your PC - Step by Step
OS: Windows® 98/98SE/2000/ME/XP
CPU: MMX Pentium® 200MHZ equivalent or faster (Pentium® III 500 MHz for PhotoSuite5™)
Memory: 32MB minimum (64MB recommended for PhotoSuite)
SVGA video card w/2MB VRAM, 800x600 screen display, 16 bit High color
200 MB available hard disk space (if installing PhotoSuite)
Internal USB Port
If you are using Windows 98, you must install drivers before connecting the camera to your PC. Insert the CD-ROM
into your computer’s CD drive; it will auto-run and the install screen will be displayed. Select “Install Driver”, then
follow the directions. After installation, restart your computer. Windows 2000, ME, and XP do not require drivers,
as the camera uses the USB mass storage standard , allowing the photo files to be accessed as if they were stored on
an external hard drive. For any Windows OS, if you are not already using photo editing software you prefer, you may
install Roxio PhotoSuite® from the CD-ROM. Be sure to read the “Release Notes” completely, noting any tips or
potential issues relevant to your PC configuration and OS.
1. Be sure the driver has been installed first if you are on Windows 98/98SE.
2. Make sure the Instant Replay power is on and connect the supplied cable to the camera’s USB port (open the
connector cover on the left side of the Replay), then directly to a main USB port on your computer-do not use front
panel/keyboard USB ports or unpowered “hubs”.
3. The LCD display will turn off to conserve battery power, and
the Instant Replay will be recognized as a standard
“USB Mass Storage” device. This means that the camera files can be easily viewed, edited, or copied to your hard
drive, just as if they were stored on an external hard drive or a CD-ROM.
Review Menus continued
18
19
11-8323 6LIM.indd 18-19 1/28/05 10:45:33 AM

4. (This step is not required with Windows XP, simply use the on-screen options to view, copy or edit your photos).
Open My Computer or Windows Explorer. The camera will be seen as a new “Removable Disk” with an unused
drive letter assigned to it. Double click this new “Disk” icon, open the “DCIM” folder inside, then the folder(s)
inside that (“100BNxxx” ,etc). Your photos/videos are the files inside-they have the prefix “PICT__” followed by a
number, same as seen earlier on the camera’s display when you review photos. Single clicking any file should show
a small preview image.
5. Click “Edit>Select All” (or click on one photo, contol+click to select multiple photos), then “Edit>Copy to
Folder” (in Windows menus). Select an existing folder on your hard drive, such as “My Pictures”, or create a new
folder (“Hawaii Vacation”, etc), then click “OK” to transfer copies of the photo files you want.
6. After the photos are transferred to your hard drive, you can disconnect the camera. Windows 2000 may produce
a screen warning that you have disconnected a USB device without stopping or ejecting the “disk” first (your
photo files will not be harmed). If so, check the box that adds an icon to your system tray or taskbar. Then next
time you finish transferring photos, you can click that icon first, and “Stop the USB Mass Storage Device” before
disconnecting the camera.
Transferring The Photos & Videos to Your PC continued
Note: If your PC will not play the .avi movie files in Windows Media Player, you may need to
download a newer version of Media Player or Direct X from Microsoft.com. The movie files can also
be played back with the QuickTime Player, included with many computers, or available as a free
download from Apple.com.
Transferring The Photos & Videos to Your PC continued
7. You’re now ready to open the photo files in any photo editing software. Just use File>Open and go to the
folder where you stored the photos earlier. If you are using PhotoSuite, select File>Open Photo, then use the
“Look in” pull down menu at the top of the Open window, select “My Computer”, select your hard drive, and
double click any photo in the folder where you copied the files from the camera. It is also possible to open and
work with your photos directly from the Instant Replay while it is still connected.To do this with PhotoSuite,
first follow steps 1-3, then open PhotoSuite, select File>Open Photo and use the “Look in” menu to select My
Computer, then select the “Removable Disk”, and open the folders inside until you get to the JPEG photo files.
If you choose to work this way, from a connected camera, be sure that you save the photo (when you are done
editing) to your hard drive, and not the camera’s memory or card. To do this in PhotoSuite, after clicking “Done”,
answer “Save Changes?” with “Yes”, but then answer “Replace Existing File”? with “No” and use the “Save As”
dialog box to save the edited photo in a folder on your hard drive (“Save In>Local Disk”), not the “Removable
Disk” (camera).
8. If you are new to photo editing on a computer, consult your software’s Help menu (PhotoSuite has extensive
built-in Help) for tips on using its features. Along with adjusting the brightness, contrast, sharpness and color of
your photos, you can resize the photo to fit the paper if you are printing, or save a smaller, low or medium resolu-
tion version for email or inserting into documents. When you are ready to save your edited file, you may want to
use “Save As” and give it a more descriptive name than “100BN___”. Doing this also preserves the original file
as a backup to reopen and re-edit later. Make sure you have successfully transferred all the photos you wanted to
save before using “Delete All” on your camera to make room for new images .
20
21
11-8323 6LIM.indd 20-21 1/28/05 10:45:33 AM

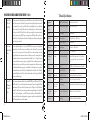
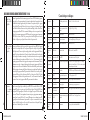
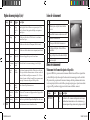
Image Size Megapixels
(approx)
Quality * Internal
Memory**
64 MB SD
Card
L 2048x1536 3.1 FQ 15 photos 60 photos
NQ 31 124
EQ 62 248
M 1600x1200 2.1 FQ 25 100
NQ 51 204
EQ 102 408
S 640x480 0.35 FQ 160 640
NQ 321 1284
EQ 642 2568
Photo Storage Capacity Reference (max capacity, +/- 2 photos)
* Selects amount of file compres-
sion (jpg ratio)
(FQ=low/EQ=high)
FQ: Fine Quality (1:4)
NQ: Normal Quality (1:8)
EQ: Economy Quality (1:16)
**Internal RAM available for
photo files: 16 MB
Image Size refers to the pixel
dimensions, or resolution, of the
digital file.
Actual storage capacity will vary
based on content of each photo
file. You may be able to take a few
photos more or less than the listed
average capacity.
Use large size and high quality set-
tings for photos you may want to
enlarge or crop later. If required,
they may also be reduced to a
smaller file size using your photo
software. Use small size and/or
low quality settings if you will
only email, insert into documents,
or make small prints, and do not
want to resize the file later.
TWO-YEAR LIMITED WARRANTY
Your Bushnell
®
product is warranted to be free of defects in materials and workmanship for
two years after the date of purchase. In the event of a defect under this warranty, we will,
at our option, repair or replace the product, provided that you return the product postage
prepaid. This warranty does not cover damages caused by misuse, improper handling, in-
stallation, or maintenance provided by someone other than a Bushnell Authorized Service
Department.
Any return made under this warranty must be accompanied by the items listed below:
1)
A check/money order in the amount of $10.00 to cover the cost of postage and handling
2) Name and address for product return
3) An explanation of the defect
4) Proof of Date Purchased
5) Product should be well packed in a sturdy outside shipping carton, to prevent damage in transit,
with return postage prepaid to the address listed below:
IN U.S.A. Send To: IN CANADA Send To:
Bushnell Performance Optics Bushnell Performance Optics
Attn.: Repairs Attn.: Repairs
8500 Marshall Drive 25A East Pearce Street, Unit 1
Lenexa, Kansas 66214 Richmond Hill, Ontario L4B 2M9
For products purchased outside the United States or Canada please contact your local dealer
for applicable warranty information. In Europe you may also contact Bushnell at:
BUSHNELL Performance Optics Gmbh
European Service Centre
MORSESTRASSE 4
D- 50769 KÖLN
GERMANY
Tél: +49 (0) 221 709 939 3
Fax: +49 (0) 221 709 939 8
This warranty gives you specific legal rights.
You may have other rights which vary from country to country.
©2005 Bushnell Performance Optics
FCC Note:
This equipment has been tested and found to comply
with the limits for a Class B digital device, pursuant
to Part 15 of the FCC Rules. These limits are designed
to provide reasonable protection against harmful
interference in a residential installation. This equipment
generates, uses and can radiate radio frequency energy
and, if not installed and used in accordance with the
instructions, may cause harmful interference to radio
communications. However, there is no guarantee that
interference will not occur in a particular installation. If
this equipment does cause harmful interference to radio
or television reception, which can be determined by
turning the equipment off and on, the user is encouraged
to try to correct the interference by one or more of the
following measures:
· Reorient or relocate the receiving antenna.
·
Increase the separation between the equipment and receiver
.
· Connect the equipment into an outlet on a circuit
different from that to which the receiver is connected.
· Consult the dealer or an experienced radio/TV
technician for help.
The shielded interface cable must be used with the
equipment in order to comply with the limits for a digital
device pursuant to Subpart B of Part 15 of FCC Rules.
Specifications and designs are subject to change without
any notice or obligation on the part of the manufacturer.
22
23
11-8323 6LIM.indd 22-23 1/28/05 10:45:34 AM

FRANÇAIS
24
25
11-8323 6LIM.indd 24-25 1/28/05 10:45:34 AM

Félicitations et merci d’avoir acheté le Compact Instant Replay
™
Bushnell
®
! Le Compact
Instant Replay est idéal pour tous les événements sportifs et l’observation de la nature car
il associe des jumelles compactes, de haute qualité, à grossissement de 8 fois, à un appareil
photo numérique polyvalent, à 3,2 mégapixels, doué d’une étonnante capacité vidéo. Le
Compact Instant Replay présente une « double personnalité » car il sait prendre des photos
fixes numériques, à haute résolution, aussi bien que des clips vidéo qui se « recyclent » ou
se rafraîchissent automatiquement, toutes les 8 à 60 secondes (selon les réglages de qualité).
Vous êtes ainsi toujours sûr de saisir le vif de l’action ! Vos photos et clips vidéo sont
automatiquement enregistrés dans la mémoire interne ou sur une carte SD (Secure Digital)
optionnelle et peuvent être visionnés instantanément sur l’écran LCD relevable, visionnés
sur un écran de TV, ou téléchargés sur un ordinateur, sans avoir à installer de logiciel spécial.
(Avec Windows 2000, XP ou Mac. Le logiciel est fourni pour Windows 98/98SE).
Avant d’utiliser votre nouveau Compact Instant Replay, veuillez lire les instructions de ce
manuel et prendre quelques instants pour vous familiariser avec le fonctionnement et les
caractéristiques attrayantes de l’instrument.
GUIDE RAPIDE : COMPACT INSTANT REPLAY 11-8323 BUSHNELL
1
Installation
des piles et de
la carte SD
(optionnelle)
Introduisez 2 piles de type AAA (voyez « Spécifications ») dans le compartiment de piles, au bas du socle
de l’appareil (notez l’indication de polarité à l’intérieur). Une carte mémoire SD (optionnelle) offrant
une plus grande capacité de stockage de photos peut aussi être installée dans son emplacement, à l’arrière
du socle de l’appareil. (Abaissez le volet en caoutchouc de l’emplacement de carte. Introduisez la carte
avec le côté étiquette vers le bas, jusqu’à ce qu’elle s’enclenche avec un déclic puis remettez le volet en
caoutchouc en place).
2
Activation de
l’appareil
Levez l’écran à l’aide de l’onglet situé à l’arrière. Appuyez brièvement sur le bouton POWER (MARCHE).
L’écran de départ doit s’allumer puis s’éteindre et la DEL rouge d’alimentation doit rester allumée. Ap-
puyez sur LCD/Mode pour rallumer l’écran : vous devez voir l’image actuelle « en direct » vue par
l’objectif de l’appareil situé entre les lentilles des jumelles. L’appareil s’éteint automatiquement au bout
de 2 minutes d’inactivité pour économiser l’énergie des piles. Vous pouvez aussi l’éteindre manuel-
lement en appuyant sur le bouton LCD/Mode ; il n’est pas nécessaire qu’il soit allumé pour prendre
une photo. L’appareil entier se désactive automatiquement au bout de 5 minutes d’inactivité (aucun
bouton n’a été actionné). Pour le désactiver manuellement, appuyez brièvement sur le bouton POWER
(MARCHE). Les réglages par défaut de l’appareil fournissent une qualité optimum dans la plupart des condi-
tions. Il est toutefois recommandé de lire tout le manuel pour profiter des nombreuses options disponibles pour
différentes situations de photographie et les préférences de l’utilisateur.
3
Formatage de la
carte SD (option-
nelle)
Si vous avez introduit une carte SD précédemment, formatez-la avant d’utiliser l’appareil. Appuyez sur
le bouton Menu/OK, au centre du clavier argent. Appuyez 4 fois sur la flèche vers le bas pour sélection-
ner « Format ». Appuyez sur la flèche vers la droite puis sur la flèche vers la gauche pour sélectionner
« Yes » (oui). Appuyez sur Menu/OK ; vous verrez un avertissement disant que toutes les images seront
effacées ; sélectionnez « Yes » et appuyez de nouveau sur OK. Utilisez la flèche vers le bas pour sélection-
ner « Exit » (sortir) et appuyez sur OK.
4
Réglage de
l’optique des
jumelles à la vue
de l’utilisateur
Si vous portez des lunettes, roulez les œilletons en caoutchouc. Réglez l’écartement entre les cylindres
gauche et droit, en regardant dans les jumelles, de façon à voir une seule image circulaire. Puis repérez
un objet éloigné comportant de fins détails et réglez la molette centrale de mise au point jusqu’à ce que
l’objet paraisse net dans l’oculaire gauche. Regardez maintenant à travers l’oculaire droit seulement.
Si l’objet n’apparaît pas aussi net, tournez l’oculaire droit (réglage dioptrique) jusqu’à ce qu’il le soit.
Une fois cela réglé, vous n’avez plus besoin de tourner le réglage dioptrique et vous pouvez simplement
utiliser la molette centrale de mise au point.
27
26
11-8323 6LIM.indd 26-27 1/28/05 10:45:35 AM

QUICK GUIDE: BUSHNELL COMPACT INSTANT REPLAY 11-8323
5
Saisie d’une
photo ou d’un
clip vidéo
Maintenez l’appareil immobile des deux mains et appuyez sur le bouton SNAP (déclencheur) pour pren-
dre une photo fixe. Vous pouvez entendre un bip (qui peut être désactivé) suivi d’une pause brève (icône
de fichier affichée) lorsque l’appareil met la photo en mémoire. Pour prendre un clip vidéo, appuyez
une fois sur Menu/OK puis sur la flèche vers la droite pour voir les options vidéo du menu de l’appareil
photo. Utilisez les flèches vers le haut et vers le bas pour sélectionner Replay (boucle) ou Normal (con-
tinu) puis appuyez sur Menu/OK. Ceci vous ramène à l’affichage en direct et vous pouvez alors saisir
le clip vidéo à tout moment en appuyant sur SNAP. Pour arrêter d’enregistrer, appuyez de nouveau sur
SNAP. Veuillez lire la section « Modes Vidéo » pour une explication détaillée des différences entre les modes
« Normal » et « Replay » ainsi que la façon de déterminer la durée d’enregistrement vidéo.
6
Revoir et effacer
des photos et
clips vidéo
Pour revoir ou afficher une photo fixe ou un clip vidéo, appuyez sur le bouton LCD/Mode (appuyez
deux fois si l’écran n’était pas déjà actif). Vous pourrez voir la photo fixe ou le clip vidéo (première im-
age) le/la plus récent(e). Pour revoir des photos ou clips précédents, un à la fois, appuyez sur la flèche vers
la gauche. L’icône du coin inférieur droit de l’écran doit indiquer si le fichier actuel est celui d’une photo
fixe ou d’un clip vidéo normal ou « instant replay ». Les nombres au-dessus de cette icône correspondent
au numéro du fichier actuel et au nombre total de fichiers (2 sur 3, etc.). Pour visionner un clip vidéo
enregistré, appuyez sur la flèche vers le bas (appuyez de nouveau pour arrêter le visionnement). Pour voir
simultanément en « onglets » les images de plusieurs photos/clips enregistrés, appuyez sur la flèche vers
le haut après avoir accédé au mode de visualisation. Utilisez les touches des flèches pour sélectionner un
seul fichier et appuyez de nouveau sur la flèche vers le haut pour voir en grand format. Pour effacer une
photo/un clip vidéo, appuyez sur Menu/OK puis une fois sur la flèche vers le bas (icône de la poubelle).
Appuyez sur la flèche vers la droite ; sélectionnez « Delete One » (effacer une) ou « Delete All » (effacer
tout) et appuyez sur la flèche vers la droite puis sélectionnez « Yes » (oui). Retournez à la colonne Menu,
sélectionnez « Exit » (sortir) et appuyez sur Menu/OK pour retourner à la visualisation.
7
Connexion à
un ordinateur
et transfert de
photos
Avant de connecter l’appareil photo, installez le pilote du CD-ROM si vous utilisez Windows 98/98SE
puis installez PhotoSuite si vous n’avez pas de logiciel d’édition de photos. Reliez le câble USB fourni
entre la prise USB de l’appareil photo (à l’arrière du socle de l’appareil) et un port USB sur l’ordinateur.
Si vous avez Windows XP, suivez simplement les instructions/options qui apparaissent automatique-
ment sur l’écran. Si vous avez Win 98 ou 2000, ouvrez « My Computer » (mon ordinateur) sur votre PC.
L’appareil photo est identifié comme un « disque amovible » ; vos photos se trouvent dans les dossiers à
l’intérieur ; il suffit de les faire glisser ou de les copier/coller dans un dossier, sur le disque dur. Reportez-
vous à la section « Transfert de photos » de ce manuel.
Caractéristiques techniques
Grossissement 8 x Taille fichier photo fixe (résolu-
tion)
2 048 x 1 536, 1 600 x 1 200, 640 x 480
Diamètre de
l’objectif
30 mm T
aux de compression de fichier
(qualité)
1:4 (FQ), 1:8 (NQ), 1:16 (EQ)
Pupille de sortie 3,75 Mémoir
e interne Mémoire Flash 16 Mo
Largeur de champ 97 m à 914 m E
xtension de mémoire Carte Secure Digital, jusqu’à 1 Go de capacité
Dégagement
oculair
e
13 mm Format fichier (fixe/vidéo) JPEG /MJPEG (.AVI)
Traitement de
lentille
M
ulticouches Gestion de fichier DCF (version 1.0), format FAT 16
Type de prisme À vision directe, BK-7 Écran LCD 38 mm, à matrice active, 120, 480 pixels
Plage de mise au
point (jumelles)
5,5 m ~ infini Résolution
vidéo/fréquence image 620 x 480 ou 320 x 240 pixels par image / 30 ou 15 images/s.
Durée de boucle mode Replay : 8/15/30/60 secondes (suivant la
résolution/fréquence sélectionnée)
Poids 406,5 g S
ortie vidéo NTSC/PAL, via port USB 8 broches avec câble spécial (inclus)
Type capteur CMOS P
lage de valeurs d’exposition +/- 2 EV par paliers de 0,5 EV
Pixels effectifs 3,2 mégapixels Options de balance des blancs Auto, jour, nuageux, fluorescent, incandescent
Couleur Couleur 24 bits Scènes préréglées P
rogramme, sports, paysage, portrait, nuit
Obturateur Électronique, 1/16 à
1/1000 seconde
Langues de menu anglais, espagnol, français, allemand, italien, por
tugais, japonais
Plage de mise au
point (appareil
photo)
F
ixe, approx. 18 m
~ infini
Désactivation automatique (après
inactivité)
Écran LCD : 2 min. / Tout l’appareil : 5 min.
Ouverture dia-
phragme
f/5,6 Alimentation 2 piles type AAA, alcalines/lithium/N
iMh
28
29
11-8323 6LIM.indd 28-29 1/28/05 10:45:35 AM

Port USB/sortie vidéo
DEL
d
’alimentation
Emplacement de carte SD
Avertisseur
sonore
Icônes affi chées sur l’écran LCD
# Icône
1
Indicateur de tension de pile (2/3 de charge représenté)
2
Nombre de photos restant (en fonction de la mémoire disponible)
3
Mode photo fi xe
4
Qualité (compression de fi chier) Fine/Normal/Economy (haute/nor-
male/économie)
5
Résolution (taille de fi chier) Large/Medium/Small (grand/moyen/petit)
6 Balance des blancs Non affi ché sauf après changement de “Auto” par défaut dans
l’exposition
7 Scène Non affi ché sauf après changement de “Program” par défaut au menu Mode
8 Mode de saisie de séquence Non affi ché sauf si sélectionné au menu Mode
Visualisation de photo fi xe
Affi chage fi lm (vidéo)
# Icône
1
Indicateur de tension de pile
(plein)
2
Total secondes de vidéo dis-
ponible (en fonction de la
mémoire disponible)
3
Mode fi lm
4
Résolution (FQ=640x480 /
NQ=320x240)
5
Fréquence image (30 ou 15
images/s)
Identifi cation des pièces
Bouton LCD/Mode
Écran LCD
Clavier 5 options
av
ec bouton
Menu/OK
Bouton Snap
(déclencheur)
M
olette
centrale de
mise au point
(jumelles)
Réglage
dioptrique
345
8 7
6
1
2
Vidéo Normal
Vidéo Replay
(relecture)
1
2
345
Vidéo Replay
Bouton
Power
(marche/
arrêt)
31
30
11-8323 6LIM.indd 30-31 1/28/05 10:45:37 AM

Mise en place des piles
Mise en place d’une carte SD
Retournez le Compact Instant Replay et glissez le couvercle du compartiment de
piles pour l’ouvrir dans le sens représenté à droite. Introduisez 2 piles alcalines ou au
lithium, de type AAA, dans le compartiment, dans le sens indiqué par les schémas
à l’intérieur puis remettez le couvercle en place jusqu’à ce qu’il s’enclenche avec
un déclic. Remarque : Il est également possible d’utiliser des piles rechargeables à
hydrure métallique de nickel (type NiMh) mais certains modèles risquent de ne pas
avoir la puissance suffi sante pour alimenter l’Instant Replay. Il est recommandé
d’utiliser des piles NiMh d’une intensité nominale de 2 300 mA/h ou plus.
L’appareil photo peut enregistrer de 15 à 642 photos environ dans sa mémoire interne
de 16 Mo, suivant les réglages de résolution et de qualité (consultez le tableau à la
fi n de ce manuel). Pour augmenter la capacité de stockage, vous pouvez ajouter une
carte mémoire optionnelle, de type SD (Secure Digital), d’une capacité maximum de
1 Go. Cette carte s’insère dans l’emplacement situé à l’arrière du socle de l’appareil,
comme illustré sur le schéma précédent. Introduisez la carte SD avec le côté étiquette
vers le bas. Remarque : Vérifi ez que l’alimentation est coupée avant d’introduire et
de retirer une carte pour éviter de perdre des fi chiers ou d’endommager la carte. Il
n’est pas nécessaire de formater une carte neuve mais une carte qui a déjà été utilisée
dans d’autres dispositifs doit être formatée par le Compact Instant Replay avant d’y
enregistrer des photos (consultez le menu Setup/Réglage à la section suivante). Notez
que ce formatage effacera tous les fi chiers enregistrés sur la carte ; veillez donc à les
télécharger ou à les copier préalablement si vous souhaitez les conserver.
Réglage de base des jumelles et de l’appareil photo
Avant de prendre des photos ou des clips vidéo, veuillez prendre quelques instants pour régler le Compact Instant Replay à votre vision et
selon vos préférences. Si vous ne portez pas de lunettes, laissez les œilletons d’oculaire en caoutchouc en position relevée ou roulez-les pour
les abaisser si vous en portez. Saisissez les jumelles par les côtés gauche et droit et écartez ou rapprochez les deux moitiés tout en regardant
dans les jumelles pour régler l’espace entre les oculaires afi n que vous puissiez voir une seule image circulaire. Repérez un objet éloigné
comportant de fi ns détails (arbre, panneau, mur de briques, etc.) et réglez la molette centrale de mise au point jusqu’à ce que l’objet paraisse
net quand vous le regardez dans l’oculaire gauche uniquement. Puis, en regardant le même objet seulement dans l’oculaire droit, tournez
l’oculaire droit jusqu’à ce que l’image y soit tout aussi nette. Il s’agit du réglage dioptrique qui compense la différence de vision entre les
deux yeux. Une fois cette méthode initiale de réglage suivie, il n’est plus nécessaire d’ajuster le réglage dioptrique et vous pouvez simplement
utiliser la molette centrale pour mettre les objets au point dans les jumelles (la distance de mise au point minimum est d’environ 5 m).
Les photos et clips vidéo numériques ne sont pas affectés par la molette centrale de mise au point car l’objectif de l’appareil photo situé
entre les oculaires des jumelles ne nécessite pas de mise au point. Il est préréglé de manière que les objets situés approximativement entre
18 m et l’infi ni paraissent nets. Notez que les jumelles peuvent effectuer une mise au point plus rapprochée que l’appareil photo. Vérifi ez
l’image en direct sur l’écran LCD pour vous assurer que vous êtes suffi samment éloigné du sujet pour avoir une photo nette. L’objectif
de l’appareil photo fournit un grossissement de 8 fois qui est le même que celui de l’optique des jumelles et il est aligné pour qu’un objet
centré avec les jumelles soit aussi centré sur les photos et clips vidéo. Par conséquent, il n’est pas nécessaire d’avoir l’écran LCD activé ou
même relevé pour pouvoir saisir des photos ou clips vidéo. La réduction de l’usage de l’écran LCD permet de prolonger sensiblement la
durée de vie des piles.
Avant d’utiliser l’appareil photo pour la première fois, vous trouverez utile d’accéder au menu de l’appareil et de régler la date. Levez l’écran
LCD et appuyez sur le bouton de marche. Une fois que le témoin rouge d’activation est allumé, appuyez sur LCD/Mode pour activer
l’écran. Appuyez sur le bouton Menu/OK au centre du clavier puis 3 fois sur la fl èche vers le bas pour parvenir au menu Setup/Réglage.
Appuyez une fois sur la fl èche vers la droite puis sur la fl èche vers le bas pour arriver à « Date ». Appuyez alors deux fois sur la fl èche vers
la droite pour accéder au réglage de la date. Utilisez les fl èches vers la gauche/droite pour sélectionner la partie de la date que vous voulez
changer puis utilisez les fl èches vers le haut ou le bas pour la changer. Pour changer le format de la date de façon que le jour, le mois et
l’année soient dans l’ordre souhaité, allez jusqu’à l’icône des fl èches, à la partie supérieure gauche de l’affi chage de la date et appuyez sur
les fl èches vers le haut/bas. Réglez l’heure (format de 24 h) avec les 4 chiffres au bas de l’affi chage de la date, de façon que la date change
automatiquement à minuit à l’endroit où vous vous trouvez. Une fois la date et l’heure réglées, appuyez une fois sur le bouton Menu/OK
puis de nouveau pour sauvegarder le réglage et sortir. Vous pouvez alors appuyer sur la fl èche vers le bas et choisir si vous souhaitez que la
date apparaisse à l’affi chage et sur vos photos ou pas (« Show Date On/Off » [indication de date oui/non]). Continuez alors à appuyer sur
la fl èche vers la gauche pour revenir à « Setup » (réglage) ; descendez jusqu’à « Exit » (sortir) et appuyez sur Menu/OK.
Emplacement de carte
(soulevez le volet)
Piles installées
Couvercle du compartiment
de piles
33
32
11-8323 6LIM.indd 32-33 1/28/05 10:45:38 AM

Saisie de photos fixes
Après avoir effectué le réglage initial comme décrit aux pages précédentes, vous êtes prêt à prendre une photo :
1) Levez l’écran LCD et appuyez brièvement sur le bouton Power (marche/arrêt) (la DEL rouge s’allume). Appuyez sur le bouton
LCD/Mode pour activer l’écran LCD si vous souhaitez voir l’image avant de prendre la photo ou vérifier les réglages de menu, l’état
de charge des piles, etc.
2)
Le Compact Instant Replay passe aux réglages par défaut : résolution et qualité les plus élevées, ainsi que « tout sur automatique »
lorsqu’il est mis en marche la première fois, afin que vous puissiez prendre immédiatement d’excellentes photos. Si vous préférez utiliser
des réglages différents, consultez la section « Utilisation du menu principal » pour savoir comment trouver et modifier les réglages tels
que la résolution et l’exposition, l’utilisation de préréglages de scène pour les sujets habituels et d’autres options.
3) Vous pouvez composer votre photo tout en regardant dans les jumelles (il n’est pas nécessaire que l’écran LCD soit activé pour pren-
dr
e une photo). Toutefois, pour obtenir le cadrage le plus précis, il est recommandé de vérifier l’image préalable sur l’écran LCD.
4) Vérifiez que le sujet ne se trouve pas à moins de 18 mètres environ. L’optique des jumelles peut effectuer une mise au point à une
distance inférieure, mais le réglage de mise au point de l’appareil photo est préréglé pour obtenir les meilleurs résultats avec les sujets
éloignés (aucune mise au point n’est nécessaire pour l’appareil photo). Vous pouvez utiliser l’écran LCD pour vérifier que le sujet n’est
pas trop proche pour donner une image nette.
5) Maintenez l’appareil aussi immobile que possible, des deux mains, et appuyez lentement sur le bouton SNAP (déclencheur). L’écran
s’obscurcit brièvement pendant l’enregistrement du fichier (l’icône de fichier apparaît) puis vous pouvez prendre une autre photo. Le
compteur situé dans le coin inférieur droit indique la capacité de photos restante qui dépend de l’espace disponible dans la mémoire
interne ou sur la carte mémoire, ainsi que des réglages de résolution et de qualité (vous pouvez passer à des réglages inférieurs à tout
moment pour « loger » davantage de photos dans l’espace restant). Remarque : Le nombre du compteur ne descend pas toujours d’une
unité après chaque photo prise, car cela dépend des réglages et du contenu réel du fichier par photo. Lorsque le compteur atteint 000,
la mémoire est pleine (il n’y a plus d’espace de stockage) et vous devez télécharger les photos que vous souhaitez conserver pour pouvoir
les effacer ou bien vous pouvez retirer la carte en place et en installer une autre.
6) Un zoom numérique grossissant jusqu’à 6 fois est disponible. Appuyez sur la flèche vers la droite pour effectuer un zoom avant (vous
pouvez voir le résultat sur l’écran LCD). Appuyez sur la flèche vers la gauche pour sortir du zoom.
7) Appuyez sur le bouton LCD/Mode si vous voulez vérifier la photo après l’avoir prise et appuyez de nouveau sur ce bouton pour
retourner à la visualisation en direct. Pour plus de détails sur la façon de voir et d’effacer les photos déjà prises, consultez la section
« Menu de visionnement ».
Saisie de clips vidéo en mode normal ou « Instant Replay »
1) Effectuez les opérations 1 à 4 de la page précédente : « Saisie de photos fixes ».
2) Pour passer du mode de photo fixe à l’un ou l’autre des modes vidéo, appuyez sur le bouton Menu/OK. Le premier groupe de menu
est « Camera » (appareil photo). Appuyez sur la flèche vers la droite puis utilisez les flèches vers le haut ou le bas pour sélectionner le mode
vidéo Normal ou Replay (l’appareil retourne à la visualisation en direct après la sélection d’un mode vidéo ; vous êtes donc prêt à filmer
immédiatement). Dans un mode comme dans l’autre, appuyez sur SNAP pour commencer à enregistrer un nouveau clip vidéo et appuyez
dessus de nouveau pour arrêter l’enregistrement et garder le clip en mémoire. Voici ce en quoi les deux modes vidéo diffèrent :
Au mode vidéo Normal, l’enregistrement continu du clip vidéo commence quand vous appuyez sur le bouton Snap (déclencheur) et se
termine quand vous appuyez de nouveau dessus. La durée d’enregistrement n’est limitée que par le volume de mémoire interne ou sur carte
disponible. Vous pouvez enregistrer un seul long clip vidéo jusqu’à ce que la mémoire soit pleine ou plusieurs clips courts en arrêtant et en
reprenant l’enregistrement quand vous le voulez, en appuyant sur Snap. Quand il est arrêté, le compteur indique la durée d’enregistrement
approximative restante (en secondes) et il décompte la durée restante quand un enregistrement en mode Normal a commencé.
Le mode vidéo Replay fonctionne différemment. À la fin d’une durée prédéterminée (déterminée par la résolution vidéo et la fréquence
d’image choisies dans le menu Réglage), le clip vidéo recommence une « boucle » ou un nouvel enregistrement, en effaçant et en rempla-
ç
ant les événements précédents. C’est une fonction idéale pour saisir l’action des sports car vous pouvez commencer à enregistrer à tout mo-
m
ent puis arrêter juste après un but ou une autre action importante. Vous serez sûr de capter le vif de l’action et vous ne serez pas obligé de
rechercher dans un long film ou de rembobiner pour revoir l’image. Les durées de boucle disponibles sont : 8, 15, 30 ou 60 secondes ; plus
la résolution et la fréquence d’images par seconde sont élevées, plus la boucle est courte. Au mode Replay, quand il est arrêté, le compteur
indique la durée d’enregistrement totale disponible (en secondes) et compte à partir de zéro jusqu’à la limite de durée de la boucle, une fois
que l’enregistrement a commencé. À la fin de la boucle, quand l’enregistrement recommence une nouvelle boucle, le compteur se remet
automatiquement à zéro et recommence le décompte. Notez que si vous arrêtez d’enregistrer à un moment quelconque d’une nouvelle
boucle, le clip vidéo contiendra la dernière partie de la boucle précédente et la première partie de la boucle actuelle ; l’appareil conserve
toujours une portion complète de 8, 15, 30 ou 60 secondes des événements les plus récents. Exercez-vous à utiliser le mode « replay » pour
comprendre son fonctionnement avant d’aller à un match important.
3) Appuyez sur le bouton LCD/Mode si vous voulez vérifier un clip vidéo après l’avoir filmé. Appuyez sur la flèche vers le bas pour com-
m
encer le visionnement et appuyez de nouveau pour l’arrêter. Appuyez sur la flèche vers la gauche ou vers la droite pour revoir les photos
fixes ou clips vidéo enregistrés précédemment. Appuyez sur la flèche du haut pour afficher les onglets de plusieurs fichiers ; utilisez les
touches des flèches pour mettre le fichier à visionner en surbrillance et appuyez sur Menu/OK pour le sélectionner et le visionner. Quand
vous êtes prêt à retourner au mode de visualisation en direct afin de saisir d’autres clips vidéo (ou photos fixes), appuyez sur le bouton
LCD/Mode.
4) Pour plus de détails sur la façon de voir et d’effacer les clips vidéo déjà saisis, consultez la section « Menu de visionnement ».
34
35
11-8323 6LIM.indd 34-35 1/28/05 10:45:39 AM

Utilisation du menu principal
Comme il a été mentionné plus haut dans ce manuel, le Compact Instant Replay est réglé par défaut à la résolution
et à la qualité les plus élevées. L’exposition, la balance des blancs et d’autres variables se règlent automatiquement.
Cela signifi e que vous pouvez obtenir de bons résultats pour la plupart des sujets et des conditions d’éclairage, sans
avoir à entrer dans des menus et à changer des réglages. Toutefois, nous recommandons de vous familiariser avec les
options disponibles, de façon à pouvoir améliorer vos photos si, par exemple, vous trouvez qu’elles sont trop sombres
(phénomène fréquent avec des paysages de neige, dans la plupart des appareils photo), ou trop vertes (sous certains
éclairages fl uorescents). Le menu principal ou menu d’enregistrement est organisé en six groupes. Appuyez sur le bou-
ton « Menu/OK » pour voir ces groupes. Utilisez les boutons des fl èches vers le haut ou vers le bas pour sélectionner
un groupe puis la fl èche vers la droite et les fl èches vers le haut/bas pour voir les articles ou options disponibles pour
ce groupe. Voici une description générale des groupes de menu et leurs fonctions :
Utilisation du menu principal (suite)
Groupe menu Icône But
Réglage Fournit les options de réglage de : Résolution (taille de fi chier), Qualité (com-
pression de fi chier), EV (valeur d’exposition), WB (balance des blancs) et ISO
(sensibilité à la lumière).
Formatage Prépare à l’utilisation une carte mémoire SD neuve ou déjà utilisée. Efface
(supprime) tous les fi chiers contenus sur la carte. Peut aussi être utilisé pour
effacer rapidement tout le contenu de la mémoire interne si une carte SD n’a
pas été insérée.
Sortie Sort du menu principal et retourne à la visualisation en direct.
Les quelques pages suivantes fournissent la liste complète de tous les articles et réglages disponibles dans les groupes
du menu principal, avec leur description et leur fonction. Procédez de la même manière que vous avez suivie dans
l’exemple ci-dessus, pour vous déplacer dans les écrans de menu afi n de mettre en surbrillance et de changer les
réglages selon vos préférences et besoins personnels. Le menu de Visionnement est différent, mais plus simple, avec
quatre groupes seulement (Diaporama, Effacer, Éditeur et Sortir). Pour une description complète, consultez la section
« Menu de visionnement » plus loin dans ce manuel.
Groupe menu Icône But
Mode appareil
photo
Permet de sélectionner la photo fi xe ou un de deux modes d’enregistrement de
clips vidéo (fi lm). Ici, les options de menu indiquent toujours les deux modes
qui ne sont pas en cours d’utilisation. Par exemple, si vous êtes au mode vidéo
« Replay », les autres options sont affi chées au menu d’appareil photo. Mode
Photo fi xe (icône d’appareil photo) ou mode Vidéo Normal (icône de caméra
avec fl èche droite).
Exposition Fournit des options de réglage WB (balance des blancs) et EV (valeur
d’exposition) pour ajuster la reproduction des couleurs et l’exposition pour dif-
férentes situations si les réglages standards automatiques ne produisent pas la
qualité ou les résultats souhaités.
Mode Permet le choix de « Scènes » préréglées qui optimisent les réglages de l’appareil
pour l’action des sports, les paysages et autres sujets de photos habituels. Les
options de photo fi xe, de minuterie automatique et de séquence rapide fi gurent
aussi dans ce groupe de menu.
36
37
11-8323 6LIM.indd 36-37 1/28/05 10:45:40 AM

Options du menu principal (réglages par défaut en caractères gras)
Groupe Réglages Description
APPAREIL
PHOTO
Photo fixe Icône de l’appareil Photographies 3,2 mégapixels, images fixes
Clip vidéo M
ode vidéo Normal
(icône film avec
flèche droite)
Filme un clip vidéo standard en continu, avec durée limitée seule-
ment, en fonction de la mémoire interne ou de carte SD restante.
Mode vidéo Replay
(icône film avec
flèche circulaire)
Filme des clips vidéo en « boucle », enregistrant par-dessus les
images de la boucle précédente. Les boucles ont une durée fixe (de
8 à 60 secondes), en fonction de la résolution et de la fréquence
d
’image (images/seconde).
EXPOSITION WB (B
alance
des blancs)
Auto La Balance des blancs est réglée automatiquement pour une repro-
duction correcte des couleurs.
Jour Réglage manuel pour l’extérieur ensoleillé
Ampoule électrique Réglage manuel pour l
’éclairage intérieur au tungstène (ampoule
électrique)
Fluorescent Réglage manuel pour l’éclairage intérieur fluorescent
Nuageux Réglage manuel pour un ciel couvert ou l’ombre
EV -2,0 ~ +2,0 F
ournit un réglage manuel de sous-exposition ou surexposition par
paliers de 0,5 EV. Les valeurs négatives produisent des photos plus
sombres, les valeurs positives des photos plus claires.
*Les réglages de Scène et de Séquence dans « Mode » ne sont pas disponibles lorsque « Camera » (appareil photo) est
réglé pour le mode vidéo Normal ou Replay.
Options du menu principal (suite)
Groupe Article Réglages Description
MODE Scène * Program Exposition standard automatique pour la plupart des sujets ou l’usage général
Sports Utilise des vitesses d’obturateur plus élevées pour capturer le mouvement
Paysage Zone de mise au point plus étendue pour une netteté accrue, du premier plan à l’arrière-plan
Portrait Zone de mise au point moins étendue pour les photos de personnes ; aide à isoler le sujet de
l’arrière-plan
Nuit Utilise des vitesses d’obturateur plus basses pour une meilleure exposition en faible luminosité
Minuterie Oui / Non Photo prise avec un retard après une pression sur le bouton Snap
Séquence * 3 ou 5 images 3 ou 5 images prises en séquence rapide sur pr
ession du bouton Snap
RÉGLAGE Taille/
qualité
(Photo fixe)
Taille d’image
(Résolution)
3 options de taille d
’image : L(2 048 x 1 536 pixels), M (1 600 x 1 200 pixels) ou S (640 x 480
pixels). Une résolution plus élevée produit des images plus nettes/grandes mais réduit l’espace total
de stockage disponible. Utilisez les réglages inférieurs pour stocker davantage en mémoire, ou pour
le courriel, etc. L = 3,1 MP / M = 2,1 MP / S = 0,35 MP
Q
ualité
(Taux compres-
sion fichier)
Règle le degré de compr
ession du fichier jpg. Les réglages sont : Fine-FQ (1:4 compression), Nor-
mal-NQ (1:8) et économie-EQ (1:16). Ce réglage peut êtr
e utilisé indépendamment de la taille
d’image pour stocker davantage de photos en échange d’une qualité légèrement réduite.
Dans mode
vidéo Normal
uniquement
Q
ualité
(Résolution
& F
réquence
image
640 x 480 pix
els par image (Résolution)> à 30 ou 15 images par seconde (Fréquence)
320 x 240 pixels par image >à 30 ou 15 images par seconde
(Après avoir choisi la résolution, appuyez sur la flèche vers la droite pour choisir la fréquence
(images/s)
D
ans mode
vidéo Replay
uniquement
Q
ualité
(Résolution &
Fréquence image
640 x 480 pixels par image (Résolution)> à 30 ou 15 images par seconde (Fréquence)
320 x 240 pixels par image >à 30 ou 15 images par seconde
Durée de boucle de 8, 15, 30 ou 60 secondes suivant les réglages de résolution/fréquence
38
39
11-8323 6LIM.indd 38-39 1/28/05 10:45:41 AM
Seite wird geladen ...
Seite wird geladen ...
Seite wird geladen ...
Seite wird geladen ...
Seite wird geladen ...
Seite wird geladen ...
Seite wird geladen ...
Seite wird geladen ...
Seite wird geladen ...
Seite wird geladen ...
Seite wird geladen ...
Seite wird geladen ...
Seite wird geladen ...
Seite wird geladen ...
Seite wird geladen ...
Seite wird geladen ...
Seite wird geladen ...
Seite wird geladen ...
Seite wird geladen ...
Seite wird geladen ...
Seite wird geladen ...
Seite wird geladen ...
Seite wird geladen ...
Seite wird geladen ...
Seite wird geladen ...
Seite wird geladen ...
Seite wird geladen ...
Seite wird geladen ...
Seite wird geladen ...
Seite wird geladen ...
Seite wird geladen ...
Seite wird geladen ...
Seite wird geladen ...
Seite wird geladen ...
Seite wird geladen ...
Seite wird geladen ...
Seite wird geladen ...
Seite wird geladen ...
Seite wird geladen ...
Seite wird geladen ...
Seite wird geladen ...
Seite wird geladen ...
Seite wird geladen ...
Seite wird geladen ...
Seite wird geladen ...
Seite wird geladen ...
Seite wird geladen ...
Seite wird geladen ...
Seite wird geladen ...
Seite wird geladen ...
Seite wird geladen ...
Seite wird geladen ...
Seite wird geladen ...
-
 1
1
-
 2
2
-
 3
3
-
 4
4
-
 5
5
-
 6
6
-
 7
7
-
 8
8
-
 9
9
-
 10
10
-
 11
11
-
 12
12
-
 13
13
-
 14
14
-
 15
15
-
 16
16
-
 17
17
-
 18
18
-
 19
19
-
 20
20
-
 21
21
-
 22
22
-
 23
23
-
 24
24
-
 25
25
-
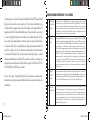 26
26
-
 27
27
-
 28
28
-
 29
29
-
 30
30
-
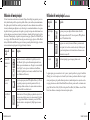 31
31
-
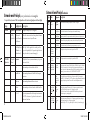 32
32
-
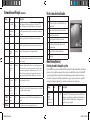 33
33
-
 34
34
-
 35
35
-
 36
36
-
 37
37
-
 38
38
-
 39
39
-
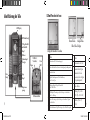 40
40
-
 41
41
-
 42
42
-
 43
43
-
 44
44
-
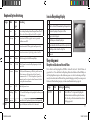 45
45
-
 46
46
-
 47
47
-
 48
48
-
 49
49
-
 50
50
-
 51
51
-
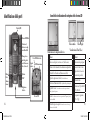 52
52
-
 53
53
-
 54
54
-
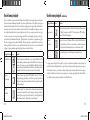 55
55
-
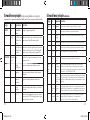 56
56
-
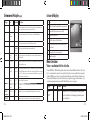 57
57
-
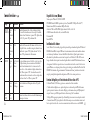 58
58
-
 59
59
-
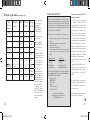 60
60
-
 61
61
-
 62
62
-
 63
63
-
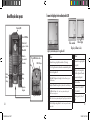 64
64
-
 65
65
-
 66
66
-
 67
67
-
 68
68
-
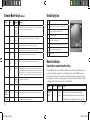 69
69
-
 70
70
-
 71
71
-
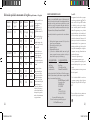 72
72
-
 73
73


Bushnell 11-8323 Benutzerhandbuch
- Kategorie
- Fernglas
- Typ
- Benutzerhandbuch
in anderen Sprachen
- français: Bushnell 11-8323 Manuel utilisateur
- español: Bushnell 11-8323 Manual de usuario
- italiano: Bushnell 11-8323 Manuale utente
- português: Bushnell 11-8323 Manual do usuário
Verwandte Artikel
-
Bushnell Instant Replay 180833 Benutzerhandbuch
-
-
-
-
-
-
-
-
-