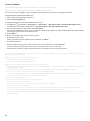
Dell H625cdw Cloud MFP Laser Printer Schnellstartanleitung
- Kategorie
- Laser- / LED-Drucker
- Typ
- Schnellstartanleitung

Dell™ Color Cloud Multifunction Printer | H625cdw
Dell™ Color Cloud Multifunction Printer | H825cdw
Dell™ Color Smart Multifunction Printer | S2825cdn
Setup Guide
Guide d'installation
Guida di configurazione
Konfigurationshandbuch
Guía de configuración

2
Thank you
for choosing Dell
Merci d'avoir choisi Dell
Grazie per aver scelto Dell
Vielen Dank, dass Sie sich für Dell entschieden haben
Gracias por elegir Dell

3
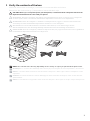
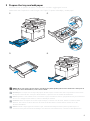
1 Verify the contents of the box
Vérifiez le contenu de l'emballage | Controllare il contenuto della confezione
Überprüfen des Lieferumfangs | Compruebe el contenido de la caja
CAUTION: Before you set up and operate your Dell printer, read and follow the safety instructions in the
Important Information that comes with your printer.
ATTENTION : Avant de configurer et d'utiliser votre imprimante Dell, lisez et respectez les consignes de
sécurité reprises dans le document Informations importantes fourni avec votre imprimante.
ATTENZIONE: Prima di configurare e utilizzare la stampante Dell, leggere e attenersi alle istruzioni di
sicurezza presenti in Informazioni importanti in dotazione con la stampante.
ACHTUNG: Bevor Sie den Dell-Drucker einrichten und bedienen, lesen und befolgen Sie die
Sicherheitshinweise in der Anleitung Wichtige Informationen im Lieferumfang des Druckers.
PRECAUCIÓN: Antes de configurar y utilizar su impresora Dell, lea y siga las instrucciones de seguridad en
la Información importante incluida con la impresora.
NOTE: The contents of the box vary depending on the country or region you purchased the printer from.
REMARQUE : Le contenu de l'emballage varie selon le pays ou la région où votre imprimante a été achetée.
NOTA: Il contenuto della confezione varia in funzione del paese o della regione dove la stampante è stata
acquistata.
HINWEIS: Der Inhalt des Kartons variiert abhängig von dem Land oder der Region, in der Sie den Drucker
gekauft haben.
NOTA: El contenido de la caja puede variar en función del país o de la región en la que compre la impresora.

4
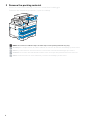
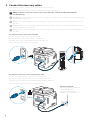
2 Remove the packing material
Retirez le matériau d'emballage | Eliminare il materiale di imballaggio
Entfernen des Verpackungsmaterials | Quite el embalaje
NOTE: The location of adhesive tapes and the shape of the packing material may vary.
REMARQUE : L'emplacement des rubans adhésifs et la forme du matériau d'emballage peuvent varier.
NOTA: Il posizionamento dei nastri adesivi e la forma del materiale di imballaggio può variare.
HINWEIS: Die Position der Klebebänder und die Form des Verpackungsmaterials können variieren.
NOTA: La ubicación de las cintas adhesivas y la forma del embalaje pueden variar.

5
3 Prepare the tray and add paper
Préparez le bac et ajoutez du papier | Preparare il vassoio e aggiungere la carta
Vorbereiten des Papierfachs und Einlegen von Papier | Prepare la bandeja y añada papel
NOTE: When you load Legal-size paper, extend the tray while pushing the lever located on the front part of
the tray. For more information, see the
User's Guide
.
REMARQUE : Lorsque vous chargez du papier de taille Légal, reculez le bac tout en poussant le levier situé
sur la partie avant du bac. Pour plus d'informations, reportez-vous au
Guide de l'utilisateur
.
NOTA: Quando si carica della carta con formato Legal, estendere il vassoio spingendo la leva posta avanti al
vassoio. Per maggiori informazioni, vedere la
Guida per l'utente
.
HINWEIS: Wenn Sie Papier im Format Legal einlegen, erweitern Sie das Fach, indem Sie auf den Hebel
drücken, der sich im vorderen Bereich des Fachs befindet. Weitere Informationen finden Sie in der
Benutzerhandbuch
.
NOTA: Cuando cargue papel de tamaño Legal, extienda la bandeja mientras pulsa la palanca que se
encuentra en la parte frontal de la bandeja. Para obtener más información, consulte la
Guía del usuario
.
LETTERHEAD

6
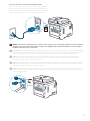
4 Connect the necessary cables
Raccordez les câbles nécessaires | Collegare i cavi necessari
Anschließen der notwendigen Kabel | Conecte los cables necesarios
NOTE: For wireless connection, do not connect the USB cable or Ethernet cable (Dell H625cdw /
Dell 825cdw only).
REMARQUE : Pour la connexion sans fil, ne raccordez pas le câble USB ou le câble Ethernet (Dell H625cdw /
Dell 825cdw uniquement).
NOTA: Per la connessione wireless, non collegare il cavo USB o il cavo Ethernet (solo Dell H625cdw / Dell
825cdw).
HINWEIS: Wenn Sie eine WLAN-Verbindung herstellen möchten, trennen Sie das USB- und Ethernet-Kabel
(nur Dell H625cdw / Dell 825cdw).
NOTA: Para la conexión inalámbrica, no conecte el cable USB o el cable Ethernet (solo Dell H625cdw / Dell
825cdw).
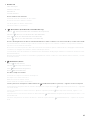
For USB connection, connect the USB cable
Pour la connexion USB, raccordez le câble USB
Nel caso di connessione USB, connettere il cavo USB
Schließen Sie bei einer USB-Verbindung das USB-Kabel an.
Para la conexión USB, conecte el cable USB
For Ethernet connection, connect the Ethernet cable
Pour la connexion Ethernet, raccordez le câble Ethernet
Nel caso di connessione ethernet, connettere il cavo ethernet
Schließen Sie bei einer Ethernet-Verbindung das Ethernet-Kabel an.
Para la conexión Ethernet, conecte el cable Ethernet
Ethernet outlet/hub
Prise/Concentrateur Ethernet
Uscita/Hub Ethernet
Ethernet-Ausgang/Hub
Salida/concentrador Ethernet

7
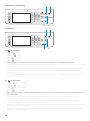
For Fax connection, connect the telephone cable
Pour la connexion Fax, raccordez le câble téléphonique
Nel caso di connessione Fax, connettere il cavo telefonico
Schließen Sie bei einer Faxverbindung das Telefonkabel an.
Para la conexión de Fax, conecte el cable de teléfono
NOTE: If the phone communication is serial in your country (such as Germany, Sweden, Denmark, Austria,
Belgium, Italy, France and Switzerland), and you are supplied with a yellow terminator, insert the yellow
terminator into the phone connector.
REMARQUE : Si la communication téléphonique est de type série dans votre pays (c'est le cas en Allemagne,
en Suède, au Danemark, en Autriche, en Belgique, en Italie, en France et en Suisse) et que vous disposez
d'une terminaison jaune, insérez la terminaison jaune dans le connecteur de ligne téléphonique.
NOTA: Se nel paese di utilizzo è presente una comunicazione seriale (ad esempio Germania, Svezia,
Danimarca, Austria, Belgio, Italia, Francia e Svizzera), e si dispone di un terminatore giallo, inserire il
terminatore giallo nel connettore telefonico.
HINWEIS: Verwendet Ihr Land serielle Telefonkommunikation (wie in Deutschland, Schweden, Dänemark,
Österreich, Belgien, Italien, Frankreich und in der Schweiz), und haben Sie einen gelben Stecker erhalten,
verbinden Sie diesen mit dem Telefonanschluss.
NOTA: Si la comunicación telefónica es de tipo en serie en su país (como Alemania, Suecia, Dinamarca,
Austria, Bélgica, Italia, Francia y Suiza), y posee un terminador amarillo, inserte el terminador amarillo en el
conector del teléfono.

8
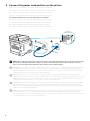
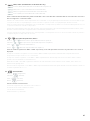
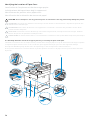
5 Connect the power cord and turn on the printer
Branchez le cordon d'alimentation et allumez l'imprimante
Connettere il cavo di alimentazione e accendere la stampante
Anschließen des Netzkabels und Einschalten des Druckers
Conecte el cable de alimentación y encienda la impresora
The following illustration uses Dell H825cdw as an example.
L'illustration suivante utilise l'appareil Dell H825cdw en exemple.
La seguente illustrazione utilizza Dell H825cdw come esempio.
Die folgende Abbildung verwendet Dell H825cdw als Beispiel.
En la siguiente ilustración se utiliza Dell H825cdw como ejemplo.
NOTE: When you turn the printer on for the first time, the initial setup appears on the operator panel. If you
do not start configuring the initial settings, the printer automatically restarts in three minutes. You can
choose to run the initial setup wizard on the operator panel if required later.
REMARQUE : Lorsque vous allumez l'imprimante pour la première fois, la configuration initiale apparaît sur le
panneau de commande. Si vous ne commencez pas la configuration des réglages initiaux, l'imprimante
redémarre dans les trois minutes. Le cas échéant, vous pouvez ré-exécuter ultérieurement l'assistant de
configuration initiale à l'aide du panneau de commande.
NOTA: Quando si accende la stampante per la prima volta, sul pannello operatore sarà visualizzata la
configurazione iniziale. Se non si avvia la configurazione delle impostazioni iniziali, la stampante si riaccende
automaticamente dopo tre minuti. È possibile scegliere di eseguire la procedura iniziale di configurazione
guidata sul pannello operatore, se necessario in un secondo momento.
HINWEIS: Wenn Sie den Drucker zum ersten Mal einschalten, wird die Ersteinrichtung auf dem Bedienfeld
angezeigt. Wenn Sie die Konfiguration der Grundeinstellungen nicht starten, führt der Drucker nach drei
Minuten automatisch einen Neustart durch. Sie können den Assistenten für die Ersteinrichtung bei Bedarf
später auf dem Bedienfeld ausführen.
NOTA: Cuando encienda la impresora por primera vez, aparecerá la pantalla de configuración inicial en el
panel del operador. Si no se comienza con el establecimiento de la configuración inicial, pasados tres
minutos la impresora se reinicia automáticamente. Puede elegir la ejecución del asistente para la instalación
en el panel del operador si se necesita más tarde.

9
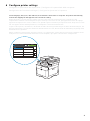
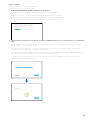
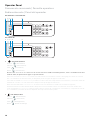
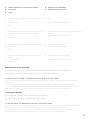
6 Configure printer settings
Configurez les paramètres de l'imprimante | Configurare le impostazioni della stampante
Konfigurieren der Druckereinstellungen | Configure los ajustes de la impresora
Set the language, time zone, date and time, then follow the instructions to setup fax. The printer automatically
restarts after tapping
OK
that appears at the end of the setting.
Réglez la langue, le fuseau horaire, la date et l'heure, puis suivez les instructions pour configurer le fax.
L'imprimante redémarre automatiquement après avoir tapé sur la touche
OK
, qui apparaît au terme du réglage.
Impostare la lingua, il fuso orario, la data e l'ora, quindi seguire le istruzioni per impostare il fax. Dopo aver toccato
OK
che appare alla fine dell'impostazione, la stampante si avvia automaticamente.
Legen Sie die Sprache, die Zeitzone, das Datum und die Uhrzeit fest und befolgen Sie dann die Anweisungen, um
das Fax einzurichten. Der Drucker wird nach dem Berühren von
OK
, das am Ende der Einstellung angezeigt wird,
automatisch neu gestartet.
Ajuste el idioma, la zona horaria, la fecha y la hora y, a continuación, siga las instrucciones para configurar el fax.
La impresora se reinicia automáticamente tras tocar
Aceptar
, que aparece al final de la configuración.
Next
English
Français
Italiano
Deutsch
Español
Dansk
Nederlands
Norsk
Select Your Language Next

10
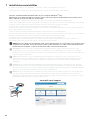
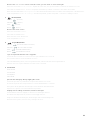
7 Install drivers and utilities
Installez les pilotes et les utilitaires | Installare i driver e i programmi di utilità
Installieren der Treiber und Dienstprogramme | Instale controladores y utilidades
Insert the
Software and Documentation
disc in your computer (Windows
®
only).
Alternatively, go to dell.com/support, enter the Service Tag of your printer, download the latest software and
driver, and then open the file that you downloaded.
Insérez le disque
Software and Documentation
dans votre ordinateur (Windows
®
uniquement).
Vous pouvez également consulter la page dell.com/support, saisir le Service Tag de votre imprimante, télécharger
la dernière version du logiciel et du pilote, puis ouvrir le fichier que vous avez téléchargé.
Inserire il disco
Software and Documentation
nel computer (solo Windows
®
).
In alternativa, visitare il sito dell.com/support, inserire il Service Tag della stampante, scaricare l'ultimo software e
driver, quindi aprire il file scaricato.
Legen Sie die CD
Software and Documentation
in den Computer ein (nur Windows
®
).
Besuchen Sie alternativ dell.com/support, geben Sie das Service-Tag Ihres Druckers ein, laden Sie sich die aktuelle
Software und den Treiber herunter, und öffnen Sie dann die heruntergeladene Datei.
Introduzca el disco
Software and Documentation
en el ordenador (solo Windows
®
).
También puede ir a dell.com/support, introducir la Service Tag de la impresora, descargar el software y el
controlador más recientes y después abrir el archivo que ha descargado.
NOTE: Before you begin, for wired printer setup, ensure that the printer is connected to your computer using
an Ethernet or USB cable. For wireless printer setup, ensure that there is no cable connected between the
printer and your computer, or there is no Ethernet cable connected to the printer.
REMARQUE : Dans le cas d'une configuration d'imprimante filaire, vérifiez avant de commencer que
l'imprimante est correctement raccordée à l'ordinateur avec un câble Ethernet ou USB. Pour configurer
l'imprimante sans fil, vérifiez qu'aucun câble ne relie l'imprimante à l'ordinateur ou qu'aucun câble Ethernet
n'est raccordé à l'imprimante.
NOTA: Prima di iniziare, per la configurazione della stampante collegata con cavo, assicurarsi che sia
connessa al computer mediante un cavo Ethernet o USB. Per la configurazione della stampante wireless,
assicurarsi che nessun cavo colleghi la stampante al computer, né un cavo Ethernet sia collegato alla
stampante.
HINWEIS: Bevor Sie mit der kabelgebundenen Druckereinrichtung beginnen, stellen Sie sicher, dass der
Drucker mit einem Ethernet- oder USB-Kabel mit dem Computer verbunden ist. Stellen Sie für die WLAN-
Druckereinrichtung sicher, dass keine Kabelverbindung zwischen dem Drucker und dem Computer besteht,
das heißt, dass kein Ethernet-Kabel mit dem Drucker verbunden ist.
NOTA: Antes de empezar, para la configuración de la impresora con cable, asegúrese de que la impresora
esté conectada al ordenador mediante un cable Ethernet o USB. Para la configuración de la impresora
inalámbrica, asegúrese de que no haya ningún cable conectado entre la impresora y su ordenador o que no
haya ningún cable Ethernet conectado a la impresora.
www.dell.com/support

11
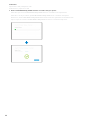
On the Dell Printer Easy Install window, click Next. Dell Printer Easy Install begins to search for your printer
(Windows
®
only).
Sur la fenêtre Dell Printer Easy Install, cliquez sur Suivant. Dell Printer Easy Install lance la recherche de cette
imprimante (Windows
®
uniquement).
Nella finestra Dell Printer Easy Install fare clic su Avanti. Dell Printer Easy Install avvia la ricerca della stampante
(solo Windows
®
).
Klicken Sie im Fenster Dell Printer Easy Install auf Weiter. Dell Printer Easy Install beginnt die Suche nach dem
Drucker (nur Windows
®
).
En la ventana Dell Printer Easy Install, haga clic en Siguiente. Dell Printer Easy Install empieza a buscar esta
impresora (solo Windows
®
).
Wireless Printer (Dell H625cdw / Dell H825cdw only)
Imprimante sans fil (Dell H625cdw / Dell H825cdw uniquement)
Stampante wireless (solo Dell H625cdw / Dell H825cdw)
Drahtlos-Drucker (nur Dell H625cdw / Dell H825cdw)
Impresora inalámbrica (solo Dell H625cdw / Dell H825cdw)
NOTE: This printer is supported on 802.11b/g/n over 2.4 GHz but not compatible with 802.11n/ac over
5.0 GHz.
REMARQUE : Cette imprimante est compatible avec 802.11b/g/n sur 2,4 GHz, mais incompatible avec
802.11n/ac sur 5,0 GHz.
NOTA: La stampante è supportata su 802.11b/g/n per 2,4 GHz ma non è compatibile con 802.11n/ac su
5,0 GHz.
HINWEIS: Dieser Drucker unterstützt 802.11b/g/n über 2,4 GHz, ist jedoch nicht mit 802.11n/ac über
5,0 GHz kompatibel.
NOTA: Esta impresora es compatible con 802.11b/g/n en 2,4 GHz pero no es compatible con 802.11n/ac en
5,0 GHz.
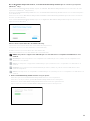
1 Wait for
Dell Printer Easy Install
wizard to find your printer.
Attendez que l'assistant Dell Printer Easy Install détecte votre imprimante.
Attendere che la procedura guidata Dell Printer Easy Install trovi la stampante.
Warten Sie, bis der Dell Printer Easy Install-Assistent den Drucker gefunden hat.
Espere a que el asistente de Dell Printer Easy Install encuentre la impresora.

12
2 After the printer is found, click
Install
. Follow the on-screen instructions to complete the setup.
Une fois l'imprimante trouvée, cliquez sur Installer. Suivez les instructions à l'écran pour terminer la
configuration.
Una volta trovata la stampante, fare clic su Installa. Seguire le istruzioni visualizzate sullo schermo per
completare l'impostazione.
Nachdem der Drucker gefunden wurde, klicken Sie auf Installieren. Befolgen Sie die Anweisungen auf dem
Bildschirm, um die Einrichtung abzuschließen.
Cuando se haya encontrado la impresora, haga clic en Instalar. Siga las instrucciones en pantalla para
completar la configuración.

13
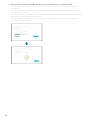
Ethernet Printer
Imprimante Ethernet | Stampante Ethernet
Ethernet-Drucker | Impresora Ethernet
1 Wait for
Dell Printer Easy Install
wizard to find your printer.
Attendez que l'assistant Dell Printer Easy Install détecte votre imprimante.
Attendere che la procedura guidata Dell Printer Easy Install trovi la stampante.
Warten Sie, bis der Dell Printer Easy Install-Assistent den Drucker gefunden hat.
Espere a que el asistente de Dell Printer Easy Install encuentre la impresora.
2 After the printer is found, select the printer, and then click
Next
. Follow the on-screen instructions to complete the
setup.
Une fois l'imprimante trouvée, sélectionnez l'imprimante, puis cliquez sur Suivant. Suivez les instructions à
l'écran pour terminer la configuration.
Una volta trovata la stampante, selezionare la stampante, quindi fare clic su Avanti. Seguire le istruzioni
visualizzate sullo schermo per completare l'impostazione.
Nachdem der Drucker gefunden wurde, wählen Sie den Drucker und klicken Sie dann auf Weiter. Befolgen Sie
die Anweisungen auf dem Bildschirm, um die Einrichtung abzuschließen.
Cuando se haya encontrado la impresora, selecciónela y haga clic en Siguiente. Siga las instrucciones en
pantalla para completar la configuración.

14
USB Printer
Imprimante USB | Stampante USB
USB-Drucker | Impresora USB
1 Wait for
Dell Printer Easy Install
wizard to find and install your printer.
Attendez que l'assistant Dell Printer Easy Install détecte et installe votre imprimante.
Attendere che la procedura guidata Dell Printer Easy Install trovi e installi la stampante.
Warten Sie, bis der Dell Printer Easy Install-Assistent den Drucker gefunden und installiert hat.
Espere a que el asistente de Dell Printer Easy Install encuentre e instale la impresora.

15
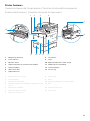
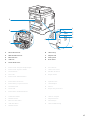
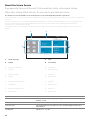
Printer Features
Caractéristiques de l'imprimante | Caratteristiche della stampante
Druckerfunktionen | Características de la impresora
1 Output Tray Extension 8 Front Cover
2 Front USB Port 9 Tray1
3 Operator Panel 10 Optional 550-Sheet Feeder (Tray2)
4 Duplex Automatic Document Feeder (DADF) 11 Multipurpose Feeder (MPF)
5 Drum Cartridges 12 Toner Cartridges
6 Waste Toner Box 13 Service Tag
7 Right Side Cover
1 Extension de bac de sortie 8 Capot avant
2 Port USB avant 9 Bac1
3 Panneau de commande 10 Chargeur 550 feuilles en option (Bac2)
4 CADRV (chargeur automatique de documents recto
verso)
11 MPF
5 Cartouches à tambour 12 Cartouches de toner
6 Collecteur de toner usagé 13 Service Tag
7 Couvercle latéral droit
4
7891011
12
13
5
6
321

16
1 Prolunga cassetto di uscita 8 Coperchio anteriore
2 Porta USB anteriore 9 Cassetto 1
3 Pannello operatore 10 Alimentatore da 550 fogli opzionale (Cassetto 2)
4 Alimentatore automatico di documenti fronte/retro
(Duplex Automatic Document Feeder, DADF)
11 Alimentatore multifunzione (Multipurpose Feeder,
MPF)
5 Cartucce tamburo 12 Cartucce toner
6 Contenitore toner di scarto 13 Service Tag
7 Coperchio laterale destro
1 Ausgabefachverlängerung 8 Vordere Abdeckung
2 Vorderer USB-Anschluss 9 Fach 1
3 Bedienerkonsole 10 Optionale 550-Blatt-Zufuhr (Fach 2)
4 Duplex Automatischer Dokumenteneinzug (DADF) 11 Universalzuführung (MPF)
5 Trommeleinheiten 12 Tonerkassetten
6 Tonersammelbehälter 13 Service Tag
7 Rechte Seitenabdeckung
1 Extensión de la bandeja de salida 8 Cubierta frontal
2 Puerto USB frontal 9 Bandeja 1
3 Panel del operador 10 Alimentador de 550 hojas opcional (Bandeja 2)
4 Alimentador automático de documentos dúplex
(DADF)
11 Alimentador multifunción (MPF)
5 Cartuchos de tambor 12 Cartuchos de tóner
6 Caja de tóner residual 13 Service Tag
7 Cubierta lateral derecha

17
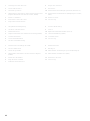
1 Phone Connector 6 "Blue" Plug
2 Wall Jack Connector 7 Duplex Unit
3 Ethernet Port 8 Fusing Unit
4 USB Port 9 Rear Cover
5 Power Connector
1 Connecteur de ligne téléphonique 6 Prise "bleue"
2 Connecteur de prise murale 7 Unité recto verso
3 Port Ethernet 8 Module de fusion
4 Port USB 9 Capot arrière
5 Connecteur d'alimentation
1 Connettore telefonico 6 Spinotto "blu"
2 Connettore per presa a muro 7 Unità duplex
3 Porta Ethernet 8 Fusore
4 Porta USB 9 Coperchio posteriore
5 Connettore di alimentazione
1 Telefonanschluss 6 "Blauer" Stopfen
2 Netzanschluss 7 Duplex-Einheit
3 Ethernet-Anschluss 8 Fixieranlage
4 USB-Anschluss 9 Hintere Abdeckung
5 Netzanschluss
2
3
5
1
4
8
6
7
9

18
1 Conector del teléfono 6 Tapón "azul"
2 Conector de la pared 7 Unidad de impresión a dos caras
3 Puerto Ethernet 8 Unidad del fusor
4 Puerto USB 9 Cubierta trasera
5 Conector de alimentación

19
1 DADF Cover 5 Document Feeder Tray
2 Document Guides 6 Document Stopper
3 DADF Chute Cover 7 Document Output Tray
4 Document Glass 8 DADF Feed Rollers
1 Capot du CADRV 5 Plateau d'alimentation en documents
2 Guides du papier 6 Guide d'arrêt de document
3 Capot de chute du CADRV 7 Bac de sortie de documents
4 Vitre d'exposition 8 Rouleaux d'alimentation du CADRV
1 Coperchio DADF 5 Vassoio di alimentazione dei documenti
2 Guide dei documenti 6 Ferma documenti
3 Coperchio a piano inclinato DADF 7 Vassoio uscita documenti
4 Vetro documenti 8 Rulli di alimentazione DADF
1 DADF-Abdeckung 5 Dokumenteneinzugsfach
2 Dokumentführungen 6 Dokumentanschlag
3 DADF-Schachtabdeckung 7 Dokumentausgabefach
4 Dokumentenglas 8 DADF-Einzugsrollen
1 Cubierta del DADF 5 Bandeja del alimentador de documentos
2 Guías de documentos 6 Tope de documentos
3 Cubierta del conducto del DADF 7 Bandeja de salida de documentos
4 Cristal del escáner 8 Rodillos de alimentación del DADF
1
2
3
4
5
6
7
8

20
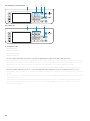
Operator Panel
Panneau de commande | Pannello operatore
Bedienerkonsole | Panel del operador
1 (Information) button
Bouton (Information)
Pulsante (Informazioni)
Taste (Information)
Botón (Información)
Moves to the
Information
screen. You can access various information and settings menu, check consumable levels and
network status, and print various types of reports and lists.
Renvoie à l'écran d'
Information
. Permet d'accéder à diverses informations et menu de réglage, de vérifier les niveaux
des consommables et l'état du réseau, et d'imprimer plusieurs types de rapports et de listes.
Passa alla schermata
Informazioni
. È possibile accedere a vari menu impostazioni e informazioni, controllare i livelli dei
materiali di consumo e lo stato della rete e stampare vari tipi di rapporti ed elenchi.
Wechselt zum Bildschirm
Information
. Sie können auf verschiedene Informationen und Menüs zugreifen,
Verbrauchsstände und den Netzwerkstatus überprüfen und verschiedene Arten von Berichten und Listen ausdrucken.
Lleva a la pantalla
Información
. Puede acceder a diversos menús de configuración e información, comprobar el nivel de
los consumibles y el estado de la red e imprimir varios tipos de informes y listas.
2 (Job Status) button
Bouton (État du travail)
Pulsante (Stato lavori)
Taste (Auftragsstatus)
Botón (Estado de trabajo)
23451
Dell H625cdw / Dell H825cdw
23451
Dell S2825cdn
Seite wird geladen ...
Seite wird geladen ...
Seite wird geladen ...
Seite wird geladen ...
Seite wird geladen ...
Seite wird geladen ...
Seite wird geladen ...
Seite wird geladen ...
Seite wird geladen ...
Seite wird geladen ...
Seite wird geladen ...
Seite wird geladen ...
Seite wird geladen ...
Seite wird geladen ...
Seite wird geladen ...
Seite wird geladen ...
Seite wird geladen ...
Seite wird geladen ...
Seite wird geladen ...
Seite wird geladen ...
-
 1
1
-
 2
2
-
 3
3
-
 4
4
-
 5
5
-
 6
6
-
 7
7
-
 8
8
-
 9
9
-
 10
10
-
 11
11
-
 12
12
-
 13
13
-
 14
14
-
 15
15
-
 16
16
-
 17
17
-
 18
18
-
 19
19
-
 20
20
-
 21
21
-
 22
22
-
 23
23
-
 24
24
-
 25
25
-
 26
26
-
 27
27
-
 28
28
-
 29
29
-
 30
30
-
 31
31
-
 32
32
-
 33
33
-
 34
34
-
 35
35
-
 36
36
-
 37
37
-
 38
38
-
 39
39
-
 40
40


Dell H625cdw Cloud MFP Laser Printer Schnellstartanleitung
- Kategorie
- Laser- / LED-Drucker
- Typ
- Schnellstartanleitung