Batavia ?THOR MULTISAW Operating Instructions Manual
- Kategorie
- Elektrowerkzeuge
- Typ
- Operating Instructions Manual

Page 1
Model: BT–CS016
Item-No.: 7063051
www.batavia.eu
THOR MULTISAW
Operating instructions
Bedienungsanleitung (Original)
Mode d'emploi
Gebruiksaanwijzing
7063051-Thor-Compact-Ma-1804-30.indb 1 04-06-18 11:55

FoldoutA
THOR MULTISAW
7063051-Thor-Compact-Ma-1804-30.indb 1 04-06-18 11:55

FoldoutB
0
5
10
15
20
25
0
5
10
15
20
25
1
A
2 3 4 5 6
7
8
9
10
11 12 13
1415
16
15b
15a
14a
17
18
19
20
21
22
23
24
25 26
7063051-Thor-Compact-Ma-1804-30.indb 2 04-06-18 11:55

2
Page 2
3
7
9
8
5 6
4
21
0
5
10
15
20
25
2.
5
0
10
15
20
25
0
5
10
15
20
25
5
0
10
15
20
25
0 1 2 3 4 5 6 7 8 9 10 11 12 13 14 15 16 17 18 CM
7 cm
7 cm
0
5
10
15
20
25
0
5
10
15
20
25
0
5
10
AUS
EIN
5
0
10
15
20
25
4.
2.
2.
2.
1.
1.
1.
1.
2.
1.
3.
3.
3.
13
9
3
16
16
15
9
19
1722
20
2
21
18
121110
15b
15a
21a21c 21b
7063051-Thor-Compact-Ma-1804-30.indb 2 04-06-18 11:55

3
Page 3
Contents
1. Pack contents/parts list . . . . . 4
2. General information . . . . . . 4
3. Safety . . . . . . . . . . 5
4. General safety instructions for power
tools . . . . . . . . . . 6
5. Additional safety warnings . . . . 7
6. Start-up . . . . . . . . 13
7. Operation . . . . . . . . .15
8. Cleaning and care. . . . . . 17
9. Storage. . . . . . . . . 18
10. Transport . . . . . . . . 18
11. Faults and repair . . . . . . 18
12. Technical data. . . . . . . 19
13. Noise/vibration information . . . 20
14. Disposal . . . . . . . . 21
15. EC-Declaration of conformity . . 21
Inhaltsverzeichnis
1. Lieferumfang/Teileliste . . . . 22
2. Allgemeines . . . . . . . 22
3. Sicherheit . . . . . . . . 23
4. Allgemeine Sicherheitshinweise für
Elektrowerkzeuge. . . . . . 24
5. Zusätzliche Sicherheitshinweise . 26
6. Inbetriebnahme . . . . . . 33
7. Bedienung . . . . . . . . 35
8. . . . . . 37
9. Lagerung . . . . . . . . 38
10. Transport . . . . . . . . 38
11. Störung und Behebung . . . . 38
12. Technische Daten. . . . . . 40
13. Geräusch-/Vibrationsinformation . 40
14. Entsorgung . . . . . . . 41
15. EG-Konformitätserklärung . . . 42
Table des matières
1. Contenu de la livraison/liste des
pièces . . . . . . . . . 43
2. Généralités. . . . . . . . 43
3. Sécurité . . . . . . . . 44
4. Consignes générales de sécurité
pour appareils électriques . . . 45
5. Indications de sécurité pour toutes
les scies . . . . . . . . 47
6. Mise en service . . . . . . 54
7. Utilisation . . . . . . . . 56
8. Nettoyage et entretien . . . . 58
9. Stockage . . . . . . . . 59
10. Transport . . . . . . . . 59
11. Panne et remède . . . . . . 59
12. Données techniques . . . . . 61
13. Information sur les bruits/vibrations 61
14. Élimination. . . . . . . . 62
15. CE-Déclaration de conformité . . 63
Inhoudsopgave
2. Inhoud van de
. . . 64
3. Algemeen . . . . . . . . 64
4. Veiligheid . . . . . . . . 65
5. Algemene veiligheidsvoorschriften
voor elektrisch gereedschap . . 66
6. Aanvullende veiligheidsvoorschriften 68
7. Ingebruikname . . . . . . 75
8. Bediening . . . . . . . . 76
9. Reiniging en verzorging . . . . 78
10. Opslag . . . . . . . . . 79
11. Transport . . . . . . . . 79
12. Storingen en reparatie . . . . 79
13. Technische gegevens . . . . 81
14. Informatie over geluid/trillingen . 81
15. Afvoer . . . . . . . . . 82
16. EG-Conformiteitsverklaring . . . 83
7063051-Thor-Compact-Ma-1804-30.indb 3 04-06-18 11:55

English
4
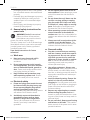
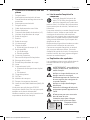
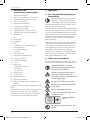
1. Pack contents/parts list
1. Front handle
2. On/Off switch for the laser
3. Access switch for the protective hood
4. On/Off switch for the mini circular saw
5. Rear handle
6. Mains cord with plug
7. Vents
8. Cover for carbon brush (× 2)
9. Cutting depth limiter
10.
11. Spindle
12.
13. Clamp bolt
14. Base plate
a. Cutting line guide (× 2)
15. Parallel guide
a. Locking knob
b. Scale
16. Protective hood
17. Dust extractor connection
18. Spindle lock
19. Cutting depth scale
20. Laser
21. Battery compartment
a. Battery compartment lid*
b. Screw*
c. Button cell
22. Suction hose
23. Star hex key
24. Transport case
25. Diamond cutting disc
26. Multi Material (MM) saw blade, 24 teeth
The product contents include one CR2032
battery.
Parts labelled with * are not represented in
the overview. For this, refer to diagram 9
and the relevant section within the user
manual.
2. General information
2.1. Reading and storing the user
manual
This user manual accompanies this
710 W Mini Circular Saw (referred to
below simply as “product”). It con-
tains important information about safety,
usage and care.
Before using the product, read the user
manual carefully. Pay particular attention to
the safety instructions and warnings. Failure
to comply with the instructions in this user
-
age to the product.
Comply with applicable local or national
regulations concerning the use of this prod-
uct. Keep this user manual in a safe place
for future reference. This user manual
belongs with this product. Make sure to
include this user manual when passing the
product on to third parties.
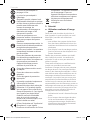
2.2. Explanation of the symbols
The following symbols are used in the user
manual or on the product:
Warning! To reduce the risk of
injury, the user must read the
instruction manual.
Denotes risk of personal injury, loss
of life or damage to the tool in case
of non-observance of the
instructions in this manual.
Risk of electric shock.
Only operate the spindle lock in idle
mode.
Do not reach into the saw blade.
Caution: laser beam! Do not look
into the laser beam.
Laser information
plate.
The product is not suitable for wet
grinding.
The product is not suitable for
rough grinding.
Switch the product off, pull the
mains plug to disconnect it from
the mains supply and let the
product cool off before setup,
changing accessories, cleaning,
maintenance, storing and
transporting the product.
LASERSTRAHLUNG
NICHT IN DEN STRAHL BLICKEN
LASER KLASSE 2
LASERSTRALING
KIJK NIET IN DE STRAAL
LASER KLASSE 2
7063051-Thor-Compact-Ma-1804-30.indb 4 04-06-18 11:55

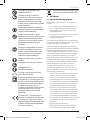
5
English
Always wear hearing protection.
The effects of noise can cause
hearing loss.
Wear a dust mask. When working
with wood and other materials,
harmful dust may be generated.
Work with asbestos containing
materials is not permitted!
Wear safety glasses. When working
with electric power tools, sparks,
splinters, chips and dust particles
may be generated and these can
cause loss of sight.
Wear suitable, protective clothing.
Wear suitable protective footwear.
Wear suitable protective gloves.
The product is suitable for indoor
use only.
Electric power tool, protection
class II. This sign symbolises that
this unit corresponds to Protection
Class II. This means that the unit is
equipped with either reinforced or
double insulation between the
mains circuit and output voltage or
metal housing respectively.
CE stands for “Conformité
Européenne”, which means “In
accordance with EU Regulations”.
With the CE marking, the
manufacturer conrms that this
Electric tool complies with the
applicable European directives.
Do not dispose of electric power
tools with domestic refuse.
3. Safety
3.1. Proper use
This product is suitable for the following
purposes.
– for making straight cuts in wood, mate-
rials resembling wood and plastics in a
dry state with MM saw blades;
– for cutting tiles, marble, granite and
concrete with dry diamond cutting discs.
The product must only be used by adults.
Children under 18 years of age must not use
the product.
Other uses or changes to the product are
considered as non-compliance with the
intended use and may lead to risks such as
manufacturer assumes no liability for dam-
ages arising from improper use. The prod-
uct is not intended for commercial use or
other applications.
Neither the manufacturer nor the retailer
or damage caused by misuse of this prod-
uct of any kind. Examples of misuse are
given in the following non-exhaustive list:
– using the product for purposes other
than those intended;
– failure to observe the safety instruc-
tions and warnings as well as the
assembly, operating, maintenance and
cleaning instructions contained in this
user manual;
– failure to comply with any regulations
relating to accident prevention, occupa-
-
cally and/or generally apply to the use
of the product;
– use of accessories and spare parts not
intended for the product;
–
– repairs of the product performed by
parties other than the manufacturer or a
– use of the product for business, com-
mercial or industrial purposes;
– operation or maintenance of the prod-
uct by persons not familiar with how to
handle the product and/or who are not
aware of the related risks.
3.2. Residual risks
Even if you operate this product properly,
there remains a potential risk for personal
-
ing risks associated with the construction
and design of this product may occur
amongst others:
–
emissions if the product is used over a
7063051-Thor-Compact-Ma-1804-30.indb 5 04-06-18 11:55

English
6
prolonged period of time, is not guided
in a controlled manner and maintained
properly.
–
caused by defective cutting tools or
during use.
–
4. General safety instructions for
power tools
WARNING! Read all instructions!
Failure to follow all instructions
listed below may result in electric
The term “power tool” in all of the warnings
listed below refers to your mains operated
(corded) power tool or battery operated
(cordless) power tool.
4.1. Work area
Cluttered and dark areas invite
accidents.
Power tools create sparks which
may ignite the dust of fumes.
Distrac-
tions can cause you to lose control.
4.2. Electrical safety
will reduce risk of electric shock.
There is an increased risk of electric
shock if your body is earthed or
grounded.
Water entering a power
tool will increase the risk of electric
shock.
Damaged or entangled cords
increase the risk of electric shock.
Use of a cord suitable for
outdoor use reduces the risk of electric
shock.
The
use of a residual circuit breaker device
reduces the risk of electric shock.
4.3. Personal safety
A moment of inattention while
operating power tools may result in
Safety equipment such
as dust mask, non-skid safety shoes,
hard hat, or hearing protection used for
appropriate conditions will reduce per-
Carrying power tools with
power tools that have the switch on
invites accidents.
A
wrench or a key left attached to a rotat-
ing part of the power tool may result in
This enables
better control of the power tool in unex-
pected situations.
7063051-Thor-Compact-Ma-1804-30.indb 6 04-06-18 11:55

7
English
hair can be caught in moving parts.
The use of these
pieces of equipment reduce hazards
caused by dust.
4.4. Power tool use and care
The correct power tool will do the
it was designed.
Any power
tool that cannot be controlled with the
switch is dangerous and must be
repaired.
Such preventive safety
measures reduce the risk of starting the
power tool accidentally.
Power tools are dangerous in the hands
of untrained users.
Many acci-
dents are caused by poorly maintained
power tools.
Properly maintained cutting tools with
sharp cutting edges are less likely to
bind and are easier to control.
Use of the power tool for
operations different from intended
could result in a hazardous situation.
4.5. Service
This will ensure proper
functioning of the power tool.
5. Additional safety warnings
5.1. Safety instructions for all saws
Sawing method
If both hands are holding the saw, they
The protective hood cannot protect you
from the saw blade under the work
piece.
Less than a full
tooth length should be visible under the
work piece.
It is important that you secure
the work piece to minimise the risk of
contact with your body, the saw blade
getting clamped or loss of control.
the metal parts of the power tool and
This improves the accuracy of the
cut and reduces the risk of the saw
blade catching.
7063051-Thor-Compact-Ma-1804-30.indb 7 04-06-18 11:55

English
8
Saw
on the saw will not rotate smoothly and
result in a loss of control.
The saw
blade washers and screws were spe-
cially designed for your saw to deliver
top performance and operating safety.
Additional safety instructions for all saws
Kickback is a sudden reaction occurring
-
rectly aligned causing it to lift out of the
work piece uncontrollably and move
towards the operator;
–
narrowing saw gap, it will be locked and
the motor power kicks the saw back
towards the operator;
– if the saw blade cants or is improperly
aligned in the saw gap, the teeth of the
rear saw blade edge could catch in the
surface of the work piece causing the
saw blade to move out of the saw gap
and the saw to kick back towards the
operator.
Kickback is the result of incorrect or
improper use of the saw. It can be prevented
by taking suitable precautions like those
described below.
In the event of a
backwards; however, the operator can
control the kickback forces by taking
suitable precautions.
Deter-
mine and rectify the cause that led to
the saw blade getting caught.
If the
the work piece or kick back when the
saw is restarted.
Large boards could bend under
their own weight. Boards must be sup-
ported on both sides both near the saw
gap and along the edge.
Saw blades with dull or incor-
rectly aligned teeth lead to increased
friction, the saw blade catching and
kickback due to the excessively narrow
saw gap.
If the settings change while cutting, the
saw blade could catch and kick back.
The saw blade cutting into
and kick back.
over your hand during kickback.
The kickback
will direct the power tool in the direction
opposite the movement of the grinding
The
around corners, sharp edges or in the
event of impacts. This will result in a
loss of control or kickback.
7063051-Thor-Compact-Ma-1804-30.indb 8 04-06-18 11:55

9
English
often cause kickback or a loss of con-
trol over the power tool.
Overloading the cutting disc will
increase the stress on it and make it
which could cause it to kick back or the
grinding tool to break.
Otherwise the disc
or cause kickback.
Therefore avoid cutting through harm-
ful/toxic materials such as paint coats
containing lead, some types of wood
and metal and use a dust extractor as
well as personal protective equipment
such as a dust mask.
Damaging a live line could
also energise metallic parts of the
5.2. Safety instructions for this pre-
cision plunge saw
Safety instructions for saws with a pro-
tective hood
If the saw acci-
dentally falls on the ground, the protec-
tive hood could be bent. Make sure that
the protective hood moves freely and
does not touch either the saw blade or
other parts at all cutting angles and
depths.
Damaged parts, sticky deposits or
any buildup of chips will delay the effec-
tiveness of the bottom protective hood.
If it slides to the
side, the saw blade can catch resulting
in kickback.
A
saw blade that is not protected and still
rotating will move the saw against the
direction of cutting and will cut through
whatever is in its way. Note the time the
saw needs to come to a stop in the
process.
Do not use grinding wheels for cutting.
Only use saw blades with diameters
corresponding to the labels on the saw.
Always use a suitable dust extractor
when cutting wood.
Always wear a dust mask when cutting
wood.
Only use the saw blades recommended
by the manufacturer.
Always wear ear protection.
When cutting through plastic, avoid
overheating the tips of the saw teeth
and melting the plastic.
5.3. Safety instructions for cut-off
grinding applications
Safety instructions for cutting-off
machines
7063051-Thor-Compact-Ma-1804-30.indb 9 04-06-18 11:55

English
10
The
protective hood should protect the
operator from fragments and acciden-
tal contact with the grinding tool.
Securing the accessories on your
power tool is no guarantee for safe use.
Accessories that rotate
faster than permissible may break and
Cutting discs are
intended for removing material using
the edge of the disc. Forces acting on
the side of the grinding tool could shat-
ter it.
grinding wheel and reduce the risk of
the grinding wheel breaking.
Grinding wheels for
larger power tools are not designed to
handle the higher speeds of smaller
power tools and could break as a result.
not be adequately shielded or
controlled.
grinding spindle of the power tool
exactly will rotate unevenly, vibrate
control.
In most cases, damaged
grinding wheels will break during this
test period.
Your eyes
debris produced in connection with
different applications. The dust or pro-
dust produced during the respective
application. If you are exposed to exces-
sive noise, you could suffer hearing loss.
Fragments of the
outside of the direct work area.
A cutting
accessory contacting a “live” wire may
make exposed metal parts of the power
tool “live” and could give the operator an
electric shock.
If you lose control of
the device, the mains cord could be
severed or get caught and your hand or
arm could come into contact with the
7063051-Thor-Compact-Ma-1804-30.indb 10 04-06-18 11:55

11
English
come into contact with the surface of
the base and you could lose control of
the power tool.
Your clothing could
accidentally come into contact with the
could be driven into your body.
The motor fan will draw dust
into the housing; if a large amount of
metal dust accumulates, it could pose
electrical hazards.
Sparks could ignite
these materials.
Using water or other
liquid coolants could cause an electrical
shock.
5.4. Safety instructions for handling
saw blades
a.
use them in a controlled manner.
b. Observe the maximum speed. The
tool must not be exceeded. Only use
speed is larger than the max. speed of
the product.
c.
tools. It is not permissible to repair
them.
d. Clean any dirt, oil, grease and water off
of the clamping surfaces.
e. It is not permitted to use loose reducing
rings or bushings to reduce bore holes
in circular saw blades.
-
ting diameter.
f.
parallel to one another.
g.
you should store them in the original
packaging or special containers. Wear
protective gloves for better grip and to
h.
all protective devices are properly
secured.
i.
tool complies with the technical require-
ments of this power tool and that it is
properly secured.
Only use the enclosed saw blade for
cutting wood and never use it to cut
metals.
5.5. Safety instructions for diamond
cutting discs
Use
Only use the cutting-off wheels for cut-off
grinding and not for rough grinding. Only
material and not for other materials.
material cool down afterwards.
General information
and therefore must be handled very care-
tools that are incorrectly clamped in place
-
Handling and storage
Fitted tools must be handled and trans-
ported with care. Fitted tools must be stored
to prevent exposure to mechanical damages
and damaging environmental factors. To
before you transport the power tool.
Selection as well as safe and proper use
tool as well as restrictions on use, safety
instructions or other notes. Comply with the
-
ted tool and the power tool.
7063051-Thor-Compact-Ma-1804-30.indb 11 04-06-18 11:55

English
12
Before use
Fitted tools must undergo a visual check
that are damaged. Secure the work piece
you intend to work on.
Inserting/changing
the manufacturer of the power tool. Only
in place. Each time after clamping the tools
in place, perform a test run for an appropri-
ate period of time. The maximum working
be exceeded in the process. Always clamp
run-out occurs.
Handling
a. Observe the notes in the user manual
for the power tool which you are using
b. Before start-up, attach the correspond-
ing protective equipment to the power
tool. Do not perform any work without
any safeguarding by protective
equipment.
c. Use personal protective equipment
corresponding to the type of machine
and application, e.g. eye and face shield,
ear protection, respiratory protection,
protective footwear, protective gloves
and other protective clothing.
d.
is suitable for. Observe any restrictions
on use, safety instructions or other
information.
e. Before setting the power tool down on
the work bench or the ground, switch it
come to a complete stop.
f. When performing cut-off grinding,
cutting slit so that the power tool
doesn’t cant.
g. Do not move back and forth in the
material; instead steadily pull it through
the applicable material.
h. Only work at a right angle and along a
level axis to rule out any risk of cracks
in the core or fragments breaking off.
i. Do not exert excessive pressure. The
cool off.
k.
during work. Only hold it with protective
gloves after it has cooled off.
5.6. Safety instructions for the laser
cutting guide
This laser emits a laser
beam that falls under laser class 2 in
accordance with EN 60825-1:2014. You
could blind people with it.
Using
it incorrectly may result in irreparable
damage to the eyes.
No liability will be assumed for any
damages caused as the result of failure
to comply with these safety
instructions.
Therefore, do not open
the housing. Otherwise, you will render
the warranty void.
Only the manu-
facturer of the laser or an authorised
representative may perform repairs.
Do not point the laser beam towards
laser optics.
Clean the laser optics with a soft, dry
cloth.
5.7. Safety instructions for batteries
Batteries could explode or leak and cause
-
tions must be followed in order to reduce
risks.
7063051-Thor-Compact-Ma-1804-30.indb 12 04-06-18 11:55

13
English
a. Observe all instructions and warning
notes on the battery and the packaging.
b. When inserting the batteries, always
make sure that the polarity (+ and –)
indicated on the battery and battery
compartment cover is correct.
c. Do not short circuit the battery
terminals.
d. Do not attempt to recharge disposable
batteries.
e. Do not use old and new batteries in
combination with one another. Replace
all batteries with new batteries of the
same type and brand.
f. Keep batteries away from heat and
direct sunlight.
g. Immediately remove empty batteries
and dispose of them at a local collec-
tion point.
h. Don’t heat up the batteries and don’t
i. Keep new and used batteries away from
children.
Do not swallow the battery as there is a
risk of chemical burn.
k. If you suspect that a battery has been
swallowed or otherwise incorporated,
immediately consult a physician.
l. Do not allow battery acid to come into
contact with skin, eyes or mucus mem-
branes. In the event of contact with
affected area with clean water and
consult a physician.
m. If you are unable to securely close the
battery compartment, stop using the
product and keep it away from children.
n. Remove the battery from the product if
you do not use it for several months.
o. -
teries out of the reach of children.
5.8. Additional safety instructions
a. Only connect the product if the mains
voltage of the socket corresponds to
b. Only connect the product to an easily
accessible socket so that you can
quickly disconnect it from the mains
supply in case of a failure.
c. Never touch the product or the mains
plug with damp hands.
d. Lay the mains cord so that it does not
pose a tripping hazard.
e. Do not kink the mains cord and do not
lay it over sharp edges.
This product generates an electro-
we recommend persons with medical
implants to consult their physician and the
manufacturer of the medical implant before
5.9. What to do in an emergency
Use this user manual to familiarise yourself
with the use of this product. Memorise the
safety instructions and adhere to them at all
times. This helps reduce risks and avoid
danger.
a. When using this product, always be
alert so that you can recognise and deal
with dangers early on. Quick interven-
damage to property.
b. If the product experiences a malfunc-
tion, switch it off immediately and
remove it from the mains supply. Have
and, if necessary, repaired before put-
ting it into operation again.
6. Start-up
The product and its packaging
Children must not play with plastic bags,
6.1. Opening the packaging
1. Unpack the parts and place them on a
2. Remove the packaging material and
packing/transport locks (if there are
any).
7063051-Thor-Compact-Ma-1804-30.indb 13 04-06-18 11:55

English
14
3. Make sure that the packaging contents
are complete and free from possible
damage. Contact the retailer you
bought the product from or telephone
the After Sales Support number if you
notice that parts are missing or dam-
aged.
Do not use the product until missing
parts have been delivered or defective
parts have been replaced. The use of an
incomplete or damaged product may
property.
4. Ensure that you have the necessary
accessories and tools for set-up and
use. This includes suitable personal
protective equipment.
6.2. Inserting and changing the tted
tool
1. Before working on the product, pull the
mains plug out of the socket.
2.
tools that are cracked or chipped.
inserting it.
3.
their hole is larger or smaller than the
4.
as those shipped with the product.
5. Release the cutting depth limiter.
6. Hold the spindle lock down and
turn the spindle until it locks into
place.
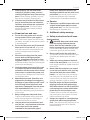
7. Use the star hex key to loosen the
clamp bolt by turning it clockwise
from the spindle (see , steps
1–4).
8. Push the access switch for the protec-
tive hood and hold it in position.
9. Open the protective hood com-
pletely, hold it in position and let go of
the access switch for the protective
hood (see , steps 1–2).
10. for
the material you intend to work on.
11.
Then close the protective hood
(see ).
12. and the
clamp bolt into the spindle. Tighten
the clamp bolt by turning the star hex
key anticlockwise.
13.
moving parts run smoothly and the
clamp bolt is tightened.
Before working with the product, let it run
idle for one minute after changing/inserting
been correctly inserted.
6.3. Mounting the parallel guide
Do not use a parallel guide if the cutting
width of the work piece is smaller than
Fix the parallel guide from the left-hand side
to saw along parallel to straight work piece
edges.
1. Loosen the locking knob by turn-
ing it anticlockwise.
2. Slide the parallel guide 15 through the
end stop guides (see , steps 1–2).
3.
desired width is shown on the scale
.
4. Tighten the locking knob clock-
wise to secure the parallel guide.
6.4. Connecting the dust extractor
Harmful/toxic dust can be produced when
working on e.g. paint coats containing lead
and some types of wood. They pose a dan-
ger for both the user and nearby persons.
– If you cut materials that could produce
hazardous dust, always use a dust
extractor. This also applies, among
other things, to hard woods, MDF pan-
els and ceramics.
7063051-Thor-Compact-Ma-1804-30.indb 14 04-06-18 11:55

15
English
– Protect yourself by wearing suitable
personal protective equipment and
keep other persons away from the work
area.
NOTICE!
Risk of damage!
Using a vacuum cleaner that is not suitable
for use in combination with the power tool
could damage the vacuum cleaner.
– Make sure that the vacuum cleaner is
suitable for use with the power tool.
Dust extraction is particularly reasonable
when performing multiple consecutive cuts.
Breaks for cleaning the product and the
work area are thus not needed as
frequently.
Connecting a dust extractor makes it possi-
ble to vacuum dust and chips off the work
piece. This will protect both the product and
your own health. This will also keep your
work area clean and safe.
Most dry vacuum cleaners designed for
household use are suitable for dust
extraction.
1. Connect the suction hose to the
dust extraction connection (see
).
2. Connect a suitable dust extraction
device (e.g. vacuum cleaner).
6.5. Setting the cutting depth
1. Release the cutting depth limiter .
2. Set the cutting depth in millimetres
according to the cutting depth scale
place again (see , steps 1–3).
The cutting depth must be slightly greater
than the material thickness with wood and
plastic.
For better cutting results, you can use a
wood base. However, the wood base will be
damaged while cutting.
6.6. Using the laser
The beam line of the laser is available to
assist in making straight cuts. You can
piece and then cut.
Before using the laser, you must remove the
insulating pad.
1. Remove the insulating pad.
2. To switch the laser on, push the
On/Off switch for the laser .
3. To switch the laser off, push the On/Off
switch for the laser again (see ).
7. Operation
7.1. Switching the device on and off
Check before each use that the product is
complete and has been built properly.
1. Connect the mains plug to a properly
installed socket.
2. Push the On/Off switch for the mini
circular saw to switch the product
on.
3. Let go of the On/Off switch to switch
the product off.
7.2. Cutting
If the product is not operated prop-
erly or is defective, this can lead to
1. Put on protective goggles.
2. Before you start work and having pulled
the mains plug out of the socket, make
sure that the protective hood, the clamp
-
correctly.
3. While working with the saw, make sure
that the protective hood does not catch
position after every working cycle.
4. Do not exert any side pressure on the
work piece whilst working.
Improper handling of the work piece can
1. Clamp small wood pieces in place
before working on them.
2. Never use your hand to hold small work
pieces.
7063051-Thor-Compact-Ma-1804-30.indb 15 04-06-18 11:55

English
16
3. Always perform a test cut on a leftover
4. Set the cutting depth (see chapter “Set-
ting the cutting depth”).
5.
on the handles .
6.
tool reach its full speed.
7. Place the base plate on the work
piece up to the mark. The base plate
The waste piece must be on the left
side of the product so that the wide part
of the base plate is located completely
on the work piece.
8. Push the access switch for the protec-
tive hood
tool into the work piece.
9. Move the product forwards across the
work piece. Never pull the product
backwards across the work piece.
10. Only exert minimal pressure (gentle
feed motion) on the product when
working. Gently and evenly push the
product forwards.
11. Once you reach the end of the cut,
tool out of the work piece.
Check the protective hood
1. Release the cutting depth limiter .
2. Push the access switch for the protec-
tive hood and hold it in position.
3. The protective hood must be able
letting go, the base plate must
spring back into the start position itself.
Cutting along a line
You can use the cutting line guides
located on the front and back of the base
plate to follow a guide line marked on
the work piece.
For precision cuts, the offset of the kerf with
respect to the marked guide line must be
determined by performing a test cut. Any
resulting deviation from the guide line indi-
cates how the new line must be marked to
compensate for the offset of the kerf so
that you can perform a precision cut.
Performing a plunge cut
1. Make sure that the material you intend
to cut is not too hard for a plunge cut.
2. Some very hard materials are not suita-
ble for plunge cutting.
3. Place the base plate on the work
piece. Make sure that the rear line cut-
ting line guide 14a is in line with the
start of the cut.
4.
tool reach its full speed.
5.
material applying gentle pressure.
6. Move the product forwards across the
work piece. Never pull the product
backwards across the work piece.
7. Once you reach the end of the cut,
tool out of the work piece.
Performing a parallel cut
1. Attach the parallel guide on the
product as described above and set it
to the desired width.
2. Switch the product on. Wait until it has
reached its full speed before inserting
the saw blade into the work piece.
3. Place the product on the work piece
and guide it parallel along the edge of
the work piece (see ).
Cutting large work pieces
Proceed as follows to work on large work
pieces or cut long, straight edges:
1. Use screw clamps to secure a board or
a strip for use as a temporary guide on
the work piece.
2. While cutting, run the left side of the
base plate along the temporary
guide.
Cutting tiles
–
to facilitate work and prevent scratches.
7.3. After use
1. Turn the product and laser off and let
2. Pull the mains plug out of the socket.
3. Let the product cool down completely.
7063051-Thor-Compact-Ma-1804-30.indb 16 04-06-18 11:55

17
English
4. Remove the accessories for the dust
out of the product.
5. Clean the product.
8. Cleaning and care
WARNING!
Risk of injury!
Switch the product off, disconnect it from
the mains and let the product cool off
before carrying out any inspection, mainte-
1. Always keep the product clean, dry and
free from oil or grease. Remove any
dust after every use and before storing.
2. Regular and proper cleaning aids
ensure safe use and prolongs the ser-
vice life of the product.
3. Check the product for worn-out and
defective parts before every use. Do not
use it if you notice any defect or worn-
out parts.
4. Make sure that no liquids penetrate the
inside of the product.
5. Clean the product with a dry cloth. Use
access.
6. Use a cloth and brush to remove any
dirt and dust from the vents in
particular.
7. Scrub off any stubborn dust with air
pressure (max. 3 bars).
Never use chemical, alkaline, abrasive or
other aggressive cleaning or disinfection
products to clean the product, as these may
damage the surfaces.
Maintenance
– Before and after each use, check the
tools) for wear and damage.
– If necessary, replace them with new
ones as described in this user manual.
Observe the technical requirements in
the process (see “Technical data”).
Replacing the carbon brushes
The carbon brushes may only be replaced
specialist.
Replacing the mains cord
If the mains cord of this product is dam-
aged, it must be replaced by the manufac-
turer, its After Sales Support department or
-
vent hazards.
Replacing the batteries
If the laser stops working, the battery must
be replaced.
1. Loosen the screw and remove the
battery compartment lid from the
battery compartment .
2. Remove the button cell (see
).
3. Now insert the new button cell. Make
sure the polarity is correct.
4. Attach the battery compartment lid to
the battery compartment again and
tighten the screw.
5. Never dispose of old or empty batteries
in your household garbage, instead
always take them to special battery or
special garbage collection points (see
chapter “Disposal”).
Repair
There are no parts that can be repaired by
the user inside this product. Contact the
After Sales Support line to check and repair
the product.
Ordering spare parts
Have your product repaired by the
After Sales Support line or a quali-
-
ment parts. This will ensure that the safety
of the product is maintained.
Always have the manufacturer of the prod-
uct or its After Sales Support replace the
plug or the mains cord. This will ensure that
the safety of the product is maintained.
7063051-Thor-Compact-Ma-1804-30.indb 17 04-06-18 11:55

English
18
You can order spare parts from the After
Sales Support line by providing the follow-
ing information:
• type/model of product;
• item number of product.
9. Storage
1. Switch the product off and disconnect
it from the mains supply.
2. Clean the product as described above.
3. Store the product and its accessories in
a dark, dry, frost-free and well-ventilated
place.
4. Always store the product in a place that
is not accessible to children. The ideal
storage temperature is between 10 °C
and 30 °C.
5. We recommend that you store the prod-
uct in its original packaging or cover it
with a suitable cloth to protect it against
dust
6. Store the product and the accessories
in the transport case .
10. Transport
1. Switch the product off and disconnect
it from the mains supply.
2. Attach any transport protection devices,
if any.
3. Always carry the product by the
handles.
4. Protect the product against impact and
intense vibrations, which occur particu-
larly when transporting in vehicles.
5. Secure the product against shifting and
tilting.
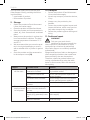
11. Faults and repair
Only carry out work that is
other inspection, maintenance or repair
work must be carried out by authorised
Alleged malfunctions, faults or damage are
often caused by situations that could have
Therefore, check the product before con-
tacting a professional by using the table
below. In most cases, faults can be reme-
died quickly.
1. The product
will not start.
The mains plug has not been
inserted in a socket.
Connect the mains plug with a prop-
erly installed socket.
The carbon brushes are
worn.
carbon brushes.
The mains cord is broken. Pull the mains cord out of the socket.
Other electrical defect on the
product.
Have it checked by a professional.
2. The product
does not reach
its full power.
Extension cable too long
and/or its cross section is
too low.
Use a suitable extension cable.
The voltage of the mains
supply (e.g. generator) is too
low.
Connect the product to a suitable
mains supply.
Vents are blocked. Clean the vents.
7063051-Thor-Compact-Ma-1804-30.indb 18 04-06-18 11:55
Seite wird geladen ...
Seite wird geladen ...
Seite wird geladen ...
Seite wird geladen ...
Seite wird geladen ...
Seite wird geladen ...
Seite wird geladen ...
Seite wird geladen ...
Seite wird geladen ...
Seite wird geladen ...
Seite wird geladen ...
Seite wird geladen ...
Seite wird geladen ...
Seite wird geladen ...
Seite wird geladen ...
Seite wird geladen ...
Seite wird geladen ...
Seite wird geladen ...
Seite wird geladen ...
Seite wird geladen ...
Seite wird geladen ...
Seite wird geladen ...
Seite wird geladen ...
Seite wird geladen ...
Seite wird geladen ...
Seite wird geladen ...
Seite wird geladen ...
Seite wird geladen ...
Seite wird geladen ...
Seite wird geladen ...
Seite wird geladen ...
Seite wird geladen ...
Seite wird geladen ...
Seite wird geladen ...
Seite wird geladen ...
Seite wird geladen ...
Seite wird geladen ...
Seite wird geladen ...
Seite wird geladen ...
Seite wird geladen ...
Seite wird geladen ...
Seite wird geladen ...
Seite wird geladen ...
Seite wird geladen ...
Seite wird geladen ...
Seite wird geladen ...
Seite wird geladen ...
Seite wird geladen ...
Seite wird geladen ...
Seite wird geladen ...
Seite wird geladen ...
Seite wird geladen ...
Seite wird geladen ...
Seite wird geladen ...
Seite wird geladen ...
Seite wird geladen ...
Seite wird geladen ...
Seite wird geladen ...
Seite wird geladen ...
Seite wird geladen ...
Seite wird geladen ...
Seite wird geladen ...
Seite wird geladen ...
Seite wird geladen ...
Seite wird geladen ...
Seite wird geladen ...
-
 1
1
-
 2
2
-
 3
3
-
 4
4
-
 5
5
-
 6
6
-
 7
7
-
 8
8
-
 9
9
-
 10
10
-
 11
11
-
 12
12
-
 13
13
-
 14
14
-
 15
15
-
 16
16
-
 17
17
-
 18
18
-
 19
19
-
 20
20
-
 21
21
-
 22
22
-
 23
23
-
 24
24
-
 25
25
-
 26
26
-
 27
27
-
 28
28
-
 29
29
-
 30
30
-
 31
31
-
 32
32
-
 33
33
-
 34
34
-
 35
35
-
 36
36
-
 37
37
-
 38
38
-
 39
39
-
 40
40
-
 41
41
-
 42
42
-
 43
43
-
 44
44
-
 45
45
-
 46
46
-
 47
47
-
 48
48
-
 49
49
-
 50
50
-
 51
51
-
 52
52
-
 53
53
-
 54
54
-
 55
55
-
 56
56
-
 57
57
-
 58
58
-
 59
59
-
 60
60
-
 61
61
-
 62
62
-
 63
63
-
 64
64
-
 65
65
-
 66
66
-
 67
67
-
 68
68
-
 69
69
-
 70
70
-
 71
71
-
 72
72
-
 73
73
-
 74
74
-
 75
75
-
 76
76
-
 77
77
-
 78
78
-
 79
79
-
 80
80
-
 81
81
-
 82
82
-
 83
83
-
 84
84
-
 85
85
-
 86
86


Batavia ?THOR MULTISAW Operating Instructions Manual
- Kategorie
- Elektrowerkzeuge
- Typ
- Operating Instructions Manual
in anderen Sprachen
- English: Batavia ?THOR MULTISAW
- français: Batavia ?THOR MULTISAW
- Nederlands: Batavia ?THOR MULTISAW
Verwandte Artikel
Andere Dokumente
-
Pattfield PSC120M1 Bedienungsanleitung
-
Greenworks G24CS Benutzerhandbuch
-
Constructor CTRSC710BC Benutzerhandbuch
-
Parkside PTS 500 A1 Original Instructions Manual
-
-
-
Parkside PTS 710 A2 Translation Of The Original Instructions
-
Parkside PTS 20-Li A1 Translation Of The Original Instructions
-
-