
Chameleon
VisuWall
Montagehandleiding
Mounting guide
Montageanleitung
Notice de montage
Instrucciones de montaje
Manuale di montaggio
NL GB DE FR ES IT
04
05
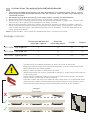
1
2
Ø 8 mm Ø 8 mm
3
2x
8 mm
35 mm
Let op: draagband kan tot 30 mm in hoogte uitrekken
Bitte beachten Sie: Trageband kann bis zu 30 mm hoch strecken
Please note: leather strap can stretch up to 30 mm in height
We make it visible
4
A
5x50
2x
5
B
A
*Click*
AB
A
2x

We make it visible
06
07
Congratulations with
your purchase!
• The wall must be smooth (no bumps or dents) and free of obstacles.
• Magnetic surface of the plate should be completly in contact with back of the
board to have it’s full holding power.
• Always mount magnets in the same flat plane.
• With bumpy walls use spacers (available in most D.I.Y. shops) to put the magnets
in the same plane.
• Check flatness between plates by using a level. Adjust with spacers and repeat
check until all surface are in the same plane.
• Provided screws and plugs are suited for solid stone walls. In case of other walls
make sure you choose suited mounting materials! Keep in mind that the screw
head should fit deep enough into the steel plate, because of the magnet!
Spacer
✓
✓
X
Image 1
- Top view -
GB
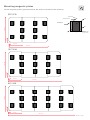
Mounting magnetic plates
Fix the magnetic plates (300x300 mm) to the wall as indicated in the drawings.
980 mm
2940 mm
100 mm
1980 mm
300 mm
980 mm
3920 mm
100 mm
1980 mm
300 mm
980 mm
4900 mm
100 mm
1980 mm
300 mm
16006.001
16006.002
16006.003
4x srew 4x40
4x dowel 6mm
4x Ø 6mm
Magnetic plate
300x300mm
Package contents
Chameleon whiteboard
panel 98 x 198 cm
Magnetic
mounting plates
Screws Dowels
16006.001 - 294 x 198 cm 3 10 40 40
16006.002 - 392 x 198 cm 4 13 52 52
16006.003 - 490 x 198 cm 5 16 64 64
We make it visible
06
07
Congratulations with
your purchase!
• The wall must be smooth (no bumps or dents) and free of obstacles.
• Magnetic surface of the plate should be completly in contact with back of the
board to have it’s full holding power.
• Always mount magnets in the same flat plane.
• With bumpy walls use spacers (available in most D.I.Y. shops) to put the magnets
in the same plane.
• Check flatness between plates by using a level. Adjust with spacers and repeat
check until all surface are in the same plane.
• Provided screws and plugs are suited for solid stone walls. In case of other walls
make sure you choose suited mounting materials! Keep in mind that the screw
head should fit deep enough into the steel plate, because of the magnet!
Spacer
✓
✓
X
Image 1
- Top view -
GB
Mounting magnetic plates
Fix the magnetic plates (300x300 mm) to the wall as indicated in the drawings.
980 mm
2940 mm
100 mm
1980 mm
300 mm
980 mm
3920 mm
100 mm
1980 mm
300 mm
980 mm
4900 mm
100 mm
1980 mm
300 mm
16006.001
16006.002
16006.003
4x srew 4x40
4x dowel 6mm
4x Ø 6mm
Magnetic plate
300x300mm
Package contents
Chameleon whiteboard
panel 98 x 198 cm
Magnetic
mounting plates
Screws Dowels
16006.001 - 294 x 198 cm 3 10 40 40
16006.002 - 392 x 198 cm 4 13 52 52
16006.003 - 490 x 198 cm 5 16 64 64
Instructies voor het wissen van (bedrukte) whiteborden
1. Wis markerstrepen enkel wanneer deze goed droog zijn om uitsmeren te voorkomen. Dit
is van cruciaal belang bij gelakte en bedrukte borden, omdat de oplosmiddelen in de natte
inkt het oppervlak hiervan zullen beschadigen.
2. Wis droge inkt enkel met een schone(!) vilt- of papierwisser welke geschikt is voor white-
borden.
3. Reinig het bord dagelijks met reinigingsspray om goede wisbaarheid te behouden.
4. Gebruik NOOIT andere reinigers dan echte whitebordreinigers. Reinigers als Glassex zijn te
agressief en tasten het bordoppervlak onherstelbaar aan wat wissen onmogelijk maakt.
5. Wanneer per ongeluk een verkeerde stift wordt gebruikt (flip-overmarker, permanent- mar-
ker): bord direct wissen met reinigingsspray en een microvezeldoekje. Als dit niet helpt, met de
whitebordmarker arcerend over het geschrevene schrijven, zodat de geschreven tekst oplost.
Vervolgens bord met reinigingsspray wissen.
Let op! Sommige markers -zelfs die van gerenommeerde merken- zijn slecht wisbaar.
We make it visible
Consignes pour effacer les panneaux blancs (imprimés)
1. N’effacez les traits de marqueur que lorsqu’ils sont bien secs pour éviter les bavures.
C’est essentiel pour les tableaux peints et imprimés car les solvants de l’encre humide
endommagent la surface.
2. Effacez l’encre sèche uniquement avec un chiffon en feutre ou en papier propre (!) adap-
té aux tableaux blancs.
3. Nettoyez le tableau tous les jours avec un spray nettoyant pour conserver une bonne capa-
cité d’effacement.
4. N’utilisez JAMAIS d’autres nettoyants que les nettoyants véritables pour tableaux blancs.
Les nettoyants tels que Glassex sont trop agressifs et érodent de manière irréversible la sur-
face du tableau, le rendant impossible à effacer.
5. Si un marqueur incorrect est utilisé accidentellement (marqueur de tableau à feuilles mo-
biles, marqueur permanent): effacez immédiatement le tableau avec un spray nettoyant et
un chiffon en microfibre. Si cela ne fonctionne pas, hachurez le texte avec le marqueur de
tableau blanc afin que le texte se dissolve. Puis nettoyez le tableau avec un spray nettoyant.
Attention! Certains marqueurs, même ceux de marques réputées, ne sont pas facilement effa-
çables.
Instructions for wiping (printed) whiteboards
1. To prevent spreading the written ink, only wipe when it’s completely dry. This is crucial
with lacquered and printed boards because the solvents in the ink will cause damage to
the board surface.
2. Only wipe dry ink with a clean (!) felt or paper wiper suitable for whiteboards.
3. Daily clean the board with cleaning spray to maintain a good erasability.
4. NEVER use other cleaning agencies than real whiteboard cleaners. Aggressive cleaners like
Glassex will cause permanent damage to the board surface.
5. When a wrong marker (flipchart marker, permanent marker) is used by accident: immedi-
ately clean the board with cleaning spray and a microfiber cloth. If that doesn’t help, write
over the written text with a whiteboard marker until it desolves. Clean the board with cle-
aning spray afterwards.
Note! Some markers –even those of renowned brands- are poorly erasable.
Hinweise zur Reinigung von (bedruckte) Weißwandtafeln
1. Um zu verhindern, dass die Tinte verwischt wird, wischen Sie sie nur ab, wenn sie kom-
plett getrocknet ist. Dies ist sehr wichtig bei unseren lackierten bzw. bedruckten
Boards, da dies sonst zu Beschädigungen führen kann.
2. Wischen Sie die getrocknete Tinte nur mit einem sauberen (!) Tuch oder Papiertücher ab,
die wir für unsere Whiteboards empfehlen.
3. Reinigen Sie das Board täglich mit dem Reinigungsspray, um einen guten Zustand zuerhal-
ten.
4. Verwenden Sie bitte NIEMALS andere Reiniger, als echte Whiteboard Reiniger. Andere Reini-
ger, wie z.B. Fensterreiniger können zu aggressiv für das Board sein und permanente Schä-
den auf der Oberfläche verursachen.
5. Reinigen Sie es sofort mit unserem empfohlenen Reinigungsspray und einem Microfaser-
tuch. Falls dies nicht helfen sollte, schreiben Sie mit einem Whiteboard Marker über die ent-
sprechende Stelle, bis sich die Farbe auflöst. Reinigen Sie danach die Stelle mit dem Reini-
gungsspray.
Bitte beachten Sie! Einige Markenschreiber, auch von namhaften Herstellern, lassen Sich sehr
schlecht entfernen. Nutzen Sie ebenfalls das Reinigungsspray bei diesen Produkten.
Instrucciones para borrar pizarras blancas (impresas)
1. Borre las marcas de rotulador únicamente cuando se hayan secado bien para evitar que
se extienda la mancha. Esto es esencial para pizarras barnizadas o impresas, porque las
soluciones de la tinta húmeda dañarían la superficie.
2. Limpie la tinta seca únicamente con un borrador limpio (!) de fieltro o papel, especial
para pizarras blancas.
3. Limpie la pizarra todos los días con un spray limpiador para que siga siendo fácil borrarla.
4. No utilice NUNCA otros limpiadores que no sean los especialmente indicados para pizarras
blancas. Los limpiaventanas de cualquier marca son demasiado agresivos y dañan irrepara-
blemente la superficie de la pizarra lo que imposibilita que se pueda limpiar.
5. Si, por error, se usa un rotulador equivocado (para caballete de hojas grandes, rotulador
permanente): limpie inmediatamente la pizarra con spray limpiador y un paño de microfi-
bra. Si no sirviera de nada, escriba con el rotulador de pizarra blanco sobre el texto escrito,
para que se disuelva. Después limpie la pizarra con spray limpiador.
¡Atención! Algunos rotuladores, incluso los de buenas marcas, son difíciles de borrar.
Istruzioni per cancellare sulle lavagne bianche (stampate)
1. Cancellare i tratti dei pennarelli soltanto quando sono perfettamente asciutti per evita-
re di spargerli. Questo punto è di cruciale importanza per le lavagne verniciate e stam-
pate, poiché i solventi presenti nell’inchiostro umido danneggerebbero la superficie.
2. Cancellare l’inchiostro asciutto soltanto con un cancellino di feltro o di carta adatto per
le lavagne bianche.
3. Pulire la lavagna ogni giorno con uno spray detergente per mantenerla perfettamente can-
cellabile.
4. NON utilizzare mai detergenti diversi da quelli previsti per le lavagne bianche. I detergenti
come il Glassex sono troppo aggressivi e danneggiano irreparabilmente la superficie della
lavagna, rendendo impossibile la cancellazione.
5. Se si utilizza per errore un pennarello inadatto (un evidenziatore o un pennarello permanen-
te), pulire immediatamente la lavagna con lo spray detergente e un panno in microfibra. Se
non è sufficiente, ripassare sui tratti con il pennarello per lavagne bianche, affinché funga da
solvente sui tratti scritti. Passare quindi lo spray detergente sulla lavagna.
Attenzione! Alcuni pennarelli, anche di marche rinomate, sono difficili da cancellare.
NL
DE
GB
IT
FR
ES
04
05
1
2
Ø 8 mm Ø 8 mm
3
2x
8 mm
35 mm
Let op: draagband kan tot 30 mm in hoogte uitrekken
Bitte beachten Sie: Trageband kann bis zu 30 mm hoch strecken
Please note: leather strap can stretch up to 30 mm in height
We make it visible
4
A
5x50
2x
5
B
A
*Click*
AB
A
2x
04
05
1
2
Ø 8 mm Ø 8 mm
3
2x
8 mm
35 mm
Let op: draagband kan tot 30 mm in hoogte uitrekken
Bitte beachten Sie: Trageband kann bis zu 30 mm hoch strecken
Please note: leather strap can stretch up to 30 mm in height
We make it visible
4
A
5x50
2x
5
B
A
*Click*
AB
A
2x
BEC1UP3B
BEC1UP4B
BEC1UP5B

We make it visible
06
07
Congratulations with
your purchase!
• The wall must be smooth (no bumps or dents) and free of obstacles.
• Magnetic surface of the plate should be completly in contact with back of the
board to have it’s full holding power.
• Always mount magnets in the same flat plane.
• With bumpy walls use spacers (available in most D.I.Y. shops) to put the magnets
in the same plane.
• Check flatness between plates by using a level. Adjust with spacers and repeat
check until all surface are in the same plane.
• Provided screws and plugs are suited for solid stone walls. In case of other walls
make sure you choose suited mounting materials! Keep in mind that the screw
head should fit deep enough into the steel plate, because of the magnet!
Spacer
✓
✓
X
Image 1
- Top view -
GB
Mounting magnetic plates
Fix the magnetic plates (300x300 mm) to the wall as indicated in the drawings.
980 mm
2940 mm
100 mm
1980 mm
300 mm
980 mm
3920 mm
100 mm
1980 mm
300 mm
980 mm
4900 mm
100 mm
1980 mm
300 mm
16006.001
16006.002
16006.003
4x srew 4x40
4x dowel 6mm
4x Ø 6mm
Magnetic plate
300x300mm
Package contents
Chameleon whiteboard
panel 98 x 198 cm
Magnetic
mounting plates
Screws Dowels
16006.001 - 294 x 198 cm 3 10 40 40
16006.002 - 392 x 198 cm 4 13 52 52
16006.003 - 490 x 198 cm 5 16 64 64
Instructies voor het wissen van (bedrukte) whiteborden
1. Wis markerstrepen enkel wanneer deze goed droog zijn om uitsmeren te voorkomen. Dit
is van cruciaal belang bij gelakte en bedrukte borden, omdat de oplosmiddelen in de natte
inkt het oppervlak hiervan zullen beschadigen.
2. Wis droge inkt enkel met een schone(!) vilt- of papierwisser welke geschikt is voor white-
borden.
3. Reinig het bord dagelijks met reinigingsspray om goede wisbaarheid te behouden.
4. Gebruik NOOIT andere reinigers dan echte whitebordreinigers. Reinigers als Glassex zijn te
agressief en tasten het bordoppervlak onherstelbaar aan wat wissen onmogelijk maakt.
5. Wanneer per ongeluk een verkeerde stift wordt gebruikt (flip-overmarker, permanent- mar-
ker): bord direct wissen met reinigingsspray en een microvezeldoekje. Als dit niet helpt, met de
whitebordmarker arcerend over het geschrevene schrijven, zodat de geschreven tekst oplost.
Vervolgens bord met reinigingsspray wissen.
Let op! Sommige markers -zelfs die van gerenommeerde merken- zijn slecht wisbaar.
We make it visible
Consignes pour effacer les panneaux blancs (imprimés)
1. N’effacez les traits de marqueur que lorsqu’ils sont bien secs pour éviter les bavures.
C’est essentiel pour les tableaux peints et imprimés car les solvants de l’encre humide
endommagent la surface.
2. Effacez l’encre sèche uniquement avec un chiffon en feutre ou en papier propre (!) adap-
té aux tableaux blancs.
3. Nettoyez le tableau tous les jours avec un spray nettoyant pour conserver une bonne capa-
cité d’effacement.
4. N’utilisez JAMAIS d’autres nettoyants que les nettoyants véritables pour tableaux blancs.
Les nettoyants tels que Glassex sont trop agressifs et érodent de manière irréversible la sur-
face du tableau, le rendant impossible à effacer.
5. Si un marqueur incorrect est utilisé accidentellement (marqueur de tableau à feuilles mo-
biles, marqueur permanent): effacez immédiatement le tableau avec un spray nettoyant et
un chiffon en microfibre. Si cela ne fonctionne pas, hachurez le texte avec le marqueur de
tableau blanc afin que le texte se dissolve. Puis nettoyez le tableau avec un spray nettoyant.
Attention! Certains marqueurs, même ceux de marques réputées, ne sont pas facilement effa-
çables.
Instructions for wiping (printed) whiteboards
1. To prevent spreading the written ink, only wipe when it’s completely dry. This is crucial
with lacquered and printed boards because the solvents in the ink will cause damage to
the board surface.
2. Only wipe dry ink with a clean (!) felt or paper wiper suitable for whiteboards.
3. Daily clean the board with cleaning spray to maintain a good erasability.
4. NEVER use other cleaning agencies than real whiteboard cleaners. Aggressive cleaners like
Glassex will cause permanent damage to the board surface.
5. When a wrong marker (flipchart marker, permanent marker) is used by accident: immedi-
ately clean the board with cleaning spray and a microfiber cloth. If that doesn’t help, write
over the written text with a whiteboard marker until it desolves. Clean the board with cle-
aning spray afterwards.
Note! Some markers –even those of renowned brands- are poorly erasable.
Hinweise zur Reinigung von (bedruckte) Weißwandtafeln
1. Um zu verhindern, dass die Tinte verwischt wird, wischen Sie sie nur ab, wenn sie kom-
plett getrocknet ist. Dies ist sehr wichtig bei unseren lackierten bzw. bedruckten
Boards, da dies sonst zu Beschädigungen führen kann.
2. Wischen Sie die getrocknete Tinte nur mit einem sauberen (!) Tuch oder Papiertücher ab,
die wir für unsere Whiteboards empfehlen.
3. Reinigen Sie das Board täglich mit dem Reinigungsspray, um einen guten Zustand zuerhal-
ten.
4. Verwenden Sie bitte NIEMALS andere Reiniger, als echte Whiteboard Reiniger. Andere Reini-
ger, wie z.B. Fensterreiniger können zu aggressiv für das Board sein und permanente Schä-
den auf der Oberfläche verursachen.
5. Reinigen Sie es sofort mit unserem empfohlenen Reinigungsspray und einem Microfaser-
tuch. Falls dies nicht helfen sollte, schreiben Sie mit einem Whiteboard Marker über die ent-
sprechende Stelle, bis sich die Farbe auflöst. Reinigen Sie danach die Stelle mit dem Reini-
gungsspray.
Bitte beachten Sie! Einige Markenschreiber, auch von namhaften Herstellern, lassen Sich sehr
schlecht entfernen. Nutzen Sie ebenfalls das Reinigungsspray bei diesen Produkten.
Instrucciones para borrar pizarras blancas (impresas)
1. Borre las marcas de rotulador únicamente cuando se hayan secado bien para evitar que
se extienda la mancha. Esto es esencial para pizarras barnizadas o impresas, porque las
soluciones de la tinta húmeda dañarían la superficie.
2. Limpie la tinta seca únicamente con un borrador limpio (!) de fieltro o papel, especial
para pizarras blancas.
3. Limpie la pizarra todos los días con un spray limpiador para que siga siendo fácil borrarla.
4. No utilice NUNCA otros limpiadores que no sean los especialmente indicados para pizarras
blancas. Los limpiaventanas de cualquier marca son demasiado agresivos y dañan irrepara-
blemente la superficie de la pizarra lo que imposibilita que se pueda limpiar.
5. Si, por error, se usa un rotulador equivocado (para caballete de hojas grandes, rotulador
permanente): limpie inmediatamente la pizarra con spray limpiador y un paño de microfi-
bra. Si no sirviera de nada, escriba con el rotulador de pizarra blanco sobre el texto escrito,
para que se disuelva. Después limpie la pizarra con spray limpiador.
¡Atención! Algunos rotuladores, incluso los de buenas marcas, son difíciles de borrar.
Istruzioni per cancellare sulle lavagne bianche (stampate)
1. Cancellare i tratti dei pennarelli soltanto quando sono perfettamente asciutti per evita-
re di spargerli. Questo punto è di cruciale importanza per le lavagne verniciate e stam-
pate, poiché i solventi presenti nell’inchiostro umido danneggerebbero la superficie.
2. Cancellare l’inchiostro asciutto soltanto con un cancellino di feltro o di carta adatto per
le lavagne bianche.
3. Pulire la lavagna ogni giorno con uno spray detergente per mantenerla perfettamente can-
cellabile.
4. NON utilizzare mai detergenti diversi da quelli previsti per le lavagne bianche. I detergenti
come il Glassex sono troppo aggressivi e danneggiano irreparabilmente la superficie della
lavagna, rendendo impossibile la cancellazione.
5. Se si utilizza per errore un pennarello inadatto (un evidenziatore o un pennarello permanen-
te), pulire immediatamente la lavagna con lo spray detergente e un panno in microfibra. Se
non è sufficiente, ripassare sui tratti con il pennarello per lavagne bianche, affinché funga da
solvente sui tratti scritti. Passare quindi lo spray detergente sulla lavagna.
Attenzione! Alcuni pennarelli, anche di marche rinomate, sono difficili da cancellare.
NL
DE
GB
IT
FR
ES
04
05
1
2
Ø 8 mm Ø 8 mm
3
2x
8 mm
35 mm
Let op: draagband kan tot 30 mm in hoogte uitrekken
Bitte beachten Sie: Trageband kann bis zu 30 mm hoch strecken
Please note: leather strap can stretch up to 30 mm in height
We make it visible
4
A
5x50
2x
5
B
A
*Click*
AB
A
2x
BEC1UP3B
screw
BEC1UP4B
BEC1UP5B
-
 1
1
-
 2
2
-
 3
3


in anderen Sprachen
- English: Chameleon VisuWall
- español: Chameleon VisuWall
- italiano: Chameleon VisuWall
Andere Dokumente
-
Olivetti Oliboard ePen Bedienungsanleitung
-
-
-
Clou CL/08.03.016.03 Benutzerhandbuch
-
Vision TM-UST EXT Bedienungsanleitung
-
SENSEO® HD7817/12 Schnellstartanleitung
-
 AmazonBasics B07S9FD67D Benutzerhandbuch
-
 Molotow LIQUID CHROME™ Benutzerhandbuch
-
IMC Toys 650152 Benutzerhandbuch
-
Lexibook CRB300 Bedienungsanleitung

