Haier HAPY6CBS6BVOCLC Benutzerhandbuch
- Kategorie
- Dunstabzugshauben
- Typ
- Benutzerhandbuch
Dieses Handbuch ist auch geeignet für

EN
Warnings and installation
FR
Avertissements et installation
PL
Ostrzeżenia i instalacja
DE
Warnungen und Einbau
IT
Avvertenze e installazione


EN
The product is designed for the extraction of cooking fumes
and steam and it is for domestic use only.
Strictly observe the instructions in this manual. No
liability shall be accepted for any inconvenience, damage
or fire caused to the product as a result of not following the
instructions given in this manual.
The device may have different aesthetic features with
respect to the illustrations in this handbook, however
the operating, maintenance and installation
instructions remain the same.
• It is important to keep all the manuals accompanying the
product so that they can be consulted at all times. If sold,
transferred or moved, make sure it remains with the
product. • Read the instructions carefully: they contain
important information on installation, operation and safety. •
Check the integrity of the product prior to its installation.
Otherwise, contact the dealer and do not continue with the
installation.
NOTES
: the items marked with this symbol are optional
accessories supplied only with some models or items that
cannot be supplied but can be purchased.
1. SAFETY AND REGULATIONS
GENERAL SAFETY
•Do not make electrical or mechanical changes on the
product or on the exhaust pipes. •Before doing any cleaning
or maintenance work, disconnect the product from the
mains power supply by removing the plug or turning off the
mains switch. •For all installation and maintenance
operations, always wear work gloves. •The product can be
used by children over the age of 8 and by people with
reduced physical, sensory or mental capabilities or without
experience or the necessary knowledge, as long as they
are properly supervised or have been instructed on how to
safely use the device and understand the inherent dangers.
•Children must be supervised to make sure that they do not
play with the product. •Cleaning and maintenance must
never be performed by children unless they are properly
supervised. •The room must have sufficient ventilation
when the product is used at the same time as other
appliances burning gas or other fuels. •The product must be
cleaned frequently both inside and out (AT LEAST ONCE A
MONTH); always follow the instructions given in the
maintenance manual. •Failure to comply with the rules
indicated for cleaning the product and replacing/cleaning
the filters may result in the risk of fire. •It is strictly forbidden
to cook food on the flame under the product.• WARNING:
•When the hob is on, the accessible parts of the product
may become hot. •Do not connect the product to the
electrical power supply until the installation is complete.
•The regulations laid down by local authorities must be
strictly followed with regard to the technical and safety
measures to adopt for fume extraction. •The extracted air
must not be conveyed through the same ducts used to
extract the fumes generated by gas combustion or other
types of combustion products. •Do not use or leave the
product without appropriately installed lamps, as this may
result in the risk of electric shock. •The product must
NEVER be used without the grille correctly fitted. •The
product must NEVER be used as a support surface unless
expressly indicated.
● Range hoods and other cooking fume extractors may
adversely affect the safe operation of appliances burning
gas or other fuels (including those in other rooms) due to
back flow of combustion gases. These gases can
potentially result in carbon monoxide poisoning. After
installation of a range hood or other cooking fume
extractor, the operation of flued gas appliances should be
tested by a competent person to ensure that back flow of
combustion gases does not occur.
• To replace the lamp, only use the lamp indicated in the
maintenance/lighting system section of this manual. • Using
a naked flame may damage the filters and cause a fire
hazard, and must therefore be avoided under all
circumstances. • Extra care must be taken when frying to
prevent the oil from overheating and catching fire. • In case
of doubt, contact the authorised service centre or similar
qualified personnel.
INSTALLATION SAFETY
•Use the fixing screws supplied with the product only if
suitable for the surface; otherwise purchase the correct
type of screws. •Check for accessories (e.g. bags
containing screws, warranty certificates, etc.) inside the
product (placed there for transport reasons). If there are
any, remove them and keep them safe. • WARNING:
Failure to install screws and fasteners in accordance with
these instructions may result in electrical hazards. •The
exhaust pipe is not supplied and must be purchased. •The
diameter of the exhaust pipe must be equivalent to the
diameter of the connecting ring. •For installation of the
product on the hob, respect the height indicated in the
drawings •The minimum distance between the surface of
the container supports on the cooker and the lowest part of
the range hood must not be less than 50 cm (not less than
65 cm only for Australia and New Zealand) for electric
cookers and 65 cm for gas or mixed cookers. •If the
installation instructions of the gas cooker specify a greater
distance, take it into account.
ELECTRICAL CONNECTION SAFETY
•The mains voltage must correspond to the voltage
indicated on the label found inside the product. •If it
features a plug, connect the product to a socket that
complies with current standards, located in an area
accessible even after installation. •If it does not feature a
2

plug (direct connection to the mains) or the plug is not
located in an accessible area, even after installation, apply
a standard double pole switch that ensures complete
disconnection from the mains in category III overvoltage
conditions, in accordance with the installation rules. •
Warning! The power cable must be replaced by the
authorised technical support service or by a person with
similar qualifications.
● Please note! Before reconnecting the circuit to the
mains power supply, make sure that it is working correctly,
always check that the power cable is correctly installed.
Please note! Do not use with a programmer, timer,
separate remote control or any other device that activates
automatically.
RECOMMENDATIONS FOR USE
Recommendations for correct use in order to reduce the
impact on the environment: When cooking begins, the
device should be turned on at minimum speed, and left on
for a few minutes even after cooking is complete. Increase
the speed only if there is a large quantity of fumes and
steam, using the Booster function only in extreme cases.
To keep the odour reduction system running efficiently,
replace the carbon filter/s when necessary. To ensure the
high performance of the grease filter, clean it when
necessary. To improve efficiency and minimise noise, use
the maximum duct diameter indicated in this manual.
END-OF-LIFE DISPOSAL
This device is marked in compliance with the
European Directive 2012/19/EC - UK SI 2013
No.3113, Waste Electrical and Electronic Equip-
ment (WEEE). Make sure that this product is dis-
posed of correctly. The user helps prevent poten-
tial negative consequences for the environment
and for health.
The symbol on the product or accompanying
documentation indicates that this product should not be
treated as household waste but should be handed over at a
suitable collection point for the recycling of electrical and
electronic equipment. Dispose of it in accordance with local
regulations for waste disposal. For further information
about the treatment, recovery and recycling of this product,
please contact your local authority, the collection service
for household waste or the shop from where the product
was purchased.
REGULATIONS
Equipment designed, tested and manufactured in
compliance with safety regulations: EN/IEC 60335-1; EN/
IEC 60335-2- 31, EN/IEC 62233. Performance: EN/IEC
61591; ISO 5167-1; ISO 5167-3; ISO 5168; EN/IEC
60704-1; EN/IEC 60704-2-13;EN/IEC 60704-3; ISO 3741;
EN 50564; IEC 62301. EMC: EN 55014-1; CISPR 14-1; EN
55014-2; CISPR 14-2; EN/IEC 61000-3-2; EN/IEC
61000-3-3.
2. USE
The extraction system can be used in the duct-out version
with external evacuation, or in the recirculating version with
filtering and internal recirculation.
● Duct-Out Version:
Vapours are evacuated outside through an exhaust pipe
attached to the connecting flange.
CAUTION! If the product features one or more carbon
filters, they must be removed.
Connect the product to wall-mounted exhaust pipes and
holes with a diameter equivalent to the air outlet
(connecting flange).
The use of pipes and outlet holes in the wall with a smaller
diameter will reduce the extraction performance and
drastically increase the noise level.
All responsibility in this regard is therefore denied.
• Use a ducting pipe with the shortest length necessary.
• Use a ducting pipe with the least number of bends
possible (maximum bend angle: 90°).
• Avoid drastic changes in the ducting pipe diameter.
● Recirculating Version:
The suctioned air will be degreased and deodorised before
it is sent back into the room. To use the product in this
version, it is necessary to install an additional activated
carbon filter system.
ASSEMBLY BEFORE INSTALLATION
• Check that the product is the right size for the installation
area.
• Remove the activated carbon filter(s) if supplied (see also
relevant paragraph).
• It(they) must be reinstalled if the product is used in the
filter version.
• If there are panels and/or walls and/or wall units on the
sides, make sure that there is enough space to install the
product and that it is always possible to access the control
panel easily.
• The product is equipped with fixing plugs suitable for most
walls/ceilings. However, it is necessary to consult a
qualified technician to make sure that the materials are
suitable for the type of wall/ceiling. The wall/ceiling must be
strong enough to support the weight of the hood.
3. OPERATION
Please note! This hood features an automatic operation
system (see the paragraph "VOC sensor calibration").
Calibration occurs automatically each time the hood is
reconnected to the electrical network (e.g.: the first time it is
installed after a blackout). It can also be performed
manually (see the paragraph "VOC sensor calibration -
manual").
During calibration, which lasts 5 minutes, the controls will
flash and only the light button can be used.
3

T1
T2
T3 L2-L3
L1
T1= ON /OFF motor.
Short and repeated pressings of the T1 key result in
cyclical passing to the control of the suction speed (power).
Each speed corresponds to lighting up of the respective
LED:
- 1st speed (LED L1 fixed white light)
- 2nd speed (LED L1 fixed white light)
- 3rd speed (LED L1 fixed white light)
- Intensive (LED L1 flashes white light), the intensive
speed is timed and lasts 5 minutes, at the end of which the
hood goes to 3rd speed.
- The hood motor can be switched off by pressing the T1
button for 3 seconds. CAUTION! The automatic VOC
function must not be active.
To switch off the hood during the automatic VOC function,
follow the instructions for deactivating of the VOC function.
T2= Adjusts the light temperature (long press).
- The default light colour tone is set to 50% (neutral).
To adjust, with the light on, hold down the T2 key for a few
seconds. The L2 and L3 LEDs will flash orange. Releasing
the T2 key the desired light tone will be set and the L2 and
L3 LEDs will return to fixed and white.
Please note! Unplugging the power cord from the outlet,
the tone is restored.
T3= Light ON/OFF button (short press) / Adjusts the
intensity of the light (long press).
- The default light intensity is set to 100% (intense).
For adjustment, with the light on, hold down the T3 key for
a few seconds, the L2 and L3 LEDs will flash white.
Releasing the T3 key the desired light intensity will be set
and the L2 and L3 LEDs will return to fixed and white.
Please note! Once the hood is turned off, the light intensity
setting is restored.
VOC sensor calibration
Calibration is necessary to allow the sensor with which the
hood is equipped to work correctly and can be Automatic
(before installation or after a power failure) or Manual (if
automatic operation is not satisfactory).
Automatic Calibration: starts with the motor off whenever
the hood is reconnected to the electricity mains. LED L1
flashes blue for 5 minutes, accompanied by a short
acoustic signal (Beep), at the end of which LED L1 starts
flashing white accompanied by a long acoustic signal
(Beep) which signals the end of the automatic calibration.
Manual Calibration: to be performed when unsatisfactory
functioning of the automatic operation is perceived and it
must be performed when normal environmental conditions
persist in the kitchen.
Manual calibration is activated by holding down key T1 for
10 seconds. LED L1 flashes blue followed by an acoustic
signal (short beep), LED L1 flashes for 5 minutes, at the
end of which LED L1 starts flashing white accompanied by
a long acoustic signal (Beep) which signals the end of the
manual calibration.
At the end of the calibration L1 will flash slowly in
dimmed mode in WHITE to indicate successful
activation. The motor will activate automatically if
vapours/fumes are detected.
Activation and deactivation of the VOC function
Keeping the T1 key pressed for 5 seconds activates or
deactivates the VOC sensor function.
- By pressing the T1 key the VOC function is activated, the
L1 LED turns white and flashes. The hood will turn on at
the most suitable speed based on the cooking fumes
detected by the sensor it is equipped with.
To disable it, follow the same procedure.
Grease filter warning
After 40 hours of operation the LED L1 L2 L3 are red and
fixed.
When this warning appears, it means that the installed
grease filter needs to be washed. To reset the signal, keep
the T1 and T3 keys pressed for 3 seconds. To confirm the
reset, all the L1-L2-L3 LEDs flash red twice and the hood
emits a long beep.
Carbon filter warning
After 160 hours of operation, the LED L1 (fixed red LED),
L2 and L3 start flashing red. When this warning appears, it
means that the installed carbon filter needs to be replaced.
To reset the signal, keep the T1 and T3 keys pressed for 3
seconds. To confirm the reset, all the L1-L2-L3 LEDs flash
red twice and the hood emits a long beep.
In standard mode, the carbon filter warning is not
active.
If the hood is used in the filter version, it is necessary to
enable the carbon filter warning.
Carbon filter warning activation:
Keeping keys T1 and T2 pressed simultaneously with the
hood off, the alarm for the saturation of the filters is set,
therefore first LED L1 turns on (red) then also L2 and L3
(red) after which a long beep will follow and the LEDs L2
and L3 flash briefly to indicate successful activation.
Carbon filter warning deactivation:
Repeat the operation described above. First LEDs L1, L2
and L3 light up at the same time then only L1, after which a
long beep will follow and LEDs L1, L2 and L3 light up again
4

to indicate that deactivation has taken place (red
backlighting).
4. MAINTENANCE WARNINGS
• Cleaning: For cleaning, simply use a cloth moistened
with neutral liquid detergents. Do not use cleaning tools or
instruments.
• Avoid the use of abrasive products. DO NOT USE
ALCOHOL!
For product maintenance, see the images at the end
of the installation marked by this symbol.
• Anti-Grease Filter: The metallic anti-grease filter
must be cleaned once a month with non-aggressive de-
tergents, manually or in a dishwasher on a short wash at
low temperatures. To remove the anti-grease filter, pull
the spring release handle.
• The Anti-Grease Filter traps the grease particles
produced during cooking. When cleaned in the dishwasher,
the metal grease filter may discolour, but its filtering
characteristics remain unchanged.
• Washable activated carbon filter (for filter
version only):
The carbon filter can be washed every two months (or
when indicated by the filter saturation system - if included
in your model). As indicated in the drawing section: remove
the grease filter, remove the carbon filter and wash using
hot water and suitable detergents or in a dishwasher at
65°C (if washing in a dishwasher, carry out the complete
washing cycle without dishes inside). Remove any excess
water without damaging the filter, then place it in the oven
for 10 minutes at 100°C to dry it out completely. Put the
anti-grease filters back in place.
Replace the foam layer every 3 years and each time the
cloth appears damaged.
• Perimeter suction panel (panel maintenance)
Disassembly:
a. firmly pull the panel (FRONT SIDE) downwards
b. release it from the rear hinges.
Cleaning: the suction panel must be cleaned manually
using non-aggressive detergents.
Assembly: the panel must be hooked at the back and
secured at the front (with magnets).
Attention! Always check that the panel is securely fixed in
place.
Illumination
• The lighting system is based on LED technology. LEDs
provide optimal illumination, last up to 10 times longer than
conventional lamps and save 90% of electricity.
•Lighting system : The lighting system cannot be re-
placed by the user, contact Customer Service in case of
malfunction.
5

FR
Le produit est conçu pour l’aspiration des fumées et des
vapeurs de cuisson et est destiné au seul usage
domestique.
Suivre de près les instructions reportées dans ce
manuel. Nous déclinons toute responsabilité face à tout
inconvénient, dommage ou incendie causé au produit en
raison du non-respect des instructions de ce manuel.
L'appareil peut avoir un aspect différent par rapport au
dessin de cette notice mais les instructions pour
l'utilisation, l'entretien et l'installation restent les
mêmes.
• Il est important de conserver tous les manuels
accompagnant le produit afin qu'ils puissent être consultés
à tout moment. En cas de vente, de cession ou de
transfert, s’assurer qu'ils restent avec le produit. • Lire
attentivement les instructions : elles contiennent des
informations essentielles sur l'installation, l'utilisation et la
sécurité. • Vérifier l'intégrité du produit avant de procéder à
l’installation. Sinon, contacter le revendeur et ne pas
continuer l'installation.
REMARQUES
: les détails marqués par ce symbole sont des
accessoirs optionnel fournis uniquement sur certains
modèles ou des détails à fourni à la demande.
1. SÉCURITÉ ET
RÈGLEMENTATIONS
SÉCURITÉ GÉNÉRALE
•Ne pas effectuer de variations électriques ou mécaniques
sur le produit ou sur les conduits d'évacuation. •Avant toute
opération de nettoyage ou d'entretien, débrancher le
produit du secteur électrique en enlevant la fiche ou à
travers le disjoncteur général du logement. •Utiliser des
gants de travail pour toutes les opérations d’installation et
d’entretien.• Le produit peut être utilisé par des enfants
âgés d’au moins 8 ans et par des personnes ayant des
capacités physiques, sensorielles ou mentales réduites ou
sans expérience ou sans les connaissances nécessaires, à
condition qu'ils soient surveillés ou après que ces
personnes aient reçu des instructions relatives à l'usage sûr
de l'appareil et à la compréhension des dangers afférents.•
Les enfants doivent être contrôlés afin qu'ils ne jouent pas
avec le produit.• Le nettoyage et l'entretien ne doivent pas
être effectués par des enfants sans surveillance. •Le local
doit disposer d'une ventilation suffisante lorsque le produit
est utilisé en même temps que d’autres appareils à
combustion de gaz ou autres combustibles. •Le produit doit
être fréquemment nettoyé, à l’intérieur comme à l’extérieur
(AU MOINS UNE FOIS PAR MOIS); respecter dans tous
les cas les indications présentes dans les instructions
d’entretien. •Le non-respect des normes de nettoyage du
produit et du remplacement/nettoyage des filtres comporte
des risques d'incendie.• Il est strictement interdit de faire
flamber des aliments sous le produit.• ATTENTION :
Lorsque la plaque de cuisson est en marche, les parties
accessibles du produit peuvent devenir chaudes.• Ne pas
brancher le produit au secteur électrique tant que
l’installation n’est pas totalement terminée.• Concernant les
mesures techniques et de sécurité à prendre pour
l’évacuation des fumées, respecter scrupuleusement les
règlementations établies par les autorités locales
compétentes.• L’air aspiré ne doit pas être conduit vers le
tube destiné à l'évacuation des fumées des appareils à
combustion à gaz ou autres combustibles.• Ne pas utiliser
ni laisser le produit sans que les ampoules ne soient
correctement montées en raison du risque possible de
décharge électrique.• Le produit ne doit JAMAIS être utilisé
sans la grille correctement montée. • Le produit ne doit
JAMAIS être utilisé comme plan à moins que cela ne soit
explicitement indiqué.
• Pour le remplacement de la lampe, utiliser uniquement le
type de lampe indiqué dans la section maintenance/
système d'éclairage de ce manuel. • L’utilisation d'une
flamme nue peut endommager les filtres et provoquer des
incendies et doit donc être évitée. • La friture doit être
surveillée afin d'éviter que l'huile ne prenne feu. • En cas
de doute, consulter le centre de service agréé ou un
personnel qualifié similaire.
SÉCURITÉ POUR L’INSTALLATION
•Utiliser le vis de fixation fournies avec le produit
uniquement si elles sont adaptées à la surface, sinon,
acheter les vis adéquates. Vérifier qu'aucun matériel
accessoire (comme des sachets avec des vis, garanties,
etc.) ne se trouve à l'intérieur de l'emballage (pour des
raisons de transport) : il doit être enlevé et conservé. •
AVERTISSEMENT: La non-installation de vis et fixations
conformément à ces instructions peut comporter des
risques électriques. • Le tube d'évacuation n’est pas fourni
et doit être acheté. • Le diamètre du tube d'évacuation doit
être identique au diamètre de l'anneau de raccordement. •
Pour l’installation du produit sur la plaque de cuisson,
respecter la hauteur indiquée sur les dessins • La distance
minimale entre la surface du support des récipients sur le
dispositif de cuisson et la partie la plus basse de la hotte ne
doit pas être inférieure à 50 cm pour les cuisines
électriques et de 65 cm pour les cuisines à gaz ou mixtes. •
Si les instructions d'installation du dispositif de cuisson à
gaz spécifient une distance plus importante, il faut en tenir
compte.
SÉCURITÉ POUR LE RACCORDEMENT
ÉLECTRIQUE
•La tension du réseau doit correspondre à la tension
figurant sur l'étiquette des caractéristiques située à
l'intérieur du produit.•Si une fiche est présente, brancher le
6

produit à une prise conforme aux normes en vigueur et
placée à un endroit accessible même après l’installation. •
Si l’appareil n’est pas doté de fiche (raccordement direct au
secteur) ou si la fiche n’est pas placée dans un endroit
accessible même après l’installation, appliquer un
interrupteur bipolaire conforme qui assure la déconnexion
complète du secteur dans les conditions de la catégorie de
surtension III, conformément aux règles d'installation. •
Attention! Le remplacement du câble de connexion doit
être effectué par le service d'assistance technique agréé ou
par une personne ayant une qualification similaire.
● Attention ! Avant de rebrancher le circuit à
l'alimentation du secteur électrique et d'en vérifier le
fonctionnement correct, toujours contrôler que le câble
d'alimentation ait été correctement monté.
Attention! Ne pas utiliser avec un programmateur, une
minuterie, une télécommande séparée ou tout autre
appareil qui s'active automatiquement.
SUGGESTIONS D’UTILISATION
Conseils pour une utilisation correcte et destinée à réduire
l'impact environnemental : Pour commencer à cuisiner,
allumer l’appareil à la vitesse minimale et la laisser allumer
quelques minutes, même après la fin de la cuisson.
Augmenter la vitesse seulement en cas de grosses
quantités de fumée et de vapeur en utilisant la fonction
booster uniquement pour les cas extrêmes. Pour préserver
l'efficacité du système de réduction des odeurs, remplacer
le(s) filtre(s) à charbon. Nettoyer le filtre à graisse
régulièrement pour en préserver l'efficacité. Pour optimiser
l'efficacité et minimiser les bruits, utiliser le diamètre
maximal du système de canalisation indiqué dans ce
manuel.
ÉLIMINATION EN FIN DE VIE
Cet appareil est marqué conformément à la Di-
rective Européenne 2012/19/CE - UK SI 2013
No.3113, Déchets d'équipements électriques et
électroniques (DEEE). S’assurer que ce produit
est correctement éliminé. L'utilisateur contribue à
prévenir les possibles conséquences négatives
pour l’environnement et la santé.
Le symbole présent sur le produit ou sur la documentation
qui l’accompagne indique qu’il ne doit pas être traité
comme déchet ménager mais être apporté à un point de
collecte pour le recyclage d’équipements électriques et
électroniques. L'éliminer conformément aux
réglementations locales d'élimination des déchets. Pour
plus d'informations sur le traitement, la récupération et le
recyclage de ce produit, contacter les autorités locales, le
service de collecte des déchets ménagers ou le magasin
où le produit a été acheté.
NORMES
Équipement conçu, testé et réalisé dans le respect des
normes sur la Sécurité : EN/CEI 60335-1 ; EN/CEI
60335-2- 31, EN/CEI 62233. Performance : EN/CEI
61591 ; ISO 5167-1 ; ISO 5167-3 ; ISO 5168 ; EN/CEI
60704-1 ; EN/CEI 60704-2-13 ; EN/CEI 60704-3 ; ISO
3741; EN 50564; CEI 62301. CEM: EN 55014-1; CISPR
14-1; EN 55014-2; CISPR 14-2; EN/CEI 61000-3-2; EN/
CEI 61000-3-3.
2. UTILISATION
Le système d’extraction peut être utilisé en version
aspirante à évacuation externe ou filtrante à recyclage
interne.
● Version Aspirante:
Les vapeurs sont évacuées vers l'extérieur par un tuyau
d'échappement fixé sur la bride de raccord.
ATTENTION! Si le produit est équipé d'un ou de plusieurs
filtres à charbon, ceux-ci doivent être retirés.
Raccorder le produit aux tuyaux et aux orifices
d'évacuation murale du même diamètre que celui de la
sortie d'air (bride de raccord).
L'utilisation des tuyaux et des orifices d'évacuation d'un
diamètre inférieur diminuera l'efficacité de l'extraction et
augmentera considérablement le bruit.
Nous déclinons, dans ce cas, toute responsabilité.
• La longueur du conduit doit être celle strictement
indispensable.
• Utiliser un conduit avec le moins de coudes possible
(angle maximal du coude : 90°).
• Éviter de changer drastiquement la section du conduit.
● Version Filtrante:
L'air aspiré sera dégraissé et désodorisé avant d'être
renvoyé dans la pièce. Pour utiliser le produit dans cette
version, il est nécessaire d’installer un système
supplémentaire de filtre à charbon actif.
MONTAGE PREMIÈRE INSTALLATION
• Vérifier que le taille du produit acheté est adaptée à la
zone d'installation choisie.
• Retirer le ou les filtres à charbon actif s'ils sont fournis
(voir également la section correspondante).
• Les filtres ne doivent être remis en place que si le produit
doit être utilisé dans sa version filtrante.
• Dans le cas de présence de panneaux et/ou de parois et/
ou de placards latéraux, vérifier que l'espace est suffisant
pour installer le produit et qu'il est toujours possible
d'accéder facilement au panneau de commande.
• Le produit est équipé de fiches de fixation adaptées à la
plupart des murs/plafonds. Toutefois, un technicien qualifié
doit être consulté pour vérifier l'adéquation des matériaux
en fonction du type de mur/plafond. Le mur/plafond doit
être suffisamment solide pour supporter le poids de la
hotte.
7

3. FONCTIONNEMENT
Attention ! Cette hotte dispose d'un système de
fonctionnement automatique (voir paragraphe «Calibrage
du capteur COV»).
Le calibrage se fait automatiquement à chaque fois que la
hotte est rebranchée au réseau électrique (ex.: lors de la
première installation ou après une coupure de courant). Il
peut aussi être effectué manuellement (voir paragraphe
«Calibrage du capteur COV - manuel»).
Durant le calibrage, qui dure 5 minutes, les commandes
clignoteront et il ne sera possible d’utiliser que la touche de
la lumière.
T1
T2
T3 L2-L3
L1
T1= ON /OFF moteur.
De courtes pressions répétées sur la touche T1 permettent
de passer cycliquement au contrôle de la vitesse
(puissance) d'aspiration.
Chaque vitesse correspond à l’allumage du voyant
correspondant:
- 1ère vitesse (led L1 lumière blanche et fixe)
- 2ème vitesse (led L1 lumière blanche et fixe)
- 3ème vitesse (led L1 lumière blanche et fixe)
- Intensive (led L1 lumière blanche et clignotante), la
vitesse intensive est temporisée et dure 5 minutes,
passées lesquelles la hotte passe en 3ème vitesse.
- Il est possible d’éteindre le moteur de la hotte en
appuyant pendant 3 secondes sur touche T1.
ATTENTION! La fonction VOC automatique ne doit pas
être activée.
Pour éteindre la hotte pendant la fonction automatique
VOC, suivre les indications de désactivation de la fonction
VOC.
T2 = Règle la température de la lumière (pression
prolongée).
- La tonalité de couleur de la lumière est réglée par défaut
à 50% (neutre).
Pour le réglage, appuyer (avec la lumière allumée) sur la
touche T2 pendant quelques secondes; les led L2 et L3 se
mettent à clignoter en orange; en relâchant la touche T2,
on règle la tonalité de la lumière désirée et les led L2 et L3
redeviennent fixes et blanches.
Attention! Si le câble d'alimentation est débranché de la
prise, la tonalité est rétablie.
T3 = Touche lumière ON/OFF (pression brève) / Règle
l’intensité de la lumière (pression prolongée).
- L’intensité de la lumière est réglée par défaut sur 100%
(intense).
Pour le réglage, appuyer (avec la lumière allumée) sur la
touche T3 pendant quelques secondes; les led L2 et L3 se
mettent à clignoter en blanc; en relâchant la touche T3, on
règle l’intensité de la lumière désirée et les led L2 et L3
redeviennent fixes et blanches.
Attention ! Quand on éteint la hotte, le réglage de
l’intensité de la lumière est rétablie.
Calibrage du capteur COV
Le calibrage est nécessaire pour permettre au capteur dont
la hotte est équipée de fonctionner correctement. Il peut
être automatique (lors de la première installation ou après
une panne de courant) ou manuel (si le fonctionnement
automatique n'est pas satisfaisant).
Calibrage automatique : il démarre avec le moteur éteint;
à chaque reconnexion de la hotte au réseau, la LED L1
clignote en bleu pendant 5 minutes, accompagnée d'un bip
sonore bref, à la fin duquel la LED L1 commence à
clignoter en blanc, accompagnée d'un bip sonore prolongé
indiquant la fin du calibrage automatique.
Calibrage manuel : il doit être effectué quand le
fonctionnement automatique n’est pas satisfaisant et en
présence de conditions environnementales normales dans
la cuisine.
Le calibrage manuel est activé en appuyant sur la touche
T1 pendant 10 secondes, après quoi la LED L1 clignote en
bleu suivie d'un bip sonore bref ; la LED L1 clignote
pendant 5 minutes, à la fin desquelles elle se met à
clignoter en blanc accompagnée d'un bip prolongé
indiquant la fin du calibrage manuel.
À la fin du calibrage, la LED L1 clignote en BLANC
lentement en mode faible luminosité pour indiquer que
l'activation est réussie. Le moteur s'active
automatiquement en cas de détection de vapeurs/
fumées.
Activation et désactivation de la fonction VOC
En appuyant sur la touche T1 pendant 5 secondes, on
active ou désactive la fonction du capteur VOC.
- En appuyant sur la touche T1, la fonction VOC est
activée, la LED L1 devient blanche et clignote, la hotte
s'allume à la vitesse la plus appropriée en fonction des
fumées de cuisson détectées par le capteur.
Pour la désactiver, suivre la même procédure.
Signal filtre à graisse
Après 40 heures de fonctionnement, les LED L1 L2 L3
sont rouges et fixes.
Quand cette signalisation apparaît, le filtre à graisse
installé doit être lavé. Pour réinitialiser la signalisation,
maintenir les touches T1 et T3 enfoncées pendant 3
secondes, pour confirmer la réinitialisation, toutes les LED
L1-L2-L3 clignotent deux fois en rouge et la hotte émet un
8

bip sonore prolongé.
Signal filtre à charbon
Après 160 heures de fonctionnement, la LED L1 (led
rouge fixe) L2 L3 se mettent à clignoter en rouge. Quand
cette signalisation apparaît, le filtre à charbon installé doit
être remplacé.
Pour réinitialiser la signalisation, maintenir les touches T1
et T3 enfoncées pendant 3 secondes, pour confirmer la
réinitialisation, toutes les LED L1-L2-L3 clignotent deux fois
en rouge et la hotte émet un bip sonore prolongé.
En mode standard le voyant du filtre à charbon n'est
pas activé.
Pour utiliser la hotte en version filtrante il faut activer le
voyant du filtre à charbon.
Activation du voyant du filtre à charbon :
En appuyant simultanément sur les touches T1 et T2
lorsque la hotte est éteinte, on programme l'alarme pour la
saturation des filtres, de sorte que la LED L1 s'allume
d'abord (couleur rouge), suivie des LED L2 et L3 (couleur
rouge), après quoi un bip sonore prolongé se déclenche et
les LED L2 et L3 clignotent brièvement pour indiquer
l'activation.
Désactivation du voyant du filtre à charbon :
Répéter l'opération ci-dessus, dans un premier temps les
LED L1, L2 et L3 s'allument simultanément, puis seulement
L1, suivie d’un bip sonore prolongé, puis les LED L1, L2 et
L3 s'allument de nouveau, indiquant une désactivation
réussie (rétro-éclairage rouge).
4. CONSIGNES D’ENTRETIEN
• Nettoyage: Pour le nettoyage, utiliser exclusivement un
chiffon imbibé de nettoyant liquide neutre. Ne pas utiliser
d’ustensiles ni d’instruments de nettoyage.
• Éviter l'usage de produits à base d'agents abrasifs. NE
PAS UTILISER D'ALCOOL !
Pour l’entretien du produit, voir les images à la fin de
l’installation marquées de ce symbole.
• Filtre à graisse : Le filtre à graisse métallique
doit être nettoyé une fois par mois avec des nettoyants
non agressifs, manuellement ou au lave-vaisselle à
basse température et avec un cycle court. Pour démonter
le filtre à graisse, tirer la poignée de décrochage à res-
sort.
• Le filtre à graisse retient les particules de graisse
provenant de la cuisson. Avec le lavage au lave-vaisselle,
le filtre anti-graisse métallique peut décolorer mais ses
caractéristiques de filtrage restent les mêmes.
• Filtre au charbon actif lavable (uniquement
pour version filtrante):
le filtre à charbon peut être lavé tous les deux mois (ou
quand le système d'indication de saturation des filtres - si
prévu sur le modèle possédé - indique ce besoin). Comme
indiqué dans la section des dessins: enlever les filtres à
graisse, enlever le filtre à charbon et laver avec de l’eau
chaude et des nettoyants adéquats ou au lave-vaisselle à
65°C (en cas de lavage au lave-vaisselle, effectuer le cycle
de lavage complet sans vaisselle à l’intérieur). Éliminer
l’excès d’eau sans abimer le filtre, puis le placer au four
pendant 10 minutes à 100°C pour le sécher définitivement.
Remettre les filtres à graisse.
Remplacer le tapis tous les 3 ans et chaque fois qu’il est
abimé.
• Panneau d’aspiration périmétrique (entretien
du panneau)
Démontage:
a. tirer le panneau (CÔTÉ AVANT) avec décision vers le
bas
b. le décrocher des charnières arrière.
Nettoyage : le panneau d'aspiration doit être nettoyé
manuellement avec des détergents non agressifs.
Montage: le panneau doit être accroché à l’arrière et fixé
à l’avant (fixation par aimant).
Attention! toujours vérifier que le panneau est bien fixé à
sa place.
Éclairage du plan de cuisson
• Le système d'éclairage est basé sur la technologie LED.
Les LED fournissent un éclairage optimal, durent jusqu'à
10 fois plus longtemps que les ampoules classiques et
permettent d'économiser 90 % d'électricité.
•Système d’Éclairage : Le système d'éclairage ne peut
pas être remplacé par l’utilisateur ; en cas de dysfonc-
tionnement, contacter le service d’assistance.
9

PL
Produkt został zaprojektowany do odciągania oparów
kuchennych i jest przeznaczony wyłącznie do użytku
domowego.
Dokładnie stosować się do wskazówek zawartych w
niniejszej instrukcji. Nie ponosimy odpowiedzialności za
jakiekolwiek nieprawidłowości, uszkodzenia lub pożar
produktu powstałe w wyniku nieprzestrzegania wskazówek
zawartych w niniejszej instrukcji.
Urządzenie może się różnić od modelu wskazanego na
rysunkach znajdujących się w niniejszej dokumentacji.
Mimo to, instrukcje obsługi, konserwacji oraz montażu
pozostają te same.
• Należy zachować wszystkie instrukcje obsługi dołączone
do produktu, aby w każdej chwili móc z nich skorzystać. W
przypadku sprzedaży, przekazania lub przeniesienia,
upewnić się, że instrukcja będzie towarzyszyć produktowi. •
Uważnie przeczytać instrukcje: znajdują się w nich ważne
informacje na temat montażu, użytkowania oraz
bezpieczeństwa. • Przed przystąpieniem do montażu,
sprawdzić integralność produktu. W przeciwnym wypadku,
przerwać montaż i skontaktować się ze sprzedawcą.
UWAGI
: elementy oznaczone takim symbolem są dodatkowymi
akcesoriami dostarczonymi tylko z niektórymi modelami lub
oddzielnymi elementami, które można zakupić.
1. BEZPIECZEŃSTWO I
PRZEPISY
BEZPIECZEŃSTWO OGÓLNE
• Nie dokonywać na produkcie lub kanałach
odprowadzających żadnych zmian elektrycznych lub
mechanicznych. • Przed rozpoczęciem czyszczenia lub
konserwacji, należy odłączyć produkt od sieci elektrycznej
wyjmując wtyczkę lub wyłączając główny wyłącznik. •
Podczas wszystkich czynności instalacyjnych i
konserwacyjnych używać rękawic roboczych.• • Produkt
może być obsługiwany przez dzieci powyżej 8 roku życia
oraz osoby o ograniczonych zdolnościach fizycznych,
sensorycznych i psychicznych, osoby nie posiadające
doświadczenia, lub wystarczającej wiedzy pod warunkiem,
że będą one nadzorowane lub zostaną przeszkolone w
zakresie bezpiecznego użytkowania urządzenia i
związanego z nim niebezpieczeństwa.• Dzieci muszą być
nadzorowane, aby nie bawiły się produktem.• Czyszczenia i
konserwacji nie mogą dokonywać dzieci bez nadzoru. •W
pomieszczeniu musi być zagwarantowana wystarczająca
wentylacja, w przypadku stosowania produktu wraz z innymi
urządzeniami gazowymi lub działającymi na inne paliwa.
•Należy często czyścić produkt, zarówno wewnątrz, jak i na
zewnątrz (CO NAJMNIEJ RAZ W MIESIĄCU) i zawsze
stosować się do zaleceń zawartych w instrukcji konserwacji.
•Nieprzestrzeganie zasad czyszczenia produktu i wymiany/
czyszczenia filtrów wiąże się z ryzykiem pożaru.• Surowo
zabrania się przygotowywania potraw na ogniu pod
produktem.• UWAGA: Podczas działania płyty kuchennej,
dostępne części produktu mogą być gorące.• Dopóki nie
zostanie zakończona instalacja nie wolno podłączać
produktu do sieci elektrycznej.• W odniesieniu do zasad
technicznych i przepisów bezpieczeństwa dotyczących
odprowadzania spalin, należy stosować się ściśle do
rozporządzeń właściwych organów lokalnych.• Wyciągane
powietrze nie może być kierowane do kanału stosowanego
do odprowadzania spalin produkowanych przez urządzenia
spalające gaz lub inne paliwa.• Nie używać lub pozostawiać
produktu bez odpowiednio zamontowanych lampek, istnieje
ryzyko porażenia prądem.• NIGDY nie używać produktu bez
prawidłowo zamontowanej kratki. • NIGDY nie używać
produktu jako blatu, chyba że jest to wyraźnie wskazane.
• Do wymiany żarówki użyć stosować wyłącznie rodzaj
żarówek wskazany w rozdziale konserwacja / system
oświetlenia w niniejszej instrukcji. • Stosowanie wolnego
ognia jest szkodliwe dla filtrów i może być przyczyną
pożaru, dlatego też jest surowo zabronione. • Smażenie
musi następować pod stałą kontrolą, aby przegrzany olej
nie zapalił się. • W razie wątpliwości należy skontaktować
się z autoryzowanym centrum serwisowym lub
wykwalifikowanym personelem.
BEZPIECZEŃSTWO PODCZAS
INSTALACJI
•Używać dołączonych śrub mocujących tylko, jeżeli nadają
się do danej powierzchni; w przeciwnym razie zakupić
odpowiednie. Sprawdzić, czy wewnątrz produktu nie
umieszczono (na czas transportu) dodatkowych elementów
(takich jak worki ze śrubami, gwarancje itd.) i ewentualnie
wyjąć je i przechować. • OSTRZEŻENIE: Niezainstalowanie
śrub i elementów mocujących zgodnie z niniejszymi
instrukcjami może doprowadzić do ryzyka natury
elektrycznej. • Rura spustowa nie znajduje się w
wyposażeniu, należy ją zakupić. • Średnica rury spustowej
musi być równa średnicy pierścienia łączącego. • Podczas
instalowania produktu na płycie kuchennej zastosować się
do wysokości wskazanej na rysunkach • Minimalna
odległość pomiędzy powierzchnią nośną pojemników na
urządzeniu grzewczym a najniższą ścianką okapu
kuchennego nie może być mniejsza niż 50 cm, w przypadku
kuchni elektrycznych, i 65 cm w przypadku kuchni gazowych
lub dwupaliwowych. • Jeżeli instrukcje instalacji urządzenia
kuchni gazowej wskazują większą odległość, należy ją
uwzględnić.
BEZPIECZEŃSTWO PODŁĄCZENIA
ELEKTRYCZNEGO
•Napięcie sieciowe musi być zgodne z napięciem
wskazanym na tabliczce znamionowej wewnątrz
produktu.•Jeśli produkt jest wyposażony we wtyczkę, należy
10

go podłączyć do gniazdka zgodnego z obowiązującymi
przepisami, znajdującego się w miejscu dostępnym nawet po
instalacji. •Jeśli nie ma wtyczki (bezpośrednie podłączenie
do sieci) lub nie znajduje się ona w dostępnym miejscu,
również po zainstalowaniu, należy zastosować zgodny z
przepisami dwubiegunowy wyłącznik, który zapewni
całkowite odłączenie od sieci w warunkach przepięcia
kategorii III, zgodnie z zasadami instalacji. • Uwaga!
Wymiana kabla zasilającego musi być wykonana przez
autoryzowany serwis techniczny lub osobę oo podobnych
kwalifikacjach.
● Uwaga! Przed ponownym podłączeniem obwodu do
zasilania sieciowego i sprawdzeniem prawidłowego
działania, należy zawsze sprawdzić, czy kabel sieciowy
został prawidłowo zamontowany.
Uwaga! Nie stosować w połączeniu z oddzielnym
programatorem, timerem, zdalnym sterowaniem lub każdym
innym urządzeniem, które uaktywnia się automatycznie.
WSKAZÓWKI DOTYCZĄCE UŻYTKOWANIA
Wskazówki dotyczące prawidłowego użytkowania
ograniczającego wpływ na środowisko: Podczas
rozpoczęcia gotowania włączyć urządzenie z minimalną
prędkością, pozostawiając je włączone również na kilka
minut po zakończeniu gotowania. Zwiększyć prędkość tylko
w przypadku dużej ilości spalin i oparów, używając funkcji
booster wyłącznie w ekstremalnych wypadkach. Aby
utrzymać skuteczność systemu redukcji nieprzyjemnych
zapachów, wymieniać, gdy jest to konieczne filtr/y węglowy/
e. Aby zachować skuteczność filtra przeciwtłuszczowego, w
razie konieczności należy go wyczyścić. Aby zwiększyć
skuteczność i zredukować hałas, zastosować maksymalną
średnicę systemu odprowadzania wskazaną w niniejszej
instrukcji.
UTYLIZACJA PO WYCOFANIU Z
EKSPLOATACJI
Urządzenie zostało oznaczone zgodnie z Dyrekty-
wą Europejską 2012/19/WE - UK SI 2013 Nr 3113
(WEEE), dotyczącą zużytego sprzętu elektryczne-
go i elektronicznego. Upewniając się o prawidło-
wej utylizacji produktu. Użytkownik przyczynia się
do zapobiegania potencjalnym negatywnym skut-
kom dla środowiska i zdrowia.
Symbol umieszczony na produkcie lub na załączonej
dokumentacji oznacza, że nie powinien on być traktowany
jako odpad domowy, należy go przekazać do
odpowiedniego punktu zbiórki sprzętu elektrycznego i
elektronicznego. Należy się go pozbyć zgodnie z lokalnymi
przepisami dotyczącymi utylizacji odpadów. Aby uzyskać
więcej informacji na temat utylizacji, złomowania i recyklingu
produktu, należy skontaktować się z właściwym biurem
lokalnym, centrum zbiórki odpadów lub ze sklepem, w
którym został zakupiony.
NORMY
Sprzęt zaprojektowany, przetestowany i wyprodukowany
zgodnie z przepisami bezpieczeństwa: EN/IEC 60335-1;
EN/IEC 60335-2- 31, EN/IEC 62233. Wydajność: EN/IEC
61591; ISO 5167-1; ISO 5167-3; ISO 5168; EN/IEC
60704-1; EN/IEC 60704-2-13;EN/IEC 60704-3; ISO 3741;
EN 50564; IEC 62301. EMC: EN 55014-1; CISPR 14-1; EN
55014-2; CISPR 14-2; EN/IEC 61000-3-2; EN/IEC
61000-3-3.
2. UŻYTKOWANIE
System zasysania oparów może być używany w wersji
wyciągowej z odprowadzaniem na zewnątrz budynku lub
filtrującej z wewnętrzną recyrkulacją.
● Wersja Wyciągowa:
Opary są odprowadzane na zewnątrz przez rurę
przymocowaną do kołnierza przyłączeniowego.
UWAGA! Jeśli produkt jest wyposażony w filtr(y)
węglowy(e), należy go(je) usunąć.
Podłączyć produkt do przewodów rurowych i otworów
spustowych na ścianie, o średnicy równej średnicy wylotu
powietrza (kołnierz łączący).
Zastosowanie przewodów rurowych i otworów spustowych
na ścianie o mniejszej średnicy doprowadzi do
zmniejszenia wydajności zasysania i znacznego
zwiększenia hałasu.
W takim przypadku producent uchyla się od wszelkiej
odpowiedzialności.
• Użyć przewodu o niezbędnej minimalnej długości.
• Użyć przewodu z możliwie jak najmniejszą liczbą kolanek
(maksymalny kąt kolanka: 90°).
• Unikać dużych różnic w przekroju przewodu.
● Wersja Filtrująca:
Wyciągane powietrze zostanie oczyszczone z tłuszczu i
zapachów, a następnie ponownie wprowadzone do
pomieszczenia. Do użycia produktu w tej wersji, należy
zainstalować dodatkowy system filtrów węglowych.
MONTAŻ PIERWSZA INSTALACJA
• Sprawdzić, czy wymiary zakupionego produktu są
odpowiednie do wybranego miejsca instalacji.
• Wyjąć filtr(y) węglowe, jeśli jest (są) dostarczone (patrz
również odpowiedni akapit).
• Należy go (je) zamontować tylko w przypadku stosowania
produktu w wersji filtrującej.
• W przypadku paneli bocznych, ścian lub szafek
wiszących należy sprawdzić, czy jest wystarczająco dużo
miejsca do zainstalowania produktu oraz, czy jest możliwy
łatwy dostęp do panelu sterowania.
• Produkt jest dostarczany z kołkami mocującymi,
umożliwiającymi montaż na większości ścian/sufitów.
Należy jednak skonsultować się z wykwalifikowanym
technikiem w celu upewnienia się o przydatności
materiałów do danego rodzaju ściany/sufitu. Ściana/sufit
musi być wystarczająco solidna, aby utrzymać ciężar
okapu.
11

3. DZIAŁANIE
Uwaga! Omawiany okap jest wyposażony w system
automatycznego działania (patrz paragraf „Kalibracja
czujnika VOC").
Kalibrowanie jest wykonywane automatycznie, za każdym
razem, gdy okap zostanie podłączony do sieci elektrycznej
(np.: po zamontowaniu lub po blackout). Można je
przeprowadzić również ręcznie (patrz paragraf „Kalibracja
czujnika VOC - ręczna").
Podczas kalibracji, która trwa 5 minut, elementy sterujące
będą migać i można użyć wyłącznie przycisku oświetlenia.
T1
T2
T3 L2-L3
L1
T1= ON /OFF silnika.
Poprzez krótkie powtarzające się wciśnięcia przycisku T1
cyklicznie przechodzi się do regulacji prędkości (mocy)
zasysania.
Każdej prędkości odpowiada aktywacja odpowiedniej diody
LED:
- 1. prędkość (biała LED L1 włączona na stałe)
- 2. prędkość ( biała LED L1 włączona na stałe)
- 3. prędkość (biała LED L1 włączona na stałe)
- Intensywna (biała LED L1 migająca), prędkość
intensywna jest ustawiona na czas i trwa 5 minut, po
upływie których okap przełącza się na 3. prędkość.
- Silnik okapu można wyłączyć, wciskając przez 3 sekundy
przycisk T1. UWAGA! Nie może być aktywna
automatyczna funkcja VOC.
Aby wyłączyć okap podczas działania automatycznej
funkcji VOC, należy postępować zgodnie ze wskazówkami
dotyczącymi wyłączania funkcji VOC.
T2= Regulacja temperatury oświetlenia (dłuższe
wciśnięcie).
- Odcień barwy oświetlenia jest domyślnie ustawiony na
50% (neutralny).
W celu wyregulowania, po włączeniu oświetlenia wcisnąć i
przytrzymać przycisk T2 przez kilka sekund, diody LED L2 i
L3 będą migać na pomarańczowo; po zwolnieniu przycisku
T2 nastąpi ustawienie żądanej barwy światła, a diody LED
L2 i L3 będą stale zapalone na biało.
Uwaga! Po odłączeniu kabla zasilającego od gniazda,
odcień zostanie wyresetowany.
T3= Przycisk ON/OFF oświetlenia (krótkie wciśnięcie) /
Regulacja intensywności oświetlenia (dłuższe
wciśnięcie).
- Natężenie światła jest domyślnie ustawione na 100%
(intensywne).
W celu wyregulowania, po włączeniu oświetlenia wcisnąć i
przytrzymać przycisk T3 przez kilka sekund, diody LED L2 i
L3 będą migać na biało; po zwolnieniu przycisku T3 nastąpi
ustawienie żądanej intensywności światła, a diody LED L2 i
L3 będą stale zapalone na biało.
Uwaga! Po wyłączeniu okapu ustawienie natężenia światła
zostanie wyresetowane.
Kalibracja czujnika VOC
W celu zagwarantowania prawidłowego działania czujnika,
w który wyposażony jest okap konieczna jest kalibracja.
Może ona być automatyczna (pierwsza instalacja lub po
awarii zasilania) lub ręczna (jeśli działanie automatyczne
nie jest zadowalające).
Kalibracja Automatyczna: rozpoczyna się przy
wyłączonym silniku, gdy tylko okap zostanie ponownie
podłączony do sieci. Dioda LED L1 miga na niebiesko
przez 5 minut i jest emitowany krótki sygnał dźwiękowy
(Beep). Po upływie takiego czasu, dioda LED L1 zaczyna
migać na biało i jest emitowany długi sygnał dźwiękowy
(Beep), wskazujący zakończenie kalibracji automatycznej.
Kalibracja Ręczna: należy ją przeprowadzić, gdy zauważy
się niezadowalające działanie trybu automatycznego;
należy ją wykonać, gdy w kuchni panują normalne warunki
środowiskowe.
Kalibracja ręczna jest aktywowana po wciśnięciu i
przytrzymaniu przycisku T1 przez 10 sekund. Dioda LED
L1 miga na niebiesko i jest emitowany sygnał dźwiękowy
(krótki Beep). Dioda LED L1 miga przez 5 minut, po
upływie których zaczyna migać na biało i jest emitowany
długi sygnał dźwiękowy (Beep), wskazujący zakończenie
kalibracji ręcznej.
Po zakończeniu kalibracji, dioda LED L1 będzie powoli
migać BIAŁYM światłem w trybie przyciemnionym,
wskazując wykonaną aktywację. W przypadku wykrycia
oparów/dymów silnik włączy się automatycznie.
Aktywacja i dezaktywacja funkcji VOC
Wcisnąć i przytrzymać przycisk T1 przez 5 sekund, aby
włączyć lub wyłączyć funkcję czujnika VOC.
- Po naciśnięciu przycisku T1 włącza się funkcja VOC,
dioda LED L1 zmienia kolor na biały i zaczyna migać. Okap
włącza się z prędkością odpowiednio dostosowaną do
wykrytych przez czujnik oparów.
Wykonać tę samą procedurę, aby dezaktywować funkcje.
Sygnalizacja filtra przeciwtłuszczowego
Po 40 godzinach pracy diody LED L1 L2 L3 są Czerwone i
włączone na stałe.
Pojawienie się takiego komunikatu oznacza konieczność
wypłukania zainstalowanego filtra przeciwtłuszczowego. W
celu wyresetowania sygnalizacji przytrzymać przez 3
sekundy przyciski T1 i T3 dla potwierdzenia
wyresetowania. Wszystkie diody L1-L2-L3 dwukrotnie
12

migną na czerwono, a okap wyemituje długi sygnał
dźwiękowy.
Sygnalizacja filtra węglowego
Po 160 godzinach pracy, diody LED L1 (czerwona
włączona na stałe) L2 L3 zaczną migać na czerwono.
Pojawienie się takiego komunikatu oznacza, że należy
wymienić zainstalowany filtr węglowy.
W celu wyresetowania sygnalizacji przytrzymać przez 3
sekundy przyciski T1 i T3 dla potwierdzenia
wyresetowania. Wszystkie diody L1-L2-L3 dwukrotnie
migną na czerwono, a okap wyemituje długi sygnał
dźwiękowy.
W trybie standardowym sygnalizacja filtra węglowego
nie jest aktywna.
W przypadku, gdy używa się okapu w wersji filtrującej
należy uaktywnić sygnalizację filtra węglowego.
Aktywacja sygnalizacja filtra węglowego:
Jednoczesne przytrzymanie przycisków T1 i T2 gdy okap
jest wyłączony spowoduje włączenie alarmu nasycenia
filtrów. Najpierw zapali się dioda LED L1 (kolor czerwony),
a następnie L2 i L3 (kolor czerwony), po czym zostanie
wyemitowany długi sygnał dźwiękowy, a diody L2 i L3 będą
krótko migać, sygnalizując włączenie.
Dezaktywacja sygnalizacja filtra węglowego:
Powtórzyć opisaną wyżej procedurę, najpierw
równocześnie włączą się diody LED L1, L2 i L3, następnie
tylko L1, po czym nastąpi długi sygnał dźwiękowy i
ponownie włączą się diody LED L1, L2 i L3, sygnalizując
udaną dezaktywację (czerwone podświetlenie).
4. OSTRZEŻENIA DOTYCZĄCE
KONSERWACJI
• Czyszczenie: Do czyszczenia używać wyłącznie szmatki
nasączonej neutralnym płynnym detergentem. Nie
stosować żadnych narzędzi i elementów do czyszczenia.
• Unikać stosowania produktów zawierających substancje
ścierne. NIE UŻYWAĆ ALKOHOLU!
Informacje na temat konserwacji produktu wskazano
na ilustracjach na końcu części o instalacji, oznaczo-
nych poniższym symbolem.
• Filtr przeciwtłuszczowy: Raz w miesiącu należy
czyścić metalowy filtr przeciwtłuszczowy za pomocą nie-
agresywnych detergentów, ręcznie lub w zmywarce w ni-
skiej temperaturze i w krótkim cyklu mycia. W celu wy-
montowania filtru przeciwtłuszczowego pociągnąć uchwyt
sprężynowy.
• Filtr przeciwtłuszczowy zatrzymuje cząsteczki tłuszczu
powstające podczas gotowania. Podczas mycia w
zmywarce do naczyń, metalowy filtr przeciwtłuszczowy
może ulec przebarwieniu, mimo to jego właściwości
filtracyjne nie ulegają zmianie.
• Filtr węglowy możliwy do mycia (tylko do wersji
filtrującej):
Filtr węglowy można myć co dwa miesiące (lub gdy system
wskazujący nasycenie filtrów - jeżeli jest obecny w
posiadanym modelu - wskazuje taką konieczność). Jak
wskazano w sekcji rysunków: wyjąć filtry
przeciwtłuszczowe, wyjąć filtr węglowy i umyć w gorącej
wodzie z odpowiednim detergentem lub w zmywarce do
naczyń w temperaturze 65°C (w przypadku zastosowania
zmywarki do naczyń, pełny cykl mycia bez żadnych innych
naczyń). Usunąć nadmiar wody, uważając aby nie
uszkodzić filtra, wyjąć matę z ramki i włożyć go na 10 minut
do piekarnika ustawionego na 100°C w celu całkowitego
wysuszenia. Włożyć filtry przeciwtłuszczowe.
Wymieniać matę filtracyjną co 3 lata i zawsze, gdy jest
uszkodzony.
• Obwodowy panel zasysania (konserwacja pa-
nelu)
Demontaż:
a. mocno pociągnąć panel (PRZEDNIA STRONA) do dołu
b. odczepić tylne zawiasy.
Czyszczenie: należy czyścić panel zasysania ręcznie przy
użyciu nieagresywnych środków czyszczących.
Montaż: panel musi być zaczepiony z tyłu i przymocowany
z przodu (mocowanie za pomocą magnesów).
Uwaga! zawsze sprawdzić, czy panel jest prawidłowo
zamocowany.
Oświetlenie
• System oświetlenia opiera się na technologii LED. Diody
LED gwarantują optymalne oświetlenie, działają do 10 razy
dłużej niż tradycyjne żarówki i pozwalają zaoszczędzić
90% energii elektrycznej.
•System oświetlenia : Użytkownik nie może wymieniać
systemu oświetlenia, w razie nieprawidłowości należy
skontaktować się z serwisem obsługi.
13

14
DE
Das Produkt ist für die Absaugung von Kochgerüchen und
Dampf konzipiert und nur für den Hausgebrauch bestimmt.
Halten Sie sich strikt an die Anweisungen in dieser
Anleitung. Es wird keine Haftung für Unannehmlichkeiten,
Schäden oder Brände am Produkt übernommen, die durch
Nichtbeachtung der in diesem Handbuch enthaltenen
Anweisungen verursacht werden.
Das Gerät kann im Vergleich zu den Abbildungen
in diesem Handbuch rein äußerlich anders aussehen,
die Betriebs-, Wartungs- und Installationsanweisungen
bleiben jedoch gleich.
• Es ist wichtig, alle dem Produkt beiliegenden Handbücher
aufzubewahren, damit sie jederzeit eingesehen werden
können. Vergewissern Sie sich, dass die Bedienungsanleitung
bei einem Verkauf, einer Weitergabe oder einem Umzug
beim Produkt verbleibt. • Lesen Sie die Anleitung sorgfältig
durch: Sie enthält wichtige Informationen zu Installation, Betrieb
und Sicherheit. • Überprüfen Sie die Unversehrtheit des
Produkts vor der Installation. Andernfalls wenden Sie sich
an den Händler und fahren Sie nicht mit der Installation fort.
HINWEISE
: Bei den mit diesem Symbol gekennzeichneten Artikeln
handelt es sich um optionales Zubehör, das nur bei einigen
Modellen mitgeliefert wird, oder um Artikel, die nicht im
Lieferumfang enthalten sind, aber erworben werden können.
1. SICHERHEIT UND
VORSCHRIFTEN
ALLGEMEINE SICHERHEIT
•Nehmen Sie keine elektrischen oder mechanischen
Veränderungen am Gerät oder an den Abluftrohren vor.
•Vor allen Reinigungs- und Wartungsarbeiten das Gerät
durch Ziehen des Steckers oder Ausschalten des
Netzschalters vom Stromnetz trennen. •Tragen Sie bei
allen Installations- und Wartungsarbeiten immer
Arbeitshandschuhe. •Das Produkt kann von Kindern
ab 8 Jahren und von Personen mit eingeschränkten
physischen, sensorischen oder geistigen Fähigkeiten oder
ohne Erfahrung und ohne die erforderlichen Kenntnisse
benutzt werden, sofern sie angemessen beaufsichtigt
werden oder in die sichere Benutzung des Geräts
eingewiesen wurden und die damit verbundenen Gefahren
verstehen. •Kinder müssen beaufsichtigt werden,
um sicherzustellen, dass sie nicht mit dem Produkt spielen.
•Reinigung und Wartung dürfen niemals von Kindern
durchgeführt werden, wenn sie nicht ordnungsgemäß
beaufsichtigt werden. •Der Raum muss ausreichend
belüftet sein, wenn das Gerät gleichzeitig mit anderen
Geräten verwendet wird, die Gas oder andere Brennstoffe
verbrennen. •Das Gerät muss regelmäßig innen und außen
gereinigt werden (MINDESTENS EINMAL IM MONAT);
dabei sind die Anweisungen im Wartungshandbuch zu
beachten. •Die Nichteinhaltung der für die Reinigung des
Geräts und das Auswechseln/Reinigen der Filter
angegebenen Regeln kann zu Brandgefahr führen. •Es ist
strengstens verboten, Lebensmittel auf der Flamme unter
dem Gerät zu kochen. • WARNUNG: •Bei eingeschalteter
Herdplatte können die zugänglichen Teile des Geräts
heiß werden. •Schließen Sie das Gerät nicht an die
Stromversorgung an, bevor die Installation abgeschlossen ist.
•Die von den örtlichen Behörden erlassenen Vorschriften
sind hinsichtlich der technischen und sicherheitstechnischen
Maßnahmen für die Rauchgasabsaugung strikt
einzuhalten. •Die abgesaugte Luft darf nicht durch
dieselben Kanäle geleitet werden, die für die Absaugung
von Dämpfen aus der Verbrennung von Gasen oder
anderen Arten von Verbrennungsprodukten verwendet
werden. •Benutzen Sie das Gerät nicht ohne
ordnungsgemäß installierte Lampen und lassen Sie
es nicht ohne diese stehen, da sonst die Gefahr eines
Stromschlags besteht. •Das Produkt darf NIEMALS ohne
korrekt montiertes Gitter verwendet werden. •Das Produkt
darf NIEMALS als Unterlage verwendet werden,
es sei denn, dies ist ausdrücklich angegeben.
• Dunstabzugshauben und andere Kochdunstabzüge
können den sicheren Betrieb von Geräten, die mit Gas oder
anderen Brennstoffen betrieben werden (auch in anderen
Räumen), durch Rückströmung von Verbrennungsgasen
beeinträchtigen. Diese Gase können grundsätzlich zu einer
Kohlenmonoxidvergiftung führen. Nach der Installation
einer Dunstabzugshaube oder eines anderen
Kochdunstabzugs sollte der Betrieb von Rauchgasgeräten
von einer sachkundigen Person getestet werden,
um sicherzustellen, dass es nicht zu einem Rückfluss
von Verbrennungsgasen kommt.
• Verwenden Sie zum Auswechseln der Lampe nur
die im Abschnitt Wartung/Beleuchtungssystem dieses
Handbuchs angegebene Lampe. • Die Verwendung einer
offenen Flamme kann die Filter beschädigen und eine
Brandgefahr darstellen und muss daher unter allen
Umständen vermieden werden. • Beim Frittieren ist
besondere Vorsicht geboten, damit das Öl nicht überhitzt
und Feuer fängt. • Wenden Sie sich im Zweifelsfall an ein
autorisiertes Kundendienstzentrum oder ähnliches
qualifiziertes Personal.
INSTALLATIONSSICHERHEIT
•Verwenden Sie die mit dem Produkt gelieferten
Befestigungsschrauben nur, wenn sie für die Oberfläche
geeignet sind; andernfalls kaufen Sie den richtigen
Schraubentyp. •Prüfen Sie, ob sich Zubehör (z. B. Beutel
mit Schrauben, Garantiezertifikate usw.) im Inneren des
Produkts befindet (aus Transportgründen dort platziert).
Wenn dies so ist, entfernen Sie die Gegenstände und

15
bewahren Sie sie auf. • WARNUNG: Wenn die Schrauben
und Befestigungselemente nicht gemäß dieser Anleitung
angebracht werden, kann dies zu elektrischen Gefahren
führen. •Das Abluftrohr ist nicht im Lieferumfang enthalten
und muss gekauft werden. •Der Durchmesser des
Abluftrohrs muss dem Durchmesser des Anschlussrings
entsprechen. •Bei der Installation des Produkts über dem
Kochfeld sind die in den Zeichnungen angegebenen
Abstände einzuhalten. •Der Mindestabstand zwischen der
Oberfläche der Behälterstützen auf dem Herd und dem
untersten Teil der Dunstabzugshaube darf bei
Elektroherden nicht weniger als 50 cm (nur für Australien
und Neuseeland nicht weniger als 65 cm) und bei Gas-
oder Mischherden nicht weniger als 65 cm betragen. •Wenn
in der Installationsanleitung des Gasherdes ein größerer
Abstand angegeben ist, ist dieser zu berücksichtigen.
SICHERHEIT ELEKTRISCHER
ANSCHLUSS
•Die Netzspannung muss mit der auf dem Etikett im Inneren
des Produkts angegebenen Spannung übereinstimmen.
•Wenn das Gerät über einen Stecker verfügt, muss es
an eine den geltenden Normen entsprechende Steckdose
angeschlossen werden, die auch nach der Installation
zugänglich bleibt. •Wenn es keinen Stecker hat (direkter
Anschluss an das Stromnetz) oder der Stecker nicht
zugänglich ist, muss auch nach der Installation ein
handelsüblicher zweipoliger Schalter verwendet werden,
der die vollständige Trennung vom Stromnetz bei
Überspannung der Kategorie III gemäß den
Installationsvorschriften gewährleistet. • Warnung!
Das Netzkabel muss vom autorisierten technischen
Kundendienst oder von einer Person mit vergleichbarer
Qualifikation ausgetauscht werden.
• Bitte beachten! Bevor Sie das Gerät wieder
an das Stromnetz anschließen, vergewissern Sie sich,
dass es ordnungsgemäß funktioniert, und prüfen Sie,
ob das Netzkabel richtig angeschlossen ist.
Bitte beachten! Verwenden Sie das Gerät nicht mit einem
Programmierer, einer Zeitschaltuhr, einer separaten
Fernbedienung oder einem anderen Gerät, das sich
automatisch aktiviert.
EMPFEHLUNGEN FÜR DIE VERWENDUNG
Empfehlungen für die richtige Verwendung im Einklang mit
dem Umweltschutz: Zu Beginn des Garvorgangs sollte das
Gerät auf kleinster Stufe eingeschaltet werden und auch
nach dem Kochen noch einige Minuten eingeschaltet
bleiben. Erhöhen Sie die Geschwindigkeit nur bei starker
Rauch- und Dampfentwicklung und verwenden Sie die
Booster-Funktion nur in Ausnahmefällen. Damit das
System zur Geruchsneutralisierung effizient arbeitet,
sollten Sie den/die Kohlefilter bei Bedarf austauschen.
Reinigen Sie den Fettfilter bei Bedarf, um seine hohe
Leistungsfähigkeit zu gewährleisten. Um die Absaugung
zu optimieren und die Geräuschentwicklung zu minimieren,
sollte der in dieser Anleitung angegebene maximale
Durchmesser des Abluftrohrs verwendet werden.
ENTSORGUNG
Dieses Gerät ist in Einklang mit der EU-Richtlinie
2012/19/EG - UK SI 2013 No.3113 über Elektro-
und Elektronik-Altgeräte (WEEE) gekennzeichnet.
Achten Sie darauf, dass dieses Produkt
ordnungsgemäß entsorgt wird. Der Nutzer trägt
dazu bei, mögliche negative Folgen für die
Umwelt und die Gesundheit zu vermeiden.
Das Symbol auf dem Produkt oder der beiliegenden
Dokumentation bedeutet, dass dieses Gerät nicht
im normalen Hausmüll entsorgt werden darf, sondern den
jeweiligen kommunalen Rücknahmesystemen für Elektro-
und Elektronik-Altgeräte übergeben werden muss. Entsorgen
Sie es gemäß den örtlichen Vorschriften für die Abfallent-
sorgung. Weitere Informationen über die Behandlung,
die Wiederverwertung und das Recycling dieses Produkts
erhalten Sie bei Ihrer Gemeindeverwaltung, der Sammelstelle
für Haushaltsabfälle oder dem Geschäft, in dem das Produkt
gekauft wurde.
VERORDNUNGEN
Gerät, das unter Einhaltung dieser Sicherheitsvorschriften
entwickelt, geprüft und hergestellt wurde: EN/IEC 60335-1;
EN/ IEC 60335-2- 31, EN/IEC 62233. Leistung: EN/IEC
61591; ISO 5167-1; ISO 5167-3; ISO 5168; EN/IEC 60704-1;
EN/IEC 60704-2-13; EN/IEC 60704-3; ISO 3741; EN 50564;
IEC 62301. EMC: EN 55014-1; CISPR 14-1; EN 55014-2;
CISPR 14-2; EN/IEC 61000-3-2; EN/IEC 61000-3-3.
2. NUTZUNG
Die Abluft kann entweder nach außen geleitet oder mit
Filterung intern umgewälzt werden.
• Abluft nach außen:
Die Dämpfe werden durch ein am Anschlussflansch
befestigtes Abluftrohr nach außen abgeleitet.
VORSICHT! Wenn das Produkt über einen oder mehrere
Kohlefilter verfügt, müssen diese entfernt werden.
Schließen Sie das Produkt an wandmontierte Abluftrohre
und Öffnungen mit einem Durchmesser an, der dem des
Luftauslasses entspricht (Anschlussflansch).
Die Verwendung von Rohren und Auslassöffnungen
in der Wand mit kleinerem Durchmesser verringert die
Absaugleistung und erhöht den Geräuschpegel drastisch.
Jede Verantwortung in dieser Hinsicht wird daher
abgelehnt.
• Verwenden Sie ein Abluftrohr mit der kürzesten
erforderlichen Länge.

16
• Verwenden Sie ein Abluftrohr mit möglichst wenigen
Biegungen (maximaler Biegewinkel: 90°).
• Vermeiden Sie drastische Änderungen des
Durchmessers des Abluftrohrs.
• Abluft intern umgewälzt:
Die angesaugte Luft wird durch Filterung entfettet und
desodoriert, bevor sie in den Raum zurückgeführt
wird. Um das Produkt mit Umwälzung zu verwenden,
ist es notwendig, ein zusätzliches Aktivkohlefiltersystem
zu installieren.
MONTAGE VOR DEM EINBAU
• Überprüfen Sie, ob das Produkt die richtige Größe für den
Installationsbereich hat.
• Entfernen Sie den/die Aktivkohlefilter, falls vorhanden
(siehe auch den entsprechenden Abschnitt).
• Sie müssen wieder eingesetzt werden, wenn das Produkt
mit Umwälzung und Filterung verwendet werden soll.
• Wenn an den Seiten Paneele, Wände oder Hängeschränke
vorhanden sind, stellen Sie sicher, dass genügend Platz für die
Installation des Produkts vorhanden ist und dass das
Bedienfeld jederzeit leicht zugänglich ist.
• Das Produkt ist mit Befestigungsdübeln ausgestattet, die
für die meisten Wände/Decken geeignet sind. Es ist jedoch
notwendig, einen qualifizierten Techniker zu konsultieren,
um sicherzustellen, dass die Materialien für die Art der
Wand/Decke geeignet sind. Die Wand/Decke muss stabil
genug sein, um das Gewicht der Haube zu tragen.
3. BETRIEB
Bitte beachten! Diese Haube verfügt über
ein automatisches Betriebssystem
(siehe Abschnitt „VOC-Sensor-Kalibrierung“).
Die Kalibrierung erfolgt automatisch, wenn die Haube wieder
an das Stromnetz angeschlossen wird (z. B. bei der ersten
Installation nach einem Stromausfall). Sie kann auch manuell
durchgeführt werden (siehe den Abschnitt „VOC-Sensorka-
librierung - manuell“).
Während der Kalibrierung, die 5 Minuten dauert, blinken die
Bedienelemente und nur die Lichttaste betätigt werden.
T1 = EIN/AUS Motor.
Kurze und wiederholte Betätigungen der Taste T1 führen
zu einem zyklischen Übergang zur Steuerung der
Sauggeschwindigkeit (Leistung). Jede Geschwindigkeit
entspricht dem Aufleuchten der jeweiligen LED:
- 1. Geschwindigkeit (LED L1 dauerhaft weißes Licht)
- 2. Geschwindigkeit (LED L1 dauerhaft weißes Licht)
- 3. Geschwindigkeit (LED L1 dauerhaft weißes Licht)
- Intensiv (LED L1 blinkt weißes Licht), die Intensivge-
schwindigkeit ist zeitlich begrenzt und dauert 5 Minuten,
nach deren Ablauf die Haube auf die 3 Geschwindigkeit
übergeht.
- Der Motor der Haube kann durch 3 Sekunden langes
Drücken der Taste T1 ausgeschaltet werden. VORSICHT!
Die automatische VOC-Funktion darf nicht aktiv sein.
Um die Abzugshaube während der automatischen
VOC-Funktion auszuschalten, folgen Sie den Anweisungen
zur Deaktivierung der VOC-Funktion.
T2 = Einstellen der Lichttemperatur (langes Drücken).
- Die Standardeinstellung für den hellen Farbton
ist 50 % (neutral).
Zum Einstellen halten Sie bei eingeschaltetem Licht die
Taste T2 einige Sekunden lang gedrückt. Die LEDs L2 und
L3 blinken orange. Wenn Sie die Taste T2 loslassen, wird
der gewünschte Lichtton eingestellt und die LEDs L2 und
L3 leuchten dauerhaft weiß.
Bitte beachten! Wenn Sie das Netzkabel aus der
Steckdose ziehen, wird der Ton wiederhergestellt.
T3 = Taste Licht EIN/AUS (kurz drücken) / Zum Einstellen
der Lichtintensität (lang drücken).
- Die Standardlichtintensität ist auf 100 % (intensiv)
eingestellt.
Zur Einstellung halten Sie bei eingeschaltetem Licht die
Taste T3 einige Sekunden lang gedrückt, die LEDs L2 und
L3 blinken weiß. Wenn Sie die Taste T3 loslassen, wird die
gewünschte Lichtintensität eingestellt und die LEDs L2 und
L3 leuchten wieder dauerhaft weiß.
Bitte beachten! Sobald die Haube ausgeschaltet wird,
wird die eingestellte Lichtintensität wiederhergestellt.
Kalibrierung des VOC-Sensors
Die Kalibrierung ist notwendig, damit der Sensor, mit dem
die Haube ausgestattet ist, korrekt funktioniert. Sie kann
automatisch (vor der Installation oder nach einem
Stromausfall) oder manuell (wenn der automatische
Betrieb nicht zufriedenstellend ist) erfolgen.
Automatische Kalibrierung: startet bei ausgeschaltetem
Motor, sobald die Haube wieder an das Stromnetz
angeschlossen wird. Die LED L1 blinkt 5 Minuten lang blau,
begleitet von einem kurzen akustischen Signal (Piepton).
Nach Ablauf dieser Zeit beginnt die LED L1 weiß
zu blinken, begleitet von einem langen akustischen
Signal (Piepton), das das Ende der automatischen
Kalibrierung anzeigt.
T1
L1
T2
T3
L2-L3

17
Manuelle Kalibrierung: Muss durchgeführt werden, wenn
der automatische Betrieb nicht zufriedenstellend
funktioniert und wenn in der Küche normale Umgebungs-
bedingungen herrschen.
Die manuelle Kalibrierung wird aktiviert, indem die Taste T1
10 Sekunden lang gedrückt wird. Die LED L1 blinkt blau,
gefolgt von einem akustischen Signal (kurzer Piepton),
die LED L1 blinkt 5 Minuten lang, danach beginnt die LED
L1 weiß zu blinken, begleitet von einem langen akustischen
Signal (Piepton), das das Ende der manuellen Kalibrierung
anzeigt.
Am Ende der Kalibrierung blinkt L1 langsam im
gedimmten Modus in WEISS, um die erfolgreiche
Aktivierung anzuzeigen. Der Motor schaltet sich
automatisch ein, wenn Dämpfe/Rauch erkannt werden.
Aktivieren und Deaktivieren der VOC-Funktion
Wenn Sie die Taste T1 5 Sekunden lang gedrückt halten,
wird die Funktion des VOC-Sensors aktiviert oder
deaktiviert.
- Durch Drücken der Taste T1 wird die VOC-Funktion
aktiviert, die LED L1 wird weiß und blinkt. Die Dunstab-
zugshaube schaltet sich je nach den vom Sensor
erfassten Kochdämpfen mit der am besten geeigneten
Geschwindigkeit ein.
Um sie zu deaktivieren, gehen Sie genauso vor.
Fettfilter-Warnung
Nach 40 Stunden Betrieb leuchtet die LED L1 L2 L3
dauerhaft rot.
Wenn diese Warnung erscheint, bedeutet dies, dass der
installierte Fettfilter gereinigt werden muss. Um das Signal
zurückzusetzen, halten Sie die Tasten T1 und T3 für
3 Sekunden gedrückt. Zur Bestätigung des Resets blinken
alle L1-L2-L3-LEDs zweimal rot und die Haube gibt einen
langen Piepton ab.
Kohlefilter-Warnung
Nach 160 Betriebsstunden beginnen die LED L1
(dauerhaft rote LED), L2 und L3 rot zu blinken. Wenn diese
Warnung erscheint, bedeutet dies, dass der installierte
Kohlefilter ausgetauscht werden muss. Um das Signal
zurückzusetzen, halten Sie die Tasten T1 und T3 für
3 Sekunden gedrückt. Zur Bestätigung des Resets blinken
alle L1-L2-L3-LEDs zweimal rot und die Haube gibt einen
langen Piepton ab.
Im Standardmodus ist die Kohlefilterwarnung nicht aktiv.
Wenn die Haube mit dem Filter verwendet wird, muss die
Kohlefilterwarnung aktiviert werden.
Aktivierung der Kohlefilterwarnung:
Durch gleichzeitiges Drücken der Tasten T1 und T2 bei
ausgeschalteter Haube wird der Alarm für die Sättigung der
Filter aktiviert, d.h. zuerst leuchtet die LED L1 (rot),
dann auch L2 und L3 (rot), danach folgt ein langer Piepton
und die LEDs L2 und L3 blinken kurz auf, um die
erfolgreiche Aktivierung anzuzeigen.
Deaktivierung der Kohlefilterwarnung:
Wiederholen Sie den oben beschriebenen Vorgang. Zuerst
leuchten die LEDs L1, L2 und L3 gleichzeitig auf, dann nur noch
L1, danach folgt ein langer Piepton und die LEDs L1, L2 und L3
leuchten erneut auf, um anzuzeigen, dass die Deaktivierung
stattgefunden hat (rote Hintergrundbeleuchtung).
4. WARTUNGSHINWEISE
• Reinigung: Zur Reinigung verwenden Sie einfach ein mit
neutralen Flüssigreinigern angefeuchtetes Tuch. Verwenden
Sie keine Reinigungswerkzeuge oder Sonstiges.
• Vermeiden Sie die Verwendung von Scheuermitteln.
VERWENDEN SIE KEINEN ALKOHOL!
Für die Wartung des Produkts, siehe die Bilder
am Ende der mit diesem Symbol gekennzeichneten
Installation.
• Anti-Fett-Filter: Der Metallfilter muss einmal
im Monat mit milden Reinigungsmitteln gereinigt werden,
entweder von Hand oder im Geschirrspüler bei niedriger
Temperatur und kurzem Spülgang. Ziehen Sie zum
Entfernen des Anti-Fett-Filters am Federentriegelungsgriff.
• Der Fettfilter fängt die beim Kochen entstehenden
Fettpartikel auf. Bei der Reinigung in der Spülmaschine
kann sich der Metallfettfilter verfärben, seine
Filtereigenschaften bleiben jedoch unverändert.
• Waschbarer Aktivkohlefilter
(nur bei der Filterversion):
Der Aktivkohlefilter kann alle zwei Monate gereinigt werden
(oder wenn das Filtersättigungssystem dies anzeigt - falls
in Ihrem Modell enthalten). Wie in der Zeichnung
angegeben: Entfernen Sie den Fettfilter, nehmen Sie den
Kohlefilter heraus und spülen Sie ihn mit heißem Wasser
und geeigneten Reinigungsmitteln oder in der
Spülmaschine bei 65°C (wenn Sie ihn in der Spülmaschine
spülen, führen Sie den kompletten Spülgang ohne Geschirr
durch). Entfernen Sie das überschüssige Wasser, ohne
den Filter zu beschädigen, und legen Sie ihn dann
10 Minuten lang bei 100°C in den Ofen, um ihn vollständig
zu trocknen. Setzen Sie die Anti-Fett-Filter wieder ein.
Ersetzen Sie die Schaumstoffschicht alle 3 Jahre und jedes
Mal, wenn der Stoff beschädigt erscheint.
• Absaugfeld (Wartung der Absaugeinheit)
Demontage:
a. Ziehen Sie die Absaugeinheit (VORDERE SEITE)
fest nach unten.
b. Lösen Sie sie dabei aus den hinteren Scharnieren.
Reinigung: Die Absaugeinheit muss manuell mit milden
Reinigungsmitteln gereinigt werden.

18
Montage: Die Absaugeinheit wieder hinten einhängen und
vorne (mit Magneten) befestigen.
Achtung! Vergewissern Sie sich immer, dass die Einheit
sicher befestigt ist.
Beleuchtung
• Das Beleuchtungssystem basiert auf der LED-Technologie.
LEDs sorgen für eine optimale Ausleuchtung, halten bis
zu 10 Mal länger als herkömmliche Lampen und sparen
90 % Strom.
• Beleuchtungssystem: Das Beleuchtungssystem kann
nicht vom Benutzer ausgetauscht werden, wenden Sie sich
im Falle einer Störung an den Kundendienst.

19
IT
Il prodotto è destinato all'aspirazione dei fumi e dei vapori
di cottura ed è destinato esclusivamente ad uso domestico.
Osservare scrupolosamente le istruzioni contenute
in questo manuale. Non si assume alcuna responsabilità
per eventuali inconvenienti, danni o incendi causati
al prodotto a seguito del mancato rispetto delle istruzioni
riportate nel presente manuale.
L'apparecchio può avere caratteristiche estetiche
diverse rispetto alle illustrazioni presenti nel manuale,
tuttavia le istruzioni sull’uso, sulla manutenzione
e sull’installazione rimangono invariate.
• È importante conservare tutti i manuali che
accompagnano il prodotto in modo che possano essere
sempre consultati. In caso di vendita, trasferimento
o spostamento, assicurarsi che il manuale rimanga con
il prodotto. • Leggere attentamente le istruzioni:
contengono informazioni importanti sull'installazione, sul
funzionamento e sulla sicurezza. • Verificare l'integrità del
prodotto prima della sua installazione. In caso contrario
contattare il rivenditore e non proseguire con l'installazione.
NOTE
: gli articoli contrassegnati da questo simbolo sono
accessori opzionali forniti solo su alcuni modelli oppure
articoli non fornibili ma acquistabili.
1. SICUREZZA E NORMATIVE
SICUREZZA GENERALE
•Non apportare modifiche elettriche o meccaniche
al prodotto o ai tubi di scarico. •Prima di effettuare qualsiasi
operazione di pulizia o manutenzione, scollegare il prodotto
dalla rete elettrica rimuovendo la spina o spegnendo
l'interruttore generale. •Per tutte le operazioni di installazione
e manutenzione indossare sempre guanti da lavoro.
•Il prodotto può essere utilizzato da bambini di età
superiore a 8 anni e da persone con ridotte capacità fisiche,
sensoriali o mentali o prive di esperienza o delle
conoscenze necessarie, purché adeguatamente
supervisionati o istruiti su come utilizzare in sicurezza
il dispositivo e comprendere i pericoli intrinseci. •I bambini
devono essere sorvegliati per assicurarsi che non giochino
con il prodotto. •La pulizia e la manutenzione non devono
mai essere eseguite dai bambini a meno che non siano
adeguatamente controllati. •La stanza deve avere una
ventilazione sufficiente quando il prodotto viene utilizzato
contemporaneamente ad altri apparecchi che bruciano gas
o altri combustibili. •Il prodotto deve essere pulito
frequentemente sia all'interno che all'esterno (ALMENO
UNA VOLTA AL MESE); seguire sempre le istruzioni
riportate nel manuale di manutenzione. •Il mancato rispetto
delle norme indicate per la pulizia del prodotto
e la sostituzione/pulizia dei filtri può comportare rischio
di incendio. •È rigorosamente vietato cuocere cibi sulla
fiamma sotto il prodotto. • ATTENZIONE: •Quando il piano
cottura è acceso, le parti accessibili del prodotto potrebbero
diventare calde. •Non collegare il prodotto alla rete elettrica
finché l'installazione non è completata.
•Per quanto riguarda le misure tecniche e di sicurezza
da adottare per l'aspirazione dei fumi devono essere
scrupolosamente seguite le norme previste dalle autorità
locali. •L'aria espulsa non deve essere convogliata negli
stessi condotti utilizzati per l'estrazione dei fumi generati
dalla combustione di gas o di altri tipi di prodotti della
combustione. •Non utilizzare o lasciare il prodotto senza
lampade adeguatamente installate, poiché ciò potrebbe
comportare il rischio di scosse elettriche. •Il prodotto non
deve MAI essere utilizzato senza la griglia correttamente
montata. •Il prodotto non deve MAI essere utilizzato come
piano di appoggio se non espressamente indicato.
• Gli estrattori e altri aspiratori di fumi di cottura possono
compromettere il funzionamento sicuro degli apparecchi
che bruciano gas o altri combustibili (compresi quelli in altre
stanze) a causa del ritorno di flusso dei gas di combustione.
Questi gas possono potenzialmente provocare avvelena-
mento da monossido di carbonio. Dopo l'installazione
di un estrattore o di un altro aspiratore di fumi di cottura,
il funzionamento degli apparecchi a gas a ventilazione
forzata deve essere testato da una persona competente
per garantire che non si verifichi un ritorno di flusso dei gas
di combustione.
• Per sostituire la lampada, utilizzare esclusivamente il tipo
di lampada indicato nella sezione relativa a manutenzione/
sistema di illuminazione del presente manuale. • L'uso di
fiamme libere può danneggiare i filtri e causare pericolo
di incendio; deve quindi essere evitato in ogni circostanza.
• È necessario prestare particolare attenzione durante
la frittura per evitare che l'olio si surriscaldi e prenda fuoco.
• In caso di dubbio, contattare il centro di assistenza
autorizzato o personale qualificato simile.
SICUREZZA DELL'INSTALLAZIONE
•Utilizzare le viti di fissaggio fornite con il prodotto solo
se adatte alla superficie; in caso contrario, acquistare il tipo
corretto di viti. •Verificare la presenza di accessori
(es. sacchetti contenenti viti, certificati di garanzia, ecc.)
all'interno del prodotto (ivi riposti per ragioni di trasporto).
Se gli accessori sono presenti, rimuoverli e conservarli.
• AVVERTENZA: La mancata installazione di viti
e dispositivi di fissaggio in conformità con queste istruzioni
può comportare rischi elettrici. •Il tubo di scarico non
è fornito e deve essere acquistato. •Il diametro del tubo
di scarico deve essere equivalente al diametro dell'anello
di collegamento. •Per l'installazione del prodotto sul piano
cottura, rispettare l'altezza indicata nei disegni •La distanza
minima tra la superficie dei supporti del contenitore della
cucina e la parte più bassa dell’estrattore non deve essere
Seite laden ...
Seite laden ...
Seite laden ...
Seite laden ...
Seite laden ...
Seite laden ...
Seite laden ...
Seite laden ...
Seite laden ...
Seite laden ...
Seite laden ...
Seite laden ...
Seite laden ...
-
 1
1
-
 2
2
-
 3
3
-
 4
4
-
 5
5
-
 6
6
-
 7
7
-
 8
8
-
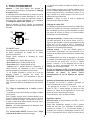 9
9
-
 10
10
-
 11
11
-
 12
12
-
 13
13
-
 14
14
-
 15
15
-
 16
16
-
 17
17
-
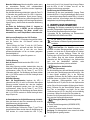 18
18
-
 19
19
-
 20
20
-
 21
21
-
 22
22
-
 23
23
-
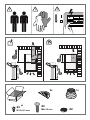 24
24
-
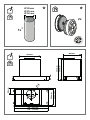 25
25
-
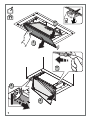 26
26
-
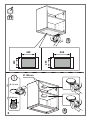 27
27
-
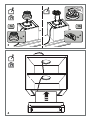 28
28
-
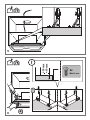 29
29
-
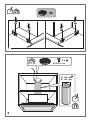 30
30
-
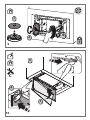 31
31
-
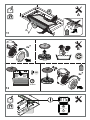 32
32
-
 33
33


Haier HAPY6CBS6BVOCLC Benutzerhandbuch
- Kategorie
- Dunstabzugshauben
- Typ
- Benutzerhandbuch
- Dieses Handbuch ist auch geeignet für
in anderen Sprachen
- English: Haier HAPY6CBS6BVOCLC User manual
- français: Haier HAPY6CBS6BVOCLC Manuel utilisateur
- italiano: Haier HAPY6CBS6BVOCLC Manuale utente
- polski: Haier HAPY6CBS6BVOCLC Instrukcja obsługi
Verwandte Papiere
Sonstige Unterlagen
-
ELICA SKYDOME-PLUS-30 Ceiling Extractor Benutzerhandbuch
-
Electrolux DMGL8360SW Benutzerhandbuch
-
HOTPOINT/ARISTON HLQVC 8 AT K/HA Benutzerhandbuch
-
-
-
-
-
HOTPOINT/ARISTON HBB 6 AB X/HA Benutzerhandbuch
-
Gorenje DVG643B Bedienungsanleitung