Juno JGI1423 Benutzerhandbuch
- Kategorie
- Gefrierschränke
- Typ
- Benutzerhandbuch

JGI 1423
GEBRAUCHSANWEISUNG
OPERATING INSTRUCTIONS
2222 145-34

2
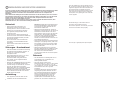
WARNUNGEN UND WICHTIGE HINWEISE
Es ist sehr wichtig, da§ diese Bedienungsanleitung mit dem betreffenden GerŠt aufbewahrt wird. Sollte
dieses GerŠt verkauft bzw. einer anderen Person gegeben werden, so ist es nštig, die Anleitung
beizufŸgen, damit der neue Besitzer Ÿber den Betrieb des GerŠtes bzw. die entsprechenden
Warnungen.
Sollte dieses GerŠt mit Magnet-TŸrverschlu§ als Ersatz fŸr ein altes GerŠt dienen, das noch mit einem
Schnappschlo§ ausgerŸstet ist, so machen Sie bitte dieses Schlo§ unbrauchbar, bevor Sie das GerŠt
beiseite stellen oder zum MŸll geben. Sie verhindern damit, da§ spielende Kinder sich selbst
einsperren und damit in Lebensgefahr kommen.
Diese Warnungen wurden zu Ihrem bzw. dem Schutz anderer erarbeitet. Wir bitten Sie daher, diese
aufmerksam zu lesen, bevor das GerŠt in Betrieb genommen wird.
Sicherheit
¥ Dieses GerŠt wurde hergestellt, um von
Erwachsenen benutzt zu werden. Es ist
unbedingt darauf zu achten, da§ Kinder es nicht
anfassen oder es als Spielzeug verwenden.
¥ Es ist gefŠhrlich, die Eigenschaften dieses
GerŠtes zu Šndern.
¥ Vor der inneren bzw. Šu§eren Reinigung des
GerŠtes sowie beim Auswechseln der GlŸhlampe
(bei damit ausgestatteten GerŠten) das GerŠt
spannungslos machen.
¥ Eis aus dem Gefrier- bzw. Frosterfach nicht
sofort essen, es kšnnte KŠlte-Brandwunden
verursachen.
¥ Dieses GerŠt ist schwer. Beim Versetzen bitte
darauf achten!
Stšrungen - Kundendienst
¥ Sollte die Installation des GerŠtes eine €nderung
der elektrischen Hausinstallation verlangen, so
darf diese nur von Elektro-FachkrŠften
durchgefŸhrt werden.
¥ Eventuelle Reparaturen dŸrfen nur von einem
ELPRO-Kundendienst oder sonstigen
autorisierten Stellen durchgefŸhrt werden.
¥ Es ist wichtig, da§ nur Original-Ersatzteile
verwendet werden.
¥ Benutzen Sie nie MetallgegenstŠnde um das GerŠt
zu reinigen, da es beschŠdigt werden kšnnte.
¥ Tritt eine Stšrung oder ein Defekt ein, versuchen
Sie nicht, das GerŠt selbst zu reparieren.
ElektrogerŠte dŸrfen nur von Elektro-FachkrŠften
repariert werden, da durch unsachgemŠ§e
Reparaturen erhebliche FolgeschŠden entstehen
kšnnen. Wenden Sie sich bitte an die nŠchste
ELPRO-Kundendienststelle.
Aufstellung
¥ Sich vergewissern, da§ das GerŠt nach der
Installation nicht auf dem Netzkabel steht.
Wichtig:BeschŠdigte Versorgungskabel mŸssen
durch ein Spezialkabel bzw. einen Spezialsatz
ersetzt werden, die beim Hersteller oder den
Kundendienst erhŠltlich sind.
¥ WŠhrend das GerŠt in Betrieb ist, werden der
VerflŸssiger und der Kompressor, die sich auf der
RŸckseite des GerŠtes befinden, hei§. Es ist
darauf zuachten, dass die Luft um das GerŠt frei
zirkulieren kann, damit die WŠrme abgefŸhrt
werden kann. Eine ungenŸgende Luftzirkulation
kann einen unregelmŠssigen Betrieb bzw.
SchŠden am GerŠt verursachen. Achten Sie auf
die Installationsanweisungen.
¥ Teile, die hei§ werden (z.B. KompressorgehŠuse,
VerflŸssiger und zugehšrige Rohre), sollen nicht
frei zugŠnglich sein. Wo es auch immer mšglich
ist, soll das GerŠt mit der RŸckseite gegen eine
Wand gestellt werden.
¥ WŠhrend des Transports kann es vorkommen,
da§ das im Motorkompressor enthaltene …l in den
KŠltekreislauf ablŠuft. Man sollte mindestens 2
Std. warten, bevor das GerŠt in Betrieb
genommen wird, damit das …l in den Kompressor
zurŸckstršmen
Gebrauch
¥ Die HaushaltskŸhl- und GefriergerŠte sind nur
zur Einlagerung bzw. zum Einfrieren von
Nahrungsmitteln bestimmt.
¥ Die beste Leistung erzielt man bei
Raumtemperaturen von +18¡C bis +43¡C (Klasse
T); +18¡C bis +38¡C (Klasse ST); +16¡C bis
+32¡C (Klasse N); +10¡C bis +32¡C (Klasse SN);
die GerŠteklasse ist auf dem Typschild
angegeben.
Zu beachten: Wird dieses GerŠtes bei anderen
Umgebungstemperaturen betrieben als den in
der entsprechenden Klimaklasse angegebenen
Werten, sind folgende Hinweise zu beachten:
sinkt die Umgebungstemperatur unter den
angegebenen Mindestwert ab, kšnnte die
Lagertemperatur im Gefrierabteil nicht mehr
garantiert sein; es wird daher empfohlen, die
19
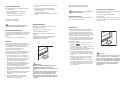
Open the appliance door and the furniture door at
90¡. Insert the small square (B) into guide (A). Put
together the appliance door and the furniture door
and mark the holes as indicated in the figure.
Remove the squares and drill holes with ¿ 2 mm at
8 mm from the outer edge of the door. Place the
small square on the guide again and fix it with the
screws supplied.
8mm
PR167
A
B
PR168
PR167/1
D
B
Should the lining up of the furniture door be
necessary, use the clearance of slots.
At the end of operations, it is necessary to check if
the door of the furniture closes properly.
Fix cover (D) on guide (B) until it clips into place.

3
eingelagerten Lebensmittel so rasch als mšglich
zu verbrauchen.
¥ Einaufgetautes Produkt darf nicht wieder
eingefroren werden.
¥ FŸr das Aufbewahren bzw. das Einfrieren der
Lebensmittel sind die Anweisungen des
Herstellers zu befolgen.
¥ In allen KŸhl- und GefriergerŠten bedecken sich
im Laufe der Zeit alle kŠltefŸhrenden Teile mit
einer Reif bzw. Eissicht. Diese Schicht wird je
nach Modell automatisch oder mit der Hand
abgetaut.
¥ Die Reifsicht niemals mit MetallgegenstŠnden
abkratzen, das GerŠt kšnnte beschŠdigt werden.
Dazu nur den mitgelieferten Plastikschaber
verwenden.
¥ Zum Lšsen der festgefrorenen Eisschalen keine
scharfkantigen oder spitzn GegenstŠnde
benutzen.
¥ Es sollten keine kohlensŠurehaltigen GetrŠnke in
das Gefrier- bzw. Frosterfach eingestellt werden,
sie kšnnten platzen.
Umweltnormen
Dieses GerŠt enthŠlt im KŸhlkreislauf und in der
Isolierung kein ozonschŠdigendes Gas. Das
GerŠt darf nicht mit dem HausmŸll entsorgt
werden. Eine BeschŠdigung des
KŠltemittelkreislaufs, insbesondere des
WŠrmetauschers auf der RŸckseite des GerŠtes,
mu§ verhindert werden. Auskunft Ÿber
Abholtermine oder SammelplŠtze gibt die
šrtliche Gemeindeverwaltung an. Die in diesem
GerŠt verwendeten und mit dem Symbol
gekennzeichneten Materialien,sind
recyclingfŠhig.
HINWEISE ZUR VERPACKUNGSENTSORGUNG
Verpackungen und Packhilfsmittel unserer Elektro-
Gro§gerŠte sind mit Ausnahme von Holzwerkstoffen
recyclingfŠhig und sollen grundsŠtzlich der
Wiederverwertung zugefŸhrt werden.
Wir empfehlen Ihnen:
¥ Papier-, Pappe- und Wellpappeverpackungen
sollten in die entsprechenden SammelbehŠlter
gegeben werden.
¥ Kunststoffverpackungsteile sollten ebenfalls in
die dafŸr vorgesehenen SammelbehŠlter
gegeben werden. Solange solche in Ihrem
Wohngebiet noch nicht vorhanden sind, kšnnen
Sie diese Materialien zum HausmŸll geben.
Als Packhilfsmittel sind bei uns nur recyclingfŠhige
Kunststoffe zugelassen, z.B.:
In den Beispielen steht
PE fŸr PolyŠthylen** 02 = ^ PE-HD; 04 = ^ PE-LD
PP fŸr Polypropylen
PS fŸr Polystyrol
BESTANDTEILE AUS PLASTIK
Zur einfacheren Entsorgung und/oder Recycling ist
ein Gro§teil der Materialien dieses GerŠtes
gekennzeichnet, um ihre Identifizierung zu
ermšglichen.
02**
PE
05
PP
06
PS
18
D726
B
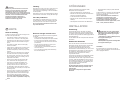
Apply covers (B) on joint cover lugs and into hinge
holes.
Place guide (A) on the inside part of the furniture
door, up and down as shown in the figure and mark
the position of external holes. After having drilled
holes, fix the guide with the screws supplied.
20mm
A
50mm
PR166
Separate parts A, B, C, D as shown in the figure
PR266
A
B
C
D
PR33
C
A
Fix cover (C) on guide (A) until it clips into place.

Reinigung der Innenteile
Bevor Sie das GerŠt in Betrieb nehmen, beseitigen
Sie den typischen ÇNeugeruchÈ am besten durch
Auswaschen der Innenteile mit lauwarmem Wasser
und einem neutralen Reinigungsmittel SorgfŠltig
nachtrocknen.
Inbetriebnahme
Den Stecker in die Steckdose einsetzen. Das
Aufleuchten der Kontrollampe (D) zeigt an, da§ das
GerŠt unter Spannung steht.Thermostatknopf (A)
von der Stellung ÇOÈ (STOP) aus im Uhrzeigersinn
drehen.
Das GerŠt ist eingeschaltet. Den Stillstand des
Gefrierabteils erhŠlt man durch Drehen des
Thermostatknopfes auf das Symbol ÇOÈ.
Temperaturregelung
Die Temperatur wird automatisch geregelt und kann
erhšht werden (wŠrmer) durch Drehen des Thermo-
statknopfes auf niedrigere Einstellungen oder
verringert (kŠlter) durch das Drehen auf hšhere
Zahlen. Die richtige Einstellung erhŠlt man, unter
BerŸcksichtigung folgender, die Innentemperatur
beeinflussender Faktoren:
¥ Raumtemperatur,
¥ HŠufigkeit des TŸršffnens,
¥ Menge der eingelagerten Lebensmittel,
¥ Aufstellung des GerŠtes.
Die mittlere Einstellung ist meistens die
geeignetste.
GEBRAUCH
Bitte keine Reinigungs- bzw. Scheuermittel
verwenden, die das GerŠt beschŠdigen
kšnnten.
Bedienungsblende
S
3
4
2
ABCDE
A. Temperaturregler
B. Schnellgefrierschalter
C. Schnellgefrieranzeige
D. Netz-Leuchtanzeige
E. Alarm-Leuchtanzeige
Schnellgefriervorgang
Zur DurchfŸhrung des Schnellgefriervorganges den
Schalter (B) nach links verschieben. Die
Kontrollampe (C) leuchtet auf.
4
INHALT
Warnungen und wichtige Hinweise . . . . . . . . . . . . . . . . . . . . . . . . . . . . . . . . . . . . . . . . . . . . . . . . . . . . . . 2
Hinweise zur Verpackungsentsorgung . . . . . . . . . . . . . . . . . . . . . . . . . . . . . . . . . . . . . . . . . . . . . . . . . . . 3
Gebrauch - Reinigung der Innenteile - Bedienungsblende - Inbetriebnahme - Temperaturregelung - Schnell-
gefriervorgang . . . . . . . . . . . . . . . . . . . . . . . . . . . . . . . . . . . . . . . . . . . . . . . . . . . . . . . . . . . . . . . . . . . . . . . . . . . 4
Gebrauch - Alarmlampe - Einfrieren von frischen Lebensmitteln - Aufbewahrung der TiefkŸhlkost . . . . . . . . .
EiswŸrfelbereitung - Auftauen - Tips - Tips fŸr das Einfrieren - Tips fŸr TiefkŸhlkost . . . . . . . . . . . . . . . . . . 5
Tips - Tips fŸr TiefkŸhlkost - Wartung - RegelmŠ§ige Reinigung - Stillstandzeiten - Abtauen . . . . . . . . . . . 6
Stšrungen - Installation - Aufstellung - Elektrischer Anschlu§ . . . . . . . . . . . . . . . . . . . . . . . . . . . . . . . . . . 7
Installation - TŸranschlagwechsel - Montageanleitungen fŸr den integrierten Einbau. . . . . . . . . . . . . . . . . 8
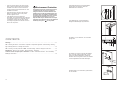
17
Open the door and push the appliance against the
side of the kitchen unit opposite to that of appliance
hinges.
Fasten the appliance with 4 screws provided in the
kit included with the appliance. Snap vent grille (C)
and hinge cover (D) into position.
D724
Slide the appliance into the recess, pushing it
against the wall on the handle side.
Apply the sealing strip pushing it between the
refrigerator and the adjacent cabinet.
It is necessary that the niche is provided with a
conduct of ventilation having the following
dimensions:
Depth 50 mm
Width 540 mm
D727
C
D
A
D022
PR01
540
50
B
T
H

5
Alarmlampe (E)
Die Alarmlampe leuchtet auf, wenn die Temperatur
im GerŠteinneren steigt, und dadurch die richtige
Lagertemperatur nicht mehr gewŠhrleistet wird. Sie
leuchtet jedoch auch dann auf, wenn das GerŠt
gerade eingeschaltet worden ist und bleibt solange
eingeschaltet, bis die richtige Lagertemperatur
erreicht ist.
Einfrieren von frischen
Lebensmitteln
Das 4 Sterne-Gefrierfach eignet sich zur
langfristigen Einlagerung von TiefkŸhlkost sowie
zum Einfrieren frischer Kost.
FŸr das Einfrieren von Lebensmitteln ist der
Schnellgefriervorgang durchzufŸhren, mindestens
24 Stunden vor Einlagerung einschalten.
Die einzufriereden Lebensmittel in das oberste Fach
einlegen.
Aufbewahrung der TiefkŸhlkost
Nach einem lŠngeren Stillstand oder bei der ersten
Inbetriebnahme des GerŠtes mu§ vor der
Einlagerung der TiefkŸhlkost das Gefrierabteil fŸr
mindestens Drei Stunden auf den
Schnellgefriervorgang gestellt werden. Nach ca. 2
Std. kann dieser auf eine mittlere Stellung
zurŸckgedreht werden.
Auftauen
Die eingefrorenen oder tiefgekŸhlten Lebensmittel
sollten vor dem Gebrauch aufgetaut werden, indem
man sie am besten im KŸhlabteil oder je nach der
zur VerfŸgung stehenden Zeit bei Raumtemperatur
auftaut. Kleine StŸcke kšnnen eingefroren gekocht
werden. SelbstverstŠndlich verlŠngert sich dabei die
Kochzeit.
EiswŸrfelbereitung
Das GerŠt hat eine oder mehrere EiswŸrfelschalen,
welche mit Wasser aufgefŸllt in das Gefrierfach
gestellt werden.
Bitte zur Entnahme der EiswŸrfelschalen keine
MetallgegenstŠnde benutzen!
Wichtig
Im Falle einer Stromunterbrechung wŠhrend der
Lagerung von TiefkŸhlkost bzw. von
eingefrorenen Lebensmitteln soll die TŸr des
Gefrierfaches nicht gešffnet werden. Die
TiefkŸhlkost verdirbt nicht, wenn es sich um
eine kurze Unterbrechung handelt (bis 6-8 Std.)
und das GerŠt voll ist. Wenn das nicht der Fall
ist, ist es nštig, die tiefgefrorenen Lebensmittel
innerhalb kurzer Zeit zu verbrauchen (eine
Temperaturerhšhung der TiefkŸhlkost verkŸrzt
die Aufbewahrungsdauer).
Tips fŸr das Einfrieren
FŸr ein einwandfreies Einfrieren der Lebensmittel
geben wir folgende RatschlŠge:
¥ Das Gefriervermšgen des Gefrierabteils (in 24
Std.) kann auf dem Typenschild abgelesen
werden.
¥ Der Gefriervorgang dauert ca. 24 Stunden. In
dieser Zeit sollte keine zusŠtzliche Ware in das
Gefrierabteil eingelegt werden.
¥ Nur erstklassige, frische und gut gesŠuberte
Produkte einfrieren.
¥ Die Nahrungsmittel vor dem Einfrieren in kleine
Portionen einteilen, damit der Gefriervorgang
beschleunigt wird; dies ermšglicht das spŠtere
Auftauen von kleineren Portionen.
¥ Die Lebensmittel in Alu- oder PolyŠthylenfolien
luftdicht verpacken.
¥ Es soll vermieden werden, da§ die
einzufrierenden Lebensmittel mit den bereits
eingefrorenen in BerŸhrung kommen, um eine
TIPS
WŠrmeŸbertragung an diese zu verhindern.
¥ Es ist zu beachten, da§ mageres Fleisch besser
und lŠnger haltbar ist. Fetthaltiges Fleisch hat
eine geringere Lagerzeit. Ferner reduziert Salz
die Haltbarkeitsdauer.
¥ Speiseeis, direkt aus dem Gefrierfach
genommen, kann KŠlte-Brandwunden
verursachen.
¥ Es ist empfehlenswert, auf der Verpackung das
Einfrierdatum zu notieren, damit die
Aufbewahrungszeit eingehalten werden kann.
¥ Auf der InnentŸr oder in einer Tabelle (falls diese
mitgeliefert wurde) sind einige Tier- und
Lebensmittelsymbole mit der in Monaten
(Zahlen) angegebenen Aufbewahrungsdauer
angebracht, die Ihnendie Haltbarkeit vom
Moment des Einfrierens an anzeigt.
¥ Es sollten keine kohlensŠurehaltigen
GetrŠnke in das Gefrierfach eingestellt
werden, da sie explodieren kšnnen.
16
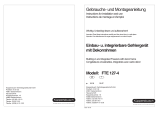
Instructions for totally built-in appliances
50 mm
min.
cm
2
200
200 cm
2
min.
D567
Building-in instructions
Dimensions of housing
Height 880 mm
Depth 550 mm
Width 560 mm
For safety reasons, minimum ventilation must be as
shown in Fig.
Attention: keep ventilation openings clear of
obstruction.
ATTENTION!
It must be possible to disconnect the appliance from
the mains power supply; the plug must therefore be
easily accessible after installation.
Electrical connection
Before plugging in, ensure that the voltage and
frequency shown on the serial number plate
correspond to your domestic power supply. Voltage
can vary by ±6% of the rated voltage.
For operation with different voltages, a suitably sized
auto-transformer must be used.
The appliance must be earthed.
The power supply cable plug is provided with a
contact for this purpose.
If the domestic power supply socket is not earthed,
connect the appliance to a separate earth in
compliance with current regulations, consulting a
specialist technician.
The Manufacturer declines all responsibility if
the above safety precautions are not observed.
INSTALLATION
Location
The appliance should be installed well away from
sources of heat such as radiators, boilers, direct
sunlight etc.
This appliance complies with the following
E.E.C. Directives:
- 87/308 EEC of 2/6/87 relative to radio interference
suppression.
- 73/23 EEC of 19.2.73 (Low Voltage Directive) and
subsequent modifications;
- 89/336 EEC of 3.5.89 (Electromagnetic
Compatibility Directive) and subsequent
modifications.
CUSTOMER SERVICE AND SPARE PARTS
If the appliance is not functioning properly, check
that:
¥ the plug is firmly in the wall socket and the mains
power switch is on;
¥ there is an electricity supply (find out by plugging
in another appliance);
¥ the thermostat knob is in the correct position.
¥ If there are water drops on the bottom of the
cabinet, check that the defrost water drain
opening is not obstructed (see ÒDefrostingÓ
section).
¥ If your appliance is still not working properly after
making the above checks, contact the nearest
service centre.
To obtain fast service, it is essential that when you
apply for it you specify the model and serial number
of your appliance which can be found on the
guarantee certificate or on the rating plate located
inside the appliance, on the bottom left-hand side.
Door reversibility
The applianceÕs door have been locked in position
for transport by means of pins on both sides.
According to the door opening direction, remove
relevant pins at the top and at the bottom.

6
Tips fŸr TiefkŸhlkost
Um optimale Leistungen des GerŠtes zu erhalten,
sich vergewissern,
¥ da§ die TiefkŸhlkost beim VerkŠufer gut
aufbewahrt wurde
¥ da§ der Transport vom VerkŠufer zum
Verbraucher in kurzer Zeit erfolgt.
WARTUNG
Vor jeder Reinigungsarbeit immer den
Netzstecker aus der Steckdose ziehen.
RegelmŠ§ige Reinigung
Benutzen Sie nie MetallgegenstŠnde um das GerŠt
zu reinigen, da es beschŠdigt werden kšnnte. Den
Innenraum mit lauwarmem Wasser und Natron
reinigen.
Gut nachwaschen und sorgfŠltig trocknen.
Stillstandszeiten
Bei lŠngerem Stillstand des GerŠtes, mŸssen Sie
folgenderma§en vorgehen:
den Stecker aus der Steckdose ziehen;
alle Lebensmittel herausnehmen;
GerŠt abtauen, Innenraum und Zubehšrteile
reinigen;
die TŸren offen lassen, um im Innern eine gute
Luftzirkulation zu gewŠhrleisten und somit
Geruchsbildung zu vermeiden.
Abtauen
Die sich im Gefrierfach bildende Reifschicht soll,
sobald diese eine StŠrke von 4 mm erreicht hat, mit
dem mitgelieferten Plastikschaber abgekratzt
werden. WŠhrend dieses Vorganges ist es nicht
nštig, das GerŠt auszuschalten und die
Nahrungsmittel herauszunehmen.
Wenn sich jedoch eine dicke Eisschicht bildet, mu§
man vollkommen abtauen. Um ein vollstŠndiges
Abtauen durchzufŸhren, geht man wie folgt vor:
1. Den Thermostatknopf auf ÇOÈ einstellen oder
den Stecker aus der Steckdose herausziehen.
2. Die eventuell im Frosterfach liegenden Lebens-
mittel herausnehmen, sie in Zeitungspapier
einwickeln und sehr kŸhl aufbewahren.
3. Die TŸr offen lassen und das Ablaufrohr als
VerlŠngerung am vorgesehenen Platz einsetzen,
soda§ das Abtauwasser in ein geeignetes,
darunter gestelltes GefŠ§ flie§en kann.
4. Nach beendetem Abtauproze§ das Gefrierteil gut
nachtrocknen. Ablaufrohr fŸr spŠteren Gebrauch
aufbewahren.
5. Den Thermostatknopf wieder in die gewŸnschte
Stellung drehen bzw. den Stecker wieder
einstecken.
6. Nachdem das GerŠt fŸr 2-3 Std. in Betrieb
genommen wurde, kšnnen tiefgefrorene
Lebensmittel darin zurŸckgelegt
D368
Achtung:
Benutzen Sie niemals MetallgegenstŠnde, um
die Reifschicht abzukratzen, damit eine
BeschŠdigungen des GerŠtes vermieden werden
kann.
Benutzen Sie kein mechanisches oder anderes
Mittel fŸr einen schnelleren Abtauproze§ mit
Ausnahme der vom Hersteller empfohlenen.
Ein Temperaturanstieg der TiefkŸhlkost wŠhrend
des Abtauens kšnnte die Aufbewahrungsdauer
verkŸrzen.
¥ TŸr so wenig wie mšglich šffnen und nicht offen
lassen.
¥ Einmal aufgetaute Lebensmittel verderben
schnell und kšnnen kein ein zweites Mal
eingefroren werden.
¥ Das Haltbarkeitsdatum auf der
TiefkŸhlkostverpackung sollte nicht Ÿberschritten
werden.
15
MAINTENANCE
Periods of non-operation
When the appliance is not in use for long periods,
take the following precautions:
remove the plug from the wall socket;
remove all food;
defrost and clean the interior and all accessories;
leave the door ajar to allow air to circulate to prevent
unpleasant smells.
Periodic cleaning
Clean the inside with warm water and bicarbonate of
soda. Rinse and dry thoroughly.
Defrosting
The freezer compartment, however, will become
progressively covered with frost. This should be
removed with the special plastic scraper provided,
whenever the thickness of the frost exceeds 4 mm.
During this operation it is not necessary to switch off
the power supply or to remove the foodstuffs.
However, when the ice becomes very thick on the
inner liner, complete defrosting should be carried out
and it is advisable to carry out this operation when
the appliance is empty.
To carry out complete defrosting of the freezer
compartment proceed as follows:
1. pull out the plug from the wall socket or turn the
thermostat knob to the ÇOÈ setting;
2. remove any stored food, wrap it in several layers
of newspaper and put it in a cool place;
3. leave the door open, insert the flexible drain tube
in the appropriate seating at the bottom centre,
placing a basin underneath to collect the defrost
water;
4. when defrosting is completed, dry the interior
thoroughly and refit the plug; keep the flexible
drain tube for future use;
5. turn the thermostat knob back to the required
setting or replace the plug in the power socket.
After letting the appliance run for at least half an
hour, replace the previously removed food into
the compartment.
Unplug the appliance before carrying out
any maintenance operation.
Important:
Never use sharp metal tools to scrape off frost
from the evaporator as you could damage it.
Do not use a maechanical device or any artificial
means to speed up the thawing process other
than those recommended by the manufacturer.
A temperature rise of the frozen food packs,
during defrosting, may shorten their safe
storage life. s
D368

7
ST…RUNGEN
Falls das GerŠt Stšrungen aufweisen sollte,
ŸberprŸfen Sie zuerst folgendes:
¥ Steckt der Netzstecker in der Steckdose?
¥ Befindet sich der Hauptschalter der elektrischen
Anlage in der richtigen Stellung?
¥ Ist die Stromzufuhr unterbrochen?
¥ Befindet sich der Thermostatknopf in richtiger
Stellung?
¥ WasserpfŸtze auf dem Boden des KŸhlfaches:
¥ Abtauwasserloch verstopft? (siehe Abschnitt
ÒAbtauenÓ)
Sollten Sie nach o.e. PrŸfungen zu keinem Resultat
kommen, so wenden Sie sich bitte an unseren
nŠchsten Kundendienst.
Um ein rasches Beheben des Schadens zu
ermšglichen, ist es beim Anruf an den
Kundendienst notwendig, die Modell- und
Seriennummer anzugeben, die Sie dem
Garantieschein oder dem Typenschild (Ð linke
Seite Ð unten) entnehmen kšnnen.
INSTALLATION
Aufstellung
Das GerŠt sollte nicht in der NŠhe von WŠrme-
quellen wie Heizkšrpern oder …fen aufgestellt und
vor direkter Sonneneinstrahlung geschŸtzt werden.
Die beste Leistung erzielt man erfahrungsgemŠ§ bei
Raumtemperaturen
FŸr den Einbau bitte den entsprechenden Abschnitt
durchlesen.
Elektrischer Anschlu§
Bevor Sie den Stecker in die Steckdose einstecken,
ŸberprŸfen Sie bitte, da§ die auf dem Typenschild
des GerŠtes angegebene Spannung sowie
Frequenz mit dem Anschlu§wert des Hauses
Ÿbereinstimmen. Eine Abweichung von ±6% von der
Nominalspannung ist zulŠssig. FŸr die Anpassung
des GerŠtes an andere Spannungen mu§ ein
Spartransformator angemessener Leistung
vorgeschaltet werden.
Das GerŠt mu§ unbedingt vorschriftsmŠ§ig geerdet
werden. Zu diesem Zweck ist der Stecker des
Speisekabels mit dem dafŸr vorgesehenen Kontakt
versehen. Sollte die Netzleitung im Haus nicht mit
einer Erdleitung versehen sein, so mu§ das GerŠt
an eine getrennte Erdleitung vorschriftsmŠ§ig und
unter Hinzuziehung eines Fachmanns
angeschlossen werden.
Die Erzeugerfirma lehnt jede Verantwortung ab,
falls diese UnfallverhŸtungsvorschrift nicht
beachtet wird.
Dieses GerŠt entspricht der folgende EWG
Richtlinie:
- 87/308 EWG vom 2.6.87 (Deutschland-
AusfŸhrung) bzw. der …VE-Richtlinie Nr. F
61/84 (…sterreich-AusfŸhrung) bezŸglich
Funkentstšrung.
- 73/23 EWG vom 19/02/73 (Niederspannung)
und folgende €nderungen;
- 89/336 EWG vom
03/05/89(Elektromagnetische VertrŠglichkeit)
und folgende €nderungen.
ACHTUNG!
Es mu§ mšglich sein, das GerŠt vom Netz zu
trennen; nach der Installation mu§ die Steckdose
daher zugŠnglich bleiben.
14
Hints for storage of frozen food
To obtain the best performance from this appliance,
you should:
¥ make sure that the commercially frozen
foodstuffs were adequately stored by the retailer;
¥ be sure that frozen foodstuffs are transferred
from the foodstore to the freezer in the shortest
possible time;
¥ not open the door frequently or leave it open
longer than absolutely necessary.
¥ Once defrosted, food deteriorates rapidly and
cannot be refrozen.
¥ Do not exceed the storage period indicated by
the food manufacturer.
Hints for freezing
To help you make the most of the freezing process,
here are some important hints:
¥ the maximum quantity of food which can be
frozen in 24 hrs. is shown on the rating plate;
¥ the freezing process takes 24 hours. No further
food to be frozen should be added during this
period;
¥ only freeze top quality, fresh and thoroughly
cleaned, foodstuffs;
¥ prepare food in small portions to enable it to be
rapidly and completely frozen and to make it
possible subsequently to thaw only the quantity
required;
¥ wrap up the food in aluminium foil or polythene
and make sure that the packages are airtight;
¥ do not allow fresh, unfrozen food to touch food
which is already frozen, thus avoiding a rise in
temperature of the latter;
¥ lean foods store better and longer than fatty
ones; salt reduces the storage life of food;
¥ water ices, if consumed immediately after
removal from the freezer compartment, can
possibly cause the skin to be freeze burnt;
¥ it is advisable to show the freezing-in date on
each individual pack to enable you to keep tab of
the storage time;
¥ on the inner door or special card (if supplied) you
will find sketches of various animals and food
types together with the recommended storage
time (in months) from the time of freezing;
¥ do not put carbonated liquids (fizzy drinks,
etc.) in the freezer compartment as they may
burst.
HINTS
Thawing
Deep-frozen or frozen food, prior to being used, can
be thawed in the refrigerator compartment or at
room temperature, depending on the time available
for this operation.
Small pieces may even be cooked still frozen, directly
from the freezer: in this case, cooking will take longer.
Ice-cube production
This appliance is equipped with one or more trays
for the production of ice-cubes. Fill these trays with
water, then put them in the freezer compartment.
Do not use metallic instruments to remove the
trays from the freezer.
Important
If there is a power failure when food is in the
freezer, do not open the door of the freezer
compartment. The frozen food will not be
affected if the power cut is of short duration (up
to 6-8 hours) and the freezer compartment is full,
otherwise, it is recommended that the food
should be used within a short time (a
temperature increase of the frozen food
shortens its safe storage period).

8
Montageanleitung fŸr den
integrierten Einbau
Nischenma§e
Hšhe 880 mm
Tiefe 550 mm
Breite 560 mm
Aus GrŸnden der Sicherheit mu§ eine
MindestbelŸftung gesichert sein, wie aus der
Abb.hervorgeht.
Achtung: Die Ventilations - …ffnungen mŸssen
immer saubergehalten werden.
Ferner ist auch am hinteren Einbauschrankteil ein
LŸftungskamin mit filgenden Massen notwendig:
Tiefe 50 mm
Breite 540 mm
50 mm
min.
cm
2
200
200 cm
2
min.
D567
TŸranschlagwechsel
Zur Transportsicherung wurde die GerŠtetŸr an
beiden Anschlagseiten mit Scharnierstiften befestigt.
Je nach TŸranschlag, Scharnierstift auf einer Seite
oben und unten entfernen.
GerŠt in die Nische einschieben bis die
Anschlagleiste (A) unten am Mšbel anliegt.
TŸr šffnen und GerŠt gegenŸber der Bandseite an
die Mšbelseitenwand anrŸcken. GerŠt mit den 4 bei-
liegenden Schrauben befestigen.
BelŸttungsgitter (C) und Scharnierabdeckung (D)
aufstecken.
A
D022
D727
C
D
PR01
540
50
B
T
H
13
Cleaning the interior
Before using the appliance for the first time, wash
the interior and all internal accessories with luke-
warm water and some neutral soap so as to remove
the typical smell of a brand-new product, then dry
thoroughly.
Operation
Insert the plug into the wall socket. The pilot light (D)
will light up, indicating that the appliance is powered.
Turn the thermostat knob (A), clockwise, beyond the
ÇOÈ (STOP) position. The freezer will start to
operate.
To stop operation, simply turn the thermostat knob to
position ÇOÈ.
Temperature regulation
The temperature is automatically regulated and can
be increased to achieve a higher temperature
(warmer) by rotating the thermostat knob toward
lower settings or reduced (colder) rotating the knob
towards higher settings.
However, the exact setting should be chosen
keeping in mind that the temperature inside the
refrigerator depends on:
¥ room temperature;
¥ how often the door is opened;
¥ the quantity of food stored;
¥ location of appliance.
A medium setting is generally the most suitable.
USE
Do not use detergents or abrasive
powders, as these will damage the finish.
Contol Panel
A. Thermostat knob
B. Normal/Super switch
C. Super control light
D. Pilot light
E. Warning light
Quick-freezing
For quick-freezing, slide the knob (B) towards the
left. The quick-freezing light (C) will then light up.
Warning light (E)
The temperature alarm light turns on automatically
whenever the temperature within the freezer rises
above a certain value which might endanger
satisfactory long-term conservation.
It is perfectly normal for the temperature alarm light
to remain lit up for a short time after the freezer is
initially turned on. It will remain lit up until the
optimum temperature for the conservation of frozen
food is attained.
S
3
4
2
ABCDE
Freezing fresh food
The 4-star compartment is suitable for long term
storage of commercially frozen food and for freezing
fresh food.
To freeze fresh foods allow it to run on the fast
freeze setting for at least 24 hours before loading
food.
Place the food to be frozen in upper the
compartment.
Storage of frozen food
When first starting-up or after a period out of use,
before putting the products in the compartment let
the appliance run for at least two hours on the fast
freeze setting, then turn the thermostat knob to the
normal operating position.

9
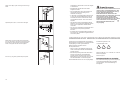
In die Befestigungs- und Scharnierlšcher
beiliegende Abdeckkappen (B) eindrŸcken.
Fugenabdeckprofil oben um die Winkeldicke
ausschneiden und zwischen GerŠt und
Mšbelseitenwand eindrŸcken.
D726
B
D724
Die Schiene (A) auf der Innenseite der MšbeltŸr
oben und unten auflegen (siehe Abb.) und die
Position der Šu§eren Bohrlšcher anzeichnen.
Nachdem die Lšcher gebohrt wurden, die Schiene
mit den mitgelieferten Schrauben befestigen.
20mm
A
50mm
PR166
PR33
C
A
PR266
A
B
C
D
Die Teile A, B, C, D abnehmen, wie in der Abb.
gezeigt wird.
Die Abdeckung (C) in die Schiene (A) eindrŸcken,
bis sie einrastet.
12
CONTENTS
Warnings . . . . . . . . . . . . . . . . . . . . . . . . . . . . . . . . . . . . . . . . . . . . . . . . . . . . . . . . . . . . . . . . . . . . . . . . . . .11
Use - Cleaning the interior - Control Panel - Operation - Temperature regulation - Quick-freezing - Warning .
light - Freezing fresh food - Storage of frozen food . . . . . . . . . . . . . . . . . . . . . . . . . . . . . . . . . . . . . . . . . . . . . .13
Use - Thawing - Ice-cube production - Hints - Hints for freezing - Hints for storage of frozen food . . . . . . . .14
Maintenance - Periods of no operation - Periodic cleaning - Defrosting . . . . . . . . . . . . . . . . . . . . . . . . . . .15
Customer service and spare parts - Installation - Location - Electrical connection - Door reversibility . .
Building-in instructions . . . . . . . . . . . . . . . . . . . . . . . . . . . . . . . . . . . . . . . . . . . . . . . . . . . . . . . . . . . . . . . . . .16
¥ There are working parts in this product which
heat up. Always ensure that there is adequate
ventilation as a failure to do this will result in
component failure and possible food loss. See
installation instructions.
¥ Parts which heat up should not be exposed.
Wherever possible the back of the product
should be against a wall.
¥ If the appliance has been transported
horizontally, it is possible that the oil contained in
the compressor ’lows in the refrigerant circuit. It
is advisable to wait at least two hours before
connecting the appliance to allow tlõe oil to flow
back in the compressor.
Environment Protection
This appliance does not contain gasses which
could damage the ozone layer, in either its
refrigerant circuit or insulation materials. The
appliance shall not be discarded together with
the urban refuse and rubbish. Avoid damaging
the cooling unit, especially at the rear near the
heat exchanger. Information on your local
disposal sites may be obtained from municipal
authorities. The materials used on this appliance
marked by the symbol are recyclable.

10
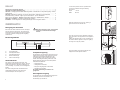
GerŠtetŸr und MšbeltŸr auf ca. 90¡ šffnen. Den
Winkel (B) in der Schiene (A) einsetzen. GerŠtetŸr
und MšbeltŸr zusammenhalten und die Bohrlšcher
anzeichnen (siehe Abb.). Winkel abnehmen und die
Bohrlšcher mit ¯ 2mm und einem Abstand von 8
mm von der TŸrau§enkante ausfŸhren. Den Winkel
wieder auf der Schiene anbringen und mit den
mitgelieferten Schrauben befestigen.
8mm
PR167
A
B
PR168
PR167/1
D
B
FŸr eine allfŠllig notwendige Ausrichtung der
MšbeltŸr, den Spielraum der Langlšcher nutzen.
Nach Beendigung der Arbeiten den einwandfreien
Verschlu§ der GerŠtetŸr ŸberprŸfen.
Die Abdeckung (D) in die Schiene (B) eindrŸcken,
bis sie einrastet.
11
WARNINGS
It is most important that this instruction book should be retained with the appliance for future
reference. Should the appliance be sold or transferred to another owner, or should you move house
and leave the appliance, always ensure that the book is supplied with the appliance in order that the
new owner can be acquainted with the functioning of the appliance and the relevant warnings.
If this appliance featuring magnetic door seals is to replace an older appliance having a spring lock
(latch) on the door or lid, be sure to make that spring lock unusable before you discard the old
appliance. This will prevent it from becoming a death-trap for a child.
This must be done before the appliance is built intoThese warnings are provided in the interest of
safety. You must read them carefully before installing or using the appliance.
General Safety
¥ This appliance is designed to be operated by
adults. Children should not be allowed to tamper
with the controls or play with the product.
¥ It is dangerous to alter the specifications or
modify this product in any way.
¥ Care must be taken to ensure that the appliance
does not stand on the electrical supply cable.
Important: if the supply cord is damaged, it must
be replaced by a special cord or assembly
available from the manufacturer or its service
agent.
¥ Before any cleaning or maintenance work is
carried out, be sure to switch off and unplug the
appliance.
¥ This appliance is heavy. Care should be taken
when moving it
¥ Ice lollies can cause frost burns if consumed
straight from the appliance.
Service/Repair
¥ Any electrical work required to install this
appliance should be carried out by a qualified
electrician or competent person
¥ This product should be serviced by an authorized
Service Centre, and only genuine spare parts
should be used.
¥ Under no circumstances should you attempt to
repair the appliance yourself. Repairs carried out
by inexperienced persons may cause injury or
more serious malfunctioning. Refer to your local
Service Centre, and always
Use
¥ The domestic refrigerators and freezers are
designed to be used specifically for the storage
of edible foodstuffs only.
¥ Best performance is obtained with ambient
temperature between +18¡C and +43¡C (class
T); +18¡C and +38¡C (class ST); +16¡C and
+32¡C (class N); +10¡C and +32¡C (class SN).
The class of your appliance is shown on its rating
plate.
Warning: when the ambient temperature is not
included within the range indicated for the class
of this appliance, the following instructions must
be observed: when the ambient temperature
drops below the minimum level, the storage
temperature in the freezer compartment cannot
be guaranteed; therefore it is advisable to use
the food stored as soon as possible.
¥ Frozen food must not be re-frozen once it has
been thawed out.
¥ ManufacturersÕ storage recommendations should
be strictly adhered to. Refer to relevant
instructions.
¥ The inner lining of the appliance consists of
channels through which the refrigerant passes. If
these should be punctured this would damage
the appliance beyond repair and cause food loss.
DO NOT USE SHARP INSTRUMENTS to scrape
off frost or ice. Frost may be removed by using
the scraper provided. Under no circumstances
should solid ice be forced off the liner. Solid ice
should be allowed to thaw when defrosting the
appliance. See defrost instructions.
¥ Do not place carbonated or fizzy drinks in the
freezer as it creates pressure on the container,
which may cause it to explode, resulting in
damage to the appliance.
Installation
¥ During normal operation, the condenser and
compressor at the back of the appliance heat up
considerably. For safety reasons, minimum
ventilation must be as shown in the relevant
Figure.
Attention: keep ventilation openings clear of
obstruction.
¥ If the appliance is transported horizontally, it is
possible that the oil contained in the compressor
flows in the refrigerant circuit. It is advisable to
wait at least two hours before connecting the
appliance to allow the oil to flow back in the
compressor.
-
 1
1
-
 2
2
-
 3
3
-
 4
4
-
 5
5
-
 6
6
-
 7
7
-
 8
8
-
 9
9
-
 10
10


Juno JGI1423 Benutzerhandbuch
- Kategorie
- Gefrierschränke
- Typ
- Benutzerhandbuch
in anderen Sprachen
- English: Juno JGI1423 User manual
Verwandte Papiere
Sonstige Unterlagen
-
Electrolux EU6420C Benutzerhandbuch
-
Zanussi ZV180R Benutzerhandbuch
-
Zanussi ZV205RM Benutzerhandbuch
-
Electrolux EU6223P Benutzerhandbuch
-
-
-
-
-
-
 Küppersbusch FTE127-4 Benutzerhandbuch
