Electrolux WA1691F Benutzerhandbuch
- Kategorie
- Waschmaschinen
- Typ
- Benutzerhandbuch
Dieses Handbuch eignet sich auch für


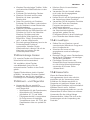
CONTENTS
1. SAFETY INFORMATION...................................................................................... 3
2. SAFETY INSTRUCTIONS.....................................................................................4
3. PRODUCT DESCRIPTION................................................................................... 5
4. CONTROL PANEL...............................................................................................6
5. PROGRAMMES ..................................................................................................9
6. CONSUMPTION VALUES..................................................................................14
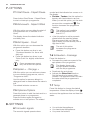
7. OPTIONS...........................................................................................................16
8. SETTINGS......................................................................................................... 16
9. BEFORE FIRST USE..........................................................................................17
10. DAILY USE...................................................................................................... 17
11. HINTS AND TIPS............................................................................................. 21
12. CARE AND CLEANING....................................................................................22
13. TROUBLESHOOTING......................................................................................26
14. TECHNICAL DATA...........................................................................................29
15. GUARANTEE ..................................................................................................30
WE’RE THINKING OF YOU
Thank you for purchasing an Electrolux appliance. You’ve chosen a product that
brings with it decades of professional experience and innovation. Ingenious and
stylish, it has been designed with you in mind. So whenever you use it, you can be
safe in the knowledge that you’ll get great results every time.
Welcome to Electrolux.
Visit our website for:
Get usage advice, brochures, trouble shooter, service information:
www.electrolux.com/webselfservice
Register your product for better service:
www.registerelectrolux.com
Buy Accessories, Consumables and Original spare parts for your appliance:
www.electrolux.com/shop
CUSTOMER CARE AND SERVICE
Always use original spare parts.
When contacting our Authorised Service Centre, ensure that you have the following
data available: Model, PNC, Serial Number.
The information can be found on the rating plate.
Warning / Caution-Safety information
General information and tips
Environmental information
Subject to change without notice.
www.electrolux.com2

1. SAFETY INFORMATION
Before the installation and use of the appliance, carefully
read the supplied instructions. The manufacturer is not
responsible if an incorrect installation and use causes
injuries and damages. Always keep the instructions with
the appliance for future reference.
1.1 Children and vulnerable people safety
• This appliance can be used by children aged from 8
years and above and persons with reduced physical,
sensory or mental capabilities or lack of experience and
knowledge if they have been given supervision or
instruction concerning use of the appliance in a safe
way and understand the hazards involved.
• Do not let children play with the appliance.
• Children of less than 3 years should be kept away
unless continuously supervised.
•
Keep all packaging away from children.
• Keep all detergents away from children.
• Keep children and pets away from the appliance door
when it is open.
• If the appliance has a child safety device, we
recommend you activate it.
• Cleaning and user maintenance shall not be made by
children without supervision.
1.2 General Safety
• Do not change the specification of this appliance.
• Obey the maximum load volume of 9 kg (refer to the
“Programme chart” chapter).
• The operating water pressure (minimum and maximum)
must be between 0,5 bar (0,05 MPa) and 8 bar (0,8
MPa).
• The ventilation openings in the base (if applicable) must
not be obstructed by a carpet.
ENGLISH
3

• The appliance is to be connected to the water mains
using the new supplied hose-sets. Old hose sets must
not be reused.
• If the supply cord is damaged, it must be replaced by
the manufacturer, its Authorised Service Centre or
similarly qualified persons in order to avoid a hazard.
• Before maintenance, deactivate the appliance and
disconnect the mains plug from the mains socket.
• Do not use water spray and steam to clean the
appliance.
• Clean the appliance with a moist soft cloth. Only use
neutral detergents. Do not use abrasive products,
abrasive cleaning pads, solvents or metal objects.
2. SAFETY INSTRUCTIONS
2.1 Installation
• Remove all the packaging and the
transit bolts.
• Keep the transit bolts. When you move
the appliance again you must block the
drum.
• Always be careful when you move the
appliance because it is heavy. Always
wear safety gloves.
• Do not install or use a damaged
appliance.
• Obey the installation instruction
supplied with the appliance.
• Do not install or use the appliance
where the temperature is less than 0
°C or where it is exposed to the
weather.
• Make sure that the floor where you
install the appliance is flat, stable, heat
resistant and clean.
• Make sure that there is air circulation
between the appliance and the floor.
• Adjust the feet to have the necessary
space between the appliance and the
carpet.
• Do not install the appliance where the
appliance door can not be fully
opened.
2.2 Electrical connection
• The appliance must be earthed.
• Always use a correctly installed
shockproof socket.
• Make sure that the electrical
information on the rating plate agrees
with the power supply. If not, contact
an electrician.
• Do not use multi-plug adapters and
extension cables.
• Make sure not to cause damage to the
mains plug and to the mains cable.
Should the mains cable need to be
replaced, this must be carried out by
our Authorised Service Centre.
• Connect the mains plug to the mains
socket only at the end of the
installation. Make sure that there is
access to the mains plug after the
installation.
• Do not touch the mains cable or the
mains plug with wet hands.
• Do not pull the mains cable to
disconnect the appliance. Always pull
the mains plug.
• Only for UK and Ireland: The appliance
has a 13 A mains plug. If it is necessary
to change the fuse in the mains plug,
use a 13 A ASTA (BS 1362) fuse.
• This appliance complies with the E.E.C.
Directives.
www.electrolux.com4

2.3 Water connection
• Make sure not to cause damage to the
water hoses.
• Before you connect the appliance to
new pipes or pipes not used for a long
time, let the water flow until it is clean.
• The first time you use the appliance,
make sure that there is no leakage.
2.4 Use
WARNING!
Risk of injury, electrical
shock, fire, burns or damage
to the appliance.
• Use this appliance in a household only.
• Obey the safety instructions on the
detergent packaging.
• Do not put flammable products or
items that are wet with flammable
products in, near or on the appliance.
• Make sure that you remove all metal
objects from the laundry.
• Do not put a container to collect
possible water leakage under the
appliance. Contact the Authorised
Service Centre to ensure which
accessories can be used.
• Do not touch the glass of the door
while a programme operates. The
glass can be hot.
2.5 Service
• To repair the appliance contact an
Authorised Service Centre.
• Use original spare parts only.
2.6 Disposal
WARNING!
Risk of injury or suffocation.
• Disconnect the appliance from the
mains supply.
• Cut off the mains cable and discard it.
• Remove the door catch to prevent
children and pets to get closed in the
appliance.
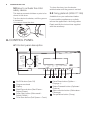
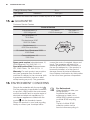
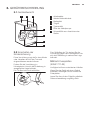
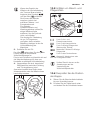
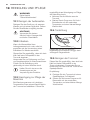
3. PRODUCT DESCRIPTION
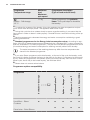
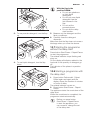
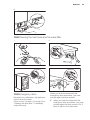
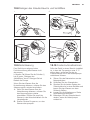
3.1 Appliance overview
1
2
3
5
6
7
4
1
Worktop
2
Detergent dispenser
3
Control panel
4
Door handle
5
Rating plate
6
Drain pump filter
7
Feet for the appliance level
ENGLISH
5

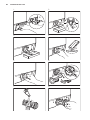
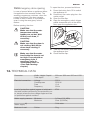
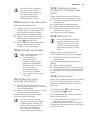
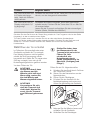
3.2 How to activate the child
safety device
This device prevents children or pets to be
closed in the drum.
Turn the device clockwise, until the groove
is horizontal.
You cannot close the door.
To close the door, turn the device
anticlockwise until the groove is vertical.
3.3 Fixing plate kit (4055171146)
Available from your authorized dealer.
If you install the appliance on a plinth,
secure the appliance in the fixing plates.
Read carefully the instructions supplied
with the accessory.
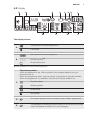
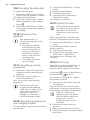
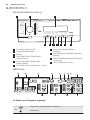
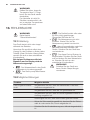
4. CONTROL PANEL
4.1 Control panel description
Start/Pause
Départ/Pause
Zeitvorwahl
Départ Différé
Zeit Sparen
Court
Spülen +
Rinçage +
Temp.
Optionen
Options
Schleudern
Essorage
Koch/Bunt
Blanc/Couleurs
Extra Leise
Extra Silence
Pflegeleicht
Synthétiques
Leichtbügeln
Repassage Facile
Feinwäsche
Délicats
Wolle/Seide
Laine/Soie
Daunen
Couette
Anti-Allergie
Anti-Allergies
Schleudern/Pumpen
Essorage/Vidange
Spülen
Rinçage
Auffrischen
Rafraîchir
Glätten
Défroissage
20 min 3 kg
Baumwolle Eco
Coton Eco
Auto Off
Jeans
Super Eco 30°
1 2 3
45678910
1
On/Off button (Auto Off)
2
Programme knob
3
Display
4
Start/Pause button (Start/Pause -
Départ/Pause)
5
Delay Start button (Zeitvorwahl -
Départ Différé )
6
Time Save button (Zeit Sparen - Court)
7
Extra Rinse button (Spülen + -
Rinçage +)
8
Stains/Prewash button (Optionen/
Options)
9
Spin reduction button (Schleudern -
Essorage)
10
Temperature button (Temp.)
www.electrolux.com6

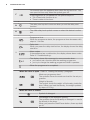
4.2 Display
A H
K J
C D E F GB
M L
I
The display shows:
A
Temperature of the set programme
Cold water
B
Spin speed of the set programme
No Spin symbol
1)
Rinse hold symbol
1)
Only available for SPIN/DRAIN programme.
C
The phase symbols
When a programme is set, all the symbols of the phases related to the pro-
gramme come on.
When the programme starts, only the symbol of the phase in operation flashes.
When the programme is completed, the symbol of the last phase is on.
Prewash phase
Washing phase
Rinse phase
Spin phase
D
The steam symbol comes on when you set a Steam programme.
E
The detergent overdosing symbol comes on at the end of the cycle
when the appliance detects too much detergent.
ENGLISH
7

F
You cannot open the appliance door when the symbol is on. You
can open the door only when the symbol goes off.
If the programme is completed but the symbol stays on:
• The «Rinse hold» function is on.
• There is water in the drum.
G
The delay start symbol comes on when you set the delay start
function.
H
The child safety lock symbol comes on when this device is activa-
ted.
I
Programme time
When the programme starts, the programme time decreases with
steps of 1 minute.
Delay start
When you press the delay start button, the display shows the delay
start time
Alarm codes
If the appliance has a malfunction, the display shows alarm codes.
Refer to «Troubleshooting».
The display shows this message for some seconds when:
• you cannot set a function with the washing programme
• you try to change the washing programme while it operates.
When the programme is completed.
J
When the door is open - Refer to 'Loading the laundry' paragraph
Maximum programme load.
The symbols shows the maximum load for the set pro-
gramme.
Weight of laundry.
The symbol shows the weight of the laundry inside the
drum. When you load the laundry, the weight updates
by steps of 0.5 kg.
When the door is closed
Symbol of detergent
Percentage of the detergent quantity.
The symbols shows the quantity of detergent to use for
the laundry in the drum.
When you press the Start/Pause button, these symbols
go off.
www.electrolux.com8

Graphic bars
The empty indicator bar appears only if the related function is
available for the set programme.
The indicator bar fills accordingly to the set functions.
If you make a wrong selection the message Err indicates that the selection
is not possible.
K
The time save symbol comes on when you set one of the pro-
gramme duration.
Shortened time
Extra Quick
L
The extra rinse symbol comes on when this function is activated.
The value shows the total number of the rinses.
The indicator bar is fully filled when you set the maximum number
of rinses.
M
the Stain symbol comes on when you activate the function.
The Prewash symbol comes on when this function is activated.
The indicator bar is not fully filled when you set only one of the
functions.
The indicator bar is fully filled when you set the two functions.
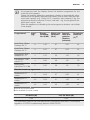
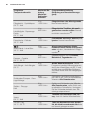
5. PROGRAMMES
5.1 Programme Chart
Programme
Temperature range
Maximum
load
Maximum
spin speed
Programme description
(Type of load and soil level)
Washing programmes
Koch/Bunt - Blanc/Couleurs
95°C - Cold
9 kg
1600 rpm
White cotton and coloured cotton.
Normal soil and light soil.
ENGLISH
9

Programme
Temperature range
Maximum
load
Maximum
spin speed
Programme description
(Type of load and soil level)
Extra Leise - Extra Silence
95°C - Cold
9 kg White and coloured cotton. Normal
soil and light soil. The programme elim-
inates all spinning phase to perform a
silent cycle. The cycle stops with water
in the tub.
Pflegeleicht - Synthétiques
60° C- Cold
4 kg
1200 rpm
Synthetic items or mixed fabric
items. Normal soil.
Leichtbügeln - Repassage
Facile
60° C - Cold
4 kg
800 rpm
Synthetic items to be gentle wash-
ed. Normal and light soil.
1)
Feinwäsche - Délicats
40° C - Cold
4 kg
1200 rpm
Delicate fabrics as acrylics, vis-
cose, polyester items. Normal soil.
Wolle/Seide - Laine/Soie
40° C - Cold
2 kg
1200 rpm
Machine washable wool, hand
washable wool and delicate fabrics
with «hand washing» care symbol.
2)
Daunen - Couette
60°C - 30° C
3 kg
800 rpm
Special programme for one synthetic
blanket, duvet, bedspread and so
on.
Anti-Allergie - Anti-Allergies
60° C
9 kg
1600 rpm
White cotton items. This programme
removes micro-organisms thanks to
the washing by 60°C and adds one
rinse. In this way the wash is more ef-
fective.
Schleudern/Pumpen - Es-
sorage/Vidange
9 kg
1600 rpm
To spin the laundry and to drain the
water in the drum. All fabrics.
Spülen - Rinçage
Cold
9 kg
1600 rpm
To rinse and spin the laundry. All fab-
rics, except woollens and very delicate
fabrics. Reduce the spin speed ac-
cordingly to the type of laundry.
Jeans
60° - Cold
9 kg
1200 rpm
Items in denim and jersey. Also for
dark coloured items.
20 min.-3 kg
40°C - 30°C
3 kg
1200 rpm
Cottons and synthetics items with
light soil level or worn only once.
www.electrolux.com10

Programme
Temperature range
Maximum
load
Maximum
spin speed
Programme description
(Type of load and soil level)
Super Eco 30°
30°C - Cold
3 kg
1200 rpm
Cottons, synthetics and mixed fab-
rics. Normal soil
3)
.
Baumwolle Eco - Coton
Eco
4)
60°C - 40° C
9 kg
1600 rpm
White cotton and colour-fast cot-
ton. Normal soil. The energy con-
sumption decreases and the time of
the washing programme is extended.
Steam programmes
5)
Steam can be used for dried, washed or worn once laundry. These programmes can
reduce creases and odours and make your laundry more soft.
Do not use any detergent. If necessary, remove stains by washing or using localized
stain removal.
Steam programmes do not perform any hygienic cycle.
Do not set a Steam programme with these types of items:
• items where it is not specified on the care label as being suitable for tumble drying.
• all items with plastic, metal, wooden parts or alike.
Auffrischen - Rafraîchir
40° C
1.5 kg Steam programme for cotton and
synthetic items. This cycle removes
odours from the laundry.
6)
ENGLISH
11

Programme
Temperature range
Maximum
load
Maximum
spin speed
Programme description
(Type of load and soil level)
Glätten - Défroissage
40° C
1.5 kg Steam programme for synthetic
items. This cycle helps to dewrinkle
the laundry.
1)
To reduce the creases of the laundry, this cycle regulates the water temperature and per-
forms a soft wash and spin phase. The appliance adds some rinses.
2)
During this cycle the drum rotates slowly to ensure a gentle washing. It can seem that the
drum doesn't rotate or doesn't rotate properly. Consider this as a normal functioning of the ap-
pliance.
3)
Set this programme to decrease the energy and water consumption maintaining a good
washing performance.
4)
Standard programmes for the Energy Label consumption values. According to regu-
lation 1061/2010, these programmes are respectively the «Standard 60°C cotton programme»
and the «Standard 40°C cotton programme». They are the most efficient programmes in terms
of combined energy and water consumption for washing normally soiled cotton laundry.
The water temperature of the washing phase may differ from the temperature de-
clared for the selected programme.
5)
If you set a Steam programme with dried laundry, at the end of the cycle the laundry could
be humid. It is better to expose the items to the fresh air for about 10 minutes to let the humid-
ity dry. When the programme is completed, quickly remove the laundry from the drum. After a
steam cycle, items may to be ironed anyway, but with less effort!
6)
Steam does not remove animal odours.
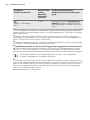
Programme options compatibility
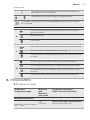
Programme
Schleudern - Essorage
Optionen/Options
1)
Spülen + - Rinçage +
2)
Zeit Sparen - Court
3)
Zeitvorwahl - Départ Différé
Koch/Bunt - Blanc/
Couleurs
■ ■ ■ ■ ■ ■
Extra Leise - Extra Silence
■ ■ ■ ■
www.electrolux.com12

Programme
Schleudern - Essorage
Optionen/Options
1)
Spülen + - Rinçage +
2)
Zeit Sparen - Court
3)
Zeitvorwahl - Départ Différé
Pflegeleicht - Synthétiques
■ ■ ■ ■ ■ ■
Leichtbügeln - Repassage
Facile
■ ■
■
4)
■ ■ ■
Feinwäsche - Délicats
■ ■ ■ ■ ■ ■
Wolle/Seide - Laine/Soie
■ ■ ■
Daunen - Couette
■ ■
Anti-Allergie - Anti-Allergies
■ ■ ■ ■ ■
Schleudern/Pumpen - Es-
sorage/Vidange
5)
■ ■ ■
Spülen - Rinçage
Cold
■ ■ ■ ■
Jeans
■ ■
■
4)
■ ■ ■
20 min.-3 kg ■ ■
Super Eco 30° ■ ■ ■ ■
ENGLISH
13

Programme
Schleudern - Essorage
Optionen/Options
1)
Spülen + - Rinçage +
2)
Zeit Sparen - Court
3)
Zeitvorwahl - Départ Différé
Baumwolle Eco - Coton
Eco
■ ■ ■ ■
■
6)
■
1)
If you use liquid detergent, set a programme without Prewash. The Stain option is not avail-
able with a temperature lower than 40°C.
2)
With a low spin speed the appliance performs delicate rinses and a short spin.
3)
If you set a shorter duration, we recommend that you decrease the quantity of the load. It is
possible to load fully the appliance, however the washing results are reduced.
4)
Only the Prewash function is available.
5)
Set the spin speed. Make sure it agrees with the laundry. If you set No Spin option the only
drain phase is available.
6)
With these programmes you can set only the shorter duration.
5.2 Woolmark Apparel Care -
Green
The wool wash cycle of this machine has
been approved by The Woolmark
Company for the washing of wool
garments labelled as «hand wash»
provided that the garments are washed
according to the instructions issued by the
manufacturer of this washing machine.
Follow the garment care label for drying
and other laundry instructions. M1361
In UK, Eire, Hong Kong and India the
Woolmark symbol is a certification
trademark.
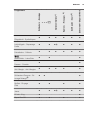
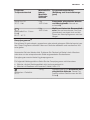
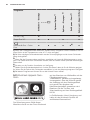
6. CONSUMPTION VALUES
The data of this table are approximate. Different causes can change the
data: the quantity and type of laundry, the water and ambient temperature.
www.electrolux.com14

At programme start the display shows the duration programme for the
maximum load capacity.
During the washing phase the programme duration is automatically calcu-
lated and can be greatly reduced if the laundry load is lower than the maxi-
mum load capacity (e.g. Cotton 60°C, maximum load capacity 9 kg, the
programme duration exceeds 2 hours; real load 1 kg, the programme du-
ration don’t reach 1 hour).
When the appliance is calculating the real programme duration a dot blinks
in the display.
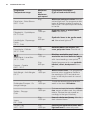
Programmes Load
(kg)
Energy
consump-
tion (kWh)
Water con-
sumption
(litre)
Approxi-
mate pro-
gramme
duration
(minutes)
Remaining
moisture
(%)
1)
Koch/Bunt - Blanc/
Couleurs 60 °C
9 1.55 87 220 44
Koch/Bunt - Blanc/
Couleurs 40 °C
9 0.97 87 205 44
Pflegeleicht - Syn-
thétiques 40 °C
4 0.72 55 155 35
Feinwäsche - Déli-
cats 40 °C
4 0.60 59 89 35
Wolle/Seide -
Laine/Soie 30 °C
2)
2 0.35 58 60 30
Standard cotton programmes
Standard 60 °C
cotton
9 0.64 57 226 44
Standard 60 °C
cotton
4.5 0.34 41 185 44
Standard 40 °C
cotton
4.5 0.34 40 199 44
1)
At the end of spin phase.
2)
Not available for some models.
Off Mode (W) Left On Mode (W)
0,05 0,05
The information given in the chart above are in compliance with the EU Commission
regulation 1015/2010 implementing directive 2009/125/EC.
ENGLISH
15

7. OPTIONS
7.1 Start/Pause - Départ/Pause
Press button Start/Pause - Départ/Pause
to start or interrupt a programme.
7.2 Zeitvorwahl - Départ Différé
With this option you can delay the start of
a programme from 30 minutes to 20
hours.
The display shows the related indicator
and delay time.
7.3 Zeit Sparen - Court
With this option you can decrease the
programme duration.
• Press this button one time to set
'Shortened duration' for items with
daily soil.
• Press this button two times to set
'Extra Quick' for slightly soiled items
only.
Some programmes accept
only one of the two options.
7.4 Spülen + - Rinçage +
With this option you can add some rinses
to some washing programmes, refer to
"Programme chart".
Use this option for persons allergic to
detergents and in areas where the water is
soft.
The related indicator comes on.
7.5 Optionen/Options
Press this button to add the stain and/or a
prewash phase to a programme.
Press the button again and again to
activate one or two options. The related
symbol and the indicator bar comes on in
the display.
• Flecken - Taches: Use this option for
laundry with hard stains to remove.
When you set this option, put the stain
remover into compartment . This
function increases the programme
duration.
This option is not available
with a temperature lower
than 40° C.
• : Use this option to add a prewash
phase before the washing phase.
We recommend that you use this
option when you have laundry with a
high level of soil.
The set of this option
increases the programme
duration.
7.6 Schleudern - Essorage
Press this button to:
• Decrease the maximum speed of the
spin phase of the programme.
The display shows only
the spin speeds available
with the set programme.
• Deactivate the spin phase.
• Activate the Rinse Hold function.
Set this function to prevent fabric
creases. The appliance does not drain
the water when the programme is
completed.
7.7 Temp.
Press this button to change the default
temperature. When the display shows
and , the appliance does not heat the
water.
8. SETTINGS
8.1 Acoustic signals
The acoustic signals operate when:
• You activate the appliance.
• You deactivate the appliance.
• You press the buttons.
www.electrolux.com16

• The programme is completed.
• The appliance has a malfunction.
To deactivate/activate the acoustic
signals, press Optionen - Options and
Spülen + - Rinçage + at the same time for
6 seconds.
If you deactivate the acoustic
signals, they continue operate
when the appliance has a
malfunction.
8.2 Child Lock
With this option you can prevent that the
children play with the control panel.
• To activate/deactivate this option,
press Temp. and Schleudern -
Essorage at the same time until the
indicator
comes on/goes off.
You can activate this option:
• After you press Start/Pause - Départ/
Pause : the options and the
programme knob are locked.
• Before you press Start/Pause - Départ/
Pause : the appliance cannot start.
8.3 Permanent Extra Rinse
With this option you can permanently have
an extra rinse when you set a new
programme.
• To activate/deactivate this option
press Zeit Sparen - Court and
Zeitvorwahl - Départ Différé at the
same time until the indicator Spülen + -
Rinçage + comes on/goes off.
8.4 Weight sensor activating or
deactivating
To activate or deactivate the weight
sensors, press Temp. and Optionen -
Options at the same time for some
seconds.
9. BEFORE FIRST USE
1. Put a small quantity of detergent in the
compartment for washing phase.
2. Set and start a programme for cotton
at the highest temperature without
laundry.
This removes all possible dirt from the
drum and the tub.
10. DAILY USE
WARNING!
Refer to Safety chapters.
10.1 Using weight sensors
For a correct operation of the
weight sensor, activate the
appliance and set the
programme BEFORE you put
the laundry in the drum.
10.2 Before activating the
appliance
1. Open the water tap.
2. Connect the mains plug to the mains
socket.
10.3 Activating the appliance
and setting a programme
1. Press button Auto Off to activate the
appliance.
2. Turn the programme knob to the
necessary programme.
The programme indicator comes on.
The indicator of Start/Pause - Départ/
Pause button flashes with red colour.
The display shows the default temperature
and spin and the empty indicator bars of
the available functions.
3. If it is necessary, press Temp. button
and Schleudern - Essorage button to
ENGLISH
17

change the water temperature and the
spin speed.
4. If necessary, press the related buttons
to add some functions or to set a
delayed start.
The display shows the symbol of the set
function and the digit shows the delayed
time.
10.4 Loading the laundry
1. Open the appliance door.
The display shows the maximum load for
the programme and the weight of the
laundry .
2. Put the laundry in the drum, one item
at time. Shake the items before you
put them in the drum.
On the display the weight of the laundry
updates by steps of kg 0.5. The weight is
indicative and changes with the type of
the laundry.
If you put in the drum more
laundry than the maximum
load, the symbol and
the value start to flash.
You can wash your laundry
but the water and energy
consumption increase.
To have the best
consumption and washing
performance remove some
items until the symbols stop
to flash.
The overload indication is
available only for
programmes with a maximum
load lower than the appliance
maximum load.
3. Close the door.
The value
near the symbol on the
display shows the quantity of the
detergent to use.
This data is indicative and refers to the
detergent quantity for a maximum load
that the manufacturer recommends.
4. Make sure that no laundry stays
between the seal and the door.
There is a risk of water leakage or damage
to the laundry.
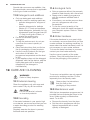
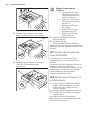
10.5 Filling the detergent and
additives
Compartment for prewash phase an
soak programme.
Compartment for washing phase.
Compartment for liquid additives
(fabric conditioner, starch).
Maximum level for quantity of liquid
additives.
Compartment for stain remover.
Flap for powder or liquid detergent.
Always obey the instructions
that you find on the
packaging of the detergent
products.
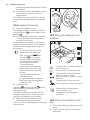
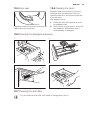
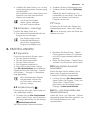
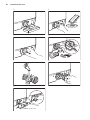
10.6 Check the position of the
flap
1. Pull out the detergent dispenser until it
stops.
2. Press the lever down to remove the
dispenser.
www.electrolux.com18

1
2
3. To use powder detergent, turn the flap
up.
A
4. To use liquid detergent, turn the flap
down.
B
With the flap in the
position DOWN:
• Do not use gelatinous
or thick liquid
detergents.
• Do not put more liquid
detergent than the
limit showed in the
flap.
• Do not set the
prewash phase.
• Do not set the delay
start function.
5. Measure out the detergent and the
fabric conditioner.
6. Carefully close the detergent
dispenser.
Make sure that the flap does not cause a
blockage when you close the drawer.
10.7 Starting the programme
without the delay start
Press button Start/Pause - Départ/Pause
to start the programme.
The related indicator stops flashing and
stays on.
On the display all indicator related to the
load and to the quantity of detergent go
off.
The indicator of the phase in operation
flashes.
10.8 Starting a programme with
the delay start
1. Press button Zeitvorwahl - Départ
Différé again and again until the
display shows the number of minutes
or hours of delay.
The related indicator comes on.
2. Press button Start/Pause - Départ/
Pause.
The appliance starts the countdown of the
delay start.
When the countdown is completed, the
programme starts automatically.
Before you press button
Start/Pause - Départ/Pause
to start the appliance, you
can cancel or change the set
of the delay start.
ENGLISH
19

10.9 Cancelling the delay start
To cancel the delay start:
1. Press button Start/Pause - Départ/
Pause to set the appliance to pause.
The related indicator flashes.
2. Press button Zeitvorwahl - Départ
Différé repeatedly until the display
shows .
3. Press button Start/Pause - Départ/
Pause again to start the programme
immediately.
10.10 Behaviour of the
appliance
After approximately 15
minutes from the start of the
programme:
• The appliance adjusts
automatically the cycle
time to the laundry you
have put in the drum to
have perfect washing
results in the minimum
necessary time.
• The display shows the
new time value.
10.11 Cancelling a running
programme
1. Press button Auto Off to cancel the
programme and to deactivate the
appliance.
2. Press button Auto Off again to
activate the appliance.
Now, you can set a new washing
programme.
Before starting the new
programme the appliance
could drain the water. In this
case, make sure that the
detergent is still in the
detergent compartment, if
not fill the detergent again.
10.12 Interrupting a programme
and changing a option
You can change only some options before
they operate.
1. Press button Start/Pause - Départ/
Pause.
The related indicator flashes.
2. Change the option set.
3. Press the button Start/Pause -
Départ/Pause again.
The programme continues.
10.13 Opening the door
If the temperature and level of
the water in the drum are too
high and/or the drum still
rotates you cannot open the
door.
While a programme or the delay start
operates, the appliance door is locked.
1. Press button Start/Pause - Départ/
Pause.
In the display the related door lock
indicator goes off.
2. Open the appliance door.
3. Close the door and press button
Start/Pause - Départ/Pause.
The programme or the delay start
continues.
10.14 End of cycle
When the programme has finished, the
appliance stops automatically. The
acoustic signal operates (if it is active).
In the display comes on and the door
locked indicator goes off.
The indicator of Start/Pause - Départ/
Pause button goes off.
1. Press button Auto Off to deactivate
the appliance.
After five minutes from the end of the
programme, the energy saving function
automatically deactivates the appliance.
When you activate the
appliance again, the display
show the end of the last set
programme. Turn the
programme knob to set a
new cycle.
2. Remove the laundry from the
appliance.
3. Make sure that the drum is empty.
4.
Keep the door ajar, to prevent mildew
and odours
www.electrolux.com20
Seite wird geladen ...
Seite wird geladen ...
Seite wird geladen ...
Seite wird geladen ...
Seite wird geladen ...
Seite wird geladen ...
Seite wird geladen ...
Seite wird geladen ...
Seite wird geladen ...
Seite wird geladen ...
Seite wird geladen ...
Seite wird geladen ...
Seite wird geladen ...
Seite wird geladen ...
Seite wird geladen ...
Seite wird geladen ...
Seite wird geladen ...
Seite wird geladen ...
Seite wird geladen ...
Seite wird geladen ...
Seite wird geladen ...
Seite wird geladen ...
Seite wird geladen ...
Seite wird geladen ...
Seite wird geladen ...
Seite wird geladen ...
Seite wird geladen ...
Seite wird geladen ...
Seite wird geladen ...
Seite wird geladen ...
Seite wird geladen ...
Seite wird geladen ...
Seite wird geladen ...
Seite wird geladen ...
Seite wird geladen ...
Seite wird geladen ...
Seite wird geladen ...
Seite wird geladen ...
Seite wird geladen ...
Seite wird geladen ...
Seite wird geladen ...
Seite wird geladen ...
Seite wird geladen ...
Seite wird geladen ...
-
 1
1
-
 2
2
-
 3
3
-
 4
4
-
 5
5
-
 6
6
-
 7
7
-
 8
8
-
 9
9
-
 10
10
-
 11
11
-
 12
12
-
 13
13
-
 14
14
-
 15
15
-
 16
16
-
 17
17
-
 18
18
-
 19
19
-
 20
20
-
 21
21
-
 22
22
-
 23
23
-
 24
24
-
 25
25
-
 26
26
-
 27
27
-
 28
28
-
 29
29
-
 30
30
-
 31
31
-
 32
32
-
 33
33
-
 34
34
-
 35
35
-
 36
36
-
 37
37
-
 38
38
-
 39
39
-
 40
40
-
 41
41
-
 42
42
-
 43
43
-
 44
44
-
 45
45
-
 46
46
-
 47
47
-
 48
48
-
 49
49
-
 50
50
-
 51
51
-
 52
52
-
 53
53
-
 54
54
-
 55
55
-
 56
56
-
 57
57
-
 58
58
-
 59
59
-
 60
60
-
 61
61
-
 62
62
-
 63
63
-
 64
64


Electrolux WA1691F Benutzerhandbuch
- Kategorie
- Waschmaschinen
- Typ
- Benutzerhandbuch
- Dieses Handbuch eignet sich auch für
in anderen Sprachen
- English: Electrolux WA1691F User manual
Verwandte Artikel
-
Electrolux WAGL4E202 Benutzerhandbuch
-
Electrolux WAGLES7000 Benutzerhandbuch
-
Electrolux WASL3E202 Benutzerhandbuch
-
-
-
Electrolux WAL4E201 Benutzerhandbuch
-
-
-
Electrolux WAL7E201 Benutzerhandbuch
-
Electrolux WA1690F Benutzerhandbuch