PURE 151110 Benutzerhandbuch
- Kategorie
- Radios
- Typ
- Benutzerhandbuch
Dieses Handbuch ist auch geeignet für

Evoke H3


1
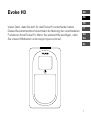
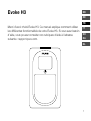
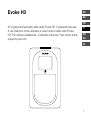
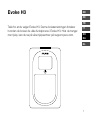
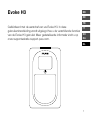
Evoke H3
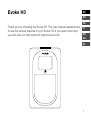
Thank you for choosing the Evoke H3. This user manual explains how
to use the various features of your Evoke H3. If you need more help,
you can view our help topics at support.pure.com.
FR
ES
IT
NO
DA
EN
DE
NL

2

3
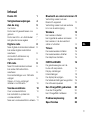
Contents
Evoke H3 1
Safety 4
Getting started 5
Your Evoke 5
Setting up your Evoke H3 6
Switching your Evoke H3 on
and off 7
Changing the volume 7
Digital radio 8
Listening to digital radio 8
Changing the digital radio station 8
Automatically tuning to digital
radio stations 9
FM radio 9
Listening to FM radio 9
Changing the FM radio station 9
Changing the scan settings for
FM radio 9
Choosing stereo or mono
reception for FM radio 10
Radio station presets 10
About presets 10
Storing a radio station as a preset 10
Listening to a preset 11
Bluetooth and auxiliary
devices 11
Connecting a Bluetooth device 11
Connecting a device with an
auxiliary cable 12
Alarms 12
Setting an alarm 12
Cancelling an existing alarm 13
Snoozing or silencing an alarm 14
Timers 14
Setting the kitchen timer 14
Silencing the kitchen timer 15
Setting the sleep timer 15
Settings 16
Personalising the sound on your
Evoke H3 16
Display settings 16
Clock settings 17
Changing the language 18
Resetting to factory settings 19
Updating the software 19
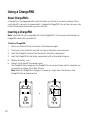
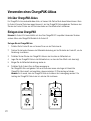
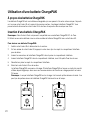
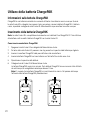
Using a ChargePAK 20
About ChargePAKs 20
Inserting a ChargePAK 20
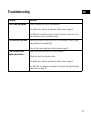
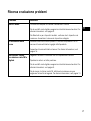
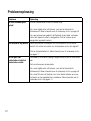
Troubleshooting 21
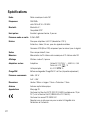
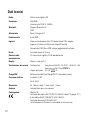
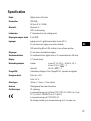
Specifications 22
EN

4
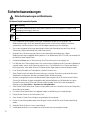
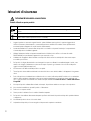
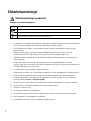
Safety
1. Read, heed and retain these instructions – All the safety and operating instructions should be read before this product is
used and retained for future reference. All warnings on the appliance and in the operating instructions should be followed
2. Failure to install or use the product in accordance with these instructions may impair the safety of the product and invalid
the warranty.
3. Use only power supply listed in these user manual/user instructions (supplied by Pure with model number SW0551000-AM)
to power the equipment and do not use the power supply for any other purpose.
4. The direct plug-in adapter is used as a disconnect device, the disconnect device shall remain readily operable and
accessible.
5. Do not immerse in water or use in a wet / moist environment, such as in the shower or bathroom if plugged into the mains
supply. The power supply shall not be exposed to dripping or splashing and no objects filled with liquids, such as vases,
placed above it.
6. Do not remove screws from or open the product casing.
7. Keep the product away from direct sunlight and from heat sources such as radiators, heaters or other appliances that
produce heat.
8. Danger of explosion if the battery is incorrectly replaced (ensure correct polarity). Replace only with the same or equivalent
type. The battery shall not be exposed to excessive heat such as sunshine, fire or similar. Attention is drawn to the
environmental aspects of battery disposal. See Section - “Using a ChargePAK”
9. Do not expose the product to naked flame sources, such lighted candles which should not be placed on or near the
product.
10. Ventilation should not be impaired by covering the product or power supply.
11. Clean only with a dry cloth.
12. This product is intended for use in moderate climates.
13. If the product is used in a manner not specified by the instructions, the product’s protection could be impaired.
14. Do not use the product if any damage is noticed.
15. Product repairs are only allowed to be carried out by competent and authorised personnel.
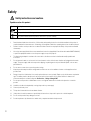
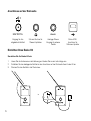
Safety instructions and cautions
Symbol Description
This symbol is used on the product to indicate a caution and that instructions should be read before use.
This symbol indicates DC voltage.
This symbol indicates where the product is switched on or put into standby.
Symbols used on this product

5
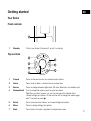
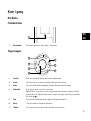
Getting started
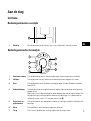
Your Evoke
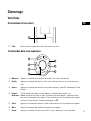
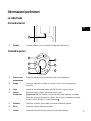
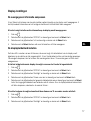
Front controls
1
1 Presets Press to store and access your favourite radio stations
2 Alarm Press to set an alarm, a kitchen timer or a sleep timer
3 Source Press to change between digital radio, FM radio, Bluetooth, and auxiliary input
4 Volume/Scroll Turn to change the volume, press to mute the volume
Tip: When you are in a menu, you can turn and press the Volume dial to
choose settings and options. To then use the dial to change the volume again,
wait 10 seconds or press
.
5 Select Press to browse radio stations, or choose settings and options
6 Menu Press to change settings and options
7 Back Press when in the menu to go back to the previous screen
1 Standby Switch your Evoke H3 on and off, or put it in standby
Top controls
Source
Menu
Select
1
2
3
4+
1
2
3
4
6
7
5
EN

6
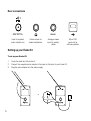
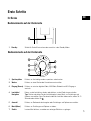
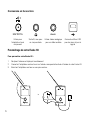
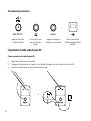
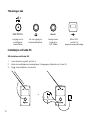
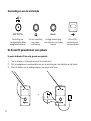
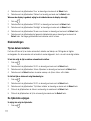
Rear connections
x inAu
Input for supplied
mains adapter only
3.5mm output for
stereo headphones
Analogue stereo
input for auxiliary
cables
Micro USB
connector for
software updates
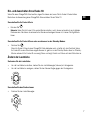
Setting up your Evoke H3
To set up your Evoke H3:
1. Unclip the aerial and fully extend it.
2. Connect the supplied mains adapter to the input on the back of your Evoke H3.
3. Plug the mains adapter into the mains supply.
>
+
–
5.5V DC 1A
Aux in
+
–
5.5V DC 1A Aux in
5.5V DC 1A
+
–
5.5V DC 1A
Aux in

7
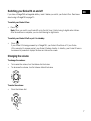
Switching your Evoke H3 on and off
If you have a ChargePAK rechargeable battery, insert it before you switch your Evoke H3 on. Read more
about using a ChargePAK on page 20.
To switch your Evoke H3 on:
• Press
.
Note: When you switch your Evoke H3 on for the first time, it starts tuning to digital radio stations.
After the autotune is complete, you can start listening to digital radio.
To switch your Evoke H3 off or put it in standby:
• Press
.
If your Evoke H3 is being powered by a ChargePAK, your Evoke H3 switches off. If your Evoke
H3 is connected to a power socket, your Evoke H3 enters standby. In standby, your Evoke H3 uses a
low amount of power and displays the time and date on the screen.
Changing the volume
To change the volume:
• To increase the volume, turn the Volume dial clockwise.
• To decrease the volume, turn the Volume dial anticlockwise.
To mute the volume:
• Press the Volume dial.
EN

8
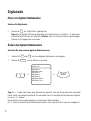
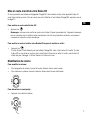
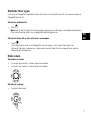
Digital radio
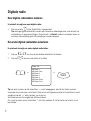
Listening to digital radio
To listen to digital radio:
• Press
Source
until ‘Digital Radio’ is displayed.
Tip: Some digital radio stations also broadcast information and graphics, such as music album
artwork or weather updates. Press and hold the Select button to change between slideshow, large
slideshow and display modes.
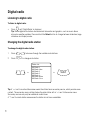
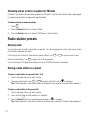
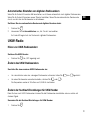
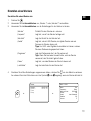
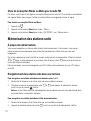
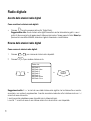
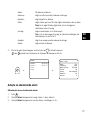
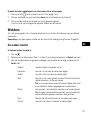
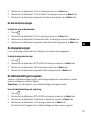
Changing the digital radio station
To change the digital radio station:
1. Press
or to browse through the available radio stations.
2. Press
Select
to change radio station.
> >
Tip: A ‘>>’ next to a radio station name means the station has a secondary service, which provides more
content. The secondary service is listed below the radio station with a ‘<<’ next to the service name.
Secondary services may only be available at certain times.
A ‘?’ next to a radio station name means the station is inactive or unavailable.
Station List
BBC Radio 1
BBC Radio 1Xtra
BBC Radio 2
BBC Radio 3
BBC Radio 4
BBC Radio 4Extra
BBC Radio 5 Live
Select

9
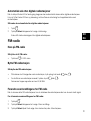
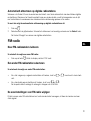
Automatically tuning to digital radio stations
When you switch your Evoke H3 on for the first time, it automatically scans for digital radio stations. If you
move your Evoke H3 to a new location, perform an autotune to update the list of radio stations.
To automatically tune to digital radio stations:
1. Press
Menu
.
2. Press the Select buttons to choose ‘Autotune’.
Your Evoke H3 starts scanning for digital radio stations.
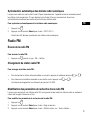
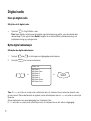
FM radio
Listening to FM radio
To listen to FM radio:
• Press
Source
until ‘FM’ is displayed.
Changing the FM radio station
To change the FM radio station:
• To scan to the previous or next radio station, press and hold
or .
• To manually tune to a radio station, press
or .
The frequency steps up or down by 0.05 MHz.
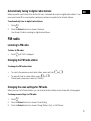
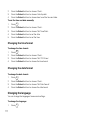
Changing the scan settings for FM radio
When you scan for FM radio stations, you can include all radio stations or only those with a strong signal.
To change scan settings for FM radio:
1. Press
Menu
.
2. Press the Select buttons to choose ‘Scan Setting’.
3. Press the Select buttons to choose ‘Strong Stations Only’ or ‘All Stations’.
EN

10
Choosing stereo or mono reception for FM radio
By default, your Evoke H3 uses stereo reception for FM radio. If your FM radio stations have a weak signal,
try using mono reception to improve the signal strength.
To choose stereo or mono reception:
1. Press
Menu
.
2. Press the Select buttons to choose ‘Stereo’.
3. Press the Select buttons to choose ‘FM Stereo’ or ‘Forced Mono’.
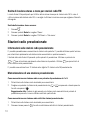
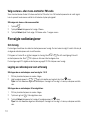
Radio station presets
About presets
You can store your favourite radio stations as presets. You can use presets to quickly tune to your stored
radio stations whenever you want.
On the top of your Evoke H3, there are four preset buttons. Use
1
to
3
for quick access to your
favourite radio stations. Use
4+
to open a list of all your presets.
You can store up to 20 digital radio stations and up to 20 FM radio stations as presets.
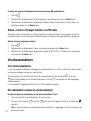
Storing a radio station as a preset
To store a radio station to a preset from 1 to 3:
1. Tune to the radio station you want to store.
2. Choose a preset button from
1
to
3
then press and hold it until a is displayed.
Tip: If there is already a radio station stored to the preset you’ve selected, the new station replaces it.
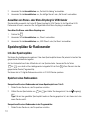
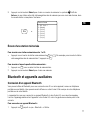
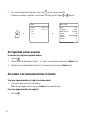
To store a radio station to the preset list:
1. Tune to the radio station you want to store.
2. Press and hold
4+
until the preset list is displayed.
3. Press the Select buttons to choose a preset number. A
is displayed.
Tip: If there is already a radio station stored to the preset you’ve selected, the new station replaces it.

11
>
Listening to a preset
To listen to a preset from 1 to 3:
• Press a preset button from
1
to
3
. For example, to listen to the radio station stored as preset
2, press
2
.
To listen to any preset:
1. Press
4+
to open the preset list.
2. Press the Select buttons to choose a preset.
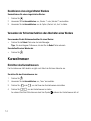
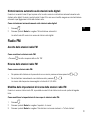
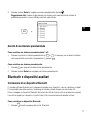
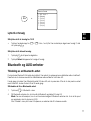
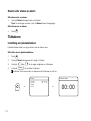
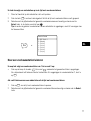
Bluetooth and auxiliary devices
Connecting a Bluetooth device
You can use Bluetooth to wirelessly connect to a device, such as a mobile phone or tablet. You can then
stream music from your mobile phone or tablet through your Evoke H3.
The first time you connect a Bluetooth device to your Evoke H3, you need to pair them. After you’ve paired
a device with your Evoke H3, your Evoke H3 remembers it for the next time.
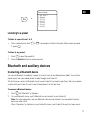
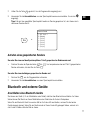
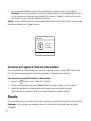
To connect a Bluetooth device:
1. Press
Source
until ‘Bluetooth’ is displayed.
2. On your Bluetooth device, switch Bluetooth on and connect to your Evoke H3.
Note: For more information, see your Bluetooth device’s user manual. If you are asked to enter a
passcode, enter 0000.
When ‘Connected’ is displayed on your Evoke H3 screen, your Evoke H3 is ready to stream music.
Save to Preset
1: BBC Radio 1
2: (Empty)
3: (Empty)
4: (Empty)
5: (Empty)
6: (Empty)
7: (Empty)
4+
EN

12
Tip: If you want to connect a different Bluetooth device to your Evoke H3, switch off Bluetooth on the
connected device first.
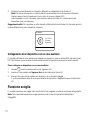
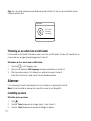
Connecting a device with an auxiliary cable
You can use an auxiliary cable to connect a device, such as an MP3 player, to your Evoke H3. You can
then enjoy music saved on the device through your Evoke H3.
To connect a device with an auxiliary cable:
1. Press
Source
until ‘Auxiliary Input’ is displayed.
2. Insert an auxiliary cable into the Aux in socket on the back of your Evoke H3.
3. Insert the other end of the auxiliary cable into the device you want to connect.
Your Evoke H3 is now ready to play music from the connected device.
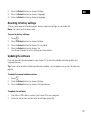
Alarms
To wake up to your favourite radio station, you can set up to two alarms on your Evoke H3.
Note: You cannot set alarms when your Evoke H3 is being powered by a ChargePAK.
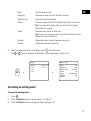
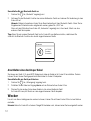
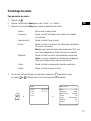
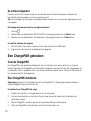
Setting an alarm
To set an alarm:
1. Press
.
2. Press the Select buttons to choose ‘Alarm 1’ or ‘Alarm 2’.
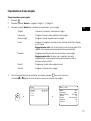
3. Press the Select buttons to change settings for the alarm.
Bluetooth
14-7-2016
Thursday
Connected

13
‘Alarm’ Turn the alarm on or off
‘Frequency’ Choose how often you want the alarm to sound
‘Wake Up time’ Choose the time for the alarm
‘Source’ Choose to wake up to an FM or digital radio station, or a buzzer
Tip: To choose FM or digital radio, you need to have stored a
radio station as a preset.
‘Preset’ Choose a radio station to wake up to
Tip: If you do not choose a preset, the default setting is the radio
station that you last listened to.
‘Duration’ Choose how many minutes the alarm sounds for
‘Volume’ Choose the volume for the alarm
4. When you have made all of your changes, press
Menu
to exit the menu.
The
1
or
2
symbol is displayed at the bottom of the screen when an alarm is set.
>
Alarm
Alarm 1
Alarm 2
Timer
Sleep
On 09:00
Off 11:30
>
Alarm 1 Info.
Alarm
Frequency
Wake Up time
Source
Preset
Duration
Volume
On
Daily
9:00 AM
FM
Last Listened
60
5
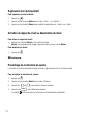
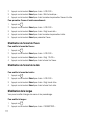
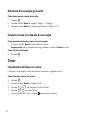
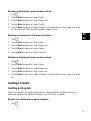
Cancelling an existing alarm
To cancel an existing alarm:
1. Press .
2. Press the Select buttons to choose ‘Alarm 1’ or ‘Alarm 2’.
3. Press the Select buttons to change the ‘Alarm’ setting to ‘Off’.
EN

14
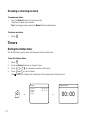
Snoozing or silencing an alarm
To snooze an alarm:
• Press the Select button or the Volume dial.
The alarm snoozes for 5 minutes.
Tip: For a longer snooze, press the Select button multiple times.
To silence an alarm:
• Press
.
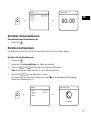
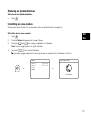
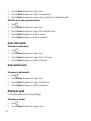
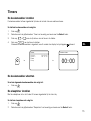
Timers
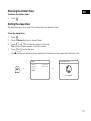
Setting the kitchen timer
The kitchen timer counts down and then ends with an alarm tone.
To set the kitchen timer:
1. Press
.
2. Press the Select buttons to choose ‘Timer’.
3. Press
or to choose the duration of the timer.
4. Press
Select
to start the timer.
The symbol is displayed at the bottom of the screen when the timer is set.
>
Alarm
Alarm 1
Alarm 2
Timer
Sleep
On 09:00
Off 11:30
>
Kitchen timer
00:00

15
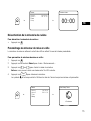
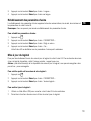
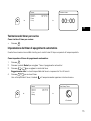
Silencing the kitchen timer
To silence the kitchen timer:
• Press .
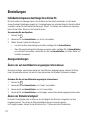
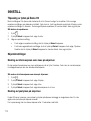
Setting the sleep timer
The sleep timer puts your Evoke H3 in standby after a set amount of time.
To set the sleep timer:
1. Press
.
2. Press the Select buttons to choose ‘Sleep’.
3. Press
or to choose the duration of the timer.
Tip: You can choose between 15 and 90 minutes.
4. Press
Select
to start the timer.
The symbol and remaining time is displayed at the bottom of the screen when the timer is set.
>
Alarm
Alarm 1
Alarm 2
Timer
Sleep
On 09:00
Off 11:30
>
Set Sleep Timer
15 minutes
EN

16
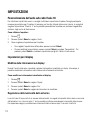
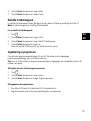
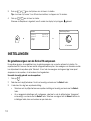
Settings
Personalising the sound on your Evoke H3
Use the equaliser setting to get the most out of your music. There are several equaliser settings set up
already. For example, to hear classical music at its best, change the equaliser setting to ‘Classic’. You can
also customise the equaliser to change the treble, bass and loudness.
To use the equaliser:
1. Press
Menu
.
2. Press the Select buttons to choose ‘Audio’.
3. Choose an equaliser setting:
• To choose an equaliser setting, press the Select buttons.
• To use custom settings, press the Select buttons to choose ‘Custom’. Then press the Select
buttons to change the treble, bass and loudness.
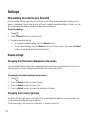
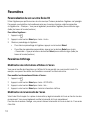
Display settings
Changing the information displayed on the screen
You can change the information that is displayed on the screen when you are listening to the radio. For
example, you can display scrolling information about the current radio station.
To change the information displayed on the screen:
1. Press
Menu
.
2. Press the Select buttons to choose ‘Display’.
3. Press the Select buttons to choose ‘Info’.
4. Press the Select buttons to choose the information to display.
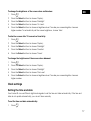
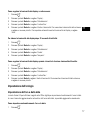
Changing the screen brightness
Your Evoke H3 has a light sensor, which adjusts the screen brightness based on your surroundings. You
can also manually change the screen brightness.
To help save energy, you can dim the screen after 10 seconds of inactivity.

17
To change the brightness of the screen when switched on:
1. Press
Menu
.
2. Press the Select buttons to choose ‘Display’.
3. Press the Select buttons to choose 'Backlight'.
4. Press the Select buttons to choose ‘On Level’.
5. Press the Select buttons to choose a brightness level. To make your screen brighter, choose a
higher number. To automatically set the screen brightness, choose ‘Auto’.
To dim the screen after 10 seconds of inactivity:
1. Press
Menu
.
2. Press the Select buttons to choose ‘Display’.
3. Press the Select buttons to choose 'Backlight'.
4. Press the Select buttons to choose ‘Duration’.
5. Press the Select buttons to choose ‘Timed’.
To change the brightness of the screen when dimmed:
1. Press
Menu
.
2. Press the Select buttons to choose ‘Display’.
3. Press the Select buttons to choose 'Backlight'.
4. Press the Select buttons to choose ‘Dim Level’.
5. Press the Select buttons to choose a brightness level. To make your screen brighter, choose a
higher number.
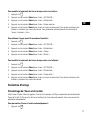
Clock settings
Setting the time and date
Your Evoke H3 can use FM and digital radio signals to set the time and date automatically. If the time and
date do not update automatically, you can set them manually.
To set the time and date automatically:
1. Press
Menu
.
EN

18
2. Press the Select buttons to choose ‘Clock’.
3. Press the Select buttons to choose ‘Auto Update’.
4. Press the Select buttons to choose how to set the time and date.
To set the time and date manually:
1. Press
Menu
.
2. Press the Select buttons to choose ‘Clock’.
3. Press the Select buttons to choose ‘Set Time/Date’.
4. Press the Select buttons to set the date.
5. Press the Select buttons to set the time.
Changing the time format
To change the time format:
1. Press
Menu
.
2. Press the Select buttons to choose ‘Clock’.
3. Press the Select buttons to choose ‘Set 12/24 Hour’.
4. Press the Select buttons to choose the time format.
Changing the date format
To change the date format:
1. Press
Menu
.
2. Press the Select buttons to choose ‘Clock’.
3. Press the Select buttons to choose ‘Set Date Format’.
4. Press the Select buttons to choose the date format.
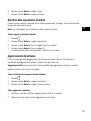
Changing the language
You can change the language of menus and settings.
To change the language:
1. Press
Menu
.
Seite laden ...
Seite laden ...
Seite laden ...
Seite laden ...
Seite laden ...
Seite laden ...
Seite laden ...
Seite laden ...
Seite laden ...
Seite laden ...
Seite laden ...
Seite laden ...
Seite laden ...
Seite laden ...
Seite laden ...
Seite laden ...
Seite laden ...
Seite laden ...
Seite laden ...
Seite laden ...
Seite laden ...
Seite laden ...
Seite laden ...
Seite laden ...
Seite laden ...
Seite laden ...
Seite laden ...
Seite laden ...
Seite laden ...
Seite laden ...
Seite laden ...
Seite laden ...
Seite laden ...
Seite laden ...
Seite laden ...
Seite laden ...
Seite laden ...
Seite laden ...
Seite laden ...
Seite laden ...
Seite laden ...
Seite laden ...
Seite laden ...
Seite laden ...
Seite laden ...
Seite laden ...
Seite laden ...
Seite laden ...
Seite laden ...
Seite laden ...
Seite laden ...
Seite laden ...
Seite laden ...
Seite laden ...
Seite laden ...
Seite laden ...
Seite laden ...
Seite laden ...
Seite laden ...
Seite laden ...
Seite laden ...
Seite laden ...
Seite laden ...
Seite laden ...
Seite laden ...
Seite laden ...
Seite laden ...
Seite laden ...
Seite laden ...
Seite laden ...
Seite laden ...
Seite laden ...
Seite laden ...
Seite laden ...
Seite laden ...
Seite laden ...
Seite laden ...
Seite laden ...
Seite laden ...
Seite laden ...
Seite laden ...
Seite laden ...
Seite laden ...
Seite laden ...
Seite laden ...
Seite laden ...
Seite laden ...
Seite laden ...
Seite laden ...
Seite laden ...
Seite laden ...
Seite laden ...
Seite laden ...
Seite laden ...
Seite laden ...
Seite laden ...
Seite laden ...
Seite laden ...
Seite laden ...
Seite laden ...
Seite laden ...
Seite laden ...
Seite laden ...
Seite laden ...
Seite laden ...
Seite laden ...
Seite laden ...
Seite laden ...
Seite laden ...
Seite laden ...
Seite laden ...
Seite laden ...
Seite laden ...
Seite laden ...
Seite laden ...
Seite laden ...
Seite laden ...
Seite laden ...
Seite laden ...
Seite laden ...
Seite laden ...
Seite laden ...
Seite laden ...
Seite laden ...
Seite laden ...
Seite laden ...
Seite laden ...
Seite laden ...
-
 1
1
-
 2
2
-
 3
3
-
 4
4
-
 5
5
-
 6
6
-
 7
7
-
 8
8
-
 9
9
-
 10
10
-
 11
11
-
 12
12
-
 13
13
-
 14
14
-
 15
15
-
 16
16
-
 17
17
-
 18
18
-
 19
19
-
 20
20
-
 21
21
-
 22
22
-
 23
23
-
 24
24
-
 25
25
-
 26
26
-
 27
27
-
 28
28
-
 29
29
-
 30
30
-
 31
31
-
 32
32
-
 33
33
-
 34
34
-
 35
35
-
 36
36
-
 37
37
-
 38
38
-
 39
39
-
 40
40
-
 41
41
-
 42
42
-
 43
43
-
 44
44
-
 45
45
-
 46
46
-
 47
47
-
 48
48
-
 49
49
-
 50
50
-
 51
51
-
 52
52
-
 53
53
-
 54
54
-
 55
55
-
 56
56
-
 57
57
-
 58
58
-
 59
59
-
 60
60
-
 61
61
-
 62
62
-
 63
63
-
 64
64
-
 65
65
-
 66
66
-
 67
67
-
 68
68
-
 69
69
-
 70
70
-
 71
71
-
 72
72
-
 73
73
-
 74
74
-
 75
75
-
 76
76
-
 77
77
-
 78
78
-
 79
79
-
 80
80
-
 81
81
-
 82
82
-
 83
83
-
 84
84
-
 85
85
-
 86
86
-
 87
87
-
 88
88
-
 89
89
-
 90
90
-
 91
91
-
 92
92
-
 93
93
-
 94
94
-
 95
95
-
 96
96
-
 97
97
-
 98
98
-
 99
99
-
 100
100
-
 101
101
-
 102
102
-
 103
103
-
 104
104
-
 105
105
-
 106
106
-
 107
107
-
 108
108
-
 109
109
-
 110
110
-
 111
111
-
 112
112
-
 113
113
-
 114
114
-
 115
115
-
 116
116
-
 117
117
-
 118
118
-
 119
119
-
 120
120
-
 121
121
-
 122
122
-
 123
123
-
 124
124
-
 125
125
-
 126
126
-
 127
127
-
 128
128
-
 129
129
-
 130
130
-
 131
131
-
 132
132
-
 133
133
-
 134
134
-
 135
135
-
 136
136
-
 137
137
-
 138
138
-
 139
139
-
 140
140
-
 141
141
-
 142
142
-
 143
143
-
 144
144
-
 145
145
-
 146
146
-
 147
147
-
 148
148


PURE 151110 Benutzerhandbuch
- Kategorie
- Radios
- Typ
- Benutzerhandbuch
- Dieses Handbuch ist auch geeignet für
in anderen Sprachen
- français: PURE 151110 Manuel utilisateur
- italiano: PURE 151110 Manuale utente
- Nederlands: PURE 151110 Handleiding
- dansk: PURE 151110 Brugermanual
Verwandte Papiere
-
PURE Evoke F4 Benutzerhandbuch
-
-
-
-
PURE Evoke D4 Benutzerhandbuch
-
PURE PURE EVOKE-1S Bedienungsanleitung
-
PURE Evoke Mio Bedienungsanleitung
-
-
PURE SIESTA S6 POLAR EU/UK Bedienungsanleitung
-
PURE Jongo S3 Benutzerhandbuch