
Instructions for Use
Mode d’emploi
Instrucciones de manejo
Bedienungsanleitung
Gebruiksaanwijzing
Istruzioni per l’uso
Bruksanvisning
Brugsanvisning
Käyttöohje
Manual de utilização
O‰ËÁ›Â˜ ¯Ú‹Ûˆ˜
AZ 7372
Portable Compact Disc Player
P
LAY
.
PA
U
S
E

2

3
English
Français
Español
Deutsch
Nederlands
Italiano
3
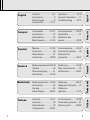
English
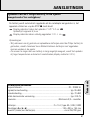
Controls........................6-7
Accessories.....................8
Power Supply ..................9
Connections .............10-11
Operation .................12-16
General information......17
Troubleshooting .......18-19
Français
Commandes ............20-21
Accessoires...................22
Alimentation..................23
Branchements..........24-25
Fonctionnement .......26-30
Généralités ...................31
Recherche des
pannes .....................32-33
Deutsch
Bedienungselemente48-49
Zubehör .........................50
Stromversorgung...........51
Anschlüsse...............52-53
Bedienung................54-58
Allg. Informationen .......59
Fehlersuche..............60-61
Nederlands
Bedieningstoetsen...62-63
Accessoires...................64
Voeding..........................65
Aansluitingen...........66-67
Bediening.................68-72
Algemene informatie .....73
Problemen
oplossen...................74-75
Español
Mandos....................34-35
Accesorios.....................36
Alimentación.................37
Conexiones...............38-39
Funcionamiento........40-44
Información general......45
Detección de
anomalías.................46-47
Italiano
Comandi...................76-77
Accessori.......................78
Alimentazione ...............79
Collegamenti............80-81
Funzionamento.........82-86
Informazioni generali......87
Ricerca guasti ..........88-89

4
Hiermit wird bescheinigt, daß dieses Gerät in Übereinstimmung mit den Be-
stimmungen der Amtsblattverfügung 1046/1984 funkentstört ist.
Der Deutschen Bundespost wurde das Inverkehrbringen dieses Gerätes angezeigt und
die Berechtigung zur Überprüfung der Serie auf Einhaltung der Bestimmungen einge-
räumt.
Typeskilt finnes på apparatens underside.
Norge
Deutschland
4

5
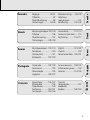
ŒÏÏËÓÈο
XÂÈÚÈÛÙ‹ÚÈ·...........146-147
EÍ·ÚÙ‹Ì·Ù·..................148
TÚÔÊÔ‰ÔÛ›· .................149
™˘Ó‰¤ÛÂȘ ............150-151
§ÂÈÙÔ˘ÚÁ›·............152-156
°ÂÓÈΤ˜
ÏËÚÔÊÔڛ˜ ...............157
¢ÈfiÚıˆÛË
‚Ï·‚ÒÓ.................158-159
Português
Comandos ............132-133
Acessorios...................134
Alimentação................135
Ligações...............136-137
Funcionamento.....138-142
Informações gerais.......143
Avarias.................144-145
Dansk
Betjeningsknapper104-105
Tilbehør........................106
Strømforsyning............107
Tilslutninger .........108-109
Anvendelse ..........110-114
Generel information ......115
Fejlfinding ............116-117
Svenska
Reglage....................90-91
Tillbehör.........................92
Strömförsörjning ...........93
Anslutningar.............94-95
Bruksanvisning.......96-100
Allmänna
upplysningar................101
Felsökning............102-103
Suomi
Käyttöpainikkeet..118-119
Tarvikkeet ....................120
Virransyöttö.................121
Kytkennät.............122-123
Käyttö...................124-128
Yleistä .........................129
Tarkistusluettelo ..130-131
Suomi
ŒÏÏËÓÈο
Português
Dansk
Svenska

6
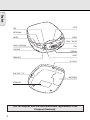
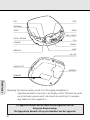
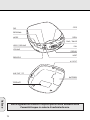
English
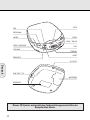
DSP
PROGRAM
MODE
HOLD / RESUME
VOLUME
PREVIOUS
LINE OUT /
p
BATTERIES
4.5 V DC
NEXT
DISPLAY
ESA
PLAY / PAUSE
OPEN
STOP
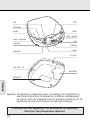
TYPEPLATE
This set complies with the radio interference requirements of the
European Community.

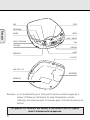
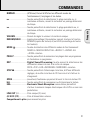
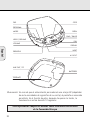
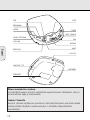
CONTROLS
7
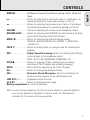
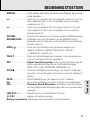
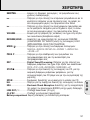
English
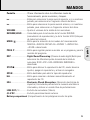
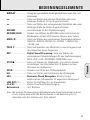
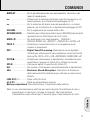
DISPLAY......................Window for showing the different playing modes, tracks and
times
§ .................................Button for selecting the next music track or, if held down, for
searching forward for a particular passage on the CD
∞ .................................Button for selecting the previous music track or, if held down,
for searching·backward for a particular passage on the CD
VOLUME......................Control for adjusting the volume at the headphone output
RESUME/HOLD ..........Switch for activating the RESUME function (resuming CD play)
and/or HOLD (blocking all buttons) function
MODE
00
......................Button for selecting the different playing modes:
SHUFFLE™SHUFFLE REPEAT ALL™REPEAT 1™REPEAT ALL
™SCAN™off
PROG P........................Button for storing tracks in a program and for reviewing the
program
DSP..............................Digital Sound Processing: Button for selecting the different
sound settings at the headphone output:
ROCK™POP™CAR™INCREDIBLE SURROUND™off
STOP 9........................Button for stopping CD play, deleting various settings,
switching off the CD player and activating charging.
OPEN ...........................Slide control for opening the lid of the CD player
2; ................................Button for starting and pausing CD play
ESA ..............................Electronic Shock Absorption: Switch for activating the
electronic buffer memory for an undisturbed sound
LINE OUT / p..............Headphone socket (3.5 mm)
4,5 V DC.......................Socket for external power supply
Battery compartment for inserting batteries
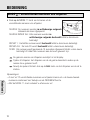
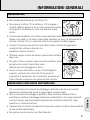
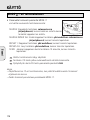
Note: In case of power supply via the DC jack (mains adapter or cigarette lighter in
your car) the display is backlighted. In battery mode, the illumination is
activated for 10 seconds after key operations.

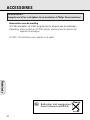
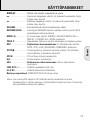
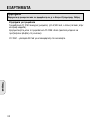
ACCESSORIES
8
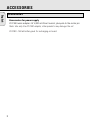
English
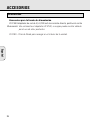
Accessories for power supply
AY 3160 mains adapter 4.5 V/400 mA Direct current, plus-pole to the center pin
Note: Use only the AY 3160 adapter, other products may damage the set.
AY 3361 - NiCad battery pack for recharging on board
Accessories

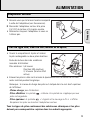
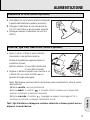
POWER SUPPLY
9
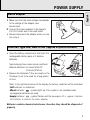
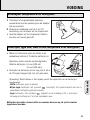
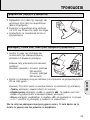
English
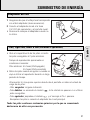
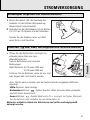
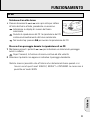
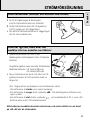
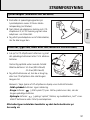
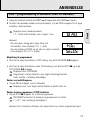
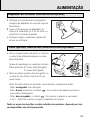
1 Make sure that the local voltage corresponds
to the voltage of the adapter (see
accessories).
2 Connect the mains adapter to the player's
4.5 V DC socket and to the wall outlet.
• Always disconnect the adapter when you are
not using it.
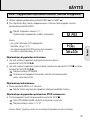
• Open the battery compartment and insert the
rechargeable battery pack or 2 alkaline
batteries.
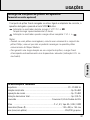
Typical playing times under normal conditions:
Alkaline batteries: 5.5 hours (ESA off)
4.5 hours (ESA on)
• Remove the batteries if they are empty or the
CD player is not to be used for a long period
of time.
Note: In the right-hand corner of the display the battery condition will be indicated:
-Full batteries: no indication.
-Weak batteries: -symbol lights up. This symbol is not available when
rechargeable batteries are used.
-Empty batteries: -symbol flashes and the message bAtt appears. Replace
the batteries or connect the mains adapter.
Batteries contain chemical substances, therefore they should be disposed of
properly.
Batteries, type LR6, UM3 or AA
(supplied or optional available)
Mains adapter

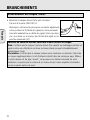
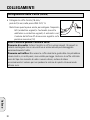
CONNECTIONS
10
English
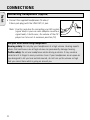
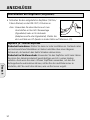
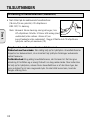
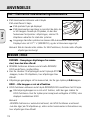
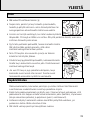
• Connect the supplied headphones (16 ohms/
3.5mm jack plug) with the LINE OUT/ p jack.
Note : Use this jack also for connecting your HiFi system
(signal lead) or your car radio (adapter cassette or
signal lead). In both cases, the volume of the CD
player has to be set to maximum position (10).
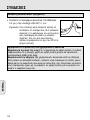
Use your head when using headphones
Hearing safety: Do not play your headphones at a high volume. Hearing experts
advise that continuous use at high volume can permanently damage hearing.
Traffic safety: Do not use headphones while driving a vehicle. It may create a
hazard and it is illegal in many countries. Even if your headphones are an open-air
type designed to let you hear outside sounds, do not turn up the volume so high
that you cannot hear what is going on around you.
Connecting headphones
(supplied)

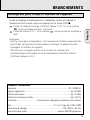
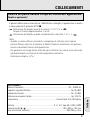
CONNECTIONS
11
English
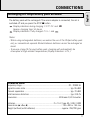
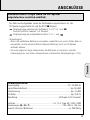
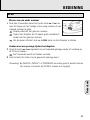
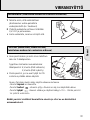
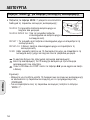
The battery pack will be recharged if the mains adapter is connected, the set is
switched off and you press the STOP 9 button.
yy
Display indication during charging: CHARGE and
Approx. charging time: 5.5 hours.
yy
Display indication if fully charged: FULL and
Notes:
- When using rechargeable batteries, we advise the use of the Philips battery pack
only, as conventional separate Nickel-Cadmium batteries cannot be recharged on
board.
- To ensure a long life for your battery pack, charging will automatically be
interrupted at high ambient temperatures (Display indication: HOt).
Recharging of Philips battery pack on board
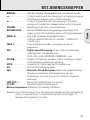
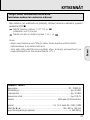
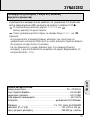
TECHNICAL DATA
Frequency range .......................................................................................20 - 20000 Hz
Signal-to-noise ratio ....................................................................................typ. 95 dBA
Channel separation ......................................................................................typ. 70 dBA
Total harmonic distortion .............................................................................typ. 0.05 %
Conversion...............................................................................Bitstream D/A Converter
Batteries........................................................................2 x 1.5 V, type AA / LR6 / UM3
Dimensions (w x h x d).................................................................134 x 30.5 x 154 mm
Weight (without/with batteries) ..................................................approx. 250/290 gms

OPERATION
12
English
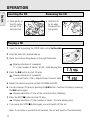
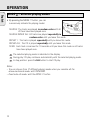
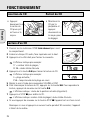
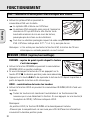
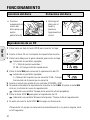
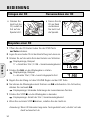
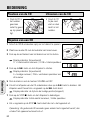
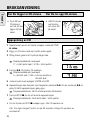
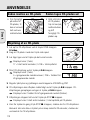
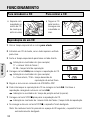
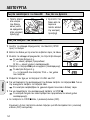
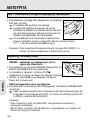
1 Open the lid by pushing the OPEN slide control to the side.
2 Insert an audio CD, printed side up.
3 Close the lid by pushing down on the right-hand side.
yy
Display indication of: (example)
17 = total number of tracks / 51:06 = total playing time
4 Press the 2; button to start CD play.
yy
Display indication of: (example)
4 = current track / 2:56 = elapsed time of current track
5 Adjust the sound using the controls VOLUME and DSP.
6 You can interrupt CD play by pressing the 2; button. Continue CD play by pressing
the 2; button again.
yy
Display indication of: time of the current position (flashing).
7 Press the STOP 9 button to stop CD play.
yy
Display indication of: total number of tracks / the total playing time.
• If you press the STOP 9 button again, you will switch off the set.
Note: If no button is pressed for 90 seconds, the set will switch off automatically.
Playing a CD
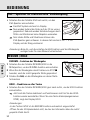
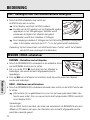
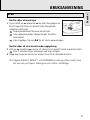
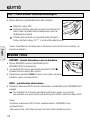
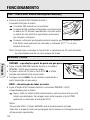
• Push gently on
the CD center
so that it fits
onto the hub.
• Hold the CD
by its edge
and press the
hub gently.
Inserting the CD Removing the CD

OPERATION
13
English
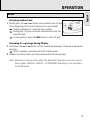
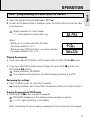
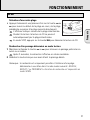
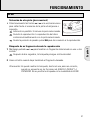
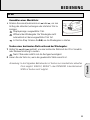
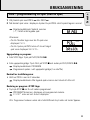
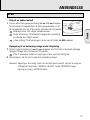
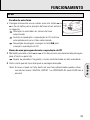
Selecting another track
• Briefly press the ∞ or § button once/several times to skip
to the beginning of the current/previous or next track(s).
yy
Display indication of: selected track number.
yy
During play: CD play continues automatically with the
selected track.
yy
In stop position: press the 2; button to start CD play.
Searching for a passage during CD play
1 Hold down the ∞ or § button to find a particular passage in forward or backward
direction.
yy
After 2 seconds, searching will start at high speed.
2 Release the button when you have reached the desired passage.
Note: Searching is only possible within the particular track when you are in one of
these modes: SHUFFLE, REPEAT 1 or PROGRAM. Searching is not possible in
the SCAN mode.
M
O
D
E
P
R
O
G
.
∞ §

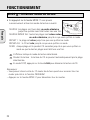
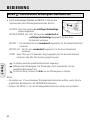
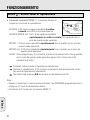
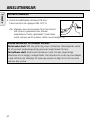
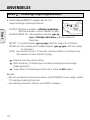
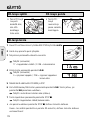
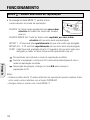
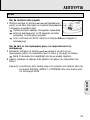
• By pressing the MODE 0 button, you can
successively activate the playing modes:
SHUFFLE: The tracks are played
in random order
until all
of them have been played once.
SHUFFLE REPEAT ALL: All tracks are played
repeatedly in
random order
until you leave this mode.
REPEAT 1: The track is played
repeatedly
until you leave this mode.
REPEAT ALL: The CD is played
repeatedly
until you leave this mode.
SCAN: Each track is scanned for 10 seconds until you leave this mode or all tracks
have been played once.
yy
The selected playing mode is indicated in the display.
yy
During play: CD play continues automatically with the selected playing mode.
yy
In stop position: press the 2; button to start CD play.
Notes:
–
You can choose from 12 different playing modes when you combine all the
above-mentioned modes with PROGRAM.
–
Deactivate all modes with the MODE 0 button.
PR
O
G.
M
O
D
E
MODE
00
– different playing modes
OPERATION
14
English

OPERATION
15
English
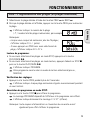
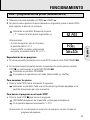
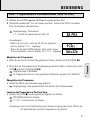
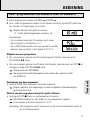
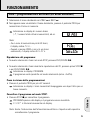
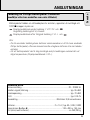
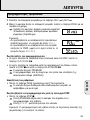
1 Select the desired track with PREV ∞ or NEXT §.
2 As soon as the desired track is displayed, press the PROG button to store the track
in the memory.
yy
Display indication of: track number
/ P / total number of stored tracks, e.g.
Notes:
- When you try to store more than 25 tracks,
the display indicates
FULL.
-
When you press PROG and there is no track selected,
the display indicates
SELECt.
Playing the program:
• If you have selected the tracks in STOP mode, press the PLAY/PAUSE 2; button.
• If you have selected the tracks during CD play, first press STOP 9 and then the
PLAY/PAUSE 2; button.
yy
Display indication: PROGRAM.
yy
Your program will be played in the selected playing mode (e.g. shuffle).
Reviewing the settings:
• Press the PROG button for more than 2 seconds.
yy
Display indication: each stored track successively flashes for a short moment.
Erasing the program in STOP mode:
• Press the STOP 9 button to erase the program.
yy
PROGRAM disappears on the display and your program is erased.
yy
CLEAR lights up briefly on the display.
Note: Interrupting the power supply or opening the lid will also erase the program.
PROG – programming of tracks (max. 25 tracks)

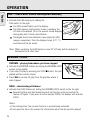
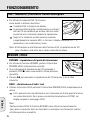
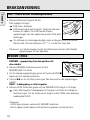
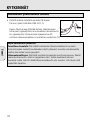
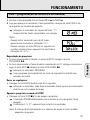
• Activate the ESA memory by sliding the
ESA switch to the right.
yy
The ESA symbol lights up in the display.
yy
The ESA memory continuously stores in advance the
CD data to be played. This is to prevent sound skipping
during play due to shock and vibration.
yy
Prolonged shocks and vibrations may empty the ESA
memory completely. Then the display shows SORRY
and there will be no sound.
Note: When switching the ESA feature on and off, CD play will be delayed or
interrupted for a short time.
RESUME – playing from where you have stopped
• Activate the RESUME feature by sliding the RESUME/HOLD
switch to the middle.
• If you stop CD play by pressing the STOP 9 button, the last
played position will be stored.
• Press 2; to resume CD play from the position where it
was stopped.
HOLD – deactivating all buttons
• Activate the HOLD feature by sliding the RESUME/HOLD switch to the far right.
yy
Now all buttons are deactivated and will not function until you switch the
feature off again. If you press a button (except OPEN), the display will indicate
HOLD.
Notes:
-In the hold position, the resume function is automatically activated.
-Do not open the lid as this erases the information about the last position played.
P
R
O
G
.
MO
D
E
RESUME / HOLD
ESA – Electronic Shock Absorption Memory
OPERATION
16
English

GENERAL INFORMATION
17
English
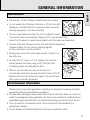
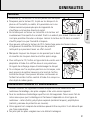
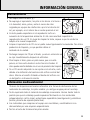
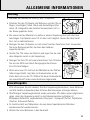
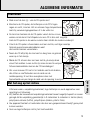
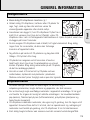
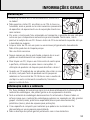
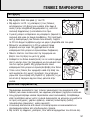
• The lens X of the CD player should never be touched!
• Do not expose the CD player, batteries or CDs to rain and
dampness, sand and dust or to excessive heat caused by
heating equipment, or to direct sunlight.
• The lens may cloud over when the set is suddenly moved
from cold to warm surroundings. Playing a CD is not possible then.
Leave the CD player in a warm environment until the moisture evaporates.
• You can clean the CD player with a soft and slightly dampened
chamois leather. Do not use any cleaning agents
as they may have a corrosive effect.
• Always pick up the CD by the edge and put it back in its
box after use.
• To clean the CD, wipe it off in a straight line from the
center towards the edge using a soft, lint-free cloth.
A cleaning agent may damage the disc!
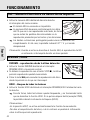
• When a new CD does not stay on the hub, this
is caused by small burrs around the center hole of the CD.
Remove the burrs by rubbing the edge of the center hole
with a pen or similar instrument.
Please observe the local regulations regarding the disposal of packing materials,
exhausted batteries and obsolete equipment.
• All redundant packaging material has been omitted. We have done our utmost to
make the packaging easyly separable into three mono-materials: cardboard (box),
expandable polystyrene (buffer), and polyethylene (bags, protective foam sheet).
• Your set consists of materials which can be recycled if disassembled by a
specialized company.
• Do not dispose of exhausted batteries with your household waste.
Environmental information
Maintenance

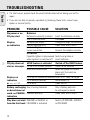
TROUBLESHOOTING
18
English
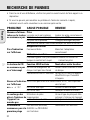
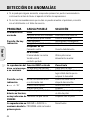
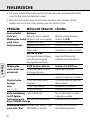
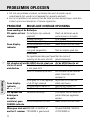
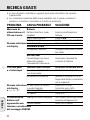
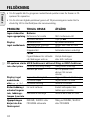
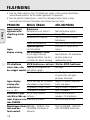
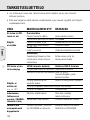
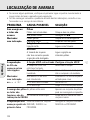
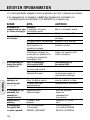
PROBLEM POSSIBLE CAUSE SOLUTION
No power or no Batteries
CD play start Batteries incorrectly inserted Insert the batteries correctly
Use of new batteries Press 2;
Display: Batteries are empty Change/recharge the batteries
no indication Contact pins are dirty Clean them with a cloth
mains adapter
Loose connection Connect the adapter securely
In-car use
Cigarette lighter is not powered
Switch on ignition or
when ignition is switched off insert batteries
CD play does not
HOLD feature is activated Switch off the HOLD feature
start or interrupts CD lid is not closed securely Close the lid securely
Moisture condensation Leave the player in a warm
place until the moisture
evaporates
Display: no CD is not or incorrectly inserted Insert a CD, label facing up
indication CD is badly scratched Use another CD
or no dISC CD is dirty Clean the CD
Battery-recharging Use of wrong batteries
Only a battery
pack can
on board does not be recharged on board
work, no CHARGE- Contacts are dirty Clean them with a cloth
indication
Play does not start RESUME or SHUFFLE or Switch off RESUME, SHUFFLE
from the first track PROGRAM is activated or PROGRAM
• If a fault occurs, please check the points listed below before taking your set for
repair.
• If you are not able to remedy a problem by following these hints, consult your
dealer or service facility.
☞

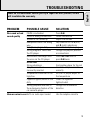
TROUBLESHOOTING
19
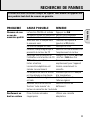
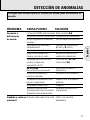
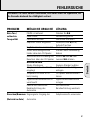
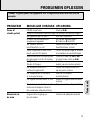
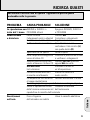
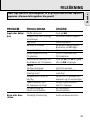
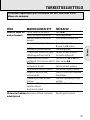
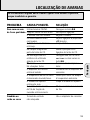
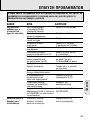
PROBLEM POSSIBLE CAUSE SOLUTION
No sound or bad PAUSE is activated Press 2;
sound quality Loose or wrong connections Check connections
Volume is not turned up Adjust the volume
Headphones worn the wrong Pay attention to the L (left)
way and R (right) indications
Headphone plug is dirty Clean the headphone plug
Strong magnetic fields near Change the player’s position
the CD player or connections
Electrostatic discharge from Press ∞ or § once or
the user via the CD player press 2; twice
In-car use
Strong vibrations Find another place for the set
Adapter cassette is Insert the adapter cassette
incorrectly inserted correctly
Temperature inside car is too Let the CD player adjust to
high/low the temperature
Cigarette lighter/socket is too Clean the cigarette
dirty lighter/socket
Wrong playback direction of Change the autoreverse
the autoreverse feature of the
direction
car cassette player
Hum or noise in-carUnfit car radio input socket Use the adapter cassette
English
Under no circumstances should you try to repair the unit yourself, as this
will invalidate the warranty.

20
Français
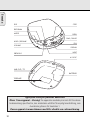
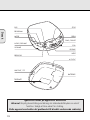
DSP
PROGRAM
MODE
HOLD / RESUME
VOLUME
PREVIOUS
LINE OUT /
p
BATTERIES
4.5 V DC
NEXT
DISPLAY
ESA
PLAY / PAUSE
OPEN
STOP
TYPEPLATE
Cet appareil est conforme aux normes d'interférence radio en vigueur
dans la Communauté européenne.
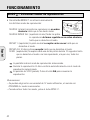
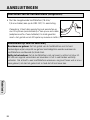
Remarque : en cas d'alimentation par la fiche jack DC (secteur ou allume-cigares de la
voiture), l'afficheur est rétroéclairé. En mode d'alimentation sur piles,
l'affichage reste allumé pendant 10 secondes après l'utilisation des touches de
fonction.
Seite wird geladen ...
Seite wird geladen ...
Seite wird geladen ...
Seite wird geladen ...
Seite wird geladen ...
Seite wird geladen ...
Seite wird geladen ...
Seite wird geladen ...
Seite wird geladen ...
Seite wird geladen ...
Seite wird geladen ...
Seite wird geladen ...
Seite wird geladen ...
Seite wird geladen ...
Seite wird geladen ...
Seite wird geladen ...
Seite wird geladen ...
Seite wird geladen ...
Seite wird geladen ...
Seite wird geladen ...
Seite wird geladen ...
Seite wird geladen ...
Seite wird geladen ...
Seite wird geladen ...
Seite wird geladen ...
Seite wird geladen ...
Seite wird geladen ...
Seite wird geladen ...
Seite wird geladen ...
Seite wird geladen ...
Seite wird geladen ...
Seite wird geladen ...
Seite wird geladen ...
Seite wird geladen ...
Seite wird geladen ...
Seite wird geladen ...
Seite wird geladen ...
Seite wird geladen ...
Seite wird geladen ...
Seite wird geladen ...
Seite wird geladen ...
Seite wird geladen ...
Seite wird geladen ...
Seite wird geladen ...
Seite wird geladen ...
Seite wird geladen ...
Seite wird geladen ...
Seite wird geladen ...
Seite wird geladen ...
Seite wird geladen ...
Seite wird geladen ...
Seite wird geladen ...
Seite wird geladen ...
Seite wird geladen ...
Seite wird geladen ...
Seite wird geladen ...
Seite wird geladen ...
Seite wird geladen ...
Seite wird geladen ...
Seite wird geladen ...
Seite wird geladen ...
Seite wird geladen ...
Seite wird geladen ...
Seite wird geladen ...
Seite wird geladen ...
Seite wird geladen ...
Seite wird geladen ...
Seite wird geladen ...
Seite wird geladen ...
Seite wird geladen ...
Seite wird geladen ...
Seite wird geladen ...
Seite wird geladen ...
Seite wird geladen ...
Seite wird geladen ...
Seite wird geladen ...
Seite wird geladen ...
Seite wird geladen ...
Seite wird geladen ...
Seite wird geladen ...
Seite wird geladen ...
Seite wird geladen ...
Seite wird geladen ...
Seite wird geladen ...
Seite wird geladen ...
Seite wird geladen ...
Seite wird geladen ...
Seite wird geladen ...
Seite wird geladen ...
Seite wird geladen ...
Seite wird geladen ...
Seite wird geladen ...
Seite wird geladen ...
Seite wird geladen ...
Seite wird geladen ...
Seite wird geladen ...
Seite wird geladen ...
Seite wird geladen ...
Seite wird geladen ...
Seite wird geladen ...
Seite wird geladen ...
Seite wird geladen ...
Seite wird geladen ...
Seite wird geladen ...
Seite wird geladen ...
Seite wird geladen ...
Seite wird geladen ...
Seite wird geladen ...
Seite wird geladen ...
Seite wird geladen ...
Seite wird geladen ...
Seite wird geladen ...
Seite wird geladen ...
Seite wird geladen ...
Seite wird geladen ...
Seite wird geladen ...
Seite wird geladen ...
Seite wird geladen ...
Seite wird geladen ...
Seite wird geladen ...
Seite wird geladen ...
Seite wird geladen ...
Seite wird geladen ...
Seite wird geladen ...
Seite wird geladen ...
Seite wird geladen ...
Seite wird geladen ...
Seite wird geladen ...
Seite wird geladen ...
Seite wird geladen ...
Seite wird geladen ...
Seite wird geladen ...
Seite wird geladen ...
Seite wird geladen ...
Seite wird geladen ...
Seite wird geladen ...
Seite wird geladen ...
Seite wird geladen ...
Seite wird geladen ...
Seite wird geladen ...
-
 1
1
-
 2
2
-
 3
3
-
 4
4
-
 5
5
-
 6
6
-
 7
7
-
 8
8
-
 9
9
-
 10
10
-
 11
11
-
 12
12
-
 13
13
-
 14
14
-
 15
15
-
 16
16
-
 17
17
-
 18
18
-
 19
19
-
 20
20
-
 21
21
-
 22
22
-
 23
23
-
 24
24
-
 25
25
-
 26
26
-
 27
27
-
 28
28
-
 29
29
-
 30
30
-
 31
31
-
 32
32
-
 33
33
-
 34
34
-
 35
35
-
 36
36
-
 37
37
-
 38
38
-
 39
39
-
 40
40
-
 41
41
-
 42
42
-
 43
43
-
 44
44
-
 45
45
-
 46
46
-
 47
47
-
 48
48
-
 49
49
-
 50
50
-
 51
51
-
 52
52
-
 53
53
-
 54
54
-
 55
55
-
 56
56
-
 57
57
-
 58
58
-
 59
59
-
 60
60
-
 61
61
-
 62
62
-
 63
63
-
 64
64
-
 65
65
-
 66
66
-
 67
67
-
 68
68
-
 69
69
-
 70
70
-
 71
71
-
 72
72
-
 73
73
-
 74
74
-
 75
75
-
 76
76
-
 77
77
-
 78
78
-
 79
79
-
 80
80
-
 81
81
-
 82
82
-
 83
83
-
 84
84
-
 85
85
-
 86
86
-
 87
87
-
 88
88
-
 89
89
-
 90
90
-
 91
91
-
 92
92
-
 93
93
-
 94
94
-
 95
95
-
 96
96
-
 97
97
-
 98
98
-
 99
99
-
 100
100
-
 101
101
-
 102
102
-
 103
103
-
 104
104
-
 105
105
-
 106
106
-
 107
107
-
 108
108
-
 109
109
-
 110
110
-
 111
111
-
 112
112
-
 113
113
-
 114
114
-
 115
115
-
 116
116
-
 117
117
-
 118
118
-
 119
119
-
 120
120
-
 121
121
-
 122
122
-
 123
123
-
 124
124
-
 125
125
-
 126
126
-
 127
127
-
 128
128
-
 129
129
-
 130
130
-
 131
131
-
 132
132
-
 133
133
-
 134
134
-
 135
135
-
 136
136
-
 137
137
-
 138
138
-
 139
139
-
 140
140
-
 141
141
-
 142
142
-
 143
143
-
 144
144
-
 145
145
-
 146
146
-
 147
147
-
 148
148
-
 149
149
-
 150
150
-
 151
151
-
 152
152
-
 153
153
-
 154
154
-
 155
155
-
 156
156
-
 157
157
-
 158
158
-
 159
159
-
 160
160


Philips AZ 7372 Bedienungsanleitung
- Kategorie
- CD-Spieler
- Typ
- Bedienungsanleitung
in anderen Sprachen
- English: Philips AZ 7372 Owner's manual
- français: Philips AZ 7372 Le manuel du propriétaire
- español: Philips AZ 7372 El manual del propietario
- italiano: Philips AZ 7372 Manuale del proprietario
- Nederlands: Philips AZ 7372 de handleiding
- português: Philips AZ 7372 Manual do proprietário
- dansk: Philips AZ 7372 Brugervejledning
- svenska: Philips AZ 7372 Bruksanvisning
- suomi: Philips AZ 7372 Omistajan opas
Verwandte Artikel
-
Philips AZ7460/00 Benutzerhandbuch
-
-
-
-
-
-
-
-
-