Neomounts FPMA-D540BLACK Benutzerhandbuch
- Kategorie
- Flachbildschirm-Schreibtischhalterungen
- Typ
- Benutzerhandbuch

FPMA-D540BLACK
IT
EN
NL
DE
FR
ES
PT
DK
Monitor desk mount
Monitor bureausteun
Monitor Tischhalterung
Support moniteur de bureau
Supporto da scrivania per monitor
Soporte de escritorio para monitor
Suporte de mesa para monitor
Bordbeslag skærm
NO
SE
FI
PL
CS
SK
RO
Bordstativ til skjerm
Skrivbordsfäste för bildskärm
Näytön pöytäteline
Uchwyt nabiurkowy do monitora
Stolní držák monitoru
Držiak na monitor
Suport de birou pentru monitor
WWW.NEOMOUNTS.COM
INSTRUCTION MANUAL
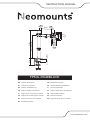
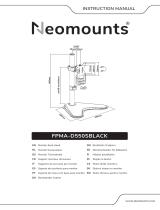
100mm
75mm
114mm
443mm
min21-max422mm
105mm
min10mm-max88mm
75mm
100mm
114mm
38mm
185mm
60mm
±180°
±90°
±90°
-45°
+45°

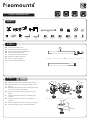
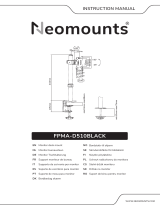
PARTS
FPMA-D540BLACK
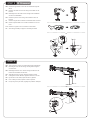
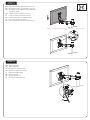
STEP 1
Place the decorative cover
Plaats het decoratieve afdekkapje
Setzen Sie die dekorative Abdeckung
Placez le couvercle décoratif
Posizionare il coperchio decorativo
Coloque la cubierta decorativa
Colocar a capa decorativa
Umieścić osłonę dekoracyjną
EN
NL
DE
FR
IT
ES
PT
PL
Mount the clamp to the rod and install to the desk
Monteer de klem aan de stang en installeer aan het
bureau
Befestigen Sie die Klemme an der Stange und instal-
lieren Sie sie auf dem Schreibtisch
Montez la pince sur la barre et installez-la sur le
bureau
Montare il morsetto sulla barra e installarlo sulla
scrivania
Monte la abrazadera en la barra e instálela en el
escritorio
Montar a braçadeira na barra e instalar na secretária
Zamontuj zacisk na pręcie i zainstaluj na biurku
EN
NL
DE
FR
IT
ES
PT
PL
Tool
B. (x1) C. (x1) D. (x1) E. (x1) F. (x1) G. (x1)
D
10-88mm
C
I
H
L
H. (x5)
I. (x3) J. (x1) K. (x1) L. 4mm
(x1)
M. 6mm
(x1)
M-A. M4x12
(x4)
M-B. M4x16
(x4)
M-C. M5x12
(x4)
M-D. M5x16
(x4)
M-F. (x4)M-E. D5
(x4)
A. (x1)
D
E
75x75 -
100x100 mm
2,1-42,2 cm
0-8 kg 0-26,6 cm
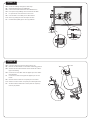
STEP 2ClampA

Attach the arm to the rod, adjust the height and tighten
Bevestig de arm aan de stang, stel de juiste hoogte in
en draai vast
Befestigen Sie den Arm an der Stange, stellen Sie die
Höhe ein und ziehen Sie ihn fest
Attachez le bras à la tige, réglez la hauteur et fixer
Collegare il braccio all'asta, regolare l'altezza e serrare
Fije el brazo a la varilla, ajuste la altura y apriete
Fixar o braço à haste, ajustar a altura e apertar
Przymocuj ramię do rurki, regulacja wysokości i dokręcić
EN
NL
DE
FR
IT
ES
PT
PL
STEP 3
Mount the grommet to the rod and install through the
desk
Monteer de doorvoer aan de stang en installeer in het
bureau
Befestigen Sie die Tülle an der Stange und installieren
Sie sie im Schreibtisch
Montez le passe-fil sur la tige et installez-le dans le
bureau
Montare il gommino sull'asta e installarlo nella scrivania
Monte el pasacables en la varilla e instálelo en el escri-
torio
Montar a argola na vara e instalar na secretária
Zamontuj przelotkę na pręcie i zainstaluj w biurku
EN
NL
DE
FR
IT
ES
PT
PL
10-88mm
C
G
H
D
J
B
F
M
STEP 2GrommetB

* Not Included
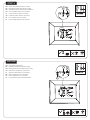
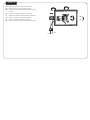
Attach the VESA plate to the monitor
Bevestig de VESA plaat aan de monitor
Befestigen Sie die VESA-Platte am Monitor
Fixez la plaque VESA sur le moniteur
Fissare la piastra VESA al monitor
Coloque la placa VESA en el monitor
Fixar a placa VESA no monitor
Przymocuj płytkę VESA do monitora
EN
NL
DE
FR
IT
ES
PT
PL
Use spacers if necessary
Gebruik afstandhouders indien nodig
Montage der Distanzscheiben wenn nötig
Utilisez des entretoises si nécessaire
Utilizzare distanziatori, se necessario
Utilice separadores si es necesario
Utilize separadores se necessário
Użyj dystansów jeśli jest taka potrzeba
EN
NL
DE
FR
IT
ES
PT
PL
OPTION
A
M-A
M-C
M-E
* Not Included
A
M-B
M-D
M-E
M-F
STEP 4

Attach the screen to the bracket and secure it
Bevestig het scherm op de beugel en zet vast
Befestigen Sie den Bildschirm an der Halterung
und sichern Sie ihn
Attachez l'écran au support et fixez-le
Fissare lo schermo alla staffa e fissarlo
Coloque la pantalla en el soporte y fíjela
Fixar o ecrã ao suporte e fixá-lo
Przymocuj ekran do uchwytu i zabezpiecz go
EN
NL
DE
FR
IT
ES
PT
PL
STEP 5
Adjust the torque
Stel het koppel in
Einstellen des Drehmoments
Ajustez les couples de serrage
Regolazione della coppia
Ajuste el tornillo
Ajustar os parafusos
Ustawić momenty obrotowe
EN
NL
DE
FR
IT
ES
PT
PL
STEP 6
K
M

Route the cable(s) through the cable clips
Geleid de kabel(s) door de kabelclips
Führen Sie das/die Kabel durch die Kabelklemmen
Faire passer le(s) câble(s) dans les attaches de câble
Far passare il/i cavo/i attraverso i fermacavi
Pase el cable o los cables por las abrazaderas
Guiar o(s) cabo(s) através dos clipes do cabo
Przełóż kabel (kable) przez uchwyty kablowe
EN
NL
DE
FR
IT
ES
PT
PL
STEP 7
Insert the Allen keys into the slot for future use
Bewaar de inbussleutels in de houder toekomstig gebruik
Stecken Sie den Inbusschlüssel in den Schlitz für zukünf-
tige Verwendung
Conservez les clés Allen dans le support pour une utilisa-
tion ultérieure
Conservare le chiavi a brugola nel supporto per un uso
futuro
Guarde las llaves Allen en el soporte para uso futuro
Manter as chaves Allen no suporte para utilização futura
Zachować klucze imbusowe wuchwytach do wykorzys-
tania w przyszłości
EN
NL
DE
FR
IT
ES
PT
PL
STEP 8
M
L

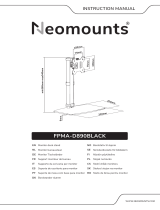
Adjust the mount to the desired position
Stel de steun in op de gewenste positie
Positionieren die Halterung in der gewünschten
Position
Ajustez le support à la position souhaitée
Regolare il supporto nella posizione desiderata
Ajuste el soporte a la posición deseada
Ajuste o suporte na posição desejada
Dostosuj pozycję uchwytu do twoich wymagań
EN
NL
DE
FR
IT
ES
PT
PL
STEP 9
360°
180°
+45°
-45°
180°

-
 1
1
-
 2
2
-
 3
3
-
 4
4
-
 5
5
-
 6
6
-
 7
7
-
 8
8


Neomounts FPMA-D540BLACK Benutzerhandbuch
- Kategorie
- Flachbildschirm-Schreibtischhalterungen
- Typ
- Benutzerhandbuch
in anderen Sprachen
- français: Neomounts FPMA-D540BLACK Manuel utilisateur
- español: Neomounts FPMA-D540BLACK Manual de usuario
- italiano: Neomounts FPMA-D540BLACK Manuale utente
- português: Neomounts FPMA-D540BLACK Manual do usuário
Verwandte Artikel
-
 Neomounts FPMA-D550DDBLACK Benutzerhandbuch
-
 Neomounts FPMA-D550SBLACK Benutzerhandbuch
-
 Neomounts FPMA-D510BLACK Benutzerhandbuch
-
 Neomounts FPMA-D890BLACK Benutzerhandbuch
-
 Neomounts FPMA-D550DDVBLACK Monitor Desk Stand Benutzerhandbuch
-
Neomounts FPMA-D550DDVBLACK Benutzerhandbuch
-
 Neomounts FPMA-D550D4BLACK Benutzerhandbuch
-
Neomounts FPMA-D550D3BLACK Benutzerhandbuch
-
Neomounts FPMA-D850BLACK Benutzerhandbuch
-
Neomounts FPMA-D650BLACK Benutzerhandbuch


Andere Dokumente
-
Newstar NM-D335BLACK 10-30�� Bedienungsanleitung
-
Sanus SD103 Benutzerhandbuch
-
-
Fellowes LOTUS RT DUAL WHITE Bedienungsanleitung
-
MyBinding Fellowes 8081701 Lotus RT White Single Display Sit Stand Workstation Benutzerhandbuch
-
-