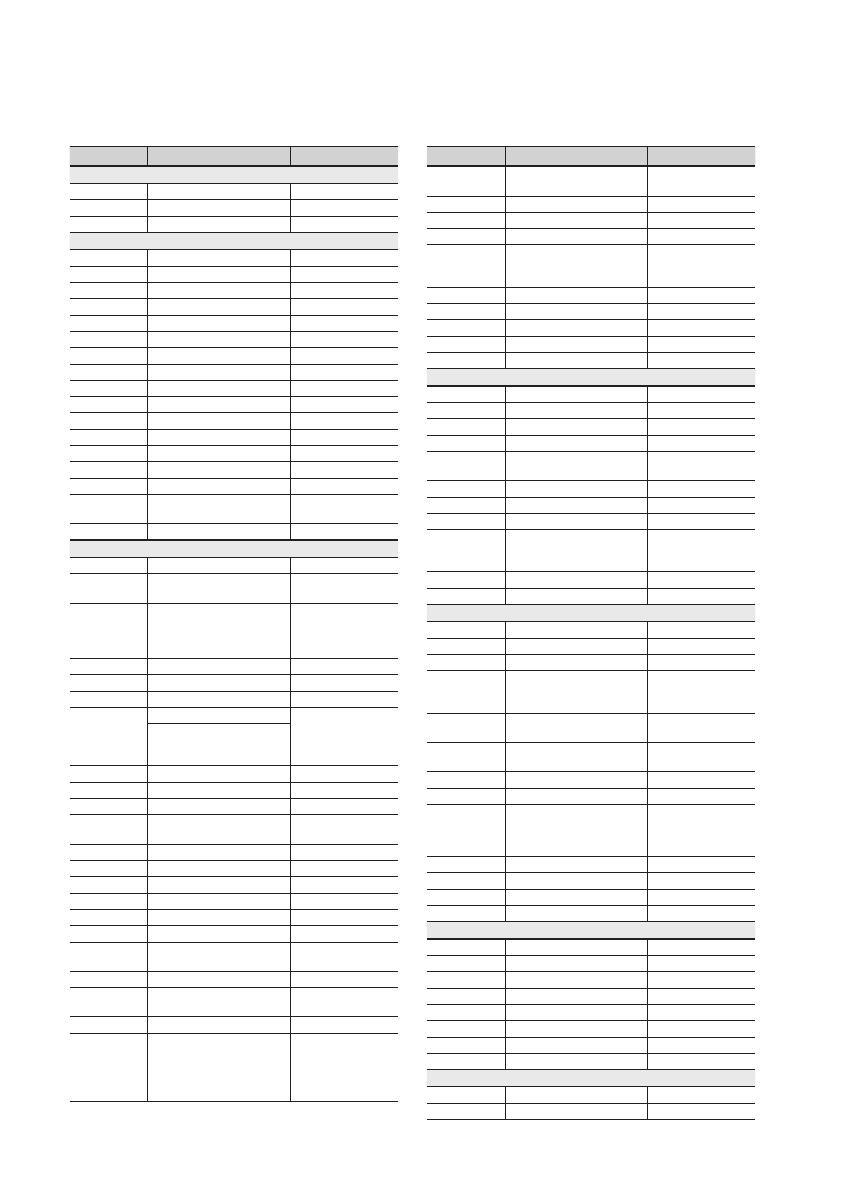
Samsung BD-D8200 Benutzerhandbuch

Kategorie
DVD Spieler
Typ
Benutzerhandbuch
imagine the possibilities
Thank you for purchasing this Samsung product.
To receive a more complete service,
please register your product at
www.samsung.com/register
BD-HDD Combo
user manual
BD-D8200
BD-D8500
02063N-BD-D8200,D8500-XN-ENG-.indb 1 2012-01-12 오전 11:38:20
16 English
Getting Started
Video File Support
File
Extention
Container Video Codec Resolution
Frame rate
(fps)
Bit rate
(Mbsp)
Audio Codec
*.avi
AVI
DivX 3.11/4.x/5.1/6.0 1920x1080 6 ~ 30
8
MP3
AC3
LPCM
ADPCM
DTS Core
H.264 BP/MP/HP 1920x1080 6 ~ 30
25
MPEG4 SP/ASP 1920x1080 6 ~ 30
8
Motion JPEG 1920x1080 6 ~ 30
8
*.mkv
MKV
DivX 3.11/4.x/5.1/6.0 1920x1080 6 ~ 30
8
MP3
AC3
LPCM
ADPCM
DTS Core
H.264 BP/MP/HP 1920x1080 6 ~ 30
25
MPEG4 SP/ASP 1920x1080 6 ~ 30
8
Motion JPEG 1920x1080 6 ~ 30
8
*.asf
ASF
DivX 3.11/4.x/5.1/6.0 1920x1080 6 ~ 30
8
MP3
AC3
LPCM
ADPCM
WMA
H.264 BP/MP/HP 1920x1080 6 ~ 30
25
MPEG4 SP/ASP 1920x1080 6 ~ 30
8
Motion JPEG 1920x1080 6 ~ 30
8
*.wmv
ASF Window Media Video v9 1920x1080 6 ~ 30
25 WMA
*.mp4
MP4
H.264 BP/MP/HP 1920x1080 6 ~ 30
25
MP3
ADPCM
AAC
MPEG4 SP/ASP 1920x1080 6 ~ 30
8
*.3gp
3GPP
H.264 BP/MP/HP 1920x1080 6 ~ 30
25
ADPCM
AAC
HE-AAC
MPEG4 SP/ASP 1920x1080 6 ~ 30
8
*.vro
VRO
VOB
MPEG2 1920x1080 24/25/30
30
AC3
MPEG
LPCM
MPEG1 352x288 24/25/30
30
*.mpg
*.mpeg
PS
MPEG1 352x288 24/25/30
30
AC3
MPEG
LPCM
AAC
MPEG2 1920x1080 24/25/30
30
H.264 1920x1080 6 ~ 30
25
*.ts
*.tp
*.trp
TS
MPEG2 1920x1080 24/25/30
30
AC3
AAC
MP3
DD+
HE-AAC
H.264 1920x1080 6 ~ 30
25
VC1 1920x1080 6 ~ 30
25
02063N-BD-D8200,D8500-XN-ENG-.indb 16 2012-01-12 오전 11:38:21
English 17
03 Getting Started
Limitations
- Even when the file is encoded by a supported
codec mentioned above, a file might not be
played if its content has a problem.
- Normal playback is not guaranteed if the file's
container information is wrong or the file itself is
corrupted.
- Files having higher Bit rate/frame rate than
standard may stutter with sound/video
playback.
- Seek (skip) function is not available if the file's
index table is damaged.
- When you playback a file remotely through
network connection, video playback may stutter
depending on established network speed.
Video decoder
- Supports up to H.264 Level 4.1
- Does not support H.264 FMO/ASO/RS, VC1
SP/MP/AP L4 and AVCHD
- MPEG4 SP, ASP:
Below 1280x720: 60 frames max
Above 1280x720: 30 frames max
- Does not support GMC 2 or higher
Audio decoder
- Supports WMA 7, 8, 9 and STD
- Does not support WMA 9 PRO multi-channel
lossless audio decoding if number of channels
is more than 2
- Does not support WMA sampling rate of
22050Hz mono
- Supports DTS Core (5.1 ch, 16 bit, 48kHz) only
- Does not support APDCM MULAW, ALAW
Optical Media
- CD Media
Bit Rate : Max 9.6Mbps
- DVD Media
Bit Rate : Max 22.16Mbps
Supported DivX subtitle file formats
*.ttxt, *.smi, *.srt, *.sub, *.txt
Music File Support
File
Extension
Container
Audio
Codec
Support Range
*.mp3
MP3
MP3 -
*.wma
WMA
WMA
Compliant with
WMA version 10
* Sampling rates (in
kHz) - 8, 11, 16,
22, 32, 44.1, 48
* Bit rates - All bit-
rates in the range
5kbps to 384kbps
02063N-BD-D8200,D8500-XN-ENG-.indb 17 2012-01-12 오전 11:38:21
English 19
03 Getting Started
Logos of Discs the Product Can Play
Blu-ray Disc 3D Blu-ray Disc DTS-HD Master Audio DivX
BD-LIVE Dolby TrueHD
PAL broadcast System in U.K.,
France, Germany, etc.
Java
Accessories
Check for the supplied accessories below.
BD-HDD/TV
2D
3D
0000-000000
POWER
1 2 3
4 5 6
7 8 9
DISC MENU
TITLE MENU
0
TTX/MIX
BD TV
TIME SHIFT
TV VOL PROG
TV SOURCE
1
1
CH LIST
SMART
GUIDE
i
MENU
2D
3D
FULL
SCREEN
A B C D
INFOTOOLS
EXIT
RETURN
...
?
×
HUB
SEARCH
AD/
SUBTITLE
REC PAUSEREC
AUDIO
TV MUTE
TV
POWER
Audio/Video cable RF cable for TV
Batteries for Remote Control (AAA Size) User Manual Remote Control
02063N-BD-D8200,D8500-XN-ENG-.indb 19 2012-01-12 오전 11:38:22
24 English
Getting Started
TV Control Codes
Brand Code
SAMSUNG
TV POWER+01, +02, +03, +04, +05,
+06, +07, +08, +09
AIWA TV POWER+82
ANAM
TV POWER+10, +11, +12, +13, +14,
+15, +16, +17, +18
BANG &
OLUFSEN
TV POWER+57
BLAUPUNKT TV POWER+71
BRANDT TV POWER+73
BRIONVEGA TV POWER+57
CGE TV POWER+52
CONTINENTAL
EDISON
TV POWER+75
DAEWOO
TV POWER+19, +20, +23, +24, +25, +26,
+27, +28, +29, +30, +31, +32, +33, +34
EMERSON TV POWER+64
FERGUSON TV POWER+73
FINLUX TV POWER+06, +49, +57
FORMENTI TV POWER+57
FUJITSU TV POWER+84
GRADIENTE TV POWER+70
GRUNDIG TV POWER+49, +52, +71
HITACHI TV POWER+60, +72, +73, +75
IMPERIAL TV POWER+52
JVC TV POWER+61, +79
LG
TV POWER+06, +19, +20, +21, +22, +78
LOEWE TV POWER+06, +69
LOEWE OPTA TV POWER+06, +57
MAGNAVOX TV POWER+40
METZ TV POWER+57
MITSUBISHI TV POWER+06, +48, +62, +65
MIVAR TV POWER+52, +77
NEC TV POWER+83
Brand Code
NEWSAN TV POWER+68
NOBLEX TV POWER+66
NOKIA TV POWER+74
NORDMENDE TV POWER+72, +73, +75
PANASONIC TV POWER+53, +54, +74, +75
PHILIPS TV POWER+06, +55, +56, +57
PHONOLA TV POWER+06, +56, +57
PIONEER TV POWER+58, +59, +73, +74
RADIOLA TV POWER+06, +56
RADIOMARELLI
TV POWER+57
RCA TV POWER+45, +46
REX TV POWER+74
SABA TV POWER+57, +72, +73, +74, +75
SALORA TV POWER+74
SANYO TV POWER+41, +42, +43, +44, +48
SCHNEIDER TV POWER+06
SELECO TV POWER+74
SHARP TV POWER+36, +37, +38, +39, +48
SIEMENS TV POWER+71
SINGER TV POWER+57
SINUDYNE TV POWER+57
SONY TV POWER+35, +48
TELEAVA TV POWER+73
TELEFUNKEN TV POWER+67, +73, +75, +76
THOMSON TV POWER+72, +73, +75
THOMSON
ASIA
TV POWER+80, +81
TOSHIBA
TV POWER+47, +48, +49, +50, +51,
+52
WEGA TV POWER+57
YOKO TV POWER+06
ZENITH TV POWER+63
02063N-BD-D8200,D8500-XN-ENG-.indb 24 2012-01-12 오전 11:38:23
English 25
04 Connections
Connecting to a TV with an Audio/Video cables and RF cable
1. Connect the RF cable as shown.
2. Using video/audio cables, connect the VIDEO OUT (yellow) / AUDIO OUT (white and red)
terminals on the rear of the product to the VIDEO IN (yellow) / AUDIO IN (white and red) terminals
of your TV.
3. Plug in the product and TV.
4. Turn on the product and TV.
NOTE
`
The RF cable connection of this product sends only signals of TV. You must connect the Audio/Video cables to watch
output from your product.
`
Noise may be generated if the audio cable is placed too close to the power cable.
`
If you want to connect to an AV receiver, please refer to the AV receiver connection pages. (See pages 29~30)
`
The number and position of terminals may vary depending on your TV set. Please refer to the user manual of your TV.
`
If there is only one audio input terminal on the TV, connect it to the AUDIO OUT (right/white) terminal of the product.
Connections
To ANT IN
To TV
RF cable
To ANT INPUT
Audio/Video cable
WhiteRed Yellow
02063N-BD-D8200,D8500-XN-ENG-.indb 25 2012-01-12 오전 11:38:24
English 35
05 Setup
Channel Manager
You can manage the stored channels.
Channel Manager Screen
1
Edited Channels : Press the ◄▲▼ buttons to
check edited channels.
• Channels (
) : Shows the channel list
according to channel type. (All, TV, Radio, Data/
Other)
• Favourites (
) : Shows all favourite channel.
(Favourites 1, Favourites 2, Favourites 3......)
2
Shows the stored channels.
3
Navigation Help : Displays remote control buttons
available.
• RED (A) : Selects Air or Cable.
• BLUE (D) : Sorts the list ordered by channel
number or channel name.
• Page : Moves to next or previous page.
• Select : Selects desired Channel.
• Tools : Displays the Channel Manager option.
• Return : Returns to previous menu.
Channel Status Display Icons
Icons Operations
c
A channel selected.
A channel set as Favourites.
\
A locked channel.
Using the TOOLS button
Press the ▲▼ buttons to select the desired
channel, then press the TOOLS button.
Watch
Select this to watch the channel.
Add to Favourites / Edit Favourites
Select this to add the desired favourite channel.
Lock / Unlock
Select this to lock the channel.
Edit Channel Number
Select this to edit the channel number.
If the Edit Channel Number option is not displayed
in the Channel Manager, set it to Enable in the
channels menu. (See page 44).
This menu will be displayed only when you set the
antenna source type and country as below.
Antenna source Country
Air Netherlands, Italy
Delete
Select this to delete the Channel.
Deselect All
Select this to deselect all channel.
Select All
Select this to select all channel.
NOTE
`
For satellite broadcasting, editing the channel
numbers may be possible depending on the
specification.
801
803
805
807
809
811
813
815
xxxxxxxx
xxxxxxxx
xxxxxxxx
xxxxxxxx
xxxxxxxx
xxxxxxxx
xxxxxxxx
xxxxxxxx
1/2 Pages
Channel Manager | All
a Antenna d Sorting ƒ Page " Select / Tools ' Return
Selected item: 1
Channel number
Air
801 xxxxxxxx
803 xxxxxxxx
805 xxxxxxxx
807 xxxxxxxx
809 xxxxxxxx
811 xxxxxxxx
813 xxxxxxxx
815 xxxxxxxx
801 xxxxxxxx
803 xxxxxxxx
805 xxxxxxxx
807 xxxxxxxx
809 xxxxxxxx
811 xxxxxxxx
813 xxxxxxxx
814 xxxxxxxx
Tools
" Enter ' Return
Watch
Add to Favourites
Lock
Edit Channel Number
Delete
Deselect All
Select All
1/2 Pages
Channel Manager | All
a Antenna d Sorting ƒ Page " Select / Tools ' Return
Channel number
Air
3
1 2
801 xxxxxxxx
803 xxxxxxxx
805 xxxxxxxx
807 xxxxxxxx
809 xxxxxxxx
811 xxxxxxxx
813 xxxxxxxx
815 xxxxxxxx
800 xxxxxxxx
802 xxxxxxxx
804 xxxxxxxx
806 xxxxxxxx
808 xxxxxxxx
810 xxxxxxxx
812 xxxxxxxx
814 xxxxxxxx
02063N-BD-D8200,D8500-XN-ENG-.indb 35 2012-01-12 오전 11:38:28
38 English
Setup
Resolution according to the output mode
Blu-ray Disc/E-contents/Digital Contents playback
Output
Setup
HDMI / connected HDMI / not connected
HDMI Mode
Component/
VIDEO Mode
Component Mode
VIDEO Mode
Blu-ray Disc
E-contents/
Digital
contents
Blu-ray Disc
E-contents/
Digital
contents
BD Wise
Resolution of
Blu-ray Disc
1080p 576i/480i - - -
Auto
Max.
Resolution of
TV input
Max.
Resolution of
TV input
576i/480i - - -
1080p 1080p 1080p 576i/480i - - -
Movie Frame : Auto (24Fs) 1080p@24F 1080p@24F 480i - - -
1080i 1080i 1080i 576i/480i 576i/480i 576p/480p 576i/480i
720p 720p 720p 576i/480i 576i/480i 576p/480p 576i/480i
576p/480p 576p/480p 576p/480p 576i/480i 576i/480i 576p/480p 576i/480i
576i/480i - - - 576i/480i 576i/480i 576i/480i
DVD playback
Output
Setup
HDMI / connected HDMI / not connected
HDMI Mode
Component/VIDEO Mode
Component Mode VIDEO Mode
BD Wise 576i/480i 576i/480i - -
Auto
Max. Resolution of TV
input
576i/480i - -
1080p 1080p 576i/480i - -
1080i 1080i 576i/480i 576p/480p 576i/480i
720p 720p 576i/480i 576p/480p 576i/480i
576p/480p 576p/480p 576i/480i 576p/480p 576i/480i
576i/480i - - 576i/480i 576i/480i
02063N-BD-D8200,D8500-XN-ENG-.indb 38 2012-01-12 오전 11:38:28
English 41
05 Setup
Digital Output Selection
Setup PCM
Bitstream
(Unprocessed)
Bitstream
(Re-encoded
DTS)
Bitstream
(Re-encoded
Dolby D)
Connection
HDMI
supported
AV receiver
Optical
HDMI
supported
AV receiver
Optical
HDMI supported
AV receiver or
Optical
HDMI supported
AV receiver or
Optical
Audio Stream
on Blu-ray
Disc
PCM
Up to PCM
7.1ch
PCM 2ch PCM PCM 2ch Re-encoded DTS
Re-encoded
Dolby Digital *
Dolby Digital
Up to PCM
7.1ch
PCM 2ch Dolby Digital Dolby Digital Re-encoded DTS
Re-encoded
Dolby Digital *
Dolby Digital
Plus
Up to PCM
7.1ch
PCM 2ch
Dolby Digital
Plus
Dolby Digital Re-encoded DTS
Re-encoded
Dolby Digital *
Dolby TrueHD
Up to PCM
7.1ch
PCM 2ch Dolby TrueHD Dolby Digital Re-encoded DTS
Re-encoded
Dolby Digital *
DTS
Up to PCM
6.1ch
PCM 2ch DTS DTS Re-encoded DTS
Re-encoded
Dolby Digital *
DTS-HD High
Resolution
Audio
Up to PCM
7.1ch
PCM 2ch
DTS-HD High
Resolution
Audio
DTS Re-encoded DTS
Re-encoded
Dolby Digital *
DTS-HD
Master Audio
Up to PCM
7.1ch
PCM 2ch
DTS-HD
Master Audio
DTS Re-encoded DTS
Re-encoded
Dolby Digital *
Audio Stream
on DVD
PCM PCM 2ch PCM 2ch PCM 2ch PCM 2ch PCM 2ch PCM 2ch
Dolby Digital
Up to PCM
5.1ch
PCM 2ch Dolby Digital Dolby Digital Dolby Digital Dolby Digital
DTS
Up to PCM
6.1ch
PCM 2ch DTS DTS DTS DTS
Audio Stream
of Broadcast
Dolby Digital
Up to PCM
5.1ch
PCM 2ch Dolby Digital Dolby Digital Re-encoded DTS
Re-encoded
Dolby Digital *
Dolby Digital
Plus
Up to PCM
5.1ch
PCM 2ch
Dolby Digital
Plus***
Dolby Digital Re-encoded DTS
Re-encoded
Dolby Digital *
MPEG1
Up to PCM
5.1ch
PCM 2ch
PCM
(up to 5.1ch)
PCM 2ch Re-encoded DTS
Re-encoded
Dolby Digital *
HE-AAC
Up to PCM
5.1ch
PCM 2ch
Re-encoded
Dolby Digital**
(for Multichannel
Programme)
Re-encoded
Dolby Digital**
(for Multichannel
Programme)
Re-encoded DTS
Re-encoded
Dolby Digital *
02063N-BD-D8200,D8500-XN-ENG-.indb 41 2012-01-12 오전 11:38:28
English 47
05 Setup
4.
On the Security screen, enter your network’s
Pass Phrase. Enter numbers directly using your
remote control.
To select a letter, press the ▲▼◄► buttons to
move the cursor, then press the ENTER button.
NOTE
`
You should be able to find the Pass Phrase on one of
the set up screens you used to set up your router or
modem.
5. When done, press the GREEN (B) button on
your remote, or press the ▲▼◄► buttons to
move the cursor to Done, and then press the
ENTER button.
The Network Status screen appears. The
product connects to the network after the
network connection is verified.
Setting Up the Wireless Network Connection
- Manual
If the Auto Setting does not work, you need to
enter the Network setting values manually.
To view your Network Settings values on most
Windows computers, follow these steps:
Windows XP
1. Right click the Network icon on the bottom
right of the Windows desktop.
2. In the pop-up menu, click Status.
3. On the dialog that appears, click the Support
tab.
4. On the Support tab, click the Details button.
The Network settings are displayed.
Windows 7
1. Click the Network icon on the bottom right of
the Windows desktop.
2. In the pop-up menu, click Network and
Sharing Centre.
3. On the dialog that appears, click the Local
Area Connection or Wireless Network
Connection depending on your network
connection.
4. On the Support tab, click the Details button.
The Network settings are displayed.
NOTE
`
Depending on your Windows version, the information
may differ.
To enter the Network settings into your product,
follow these steps:
1. Follow Steps 1 through 4 in the ‘Setting Up
the Wireless Network Connection - Auto’
procedure.
2. When done, press the GREEN (B) button on
your remote, or press the ▲▼◄► buttons to
move the cursor to Done, and then press the
ENTER button. The Network Status screen
appears.
3. On the Network Status screen, select Cancel,
and then press Enter.
4. Press the ◄► buttons to select IP Settings,
and then press the ENTER button.
5. Press the ENTER button to select IP Mode.
6. Press the ▲▼ buttons to select Manual, and
then press the ENTER button.
7. Press the ▼ button to go to the first entry field
(IP Address).
8. Use the number buttons to enter numbers.
Settings
Display
Audio
Channel
Network
System
Language
Security
General
Support
Network Settings
a Previous m Move " Enter ' Return
Enter security key. 0 entered
a b c d e f 1 2 3
g h i j k l 4 5 6
m n o p q r 7 8 9
s t u v w x y z 0
a/A
*
Delete Space Done
Settings
Display
Audio
Channel
Network
System
Language
Security
General
Support
IP Settings
> Move " Enter ' Return
IP Mode Manual
IP Address
0
.
0
.
0
.
0
Subnet Mask
0
.
0
.
0
.
0
Gateway
0
.
0
.
0
.
0
DNS Mode Manual
DNS Server
0
.
0
.
0
.
0
OK
02063N-BD-D8200,D8500-XN-ENG-.indb 47 2012-01-12 오전 11:38:29
50 English
Setup
Device Management
Manage internal HDD and external devices.
You can manage options such as device format
and default recording device.
• Device Format : Format the device.
• Checking Device : Checks for errors on the
device.
• Device Performance Test : Test the recording
performance of the device.
• Default Recording Device : Select default
recording device.
By HDD
1. Select the Default Recording Device, and
then press the ENTER button.
2. Select recording device to HDD. (You can also
check available storage in this menu.)
By External Device
1. In Stop mode, connect the external storage
device to the USB port on the front panel of
the product.
2. Select the Device Format, and then press
the ENTER button. Device format will be
started.
3. Select the Default Recording Device, and
then press the ENTER button.
4. Select recording device to connected external
device. (You can also check available storage
in this menu.)
NOTE
`
It may take several times to detect a connected
external device.
`
The total size of device must have at least 375MB of
free space to use the time shift function.
`
In case of USD HDD is used for recording, Don't
plug-out USB HDD Device during format.
`
Recording Function is supported only for DTV.
`
Recording Function is not supported for data
channel.
`
Maximum length of Recording or Time shift is
affected by available size of storage device and the
Video resolution of TV Programme.
BD Data Management
Enables you to manage the downloaded contents
from a Blu-ray Disc that supports the BD-LIVE
service.
You can check the device information including
the storage size, delete the BD data.
Settings
Display
Audio
Channel
Network
System
Language
Security
General
Support
Plug & Play
HDMI Deep Color : Auto
Device Management
Device Format
Checking Device
Device Performance Test
Default Recording Device : HDD
> Move " Enter ' Return
Settings
Display
Audio
Channel
Network
System
Language
Security
General
Support
Plug & Play
HDMI Deep Color : Auto
Default Recording Device
> Move " Enter ' Return
Select default device for recording.
HDD XXX.XX GB/XXX.XX GB
 HDD Internal storage
abc Recordable
Settings
Display
Audio
Channel
Network
System
Language
Security
General
Support
Plug & Play
HDMI Deep Color : Auto
Default Recording Device
> Move " Enter ' Return
Select default device for recording.
HDD XXX.XX GB/XXX.XX GB
HDD Internal storage

abc Recordable
02063N-BD-D8200,D8500-XN-ENG-.indb 50 2012-01-12 오전 11:38:30
60 English
Basic Functions
Changing the Camera Angle
hZ
When a Blu-ray Disc/DVD contains multiple angles
of a particular scene, you can use the ANGLE
function.
1. During playback, press the TOOLS button.
2. Press the ▲▼ buttons to select Angle.
3. Press the ◄► buttons to select the desired
Angle.
Selecting the Information
Tx
This function enables you to check the contents
information including the name and size, etc.
1. During playback, press the TOOLS
button.
2. Press the ▲▼ buttons to select the Detailed
Information, then press the ENTER button.
Setting BONUSVIEW
h
The BONUSVIEW feature allows you to view
additional content (such as commentaries) in a
small screen window while the movie is playing.
This function is only available if the disc has the
BONUSVIEW feature.
1. During playback, press the TOOLS button.
2. Press the ▲▼ buttons to select BONUSVIEW
Video or BONUSVIEW Audio.
3. Press the ◄► buttons to select the desired
BONUSVIEW.
NOTE
`
If you switch from BONUSVIEW Video, BONUSVIEW
Audio will change automatically in accordance with
BONUSVIEW Video.
`
2D contents are playing convert into 3D, bonusview
function is not available. (Depending on discs, black
outline may be shown)
Listening to Music
ow
Playing an Audio CD (CD-DA)/MP3
1. Insert an Audio CD (CD-DA) or an MP3 Disc.
• For an Audio CD (CD-DA), the first track
plays automatically.
• For an MP3 disc, press the ▲▼ buttons
to select Music, then press the ENTER
button.
Audio CD (CD-DA)/MP3 Screen Elements
1
Displays the music information.
2
Displays the playlist.
3
Displays buttons available.
4
Shows the current play time/total play time.
5
Displays the current playback status.
6
Displays the repeated playback status.
2. Press the ▲▼ buttons to select the track
you want to play, and then press the ENTER
button.
+ 00:13 / 00:43
TRACK 001
Music
Audio CD " Enter < Page / Tools ' Return
1
5
4
6
3
2
TRACK 001
00:43
TRACK 002
03:56
TRACK 003
04:41
TRACK 004
04:02
02063N-BD-D8200,D8500-XN-ENG-.indb 60 2012-01-12 오전 11:38:32
Area Contact Centre
Web Site
`
North America
Canada 1-800-SAMSUNG (726-7864) www.samsung.com
Mexico 01-800-SAMSUNG (726-7864) www.samsung.com
U.S.A 1-800-SAMSUNG (726-7864) www.samsung.com
`
Latin America
Argentine 0800-333-3733 www.samsung.com
Brazil 0800-124-421 / 4004-0000 www.samsung.com
Chile 800-SAMSUNG (726-7864) www.samsung.com
Colombia 01-8000112112 www.samsung.com
Costa Rica 0-800-507-7267 www.samsung.com
Dominica 1-800-751-2676 www.samsung.com
Ecuador 1-800-10-7267 www.samsung.com
El Salvador 800-6225 www.samsung.com
Guatemala 1-800-299-0013 www.samsung.com
Honduras 800-7919267 www.samsung.com
Jamaica 1-800-234-7267 www.samsung.com
Nicaragua 00-1800-5077267 www.samsung.com
Panama 800-7267 www.samsung.com
Peru 0-800-777-08 www.samsung.com
Puerto Rico 1-800-682-3180 www.samsung.com
Trinidad &
Tobago
1-800-SAMSUNG (726-7864) www.samsung.com
Venezuela 0-800-100-5303 www.samsung.com
`
Europe
Albania 42 27 5755 -
Austria
0810 - SAMSUNG (7267864,
€ 0.07/min)
www.samsung.com
Belgium 02-201-24-18
www.samsung.com/
be (Dutch)
www.samsung.com/
be_fr (French)
Bosnia 05 133 1999 -
Bulgaria 07001 33 11 www.samsung.com
Croatia 062 SAMSUNG (062 726 7864) www.samsung.com
Czech
800-SAMSUNG (800-726786)
www.samsung.com
Samsung Zrt., česká organizační
složka, Oasis Florenc, Soko-
lovská394/17, 180 00, Praha 8
Denmark 70 70 19 70 www.samsung.com
Finland 030 - 6227 515 www.samsung.com
France 01 48 63 00 00 www.samsung.com
Germany
01805 - SAMSUNG (726-7864
€ 0,14/Min)
www.samsung.com
Hungary 06-80-SAMSUNG (726-7864) www.samsung.com
Italia 800-SAMSUNG (726-7864) www.samsung.com
Kosovo +381 0113216899 -
Luxemburg 261 03 710 www.samsung.com
Macedonia 023 207 777 -
Montenegro 020 405 888 -
Netherlands
0900-SAMSUNG
(0900-7267864) (€ 0,10/Min)
www.samsung.com
Norway 815-56 480 www.samsung.com
Poland
0 801 1SAMSUNG (172678)
/ 022-607-93-33
www.samsung.com
Portugal 80820-SAMSUNG (726-7864) www.samsung.com
Rumania
1. 08010 SAMSUNG (72678) -
doar din reţeaua Romtelecom,
tarif local
2. 021.206.01.10 - din orice
reţea, tarif normal
www.samsung.com
Area Contact Centre
Web Site
Serbia
0700 Samsung (0700 726
7864)
www.samsung.com
Slovakia 0800-SAMSUNG (726-7864) www.samsung.com
Spain 902-1-SAMSUNG (902 172 678) www.samsung.com
Sweden 0771 726 7864 (SAMSUNG) www.samsung.com
Switzerland
0848-SAMSUNG (7267864,
CHF 0.08/min)
www.samsung.com/ch
www.samsung.com/
ch_fr/(French)
U.K 0330 SAMSUNG (7267864) www.samsung.com
Eire 0818 717100 www.samsung.com
Lithuania 8-800-77777 www.samsung.com
Latvia 8000-7267 www.samsung.com
Estonia 800-7267 www.samsung.com
`
CIS
Russia 8-800-555-55-55 www.samsung.com
Georgia 8-800-555-555 -
Armenia 0-800-05-555 -
Azerbaijan 088-55-55-555 -
Kazakhstan
8-10-800-500-55-500
(GSM: 7799)
www.samsung.com
Uzbekistan 8-10-800-500-55-500 www.samsung.com
Kyrgyzstan 00-800-500-55-500 www.samsung.com
Tadjikistan 8-10-800-500-55-500 www.samsung.com
Ukraine 0-800-502-000
www.samsung.ua
www.samsung.com/
ua_ru
Belarus 810-800-500-55-500 -
Moldova 00-800-500-55-500 -
`
Asia Pacific
Australia 1300 362 603 www.samsung.com
New Zealand
0800 SAMSUNG (0800 726 786)
www.samsung.com
China
400-810-5858 / 010-6475 1880
www.samsung.com
Hong Kong (852) 3698 4698
www.samsung.com/hk
www.samsung.com/
hk_en/
India
3030 8282 / 1800 110011 /
1800 3000 8282 / 1800 266 8282
www.samsung.com
Indonesia
0800-112-8888 /
021-5699-7777
www.samsung.com
Japan 0120-327-527 www.samsung.com
Malaysia 1800-88-9999 www.samsung.com
Philippines
1-800-10-SAMSUNG(726-7864) /
1-800-3-SAMSUNG(726-7864) /
1-800-8-SAMSUNG(726-7864) /
02-5805777
www.samsung.com
Singapore 1800-SAMSUNG (726-7864) www.samsung.com
Thailand 1800-29-3232 / 02-689-3232 www.samsung.com
Taiwan 0800-329-999 www.samsung.com
Vietnam 1 800 588 889 www.samsung.com
`
Middle East
Bahrain 8000-4726 www.samsung.com
Egypt 08000-726786 www.samsung.com
Jordan 800-22273 www.samsung.com
Morocco 080 100 2255 www.samsung.com
Oman 800-SAMSUNG (726-7864) www.samsung.com
Saudi Arabia 9200-21230 www.samsung.com
Turkey 444 77 11 www.samsung.com
U.A.E 800-SAMSUNG (726-7864) www.samsung.com
`
Africa
Nigeria 0800-SAMSUNG (726-7864) www.samsung.com
South Africa 0860-SAMSUNG (726-7864 ) www.samsung.com
Contact SAMSUNG WORLD WIDE
If you have any questions or comments relating to Samsung products, please contact the SAMSUNG
customer care centre.
02063N-BD-D8200,D8500-XN-ENG-.indb 92 2012-01-12 오전 11:38:40
imaginez les possibilités
Nous vous remercions d’avoir choisi ce produit Samsung.
Pour avoir accès à d’avantage de services, veuillez
enregistrer votre produit sur le site
www.samsung.com/register
BD-D8200
BD-D8500
BD-HDD Combo
manuel d’utilisation
02063N-BD-D8200,D8500-XN-FRA.indb 1 2012-01-12 오후 1:43:36
10 Français
Tables des matières
FONCTIONS DE BASE
56 Utilisation des fonctions Recherche et Ignorer
56 Recherche d'une scène
57 Saut de chapitre
57 Lecture au ralenti / Lecture pas à pas
57 Lecture au ralenti
57 Lecture pas à pas
57 Utilisation du bouton TOOLS
57 Accès direct à la scène souhaitée
58 Répétition du titre ou du chapitre
58 Répétition d'une section
58 Sélection du Réglage de l'image
59 Sélection de la langue de la bande son
59 Sélection de la langue des sous-titres
60 Changement d'angle de la caméra
60 Sélection des informations
60 Réglage de BONUSVIEW
60 Écouter de la musique
60 Lecture d'un CD audio (CD-DA)/MP3
61 Fonction AMG
61 Répétition d'un CD audio (CD-DA)/MP3
61 Liste d'écoute
62 Lecture de photos
62 Lecture de fichiers JPEG
62 Utilisation du bouton TOOLS
63 Media Play
FONCTIONS DE LA
TÉLÉVISION NUMÉRIQUE
64 Écran d’affichage
64 Utilisation du bouton TOOLS
64 Péglage de l'image
64 Sélection de la langue de la bande son
65 Sélection de Dual I II
65 Verrouiller canal actuel
65 Basculer vers Câblé
65 Ajouter aux favoris
65 Informations de signal
02063N-BD-D8200,D8500-XN-FRA.indb 10 2012-01-12 오후 1:43:37
16 Français
Mise en route
Prise en charge des fichiers vidéo
Extension
de fichier
Conteneur Codec vidéo Définition
Vitesse de
défilement
(FPS)
Débit
binaire
(Mbsp)
Codec audio
*.avi
AVI
DivX 3.11/4.x/5.1/6.0 1920x1080 6 ~ 30
8
MP3
AC3
LPCM
ADPCM
DTS Core
H.264 BP/MP/HP 1920x1080 6 ~ 30
25
MPEG4 SP/ASP 1920x1080 6 ~ 30
8
Motion JPEG 1920x1080 6 ~ 30
8
*.mkv
MKV
DivX 3.11/4.x/5.1/6.0 1920x1080 6 ~ 30
8
MP3
AC3
LPCM
ADPCM
DTS Core
H.264 BP/MP/HP 1920x1080 6 ~ 30
25
MPEG4 SP/ASP 1920x1080 6 ~ 30
8
Motion JPEG 1920x1080 6 ~ 30
8
*.asf
ASF
DivX 3.11/4.x/5.1/6.0 1920x1080 6 ~ 30
8
MP3
AC3
LPCM
ADPCM
WMA
H.264 BP/MP/HP 1920x1080 6 ~ 30
25
MPEG4 SP/ASP 1920x1080 6 ~ 30
8
Motion JPEG 1920x1080 6 ~ 30
8
*.wmv
ASF Window Media Video v9 1920x1080 6 ~ 30
25 WMA
*.mp4
MP4
H.264 BP/MP/HP 1920x1080 6 ~ 30
25
MP3
ADPCM
AAC
MPEG4 SP/ASP 1920x1080 6 ~ 30
8
*.3gp
3GPP
H.264 BP/MP/HP 1920x1080 6 ~ 30
25
ADPCM
AAC
HE-AAC
MPEG4 SP/ASP 1920x1080 6 ~ 30
8
*.vro
VRO
VOB
MPEG2 1920x1080 24/25/30
30
AC3
MPEG
LPCM
MPEG1 352x288 24/25/30
30
*.mpg
*.mpeg
PS
MPEG1 352x288 24/25/30
30
AC3
MPEG
LPCM
AAC
MPEG2 1920x1080 24/25/30
30
H.264 1920x1080 6 ~ 30
25
*.ts
*.tp
*.trp
TS
MPEG2 1920x1080 24/25/30
30
AC3
AAC
MP3
DD+
HE-AAC
H.264 1920x1080 6 ~ 30
25
VC1 1920x1080 6 ~ 30
25
02063N-BD-D8200,D8500-XN-FRA.indb 16 2012-01-12 오후 1:43:39
Français 19
03 Mise en route
Logos des disques pouvant être lus sur ce produit
Disque Blu-ray Disque Blu-ray 3D DTS-HD Master Audio DivX
BD-LIVE Dolby TrueHD
Système PAL applicable au
Royaume-Uni, en France, en
Allemagne, etc.
Java
Accessoires
Vérifiez que les accessoires ci-dessous sont fournis.
BD-HDD/TV
2D
3D
0000-000000
POWER
1 2 3
4 5 6
7 8 9
DISC MENU
TITLE MENU
0
TTX/MIX
BD TV
TIME SHIFT
TV VOL PROG
TV SOURCE
1
1
CH LIST
SMART
GUIDE
i
MENU
2D
3D
FULL
SCREEN
A B C D
INFOTOOLS
EXIT
RETURN
...
?
×
HUB
SEARCH
AD/
SUBTITLE
REC PAUSEREC
AUDIO
TV MUTE
TV
POWER
Câble audio/vidéo Câble RF pour téléviseur
Piles pour télécommande (taille AAA) Manuel d'utilisation Télécommande
02063N-BD-D8200,D8500-XN-FRA.indb 19 2012-01-12 오후 1:43:40
24 Français
Mise en route
Codes de commande des TÉLÉVISEURS
Marque Code
SAMSUNG
TV POWER+01, +02, +03, +04, +05,
+06, +07, +08, +09
AIWA TV POWER+82
ANAM
TV POWER+10, +11, +12, +13, +14,
+15, +16, +17, +18
BANG &
OLUFSEN
TV POWER+57
BLAUPUNKT TV POWER+71
BRANDT TV POWER+73
BRIONVEGA TV POWER+57
CGE TV POWER+52
CONTINENTAL
EDISON
TV POWER+75
DAEWOO
TV POWER+19, +20, +23, +24, +25, +26,
+27, +28, +29, +30, +31, +32, +33, +34
EMERSON TV POWER+64
FERGUSON TV POWER+73
FINLUX TV POWER+06, +49, +57
FORMENTI TV POWER+57
FUJITSU TV POWER+84
GRADIENTE TV POWER+70
GRUNDIG TV POWER+49, +52, +71
HITACHI TV POWER+60, +72, +73, +75
IMPERIAL TV POWER+52
JVC TV POWER+61, +79
LG
TV POWER+06, +19, +20, +21, +22, +78
LOEWE TV POWER+06, +69
LOEWE OPTA TV POWER+06, +57
MAGNAVOX TV POWER+40
METZ TV POWER+57
MITSUBISHI TV POWER+06, +48, +62, +65
MIVAR TV POWER+52, +77
NEC TV POWER+83
Marque Code
NEWSAN TV POWER+68
NOBLEX TV POWER+66
NOKIA TV POWER+74
NORDMENDE TV POWER+72, +73, +75
PANASONIC TV POWER+53, +54, +74, +75
PHILIPS TV POWER+06, +55, +56, +57
PHONOLA TV POWER+06, +56, +57
PIONEER TV POWER+58, +59, +73, +74
RADIOLA TV POWER+06, +56
RADIOMARELLI
TV POWER+57
RCA TV POWER+45, +46
REX TV POWER+74
SABA TV POWER+57, +72, +73, +74, +75
SALORA TV POWER+74
SANYO TV POWER+41, +42, +43, +44, +48
SCHNEIDER TV POWER+06
SELECO TV POWER+74
SHARP TV POWER+36, +37, +38, +39, +48
SIEMENS TV POWER+71
SINGER TV POWER+57
SINUDYNE TV POWER+57
SONY TV POWER+35, +48
TELEAVA TV POWER+73
TELEFUNKEN TV POWER+67, +73, +75, +76
THOMSON TV POWER+72, +73, +75
THOMSON
ASIA
TV POWER+80, +81
TOSHIBA
TV POWER+47, +48, +49, +50, +51,
+52
WEGA TV POWER+57
YOKO TV POWER+06
ZENITH TV POWER+63
02063N-BD-D8200,D8500-XN-FRA.indb 24 2012-01-12 오후 1:43:42
38 Français
Configuration
Résolution selon le mode de sortie
Lecture du disque Blu-ray/des e-contenus/des contenus numériques
Sortie
Configuration
HDMI / connecté HDMI / non connecté
Mode HDMI
Mode
Composante/
VIDÉO
Mode Composante
Mode VIDÉO
Disque
Blu-ray
E-content/
Contenus
numériques
Disque
Blu-ray
E-content/
Contenus
numériques
BD Wise
Résolution du
disque
Blu-ray
1080p 576i/480i - - -
Auto
Résolution
optimale de
l'entrée du
téléviseur
Résolution
optimale de
l'entrée du
téléviseur
576i/480i - - -
1080p 1080p 1080p 576i/480i - - -
Trame vidéo : Auto (24Fs) 1080p@24F 1080p@24F 480i - - -
1080i 1080i 1080i 576i/480i 576i/480i 576p/480p 576i/480i
720p 720p 720p 576i/480i 576i/480i 576p/480p 576i/480i
576p/480p 576p/480p 576p/480p 576i/480i 576i/480i 576p/480p 576i/480i
576i/480i - - - 576i/480i 576i/480i 576i/480i
Lecture DVD
Sortie
Configuration
HDMI / connecté HDMI / non connecté
Mode HDMI
Mode Composante/VIDÉO
Mode Composante Mode VIDÉO
BD Wise 576i/480i 576i/480i - -
Auto
Résolution optimale de
l'entrée du téléviseur
576i/480i - -
1080p 1080p 576i/480i - -
1080i 1080i 576i/480i 576p/480p 576i/480i
720p 720p 576i/480i 576p/480p 576i/480i
576p/480p 576p/480p 576i/480i 576p/480p 576i/480i
576i/480i - - 576i/480i 576i/480i
02063N-BD-D8200,D8500-XN-FRA.indb 38 2012-01-12 오후 1:43:49
Services réseau
Utilisation du clavier numérique
Grâce à votre télécommande, vous pouvez utiliser
le clavier numérique à l'écran pour saisir les
lettres, les chiffres et les symboles.
1
Le clavier numérique actuel.
Permet de saisir des lettres, des chiffres et des
symboles.
2
Appuyez sur le bouton DISC MENU de la
télécommande pour changer de mode de saisie.
: ab, Ab, AB, chiffres ou icônes.
3
Affiche le mode de saisie actuellement sélectionné.
4
Appuyez sur le bouton VERT (B) de la télécommande
pour changer de méthode de saisie. (T9 ou ABC)
5
Appuyez sur le bouton TOOLS de la télécommande
pour changer de langue.
6
Appuyez sur le bouton TITLE MENU de la
télécommande pour supprimer un caractère.
Saisie de texte, de chiffres et de symboles
Pour saisir du texte, appuyez sur le bouton
numérique de la télécommande qui correspond à
la lettre que vous souhaitez entrer. Appuyez sur le
bouton rapidement pour saisir une lettre qui n'est
pas la première indiquée sur le bouton du clavier
numérique à l'écran. Par exemple, pour saisir
la lettre b, appuyez rapidement à deux reprises
sur le bouton 2 de la télécommande. Pour saisir
la première lettre apparaissant sur le bouton,
appuyez, relâchez puis patientez.
Pour vous déplacer dans le texte, servez-vous des
boutons de direction. Pour supprimer du texte,
placez le curseur à droite du caractère que vous
souhaitez supprimer, puis appuyez sur le bouton
TITLE MENU. Pour changer la casse ou saisir des
chiffres ou des signes de ponctuations, appuyez
sur le bouton DISC MENU.
Création d'un compte
Pour établir votre configuration Smart Hub
exclusive, créez votre propre Compte Smart TV.
Pour créer un compte, suivez les étapes suivantes :
1.
Appuyez sur le bouton ROUGE (A) de votre
télécommande. L'écran Créer compte apparaît.
2. Appuyez sur le s boutons ▲▼◄► pour
sélectionner Créer compte, puis appuyez sur
le bouton ENTRÉE.
3. Sur l'écran suivant, sélectionnez ID Smart
Hub, puis appuyez sur le bouton ENTRÉE.
Un écran de saisie apparaît avec un clavier
numérique.
4. Utilisez le clavier numérique pour entrer votre
adresse e-mail. Celle-ci vous servira d'ID.
REMARQUE
`
Le clavier numérique fonctionne exactement comme
un clavier de téléphone portable.
5. Une fois l'opération terminée, appuyez sur le
bouton ENTRÉE pour sélectionner OK, puis
appuyez à nouveau sur le bouton ENTRÉE.
L'écran Créer compte réapparaît.
6. Sélectionnez Mot de passe, puis appuyez
sur le bouton ENTRÉE. Un écran de saisie
apparaît avec un clavier numérique.
7.
Entrez un mot de passe via le clavier numérique.
Le mot de passe peut être une combinaison
de lettres, de chiffres et de symboles.
REMARQUE
`
Appuyez sur le bouton ROUGE (A) sur la
télécommande pour afficher ou masquer le mot de
passe que vous venez de saisir.
. , –
abc def
1 2 3
ghi jkl mno
4 5 6
pqrs tuv wxyz
7 8 9
Maj. Supprimer
0
b
Mode de saisie
/
Langue: Français
T9
ab Ab AB 1
1
4 5
2 6
3
xxxxxxxx
Contents 1
xxxxxxxx
Contents 6
xxxxxxxx
Contents 5
xxxxxxxx
Contents 4
xxxxxxxx
Contents 3
xxxxxxxx
Contents 2
xxxxxxxx
Contents 7
xxxxxxxx
Contents 8
xxxxxxxx
Contents 9
xxxxxxxx
Contents 10
xxxxxxxx
Contents 11
xxxxxxxx
Contents 12
xxxxxxxx
Contents 1
xxxxxxxx
Contents 2
xxxxxxxx
Contents 3
xxxxxxxx
Contents 4
xxxxxxxx
Contents 5
Contents 1 Contents 2 Contents 3 Contents 4
a
Ouvrir une session
b
Trier par
Mode édit.
d
Paramètres
Search
Your Video
Recommended
Samsung Apps
Ouvrir une session
Ouvrir une session
Annuler
Créer compte M.de p. oublié
Mémorisez l'ID et le mot de passe Smart TV.
ID Smart Hub
Mot de passe
App. sur [Enter]
App. sur [Enter]
76 Français
02063N-BD-D8200,D8500-XN-FRA.indb 76 2012-01-12 오후 1:44:05
  • Page 1 1
  • Page 2 2
  • Page 3 3
  • Page 4 4
  • Page 5 5
  • Page 6 6
  • Page 7 7
  • Page 8 8
  • Page 9 9
  • Page 10 10
  • Page 11 11
  • Page 12 12
  • Page 13 13
  • Page 14 14
  • Page 15 15
  • Page 16 16
  • Page 17 17
  • Page 18 18
  • Page 19 19
  • Page 20 20
  • Page 21 21
  • Page 22 22
  • Page 23 23
  • Page 24 24
  • Page 25 25
  • Page 26 26
  • Page 27 27
  • Page 28 28
  • Page 29 29
  • Page 30 30
  • Page 31 31
  • Page 32 32
  • Page 33 33
  • Page 34 34
  • Page 35 35
  • Page 36 36
  • Page 37 37
  • Page 38 38
  • Page 39 39
  • Page 40 40
  • Page 41 41
  • Page 42 42
  • Page 43 43
  • Page 44 44
  • Page 45 45
  • Page 46 46
  • Page 47 47
  • Page 48 48
  • Page 49 49
  • Page 50 50
  • Page 51 51
  • Page 52 52
  • Page 53 53
  • Page 54 54
  • Page 55 55
  • Page 56 56
  • Page 57 57
  • Page 58 58
  • Page 59 59
  • Page 60 60
  • Page 61 61
  • Page 62 62
  • Page 63 63
  • Page 64 64
  • Page 65 65
  • Page 66 66
  • Page 67 67
  • Page 68 68
  • Page 69 69
  • Page 70 70
  • Page 71 71
  • Page 72 72
  • Page 73 73
  • Page 74 74
  • Page 75 75
  • Page 76 76
  • Page 77 77
  • Page 78 78
  • Page 79 79
  • Page 80 80
  • Page 81 81
  • Page 82 82
  • Page 83 83
  • Page 84 84
  • Page 85 85
  • Page 86 86
  • Page 87 87
  • Page 88 88
  • Page 89 89
  • Page 90 90
  • Page 91 91
  • Page 92 92
  • Page 93 93
  • Page 94 94
  • Page 95 95
  • Page 96 96
  • Page 97 97
  • Page 98 98
  • Page 99 99
  • Page 100 100
  • Page 101 101
  • Page 102 102
  • Page 103 103
  • Page 104 104
  • Page 105 105
  • Page 106 106
  • Page 107 107
  • Page 108 108
  • Page 109 109
  • Page 110 110
  • Page 111 111
  • Page 112 112
  • Page 113 113
  • Page 114 114
  • Page 115 115
  • Page 116 116
  • Page 117 117
  • Page 118 118
  • Page 119 119
  • Page 120 120
  • Page 121 121
  • Page 122 122
  • Page 123 123
  • Page 124 124
  • Page 125 125
  • Page 126 126
  • Page 127 127
  • Page 128 128
  • Page 129 129
  • Page 130 130
  • Page 131 131
  • Page 132 132
  • Page 133 133
  • Page 134 134
  • Page 135 135
  • Page 136 136
  • Page 137 137
  • Page 138 138
  • Page 139 139
  • Page 140 140
  • Page 141 141
  • Page 142 142
  • Page 143 143
  • Page 144 144
  • Page 145 145
  • Page 146 146
  • Page 147 147
  • Page 148 148
  • Page 149 149
  • Page 150 150
  • Page 151 151
  • Page 152 152
  • Page 153 153
  • Page 154 154
  • Page 155 155
  • Page 156 156
  • Page 157 157
  • Page 158 158
  • Page 159 159
  • Page 160 160
  • Page 161 161
  • Page 162 162
  • Page 163 163
  • Page 164 164
  • Page 165 165
  • Page 166 166
  • Page 167 167
  • Page 168 168
  • Page 169 169
  • Page 170 170
  • Page 171 171
  • Page 172 172
  • Page 173 173
  • Page 174 174
  • Page 175 175
  • Page 176 176
  • Page 177 177
  • Page 178 178
  • Page 179 179
  • Page 180 180
  • Page 181 181
  • Page 182 182
  • Page 183 183
  • Page 184 184
  • Page 185 185
  • Page 186 186
  • Page 187 187
  • Page 188 188
  • Page 189 189
  • Page 190 190
  • Page 191 191
  • Page 192 192
  • Page 193 193
  • Page 194 194
  • Page 195 195
  • Page 196 196
  • Page 197 197
  • Page 198 198
  • Page 199 199
  • Page 200 200
  • Page 201 201
  • Page 202 202
  • Page 203 203
  • Page 204 204
  • Page 205 205
  • Page 206 206
  • Page 207 207
  • Page 208 208
  • Page 209 209
  • Page 210 210
  • Page 211 211
  • Page 212 212
  • Page 213 213
  • Page 214 214
  • Page 215 215
  • Page 216 216
  • Page 217 217
  • Page 218 218
  • Page 219 219
  • Page 220 220
  • Page 221 221
  • Page 222 222
  • Page 223 223
  • Page 224 224
  • Page 225 225
  • Page 226 226
  • Page 227 227
  • Page 228 228
  • Page 229 229
  • Page 230 230
  • Page 231 231
  • Page 232 232
  • Page 233 233
  • Page 234 234
  • Page 235 235
  • Page 236 236
  • Page 237 237
  • Page 238 238
  • Page 239 239
  • Page 240 240
  • Page 241 241
  • Page 242 242
  • Page 243 243
  • Page 244 244
  • Page 245 245
  • Page 246 246
  • Page 247 247
  • Page 248 248
  • Page 249 249
  • Page 250 250
  • Page 251 251
  • Page 252 252
  • Page 253 253
  • Page 254 254
  • Page 255 255
  • Page 256 256
  • Page 257 257
  • Page 258 258
  • Page 259 259
  • Page 260 260
  • Page 261 261
  • Page 262 262
  • Page 263 263
  • Page 264 264
  • Page 265 265
  • Page 266 266
  • Page 267 267
  • Page 268 268
  • Page 269 269
  • Page 270 270
  • Page 271 271
  • Page 272 272
  • Page 273 273
  • Page 274 274
  • Page 275 275
  • Page 276 276
  • Page 277 277
  • Page 278 278
  • Page 279 279
  • Page 280 280
  • Page 281 281
  • Page 282 282
  • Page 283 283
  • Page 284 284
  • Page 285 285
  • Page 286 286
  • Page 287 287
  • Page 288 288
  • Page 289 289
  • Page 290 290
  • Page 291 291
  • Page 292 292
  • Page 293 293
  • Page 294 294
  • Page 295 295
  • Page 296 296
  • Page 297 297
  • Page 298 298
  • Page 299 299
  • Page 300 300
  • Page 301 301
  • Page 302 302
  • Page 303 303
  • Page 304 304
  • Page 305 305
  • Page 306 306
  • Page 307 307
  • Page 308 308
  • Page 309 309
  • Page 310 310
  • Page 311 311
  • Page 312 312
  • Page 313 313
  • Page 314 314
  • Page 315 315
  • Page 316 316
  • Page 317 317
  • Page 318 318
  • Page 319 319
  • Page 320 320
  • Page 321 321
  • Page 322 322
  • Page 323 323
  • Page 324 324
  • Page 325 325
  • Page 326 326
  • Page 327 327
  • Page 328 328
  • Page 329 329
  • Page 330 330
  • Page 331 331
  • Page 332 332
  • Page 333 333
  • Page 334 334
  • Page 335 335
  • Page 336 336
  • Page 337 337
  • Page 338 338
  • Page 339 339
  • Page 340 340
  • Page 341 341
  • Page 342 342
  • Page 343 343
  • Page 344 344
  • Page 345 345
  • Page 346 346
  • Page 347 347
  • Page 348 348
  • Page 349 349
  • Page 350 350
  • Page 351 351
  • Page 352 352
  • Page 353 353
  • Page 354 354
  • Page 355 355
  • Page 356 356
  • Page 357 357
  • Page 358 358
  • Page 359 359
  • Page 360 360
  • Page 361 361
  • Page 362 362
  • Page 363 363
  • Page 364 364
  • Page 365 365
  • Page 366 366
  • Page 367 367
  • Page 368 368
  • Page 369 369
  • Page 370 370
  • Page 371 371
  • Page 372 372
  • Page 373 373
  • Page 374 374
  • Page 375 375
  • Page 376 376
  • Page 377 377
  • Page 378 378
  • Page 379 379
  • Page 380 380
  • Page 381 381
  • Page 382 382
  • Page 383 383

Samsung BD-D8200 Benutzerhandbuch

Kategorie
DVD Spieler
Typ
Benutzerhandbuch