
Register your product and get support at
HD9103
HD9104
HD9115
HD9116
HD9124
HD9125
HD9126
www.philips.com/welcome
Specifications are subject to change without notice
© 2013 Koninklijke Philips Electronics N.V.
All rights reserved.
HD9103_04_15_16_24_25_26_WEU_UM_V2.0
3140 035 32632
1
2
400g
450g
450g
400g
400g
13-15min
15-18min
15-18min
18-20min
18-20min
450g 13-15min
300g 25min
400g
15-18min
1
4
4
30min
500ml 25-30min
15-20min
15-20min
2
15-20min
250g
450g
15-20min
30-35min
15-20min
10-15min
20min
350g 10-12min
450g
400g
6 - 8
8-10min250g
250g 12-15min
250g + 375ml
150g + 200ml
150g + 300ml
40min
15min
15-20min
+
+
+
1
3
4
5 6
7
23
6
54
a
b
c
d
e
f
g
h
i
j
k
l
m
n
2
3
1
1
1
2
3
1
2
3
1
1
25 min.
HD9115
HD9116
HD9124
HD9125
HD9126
HD9115
HD9116
HD9124
HD9125
HD9126
+
+
Couscous
a
EN
a Couscous
DE
a
Couscous
EL
a
Κους κους
IT
a
Couscous
English
1 Important
Read this user manual carefully before you use the appliance, and save the user manual for
future reference.
Danger
• Never immerse the base in water or rinse it under the tap.
Warning
• Check if the voltage indicated on the appliance corresponds to the local mains voltage
before you connect the appliance.
• Only connect the appliance to an earthed wall socket. Always make sure the plug is
inserted rmly into the socket.
• Do not use the appliance if the plug, the mains cord or the appliance itself is damaged.
• If the mains cord is damaged, you must have it replaced by Philips, a service centre
authorised by Philips or similarly qualied persons in order to avoid a hazard.
• This appliance is not intended for use by persons (including children) with reduced
physical, sensory or mental capabilities, or lack of experience and knowledge, unless
they have been given supervision or instruction concerning use of the appliance by a
person responsible for their safety.
• Children should be supervised to ensure that they do not play with the appliance.
• Keep the mains cord out of the reach of children. Do not let the mains cord hang over
the edge of the table or worktop on which the appliance stands.
• Never steam frozen meat, poultry or seafood. Always thaw these ingredients
completely before you steam them.
• Never use the food steamer without the drip tray, otherwise hot water splashes out of
the appliance.
• Only use steaming bowls 1, 2 and 3 and the top steaming bowl in combination with the
original base.
• Keep the mains cord away from hot surfaces.
Caution
• Never use any accessories or parts from other manufacturers or that Philips does not
specically recommend. If you use such accessories or parts, your guarantee becomes
invalid.
• Do not expose the base of the appliance to high temperatures, hot gas, steam or damp
heat from other sources than the steamer itself. Do not place the food steamer on or
near an operating or still hot stove or cooker.
• Always make sure the appliance is off before you unplug it.
• Always unplug the appliance and let it cool down before you clean it.
• This appliance is intended for household use only. If the appliance is used improperly
or for professional or semi-professional purposes or if it is not used according to the
instructions in the user manual, the guarantee becomes invalid and Philips refuses any
liability for damage caused.
• Place the food steamer on a stable, horizontal and level surface and make sure there is
at least 10cm free space around it to prevent overheating.
• While using steaming bowls 1, 2 and 3 with their removable bottoms, always make sure
the rim of the bottom points upwards and that the bottom locks into place (‘click’).
• Beware of the hot steam that comes out of the food steamer during steaming or when
you remove the lid.When you check food, always use kitchen utensils with long handles.
• Always remove the lid carefully and away from you. Let condensation drip off the lid
into the food steamer to avoid scalding.
• Always hold the steaming bowls by one of their handles when you stir hot food or
remove it from the bowls.
• Always hold the steaming bowls by their handles when the food is hot.
• Do not move the food steamer while it is operating.
• Do not reach over the food steamer while it is operating.
• Do not touch the hot surfaces of the appliance. Always use oven mitts when you
handle hot parts of the appliance.
• Do not place the appliance near or underneath objects that would be damaged by
steam, such as walls and cupboards.
• Do not operate the appliance in the presence of explosive and/or ammable fumes.
• Never connect the appliance to a timer switch or reote control system in order to
avoid a hazardous situation.
• There is a small sieve inside the water tank. If the sieve becomes detached, keep it out
of the reach of children to prevent them from swallowing it.
Automatic switch-off
The appliance switches off automatically after the set steaming time has elapsed.
Boil-dry protection
This food steamer is equipped with boil-dry protection. The boil-dry protection automatically
switches off the appliance if it is switched on when there is no water in the water tank or if
the water runs out during use. Let the food steamer cool down for 10 minutes before you
use it again.
Recycling
Your product is designed and manufactured with high quality materials and components,
which can be recycled and reused.
When you see the crossed-out wheel bin symbol attached to a product, it means the
product is covered by the European Directive 2002/96/EC:
Couscous
a
EN User manual
DE Benutzerhandbuch
EL Εγχειρίδιοχρήσης
IT Manuale utente
Never dispose of your product with other household waste. Please inform yourself about
the local rules on the separate collection of electrical and electronic products. The correct
disposal of your old product helps prevent potentially negative consequences on the
environment and human health.
2 Electromagnetic fields (EMF)
This Philips appliance complies with all standards regarding electromagnetic elds (EMF). If
handled properly and according to the instructions in this user manual, the appliance is safe
to use based on scientic evidence available today.
3 Introduction
Congratulations on your purchase and welcome to Philips! To fully benet from the support
that Philips offers, register your product at www.philips.com/welcome.
For recipes to use with your steamer, go to www.philips.com/kitchen.
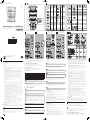
4 Overview
a
Lid
h
Steaming bowl 1
b
Top steaming bowl
i
Flavor booster
c
Removable bottom
j
Drip tray
d
Steaming bowl 3
k
Base with water tank
e
Removable bottom
l
Steaming time adjustment button
f
Steaming bowl 2
m
Steaming light
g
Removable bottom
n
Water inlet
Note
• HD9124/25/26: one top steaming bowl and three steaming bowls with removable bottom
• HD9115/16: one top steaming bowl and two steaming bowls with removable bottom
• HD9103/04: two steaming bowls with non-removable bottom
5 Before the first use
1 Thoroughly clean the parts that come into contact with food before you use the
appliance for the rst time (see chapter ‘Cleaning and maintenance’).
2 Wipe the inside of the water tank with a damp cloth.
6 Using the appliance
Tip
• Put the appliance on a stable, horizontal and level surface.
• Fill the water tank with water up to the maximum level. with a full water tank, the steamer can
steam approximately 1 hour.
• Only ll the water tank with water. Never put seasoning, oil, or other substances in the water tank.
Note
• When you want to steam foods that require various steaming times, set the timer to the
longest steaming time. Put the food with the longest steaming time in bowl 1. Steam until the
remaining steaming time on the display is equal to the shorter steaming time. Then carefully
remove the lid with oven mitts and place bowl 2 containing the ingredients with the shorter
steaming time on top of bowl 1. Put the lid on bowl 2 and continue steaming until the set
steaming time has elapsed.
• Food in the top bowl takes usually a little longer to steam than food in the lower bowls.
• If you steam large quantities of food, stir the food halfway through the steaming process.
Wear oven mitts and use a kitchen utensil with a long handle.
• If you use ground herbs and spices, rinse the drip tray to wet the avour booster, This prevents
ground herbs or spices from falling through the openings of the avour booster. If desired, put
dried or fresh herbs or spices on the avour booster to add extra avour to the food to be
steamed.
Steaming food (Fig.3 and Fig.6)
Put the food to be steamed in one or more steaming bowls and/or in the top steaming bowl.
You can use the bowl for melting chocolate/butter and cooking rice.
Steaming egg (Fig.4)
Put the egg holders to steam eggs conveniently.
Note
• Use a needle to make a small hole on the bottom of the egg before placed on the egg holder.
• Make sure you place the bowl properly and they do not wobble.
Steaming bowls
You do not have to use all 3 steaming bowls.
The steaming bowls are numbered. You can nd the number on their handles. The top
steaming bowl is No. 3. The middle steaming bowl is No.2, and the bottom steaming bowl is
No.1.
Only stack the steaming bowls in the following order: steaming bowl 1, steaming bowl 2,
steaming bowl 3.
Note
• If you use steaming bowls 2 and 3 with their removable bottoms (when using the top
steaming bowl), always make sure the rim of the bottom points upwards and that the bottom
locks into place when you hear a click.
7 Cleaning and maintenance (Fig.7)
Note
• Never use scouring pads, abrasive cleaning agents or aggressive liquids such as petrol or
acetone to clean the appliance.
• If the vinegar starts to boil over the edge of the base, unplug the appliance and reduce the
amount of vinegar.
Caution
• Do not clean the base in the dishwasher.
• If the sieve in the water tank becomes detached, keep it out of the reach of children to
prevent them from swallowing it.
• Never immerse the base in water, nor rinse it under the tap.
Descaling
You have to descale the appliance after it has been used for 15 hours. It is important that
you descale the food steamer regularly to maintain optimal performance and to extend the
lifetime of the appliance.
1 Fill the water tank with white vinegar (8% acetic acid) up to the maximum level.
Note
• Do not use any other kind of descaler.
2 Put the drip tray, steaming bowls, and lid on top of the steamer.
3 Turn the steaming time adjustment knob to set a steaming time of 25 minutes.
4 Let the vinegar cool down completely and empty the water tank. Rinse the water tank
with cold water several times.
Note
• Repeat the procedure if there is still some scale in the water tank.
8 Storage
1 Make sure all parts are clean and dry before you store the appliance (see chapter
“Cleaning and maintenance”).
2 Place the bottoms in steaming bowls 2 and 3.
3 Place steaming bowl 3 on the drip tray.
4 Place steaming bowl 2 in teaming bowl 3. Place steaming bowl 1 in steaming bowl 2.
5 Place the top steaming bowl on the other steaming bowls.
6 Place the lid on the top steaming bowl.
7 To store the mains cord, push it into the cord storage compartment in the base.
9 Guarantee and service
If you need service or information or if you have a problem, please visit the Philips website at
http://www.philips.com/ or contact the Philips Consumer Care Center in your country (you
nd its phone number in the worldwide guarantee leaet). If there is no Consumer Care
Center in your country, go to your local Philips dealer.
Deutsch
1 Wichtig
Lesen Sie diese Bedienungsanleitung vor dem Gebrauch des Geräts aufmerksam durch und
bewahren Sie sie für eine spätere Verwendung auf.
Gefahr
• Tauchen Sie den Aufheizsockel niemals in Wasser. Spülen Sie sie auch nicht unter
ießendem Wasser ab.
Warnhinweis
• Prüfen Sie, bevor Sie das Gerät in Betrieb nehmen, ob die Spannungsangabe auf dem
Gerät mit der örtlichen Netzspannung übereinstimmt.
• Schließen Sie das Gerät nur an eine geerdete Steckdose an. Vergewissern Sie sich
immer, dass der Stecker fest in die Steckdose gesteckt ist.
• Verwenden Sie das Gerät nicht, wenn der Netzstecker, das Netzkabel oder das Gerät
selbst defekt oder beschädigt sind.
• Um Gefährdungen zu vermeiden, darf ein defektes Netzkabel nur von einem
Philips Service-Center, einer von Philips autorisierten Werkstatt oder einer ähnlich
qualizierten Person durch ein Original-Ersatzkabel ersetzt werden.
• Dieses Gerät ist für Benutzer (einschl. Kinder) mit eingeschränkten physischen,
sensorischen oder psychischen Fähigkeiten bzw. ohne jegliche Erfahrung oder Vorwissen
nur dann geeignet, wenn eine angemessene Aufsicht oder ausführliche Anleitung zur
Benutzung des Geräts durch eine verantwortliche Person sichergestellt ist.
• Achten Sie darauf, dass Kinder nicht mit dem Gerät spielen.
• Stellen Sie sicher, dass sich das Stromkabel außerhalb der Reichweite von Kindern
bendet. Lassen Sie das Netzkabel nicht über den Rand der Arbeitsäche hängen, auf
der das Gerät steht.
• Dämpfen Sie nie gefrorenes Fleisch, gefrorenes Geügel oder gefrorene Meeresfrüchte.
Tauen Sie diese Zutaten vollständig auf, bevor Sie sie dämpfen.
• Verwenden Sie den Dampfgarer niemals ohne Auffangschale, da sonst heiße Flüssigkeit
aus dem Gerät herausspritzen kann.
• Verwenden Sie die Dampfaufsätze 1, 2 und 3 und den obersten Dampfaufsatz nur mit
dem Original-Gerätesockel.
• Achten Sie darauf, dass das Netzkabel nicht in der Nähe heißer Flächen verläuft.
Vorsicht
• Verwenden Sie niemals Zubehör oder Teile, die von Drittherstellern stammen bzw.
nicht von Philips empfohlen werden. Wenn Sie diese(s) Zubehör oder Teile verwenden,
erlischt Ihre Garantie.
• Setzen Sie die Gerätebasis nicht zu hohen Temperaturen, heißem Gas, Dampf oder Dunst
von anderen Quellen als dem Dampfgarer aus. Stellen Sie den Dampfgarer niemals auf
oder in die Nähe eines Herds oder Kochers, der in Betrieb oder noch heiß ist.
• Stellen Sie immer sicher, dass das Gerät ausgeschaltet ist, bevor Sie es von der
Stromversorgung trennen.
• Ziehen Sie vor dem Reinigen stets den Netzstecker aus der Steckdose, und lassen Sie
das Gerät abkühlen.
• Dieses Gerät ist nur für den Gebrauch im Haushalt bestimmt. Bei unsachgemäßem
Gebrauch oder Verwendung für halbprofessionelle oder professionelle Zwecke oder
bei Nichtbeachtung der Anweisungen in der Bedienungsanleitung erlischt die Garantie.
In diesem Fall lehnt Philips jegliche Haftung für entstandene Schäden ab.
• Stellen Sie den Dampfgarer auf eine stabile, waagerechte und ebene Unterlage.
Halten Sie um das Gerät herum mindestens 10 cm Platz frei, um eine Überhitzung zu
vermeiden.
• Achten Sie beim Gebrauch der Dampfaufsätze 1, 2 und 3 mit den abnehmbaren
Bodeneinsätzen immer darauf, dass der Rand des Bodeneinsatzes nach oben zeigt und
der Einsatz hörbar einrastet.
• Vorsicht vor heißem Dampf, der beim Dampfgaren oder beim Abnehmen des Deckels
aus dem Dampfgarer austritt. Verwenden Sie zum Prüfen der Zutaten immer Utensilien
mit langen Griffen.
• Nehmen Sie den Deckel stets vorsichtig ab, und halten Sie ihn von sich weg. Lassen
Sie Kondenswasser vom Deckel in den Dampfgarer tropfen, um Verbrühungen zu
vermeiden.
• Halten Sie die Dampfaufsätze immer an einem der Griffe fest, wenn Sie heiße Speisen
umrühren oder sie aus den Dampfausätzen entnehmen.
• Fassen Sie die Dampfaufsätze immer an den Griffen an, wenn die Speisen heiß sind.
• Verschieben Sie den Dampfgarer nicht während des Gebrauchs.
• Greifen Sie nicht über den Dampfgarer, wenn dieser in Betrieb ist.
• Berühren Sie nicht die heißen Oberächen des Geräts. Verwenden Sie immer
Ofenhandschuhe, wenn Sie heiße Geräteteile anfassen.
• Stellen Sie das Gerät nicht in die Nähe von Wänden und anderen Gegenständen bzw.
unter Schränke, die durch den Dampf beschädigt werden können.
• Verwenden Sie das Gerät nicht in der Nähe von explosiven und/oder entzündbaren
Dämpfen.
• Schließen Sie das Gerät nie an einen Zeitschalter oder ein Fernbedienungssystem an,
um Gefährdungen zu vermeiden.
• Im Wasserbehälter bendet sich ein kleines Sieb. Wenn sich das Sieb im Wasserbehälter
gelöst hat, bewahren Sie es außerhalb der Reichweite von Kindern auf; sie könnten sich
daran verschlucken.
Automatische Abschaltung
Nach Ablauf der eingestellten Garzeit schaltet sich das Gerät automatisch aus.
Trockengehschutz
Dieser Dampfgarer ist mit einem Trockengehschutz ausgestattet. Durch diesen
Trockengehschutz wird das Gerät automatisch abgeschaltet, wenn beim Einschalten des
Geräts kein Wasser im Wasserbehälter ist oder während des Betriebs das Wasser ausgeht.
Lassen Sie den Dampfgarer vor dem nächsten Gebrauch 10 Minuten abkühlen.
Recycling
Ihr Gerät wurde unter Verwendung hochwertiger Materialien und Komponenten entwickelt
und hergestellt, die recycelt und wiederverwendet werden können.
Bendet sich das Symbol einer durchgestrichenen Abfalltonne auf Rädern auf dem Gerät,
bedeutet dies, dass für dieses Gerät die Europäische Richtlinie 2002/96/EG gilt.
Entsorgen Sie dieses Produkt nie mit dem restlichen Hausmüll. Bitte informieren Sie sich über
die örtlichen Bestimmungen zur getrennten Entsorgung von elektrischen und elektronischen
Produkten. Durch die korrekte Entsorgung Ihrer Altgeräte werden Umwelt und Menschen
vor möglichen negativen Folgen geschützt.
2 Elektromagnetische Felder
Dieses Philips Gerät erfüllt sämtliche Normen bezüglich elektromagnetischer Felder.
Nach aktuellen wissenschaftlichen Erkenntnissen ist das Gerät sicher im Gebrauch, sofern
es ordnungsgemäß und entsprechend den Anweisungen in diesem Benutzerhandbuch
gehandhabt wird.

3 Einführung
Herzlichen Glückwunsch zu Ihrem Kauf und willkommen bei Philips. Um die Unterstützung
von Philips optimal nutzen zu können, sollten Sie Ihr Produkt unter
www.philips.com/welcome registrieren.
Rezepte für Ihren Dampfgarer nden Sie unter www.philips.com/kitchen.
4 Überblick
a
Deckel
h
Dampfaufsatz 1
b
Oberster Dampfaufsatz
i
Aromaverstärker
c
Abnehmbarer Bodeneinsatz
j
Auffangschale
d
Dampfaufsatz 3
k
Aufheizsockel mit Wasserbehälter
e
Abnehmbarer Bodeneinsatz
l
Garzeitregler
f
Dampfaufsatz 2
m
Dampfanzeige
g
Abnehmbarer Bodeneinsatz
n
Wassereinfüllöffnung
Hinweis
• HD9124/25/26: ein oberster Dampfaufsatz und drei Dampfaufsätze mit abnehmbarem Boden
• HD9115/16: ein oberster Dampfaufsatz und zwei Dampfaufsätze mit abnehmbarem Boden
• HD9103/04: zwei Dampfaufsätze mit fest montiertem Boden
5 Vor dem ersten Gebrauch
1 Reinigen Sie vor dem ersten Gebrauch des Geräts alle Teile gründlich, die mit
Lebensmitteln in Kontakt kommen (siehe „Reinigung und Pege“).
2 Reinigen Sie den Wasserbehälter von innen mit einem feuchten Tuch.
6 Das Gerät benutzen
Tipp
• Stellen Sie das Gerät auf eine stabile, waagerechte und ebene Unterlage.
• Füllen Sie den Wassertank bis zur Maximum-Markierung mit Wasser. Mit einem vollen
Wasserbehälter können Sie den Dampfgarer ca. 1 Stunde lang verwenden.
• Füllen Sie den Wasserbehälter nur mit Wasser. Geben Sie niemals Gewürze, Öl oder andere
Substanzen in den Wasserbehälter.
Hinweis
• Wenn Sie Lebensmittel mit unterschiedlichen Garzeiten dampfgaren, stellen Sie die
Zeitschaltuhr auf die längste Garzeit ein. Geben Sie die Lebensmittel mit der längsten
Garzeit in den Dampfaufsatz 1. Garen Sie diese so lange, bis die auf dem Display angezeigte
verbleibende Garzeit der kürzeren Garzeit der anderen Lebensmittel entspricht. Nehmen Sie
dann mit Ofenhandschuhen vorsichtig den Deckel ab, und setzen Sie den Dampfaufsatz 2
mit den Zutaten, die eine kürzere Garzeit erfordern, auf den Dampfaufsatz 1. Setzen Sie
den Deckel auf den Aufsatz 2, und setzen Sie den Dampfgarvorgang fort, bis die eingestellte
Garzeit abgelaufen ist.
• Die Garzeit für Speisen im oberen Dampfaufsatz ist normalerweise etwas länger als für die in
den unteren Dampfaufsätzen.
• Wenn Sie größere Mengen Lebensmittel dampfgaren, rühren Sie die Lebensmittel nach der
Hälfte der Garzeit um. Tragen Sie Ofenhandschuhe, und verwenden Sie ein Küchenwerkzeug
mit einem langen Griff.
• Wenn Sie gemahlene Kräuter und Gewürze verwenden, spülen Sie die Auffangschale mit
Wasser ab, um den Aromaverstärker anzufeuchten. Dadurch wird verhindert, dass gemahlene
Kräuter und Gewürze durch die Öffnungen des Aromaverstärkers fallen. Geben Sie nach
Wunsch getrocknete oder frische Kräuter oder Gewürze in den Aromaverstärker, um den
Speisen beim Dampfgaren zusätzlichen Geschmack zu verleihen.
Dämpfen von Lebensmitteln (Abb. 3 und Abb. 6)
Geben Sie die Zutaten zum Dampfgaren in einen oder mehrere Dampfaufsätze und/oder in
den obersten Dampfaufsatz. Sie können den Aufsatz zum Schmelzen von Schokolade/Butter
und zum Kochen von Reis verwenden.
Dämpfen von Eiern (Abb. 4)
Setzen Sie Eier auf die Eierhalter, um sie mühelos zu garen.
Hinweis
• Stechen Sie mit einer Nadel ein kleines Loch unten in die Eier, bevor Sie sie in die Eierhalter
setzen.
• Stellen Sie sicher, dass Sie den Aufsatz richtig aufsetzen und die Eier nicht wackeln.
Dampfaufsätze
Sie müssen nicht alle 3 Dampfaufsätze verwenden.
Die Dampfaufsätze sind nummeriert. Die Nummern stehen auf den Griffen. Der oberste
Dampfaufsatz ist Nr. 3. Der mittlere Dampfaufsatz ist Nr. 2, und der unterste Dampfaufsatz
ist Nr. 1.
Setzen Sie die Dampfaufsätze nur in der folgenden Reihenfolge aufeinander: Dampfaufsatz 1,
Dampfaufsatz 2, Dampfaufsatz 3.
Hinweis
• Wenn Sie die Dampfaufsätze 2 und 3 mit den abnehmbaren Böden verwenden (bei
Verwendung des obersten Dampfaufsatzes), stellen Sie immer sicher, dass der erhöhte
Randbereich des Bodeneinsatzes nach oben gerichtet ist und der Einsatz hörbar einrastet.
7 Reinigung und Wartung (Abb. 7)
Hinweis
• Benutzen Sie zum Reinigen des Geräts keine Scheuerschwämme und -mittel oder aggressive
Flüssigkeiten wie Benzin oder Azeton.
• Wenn der Essig überkocht und über den Rand des Sockels läuft, ziehen Sie den Netzstecker
aus der Steckdose, und gießen Sie etwas Essig ab.
Achtung
• Reinigen Sie den Aufheizsockel nicht in der Spülmaschine.
• Wenn sich das Sieb im Wasserbehälter gelöst hat, bewahren Sie es außerhalb der Reichweite
von Kindern auf; sie könnten sich daran verschlucken.
• Tauchen Sie den Aufheizsockel keinesfalls in Wasser. Spülen Sie ihn auch nicht unter
ießendem Wasser ab.
Entkalken
Sie müssen das Gerät entkalken, nachdem es 15 Stunden verwendet wurde. Regelmäßiges
Entkalken des Dampfgarers ist erforderlich, um eine optimale Leistung und eine lange
Lebensdauer des Geräts zu gewährleisten.
1 Füllen Sie den Wasserbehälter bis zur Markierung MAX mit Haushaltsessig (8 %
Säuregehalt).
Hinweis
• Verwenden Sie keinen anderen Entkalker.
2 Setzen Sie die Auffangschale, die Dampfaufsätze und den Deckel auf den Dampfgarer.
3 Stellen Sie den Garzeitregler auf 25 Minuten.
4 Lassen Sie den Essig vollständig abkühlen, und entleeren Sie den Wasserbehälter. Spülen
Sie den Wasserbehälter mehrmals mit kaltem Wasser nach.
Hinweis
• Wurden nicht alle Kalkablagerungen entfernt, wiederholen Sie den Vorgang.
8 Aufbewahrung
1 Stellen Sie sicher, dass alle Teile sauber und trocken sind, bevor Sie das Gerät verstauen
(siehe Kapitel „Reinigung und Pege“).
2 Legen Sie die Bodeneinsätze in die Dampfaufsätze 2 und 3.
3 Setzen Sie den Dampfaufsatz 3 auf die Auffangschale.
4 Setzen Sie den Dampfaufsatz 2 auf den Dampfaufsatz 3. Setzen Sie anschließend den
Dampfaufsatz 1 auf den Dampfaufsatz 2.
5 Setzen Sie den obersten Dampfaufsatz auf die anderen Dampfaufsätze.
6 Setzen Sie den Deckel auf den obersten Dampfaufsatz.
7 Das Netzkabel lässt sich zum Aufbewahren in das Kabelfach im Aufheizsockel schieben.
9 Garantie und Kundendienst
Benötigen Sie weitere Informationen oder treten Probleme auf, wenden Sie sich bitte an
Ihren Philips Händler, oder setzen Sie sich mit einem Philips Service-Center in Ihrem Land in
Verbindung (Sie nden die Telefonnummer in der internationalen Garantieschrift). Besuchen
Sie auch die Philips Website (http://www.philips.com/). Sollte es in Ihrem Land kein Service-
Center geben, wenden Sie sich bitte an Ihren lokalen Philips Händler.
Ελληνικά
1 Σημαντικό
Διαβάστε προσεκτικά το παρόν εγχειρίδιο χρήσης προτού χρησιμοποιήσετε τη
συσκευή και κρατήστε το για μελλοντική αναφορά.
Κίνδυνος
• Μην βυθίζετε ποτέ τη βάση σε νερό και μην την ξεπλένετε με νερό βρύσης.
Προειδοποίηση
• Πριν συνδέσετε τη συσκευή, ελέγξτε αν η τάση που αναγράφεται στη συσκευή
αντιστοιχεί στην τοπική τάση ρεύματος.
• Συνδέετε τη συσκευή μόνο σε πρίζα με γείωση. Να βεβαιώνεστε πάντοτε ότι το
φις έχει συνδεθεί σωστά στην πρίζα.
• Μην χρησιμοποιείτε τη συσκευή εάν το φις, το καλώδιο ή η ίδια η συσκευή έχει
υποστεί φθορά.
• Αν το καλώδιο υποστεί φθορά, θα πρέπει να αντικατασταθεί από τη Philips,
από κάποιο κέντρο επισκευών εξουσιοδοτημένο από τη Philips ή από εξίσου
εξειδικευμένα άτομα, προς αποφυγή κινδύνου.
• Αυτή η συσκευή δεν προορίζεται για χρήση από άτομα (συμπεριλαμβανομένων
των παιδιών) με περιορισμένες σωματικές, αισθητήριες ή διανοητικές ικανότητες
ή από άτομα χωρίς εμπειρία και γνώση, εκτός και εάν τη χρησιμοποιούν υπό
επιτήρηση ή έχουν λάβει οδηγίες σχετικά με τη χρήση της συσκευής από άτομο
υπεύθυνο για την ασφάλειά τους.
• Τα παιδιά πρέπει να επιβλέπονται, ώστε να μην παίζουν με τη συσκευή.
• Κρατήστε το καλώδιο μακριά από παιδιά. Μην αφήνετε το καλώδιο να κρέμεται
από την άκρη του τραπεζιού ή του πάγκου στον οποίο έχετε τοποθετήσει τη
συσκευή.
• Μην μαγειρεύετε ποτέ στον ατμό κατεψυγμένο κρέας, πουλερικά ή θαλασσινά. Τα
συγκεκριμένα τρόφιμα πρέπει να αποψυχθούν εντελώς πριν μαγειρευτούν στον
ατμό.
• Μην χρησιμοποιείτε ποτέ τον ατμομάγειρα χωρίς το δίσκο περισυλλογής υγρών,
καθώς μπορεί να εκτοξευτεί καυτό νερό από τη συσκευή.
• Να χρησιμοποιείτε τα μπολ 1, 2 και 3 και το πάνω μπολ μόνο σε συνδυασμό με
την αυθεντική βάση.
• Κρατάτε το καλώδιο μακριά από ζεστές επιφάνειες.
Προσοχή
• Μην χρησιμοποιείτε ποτέ εξαρτήματα ή μέρη από άλλους κατασκευαστές ή που
η Philips δεν συνιστά ρητώς. Αν χρησιμοποιήσετε τέτοια εξαρτήματα ή μέρη, η
εγγύησή σας καθίσταται άκυρη.
• Μην εκθέτετε τη βάση της συσκευής σε υψηλές θερμοκρασίες, ζεστά αέρια, ατμό
ή υδρατμούς που να προέρχονται από άλλες πηγές εκτός από τον ίδιο τον
ατμομάγειρα. Μην τοποθετείτε τον ατμομάγειρα πάνω ή κοντά σε αναμμένες ή
ζεστές εστίες μαγειρέματος.
• Πριν αποσυνδέσετε τη συσκευή από την πρίζα, να βεβαιώνεστε πάντοτε ότι είναι
απενεργοποιημένη.
• Πριν καθαρίσετε τη συσκευή, να την αποσυνδέετε πάντα από την πρίζα και να την
αφήνετε πρώτα να κρυώσει.
• Αυτή η συσκευή προορίζεται για οικιακή χρήση μόνο. Εάν η συσκευή
χρησιμοποιηθεί με μη ενδεδειγμένο τρόπο ή για επαγγελματικούς ή ημι-
επαγγελματικούς σκοπούς ή εάν δεν χρησιμοποιηθεί σύμφωνα με τις οδηγίες
του εγχειριδίου χρήσης, η εγγύηση καθίσταται άκυρη και η Philips θα αποποιηθεί
οποιασδήποτε ευθύνης για τυχόν βλάβες που θα προκληθούν.
• Τοποθετήστε τον ατμομάγειρα σε σταθερή, οριζόντια επιφάνεια και βεβαιωθείτε
ότι υπάρχουν τουλάχιστον 10 εκ. ελεύθερου χώρου γύρω από αυτόν έτσι ώστε να
μην υπερθερμανθεί.
• Αν χρησιμοποιήσετε τα μπολ μαγειρέματος στον ατμό 1, 2 και 3 με τις
αποσπώμενες βάσεις τους, να βεβαιώνεστε πάντα ότι το περίγραμμα της βάσης
δείχνει προς τα επάνω και ότι η βάση εφαρμόζει στη θέση της («κλικ»).
• Προσέχετε το ζεστό ατμό που εξέρχεται από τον ατμομάγειρα κατά τη διάρκεια
του μαγειρέματος με ατμό ή όταν αφαιρείτε το καπάκι. Όταν ελέγχετε το φαγητό,
να χρησιμοποιείτε πάντα οικιακά σκεύη με μακριές λαβές.
• Να αφαιρείτε πάντα το καπάκι με μεγάλη προσοχή, κρατώντας το μακριά από το
σώμα σας. Για να μην καείτε, αφήστε τους υδρατμούς να κυλήσουν από το καπάκι
στον ατμομάγειρα.
• Όταν ανακατεύετε ζεστό φαγητό ή όταν το αφαιρείτε από τα μπολ, να κρατάτε
σταθερά τα μπολ από τη μία τους λαβή.
• Όταν το φαγητό είναι ζεστό, να κρατάτε πάντα τα μπολ από τις λαβές τους.
• Μην μετακινείτε τον ατμομάγειρα όταν βρίσκεται σε λειτουργία.
• Μην σκύβετε πάνω από τον ατμομάγειρα όταν βρίσκεται σε λειτουργία.
• Μην αγγίζετε τις ζεστές επιφάνειες της συσκευής. Όταν αγγίζετε ζεστά σημεία της
συσκευής, να φοράτε πάντα γάντια κουζίνας.
• Μην τοποθετείτε τη συσκευή κοντά ή κάτω από αντικείμενα στα οποία ο ατμός
ενδέχεται να προκαλέσει βλάβη, όπως τοίχους και ντουλάπια.
• Μην χρησιμοποιείτε τη συσκευή σε περιβάλλον όπου υπάρχουν εκρηκτικά ή/και
εύφλεκτα αέρια.
• Για να αποφύγετε τη δημιουργία τυχόν επικίνδυνων συνθηκών, μην συνδέετε ποτέ
τη συσκευή σε χρονόμετρο ή σε σύστημα τηλεχειριστηρίου.
• Η δεξαμενή νερού περιέχει ένα μικρό σουρωτήρι. Αν το σουρωτήρι αποσυνδεθεί
από τη θέση του, κρατήστε το μακριά από παιδιά, καθώς υπάρχει κίνδυνος να το
καταπιούν.
Αυτόματηαπενεργοποίηση
Μόλις λήξει ο καθορισμένος χρόνος μαγειρέματος, η συσκευή απενεργοποιείται
αυτόματα.
Προστασίαβρασμούενκενώ
Ο ατμομάγειρας διαθέτει προστασία βρασμού εν κενώ. Αν δεν υπάρχει νερό στη
δεξαμενή ή αν το νερό τελειώσει κατά τη διάρκεια του μαγειρέματος, η προστασία
βρασμού εν κενώ απενεργοποιεί αυτόματα τη συσκευή. Αφήστε τον ατμομάγειρα να
κρυώσει για 10 λεπτά πριν τον χρησιμοποιήσετε ξανά.
Ανακύκλωση
Το προϊόν είναι σχεδιασμένο και κατασκευασμένο από υψηλής ποιότητας υλικά και
εξαρτήματα, τα οποία μπορούν να ανακυκλωθούν και να ξαναχρησιμοποιηθούν.
Όταν δείτε το σύμβολο του διαγραμμένου κάδου με ρόδες πάνω σε προϊόν, τότε αυτό
το προϊόν καλύπτεται από την Ευρωπαϊκή οδηγία 2002/96/ΕΚ:
Μην απορρίπτετε ποτέ αυτό το προϊόν μαζί με άλλα απορρίμματα του σπιτιού σας.
Παρακαλούμε ενημερωθείτε για τους τοπικούς κανόνες σχετικά με την ξεχωριστή
συλλογή ηλεκτρικών και ηλεκτρονικών προϊόντων. Η σωστή απόρριψη του παλιού σας
προϊόντος θα βοηθήσει στην αποτροπή τυχόν αρνητικών επιπτώσεων που ενδέχεται να
υπάρξουν στο περιβάλλον και στην ανθρώπινη υγεία.
2 ΗλεκτρομαγνητικάΠεδία(EMF)
Η συγκεκριμένη συσκευή της Philips συμμορφώνεται με όλα τα πρότυπα που αφορούν
τα ηλεκτρομαγνητικά πεδία (EMF). Εάν γίνει σωστός χειρισμός και σύμφωνος με τις
οδηγίες του παρόντος εγχειριδίου χρήσης, η συσκευή είναι ασφαλής στη χρήση βάσει
των επιστημονικών αποδείξεων που είναι διαθέσιμες μέχρι σήμερα.
3 Εισαγωγή
Συγχαρητήρια για την αγορά σας και καλωσορίσατε στη Philips! Για να επωφεληθείτε
πλήρως από την υποστήριξη που προσφέρει η Philips, δηλώστε το προϊόν σας στη
διεύθυνση www.philips.com/welcome.
Μπορείτε να βρείτε συνταγές για τον ατμομάγειρα στη διεύθυνση www.philips.com/kitchen.
4 Επισκόπηση
a
Καπάκι
h
Μπολ μαγειρέματος στον ατμό 1
b
Πάνω μπολ μαγειρέματος στον
ατμό
i
Ενισχυτής γεύσης
c
Αποσπώμενη βάση
j
Δίσκος περισυλλογής υγρών
d
Μπολ μαγειρέματος στον ατμό 3
k
Βάση με δεξαμενή νερού
e
Αποσπώμενη βάση
l
Κουμπί ρύθμισης χρόνου
μαγειρέματος στον ατμό
f
Μπολ μαγειρέματος στον ατμό 2
m
Λυχνία μαγειρέματος στον ατμό
g
Αποσπώμενη βάση
n
Είσοδος νερού
Σημείωση
• HD9124/25/26: ένα πάνω μπολ και τρία μπολ με αποσπώμενη βάση
• HD9115/16: ένα πάνω μπολ και δύο μπολ με αποσπώμενη βάση
• HD9103/04: δύο μπολ με μη αποσπώμενη βάση
5 Πριναπότηνπρώτηχρήση
1 Πριν χρησιμοποιήσετε τη συσκευή για πρώτη φορά, καθαρίστε σχολαστικά τα
μέρη που έρχονται σε επαφή με τρόφιμα (δείτε το κεφάλαιο «Καθαρισμός και
συντήρηση»).
2 Σκουπίστε το εσωτερικό της δεξαμενής νερού με ένα υγρό πανί.
6 Χρήσητηςσυσκευής
Συμβουλή
• Τοποθετήστε τη συσκευή σε σταθερή, οριζόντια και επίπεδη επιφάνεια.
• Γεμίστε τη δεξαμενή με νερό μέχρι τη μέγιστη στάθμη. Όταν η δεξαμενή νερού είναι
γεμάτη, ο ατμομάγειρας μπορεί να μαγειρέψει στον ατμό περίπου για 1 ώρα.
• Να γεμίζετε τη δεξαμενή μόνο με νερό. Μην τοποθετείτε ποτέ καρυκεύματα, λάδι ή άλλες
ουσίες μέσα στη δεξαμενή νερού.
Σημείωση
• Όταν θέλετε να μαγειρέψετε στον ατμό φαγητά με διαφορετικούς χρόνους μαγειρέματος,
ρυθμίστε τον ατμομάγειρα στο μεγαλύτερο χρόνο. Τοποθετήστε το φαγητό με το
μεγαλύτερο χρόνο μαγειρέματος στο μπολ 1. Μαγειρέψτε μέχρι ο υπόλοιπος χρόνος
μαγειρέματος που φαίνεται στην οθόνη να είναι ίσος με τον χρόνο μαγειρέματος που
απαιτεί το επόμενο φαγητό. Τότε αφαιρέστε προσεκτικά το καπάκι, φορώντας γάντια
κουζίνας, και τοποθετήστε το μπολ 2 (που θα περιέχει τα συστατικά με το μικρότερο
χρόνο μαγειρέματος) πάνω στο μπολ 1. Τοποθετήστε το καπάκι στο μπολ 2 και
συνεχίστε το μαγείρεμα στον ατμό μέχρι να ολοκληρωθεί ο χρόνος μαγειρέματος.
• Τα τρόφιμα στο υψηλότερο μπολ χρειάζονται συνήθως λίγο περισσότερο χρόνο να
ετοιμαστούν σε σχέση με τα τρόφιμα στα κατώτερα μπολ.
• Αν μαγειρεύετε μεγάλες ποσότητες, ανακατέψτε το φαγητό περίπου στα μισά της
διαδικασίας. Φορέστε γάντια κουζίνας και χρησιμοποιήστε ένα εργαλείο με μακριά λαβή.
• Αν χρησιμοποιείτε μυρωδικά ή καρυκεύματα σε σκόνη, ρίξτε νερό στο δίσκο
περισυλλογής υγρών για να υγρανθεί ο ενισχυτής γεύσης. Με αυτό τον τρόπο η σκόνη
δεν πέφτει από τα ανοίγματα του ενισχυτή γεύσης. Αν θέλετε, τοποθετήστε αποξηραμένα
ή φρέσκα μυρωδικά ή καρυκεύματα στον ενισχυτή γεύσης για να προσθέσετε γεύση στο
φαγητό σας.
Μαγείρεμαφαγητούστονατμό(εικ.3καιεικ.6)
Τοποθετήστε τα τρόφιμα που θέλετε να μαγειρέψετε σε ένα ή περισσότερα μπολ ή/
και στο πάνω μπολ. Μπορείτε να χρησιμοποιήσετε το μπολ για να λιώσετε σοκολάτα/
βούτυρο ή και για να μαγειρέψετε ρύζι.
Μαγείρεμααυγούστονατμό(εικ.4)
Για περισσότερη άνεση, χρησιμοποιήστε τις θήκες των αυγών.
Σημείωση
• Πριν τοποθετήσετε το αυγό στη θήκη, ανοίξτε μια τρύπα στο κάτω μέρος του αυγού με
μια βελόνα.
• Να φροντίζετε πάντα να τοποθετείτε τα μπολ σωστά και σταθερά.
Μπολμαγειρέματοςστονατμό
Δεν χρειάζεται να χρησιμοποιείτε και τα 3 μπολ.
Τα μπολ είναι αριθμημένα. Ο αριθμός του κάθε μπολ αναγράφεται στη λαβή του. Το
πάνω μπολ μαγειρέματος είναι το Νο. 3. Το μεσαίο είναι το Νο. 2 και το κάτω μπολ
είναι το Νο. 1.
Να στοιβάζετε τα μπολ μόνο με την εξής σειρά: μπολ 1, μπολ 2, μπολ 3.
Σημείωση
• Αν χρησιμοποιήσετε τα μπολ 2 και 3 με τις αποσπώμενες βάσεις τους (όταν
χρησιμοποιείτε το πάνω μπολ), να βεβαιώνεστε πάντα ότι το περίγραμμα της βάσης
δείχνει προς τα επάνω και ότι η βάση εφαρμόζει στη θέση της ("κλικ").
7 Καθαρισμόςκαισυντήρηση(εικ.7)
Σημείωση
• Μην καθαρίζετε τη συσκευή με συρμάτινα σφουγγαράκια, στιλβωτικά καθαριστικά ή
υγρά όπως πετρέλαιο ή ασετόν.
• Εάν το ξύδι αρχίσει να βράζει και ξεχειλίζει από τη βάση, αποσυνδέστε τη συσκευή από
την πρίζα και μειώστε την ποσότητα ξυδιού.
Προσοχή
• Μην καθαρίζετε τη βάση σε πλυντήριο πιάτων.
• Αν το σουρωτήρι της δεξαμενής νερού αποσυνδεθεί από τη θέση του, κρατήστε το
μακριά από παιδιά, καθώς υπάρχει κίνδυνος να το καταπιούν.
• Μην βυθίζετε ποτέ τη βάση σε νερό και μην την ξεπλένετε στη βρύση.
Αφαίρεσηαλάτων
Πρέπει να καθαρίζετε τα άλατα από τη συσκευή κάθε φορά που συμπληρώνονται 15
ώρες χρήσης. Η τακτική αφαλάτωση του ατμομάγειρα είναι πολύ σημαντική, καθώς έτσι
διατηρείτε την κορυφαία απόδοση και παρατείνετε τη διάρκεια ζωής της συσκευής.
1 Γεμίστε τη δεξαμενή νερού με λευκό ξύδι (8% ακετικό οξύ) μέχρι το μέγιστο
επίπεδο.
Σημείωση
• Μην χρησιμοποιήσετε άλλο είδος αφαλατικού.
2 Τοποθετήστε το δίσκο περισυλλογής υγρών, τα μπολ μαγειρέματος στον ατμό και
το καπάκι πάνω στον ατμομάγειρα.
3 Γυρίστε το διακόπτη ρύθμισης χρόνου για να ρυθμίσετε χρόνο μαγειρέματος 25
λεπτών.
4 Αφήστε το ξύδι να κρυώσει εντελώς και αδειάστε τη δεξαμενή νερού. Ξεπλύνετε
τη δεξαμενή με κρύο νερό αρκετές φορές.
Σημείωση
• Επαναλάβετε τη διαδικασία εάν υπάρχουν ακόμη άλατα στη δεξαμενή νερού.
8 Συστήματααποθήκευσης
1 Βεβαιωθείτε ότι όλα τα μέρη είναι καθαρά και στεγνά πριν αποθηκεύσετε τη
συσκευή (δείτε το κεφάλαιο «Καθαρισμός και συντήρηση»).
2 Τοποθετήστε τις βάσεις στα μπολ 2 και 3.
3 Τοποθετήστε το μπολ 3 πάνω στο δίσκο περισυλλογής υγρών.
4 Τοποθετήστε το μπολ 2 μέσα στο μπολ 3. Τοποθετήστε το μπολ 1 μέσα στο
μπολ 2.
5 Τοποθετήστε το πάνω μπολ πάνω στα άλλα μπολ.
6 Τοποθετήστε το καπάκι στο πάνω μπολ.
7 Για να αποθηκεύσετε το καλώδιο, σπρώξτε το μέσα στο χώρο αποθήκευσης
καλωδίου στη βάση.
9 Εγγύησηκαιεπισκευή
Αν χρειάζεστε επισκευή ή πληροφορίες ή αν αντιμετωπίζετε κάποιο πρόβλημα,
επισκεφτείτε τη διαδικτυακή τοποθεσία της Philips στη διεύθυνση http://www.philips.com/
ή επικοινωνήστε με το Κέντρο Εξυπηρέτησης Καταναλωτών της Philips στη χώρα σας
(θα βρείτε το τηλέφωνο στο φυλλάδιο της διεθνούς εγγύησης). Αν δεν υπάρχει Κέντρο
Εξυπηρέτησης Καταναλωτών στη χώρα σας, απευθυνθείτε στον τοπικό αντιπρόσωπο
της Philips.
Italiano
1 Importante
Leggere attentamente il presente manuale prima di utilizzare l’apparecchio e conservarlo per
riferimenti futuri.
Pericolo
• Non immergete mai la base nell’acqua e non risciacquatela sotto l’acqua corrente.
Avviso
• Prima di collegare l’apparecchio, vericare che la tensione riportata sull’apparecchio
corrisponda alla tensione di rete locale.
• Collegare l’apparecchio esclusivamente a una presa a muro con messa a terra.
Accertarsi sempre che la spina sia completamente inserita nella presa a muro.
• Non utilizzate l’apparecchio se la spina, il cavo di alimentazione o l’apparecchio stesso
sono danneggiati.
• Se il cavo di alimentazione è danneggiato deve essere sostituito da Philips, da un centro
di assistenza autorizzato Philips o da persone qualicate al ne di evitare possibili danni.
• L’apparecchio non è destinato a persone (inclusi bambini) con capacità mentali, siche
o sensoriali ridotte, fatti salvi i casi in cui tali persone abbiano ricevuto assistenza o
formazione per l’uso dell’apparecchio da una persona responsabile della loro sicurezza.
• Adottare le dovute precauzioni per evitare che i bambini giochino con l’apparecchio.
• Tenere il cavo di alimentazione lontano dalla portata dei bambini. Assicurarsi che il
cavo di alimentazione non penda dal bordo del tavolo o dal piano di lavoro su cui è
posizionato l’apparecchio.
• Non cucinare a vapore carne, pollame o pesce surgelati. Scongelare sempre
completamente questi ingredienti prima di cuocerli a vapore.
• Non utilizzate mai il sistema di cottura a vapore senza il vassoio antigoccia, per evitare
che l’acqua calda fuoriesca dall’apparecchio.
• Utilizzare soltanto i recipienti per la cottura a vapore 1, 2 e 3 e il recipiente per la
cottura a vapore superiore insieme alla base originale.
• Tenete il cavo lontano da superci incandescenti.
Attenzione
• Non utilizzare mai accessori o parti di altri produttori oppure componenti non
consigliati in modo specico da Philips. In caso di utilizzo di tali accessori o parti, la
garanzia si annulla.
• Non esporre mai la base dell’apparecchio ad alte temperature, gas caldo o vapore
emesso da altre sorgenti diverse dalla vaporiera. Non posizionare la vaporiera sopra o
vicino a un fornello o a una pentola ancora caldi o in funzione.
• Assicurarsi sempre che l’apparecchio sia spento prima di scollegarlo.
• Prima di procedere alla pulizia, scollegate sempre la spina dalla presa di corrente e
lasciate raffreddare l’apparecchio.
• Questo apparecchio è destinato esclusivamente all’uso domestico. Se l’apparecchio
non viene utilizzato correttamente, è destinato a usi professionali o semi-professionali,
oppure viene utilizzato senza attenersi alle istruzioni del manuale dell’utente, la garanzia
non è più valida e Philips non risponde per eventuali danni.
• Posizionate la vaporiera su una supercie piana, orizzontale e stabile e tenetela a una
distanza di almeno 10 cm dagli altri oggetti per evitare fenomeni di surriscaldamento.
• Se si utilizzano i recipienti per la cottura a vapore 1, 2 e 3 con le parti inferiori
rimovibili, assicurarsi sempre che il bordo sia rivolto verso l’alto e che i blocchi inferiori
siano in posizione (“clic”).
• Fare attenzione a vapore caldo che fuoriesce dalla vaporiera durante il funzionamento
o quando si rimuove il coperchio. Quando si controllano gli alimenti, utilizzare sempre
utensili per la cucina con manici lunghi.
• Rimuovere sempre il coperchio attentamente e lontano da sé. Lasciare che la condensa
scivoli dal coperchio nella vaporiera per evitare scottature.
• Tenere sempre i recipienti per la cottura a vapore per i manici quando si mescola il
cibo caldo o lo si rimuove dai recipienti.
• Tenete sempre i contenitori per la cottura a vapore per i manici quando il cibo è caldo.
• Non spostate la vaporiera durante il funzionamento.
• Non sporgetevi davanti alla vaporiera durante il funzionamento.
• Non toccare le superci calde dell’apparecchio. Usare sempre guanti da forno quando
si maneggiano le parti calde dell’apparecchio.
• Non posizionare l’apparecchio vicino o sotto oggetti che possono essere danneggiati
dal vapore, come pareti e armadietti.
• Non utilizzate l’apparecchio in presenza di materiale esplosivo e/o di gas inammabili.
• Non collegare l’apparecchio a un timer o a un sistema di controllo a distanza in modo
da evitare situazioni pericolose.
• Nel serbatoio dell’acqua è presente un piccolo setaccio. Se il setaccio nel serbatoio
dell’acqua si stacca, tenerlo lontano dalla portata dei bambini per evitare che venga
ingerito.
Spegnimento automatico
L’apparecchio si spegne automaticamente una volta trascorso il tempo impostato.
Protezione contro il funzionamento a secco
Questa vaporiera è dotata di protezione contro il funzionamento a secco. Questa funzionalità
spegne automaticamente l’apparecchio qualora quest’ultimo sia in funzione e il serbatoio
dell’acqua non contenga più acqua o la esaurisca durante il funzionamento. Lasciare
raffreddare il sistema di cottura a vapore per 10 minuti prima di riutilizzarlo.
Riciclaggio
Questo prodotto è stato progettato e realizzato con materiali e componenti di alta qualità,
che possono essere riciclati e riutilizzati.
Se su un prodotto si trova il simbolo di un bidone con ruote, ricoperto da una X, vuol dire
che il prodotto soddisfa i requisiti della Direttiva Comunitaria 2002/96/CE.
Non smaltire questo prodotto con i riuti domestici. Informarsi sui regolamenti locali per la
raccolta differenziata dei prodotti elettrici ed elettronici. Il corretto smaltimento dei prodotti
usati contribuisce a prevenire potenziali effetti negativi sull’ambiente e sulla salute.
2 Campi elettromagnetici (EMF)
Questo apparecchio Philips è conforme a tutti gli standard relativi ai campi elettromagnetici
(EMF). Se utilizzato in maniera appropriata e secondo quanto riportato nel manuale di
istruzioni, l’apparecchio risulta sicuro in conformità alle prove scientiche disponibili ad oggi.
3 Introduzione
Congratulazioni per l’acquisto e benvenuto in Philips! Per trarre il massimo vantaggio dall’assistenza
fornita da Philips, registrare il proprio prodotto sul sito: www.philips.com/welcome.
Per ricette da utilizzare con la vaporiera, andare su www.philips.com/kitchen.
4 Panoramica
a
Coperchio
h
Contenitore per cottura a vapore 1
b
Recipiente per la cottura a vapore
superiore
i
Flavour Booster
c
Parte inferiore rimovibile
j
Vassoio antigoccia
d
Contenitore per cottura a vapore 3
k
Base con serbatoio per l'acqua
e
Parte inferiore rimovibile
l
Pulsante di regolazione del tempo di
cottura a vapore
f
Recipiente per cottura a vapore 2
m
Spia cottura a vapore
g
Parte inferiore rimovibile
n
Apertura per l'acqua
Nota
• HD9124/25/26: un recipiente per la cottura a vapore superiore e tre recipienti per la cottura
a vapore con parte inferiore rimovibile
• HD9115/16: un recipiente per la cottura a vapore superiore e due recipienti per la cottura a
vapore con parte inferiore rimovibile
• HD9103/04: due recipienti per la cottura a vapore con parte inferiore non rimovibile
5 Primo utilizzo
1 Al primo utilizzo dell’apparecchio, lavare con cura tutte le parti che verranno a contatto
con gli alimenti (consultare il capitolo “Pulizia e manutenzione”).
2 Pulire la parte interna del serbatoio dell’acqua con un panno umido.
6 Utilizzo dell’apparecchio
Suggerimento
• Posizionate l'apparecchio su una supercie orizzontale, piana e stabile.
• Riempire il serbatoio con acqua no al livello massimo. Con un serbatoio dell'acqua pieno, la
vaporiera può erogare vapore per circa 1 ora.
• Riempire il serbatoio solo con acqua. Non inserire mai condimenti, olio o altre sostanze nel
serbatoio dell'acqua.
Nota
• Se si desidera cuocere a vapore alimenti che richiedono tempi di cottura a vapore diversi,
impostare il timer sul tempo di cottura a vapore più lungo. Posizionare il cibo con il tempo
di cottura a vapore più lungo nel recipiente 1. Cuocere a vapore no a quando il tempo di
cottura rimanente sul display è pari al tempo di cottura a vapore più corto. Quindi rimuovere
con cautela il coperchio utilizzando guanti da forno e posizionare il recipiente 2 contenente
gli ingredienti con il tempo di cottura a vapore più breve sopra al recipiente 1. Posizionare il
coperchio sul recipiente 2 e continuare la cottura a vapore nché il tempo di cottura a vapore
impostato non è trascorso.
• Gli alimenti che si trovano nel contenitore superiore richiedono un tempo di cottura
leggermente superiore rispetto a quelli che si trovano nei contenitori inferiori.
• Se si cuociono a vapore grossi quantitativi di cibo, mescolare il cibo a metà cottura durante il
processo di cottura. Per farlo, indossare guanti da forno e utilizzare un utensile per la cucina
con manico lungo.
• Se si usano aromi o spezie macinate, sciacquare il vassoio antigoccia per inumidire il Flavour
Booster. In questo modo, gli aromi o le spezie macinati non passeranno attraverso le aperture
del Flavour Booster. Utilizzare aromi disidratati o freschi oppure spezie a proprio piacimento
collocandoli sul sistema Flavour Booster che consente di aggiungere sapore alle pietanze cotte
a vapore.
Cottura a vapore degli alimenti (Fig.3 e Fig. 6)
Inserire gli alimenti da cuocere in uno o più recipienti per la cottura a vapore e/o nel
recipiente per la cottura a vapore superiore. È possibile usare il recipiente per fondere
cioccolato/burro e per cuocere il riso.
Cottura a vapore dell’uovo (Fig.4)
Inserire le uova nei porta-uova per una cottura più semplice.
Nota
• Usare un ago per praticare un piccolo foro nella parte inferiore dell'uovo prima di
posizionarlo sul porta-uovo.
• Accertarsi di posizionare il recipiente correttamente e assicurarsi che non si muovano.
Recipiente per la cottura a vapore
Non è necessario usare tutti e 3 i recipienti per la cottura a vapore.
I recipienti per la cottura a vapore sono numerati. È possibile trovare il numero
sull’impugnatura. Il recipiente per la cottura a vapore superiore è il n. 3. Il recipiente per la
cottura a vapore medio è il n. 2 e il recipiente per la cottura a vapore inferiore è n.1.
Impilare i recipienti per la cottura a vapore nel seguente ordine: recipiente per la cottura a
vapore 1, recipiente per la cottura a vapore 2, recipiente per la cottura a vapore 3.
Nota
• Se si usano i recipienti per la cottura a vapore 2 e 3 con le parti inferiori rimovibili (quando si
utilizza il recipiente superiore), assicurarsi sempre che il bordo sia rivolto verso l'alto e che i
blocchi inferiori siano in posizione.
7 Pulizia e manutenzione (Fig.7)
Nota
• non usate prodotti o sostanze abrasive o detergenti aggressivi, come benzina o acetone, per
pulire l'apparecchio.
• Se l'aceto inizia a bollire fuoriuscendo dai bordi della base, scollegate l'apparecchio e
riducetene la quantità.
Attenzione
• Non pulite la base nella lavastoviglie.
• Se il setaccio nel serbatoio dell'acqua si stacca, tenetelo lontano dalla portata dei bambini per
evitare che venga ingerito.
• Non immergete mai la base nell'acqua e non risciacquatela sotto l'acqua corrente.
Rimozione del calcare
È necessario provvedere alla rimozione del calcare dopo un utilizzo di 15 ore. È importante
disincrostare regolarmente il sistema di cottura a vapore per alimenti al ne di mantenere
prestazioni ottimali e prolungare il ciclo di vita dell’apparecchio.
1 Riempire il serbatoio dell’acqua con aceto di vino bianco (8% di acido acetico) no al
livello massimo.
Nota
• non utilizzare nessun altro tipo di agente anticalcare.
2 Posizionare il vassoio antigoccia, i recipienti per la cottura a vapore e il coperchio sulla
vaporiera.
3 Posizionate la manopola di regolazione del tempo di cottura a vapore su 25 minuti.
4 Lasciare che l’aceto si raffreddi completamente e svuotare il serbatoio dell’acqua.
Risciacquare più volte il serbatoio dell’acqua con acqua fredda.
Nota
• ripetete questa procedura no alla completa eliminazione del calcare dal serbatoio dell'acqua.
8 Conservazione
1 Assicurarsi che tutte le parti siano pulite e asciutte prima di riporre l’apparecchio
(vedere il capitolo “Pulizia e manutenzione”).
2 Inserire le parti inferiori nei recipienti per la cottura a vapore 2 e 3.
3 Inserite il contenitore per la cottura a vapore 3 sul vassoio antigoccia.
4 Posizionare il recipiente 2 nel contenitore 3. Posizionare il recipiente 1 nel
contenitore 2.
5 Posizionare il recipiente per la cottura a vapore superiore sugli altri recipienti.
6 Posizionare il coperchio sul recipiente per la cottura a vapore superiore.
7 Per riporre il cavo di alimentazione, spingetelo nel vano di avvolgimento della base.
9 Garanzia e assistenza
Per ricevere ulteriori informazioni, richiedere assistenza o risolvere eventuali problemi, visitare
il sito Web Philips all’indirizzo www.philips.com oppure contattate il centro assistenza clienti
Philips di zona (il numero di telefono è riportato nell’opuscolo della garanzia). Se nel proprio
paese non è presente alcun centro di assistenza clienti, rivolgersi al proprio rivenditore Philips.
-
 1
1
-
 2
2


Philips HD9104/00 Benutzerhandbuch
- Kategorie
- Dampfgarer
- Typ
- Benutzerhandbuch
in anderen Sprachen
- English: Philips HD9104/00 User manual
- italiano: Philips HD9104/00 Manuale utente
Verwandte Artikel
-
Philips HD9160/00 Benutzerhandbuch
-
-
-
-
-
Philips HD9140/91R1 Benutzerhandbuch
-
-
Philips HD9190/30 Benutzerhandbuch
-
Philips HD9150/91 Benutzerhandbuch
-
Philips HD 9140 Bedienungsanleitung