Autel AR82060326 Smart Controller SE Benutzerhandbuch
- Typ
- Benutzerhandbuch

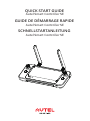
QUICK START GUIDE
GUIDE DE DÉMARRAGE RAPIDE
SCHNELLSTARTANLEITUNG

Contents
1. EN ......................................... 01~14
2. FR ......................................... 15~28
3. DE ......................................... 29~42

1. Disclaimer
To ensure safe and successful operation of your Autel Smart Controller
SE (hereinafter referred to as the "controller"), please strictly follow the
operating instructions and steps in this guide.
If the user does not abide by the instructions, Autel Robotics will not be
responsible for any product damage or loss in use, whether direct or indirect,
legal, special, accident or economic loss (including but not limited to loss of
profit) and does not provide warranty service. Do not use incompatible parts
or use any method that does not comply with the official instructions of Autel
Robotics to modify the product.
The safety guidelines in this document will be updated from time to
time. To ensure you get the latest version, please visit the official
website: https://www.autelrobotics.com/
2. Battery Safety
The controller is powered by a smart lithium-ion battery. Improper
use of lithium-ion batteries can be dangerous. Please ensure that the
following battery usage, charging and storage guidelines are strictly
followed.
Note
• Only use the battery and charger provided by Autel Robotics. It
is forbidden to modify the battery assembly and its charger or
use third-party equipment to replace it.
• The electrolyte in the battery is extremely corrosive. If the
electrolyte spills into your eyes or skin accidentally, please rinse
the affected area with clean water and seek medical attention
immediately.
3. Precaution
1

2
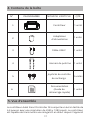
4. Item List
NO DIAGRAM ITEM NAME QTY
If used improperly, the aircraft may cause injury and damage to
people and property. Please be cautious while using it. For details,
please refer to the aircraft’s disclaimer and safety guidelines.
• Before each flight, make sure that the controller is fully charged.
• Make sure the controller antennas are unfolded and adjusted to
the appropriate position to ensure the best possible flight results.
• If the controller antennas are damaged, it will affect the
performance. Please contact the after-sales technical support
immediately.
• If the aircraft is changed due to damage, it needs to be relinked
before use.
• Make sure to turn off the aircraft power before turning off the
controller each time.
• When not in use, make sure to fully charge the controller every
three months.
• Once the power of the controller is less than 10%, please charge
it to prevent an over-discharge error. This is caused by long-term
storage with a low battery charge. When the controller will not be in
use for an extended time, discharge the battery between 40%-60%
before storage.
• Do not block the vent of the controller to prevent overheating
and diminished performance.
• Do not disassemble the controller. If any parts of the controller
are damaged, contact Autel Robotics After-Sale Support.

3
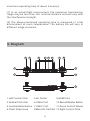
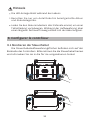
5. Overview
Documentation
(Quick Start Guide)
1pc
Chest Strap
Spare Control Sticks
1pc
1pc
1pc
2pcs
1pc
Controller
Power Adapter
USB-C Cable
The Autel Smart Controller SE is integrated with a 6.4-inch touch
screen which boasts a 2340x1080 pixel resolution. The controller f
can transmit a live HD view from the aircraft[1] at a distance of up
to 15km[1] (9.32 miles). The controller uses the Android operating
system and supports Wi-Fi internet connection, Bluetooth and
GNSS. Users can download third-party APPs.
The built-in battery has a capacity of 1900mAh, providing a
maximum operating time of about 3 hours[2].
[1] In an actual flight environment, the maximum transmission
range may be less than this nominal distance and will vary with
the interference strength.
[2] The above-mentioned operating time is measured in a lab
environment at room temperature. The battery life will vary in
different usage scenarios.

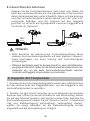
6. Diagram
1.Left Control Stick
2.Gimbal Pitch Dial
3.Customizable Button
4.Chest Strap Hook
4
4 5 69
8
11
310
2
4
112
The Autel Smart Controller SE is integrated with a 6.4-inch touch
screen which boasts a 2340x1080 pixel resolution. The controller f
can transmit a live HD view from the aircraft[1] at a distance of up
to 15km[1] (9.32 miles). The controller uses the Android operating
system and supports Wi-Fi internet connection, Bluetooth and
GNSS. Users can download third-party APPs.
The built-in battery has a capacity of 1900mAh, providing a
maximum operating time of about 3 hours[2].
[1] In an actual flight environment, the maximum transmission
range may be less than this nominal distance and will vary with
the interference strength.
[2] The above-mentioned operating time is measured in a lab
environment at room temperature. The battery life will vary in
different usage scenarios.
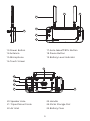
7
5.Air Outlet
6.USB-A Port
7.USB-C Port
8.Micro-SD Card Slot
9.HDMI Port
10.Record/Shutter Button
11.Zoom Control Wheel
12.Right Control Stick

5
20.Speaker Hole
21.Tripod Mount Hole
22.Air Inlet
13.Power Button
14.Antenna
15.Microphone
16.Touch Screen
15
14
19
17
1816
17.Auto-takeoff/RTH Button
18.Pause Button
19.Battery Level Indicator
25
21
20
24
23
22
13
23.Handle
24.Sticks Storage Slot
25.Battery Case

7. Charge the Battery
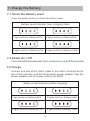
7.1 Check the Battery Level
Press the power button to check the battery level.
7.3 Charge
Connect one end of the USB-C cable to the USB-C interface at the
top of the controller, and the other end to power adapter. Plug the
power adapter into AC power outlet (100-240V).
7.2 Power On / Off
Press and hold the power button for 2 secs to turn on and off the controller.
6
1 light solid on: Battery≥25%
Battery Level Indicator (non-charging state)
2 lights solid on: Battery≥50%
3 lights solid on: Battery≥75% 4 lights solid on: Battery=100%
1 light solid on: Battery≥25%
Battery Level Indicator (while charging)
2 lights solid on: Battery≥50%
3 lights solid on: Battery≥75% 4 lights solid on: Battery=100%

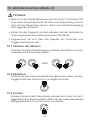
8. Set Up the Controller
8.1 Install the Sticks
The sticks storage slots are located on the back of the controller.
Please take out the sticks and screw them into the corresponding
bases.
7
Note
LED indication light will blink while charging.
Only use the battery and charger provided by Autel Robotics.
Recharge the battery at least every 3 months to prevent over
discharging. The battery depletes when stored for an extended
period.

8.2 Adjust the Antennas
Unfold the controller antennas and adjust them to the optimal
angle. The signal strength varies when the antenna angle is
different. When the antenna and the back of the controller are at
an angle of 180° or 270°, and the antenna surface is facing the
aircraft, the signal quality between aircraft and controller will
reach the optimal condition.
9. Pair the Frequency
1. Press (short press) the linking button next to the USB port on the
right side of the aircraft body to put the aircraft into the linking mode.
2. Power on the Smart Controller and run the Autel Explorer app,
enter the mission flight interface, click the gear icon in the upper
right corner, enter the settings menu, click "remote control -> data
transmission and image transmission linking> start linking", wait a
few seconds until the data transmission is set correctly and the
linking is a success.
8
Note
To avoid controller signal interference, please do not use other
communication equipment with the same frequency band at the
same time.
During operation, the App will prompt the user when the image
transmission signal is poor. Adjust the antenna angles according
to the prompts to ensure the controller and aircraft have the
best communication range.

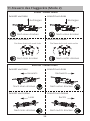
10.1 Motor Starting
Press in or out on both command sticks for about 2 seconds to start
the motors.
10.2 Take off
Slowly push up the left stick to take off the aircraft to 2.5m height.
10.3 Landing
Slowly push down the left stick until the aircraft lands. Hold the left
stick until the motor stops.
10. Takeoff / Landing (Mode 2)
or
9
Note
Mode 2 is the default control mode of the Smart Controller. The
left stick controls the altitude and heading of the aircraft, while
the right stick controls the forward, backward and sideward
movements.
Before takeoff, place the aircraft on a flat and level surface and
face the rear side of the aircraft towards you.
Please make sure that the controller is successfully paired with
the aircraft.

10
Left Control Stick
Right Control Stick
11. Control Stick Operation (Mode 2)
Left Side View
Top View Top View
Ascend
Left Side View
Left Side View Left Side View
Rear View Rear View
Descend
Nose Rotates Left Nose Rotates Right
Upward Downward
Move Left
Left Right
Forward Backward
Move Right
Upward Downward
Move RightMove Left

11
12. Firmware Update
To ensure users have a premium operating experience, Autel
Robotics will update firmware when necessary. You can refer to the
following steps to upgrade.
1. Power on the controller and make sure it is connected to the
internet.
2. Run Autel Explorer App. A pop-up will appear when new firmware
is available. Tap the notification to enter the update interface.
3. Update will start automatically after downloading the latest
firmware. Please restart the controller when the update is complete.
13. Specifications
Image Transmission
902-928MHzFCC
2.400-2.4835GHz
5.725-5.850GHzNon-Japan
5.650-5.755GHzJapan Only
*Operating Frequency
Max Signal Transmission
Distance(No interference,
No obstacles)
Note
Before updating, please make sure the controller battery is
above 50%.
If the network is disconnected during the firmware downloading,
the upgrade will fail.
The update takes approximately 15 minutes. Make. Please wait
patiently.
FCC15km CE 8km

Operating Frequency
2340×1080
6.4 inches
60fps
800nits
10-point multi-touch
Bluetooth 5.0
2.400-2.4835GHz
≤11dBm
Wi-Fi 802.11a/b/g/n/ac, 2×2 MIMO
2.400-2.4835GHz
5.725-5.850GHz
FCC≤26 dBm
CE≤20 [email protected] ≤14 [email protected]
SRRC≤20 [email protected] ≤26
Wi-Fi
Protocols
Bluetooth
Screen
Transmitter Power
(EIRP)
Dimensions
Resolution
Frame Rate
Max. Brightness
Touch Screen
Transmitter Power
(EIRP)
FCC ≤33 dBm
CE ≤20 [email protected] ≤14 [email protected]
SRRC ≤20 [email protected] ≤[email protected]/5.7G
Protocols
Operating Frequency
Transmitter Power
(EIRP)
12

General Specifications
ROM 128GB + expandable storage via
micro-SD card
HDMI Port
5V/2A
Battery
Type
Capacity
Voltage
Rated Power
Li-ion
1900mAh
7.7V
14.63W
Operating Time
Charging Time
Charging Temperature
~2 hours (Max. Brightness)
~3 hours (50% Brightness)
90 minutes
5 to 45 41 to 113
Power Adapter
Input
Output
Rated Power
100-240V~50/60Hz1A Max
5V 3A9V 2A12V 2.5A
30W
Internal Storage
Video Output Port
USB-A Voltage/Current
Operating Temperature
13

**Supported Models
Dimensions
Weight
GNSS
Storage Temperature
Ingress Protection
Note
* The operating frequency band varies according to different
countries and models.
** We will support more models in the future, please visit our
official website https://www.autelrobotics.com/ for the latest
information.
>3 months: -20 to 25 -4 to 77
1-3 months: -20 to 45 -4 to 113
<1 month: -20 to 60 -4 to 140
IP43
226.3×137.7×31.5mm (antennas folded)
226.3 x 215.4 x 31.5mm (antennas unfolded)
617 g
EVO II Pro V3
EVO II Dual 640T V3
EVO II RTK Series V3
EVO II Enterprise V3
GPS/GLONASS/Galileo/BeiDou/
NavIC/QZSS
14

1. Avertissement
Pour garantir un fonctionnement correct et en toute sécurité de votre
contrôleur Autel Smart Controller SE (dans le reste du document appelé
« contrôleur »), veuillez suivre scrupuleusement les instructions et les
étapes indiquées dans ce guide.
En cas de non-respect des instructions, Autel Robotics ne pourra être
tenu responsable de tout dommage ou perte encourue pendant
l'utilisation du produit, que ce soit direct ou indirect, légal, spécial,
accident ou perte économique (y compris, mais sans s'y limiter, la perte
de profit) et ne fournira pas de service de garantie. N'utilisez pas de
pièces incompatibles et ne modifiez pas le produit dans le non-respect
des instructions officielles d'Autel Robotics.
Les consignes de sécurité de ce document seront mises à jour de temps à autre.
Pour vous assurer que vous possédiez la dernière version du document, veuillez
visiter le site Web officiel : https://www.autelrobotics.com/
2. Consignes de sécurité de la batterie
Le contrôleur est alimenté par une batterie lithium-ion intelligente.
Une utilisation incorrecte des batteries au lithium-ion peut être
dangereuse. Veillez à respecter scrupuleusement les consignes
suivantes relatives à l'utilisation, à la charge et au stockage de la
batterie.
Remarque
• Utilisez uniquement la batterie et le chargeur fournis par Autel
Robotics. Il est interdit de modifier la batterie et son chargeur
ou d'utiliser un équipement tiers pour les remplacer.
• L'électrolyte de la batterie est extrêmement corrosif. Si
l'électrolyte entre accidentellement en contact avec vos yeux
ou votre peau, rincez la zone touchée à l'eau propre et
consultez immédiatement un médecin.
15

16
Si l'appareil n'est pas utilisé correctement, il peut occasionner des
blessures ou des dommages. Soyez prudent pendant son utilisation.
Pour plus de détails, veuillez vous reporter à la clause de
non-responsabilité et aux directives de sécurité de l’aéronef.
• Avant chaque vol, assurez-vous que le contrôleur est entièrement
chargé.
• Assurez-vous que les antennes du contrôleur sont déployées et
orientées de manière appropriée pour garantir les meilleurs résultats
de vol possibles.
• Si les antennes du contrôleur sont endommagées, cela affectera
les performances. Veuillez contacter immédiatement l'assistance
technique après-vente.
• Si l'appareil est remplacé après une réparation, il doit être de
nouveau associé avant l'utilisation.
• Assurez-vous de toujours mettre l'appareil hors tension avant
d'éteindre le contrôleur.
• Lorsqu'il n'est pas utilisé, assurez-vous de charger complètement le
contrôleur tous les trois mois.
• Lorsque le niveau de charge du contrôleur est inférieur à 10 %,
chargez-le pour éviter des problèmes liés à une décharge excessive.
Ceci peut être causé par un stockage à long terme avec une charge
de batterie faible. Si vous prévoyez de ne pas utiliser le contrôleur
pendant une période prolongée, déchargez la batterie à un niveau
compris entre 40 % et 60 % avant de le ranger.
• Ne bloquez pas l'ouverture de ventilation du contrôleur pour
éviter une surchauffe et une baisse des performances.
3. Précautions
• Ne démontez pas le contrôleur. Si des pièces du contrôleur
sont endommagées, contactez le service après-vente d'Autel Robotics.

4. Contenu de la boîte
N° DIAGRAMME NOM DE L’ARTICLE QTÉ
17
5. Vue d’ensemble
Documentation
(Guide de
démarrage rapide)
Harnais de poitrine
Joysticks de contrôle
de rechange
1 unité
Contrôleur
Adaptateur
d'alimentation
Câble USB-C
Le contrôleur Autel Smart Controller SE comporte un écran tactile de
6,4 pouces avec une résolution de 2340 x 1080 pixels. Le contrôleur
est capable de transmettre une image HD en direct depuis l'appareil
à une distance maximale de 15 km[1] (9,32 miles). Le contrôleur
est équipé du système d'exploitation Android et prend en charge
la connexion Internet Wi-Fi, Bluetooth et GNSS. Les utilisateurs
peuvent utiliser des applications tierces.
La batterie intégrée dispose d'une capacité de 1900 mAh, offrant
une autonomie de fonctionnement maximale d'environ 3 heures[2].
[1] Dans un environnement de vol réel, la portée maximale de
transmission peut être inférieure à cette distance nominale et
varie en fonction de la présence éventuelle d'interférence.
[2] l'autonomie mentionnée ci-dessus est mesurée dans un environne-
ment de laboratoire à température ambiante. L'autonomie de la batterie
varie selon les cas d'utilisation.
1 unité
1 unité
1 unité
2 unités
1 unité

Le contrôleur Autel Smart Controller SE comporte un écran tactile de
6,4 pouces avec une résolution de 2340 x 1080 pixels. Le contrôleur
est capable de transmettre une image HD en direct depuis l'appareil
à une distance maximale de 15 km[1] (9,32 miles). Le contrôleur
est équipé du système d'exploitation Android et prend en charge
la connexion Internet Wi-Fi, Bluetooth et GNSS. Les utilisateurs
peuvent utiliser des applications tierces.
La batterie intégrée dispose d'une capacité de 1900 mAh, offrant
une autonomie de fonctionnement maximale d'environ 3 heures[2].
[1] Dans un environnement de vol réel, la portée maximale de
transmission peut être inférieure à cette distance nominale et
varie en fonction de la présence éventuelle d'interférence.
[2] l'autonomie mentionnée ci-dessus est mesurée dans un environne-
ment de laboratoire à température ambiante. L'autonomie de la batterie
varie selon les cas d'utilisation.
6. Diagramme
1.Joystick de gauche
2.Molette de réglage d'angle de la nacelle
3.Bouton personnalisable
4.Crochet pour harnais de poitrine
5.Sortie d'air
6.Port USB-A
7.Port USB-C
8.Logement pour carte SD
4 5 69
8
11
310
2
4
112
7
18
Seite wird geladen ...
Seite wird geladen ...
Seite wird geladen ...
Seite wird geladen ...
Seite wird geladen ...
Seite wird geladen ...
Seite wird geladen ...
Seite wird geladen ...
Seite wird geladen ...
Seite wird geladen ...
Seite wird geladen ...
Seite wird geladen ...
Seite wird geladen ...
Seite wird geladen ...
Seite wird geladen ...
Seite wird geladen ...
Seite wird geladen ...
Seite wird geladen ...
Seite wird geladen ...
Seite wird geladen ...
Seite wird geladen ...
Seite wird geladen ...
Seite wird geladen ...
Seite wird geladen ...
Seite wird geladen ...
Seite wird geladen ...
Seite wird geladen ...
Seite wird geladen ...
-
 1
1
-
 2
2
-
 3
3
-
 4
4
-
 5
5
-
 6
6
-
 7
7
-
 8
8
-
 9
9
-
 10
10
-
 11
11
-
 12
12
-
 13
13
-
 14
14
-
 15
15
-
 16
16
-
 17
17
-
 18
18
-
 19
19
-
 20
20
-
 21
21
-
 22
22
-
 23
23
-
 24
24
-
 25
25
-
 26
26
-
 27
27
-
 28
28
-
 29
29
-
 30
30
-
 31
31
-
 32
32
-
 33
33
-
 34
34
-
 35
35
-
 36
36
-
 37
37
-
 38
38
-
 39
39
-
 40
40
-
 41
41
-
 42
42
-
 43
43
-
 44
44
-
 45
45
-
 46
46
-
 47
47
-
 48
48


