
Instruction manual
Инструкция по эксплуатации
Vacuum cleaner BR4261
Пылесос BR4261
brayer.pro

СОДЕРЖАНИЕ
EN ......................................................................................................................................3
DE ....................................................................................................................................13
RU ...................................................................................................................................24
KZ ....................................................................................................................................35

3
EN
EN
VACUUM CLEANER BR4261
Wireless handheld vacuum cleaner is intended for
room dry cleaning.
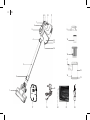
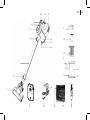
DESCRIPTION
1. Electric brush
2. Brush release button
3. Extension pipe
4. Extension pipe clamp
5. Dust bin upper lid
6. Dust bin lid clamp
7. Operation/charge indicator
8. Maximal power on button «МАХ»
9. On/o button
10. Handle
11. Power adapter connection socket
12. Dust bin ask
13. Lower lid
14. Dust bin lower lid clamp
15. HEPA lter
16. Separator
17. Wall-mounted holder of the vacuum cleaner
18. Power adapter
19. Power adapter connecting cord jack
20. Round brush clamp
21. Round brush
22. Crevice nozzle

4
EN
1
2
3
4
5 5
15
16
4
14
6
7
8 9 10 11
12
13
14
12
13
17 19
18
21 2220

5
EN
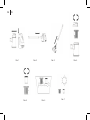
Рiс. 1 Рiс. 2 Рiс. 3 Рiс. 4
Рiс. 5 Рiс. 6 Рiс. 7

6
EN
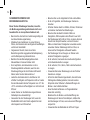
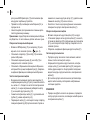
SAFETY MEASURES AND OPERATION
RECOMMENDATIONS
Read the operation manual carefully before using
the vacuum cleaner; after reading, keep it for future
reference.
• Use the unit for its intended purpose only, as it is stated
in this manual.
• Mishandling the unit can lead to its breakage and cause
harm to the user or damage to the user’s property,
which is not covered by warranty.
• Make sure that the operating voltage of the unit
indicated on the label corresponds to your home mains
voltage.
• Do not touch the power adapter body with wet hands
during battery charging.
• Before using the vacuum cleaner charge the battery.
If you didn’t use the vacuum cleaner more than for 3
months, charge the battery.
• Do not charge the rechargeable battery in places
with high moisture and high temperature. Charge the
accumulator battery at the temperature from +5° C to
+35° C and relative air humidity no more than 80%.
• Do not leave the plugged in power adapter unattended.
• Do not use the vacuum cleaner if the dust bin is not
installed or installed improperly, or if the separator and
the lter block are not installed.
• Do not use the vacuum cleaner if the dust bin is not
installed or installed improperly, or if the inlet and outlet
lters are not installed.
• Use only the parts and attachments supplied with the unit.
• Do not use the vacuum cleaner outdoors.
• Protect the unit from impacts, falling, vibrations and other
mechanical stress.
• Do not use the unit near heating appliances, heat sources
or open ame.
• Do not use the vacuum cleaner in places where aerosols
are used or sprayed, and in proximity to highly inammable
liquids; do not use the vacuum cleaner in the places where
such liquids are stored.
• The vacuum cleaner is not intended for collecting water or
other liquids.
• Do not use the vacuum cleaner for collecting burning or
smoking cigarettes or cinders.
• Do not use the vacuum cleaner for collecting dust of
plaster, concrete, our or ashes.
• Do not use the vacuum cleaner to clean your pets’ fur.
• Keep free hanging clothes, hair and other parts of
your body away from the air inlets of the brush or the
attachments while room cleaning.
• Close attention is necessary while cleaning the stair
landings
• Do not cover the inlets and outlets of the vacuum cleaner
with any foreign objects. Do not switch the vacuum cleaner
on if any of its openings is blocked.
• Do not use the power cord as a handle for carrying the
vacuum cleaner; carry it by the handle.
• Regularly clean the dust bin and the lters of the vacuum
cleaner.
• After you nish using the vacuum cleaner or before
cleaning it, switch the unit o with the on/o button.

7
EN
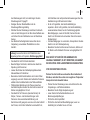
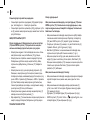
• For children safety reasons do not leave polyethylene
bags used as a packaging unattended.
THE UNIT IS INTENDED FOR HOUSEHOLD USE
ONLY, DO NOT USE THE UNIT FOR COMMERCIAL
OR LABORATORY PURPOSES.
BEFORE THE FIRST USE
After the unit’s transportation or storage at negative
temperature, unpack it and wait for at least 3 hours
before using it.
• Unpack the vacuum cleaner, remove all packaging
and advertising materials.
• Keep the original package.
• Read the safety measures and operating
recommendations.
• Check the delivery set.
• Examine the unit for damages; if the unit is damaged,
do not switch it on.
• Make sure that specied specications of power
supply voltage of the power adapter correspond to
the specications of your mains.
WALL-MOUNTED HOLDER OF THE VACUUM
CLEANER
• Select the storage place for the vacuum cleaner/the
battery charging. Place the wall-mounted holder (17)
near the mains socket.
• Place the wall-mounted holder (17) so that the
vacuum cleaner does not hang. The vacuum cleaner
should rest on the electric brush (1).
• Fasten the wall-mounted holder (17) with dowels and
fastening screws.
Attention! Do not allow children to play with
polyethylene bags or packaging lm. Danger of
suocation!
• The unit is not intended for usage by children.
• Do not leave children unattended to prevent using
the unit as a toy.
• Do not allow children to touch the power adapter
body during battery charging.
• Be especially careful if children or disabled persons
are near the operating unit.
• During the unit operation and breaks between
operation cycles, place the unit out of reach of
children.
• The unit is not intended for usage by physically or
mentally disabled persons (including children) or by
persons lacking experience or knowledge if they are
not under supervision of a person who is responsible
for their safety or if they are not instructed by this
person on the usage of the unit.
• Do not repair the unit by yourself. Do not
disassemble the unit by yourself; if any malfunction is
detected, and after the unit has been dropped, apply
to the service center.
• To avoid damage, transport the unit in the original
package.
• Keep the unit in a dry cool place out of reach of
children and disabled persons.

8
EN
BATTERY CHARGING
ATTENTION!
– Use only the battery supplied with the unit. Using a
non-original battery can be dangerous.
– Do not expose Li-ion batteries to impacts and high
temperatures. Do not disassemble the battery to avoid
the electrolyte leakage.
– Do not throw the battery into re.
– Avoid the battery terminals circuit, it may cause burns
or re.
– Do not discard the battery with usual household
waste, apply to a specialized center for further recycling.
• Before using the unit for the rst time or after a long
period of inactivity, charge the battery.
• Insert the power adapter (18) connection cord jack
(19) into the socket (11).
• Connect the power adapter (18) to the mains socket,
the indicator (7) will light up and start ashing. When
the battery is fully charged, the indicator (7) will glow
constantly.
• Full charging of the rechargeable battery takes about
4-5 hours.
• After charging the battery disconnect the power
adapter (18) from the mains.
• Remove the power adapter (18) connection cord jack
(19) from the socket (11).
Notes:
– charge the battery at the temperature from +5°C to
+35°C.
– if you didn’t use the vacuum cleaner for more than
2-3 months, fully charge the battery before using the
vacuum cleaner.
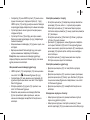
USING THE VACUUM CLEANER
ATTENTION!
– If the suction power of the vacuum cleaner decreases
rapidly while cleaning, switch it o immediately and
check the extension pipe (3) for obstruction. Remove
the obstruction and only then continue cleaning.
– Do not use the vacuum cleaner to collect burning or
smoking cigarettes, cinders, plaster or concrete dust,
our or ashes.
– The vacuum cleaner is not intended for collecting
water or other liquids.
– Do not use the vacuum cleaner in places where
aerosols are used or sprayed, and in proximity to highly
inammable liquids, do not use the vacuum cleaner in
the places where such liquids are stored.
ASSEMBLING THE VACUUM CLEANER
• Install the dust bin on the motor unit of the vacuum
cleaner and make sure that the dust bin is properly
secured with the clamp (6) (pic. 1).

9
EN
Attaching the extension pipe
• Insert the extension pipe (3) into the vacuum cleaner
air inlet until
• the clamp (4) clicking (pic. 2).
• Connect the electric brush (1) to the extension pipe
(3) (pic. 3).
• To detach the extension pipe (3) from the vacuum
cleaner press and hold the clamp (4).
• To detach the electric brush (1) from the extension
pipe (3) press and hold the clamp (2).
Electric brush
• Use the electric brush (1) for cleaning rooms with
smooth oors or carpets with medium and low pile.
Notes:
– do not use the electric brush (1) if the pile length
exceeds 15 mm.
– do not run the electric brush (1) over electric wires.
– after you nish cleaning the room with the electric
brush (1), switch the vacuum cleaner o with the on/o
button (9).
Сrevice nozzle
• The crevice nozzle (22) is intended for cleaning
radiators, crevices etc.
• You can attach the crevice nozzle (22) to the
extension pipe (3) or to the air inlet of the vacuum
cleaner.
SWITCHING THE VACUUM CLEANER ON
Attention! Switch the vacuum cleaner on only with
the dust bin installed and with the separator (18)
and the lter block (19) installed in the dust bin.
• During cleaning or when carrying the vacuum cleaner
hold the unit by the handle (10).
• For easy storing of the vacuum cleaner or the battery
charging use the wall-mounted holder of the vacuum
cleaner (17).
• To switch the vacuum cleaner on press the on/o
button (9). The vacuum cleaner will switch on at the
low power level. To switch the maximal power on,
press the button (8) «МАХ». Press the button (8)
«МАХ» to switch to the low power level and press the
button (9) again to switch the vacuum cleaner o.
• During the vacuum cleaner operation the indicators
(7) light up and electric brush (1).
• When the last indicator (7) starts ashing, switch the
vacuum cleaner o and charge the battery.
CLEANING AND CARE
Attention!
Provide that the dust bin, the separator (18) and
the HEPA-lter (15) are always clean, because the
overall performance of the vacuum cleaner depends
on it.

10
EN
• It is recommended to clean the dust bin after every
use of the vacuum cleaner. Regularly clean the
separator (18) and the HEPA-lter (15).
• Remove the extension pipe (3), to do it, press and hold
the clamp (4) (pic. 2).
• Remove the dust bin from the motor unit of the
vacuum cleaner by pressing the clamp (6) (pic. 1).
• To remove dust and garbage place the dust bin above
the garbage bin, press the clamp (14) and open the lid
(13), remove the garbage and dust and close the lid
(13) until the clamp (14) clicking.
Cleaning the dust bin
• Before disassembling the dust bin remove dust and
garbage from it as described above.
• Take the upper lid (5) of the dust bin, turn it
counterclockwise and remove from the ask (12) (pic.
4).
• Remove the separator (16) from the ask (12) (pic. 4).
• Turn the HEPA lter (15) counterclockwise « » and
remove it from the separator (16) (pic. 5).
• Wash the separator (16) and the HEPA lter (15)
under a warm water jet and dry them (pic. 6, 7). Do
not dry the HEPA lter (15) with a hairdryer or similar
appliances.
• Wash the lters under a warm water jet and dry them.
Do not dry the HEPA-lter (15) with a hairdryer or
similar appliances.
• Wash the dust bin ask (12) and dry it.
• Do not wash all removable parts in a dishwashing
machine.
Note: before assembling the dust bin make sure that all
removable parts are clean and dry.
Assembling of the dust bin
• Insert the HEPA lter (15) in the separator (16) and turn
it clockwise « » (pic. 5).
• Install the separator (16) in the dust bin ask (12).
• Install the upper lid (5) on the ask (12) and turn it
clockwise.
• Install the assembled dust bin in the installation place
until the clamp (6) clicking and make sure that the dust
bin is xed properly.
Cleaning the electric brush
• When using the electric brush (1) threads or long hair
etc. can wind up around the rotating brush (21). Keep
the electric brush (1) clean, disassemble the brush (1)
and clean the round brush (21) as it becomes dirty.
• Remove the electric brush (1) from the extension pipe
(3) by pressing the release button (2).
• Turn over the brush (1), turn the clamp (20)
counterclockwise with a at screwdriver and remove it.
Remove the round brush (21) and remove the threads
and hair wound up around the brush.
• Clean the inner and outer surface of the electric brush
(1) body from garbage and dust.
Assembling the electric brush
• Insert the left part of the round brush (21) into the body.

11
EN
• Install the right side of the round brush (21) back to
its place, install the clamp (20) to x the round brush
(21) and turn it clockwise with a at screwdriver.
• Make sure that the round brush (21) is xed properly.
Cleaning the vacuum cleaner body
• Wipe the vacuum cleaner body with a soft, slightly
damp cloth and then wipe it dry.
• Never immerse the vacuum cleaner body, the electric
brush (1) and the power adapter (18) into water or
other liquids. Make sure that no liquid gets inside the
vacuum cleaner body and the electric brush (1).
• Do not use solvents or abrasives for cleaning the
vacuum cleaner body and the removable parts.
STORAGE
• Before taking the vacuum cleaner away for storage,
clean the vacuum cleaner body, the dust bin and the
electric brush (1).
• Keep the vacuum cleaner in a dry cool place out of
reach of children and disabled persons.
DISPOSING OF THE BATTERY
• Disassemble the motor unit using a cross-head
screwdriver and remove the battery. Do not throw out
the battery with usual household waste, apply to a
specialized center for further recycling.
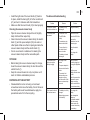
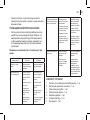
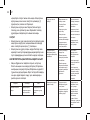
Troubles and troubleshooting
Problem Reasons Solution
The vacuum cleaner
cannot be switched on.
The battery is fully
discharged.
Charge the battery.
The suction power
decreased.
The dust bin is full.
The HEPA-lter
is dirty.
The extension pipe
became obstructed.
The round brush in
the electric brush
does not rotate.
The battery is almost
discharged.
Clean the dust bin.
Clean the HEPA-lter.
Remove the
obstruction from the
extension pipe.
Clean the electric
brush.
Fully charge the
battery.
The indicators don’t
light up during the
battery charging.
No voltage in the
socket.
The power adapter is
disconnected from the
mains.
The contact fault
between the power
adapter cord plug
and the socket on the
vacuum cleaner body
occurred.
Check the mains
socket by plugging a
known good appliance
to it.
Plug the power
adapter into the mains
socket.
Check the connection
between the power
adapter cord plug
and the socket on the
vacuum cleaner body.
Short operation time of
the vacuum cleaner.
The battery is not fully
charged.
Natural aging process
of the battery.
Fully charge the
battery.
The rechargeable
battery is a
consumable material.
After the warranty
period expires, the
consumer should buy
a new battery.

12
EN
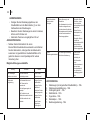
DELIVERY SET
1. Vacuum cleaner (with the dust bin) – 1 pc.
2. Wall-mounted holder - 1 pc.
3. Extension pipe – 1 pc.
4. Electric brush – 1 pc.
5. Crevice nozzle – 1pc.
6. Power adapter – 1 pc.
7. Manual – 1 pc.
TECHNICAL SPECIFICATIONS
Vacuum cleaner:
• Rechargeable battery: 22.2 V, Li-Ion 2,200 mA/h
• Rated input power: 120 W
Power adapter:
• Power supply: 220-240 V ~ 50/60 Hz
• Output voltage: 27 V 500 mA
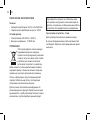
RECYCLING
To prevent possible damage to the
environment or harm to the health of
people by uncontrolled waste disposal,
after expiration of the service life of the
unit or the batteries (if included), do not
discard them with usual household waste, but take the
unit and the batteries to specialized stations for further
recycling.
The waste generated during the recycling of the unit
is subject to mandatory collection and consequent
recycling in the prescribed manner.
For further information about recycling of this product,
apply to the local municipal administration, a household
waste recycling service or to the shop where you
purchased this product.
The manufacturer reserves the right to change the
appearance, design and specications not aecting
the general operation principles of the unit, without
prior notice.
The unit operating life is 3 years
The manufacturing date is specied in the serial
number.
In case of any malfunctions, promptly apply to the
authorized service center.

13
DE
DE
STAUBSAUGER BR4261
Drahtloser Handstaubsauger ist zum
Trockenaufräumen bestimmt.
BESCHREIBUNG
1. Elektrobürste
2. Bürstenverriegelungstaste
3. Verlängerungsrohr
4. Verlängerungsrohrverriegelung
5. Staubbehälteroberdeckel
6. Staubbehälterverriegelung
7. Betriebskontrolleuchte/Ladezustandsanzeige
8. „MAX“-Maximalleistungseinschalttaste
9. Ein-/Ausschalttaste
10. Gri
11. Netzadapteranschlussstelle
12. Staubbehälterkolben
13. Unterdeckel
14. Staubbehälterunterdeckelverriegelung
15. HEPA-Filter
16. Separator
17. Staubsaugerwandhalterung
18. Netzadapter
19. Netzadapteranschlußstecker
20. Rundbürstenverriegelung
21. Rundbürste
22. Fugendüse

14
DE
1
2
3
4
5 5
15
16
4
14
6
7
8 9 10 11
12
13
14
12
13
17 19
18
21 2220

15
DE
Abb. 1 Abb. 2 Abb. 3 Abb. 4
Abb. 5 Abb. 6 Abb. 7

16
DE
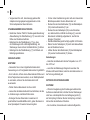
SICHERHEITSHINWEISE UND
BEDIENUNGSANLEITUNG
Bevor Sie den Staubsauger benutzen, lesen Sie
die Bedienungsanleitung aufmerksam durch und
bewahren Sie sie zum späteren Gebrauch auf.
• Benutzen Sie das Gerät nur bestimmungsmäßig und
laut dieser Bedienungsanleitung.
• Missbrauch des Geräts kann zu seiner Störung
führen, den Benutzer oder sein Eigentum beschädigen
und ist kein Garantiefall.
• Vergewissern Sie sich, dass die auf dem
Bezeichnungszettel angegebene Betriebsspannung
und die Netzspannung übereinstimmen.
• Berühren Sie das Netzadaptergehäuse beim
Akkuauaden mit nassen Händen nicht.
• Es ist empfohlen, den Akkumulator vor dem
Staubsaugerbetrieb aufzuladen; wenn Sie den
Staubsauger länger als drei Monate nicht benutzt
haben, laden Sie den Akkumulator auf.
• Laden Sie den Akkumulator in den Räumen mit
erhöhter Feuchtigkeit und Temperatur nicht auf. Laden
Sie den Akkumulator bei der Temperatur von +5°C bis
+35°C und relativer Luftfeuchtigkeit von nicht mehr als
80% auf.
• Lassen Sie den an die Steckdose angeschlossen
Netzadapter nie unbeaufsichtigt
• Verwenden Sie den Staubsauger nicht, wenn der
Staubbehälter nicht oder falsch aufgestellt ist oder
ohne Separator und Filtereinheit.
• Benutzen Sie nur die mitgelieferten Teile und Aufsätze.
• Es ist nicht gestattet, den Staubsauger draußen zu
benutzen.
• Schützen Sie das Gerät vor Stößen, Stürzen, Vibrationen
und anderen mechanischen Einwirkungen.
• Benutzen Sie das Gerät in direkter Nähe von
Heizgeräten, Wärmequellen oder oenem Feuer nicht.
• Der Staubsauger darf nicht an Orten, an denen Aerosole
benutzt oder versprüht werden, und auch in keiner
Nähe von brennbaren Flüssigkeiten verwendet werden;
verwenden Sie den Staubsauger nicht an Orten, an
denen solche Flüssigkeiten aufbewahrt werden.
• Der Staubsauger ist zum Saugen von Wasser oder
anderen Flüssigkeiten ungeeignet.
• Es ist verboten, brennende oder rauchende Zigaretten
und schwelende Asche zu saugen.
• Es ist verboten, Putz-, Beton-, Mehl- oder Aschenstaub
zu saugen.
• Verwenden Sie keinen Staubsauger, um den Pelz der
Haustiere zu reinigen.
• Achten Sie beim Raumreinigen darauf, dass sich keine
freihängenden Kleidungsstücke, Haar oder andere
Körperteile in der Nähe der Lufteinlassönungen der
Bürsten- oder Aufsätze benden.
• Seien Sie beim Aufräumen von Treppenabsätzen
besonders vorsichtig.
• Bedecken Sie die Einlass- und Auslassönung des
Staubsaugers mit keinen Fremdkörpern, schalten Sie
den Staubsauger nicht ein, wenn eine seiner Önungen
versperrt ist.
• Verwenden Sie das Netzkabel als Gri zum Tragen

17
DE
des Staubsaugers nicht, sondern tragen Sie den
Staubsauger am Tragegri.
• Reinigen Sie den Staubbehälter und die
Staubsaugerlter regelmäßig.
• Schalten Sie den Staubsauger nach dem Gebrauch
oder vor dem Reinigen mit der Ein-/Ausschalttaste aus
und ziehen Sie den Netzstecker aus der Steckdose
heraus.
• Aus Kindersicherheitsgründen lassen Sie die als
Verpackung verwendeten Plastiktüten nie ohne
Aufsicht.
nicht benden oder entsprechende Anweisungen über die
Gerätenutzung nicht bekommen haben.
• Es ist nicht gestattet, das Gerät selbständig zu
reparieren. Es ist nicht gestattet, das Gerät selbständig
auseinanderzunehmen; bei der Feststellung jeglicher
Beschädigungen, sowie im Sturzfall, trennen Sie das
Gerät vom Stromnetz ab und wenden Sie sich an einen
Kundendienst.
• Um Beschädigungen zu vermeiden, transportieren Sie das
Gerät nur in der Fabrikverpackung.
• Bewahren Sie das Gerät an einem trockenen, kühlen und
für Kinder und behinderte Personen unzugänglichen Ort
auf.
DAS GERÄT IST NUR FÜR DEN GEBRAUCH IM
HAUSHALT GEEIGNET, ES IST VERBOTEN, DAS GERÄT
ZU INDUSTRIE- ODER LABORZWECKEN ZU BENUTZEN.
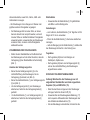
VOR DER ERSTEN NUTZUNG
Packen Sie das Gerät aus und warten Sie mindestens 3
Stunden, nachdem Sie es bei einer negativen Temperatur
transportiert oder bewahrt haben.
• Packen Sie den Staubsauger aus und entfernen Sie alle
Verpackungs- und Werbematerialien.
• Bewahren Sie die Originalverpackung auf.
• Lesen Sie die Sicherheitsmaßnahmen und
Bedienungsempfehlungen.
• Prüfen Sie die Komplettheit.
• Prüfen Sie das Gerät auf Beschädigungen; wenn es
beschädigt ist, schalten Sie es nicht ein.
Achtung! Lassen Sie Kinder mit Plastiktüten oder
Verpackungsfolien nicht spielen. Erstickungsgefahr!
• Das Gerät ist nicht für Kinder bestimmt.
• Beaufsichtigen Sie Kinder, damit sie das Gerät als
Spielzeug nicht benutzen.
• Lassen Sie Kinder das Netzadaptergehäuse beim
Akkuauaden nicht berühren
• Besondere Vorsichtsmaßnahmen sind in den Fällen
angesagt, wenn sich Kinder oder behinderte Personen
während des Gerätebetriebs in der Nähe aufhalten.
• Während des Betriebs und der Pausen zwischen
den Betriebszyklen stellen Sie das Gerät an einen für
Kinder unzugänglichen Ort auf.
• Das Gerät ist für Personen (darunter Kinder) mit
Körper-, Nerven- oder Geistesstörungen oder
Personen ohne ausreichende Erfahrung und
Kenntnisse nicht geeignet, wenn sie sich unter Aufsicht
der Person, die für ihre Sicherheit verantwortlich ist,

18
DE
• Vergewissern Sie sich, dass die angegebenen Net
zadapterversorgungsspannungsparameter und die
Stromnetzparameter übereinstimmen.
STAUBSAUGERWANDHALTERUNG
• Bestimmen Sie den Platz für Staubsaugeraufbewahrung/
Akkuauadung. Die Wandhalterung (17) muss sich in der
Nähe einer Steckdose benden.
• Befestigen Sie die Wandhalterung (17) so, dass
der Staubsauger nicht vollständig herabhängt, der
Staubsauger muss sich auf die Elektrobürste (1) stützen.
• Befestigen Sie die Wandhalterung (17) mit Dübeln und
Befestigungsschrauben.
AKKUAUFLADEN
ACHTUNG!
– Verwenden Sie nur den mitgelieferten Akkumulator;
Verwendung von nicht originalem Akkumulator ist gefährlich.
– Es ist verboten, Lithium-Ionen-Akkumulatoren Stößen und
hohen Temperaturen auszusetzen; um ein Elektrolytauslauf
zu vermeiden, nehmen Sie den Akkumulator nicht
auseinander.
– Werfen Sie den Akkumulator ins Feuer nicht.
– Lassen Sie die Akkukontakte nicht kurzschließen, da dies
zu Verbrennungen oder Brand führen kann.
– Entsorgen Sie den Akkumulator zusammen mit
gewöhnlichen Haushaltsabfällen nicht, geben Sie diesen in
einen Spezialpunkt für weitere Verwertung über.
• Vor der ersten Gerätenutzung oder nach einer dauernden
Betriebspause laden Sie den Akkumulator auf.
• Stecken Sie den Anschlußstecker (19) des Netzadapters
(18) in die Anschlussstelle (11) ein.
• Stecken Sie den Netzadapter (18) in eine Steckdose
ein, dabei leuchtet und blinkt die Anzeige (7), wenn der
Akkumulator vollständig aufgeladen ist, leuchtet die
Anzeige (7) konstant.
• Die Akkuvollauadungszeit beträgt ungefähr 4-5 Stunden.
• Ziehen Sie den Netzadapter (18) nach dem Akkuauaden
aus der Steckdose heraus.
• •Ziehen Sie den Anschlußstecker (19) des Netzadapters
(18) aus der Anschlussstelle (11) heraus.
Anmerkungen:
– laden Sie den Akkumulator bei der Temperatur von +5°C
bis +35°C auf.
– wenn Sie den Staubsauger länger als zwei oder drei
Monate nicht benutzt haben, laden Sie den Akkumulator vor
der Nutzung vollständig auf.
NUTZUNG DES STAUBSAUGERS
ACHTUNG!
– Wenn die Saugleistung des Staubsaugers während des
Aufräumens stark abnimmt, schalten Sie den Staubsauger
sofort aus und überprüfen Sie das Verlängerungsrohr (3)
auf Verstopfung. Entfernen Sie die Verstopfung, erst dann
können Sie das Aufräumen fortsetzen.
– Es ist verboten, brennende oder rauchende Zigaretten,

19
DE
schwelende Asche, sowie Putz-, Beton-, Mehl- oder
Aschenstaub zu saugen.
– Der Staubsauger ist zum Saugen von Wasser oder
jeglichen anderen Flüssigkeiten ungeeignet.
• Der Staubsauger darf an keinen Orten, an denen
Aerosole benutzt oder versprüht werden, und auch
in keiner Nähe von leichtentzündbaren Flüssigkeiten
verwendet werden; verwenden Sie den Staubsauger
an keinen Orten, an denen solche Flüssigkeiten
aufbewahrt werden.
ZUSAMMENBAU DES STAUBSAUGERS
• Stellen Sie den Staubbehälter auf die Motoreinheit
des Staubsaugers auf und stellen Sie sicher, dass die
Verriegelung (6) den Staubbehälter sicher befestigt
(Abb. 1).
Ansetzen des Verlängerungsrohrs
• Setzen Sie das Verlängerungsrohr (3) in die
Lufteintrittsönung des Staubsaugers, bis die
Verriegelung (4) einrastet, ein (Abb. 2).
• Setzen Sie die Elektrobürste (1) ans Verlängerungsrohr
(3) an (Abb. 3).
• Um das Verlängerungsrohr (3) vom Staubsauger
abzutrennen, halten Sie die Verriegelungstaste (4)
gedrückt.
• Um die Elektrobürste (1) vom Verlängerungsrohr (3)
abzutrennen, halten Sie die Verriegelungstaste (2)
gedrückt.
Elektrobürste
• Verwenden Sie die Elektrobürste (1) für glatte Böden
oder Mittel- und Kurzorteppiche.
Anmerkungen:
– es ist verboten, die Elektrobürste (1) für Teppiche mit Flor
länger als 15 mm zu verwenden.
– führen Sie die Elektrobürste (1) über keine elektrischen
Leitungen.
– nach der Reinigung mit der Elektrobürste (1) schalten Sie
den Staubsauger mit der Ein-/ Aus-Taste (9) aus.
Fugendüse
• Die Fugendüse (22) dient zum Reinigen von
Heizkörpern, Spalten usw.
• Die Fugendüse (22) kann ans Verlängerungsrohr (3)
oder an die Lufteintrittsönung des Staubsaugers
angeschlossen werden.
EINSCHALTUNG DES STAUBSAUGERS
Achtung! Betreiben Sie den Staubsauger nur mit
aufgestelltem Staubbehälter und darin eingesetztem
Separator (16) und HEPA-lter (15).
• Wenn Sie den Raum reinigen und den Staubsauger
umtragen, halten Sie ihn am Gri (10).
• Verwenden Sie den Staubsaugerwandhalterung (17)
zum bequemen Aufbewahren des Staubsaugers oder
zum Auaden des Akkumulators (10).
• Um den Staubsauger einzuschalten, drücken Sie die

20
DE
Ein-/Ausschalttaste (9), der Staubsauger schaltet
sich mit niedriger Leistung ein, um die maximale
Leistung einzuschalten, drücken Sie die „MAX“-Taste
(8). Drücken Sie die «MAX»-Taste (8) erneut, der
Staubsauger schaltet sich mit niedriger Leistung
ein, drücken Sie die Taste (9) noch einmal, um den
Staubsauger auszuschalten.
• Während des Staubsaugerbetriebs leuchten die
Anzeigen (7) und zeigen den Ladestand des
Akkumulators (10) an. Während der Akkuentladung
nimmt die Anzahl der Leuchtanzeigen (5) ab.
• Wenn eine Anzeige (7) blinkt, schalten Sie den
Staubsauger aus und laden Sie den Akkumulator auf.
REINIGUNG UND PFLEGE
Achtung!
Halten Sie den Staubbehälter, den Separator
(16) und die HEPA-Filter (15) sauber, da die
Staubsaugerezienz davon abhängt.
• Es ist empfohlen, den Staubbehälter nach jedem
Gebrauch des Staubsaugers zu reinigen, reinigen
Sie den Separator (16) und die HEPA-Filter (15) auch
regelmäßig.
• Entfernen Sie das Verlängerungsrohr (3), halten Sie
dazu die Verriegelungstaste (4) gedrückt (Abb. 2).
• Entfernen Sie den Staubbehälter von der Motoreinheit
des Staubsaugers, indem Sie die Verriegelung (6)
drücken (Abb. 1).
• Um Staub und Müll zu entfernen, halten Sie den
Staubbehälter über dem Abfalleimer, drücken Sie
die Verriegelung (14) und machen Sie den Deckel
(13) auf, entfernen Sie Staub und Müll und schließen
Sie den Deckel (13), bis sich die Verriegelung (14)
einrastet.
Reinigung des Staubbehälters
• Vor dem Auseinandernehmen des Staubbehälters
entfernen Sie Staub und Müll, wie oben beschrieben.
• Fassen Sie den Staubbehälteroberdeckel (5) an,
drehen Sie ihn entgegen dem Uhrzeigersinn und
nehmen Sie ihn vom Kolben (12) ab (Abb. 4).
• Nehmen Sie den Separator (16) aus dem Kolben
(12) heraus (Abb. 4).
• Drehen Sie das HEPA-Filter (15) entgegen dem
Uhrzeigersinn « » und nehmen Sie ihn aus dem
Separator (16) heraus (Abb. 5).
• Spülen Sie den Separator (16) und das HEPA-Filter
(15) unter ießendem Warmwasser und trocknen Sie
sie ab (Abb. 6, 7).
• Verwenden Sie keinen Haartrockner oder ähnliche
Geräte zum Trocknen des HEPA-Filters (15).
• Spülen Sie die Filter unter Warmwasserstrahl aus
und trocknen Sie sie ab. Verwenden Sie keinen
Haartrockner oder ähnliche Geräte zum Trocknen der
Filtereinheit (19) (Abb. 6).
• Drehen Sie den Separator (18) im Uhrzeigersinn
und nehmen Sie ihn aus dem Kolben (3) heraus.
Reinigen Sie den Separator (18) von Staub und Müll,
Seite wird geladen ...
Seite wird geladen ...
Seite wird geladen ...
Seite wird geladen ...
Seite wird geladen ...
Seite wird geladen ...
Seite wird geladen ...
Seite wird geladen ...
Seite wird geladen ...
Seite wird geladen ...
Seite wird geladen ...
Seite wird geladen ...
Seite wird geladen ...
Seite wird geladen ...
Seite wird geladen ...
Seite wird geladen ...
Seite wird geladen ...
Seite wird geladen ...
Seite wird geladen ...
Seite wird geladen ...
Seite wird geladen ...
Seite wird geladen ...
Seite wird geladen ...
Seite wird geladen ...
Seite wird geladen ...
Seite wird geladen ...
Seite wird geladen ...
Seite wird geladen ...
-
 1
1
-
 2
2
-
 3
3
-
 4
4
-
 5
5
-
 6
6
-
 7
7
-
 8
8
-
 9
9
-
 10
10
-
 11
11
-
 12
12
-
 13
13
-
 14
14
-
 15
15
-
 16
16
-
 17
17
-
 18
18
-
 19
19
-
 20
20
-
 21
21
-
 22
22
-
 23
23
-
 24
24
-
 25
25
-
 26
26
-
 27
27
-
 28
28
-
 29
29
-
 30
30
-
 31
31
-
 32
32
-
 33
33
-
 34
34
-
 35
35
-
 36
36
-
 37
37
-
 38
38
-
 39
39
-
 40
40
-
 41
41
-
 42
42
-
 43
43
-
 44
44
-
 45
45
-
 46
46
-
 47
47
-
 48
48


Verwandte Artikel
-
 Brayer BR4263 Bedienungsanleitung
-
 Brayer BR4260 Bedienungsanleitung
-
Brayer BR4265 Bedienungsanleitung
-
-
Brayer BR4264 Bedienungsanleitung
-
Brayer BR4266 Benutzerhandbuch
-
-
 Brayer BR4267 Bedienungsanleitung
-
 Brayer BR4201 Bedienungsanleitung
-
 Brayer BR4202 Bedienungsanleitung


