Hirschmann 19” Rackmount Extension Benutzerhandbuch
- Typ
- Benutzerhandbuch

Montagehinweise
MACH 100 / MACH 1000
Befestigungswinkel
Mounting instructions
MACH 100 / MACH 1000 fixing brackets
MACH 100
MACH 1000
19” Rackmount
Extension
Die MACH 100 und MACH 1000-Geräte wer-
den mit MACH 19” Rackmount Extension
Befestigungswinkeln (47 mm) ausgeliefert.
Die Befestigungswinkel mit einer Länge von
97 mm beziehungsweise 127 mm ermögli-
chen Ihnen die Montage Ihrer MACH-Geräte
in einem 19“-Schrank 50 mm beziehungs-
weise 80 mm tiefer. Die Befestigungswinkel
bieten Ihnen mehrere Montagemöglichkei-
ten (siehe Abb. 1 bis 3) und sind als
Zubehör erhältlich.
Hinweise zur Montage Ihres MACH-Gerätes
(Wärmeabführung, Tragschienen, etc.) ent-
nehmen Sie dem “Anwender-Handbuch
Installation – Industrial Ethernet MACH-
Familie” (im Lieferumfang des MACH ent-
halten).
The MACH 100 and MACH 1000 are deliver-
ed with two MACH 19” Rackmount Extensi-
on fixing brackets (47 mm).
The fixing brackets with a length of 97 mm
and 127 mm enable you to assemble your
MACH devices in a 19“ rack, 50 mm or 80
mm respectively.
Both fixing brackets give you several possi-
bilities for assembly (see Fig. 1 to 3) and are
available as accessories.
For notes concerning the mounting of your
MACH device (heat dissipation, mounting
rails, etc.) please consult the “User Manual
Installation - Industrial Ethernet MACH
Familiy” (included in the scope of delivery
of the MACH).
Hirschmann. Simply a good Connection.
MACH 19” Rackmount
Extension+50 mm
MACH 19” Rackmount
Extension
MACH 19” Rackmount
Extension+80 mm

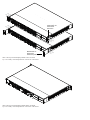
Abb. 1: Montage der Befestigungswinkel vorne am Gerät
Fig. 1: Assembly of the fixing brackets on the front of the device
MACH1000 19”
Rackmount
Extension(+50mm)
MACH1000 19”
Rackmount
Extension
Abb. 2: Montage der Befestigungswinkel hinten am Gerät
Fig. 2: Assembly of the fixing brackets on the back of the device

3
Weitergabe sowie Vervielfältigung dieser
Unterlage, Verwertung und Mitteilung ihres
Inhalts ist nicht gestattet, soweit nicht aus-
drücklich zugestanden. Zuwiderhandlungen
verpflichten zu Schadensersatz. Alle Rechte
vorbehalten, insbesondere für den Fall der
Patenterteilung oder GM-Eintragung.
Copyright: © Hirschmann
Automation and Control GmbH
2012
All Rights Reserved
Bestimmungsgemäßer Gebrauch
Bitte beachten Sie folgendes:
Das Gerät darf nur für die im Katalog und in
der technischen Beschreibung vorgesehe-
nen Einsatzfälle und nur in Verbindung mit
von Hirschmann empfohlenen bzw. zugelas-
senen Fremdgeräten und -komponenten
verwendet werden. Der einwandfreie und
sichere Betrieb des Produktes setzt sach-
gemäßen Transport, sachgemäße
Lagerung, Aufstellung und Montage sowie
sorgfältige Bedienung und Instandhaltung
voraus.
,
Recycling Hinweis:
Dieses Produkt ist nach seiner Ver-
wendung entsprechend den aktuel-
len Entsorgungsvorschriften Ihres
Landkreises / Landes / Staates als
Elektronikschrott einer geordneten
Entsorgung zuzuführen.
1 Auspacken, Prüfen
䡺 Überprüfen Sie, ob das Paket komplett
ausgeliefert wurde (s. Lieferumfang).
䡺 Überprüfen Sie die Einzelteile auf Trans-
portschäden.
z Nehmen Sie nur unbeschädigte Teile in
Betrieb!
2 Montage
䡺 Entfernen Sie, falls noch nicht erfolgt,
die beim MACH mitgelieferten Befesti-
gungswinkel an beiden Seiten des Gerä-
tes.
Lösen Sie dazu die jeweils vier Schrau-
ben pro Befestigungswinkel.
䡺 Schrauben Sie die Montagewinkel mit
jeweils vier Schrauben an beiden Seiten
des MACH Gerätes an, je nach Ihren
Anforderungen wie in Abb. 1 bis 3 darge-
stellt.
Hinweis: Verwenden Sie eine Unterlag-
schiene, wenn Sie Ihr MACH-Gerät mit
MACH19” Rackmount Extension Befesti-
gungswinkeln einbauen (Unterlagschiene
nicht im Lieferumfang enthalten).
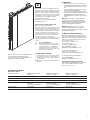
Hinweis: Bitte beachten Sie, dass das
Gerät bei Wandmontage (siehe Abb. 3)
nicht den Brandschutzeigenschaften gemäß
EN 60950-1 entspricht.
3 Weitere Unterstützung
Bei technischen Fragen wenden Sie sich
bitte an den Hirschmann Vertragspartner in
Ihrer Nähe oder direkt an Hirschmann. Die
Adressen unserer Vertragspartner finden
Sie im Internet unter
http://www.hirschmann.com
Sie erreichen uns
in der Region EMEA unter
Tel.: +49 (0)1805 14-1538
E-Mail: [email protected]
in der Region Amerika unter
Tel.: +1 (717) 217-2270
E-Mail: [email protected]
in der Region Asien-Pazifik unter
Tel.: +65 6854 9860
E-Mail: [email protected]
Hirschmann Competence Center
Das aktuelle Schulungsangebot zu Techno-
logie und Produkten finden Sie unter
www.hicomcenter.com.
4 Technische Daten
Allgemeine Daten
Befestigungswinkel MACH 19” Rackmount MACH 19” Rackmount MACH 19” Rackmount
Extension Extension +50mm Extension +80 mm
Abmessungen B x H x T 47 x 44 x 19 mm 97 x 44 x 19 mm 127 x 44 x 19 mm
Masse 40 g 70 g 90 g
Lieferumfang
Inkl. Montagehinweise 2 x MACH 19” Rackmount
2 x MACH19” Rackmount 2 x MACH 19” Rackmount
Extension
Extension +50mm Extension +80 mm
8 x Senkschraube M4 x 6 8 x Senkschraube M4 x 6 8 x Senkschraube M4 x 6
Bestellnummer 943 943-001 943 943-101 943 943-201
D
Abb. 3: Montage der Befestigungswinkel
zur Vorbereitung der Wandmontage
Fig. 3: Assembly of the fixing brackets for
preparing the wall mounting

Hirschmann Automation and Control GmbH
Stuttgarter Straße 45-51
72654 Neckartenzlingen
Germany
Tel.: +49 1805 14-1538
Printed in Germany
Subject to alterations
4 Technical data
General data
Fixing bracket MACH 19” Rackmount MACH 19” Rackmount MACH 19” Rackmount
Extension Extension + 50mm Extension + 80 mm
Dimensions W x H x D 47 x 44 x 19 mm 97 x 44 x 19 mm 127 x 44 x 19 mm
Mass 40 g 70 g 90 g
Scope of delivery
Incl. mounting instructions 2 x MACH 19” Rackmount
2 x MACH 19” Rackmount 2 x MACH 19” Rackmount
Extension
Extension + 50mm Extension + 80 mm
8 x flat headed screw M4 x 6 8 x flat headed screw M4 x 6 8 x flat headed screw M4 x 6
Order number 943 943-001 943 943-101 943 943-201
Permission is not given for the circulation
or reproduction of this document, its use or
the passing on of its contents unless gran-
ted expressly by Hirschmann. Contraventi-
on renders the perpetrator liable for com-
pensation for damages. All rights reserved,
in particular in the case of patent grant or
registration of a utility or design.
Copyright: ©
Hirschmann
Automation and Control GmbH 2012
All Rights Reserved
Certified usage
Please observe the following:
The device may only be employed for the
purposes described in the catalog and tech-
nical description, and only in conjunction
with external devices and components
recommended or approved by Hirschmann.
The product can only be operated correctly
and safely if it is transported, stored, instal-
led and assembled properly and correctly.
Furthermore, it must be operated and
serviced carefully.
,
Recycling Note:
After its use, this product has to be
processed as electronic scrap and
disposed of according to the prevai-
ling waste disposal regulations of
your community / district / country /
state.
1 Unpacking, Checking
䡺 Check whether the package was deli-
vered complete (see scope of delivery).
䡺 Check the individual parts for transport
damage.
z Use only undamaged parts!
2 Assembly
䡺 If necessary, remove the fixing brackets
delivered with the MACH, from both
sides of the device.
For this purpose remove the four
screws on each fixing bracket.
䡺 Tighten the fixing brackets with four
screws each on both sides of the
MACH device, as shown in Fig. 1 to 3,
according to your requirements.
Note: If you install your MACH device with
MACH 19” Rackmount Extension-(+50mm)
fixing brackets, an underlay bar is to be
used (underlay bar is not included in the
scope of delivery).
Note: Please note that the device, if moun-
ted on the wall (see Fig. 3), does not meet
the fire protection characteristics according
to EN 60950-1.
3 Further support
In the event of technical queries, please talk
to the Hirschmann contract partner respon-
sible for looking after your account or
directly to the Hirschmann office.
You will find the addresses of our partners
on the Internet at
http://www.hirschmann.com
You can contact us
in the EMEA region at
Tel.: +49 (0)1805 14-1538
E-Mail: [email protected]
in the America region at
Tel.: +1 (717) 217-2270
E-Mail: [email protected]
in the Asia-Pacific region
Tel.: +65 6854 9860
E-Mail: [email protected]
Hirschmann Competence Center
An up-to-date overview of training courses
about technology and products are found at
www.hicomcenter.com
EN
-
 1
1
-
 2
2
-
 3
3
-
 4
4


Hirschmann 19” Rackmount Extension Benutzerhandbuch
- Typ
- Benutzerhandbuch
in anderen Sprachen
Verwandte Artikel
-
Hirschmann MACH1040 Benutzerhandbuch
-
-
-
-
Hirschmann RS20/RS30/RS40, MS20/MS30 (L2E) Benutzerhandbuch
-
-
-
Hirschmann RS20/RS30/RS40, MS20/MS30, OCTOPUS, PowerMICE, RSR20/RSR30, MACH100, MACH1000, MACH4000 (L2P) Referenzhandbuch
-
-