HiTEC Multicharger X4 Micro Se Bedienungsanleitung
- Typ
- Bedienungsanleitung

Einleitung
12V
Bedienungsanleitung
Herzlichen Glückwunsch zum Kauf des HiTEC Multichargers X4 MICRO SE. Sie sind nun Besitzer eines
hochwertigen und kompakten 4-fach Mirco-Laders mit sehr einfacher Bedienstruktur. Vor dem erstmaligen
Einsatz sollten Sie die Bedienungswanleitung sorgfältig lesen. Wir hoffen Sie haben viele Jahre Freude mit
Ihrem neuen Ladegerät.
Das X4 MICRO SE hat vier komplett identische, aber dennoch unabhängige Ladeausgänge mit je einer
Ladeleistung von 5 Watt. Es können bis zu 4 Akkus gleichzeitig geladen werden und der Ladestrom kann
wahlweise von 0,05 - 1,2A betragen. Die geladene Kapazität, der Strom und die Spannung werden
während des Ladevorgangs auf dem Display des jeweiligen Kanals angezeigt.
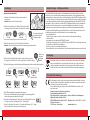
Anschluss mit dem Netzkabel
1.
Verbinden Sie das beiliegende Netzkabel mit dem Ladegerät.
2. Verbinden Sie das Netzkabel mit dem Stromnetz
(Steckdose 100-240 Volt).
3. Wenn Sie das Ladegerät mit dem Stromnetz verbunden
haben, blinken die vier LEDs einmal auf, gleichzeitig ist
ein Ton zu hören und die Displays zeigen 8888.
Danach ist Ihr X4 MICRO SE bereit.
Achtung: Jeder Ausgang kann nur einen Akku auf einmal laden!
Anschluss an eine Autobatterie
Anschluss mit dem beiliegenden 12V Anschlusskabel
an eine Autobatterie
Wenn ein Fehler auftritt, blinkt die LED 2mal pro Sekunde & ein Signal ertönt.
Nach ca. 10 Sekunden stoppt das Blinken und ein Fehlercode wird angezeigt.
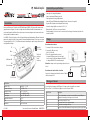
· Vier unabhängige Ladebuchsen
· Vier verschiedene Anschlussmöglichkeiten je Ausgang
· Vier unabhängige Ladeleistungen
· Vier unabhängige LED-Displays für Strom, Spannung und Kapazität
· LED und akustische Signale zeigen Ladestatus
· Ladestrom von 0,05 - 1,2A stufenlos einstellbarer
· AC oder DC Stromversorgung (Netz- oder Akkubetrieb)
· Maximale Sicherheit: Kurzschlussschutz, Überladungsschutz, Verpolschutz und DC-Eingangspannungsschutz
# 1-00689 Irrtum und Änderung vorbehalten © MULTIPLEX
Besondere Merkmale
Laden
Fehlermeldungen
Spezikationen
AC / DC Eingang 100-240V / 11-15V
Ladeleistung 4x 5,22W ± 10%
Ladestrom 0,05 - 1,2A ± 10%
Akku Typ 4x 1 Zelle LiPo / LiHV
Anschlussmöglichkeiten Micro / JST / MX / mCPX
Arbeitstemperatur 0-50°C
Gewicht 245 g
Maße 130x94x50mm
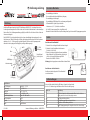
JST mCPX
Micro
MX
4 LED Displays
Ladestatusanzeige
LED
Einstellrad und
Start/Stop-Taste
100 - 240 Volt
AC Eingang
11 - 15 Volt
DC Eingang
Fehlercode Beschreibung
-11- Der Akku ist kaputt oder die Spannung des Akkus ist zu hoch oder zu
niedrig, um einen sicheren Ladevorgang zu starten.
-22- Die Polung des Akkus ist falsch.
-33- Die Verbindung zum Akku wurde unterbrochen.
-44- Kurzschluss oder Überladung des Akkus.
-55- Die DC Eingangsspannung des Ladegerätes ist zu hoch oder zu niedrig.
DE
12V

Entsorgung
Gewährleistungs- / Haftungsausschluss
CE-Konformitätserklärung
Dieses Symbol bedeutet, dass elektrische und elektronische Geräte am Ende ihrer Nutzungs-
dauer vom Hausmüll getrennt, entsorgt werden müssen. Entsorgen Sie das Gerät bei Ihrer
örtlichen, kommunalen Sammelstelle oder Recycling-Zentrum. Dies gilt für alle Länder der
Europäischen Union sowie in anderen Europäischen Ländern mit separatem Sammelsystem.
Die Firma MULTIPLEX Modellsport GmbH & Co.KG übernimmt keinerlei Haftung für Verluste, Schäden
oder Kosten, die sich aus fehlerhafter Verwendung und Betrieb ergeben oder in irgendeiner Weise damit
zusammen hängen. Soweit gesetzlich zulässig, ist die Verpichtung der Firma MULTIPLEX Modellsport GmbH
& Co.KG zur Leistung von Schadenersatz, gleich aus welchem Rechtsgrund, begrenzt auf den Rechnungswert
der an dem Schadenstiftenden Ereignis unmittelbar beteiligten Warenmenge der Firma MULTIPLEX Modell
-
sport GmbH & Co.KG. Dies gilt nicht, soweit die MULTIPLEX Modellsport GmbH & Co.KG nach zwingenden
gesetzlichen Vorschriften wegen Vorsatzes oder grober Fahrlässigkeit unbeschränkt haftet. Für unsere
Produkte leisten wir entsprechend den derzeit geltenden gesetzlichen Bestimmungen Gewähr. Wenden
Sie sich mit Gewährleistungsfällen an den Fachhändler, bei dem Sie das Produkt erworben haben. Von der
Gewährleistung ausgeschlossen sind Fehlfunktionen, die verursacht wurden durch:
· Unsachgemäßen Betrieb
· Falsche, nicht oder verspätet, oder nicht von einer autorisierten Stelle durchgeführte Wartung
· Falsche Anschlüsse
· Verwendung von nicht originalem MULTIPLEX/HiTEC-Zubehör
· Veränderungen / Reparaturen, die nicht von MULTIPLEX oder einer MULTIPLEX-Servicestelle ausgeführt wurden
· Versehentliche oder absichtliche Beschädigungen
· Defekte, die sich aus der normalen Abnutzung ergeben
· Betrieb außerhalb der technischen Spezikationen oder im Zusammenhang mit Komponenten anderer Hersteller.
Die Bewertung des Gerätes erfolgte nach europäisch harmonisierten Richtlinien. Sie besitzen
daher ein Produkt, das hinsichtlich der Konstruktion die Schutzziele der Europäischen Gemein
-
schaft zum sicheren Betrieb der Geräte erfüllt.
Die Konformitätserklärung des Gerätes kann bei der MULTIPLEX Modellsport GmbH & Co.KG
angefordert werden.
Irrtum und technische Änderungen vorbehalten
Copyright Multiplex Modellsport 2015
Kopie und Nachdruck, auch auszugsweise, nur mit schriftlicher Genehmigung der
Multiplex Modellsport GmbH & Co.KG
MULTIPLEX Modellsport GmbH & Co.KG
Westliche Gewerbestr. 1
75015 Bretten · Deutschland
Multiplex Service: +49 (0) 7252 - 5 80 93 0
www.multiplex-rc.de
Bedienung
Anschluss mit dem Netzkabel
1. Verbinden Sie den Akku mit der dafür vorgesehenen Buchse
am Ladegerät.
Hinweis: Achten Sie auf die richtige Polarität!
2.
Wählen Sie den Batterietyp (LiPo / LiHV) durch Drehen des Einstellrads
und bestätigen Sie diesen, durch kurzen Tastendruck auf das Einstellrad.
3. Wählen Sie den Ladestrom (0,05-1,2 A) mit Hilfe des Einstellrads.
Hinweis: Sie können den Ladestrom während des Ladevorgangs nicht mehr ändern.
4.
Halten Sie das Einstellrad 3 Sekunden gedrückt, um den Ladevorgang zu starten.
Die zugehörige Status-LED leuchtet rot und ein langer Piepton ertönt zur Bestätigung.
5.
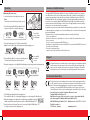
Während des Ladevorgangs erscheint auf der Anzeige die Akkuspannung, den Ladestrom und die geladene Kapazität an.
Durch kurzen Tastendruck
auf das Einstellrad den
Akkutyp bestätigen.
Halten Sie das
Einstellrad
3 Sekunden
gedrückt
Ladestrom (A)
Akkuspannung
Spannung LiPo Spannung LiHV KapazitätLadestrom
Ladestrom (A)
Ladestrom (A) geladene
Kapazität (mAh)
6. Die LED leuchtet während des gesamten Ladevorgangs rot.
7. Halten Sie das Einstellrad während des Ladevorgangs 3 Sekunden lang gedrückt,
um den Ladevorgang zu beenden. Die LED erlischt.
8.
Wenn der Ladevorgang beendet ist, leuchtet die Status-LED grün, blinkt 5 mal und
ein Piepton ist zu hören.
Im Display wird „FULL“ (Voll) angezeigt.
9. Ziehen Sie den Akku ab. Bitte warten Sie 30 Sekunden bis die Anzeige „LIPO“ anzeigt.
Nun ist der Kanal bereit für einen weiteren Ladevorgang.
LiPo Akku LiHV Akku

Introduction
12V
Instruction manual
EN
Thank you for your choice of the HiTEC multicharger X4 MICRO SE. This unit is simple to use but it´s
operation does require some knowledge on the part of the user. Please read this entire operating manual
completely and attentively before using this product, as it covers a wide range of information on operating
and safety.
The multicharger X4 MICRO SE employs the circuit that features four totally independent but identical power
outputs which are powered 5W each. It is designed for charging single cell LiPo. Insert the battery lead to
the right connector in each port, the charger will charge 4 batteries at the same time. And the charging
current can be adjusted from
0.05 to 1.2A
by dial, the charging capacity and cell voltage can be displayed in
the digital LED indicator.
# 1-00689 Errors and omissions excepted © MULTIPLEX
Specikation
AC / DC Input 100-240V / 11-15V
Charge circuit power 4x 5,22W ± 10%
Charge current range 0.05 - 1.2A ± 10%
Battery type 4x 1 Zelle LiPo / LiHV
Battery connector type Micro / JST / MX / mCPX
Working temperature 0-50°C
Net weight 245 g
Dimension 130x94x50mm
JST mCPX
Micro
MX
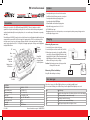
4-Digital LED
Indicator
Charging Status
LED Indicator
Rotary Dial
for Setting
Charging Current
Start/Stop Button
AC Input Power Port
100-240V
DC Input
Power Jack
11-15V
When using AC power source
1. Insert the AC power cord into the charger.
2.
Insert the AC power cord into a wall socket (100-240V).
3. When charger is powered on, 4 status LEDs will blink
once with one beep and all digital LED indicators will
display 8888. After that, 4 LEDs will extinguish and all
digital Displays will show the charging current which
indicates the charger is ready to charge.
Caution: Each charging port can only charge one kind
of battery at the same time.
When using 12V lead acid battery
Using DC cable attaching to car battery
When there is an error, the LED will blink red twice per second with an audible sound.
After ten times of blinking, the red LED will stay on and the digital LED will display the error code.
· Four independent ports can be used at the same time
· Four different kinds of battery connectors at each port
· Four independent functioning charging circuits
· Four independent digital LED Displays
· LED and audible sound indicate charging status
· Adjustable charging current from 0.05 to 1.2A
· AC/DC Dual Power Input
· Maximum protection: short circuit protection; over current protection; battery reverse polarity protection
and DC input voltage protection
Features
Charging
Error messages
Error Error Message
-11-
Dead cell or the voltage of the cell is either too high or too low for safe charging.
-22- The battery polarity is connected incorrectly.
-33- The battery connection is wrong.
-44- Short circuit or over current in the battery.
-55- The DC input voltage is either too high or too low.
12V

Disposal
Guarantee / Liability Exclusion
CE Conformity Declaration
When using AC power source
1. Insert the battery lead to the right battery connector.
Note:
Please make sure insert the battery polarities correctly.
2. Select the battery type(LiPo/LiHV) by rotating the dial
and press the dial once to conrm the battery type.
3. Select the charging current (0.05-1.2A) by rotating the dial.
Note: You are not able to adjust the charging current during charging process.
4. Press and hold the dial for 3 seconds to start charging process.
The related status LED will turn red with long beep.
5.
During the charging process, the 4 digital LED will display battery voltage, charging current and charging capacity.
Press the dial
once to conrm
the battery type
Press and hold
the dial for 3
seconds
LiPo Battery LiHV Battery
Charging Current(A)
Battery Voltage
Voltage of
LiPo Battery
Voltage of
LiHV Battery
Charging
Capacity
Charging
Current
Charging Current(A)
Charging Current(A) Charging Capacity(mAh)
6. The LED will stay red during the whole charging process.
7. Press and hold the dial for 3 seconds during charging process to stop charging. The LED will turn off.
8. When the charging process is nished, the status LED turn green and blinks 5 times with
audible sound. And the status LED stays green and the 4-digital LED will display “FULL”.
9. Remove battery from the charger. Please wait 30 seconds and 4 digital LED will display “LIPO”,
the charger is ready for another charging process.
Operating
This symbol means that it is essential to dispose of electrical and electronic equipment separately
from the domestic refuse when it reaches the end of its useful life. Take your unwanted equip
-
ment to your local communal collection point or recycling centre. This applies to all countries of
the European Union, and to other European countries with separate waste collection systems.
The company MULTIPLEX Modellsport GmbH & Co.KG accepts no liability of any kind for loss, damage or
costs which are due to the incorrect use and operation of this product, or which are connected with such
operation in any way. Unless the law expressly states otherwise, the liability on the part of MULTI¬PLEX
Modellsport GmbH & Co.KG to pay damages, regardless of the legal argument employed, is limited to the
invoice value of those products supplied by MULTIPLEX Modellsport GmbH & Co.KG which were directly
involved in the event in which the damage occurred. This does not apply if liability is incurred according to
statutory law on account of intentional or gross negligence.
We guarantee our products in accordance with the currently valid statutory regulations. If you wish to make
a claim under guarantee, your initial course of action should always be to contact the dealer from whom you
purchased the equipment.
The guarantee does not cover faults and malfunctions which are caused by the following:
· Incorrect or incompetent use
· Maintenance carried out incorrectly, belatedly or not at all, or not carried out by an authorised Service Centre
· Incorrect connections
· The use of accessories other than genuine MULTIPLEX items
· Modications or repairs which were not carried out by MULTIPLEX or by an authorised MULTIPLEX Service Centre
· Accidental or intentional damage
· Defects due to normal wear and tear
· Operation of the unit outside the limits stated in the Specication
This device has been assessed and approved in accordance with European harmonised directi-
ves. This means that you possess a product whose design and construction full the protective
aims of the European Community designed to ensure the safe operation of equipment.
If required, you can request MULTIPLEX Modellsport GmbH & Co.KG to supply a copy of the unit’s
Conformity Declaration. Please contact the company using the contact details at the foot of the page.
Errors and omissions excepted. Technical modications reserved.
Copyright Multiplex Modellsport 2015
Duplication and copying of the text, in whole or in part, is only permitted with the
prior written approval of Multiplex Modellsport GmbH & Co.KG
MULTIPLEX Modellsport GmbH & Co.KG
Westliche Gewerbestr. 1
75015 Bretten · Germany
Multiplex Service: +49 (0) 7252 - 5 80 93 0
www.multiplex-rc.de

Introduction
12V
Mode d’emploi
FR
Nous vous félicitons pour l’achat de votre HiTEC Multicharger X4 MICRO SE. Vous possédez un micro-char-
geur performant et compact à 4 sorties très simple dans son utilisation. Veuillez lire attentivement cette
notice avant la première utilisation. Nous espérons que votre nouveau chargeur vous donnera entière satis
-
faction pendant de nombreuses années.
Le X4 MICRO SE est doté de quatre sorties de charge identiques, mais indépendantes, délivrant chacune une
puissance de charge de 5 watts. Il vous permet de recharger simultanément jusqu’à 4 accus avec un courant
de charge réglable de 0,05 à 1,2 A. L’afcheur de chaque sortie indique la capacité chargée, l’intensité et la
tension pendant la charge.
Raccordement au secteur
1.
Connectez le câble secteur fourni au chargeur.
2. Connectez le câble au secteur.
(prise 100-240 volts).
3. Une fois le chargeur branché au secteur,
les quatre LED clignotent une fois et un signal
sonore retentit. Les afcheurs indiquent alors 8888.
Le chargeur X4 MICRO SE est maintenant prêt.
Attention : chaque sortie ne peut recharger qu’un seul accu à
la fois!
Raccordement à une batterie de voiture
Connectez le chargeur à une batterie de voiture à l’aide du
câble de connexion 12 V
En cas de dysfonctionnement, la LED clignote 2 fois par seconde & un signal sonore retentit.
Au bout d’env. 10 s, la LED arrête de clignoter et un code d’erreur s’afche.
· Quatre prises de charge indépendantes
· Quatre connectiques différentes par sortie
· Quatre puissances de charge indépendantes
· Quatre afchages LED indépendants indiquant l’intensité, la tension et la capacité
· Voyants LED et signaux sonores indiquant l’état de charge
· Courant de charge réglable en continu de 0,05 à 1,2 A
· Alimentation AC ou DC (sur secteur ou sur batterie)
· Sécurité maximale: Protection contre les courts-circuits, la surcharge, les inversions de polarité et la
tension d’entrée DC
# 1-00689 Sous réserve d’erreurs et de modications © MULTIPLEX
Caractéristiques particulières
Charge
Messages d’erreurs
Spécications
Entrée AC / DC 100-240 V / 11-15 V
Puissance de charge 4 x 5,22 W ± 10%
Courant de charge 0,05 - 1,2 A ± 10%
Type d’accu 4 x 1 cellule LiPo / LiHV
Connectiques Micro / JST / MX / mCPX
Température de service 0 - 50°C
Poids 245 g
Dimensions 130 x 94 x 50 mm
JST mCPX
Micro
MX
4 afcheurs LED
LED
d’état de charge
Molette de
réglage et
touche
Start/Stop
Entrée AC
100 - 240 volts
Entrée DC
11 - 15 volts
Code d’erreur Description
-11- L’accu est endommagé ou sa tension est trop élevée ou trop faible pour
permettre le démarrage de la charge en toute sécurité.
-22- Inversion des polarités de l’accu.
-33- La connexion avec l’accu a été interrompue.
-44- Court-circuit ou surcharge de l’accu.
-55-
La tension d’entrée DC alimentant le chargeur est trop élevée ou trop faible.
12V

Élimination
Garantie / exclusion de responsabilité
Déclaration de conformité CE
Ce pictogramme indique que les appareils électriques et électroniques usagés ne doivent pas être
éliminés avec les ordures ménagères. Veuillez porter votre appareil au centre de collecte ou de
recyclage local ou communal pour son élimination. Cette disposition est en vigueur dans tous les
pays de l’Union européenne et dans d’autres pays européens dotés d’un système de tri sélectif.
La société MULTIPLEX Modellsport GmbH & Co.KG décline toute responsabilité pour toute perte, tout
dommage ou frais entraînés par une utilisation ou une exploitation non conforme ou toute conséquence de
ceci. Dans la mesure autorisée par la loi, la responsabilité de la société MULTIPLEX Modellsport GmbH &
Co.KG se limite au versement de dommages-intérêts, pour quelque raison juridique que ce soit, limités au
montant de la facture des biens immédiatement liés à l’événement dommageable de la société MULTIPLEX
Modellsport GmbH & Co.KG. Ceci ne fait pas foi si la société MULTIPLEX Modellsport GmbH & Co.KG est
soumise à une responsabilité illimitée liée à des prescriptions légales contraignantes suite à une négligence
ou une faute grave. Nous assumons la garantie de nos produits, conformément aux dispositions légales
faisant actuellement foi. Pour les problèmes de garantie, s’adresser au revendeur chez lequel a été acquis le
produit. La garantit exclut les dysfonctionnements provoqués par les éléments suivants:
· Utilisation non conforme.
· Maintenance défaillante, absente ou retardée, ou encore réalisée par une personne non autorisée.
· Défauts de raccordement.
· Utilisation d’accessoires autres que MULTIPLEX/HiTEC.
· Modications/réparations non réalisées par MULTIPLEX ou un revendeur agréé MULTIPLEX.
· Dommages accidentels ou délibérés.
· Défaillances entraînées par une usure normale.
· Exploitation en dehors des spécications techniques ou avec des composants d’autres fabricants.
L’évaluation de l’appareil a été réalisée selon des directives harmonisées au plan européen.
Vous possédez donc un produit qui, d’un point de vue de la construction, satisfait aux objectifs
de prévention des risques de l’Union européenne pour la sécurité de fonctionnement des
appareils.
La déclaration de conformité de cet appareil peut être demandée auprès de MULTIPLEX Mo
-
dellsport GmbH & Co.KG.
Sous réserve d’erreurs et de modications techniques
Copyright Multiplex Modellsport 2015
Copie ou reproduction, même partielle, interdite sans l’autorisation écrite de Multi
-
plex Modellsport GmbH & Co.KG
MULTIPLEX Modellsport GmbH & Co.KG
Westliche Gewerbestr. 1
75015 Bretten · Allemagne
Multiplex Service: +49 (0) 7252 - 5 80 93 0
www.multiplex-rc.de
Mode d’utilisation
Raccordement au secteur
1. Connectez l’accu via la prise correspondante
du chargeur.
Remarque: veillez à la bonne polarité!
2.
Sélectionnez le type d’accu (LiPo / LiHV) en tournant la molette de réglage
puis conrmez en appuyant brièvement sur la touche de la molette.
3. Sélectionnez le courant de charge (0,05 - 1,2 A) à l’aide de la molette de réglage.
Remarque: le courant de charge ne peut pas être modié pendant la charge.
4.
Pour lancer la charge, maintenez la molette enfoncée pendant 3 s.
Le voyant LED correspondant s’allume en rouge et un signal sonore prolongé retentit
pour conrmation.
5.
Pendant la charge, l’afcheur indique la tension de l’accu, le courant de charge et la capacité chargée.
Conrmez le type d’accu
en appuyant brièvement
sur la touche de la molette.
Maintenez la
molette
enfoncée
pendant 3 s
Courant de charge (A)
Tension de l’accu
Tension LiPo Tension LiHV CapacitéCourant de charge
Courant de charge (A)
Courant de
charge (A)
Capacité
chargée (mAh)
6. La LED reste allumée en rouge pendant tout le processus de charge.
7. Pour suspendre la charge, veuillez maintenir la molette enfoncée
pendant 3 secondes. La LED s’éteint.
8.
Lorsque l’accu est rechargé, le voyant LED passe au vert, clignote 5 fois et
un signal sonore retentit.
L’afcheur indique «FULL» (plein).
9. Débranchez l’accu. Attendez 30 secondes jusqu’à ce que l’afcheur indique «LIPO».
La sortie est maintenant prête pour recharger un autre accu.
Accu LiPo Accu LiHV
-
 1
1
-
 2
2
-
 3
3
-
 4
4
-
 5
5
-
 6
6


HiTEC Multicharger X4 Micro Se Bedienungsanleitung
- Typ
- Bedienungsanleitung
in anderen Sprachen
Verwandte Artikel
Andere Dokumente
-
MULTIPLEX Power Multilight Wireless Bedienungsanleitung
-
-
-
-
-
-
-
E-flite Celectra UMX-4 Benutzerhandbuch
-
 Reely 1719875 Bedienungsanleitung
-
