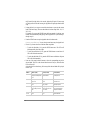
Korg SP-300 Benutzerhandbuch
- Kategorie
- Synthesizer
- Typ
- Benutzerhandbuch
Dieses Handbuch ist auch geeignet für

ENGLISH
FRANÇAIS
DEUTSCH
ITALIANO
User’s manual
Mode d’emploi
Bedienungseinleitung
Manuale d’istruzioni
PART NUMBER: MAN0001083
Address
KORG ITALY Spa
Via Cagiata, 85
I-60027 Osimo (An)
Italy
Web servers
www.korg.co.jp
www.korg.com
www.jam-ind.com
www.korgfr.net
www.korg.de
www.korg.it
© KORG Italy 2002. All rights reserved
Digital Piano
Piano Numérique
Digital-Piano
Pianoforte Digitale


English
User’s Manual
Français
Mode d’emploi
Deutsch
Bedienungseinleitung
Italiano
Manuale di istruzioni

Seite laden ...
Seite laden ...
Seite laden ...
Seite laden ...
Seite laden ...
Seite laden ...
Seite laden ...
Seite laden ...
Seite laden ...
Seite laden ...
Seite laden ...

14
Chapter 2
tially from left to right. After a few seconds, playback will begin. All demo songs
will be played back. After the last song, the playback will begin again from the first
song.
2
During playback, you can press a sound selection button to repeat just the current
bank of ten demo songs. (There are three banks of ten demo songs each: 1-10, 11-
20, 21-30).
For example, if you press the CHOIR button while song number 1 is playing, song
number 10 will immediately start playing, and the playback will cycle from song 1
through song 10.
3
Press the DEMO button to stop the playback and exit the demo mode.
Listen to a specified song.
You can select just one demo song to be played back.
1
First of all, you must select one of the three demo song banks.
• To select the first bank (1-10), press the DEMO button once. The LEDs will
blink sequentially, from left to right.
• To select the second bank (11-20), press the DEMO button a second time. All
LEDs will blink at the same time.
• To select the third bank (21-30), press the DEMO button a third time. Adjacent
LEDs will blink alternatively
2
Press one of the sound selection buttons to select the corresponding song in the
selected bank. The LED on the selected demo button will stay on, while the other
LEDs will turn off.
After the end of the selected song, all the songs of the selected bank will be played
back in cycle.
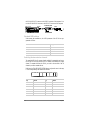
Button Bank 1 (1-10) Bank 2 (11-20) Bank 3 (21-30)
PIANO 1 F. Mendelssohn-Bar-
tholdy: Prelude Op.104a,
no.2
Korg Original (M. Tem-
pia): Reflection
C.A. Debussy:
Arabesque no.1
PIANO 2 F. Chopin: Nocturne
Op.9, no.2
S. Joplin: The Enter-
tainer
J.S. Bach: Two-voice
invention no.13
E.PIANO 1 C.A. Debussy: Clair de
lune
Korg Original (M. Tem-
pia): Jumper
F. Chopin: Fantasie-
Impromptu Op.66
E.PIANO 2 Korg Original (M. Tem-
pia): Lullaby for a Little
Star
Korg Original (M. Tem-
pia): All the Ones You
Don’t Know
J.S. Bach: Prelude in C
major (from Das Wohl-
temeperierte Klavier)
HARPSI
/CLAV
L. van Beethoven: Für
Elise
J.S. Bach: Italian Con-
cert
Korg Original (M. Tem-
pia): Rubber Bob

Before you begin
15
3
Press the DEMO button to stop the playback and exit the demo mode.
Note:
During the demo playback you can’t use the sound selection buttons to select
sounds, or the REVERB and CHORUS buttons.
Adjusting the tempo of the demo songs.
Use the TEMPO slider to change the
tempo of the selected demo song. Normally, the playback tempo of the demo song
will not match the markings of the TEMPO slider.
Note:
You can’t use the metronome during the demo playback.
Note:
When a demo is selected, its original tempo is recalled.
VIBES
/GUITAR
F. Chopin: Etude Op.10,
no.3
Korg Original (M. Tem-
pia): Jazz in Spain
R. Schumann: Trauma-
rei, Op.15, no.7
ORGAN 1 W.A. Mozart: A la turque
(from the Sonata in A-
major K.331)
Korg Original (M. Tem-
pia): Cool “B”
F. Mendelssohn-Bar-
tholdy: Spring Song,
Op.62, no.6
ORGAN 2 F. Chopin: Valse no.6 in
D
-major Op.64, no.1
F. Mendelssohn-Bar-
tholdy: Wedding March
Korg Original (M. Tem-
pia): Sunflowers
STRINGS
/PAD
Korg Original (M. Tem-
pia): Old Feather Blues
J.S. Bach: Air on the G
string
P.D. Paradisi: Toccata in
A major
CHOIR Korg Original (M. Tem-
pia): Noise of time
Korg Original (M. Tem-
pia): Voice Texture
Korg Original (M. Tem-
pia): Wet Raccoon Rag
Button Bank 1 (1-10) Bank 2 (11-20) Bank 3 (21-30)

16
Chapter 3
CHAPTER
3
Basic functions
Playing a single sound (Single mode)
You can select a sound from the thirty sounds supplied with the instrument.
1
Press one of the sound selection buttons in order to select a sound. The LED on the
button you pressed will light.
2
Use the BANK button to select one of the three available banks (1-10, 11-20, 21-
30). Pressed a first time it selects Bank 2; pressed a second time it selects Bank 3;
pressed a third time it selects Bank 1 again.
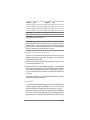
Playing two sounds at the same time (Layer mode)
You can play two sounds at the same time on the keyboard. This is called the Layer
mode.
Button Bank 1 # Bank 2 # Bank 3 #
PIANO 1 Grand Piano 1 2 Bright Piano 2 Grand Piano 2 1
PIANO 2 Classic Piano 2 Honky-Tonky 2 E.Grand Piano 1
E.PIANO 1 Stage E.Piano 1 Club E.Piano 2 Thin E.Piano 2
E.PIANO 2 Digital E.Piano 1 60’s E.Piano 1 Vintage E.Piano 2
HARPSI/CLAV Harpsichord 1 Clav. 1 Wah Clav. 1
VIBES/GUITAR Vibraphone 1 Marimba 1 Acoustic Guitar 1
ORGAN 1 Jazz Organ 1 2 Jazz Organ 2 2 Jazz Organ 3 2
ORGAN 2 Church Organ 1 3 Church Organ 2 1 Church Organ 3 1
STRINGS/PAD Strings 1 Slow Strings 2 Warm Pad 2
CHOIR Choir Hoo 1 Choir Doo 2 Choir Pad 2
(#) These columns show the number of oscillators per voice used by each sound
Seite laden ...
Seite laden ...
Seite laden ...
Seite laden ...
Seite laden ...
Seite laden ...
Seite laden ...
Seite laden ...
Seite laden ...
Seite laden ...
Seite laden ...
Seite laden ...

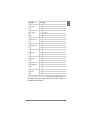
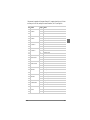
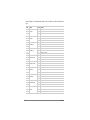
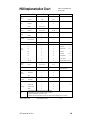
MIDI 29
Program Change enable/disable. To transmit and receive this kind of data, you
must enable Program Change messages transmission and reception. Otherwise, you
can disable Program Changes data.
6
E.PIANO 1
1 Stage E.Piano
7 2 Club E.Piano
8 3 Thin E.Piano
9
E.PIANO 2
1 Digital E.Piano
10 2 60’s E.Piano
11 3 Vintage E.Piano
12
HARPSI/CLAV
1 Harpsichord
13 2 Clav.
14 3 Wah Clav.
15
VIBES/GUITAR
1 Vibraphone
16 2 Marimba
17 3 Acoustic Guitar
18
ORGAN1
1 Jazz Organ 1
19 2 Jazz Organ 2
20 3 Jazz Organ 3
21
ORGAN2
1 Church Organ 1
22 2 Church Organ 2
23 3 Church Organ 3
24
STRINGS/PAD
1 Strings
25 2 Slow Strings
26 3 Warm Pad
27
CHOIR
1 Choir Hoo
28 2 Choir Doo
29 3 Choir Pad
PC# Button Bank Sound
Seite laden ...
Seite laden ...
Seite laden ...
Seite laden ...
Seite laden ...

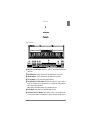
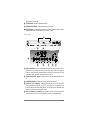
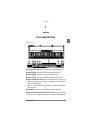
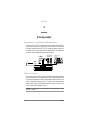
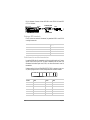
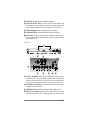
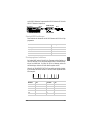
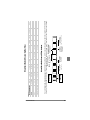
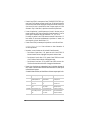
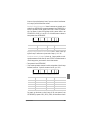
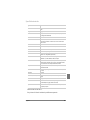
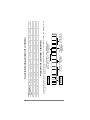
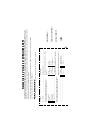
Control panel shortcuts 35
Control panel shortcuts
Control panel and keyboard
The following diagram shows the various functions you can access by holding the METRONOME or TRANSPOSE/
FUNCTION button down, while pressing one of the notes on the keyboard.
…while pressing this one
PIANO 1 PIANO2 E.PIANO 1 E.PIANO 2 HARPSI/CLAV
VIBES/GUITAR
ORGAN 1 ORGAN 2 STRINGS/PAD CHOIR
Keep this button pressed…
REVERB Depth = Low Depth = Medium Depth = High
CHORUS Depth = Low Depth = Medium Depth = High
TOUCH Light Normal Heavy Werckmeister Kirnberger
METRONOME Time: 2/4 Time: 3/4 Time: 4/4 Time: 6/4 Accent Bell sound Metro Vol. Dec. Metro Vol. Inc.
TRANSPOSE/FUNCTION Local On/Off
Prg.Change Rx/Tx
Crl.Change Rx/Tx Data Dump
METRONOME
TRANSPOSE
/FUNCTION
MIDI Channels
C2 = Ch 01
…
D#3 = Ch 16
Tuning
B5 = Down (-)
C6 = Up (+)
(Press both
for Reset)
Transpose
F#6…B6 = -6…-1 st.
C7 = Standard
C#7…F7 = +1…+5 st.
(Press both for Reset)
Metronome Volume
B5 = Decrease (-)
C6 = Increase (+)
Numeric Tempo Input
C5 = 0 C#5 = 1 D5 = 2
D#5 = 3 E5 = 4 F5 = 5
F#5 = 6 G5 = 7 G#5 = 8
A5 = 9
Touch Setting
B3 = Light
C4 = Normal
D4 = Heavy
Demo Start
Seite laden ...
Seite laden ...
Seite laden ...

39
• Consult the dealer or an experienced radio/TV
technician for help.
Unauthorized changes or modification to this sys-
tem can void the user’s authority to operate this
equipment.
CANADA
THIS APPARATUS DOES NOT EXCEED THE
“CLASS B” LIMITS FOR RADIO NOISE EMIS-
SIONS FROM DIGITAL APPARATUS SET OUT
IN THE RADIO INTERFERENCE REGULA-
TION OF THE CANADIAN DEPARTMENT OF
COMMUNICATIONS.
LE PRESENT APPAREIL NUMERIQUE
N’EMET PAS DE BRUIT RADIOELECTRIQUE
DEPASSANT LES LIMITES APPLICABLES
AUX APPAREILS NUMERIQUES DE LA
“CLASSE B” PRESCRITES DANS LE REGLE-
MENT SUR LE BROUILLAGE RADIOELEC-
TRIQUE EDICTE PAR LE MINISTERE DES
COMMUNICATIONS DU CANADA.
RECLAMATIONS
Les informations contenues dans cette publication
ont été soigneusement préparées et vérifiées. Vu
notre continuel engagement à l’amélioration de
nos produits, il se peut que des spécifications
soient différentes de celles détaillées dans le
mode d’emploi. Korg décline toute responsabilité
envers les éventuelles différences qui peuvent se
présenter entre les spécifications et la description
détaillée dans le mode d’emploi - les spécifica-
tions sont sujettes à modifications sans préavis.
GARANTIE
Les produits KORG sont fabriqués conformément
aux plus rigoureuses spécifications en vigueur
dans chaque pays. Ces produits sont garantis par
le distributeur KORG dans le pays où ils ont été
vendus. Le fabricant/distributeur décline toute
responsabilité ou garantie envers tout produit
KORG vendu démuni de garantie ou de numéro
de série. Ceci afin de mieux garantir la protection
et la sécurité de l’acheteur.
SERVICE ET ASSISTANCE AU MUSICIEN
Contactez le Service d’Assistance Agréé KORG
le plus proche. Le revendeur Agréé KORG est à
votre disposition pour toute ultérieure information
concernant les produits, les logiciels et les acces-
soires pour piano.
KORG SUR INTERNET
Accueil Korg Inc. : www.korg.co.jp
Accueil Korg France : www.korgfr.net
Accueil Korg Canada : www.jamindustries.com
Accueil Korg USA : www.korg.com
Accueil Korg Italy : www.korg.it
RETABLISSEMENT DES DONNEES
Lors de la mise hors tension de l’instrument, tous
les paramètres se rétablissent à leur valeur
d’usine.
© 2002 Korg Italy Spa. Imprimé en Italie
Seite laden ...
Seite laden ...
Seite laden ...
Seite laden ...
Seite laden ...
Seite laden ...
Seite laden ...
Seite laden ...
Seite laden ...

A lire en premier 49
3 Appuyez sur DEMO pour arrêter la reproduction et quitter le mode de démonstra-
tion.
Note : Pendant la reproduction des morceaux de démonstration, vous ne pouvez pas
sélectionner un timbre en appuyant sur les boutons de sélection des timbres ou sur
les boutons REVERB et CHORUS.
Régler le tempo des morceaux de démonstration. A l’aide du curseur
TEMPO, vous pouvez modifier le tempo du morceau de démonstration sélectionné.
Normalement, le tempo de reproduction des morceaux de démonstration n’est pas
influencé par les positions du curseur TEMPO.
Note : Vous ne pouvez pas utiliser le métronome pendant la reproduction d’un mor-
ceau de démonstration.
Note : Lorsqu’un morceau de démonstration est sélectionné, c’est son tempo origi-
nal qui est reproduit.
HARPSI
/CLAV
L. van Beethoven: Für
Elise
J.S. Bach: Italian Con-
cert
Korg Original (M. Tem-
pia): Rubber Bob
VIBES
/GUITAR
F. Chopin: Etude Op.10,
no.3
Korg Original (M. Tem-
pia): Jazz in Spain
R. Schumann: Trauma-
rei, Op.15, no.7
ORGAN 1 W.A. Mozart: A la turque
(from the Sonata in A-
major K.331)
Korg Original (M. Tem-
pia): Cool “B”
F. Mendelssohn-Bar-
tholdy: Spring Song,
Op.62, no.6
ORGAN 2
F. Chopin: Valse
no.6 in D-major
Op.64, no.1
F. Mendelssohn-Bar-
tholdy: Wedding March
Korg Original (M. Tem-
pia): Sunflowers
STRINGS
/PAD
Korg Original (M. Tem-
pia): Old Feather Blues
J.S. Bach: Air on the G
string
P.D. Paradisi: Toccata in
A major
CHOIR Korg Original (M. Tem-
pia): Noise of time
Korg Original (M. Tem-
pia): Voice Texture
Korg Original (M. Tem-
pia): Wet Raccoon Rag
Bouton Banque1 (1-10) Banque 2 (11-20) Banque 3 (21-30)

50 Chapitre 3
CHAPITRE
3
Fonctions de base
Jouer un timbre (mode Single)
Sélectionner l’un des trente timbres à disposition.
1 Appuyez sur l’un des boutons de sélection des timbres. Le témoin du bouton
enfoncé s’allume.
2 Appuyez sur le bouton BANK pour sélectionner l’une des trois banques disponibles
(1-10, 11-20, 21-30). En appuyant une fois sur ce bouton, c’est la Banque 2 qui est
sélectionnée ; en l’appuyant deux fois, c’est la Banque 3 qui est sélectionnée ; en
l’appuyant trois fois, c’est la Banque 1 qui est de nouveau sélectionnée.
Jouer deux timbres à la fois (mode Layer)
Vous pouvez jouer deux timbres ensemble sur le clavier. C’est le mode Layer.
Bouton Banque 1 # Banque 2 # Banque 3 #
PIANO 1 Grand Piano 1 2 Bright Piano 2 Grand Piano 2 1
PIANO 2 Classic Piano 2 Honky-Tonky 2 E.Grand Piano 1
E.PIANO 1 Stage E.Piano 1 Club E.Piano 2 Thin E.Piano 2
E.PIANO 2 Digital E.Piano 1 60’s E.Piano 1 Vintage E.Piano 2
HARPSI/CLAV Harpsichord 1 Clav. 1 Wah Clav. 1
VIBES/GUITAR Vibraphone 1 Marimba 1 Acoustic Guitar 1
ORGAN 1 Jazz Organ 1 2 Jazz Organ 2 2 Jazz Organ 3 2
ORGAN 2 Church Organ 1 3 Church Organ 2 1 Church Organ 3 1
STRINGS/PAD Strings 1 Slow Strings 2 Warm Pad 2
CHOIR Choir Hoo 1 Choir Doo 2 Choir Pad 2
(#) Cette colonne détaille le nombre d’oscillateurs par voix exploités par chaque timbre
Seite laden ...
Seite laden ...
Seite laden ...
Seite laden ...
Seite laden ...
Seite laden ...
Seite laden ...
Seite laden ...
Seite laden ...
Seite laden ...
Seite laden ...
Seite laden ...

MIDI 63
Uniquement les numéros de Program Change (PC) compris dans la plage 0–29 sont
reconnus par le SP-300, tandis que les autres numéros (30-127) sont ignorés.
PC# Bouton Banque Timbre
0
PIANO 1
1 Grand Piano 1
1 2 Bright Piano
2 3 Grand Piano 2
3
PIANO 2
1 Classic Grand Piano
4 2 Honky-Tonky
5 3 E.Grand Piano
6
E.PIANO 1
1 Stage E.Piano
7 2 Club E.Piano
8 3 Thin E.Piano
9
E.PIANO 2
1 Digital E.Piano
10 2 60’s E.Piano
11 3 Vintage E.Piano
12
HARPSI/CLAV
1 Harpsichord
13 2 Clav.
14 3 Wah Clav.
15
VIBES/GUITAR
1 Vibraphone
16 2 Marimba
17 3 Acoustic Guitar
18
ORGAN1
1 Jazz Organ 1
19 2 Jazz Organ 2
20 3 Jazz Organ 3
21
ORGAN2
1 Church Organ 1
22 2 Church Organ 2
23 3 Church Organ 3
24
STRINGS/PAD
1 Strings
25 2 Slow Strings
26 3 Warm Pad
27
CHOIR
1 Choir Hoo
28 2 Choir Doo
29 3 Choir Pad
Seite laden ...
Seite laden ...
Seite laden ...
Seite laden ...
Seite laden ...

Appendice 69
Spécifications techniques
Sons élaborés avec INFINITY™.
Korg se réserve le droit de modifier les spécifications sans préavis.
Spécifications SP-300
Clavier 88 notes lestées, sensibles à la dynamique du toucher, avec
simulation de marteau
Réglage du toucher Léger, Normal, Lourd
Accordage Transposition, Accordage fin, Tempérament (Egal, Kirnber-
ger, Werckmeister)
Génération de sons Stereo PCM System
Polyphonie 60 notes (max). L’utilisation de timbres à 2 oscillateurs, du
mode Layer et/ou des effets de réverbération ou chorus
réduit le nombre maximum de notes jouées simultanément.
Timbres 30 timbres en ROM
Effets Réverbération, Chorus (chacun avec 3 niveaux)
Démo 30 morceaux de démonstration incorporés
Métronome Réglages du Tempo, de la Time signature (métrique), de
l’Accent et du Volume
Pédales Damper (fournie). Mi-pédale avec Korg DS1H (en option).
Connexions Sorties Audio (OUTPUT L/MONO, R), Entrées Audio (INPUT
L/MONO, R), Casques, MIDI (IN, OUT), Damper
Contrôles Interrupteur, Speakers, Master Volume, Reverb, Chorus,
Touch, Transpose/Function, Bank, sélecteurs de timbres,
Tempo, Métronome, Démo
Alimentation DC21V, 1A, pôle négatif au centre, adaptateur AC (fourni)
Consommation 21 Watts
Dimensions (L x P x H) 1300 × 343,8 × 132,5 mm (51.1 × 13.5 × 5.2 inch), pupitre
exclu
Poids 25 kg (55.1 lbs)
Accessoires DC12V, 500mA, pôle négatif au centre, adaptateur AC ;
Pédale Damper ; Pupitre (tous fournis)
Options DS 1H - Pédale Damper avec mi-pédale de contrôle, Piano
stand

70
Détails du tableau de commande
Tableau de commande et clavier
Le diagramme suivant indique les diverses fonctions accessibles en maintenant enfoncé le bouton METRONOME ou
TRANSPOSE/FUNCTION et en appuyant sur l'une des touches du clavier.
…pendant que vous appuyez sur celui-ci
PIANO 1 PIANO2 E.PIANO 1 E.PIANO 2 HARPSI/CLAV
VIBES/GUITAR
ORGAN 1 ORGAN 2 STRINGS/PAD CHOIR
Maintenez ce bouton enfoncé…
REVERB Prof = Grave Prof = Moyen Prof = Aigu
CHORUS Prof = Grave Prof = Moyen Prof = Aigu
TOUCH Léger Normal Lourd Werckmeister Kirnberger
METRONOME Tempo: 2/4 Tempo: 3/4 Tempo: 4/4 Tempo: 6/4 Accent Bell sound Metro Vol. Dec. Metro Vol. Inc.
TRANSPOSE/FUNCTION Local On/Off
Prg.Change Rx/Tx
Crl.Change Rx/Tx Data Dump
METRONOME
TRANSPOSE
/FUNCTION
MIDI Channels
C2 = Ch 01
…
D#3 = Ch 16
Tuning
B5 = Down (-)
C6 = Up (+)
(Press both
for Reset)
Transpose
F#6…B6 = -6…-1 st.
C7 = Standard
C#7…F7 = +1…+5 st.
(Press both for Reset)
Metronome Volume
B5 = Decrease (-)
C6 = Increase (+)
Numeric Tempo Input
C5 = 0 C#5 = 1 D5 = 2
D#5 = 3 E5 = 4 F5 = 5
F#5 = 6 G5 = 7 G#5 = 8
A5 = 9
Touch Setting
B3 = Light
C4 = Normal
D4 = Heavy
Demo Start

Bedienungsanleitung
Digital-Piano

72
VORSICHTSMASSNAHMEN
Aufstellungsort
Bei Benutzung des Instruments an folgenden
Orten kann es zu Funktionsstörungen kommen.
• In direktem Sonnenlicht
• bei hohen Temperaturen oder hoher Luft-
feuchtigkeit
• in sehr staubigen oder schmutzigen Räumen
• bei starken Vibrationen
Stromversorgung
Schließen Sie den Wechselstromstecker des
Instruments an eine WS-Steckdose mit der richti-
gen Spannung an. Schließen Sie das Instrument
keinesfalls an eine WS-Steckdose mit einer ande-
ren als der angegebenen Spannung an.
Interferenzen mit anderen elektrischen Gerä-
ten
Das Instrument ist mit einem Computer ausgestat-
tet. In der Nähe des Instruments befindliche
Radio- und Fernsehgeräte können Empfangsstö-
rungen erleiden. Stellen Sie das Instrument des-
halb in einem gewissen Abstand von diesen
Geräten auf.
Handhabung
Zur Vermeidung von Beschädigungen sind Schal-
ter und Regler des Instruments ohne übertriebe-
nen Kraftaufwand zu bedienen.
Pflege
Wenn die Außenseite des Instruments schmutzig
ist, wischen Sie sie mit einem trockenen, sauberen
Tuch ab. Verwenden Sie weder Flüssigreiniger
wie Benzin oder Verdünner, noch Reinigungs-
oder brennbare Poliermittel.
Aufbewahrung des Handbuches
Nach Durchlesen des Handbuches ist dieses sorg-
fältig aufzubewahren, um jederzeit eingesehen
werden zu können.
Vermeidung von Fremdkörpern im Instru-
ment
• Stellen Sie keine Behältnisse mit Flüssigkei-
ten auf dem Instrument ab. Eindringende Flüs-
sigkeiten können einen Geräteausfall, Brand
oder Stromschlag verursachen.
• Achten Sie darauf, dass keine Metallgegen-
stände ins Innere des Instruments geraten.
Sollte dies dennoch einmal geschehen, ziehen
Sie sofort den Stecker aus der Steckdose und
wenden Sie sich an Ihren Korg Händler, bei
dem Sie das Instrument gekauft haben.
CE-ZEICHEN ZUR VEREINHEIT-
LICHUNG DER EUROPÄISCHEN
STANDARDS
Das bis 31. Dezember 1996 vergebene CE-Zei-
chen, das unsere mit Wechselstrom betriebenen
Produkte tragen, zeigt an, dass diese Instrumente
der EMC Richtlinie (89/336/EWG) und der CE-
Zeichen-Richtlinie (93/68/EEC) entsprechen.
Das nach dem 1. Januar 1997 vergebene CE-Zei-
chen zeigt an, dass die Instrumente der EMC
Richtlinie (89/336/EEC), der CE-Zeichen-Richt-
linie (93/68/EEC) und der Niederspan
nungs-
richtlinie (73/23/EEC) entsprechen
Das CE-Zeichen auf unserern batteriegespeisten
Instrumenten zeigt an, dass diese der EMC Richt-
linie (89/336/EEC) und der CE-Zeichen-Richtli-
nie (93/68/EEC) entsprechen.
HAFTUNGSAUSSCHLUSS
Die im vorliegenden Handbuch enthaltenen Infor-
mationen wurden mit großer Sorgfalt geprüft und
überarbeitet. Aufgrund des Bemühens, unsere
Produkte ständig zu verbessern, können die tech-
nischen Daten jedoch von den Beschreibungen
des Handbuches abweichen. Korg ist nicht verant-
wortlich für eventuelle Abweichungen zwischen
den technischen Daten und den im Handbuch ent-
haltenen Beschreibungen. Technische Daten kön-
nen jederzeit ohne Vorankündigung geändert
werden.
HAFTUNG
Alle KORG Produkte werden entsprechend den in
den verschiedenen Ländern geltenden Spezifika-
tionen und erforderlichen Spannungen herge-
stellt. Sie unterliegen den Garantiebestimmungen
der KORG Vertriebsfirmen in den einzelnen Län-

73
dern. KORG Produkte, die ohne Garantiekarte
und Seriennummer verkauft wurden, sind von
Garantieleistungen und Haftungsansprüchen
durch den Hersteller/Händler ausgeschlossen.
Diese Vorschrift dient zu Ihrer eigenen Sicherheit.
SERVICE UND KUNDENDIENSTLEI-
STUNGEN FÜR MUSIKER
Wenden Sie sich zwecks Kundendienstleistungen
bitte an das nächste KORG Kundendienstzen-
trum. Ausführliche Informationen über KORG
Produkte sowie über Software und Zubehör für
Ihr Klavier erhalten Sie bei Ihrem KORG Händ-
ler.
KORG IM INTERNET
Home page Korg Deutschland.: www.korg.de
Home page Korg Inc.: www.korg.co.jp
Home page Korg USA: www.korg.com
Home page Korg Italy: www.korg.it
DATEN-RESET
Wenn das Instrument ausgeschaltet wird, werden
alle Parameter zurückgesetzt.
© 2002 Korg Italy Spa. Printed in Italy.

74 Inhaltsverzeichnis
INHALTSVERZEICHNIS
Einführung . . . . . . . . . . . . . . . . . . . . . . . . . . . . . . . . . . . . . . . . . . . . . . . . . . . . . . . . . .75
Hauptfunktionen . . . . . . . . . . . . . . . . . . . . . . . . . . . . . . . . . . . . . . . . . . . . . . . . . . . . . . . . . . . .75
1 Paneele . . . . . . . . . . . . . . . . . . . . . . . . . . . . . . . . . . . . . . . . . . . . . . . . . . . . . . . . . . . .77
Vorderseite . . . . . . . . . . . . . . . . . . . . . . . . . . . . . . . . . . . . . . . . . . . . . . . . . . . . . . . . . . . . . . . .77
Rückseite . . . . . . . . . . . . . . . . . . . . . . . . . . . . . . . . . . . . . . . . . . . . . . . . . . . . . . . . . . . . . . . . . .78
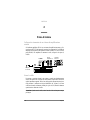
2 Bevor Sie beginnen . . . . . . . . . . . . . . . . . . . . . . . . . . . . . . . . . . . . . . . . . . . . . . . . . . .80
Anschluss an einen externen Verstärker . . . . . . . . . . . . . . . . . . . . . . . . . . . . . . . . . . . . . . . . . .80
Verwendung der Kopfhörer . . . . . . . . . . . . . . . . . . . . . . . . . . . . . . . . . . . . . . . . . . . . . . . . . . . .80
Anschluss von externen Quellen . . . . . . . . . . . . . . . . . . . . . . . . . . . . . . . . . . . . . . . . . . . . . . . .81
Instrument einschalten . . . . . . . . . . . . . . . . . . . . . . . . . . . . . . . . . . . . . . . . . . . . . . . . . . . . . . . .81
Lautstärke einstellen . . . . . . . . . . . . . . . . . . . . . . . . . . . . . . . . . . . . . . . . . . . . . . . . . . . . . . . . .81
Demos abspielen . . . . . . . . . . . . . . . . . . . . . . . . . . . . . . . . . . . . . . . . . . . . . . . . . . . . . . . . . . . .81
3 Basisfunktionen . . . . . . . . . . . . . . . . . . . . . . . . . . . . . . . . . . . . . . . . . . . . . . . . . . . . . .84
Mit nur einem Klang spielen (Single Modus) . . . . . . . . . . . . . . . . . . . . . . . . . . . . . . . . . . . . . .84
Mit zwei Klängen gleichzeitig spielen (Layer Modus) . . . . . . . . . . . . . . . . . . . . . . . . . . . . . . .84
Hall- und Chorus-Effekt wählen . . . . . . . . . . . . . . . . . . . . . . . . . . . . . . . . . . . . . . . . . . . . . . . .85
Das Damper Pedal . . . . . . . . . . . . . . . . . . . . . . . . . . . . . . . . . . . . . . . . . . . . . . . . . . . . . . . . . . .86
Das Metronom . . . . . . . . . . . . . . . . . . . . . . . . . . . . . . . . . . . . . . . . . . . . . . . . . . . . . . . . . . . . . .87
4 Weitere Funktionen . . . . . . . . . . . . . . . . . . . . . . . . . . . . . . . . . . . . . . . . . . . . . . . . . . .90
Einstellung des Anschlags . . . . . . . . . . . . . . . . . . . . . . . . . . . . . . . . . . . . . . . . . . . . . . . . . . . . .90
Transponierung . . . . . . . . . . . . . . . . . . . . . . . . . . . . . . . . . . . . . . . . . . . . . . . . . . . . . . . . . . . . .91
Feinstimmung . . . . . . . . . . . . . . . . . . . . . . . . . . . . . . . . . . . . . . . . . . . . . . . . . . . . . . . . . . . . . .92
Temperierung selektieren . . . . . . . . . . . . . . . . . . . . . . . . . . . . . . . . . . . . . . . . . . . . . . . . . . . . .92
5 MIDI . . . . . . . . . . . . . . . . . . . . . . . . . . . . . . . . . . . . . . . . . . . . . . . . . . . . . . . . . . . . . .94
Was ist MIDI? . . . . . . . . . . . . . . . . . . . . . . . . . . . . . . . . . . . . . . . . . . . . . . . . . . . . . . . . . . . . . .94
Was leistet MIDI? . . . . . . . . . . . . . . . . . . . . . . . . . . . . . . . . . . . . . . . . . . . . . . . . . . . . . . . . . . .94
Anschlüsse . . . . . . . . . . . . . . . . . . . . . . . . . . . . . . . . . . . . . . . . . . . . . . . . . . . . . . . . . . . . . . . . .94
Standard MIDI Einstellungen . . . . . . . . . . . . . . . . . . . . . . . . . . . . . . . . . . . . . . . . . . . . . . . . . .95
Übertragungskanal selektieren . . . . . . . . . . . . . . . . . . . . . . . . . . . . . . . . . . . . . . . . . . . . . . . . .95
SP-300 als multitimbraler Tongenerator . . . . . . . . . . . . . . . . . . . . . . . . . . . . . . . . . . . . . . . . . .96
Local On/Off . . . . . . . . . . . . . . . . . . . . . . . . . . . . . . . . . . . . . . . . . . . . . . . . . . . . . . . . . . . . . . .96
Program Change . . . . . . . . . . . . . . . . . . . . . . . . . . . . . . . . . . . . . . . . . . . . . . . . . . . . . . . . . . . .97
Control Change . . . . . . . . . . . . . . . . . . . . . . . . . . . . . . . . . . . . . . . . . . . . . . . . . . . . . . . . . . . . .99
MIDI Data Dump . . . . . . . . . . . . . . . . . . . . . . . . . . . . . . . . . . . . . . . . . . . . . . . . . . . . . . . . . .100
6 Anhang . . . . . . . . . . . . . . . . . . . . . . . . . . . . . . . . . . . . . . . . . . . . . . . . . . . . . . . . . . .102
Fehlerbeseitigung . . . . . . . . . . . . . . . . . . . . . . . . . . . . . . . . . . . . . . . . . . . . . . . . . . . . . . . . . .102
Polyphonie . . . . . . . . . . . . . . . . . . . . . . . . . . . . . . . . . . . . . . . . . . . . . . . . . . . . . . . . . . . . . . . .102
Technische Daten . . . . . . . . . . . . . . . . . . . . . . . . . . . . . . . . . . . . . . . . . . . . . . . . . . . . . . . . . .104
Bedienfeld-Kurzbefehle . . . . . . . . . . . . . . . . . . . . . . . . . . . . . . . . . . . . . . . . . . . . . . .105
Bedienfeld und Tastatur . . . . . . . . . . . . . . . . . . . . . . . . . . . . . . . . . . . . . . . . . . . . . .105
MIDI Implementation Chart . . . . . . . . . . . . . . . . . . . . . . . . . . . . . . . . . . . . . . . . . . . .141

Einführung 75
EINFÜHRUNG
Einführung
Hauptfunktionen
Großer Klangbereich.
Dreißig verschiedene, ausdruckstarke Hochqualitätsklänge ein-
schließlich ein Stereo-Konzertflügelklang. Sie können die Layer Funktion zum gleichzeiti-
gen Spielen von zwei Klängen nutzen.
Effekte.
Das SP-300 besitzt eingebaute, digitale Effekte, die die Klangeigenschaften einer
Konzerthalle (Reverb) nachahmen und den Klang voller machen (Chorus).
Damper Pedal-Simulation.
Das Damper-Pedal des SP-300 entspricht dem Damper- oder
Forte-Pedal eines akustischen Klaviers. Wenn Sie bei einem akustischen Klavier dieses Pedal
drücken, werden die Dämpfer (Dampers), die die Vibrationen der Saiten unterbrechen, ange-
hoben.
Metronom.
Beim eingebauten Metronom können Sie die Taktunterteilung, das Tempo und
die Lautstärke einstellen und darüber hinaus einen Glockenton zur Akzentuierung einsetzen.
Anschlagsteuerung.
Sie können drei verschiedene Einstellungen wählen, mit denen Sie
festlegen, wie der Klang sich mit der Anschlagstärke verändern soll.
Temperierungen.
Neben der wohltemperierten Stimmung besitzt das SP-300 zwei weitere
klassische Stimmungen (Kirnberger und Werckmeister) zur historisch korrekten Wiedergabe
klassischer Stücke. Wenn Sie einen akustischen Klavierklang wählen, wird automatisch die
typisch gedehnte Temperierung selektiert.
Einstellbare Tonhöhe.
Die Transpose Funktion ermöglicht es, die Tonhöhe des Klaviers zu
ändern, während die Pitch Control Funktion zur Feinabstimmung dient.
MIDI-Funktionen.
Das SP-300 unterstützt das MIDI Protokoll, ein Standard, mit welchem
Musikdaten zwischen Musikinstrumenten und Computern ausgetauscht werden können Mit
MIDI können zwei oder mehr Instrumente gesteuert werden oder zur Steuerung eingesetzt
werden; das SP-300 kann als 16-Part multitimbraler Tongenerator eingesetzt werden.
Seite laden ...
Seite laden ...
Seite laden ...
Seite laden ...
Seite laden ...
Seite laden ...
Seite laden ...
Seite laden ...
Seite laden ...
Seite laden ...
Seite laden ...
Seite laden ...
Seite laden ...
Seite laden ...
Seite laden ...
Seite laden ...
Seite laden ...
Seite laden ...
Seite laden ...
Seite laden ...
Seite laden ...
Seite laden ...
Seite laden ...
Seite laden ...
Seite laden ...
Seite laden ...
Seite laden ...
Seite laden ...
Seite laden ...
Seite laden ...
Seite laden ...
Seite laden ...
Seite laden ...
Seite laden ...
Seite laden ...
Seite laden ...
Seite laden ...
Seite laden ...
Seite laden ...
Seite laden ...
Seite laden ...
Seite laden ...
Seite laden ...
Seite laden ...
Seite laden ...
Seite laden ...
Seite laden ...
Seite laden ...
Seite laden ...
Seite laden ...
Seite laden ...
Seite laden ...
Seite laden ...
Seite laden ...
Seite laden ...
Seite laden ...
Seite laden ...
Seite laden ...
Seite laden ...
Seite laden ...
Seite laden ...
Seite laden ...
Seite laden ...
Seite laden ...
Seite laden ...
Seite laden ...
Seite laden ...
Seite laden ...
Seite laden ...
Seite laden ...
Seite laden ...
Seite laden ...
Seite laden ...
Seite laden ...
Seite laden ...
Seite laden ...
Seite laden ...
-
 1
1
-
 2
2
-
 3
3
-
 4
4
-
 5
5
-
 6
6
-
 7
7
-
 8
8
-
 9
9
-
 10
10
-
 11
11
-
 12
12
-
 13
13
-
 14
14
-
 15
15
-
 16
16
-
 17
17
-
 18
18
-
 19
19
-
 20
20
-
 21
21
-
 22
22
-
 23
23
-
 24
24
-
 25
25
-
 26
26
-
 27
27
-
 28
28
-
 29
29
-
 30
30
-
 31
31
-
 32
32
-
 33
33
-
 34
34
-
 35
35
-
 36
36
-
 37
37
-
 38
38
-
 39
39
-
 40
40
-
 41
41
-
 42
42
-
 43
43
-
 44
44
-
 45
45
-
 46
46
-
 47
47
-
 48
48
-
 49
49
-
 50
50
-
 51
51
-
 52
52
-
 53
53
-
 54
54
-
 55
55
-
 56
56
-
 57
57
-
 58
58
-
 59
59
-
 60
60
-
 61
61
-
 62
62
-
 63
63
-
 64
64
-
 65
65
-
 66
66
-
 67
67
-
 68
68
-
 69
69
-
 70
70
-
 71
71
-
 72
72
-
 73
73
-
 74
74
-
 75
75
-
 76
76
-
 77
77
-
 78
78
-
 79
79
-
 80
80
-
 81
81
-
 82
82
-
 83
83
-
 84
84
-
 85
85
-
 86
86
-
 87
87
-
 88
88
-
 89
89
-
 90
90
-
 91
91
-
 92
92
-
 93
93
-
 94
94
-
 95
95
-
 96
96
-
 97
97
-
 98
98
-
 99
99
-
 100
100
-
 101
101
-
 102
102
-
 103
103
-
 104
104
-
 105
105
-
 106
106
-
 107
107
-
 108
108
-
 109
109
-
 110
110
-
 111
111
-
 112
112
-
 113
113
-
 114
114
-
 115
115
-
 116
116
-
 117
117
-
 118
118
-
 119
119
-
 120
120
-
 121
121
-
 122
122
-
 123
123
-
 124
124
-
 125
125
-
 126
126
-
 127
127
-
 128
128
-
 129
129
-
 130
130
-
 131
131
-
 132
132
-
 133
133
-
 134
134
-
 135
135
-
 136
136
-
 137
137
-
 138
138
-
 139
139
-
 140
140
-
 141
141
-
 142
142
-
 143
143
-
 144
144
-
 145
145
-
 146
146
-
 147
147
-
 148
148
-
 149
149
-
 150
150
-
 151
151
-
 152
152
-
 153
153
-
 154
154


Korg SP-300 Benutzerhandbuch
- Kategorie
- Synthesizer
- Typ
- Benutzerhandbuch
- Dieses Handbuch ist auch geeignet für
in anderen Sprachen
- English: Korg SP-300 User manual
- français: Korg SP-300 Manuel utilisateur
- italiano: Korg SP-300 Manuale utente