Sub-Zero ICBSRT484CG Benutzerhandbuch
- Kategorie
- Herde
- Typ
- Benutzerhandbuch
Dieses Handbuch eignet sich auch für

SEALED BURNER RANGETOPS
USE & CARE INFORMATION
GUÍA DE USO Y MANTENIMIENTO
GUIDE D’UTILISATION ET D’ENTRETIEN
INFORMAZIONI SU USO E MANUTENZIONE
BEDIENUNGS- UND PFLEGEANLEITUNG


3
ENGLISH
Wolf Sealed Burner Rangetop 5
Safety Instructions and Precautions 6
Sealed Burner Rangetop Features 10
Sealed Burner Rangetop Operation 12
Sealed Burner Rangetop Care 24
Troubleshooting Guide 27
Wolf Service Information 28
ESPÃNOL
Encimera de cocción a gas con quemadores
herméticos de Wolf 30
Precauciones e instrucciones de seguridad 31
Características de la encimera de cocción
a gas con quemadores herméticos 35
Funcionamiento de la encimera de cocción
a gas con quemadores herméticos 37
Mantenimiento de la encimera de cocción
a gas con quemadores herméticos 49
Guía de localización y solución de problemas 52
Información de mantenimiento de Wolf 53
FRANÇAIS
Entablement à brûleurs étanches Wolf 55
Instructions et mesures de sécurité 56
Caractéristiques de l’entablement à
brûleurs étanches 60
Fonctionnement de l’entablement à
brûleurs étanches 62
Entretien de l’entablement à brûleurs étanches 74
Guide de dépistage des pannes 77
Service après-vente Wolf 78
ITALIANO
Piani cottura professionali con bruciatori
monopezzo Wolf 80
Precauzioni e istruzioni di sicurezza 81
Funzioni dei piani cottura professionali
con bruciatori monopezzo 85
Funzionamento dei piani cottura
professionali con bruciatori monopezzo 87
Pulizia dei piani cottura professionali
con bruciatori monopezzo 99
Guida alla soluzione dei problemi 102
Informazioni sull’assistenza Wolf 103
DEUTSCH
Kochmulde mit versiegelten brennern von Wolf 105
Sicherheitshinweise und vorsichtsmassnahmen 106
Leistungsmerkmale der kochmulde von Wolf
mit versiegelten brennern 110
Bedienung der kochmulde von Wolf mit
versiegelten brennern 112
Pflege der kochmulde von Wolf mit
versiegelten brennern 124
Anleitung zur fehlersuche von Wolf 127
Serviceinformationen von Wolf 128

As you read this Use & Care Information,
take particular note of the CAUTION and
WARNING symbols when they appear.
This information is impor tant for safe and
efficient use of the Wolf equipment.
In addition, this Use & Care Information may
signal an IMPORTANT NOTE which highlights
information that is especially important.
signals a situation where minor injury or
product damage may occur if you do not
follow instructions.
states a hazard that may cause serious
injury or death if precautions are not
followed.
WOLF
®
is a registered trademark of Wolf Appliance, Inc.

5
THANK YOU
Your purchase of a Wolf sealed burner
rangetop attests to the importance you place
upon the quality and performance of your
cooking equipment. We understand this
importance and have designed and built your
rangetop with quality materials and workman-
ship to give you years of dependable service.
We know you are eager to start cooking, but
before you do, please take some time to read
this Use & Care Information. Whether you are
a beginning cook or an expert chef, it will be
to your benefit to familiarize yourself with the
safety practices, features, operation and care
recommendations of the Wolf sealed burner
rangetop.
We appreciate your choice of a Wolf Appli-
ance product and welcome any suggestions
or comments you may have. To share your
opinions with us, please visit our website at
www.wolfappliance.com.
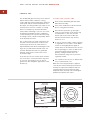
IMPORTANT NOTE:
Check the product rating
plate for type of gas. The rating plate is
located under the control panel on the far
right. Refer to the illustration on page 10.
WOLF
SEALED BURNER RANGETOP
IMPORTANT NOTE:
Installation and service must be
performed by a qualified installer,
service agency or the gas supplier.
Do not store or use gasoline or
other flammable vapors and liquids
in the vicinity of this or any other
appliance.
A ventilation hood is recommended
for use with the Wolf sealed burner
rangetop.
WHAT TO DO IF YOU SMELL GAS:
Do not try to light any appliance.
Do not touch any electrical switch.
Do not use any phone in your
building.
Immediately call your gas supplier
from a neighbor’s phone. Follow the
gas supplier’s instructions.
If you cannot reach your gas
supplier, call the fire department.
CONTACT
INFORMATION
Website:
wolfappliance.com
If the information in this book is
not followed exactly, a fire or
explosion may result, causing
property damage, personal injury
or death.

6
THE RANGETOP
IMPORTANT NOTE: Read all
instructions before using this
appliance.
Read this Use & Care Information
carefully before using your new
Wolf sealed burner rangetop to
reduce the risk of fire, electric shock
or injury to persons.
Ensure proper installation and
servicing. This appliance must be
properly installed and grounded by
a qualified technician.
Have your installer show you where
the fuse or junction box is located in
your home. Learn how and where to
turn off the electricity to the
rangetop.
Always use dry pot holders when
removing pans from the rangetop.
Wet or damp pot holders can cause
steam burns. Do not use a towel or
bulky cloth in place of pot holders.
Do not use the appliance to warm
or heat the room.
Do not repair or replace any part of
the rangetop unless specifically
recommended in literature accompa-
nying this appliance. All service
should be referred to a qualified
technician.
SAFETY INSTRUCTIONS AND PRECAUTIONS
Never leave the rangetop
unattended when in use.
Do not leave children alone or
unattended in the area where the
rangetop is in use. Never allow
children to sit or stand on any part
of the rangetop. Do not let children
play with the rangetop.
Do not store items of interest to
children above or at the back of the
rangetop, as they could climb on the
appliance to reach items and be
injured.
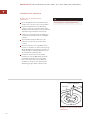
Do not use water on grease fires.
Smother any flames with a lid,
baking sheet or metal tray. Flaming
grease can be extinguished with
baking soda or a multipurpose
chemical or foam extinguisher.
Do not heat unopened food contain-
ers, as they could burst and cause
injury.
Do not store combustible, flamma-
ble or explosive materials near
burners, oven or adjacent cabinets
or let grease or other flammable
substances accumulate on the
rangetop.
NEVER use this appliance as a
space heater to heat or warm the
room. Doing so may result in
carbon monoxide poisoning and
overheating of the rangetop.

7
In the event that a burner goes out
and gas escapes, open a window or
a door. Wait at least five minutes
before using the rangetop.
Do not obstruct the flow of air. Your
kitchen must have an adequate
supply of fresh air to ensure proper
combustion and ventilation.
When cooking, set burner controls
so that the flame does not extend
beyond the bottom of the pan.
Always turn pan handles inward so
they do not extend over adjacent
work areas, burners or the edge of
the rangetop.
TOP SURFACE BURNERS
Have your installer show you where
the gas supply shut-off valve is
located in your home. Learn how
and where to turn off the gas to the
rangetop.
Before performing any service, turn
off the gas supply by closing the gas
shut-off valve and turn off the elec-
tricity.
Keep igniters clean and dry for
proper lighting and performance of
the burners.
Keep appliance area clear and free
from combustible material.

8
SAFETY INSTRUCTIONS AND PRECAUTIONS
Always light each burner prior to
placing a pan on the burner grate.
Also, turn the control knob to the
position before removing a pan from
the burner grate.
Keep any ventilation filters clean to
avoid grease fires.
Do not clean the rangetop while it is
still hot. If using a damp sponge or
cloth, wait until the rangetop has
cooled sufficiently to prevent steam
burns. Also, some cleaners can
produce harmful or unpleasant
fumes if applied to hot surfaces.
Refer to Care Recommendations
on pages 24–25.
Always set pans gently onto the
grates and center them so that they
are well balanced.
TOP SURFACE BURNERS
Always check the positions of the
control knobs to make certain the
rangetop and top surface burners
are off when you are finished
cooking.
When deep fat frying, be certain that
the pan is large enough to accom-
modate the desired volume of food
without overflow caused by
bubbling of the fat. Never leave a
deep fat fryer unattended. Avoid
deep fat frying of moist or frost-
covered foods, as foods with high
water content may cause spattering
or spilling of the hot fat. Heat fat
slowly, and stir together any combi-
nations of oils and fats prior to
applying heat. Utilize a deep fat
frying thermometer to avoid heating
the fat to temperatures above the
flash point.

9
When using the rangetop, do not
touch the grates, burner caps,
burner bases or any other parts in
proximity to the flame. These
components may be hot enough to
cause burns.
If the rangetop is near a window, do
not use long curtains as a window
treatment, as they could blow over
the rangetop and create a fire
hazard.
Boilovers and greasy spills may
smoke or ignite.
Do not store or use gasoline or
other flammable vapors and liquids
in the vicinity of this or any other
appliance.
Choose pans with easily grasped
handles that will stay cool while
cooking. Refer to Cookware Selec-
tion on page 23.
TOP SURFACE BURNERS
Do not allow aluminum foil, plastic,
paper or cloth to come in contact
with a hot burner or grate. Do not
allow pans to boil dry.
Start the ventilation hood approxi-
mately five minutes before cooking
on the rangetop or top surface
burners; this establishes an air
curtain and improves the capture of
vapor and moisture.
Do not cover the burners and grates
with anything except properly
selected utensils. Decorative covers
should not be used.
Wear proper apparel. Never let loose
clothing or other flammable materi-
als come in contact with the burners
while in operation. Fabric may ignite
and cause personal injury.

10
RANGETOP FEATURES
Available in natural (I2H, I2E and I2E+)
and LP (I3P) gas
Classic stainless steel exterior finish with
island trim
Distinctive red or black control knobs
Platinum bezels surround all knobs—
chrome or brass bezels optional
Dual stacked, sealed surface burners, all
with simmer capabilities and automatic
reignition at all settings
4.6 kW (286 g/h) burners with .9 kW
(57 g/h) delivered at simmer
2.8 kW (179 g/h) burner with .55 kW
(43 g/h) delivered at simmer and melt
feature
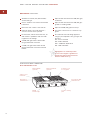
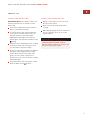
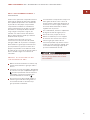
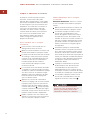
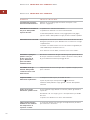
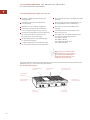
WOLF SEALED BURNER RANGETOP FEATURES
This appliance is certified by Star-K
to meet strict religious regulations in
conjunction with specific instructions
found on www.star-k.org.
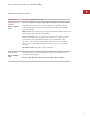
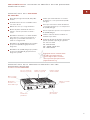
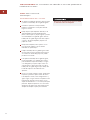
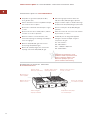
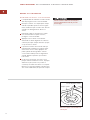
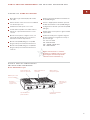
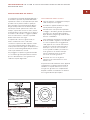
SEALED BURNER RANGETOP
Model ICBSRT484CG shown
Continuous cast
iron top grates
Control knobs with
platinum bezels
Griddle
indicator light
Stainless steel
island trim
Infrared griddle
(optional)
Infrared charbroiler
(optional)
Dual stacked,
sealed burners
Optional 279 mm infrared 5.8 kW (378 (g/h)
charbroiler
Optional 279 mm infrared 5.5 kW (336 g/h)
griddle or double griddle
Optional 4.6 kW (286 g/h) French Top
Porcelain-coated cast iron continuous top
grates
CE certified for the following appliance
category and adjusted to the gas type and
pressure:
I3P – G31 at 37 mbar
I2E – G20 at 20 mbar
I2E+ – G20/25 at 20/25 mbar
I2H – G20 at 20 mbar
Location of rating
plate

11
WOLF SEALED BURNER RANGETOP FEATURES
RANGETOP ACCESSORIES
These optional accessories are available
through your Wolf dealer. To obtain local
dealer information, visit the International
section of our website, wolfappliance.com.
127 mm or 254 mm classic stainless
steel riser
508 mm classic stainless steel riser
with shelf
Black control knobs
Bezels in accent colors of chrome or brass
Porcelain cast two-burner wok grate
Porcelain cast two-burner S-grate
High altitude conversion kit
ACCESSORIES
Optional acces-
sories are available
through your Wolf
dealer. To obtain
local dealer infor-
mation, visit the
International
section of our
website,
wolfappliance.com.

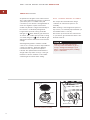
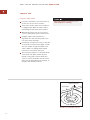
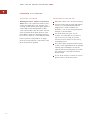
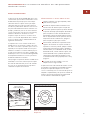
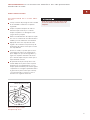
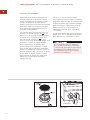
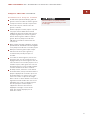
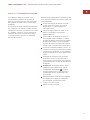
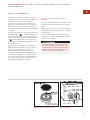
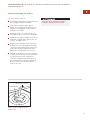
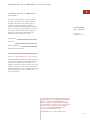
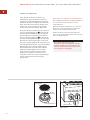
DUAL STACKED BURNER ASSEMBLY
The unique dual stacked burner design
combines all of the burner parts in one
assembly.
After cleaning or removing burner parts for
any reason, it is extremely important that you
reassemble burners correctly.
The burner cap should sit flat on the burner
or you will not get a blue flame. Refer to the
illustration below.
12
SURFACE BURNERS
A spark electrode ignites each surface burner.
This control eliminates the need for continuous
open flame pilots. For added safety and
convenience, each burner is designed with an
electronic reignition system. This feature
enables any burner to relight automatically in
the event it is accidentally extinguished.
Large burners provide a rating of 4.6 kW
(286 g/h) on , with .9 kW (57 g/h) delivered
at simmer. The small burner provides a rating
of 2.8 kW (179 g/h) on , with .55 kW (43 g/h)
delivered at simmer. All burners have simmer
settings.
A distinguishing feature of Wolf’s low kW
control is its constant, low heat output without
continuous ignitions. The flame diameter
remains full size; only the heat output is
lowered. This patented dual stacked burner
design makes it possible to enjoy cooking at
full flame as well as maintain control while
simmering at the lowest flame setting.
WOLF SEALED BURNER RANGETOP OPERATION
Burner Cap
Igniter
Sealed Burner
Dual stacked burner assembly
Nyliner Insertion
Nyliner insertion
Failure to position the burner parts
correctly could cause flames or gas to
escape, causing heat damage to your
range, or burn between parts, resulting
in poor combustion.

13
WOLF SEALED BURNER RANGETOP OPERATION
CONTROL KNOBS
The control knobs are positioned to corre-
spond to the burners they regulate. The knobs
on the far left regulate the burners on the left
side. Conversely, the knobs on the far right
regulate the burners on the right side.
The precision fit of the control knobs requires
the use of a nyliner insertion between the knob
and bezel. When removing knobs for cleaning,
place the nyliner back inside the bezel for easy
reinstallation of the knobs. Refer to the illustra-
tion on page 12.
To light a burner:
push in and turn the corre-
sponding control knob counterclockwise to
setting. You will hear a clicking sound and see
the burner ignite. Once the burner is lit,
continue turning the knob counterclockwise to
any one of the settings— through .
To select a SIMMER setting:
turn the burner
knob to the setting; you will feel a stop
detent in the knob rotation. Push in on the
knob, continuing to turn it counterclockwise.
This moves the flame to the second tier. Now,
select any variation within the flame
settings— through .
Each knob is designed to be a ”push-to-turn”
knob. Although this is a child-safe design,
children should never be left unattended in
the kitchen when the rangetop is in use.
Never leave pans on a setting unat-
tended. Be particularly cautious when
cooking food in fat or grease. It can
become hot enough to ignite.

14
WOLF SEALED BURNER RANGETOP OPERATION
BEFORE USING YOUR RANGETOP
Before using for the first time, you should
clean your rangetop thoroughly with hot water
and a mild detergent. Rinse and dry with a soft
cloth. This removes any residual oil and grease
left on the surface from the manufacturing
process. Refer to Care Recommendations on
pages 24–25.
IMPORTANT NOTE:
Before using your Wolf
sealed burner rangetop, check that the surface
burner caps are positioned correctly.
Griddles and French Tops need to go through
a ”burn in” period to clean oils from the
bottom of these assemblies. To prevent food
from sticking and to protect the surface from
moisture, it is necessary to season the griddle
and French Top prior to use. Refer to the
following pages for specific instructions on
using the optional charbroiler, griddle and
French Top.
The use of proper cookware is very important.
Refer to Cookware Selection on page 23 for
cookware recommendations.
FLAME HEIGHT AND APPEARANCE
Select a flame that is just high enough to
maintain the desired cooking speed and is
sized to fit the base diameter of the pan. Never
extend the flame beyond the base of the pan.
Smaller diameter pans should be used on the
left rear burner.
The flame on natural gas should be blue with a
deeper blue core. There should be minimal
trace of a yellow flame. A yellow flame indi-
cates an improper mixture of air and gas or
impurities in the gas supply to the range. If
this occurs consistently, call a Wolf authorized
service center to adjust the mixture. With LP
gas, some yellow tipping to the flame is
acceptable and may not require an adjustment.
A ”popping” sound may be noticed with LP
gas when the surface burner is turned off. This
is normal.
GRATE PLACEMENT
The low profile, cast iron grates are designed
for a close fit. This enables you to move pans
easily from one burner to another without
having to lift the pan or have it tip over
between the grates. Each grate sets securely
on dimples on each corner of the burner pan.
Continuous grates are interchangeable, exclud-
ing the charbroiler grate with the burner grate.
Position the porcelain-coated, cast iron grates
over two burners. Rubber pads located under
the grate support legs will match up with the
dimples on the burner pans.
The drip pan holds as much as .6 L of liquid
spillover per two-burner pan.

15
WOLF SEALED BURNER RANGETOP OPERATION
To minimize flare-ups when grilling chicken
breasts and thighs, remove the skin. Brush
pieces with peanut or vegetable oil to
reduce sticking to the grate.
If flare-ups occur, quickly move the food to
another place on the grate with long tongs.
Apply basting sauce halfway through
cooking time.
Use a minute timer as a reminder to turn
the food over halfway through cooking
time.
Leave the charbroiler on for approximately
five minutes after grilling is complete. This
allows for easier cleaning after the char-
broiler has cooled sufficiently.
INFRARED CHARBROILER
This optional feature is designed with an
infrared burner to give the highest quality and
most efficient method of gas grilling. A radiant
plate with numerous holes distributes the heat
evenly over the grate. The burner becomes an
orange-red color at the surface of the ceramic
tile, and when it glows, it transfers an intense
heat to the food. This sears the outside of the
food, leaving the inside tender and juicy.
The infrared burner is designed to operate at
5.8 kW (378 g/h) at 100% full heat output.
Before using the charbroiler for the first time,
place the radiant plate slots over the front
deflector of the charbroiler frame. The edges
of the charbroiler grate should line up on top
of the assembly.
CHARBROILER TIPS
Turn on the ventilation hood five minutes
prior to using the charbroiler.
High is the only setting on the knob. If the
knob is not set fully at , the burner may
turn blue and the automatic igniter will
begin sparking. Turn the knob back to .
Always select lean meat or trim fat before
grilling. Flaming may occur when grilling
meat and poultry with excessive fat.
To prevent flare-ups, you must never
leave the charbroiler unattended during
use.

16
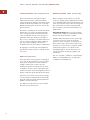
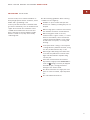
CHARBROILER ASSEMBLY
Follow these steps to disassemble the
charbroiler for cleaning:
1)
Remove the charbroiler grate. Refer to the
illustration below.
2)
Remove the radiant plate. Refer to the
illustration below.
3)
Remove the charbroiler frame.
4)
After cleaning, put the charbroiler frame
back in place.
5)
Line up the slots in the front of the radiant
plate with the front angle. The slots should
fit over the front angle and sit flat on the
charbroiler frame.
6)
Reinstall the charbroiler grate.
WOLF SEALED BURNER RANGETOP
OPERATION
Be careful when assembling the compo-
nents. Avoid any contact with the igniter;
it is fragile and can chip or break.
Radiant
Plate
Front
Angle
Charbroiler radiant plate
Charbroiler
Grate
Charbroiler grate
INFRARED CHARBROILER
CHARBROILER OPERATION
IMPORTANT NOTE:
The stainless steel cover
must be removed prior to operation of the
charbroiler.
Turn the knob counterclockwise to .
Preheat charbroiler for about 10 minutes
before adding the food. The ceramic tiles
will have an orange-red glow.
To turn the charbroiler off, turn the control
knob clockwise to the position.
Do not use cookware on the charbroiler
grate.

17
INFRARED CHARBROILER
CHARBROILER CARE
To keep the charbroiler looking its best, it is
recommended that you clean it after every use.
Charbroiler Grate
(porcelain-coated cast
iron): When cool, lift off and set in the sink.
Use a soft bristle brush to remove food
particles from the grate. Pour very hot
water over the cooked-on residue. Cover
with wet dish towels and pour more hot
water over it. Allow the hot, moist condi-
tions to help loosen the residue. Remove
remaining soil with a soap-filled scouring
pad. Rinse and dry.
Charbroiler Frame
(stainless steel):
Remove from the rangetop. Soak in hot
water and dish detergent. Wash thoroughly,
scrubbing with scouring pad, if needed.
Igniter
(ceramic): Avoid contact with the
igniter; it is fragile and can chip or break.
IMPORTANT NOTE:
Do not use any commer-
cial cleaners on any part of the charbroiler
assembly.
WOLF SEALED BURNER RANGETOP OPERATION
Allow the charbroiler surface to cool
sufficiently before cleaning.

18
WOLF SEALED BURNER RANGETOP OPERATION
GRIDDLE OPERATION
IMPORTANT NOTE:
The stainless steel cover
must be removed prior to operation of the
griddle.
Turn on the ventilation hood five minutes
prior to using the griddle.
To heat the griddle, push in the control
knob and turn counterclockwise to the
desired temperature. It is normal to hear a
clicking sound. This is the electronic
ignition lighting the burner. When the
burner is lit, the thermostat will control the
temperature.
Preheat for approximately 10 minutes.
When the griddle is preheated, the griddle
indicator light will go out. The light will
cycle on and off as the thermostat requires
more heat to maintain the set temperature.
This will allow heat to be evenly distributed
and the griddle to maintain the set
temperature.
The double griddle has two burners with
separate control knobs that act indepen-
dently of each other. If only one griddle is
being used, there will be some heat transfer
to the inactive griddle.
To turn the griddle off, turn the control knob
clockwise to the position.
INFRARED GRIDDLE
The steel griddle plate operates at 5.5 kW
(336 g/h). It is thermostatically controlled,
which means once the set temperature is
reached, the heat cycles to hold that tempera-
ture. To prevent food from sticking and to
protect the surface from moisture, it is neces-
sary to season the griddle prior to use. This
seasoning process as well as general use will
change the appearance of the griddle.
SEASON THE GRIDDLE
Clean the surface with hot water and a mild
detergent. Rinse and dry.
Turn on the ventilation hood five minutes
prior to using the griddle.
The griddle needs to go through a ”burn
in” period. Turn the griddle on at 175˚C for
30 minutes to clean oils from the bottom of
the griddle. After 30 minutes, turn the
griddle off and allow it to cool.
To season, pour 5 ml of peanut or vegetable
oil per 279 mm griddle in the center; spread
evenly with a paper towel, avoiding the
corners. Be careful not to apply too much
oil. Excess oil will leave a gummy residue
that will have to be removed.
Push and turn the control knob to 175˚C.
Heat until you see the first signs of smoke.
Turn the griddle . When the griddle has
cooled and is only slightly warm, wipe off
any excess oil. Let the griddle cool
completely.
Repeat with another teaspoon of oil. The
brown appearance will darken with use.
Be particularly cautious when cooking
food high in fat. It can become hot
enough to ignite.

19
WOLF SEALED BURNER RANGETOP OPERATION
INFRARED GRIDDLE
GRIDDLE CARE
Using a metal spatula, scrape grease into
the grease collection tray.
When the surface has cooled, wipe it with a
paper towel to remove excess grease or oil.
Scrape the griddle clean. Pour .1 L warm
water and 5 ml griddle cleaner onto the
griddle and scrape the grease into the
grease collection tray. Empty the grease
collection tray. Rinse the griddle with .1 L
warm water and dry with paper towels.
Reapply a small amount of peanut or
vegetable oil to the griddle with a clean
cloth after each cleaning.
Clean the grease collection tray after each
use. Do not allow grease to accumulate in
the tray and become a fire hazard.
To remove the grease collection tray, gently
pull the tray toward you to lift it out. Clean
the tray with soapy water and a clean cloth.
To replace, slide the short edge of the
grease collection tray under the edge of the
griddle and lower into the opening.
Occasionally remove the seasoning, clean
the griddle thoroughly and reapply. To
remove, add either white vinegar and water
or club soda to a slightly warm surface.
Scrub with a fine wire brush or a fine-grit
griddle brick. Repeat application if neces-
sary. Be certain to apply a light coat of oil
after cleaning for seasoning.
Allow the griddle surface to cool suffi-
ciently before cleaning.

20
WOLF SEALED BURNER RANGETOP OPERATION
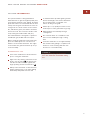
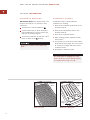
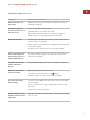
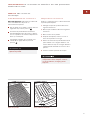
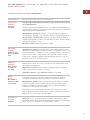
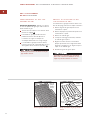
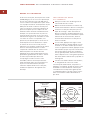
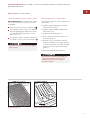
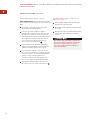
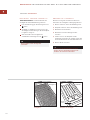
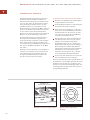
FRENCH TOP
The 4.6 kW (286 g/h) French Top is an optional
feature that provides a 559 mm cooking
surface with the hottest temperature under the
center plate and the lowest temperature near
the edges. This design makes it possible to use
several pans at once for a variety of cooking
tasks. For example, fry chicken toward the
center, while simmering a sauce in one corner
and keeping vegetables warm in a different
corner. Place the pan or pans toward the edge
according to their contents and quantity. Refer
to the illustrations below.
The cooking surface is made of polished cast
iron that is an excellent heat conductor. The
several rings allow for the solid surface to
expand with the heat while remaining flat. The
rings also provide thermal breaks in the cast
iron that distribute the heat in a graduated
intensity, hottest in the center and coolest
around the edges.
To protect the cast iron surface from moisture,
it is necessary to season the French Top prior
to use. This seasoning process as well as
general use will change the appearance of the
French Top.
HIGH
HIGH
HIGH
LOW
LOW
LOW
LOW
MED MED
French Top heating zones
French Top
Center Plate
French Top center plate
SEASON THE FRENCH TOP
Clean surface with detergent and warm
water. Rinse and dry.
Turn on the ventilation hood five minutes
prior to using the French Top.
The French Top needs to go through a
”burn in” period. Turn on the French Top
for 30 minutes to clean oils from the
bottom side of the surface. After 30
minutes, turn the French Top off and
allow it to cool.
To season, spread a light coating of peanut
or vegetable oil on a towel or cloth. While
surface is still slightly warm, apply oil
evenly until it is absorbed into the cast iron.
Use oil sparingly; too much oil will smoke
excessively when heated and leave a
gummy coating that will have to be
removed. Avoid using olive oil; it leaves
a gummy residue.
It is normal for the cast iron to darken with
use to a bluish-black color.
When this seasoning technique is applied
correctly, the surface will be protected from
moisture. Its appearance darkens with use,
a sign that the French Top has been fully
tempered and is properly seasoned. Regular
maintenance will become easier.
Seite wird geladen ...
Seite wird geladen ...
Seite wird geladen ...
Seite wird geladen ...
Seite wird geladen ...
Seite wird geladen ...
Seite wird geladen ...
Seite wird geladen ...
Seite wird geladen ...
Seite wird geladen ...
Seite wird geladen ...
Seite wird geladen ...
Seite wird geladen ...
Seite wird geladen ...
Seite wird geladen ...
Seite wird geladen ...
Seite wird geladen ...
Seite wird geladen ...
Seite wird geladen ...
Seite wird geladen ...
Seite wird geladen ...
Seite wird geladen ...
Seite wird geladen ...
Seite wird geladen ...
Seite wird geladen ...
Seite wird geladen ...
Seite wird geladen ...
Seite wird geladen ...
Seite wird geladen ...
Seite wird geladen ...
Seite wird geladen ...
Seite wird geladen ...
Seite wird geladen ...
Seite wird geladen ...
Seite wird geladen ...
Seite wird geladen ...
Seite wird geladen ...
Seite wird geladen ...
Seite wird geladen ...
Seite wird geladen ...
Seite wird geladen ...
Seite wird geladen ...
Seite wird geladen ...
Seite wird geladen ...
Seite wird geladen ...
Seite wird geladen ...
Seite wird geladen ...
Seite wird geladen ...
Seite wird geladen ...
Seite wird geladen ...
Seite wird geladen ...
Seite wird geladen ...
Seite wird geladen ...
Seite wird geladen ...
Seite wird geladen ...
Seite wird geladen ...
Seite wird geladen ...
Seite wird geladen ...
Seite wird geladen ...
Seite wird geladen ...
Seite wird geladen ...
Seite wird geladen ...
Seite wird geladen ...
Seite wird geladen ...
Seite wird geladen ...
Seite wird geladen ...
Seite wird geladen ...
Seite wird geladen ...
Seite wird geladen ...
Seite wird geladen ...
Seite wird geladen ...
Seite wird geladen ...
Seite wird geladen ...
Seite wird geladen ...
Seite wird geladen ...
Seite wird geladen ...
Seite wird geladen ...
Seite wird geladen ...
Seite wird geladen ...
Seite wird geladen ...
Seite wird geladen ...
Seite wird geladen ...
Seite wird geladen ...
Seite wird geladen ...
Seite wird geladen ...
Seite wird geladen ...
Seite wird geladen ...
Seite wird geladen ...
Seite wird geladen ...
Seite wird geladen ...
Seite wird geladen ...
Seite wird geladen ...
Seite wird geladen ...
Seite wird geladen ...
Seite wird geladen ...
Seite wird geladen ...
Seite wird geladen ...
Seite wird geladen ...
Seite wird geladen ...
Seite wird geladen ...
Seite wird geladen ...
Seite wird geladen ...
Seite wird geladen ...
Seite wird geladen ...
Seite wird geladen ...
Seite wird geladen ...
Seite wird geladen ...
Seite wird geladen ...
Seite wird geladen ...
Seite wird geladen ...
-
 1
1
-
 2
2
-
 3
3
-
 4
4
-
 5
5
-
 6
6
-
 7
7
-
 8
8
-
 9
9
-
 10
10
-
 11
11
-
 12
12
-
 13
13
-
 14
14
-
 15
15
-
 16
16
-
 17
17
-
 18
18
-
 19
19
-
 20
20
-
 21
21
-
 22
22
-
 23
23
-
 24
24
-
 25
25
-
 26
26
-
 27
27
-
 28
28
-
 29
29
-
 30
30
-
 31
31
-
 32
32
-
 33
33
-
 34
34
-
 35
35
-
 36
36
-
 37
37
-
 38
38
-
 39
39
-
 40
40
-
 41
41
-
 42
42
-
 43
43
-
 44
44
-
 45
45
-
 46
46
-
 47
47
-
 48
48
-
 49
49
-
 50
50
-
 51
51
-
 52
52
-
 53
53
-
 54
54
-
 55
55
-
 56
56
-
 57
57
-
 58
58
-
 59
59
-
 60
60
-
 61
61
-
 62
62
-
 63
63
-
 64
64
-
 65
65
-
 66
66
-
 67
67
-
 68
68
-
 69
69
-
 70
70
-
 71
71
-
 72
72
-
 73
73
-
 74
74
-
 75
75
-
 76
76
-
 77
77
-
 78
78
-
 79
79
-
 80
80
-
 81
81
-
 82
82
-
 83
83
-
 84
84
-
 85
85
-
 86
86
-
 87
87
-
 88
88
-
 89
89
-
 90
90
-
 91
91
-
 92
92
-
 93
93
-
 94
94
-
 95
95
-
 96
96
-
 97
97
-
 98
98
-
 99
99
-
 100
100
-
 101
101
-
 102
102
-
 103
103
-
 104
104
-
 105
105
-
 106
106
-
 107
107
-
 108
108
-
 109
109
-
 110
110
-
 111
111
-
 112
112
-
 113
113
-
 114
114
-
 115
115
-
 116
116
-
 117
117
-
 118
118
-
 119
119
-
 120
120
-
 121
121
-
 122
122
-
 123
123
-
 124
124
-
 125
125
-
 126
126
-
 127
127
-
 128
128
-
 129
129
-
 130
130


Sub-Zero ICBSRT484CG Benutzerhandbuch
- Kategorie
- Herde
- Typ
- Benutzerhandbuch
- Dieses Handbuch eignet sich auch für
in anderen Sprachen
- English: Sub-Zero ICBSRT484CG User manual
- français: Sub-Zero ICBSRT484CG Manuel utilisateur
- español: Sub-Zero ICBSRT484CG Manual de usuario
- italiano: Sub-Zero ICBSRT484CG Manuale utente
Verwandte Artikel
Andere Dokumente
-
Wolf ICBDF484CG Use & Care Information Manual
-
Wolf ICBSRT484CG Benutzerhandbuch
-
-
-
-
-
-
-
Klarstein 10045729 Bedienungsanleitung
-
 ToCi 10045721 Bedienungsanleitung
