
DOC022.98.00744
TenSette plus
08/2018, Edition 2
User Manual
Bedienungsanleitung
Manuel de l'utilisateur
Gebruikershandleiding

English..............................................................................................................................3
Deutsch.......................................................................................................................... 17
Français......................................................................................................................... 33
Nederlands....................................................................................................................49
2

Table of contents
Specifications on page 3 Operation on page 7
General information on page 3 Calibration on page 12
Installation on page 5 Maintenance on page 14
Configuration on page 6 Troubleshooting on page 16
Legal information
Manufacturer: Thermo Fisher
Distributor: Hach Lange GmbH
The translation of the manual is approved by the manufacturer.
Specifications
Specifications are subject to change without notice.
Specification Details
Enclosure Pipette: Mechanically and chemically resistant materials (indoor use only)
Tips: natural color polypropylene
Weight 210 g (with battery installed)
Battery Li-ion battery, 950 mAh
Charging temperature 0 to 45 °C (32 to 140 °F)
Power adapter Input voltage: 100–240 V, 50–60 Hz, 180 mA
Output voltage: 5.0 V–0.5 A
Operating temperature 15 to 35 °C (59 to 95 °F)
Storage temperature ≤ 1 month: -20 to 45 °C (-4 to 140 °F) (60±25% relative humidity)
> 1 month: -10 to 20 °C (14 to 68 °F) (60±25% relative humidity)
Relative humidity 20 to 85%, non-condensing
Altitude 2000 m (6562 ft) maximum
Certifications CE
Warranty 1 year (EU: 2 years)
General information
In no event will the manufacturer be liable for direct, indirect, special, incidental or consequential
damages resulting from any defect or omission in this manual. The manufacturer reserves the right to
make changes in this manual and the products it describes at any time, without notice or obligation.
Revised editions are found on the manufacturer’s website.
Safety information
N O T I C E
The manufacturer is not responsible for any damages due to misapplication or misuse of this product including,
without limitation, direct, incidental and consequential damages, and disclaims such damages to the full extent
permitted under applicable law. The user is solely responsible to identify critical application risks and install
appropriate mechanisms to protect processes during a possible equipment malfunction.
English 3

Please read this entire manual before unpacking, setting up or operating this equipment. Pay
attention to all danger and caution statements. Failure to do so could result in serious injury to the
operator or damage to the equipment.
Make sure that the protection provided by this equipment is not impaired. Do not use or install this
equipment in any manner other than that specified in this manual.
Use of hazard information
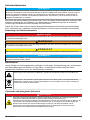
D A N G E R
Indicates a potentially or imminently hazardous situation which, if not avoided, will result in death or serious injury.
W A R N I N G
Indicates a potentially or imminently hazardous situation which, if not avoided, could result in death or serious
injury.
C A U T I O N
Indicates a potentially hazardous situation that may result in minor or moderate injury.
N O T I C E
Indicates a situation which, if not avoided, may cause damage to the instrument. Information that requires special
emphasis.
Precautionary labels
Read all labels and tags attached to the instrument. Personal injury or damage to the instrument
could occur if not observed. A symbol on the instrument is referenced in the manual with a
precautionary statement.
This symbol, if noted on the instrument, references the instruction manual for operation and/or safety
information.
Electrical equipment marked with this symbol may not be disposed of in European domestic or public
disposal systems. Return old or end-of-life equipment to the manufacturer for disposal at no charge to
the user.
Chemical and Biological Safety
D A N G E R
Chemical or biological hazards. If this instrument is used to monitor a treatment process and/or
chemical feed system for which there are regulatory limits and monitoring requirements related to
public health, public safety, food or beverage manufacture or processing, it is the responsibility of the
user of this instrument to know and abide by any applicable regulation and to have sufficient and
appropriate mechanisms in place for compliance with applicable regulations in the event of malfunction
of the instrument.
Normal operation of this device may require the use of chemicals or samples that are biologically
unsafe.
• Observe all cautionary information printed on the original solution containers and safety data
sheets prior to their use.
• Dispose of all consumed solutions in accordance with the local and national regulations and laws.
• Select the type of protective equipment suitable to the concentration and quantity of the dangerous
material being used.
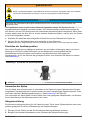
Product overview
The Hach TenSette plus is an electronically assisted pipette for a wide range of liquid handling
operations. Use the Hach TenSette plus with original Hach pipette tips (Item no. BBP068). Thanks to
4
English

the electronic motor and electronic control, pipetting is easy and comfortable, yet still fast and
accurate. It operates on the air displacement principle (i.e., an air interface) and uses detachable,
disposable tips, which are easy to remove with a soft touch tip ejector.
The adjustable, index finger-operated pipetting trigger uses natural hand movement. The Hach
TenSette plus provides many functions that are very practical for daily use in laboratory work, such
as forward, reverse and repetitive pipetting, stepper and diluting modes.
The adjusted delivery volume is clearly indicated in the LCD display on top of the handle. The long
lasting lithium ion battery is always charged with rapid charge technique.
All pipettes are factory calibrated. A Pipette Inspection Report, which covers calibration conditions
and results, is delivered with the pipette.
Product components
Make sure that all components have been received. If any items are missing or damaged, contact the
manufacturer or a sales representative immediately.
• Hach TenSette plus (supplied with installed rechargeable battery, Item no. BBP089)
• Charger (includes external power supply 100–240 V, 50/60 Hz, 15 mmA and power plug adapters
for EU, UK, US, Australia)
• Shelf hanger
• Spare O-ring and tube of grease
• Sample Hach pipette tips
Installation
C A U T I O N
Multiple hazards. Only qualified personnel must conduct the tasks described in this section of the
document.
Connect to power
W A R N I N G
Explosion and fire hazard. Battery substitution is not permitted. Use only batteries that are supplied by
the instrument manufacturer.
W A R N I N G
Fire and explosion hazard. Lithium batteries may get hot, explode or ignite and cause serious injury if
exposed to abuse conditions.
N O T I C E
Use only the original Hach TenSette plus charger and battery.
The pipette battery must be charged before initial use. You can use the pipette while the charger is
connected. The charging time is typically less than one hour. An indicator in the LCD display shows
the charge level of the battery. When the indicator shows an empty battery, pipetting is not possible,
and the pipette must be charged again.
1. Connect the lead of charger to the socket on the back of the pipette.
2. Connect the charger to an AC wall socket.
Note: If the battery is completely empty, it may take a few minutes before the pipette will turn on.
English
5

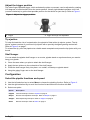
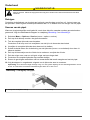
Adjust the trigger position
The index finger-operated trigger, which activates the piston movement, can be adjusted by rotating
it 60 degrees in both directions from the center position. Usually right-handed operators turn it left
(counter-clockwise) to get the best possible position for the thumb to eject the tip. Refer to Figure 1.
Figure 1 Adjust the trigger position
1 Trigger 2 Trigger and finger rest adjustable
Tip ejection
To help eliminate the risk of contamination, the pipette is fitted with a tip ejector system. The tip
ejector system consists of a soft-touch tip ejector with a specially designed gearing mechanism.
Refer to Figure 2 on page 7.
To release the tip, point the pipette at a suitable waste receptacle and press the tip ejector with your
thumb.
Shelf hanger
You can attach the pipette shelf hanger on a counter, pipette stand or anywhere where you want to
hang your pipette.
1. Clean the area where you plan to attach the shelf hanger.
2. Apply the two stickers to the underside of the shelf hanger.
3. Press the shelf hanger firmly into place—on a shelf, countertop or pipette stand.
4. Hang the grippy finger rest on the shelf hanger.
Configuration
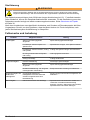
Select the pipette functions and speed
1. Use the left selection key to select Menu to choose the pipetting function. Refer to Figure 2.
2. Use the right selection key to scroll the function list and select the function with OK.
3. Select one option.
Option Description
Pippete Forward technique. Refer to Pipette on page 8.
RPipet Reverse and repetitive technique. Refer to RPipet on page 8.
Stepper Multi-dispensing technique. Refer to Stepper on page 9.
Dilute Dilution technique. Refer to Dilute on page 9.
6 English

Option Description
Program Select the program number from 1 to 9. Default volumes: 0.2, 0.4, 0.5, 1.0, 1.3, 2.0, 2.3, 2.5,
5.0 mL
Options Calibrate: Calibration mode. Select between:
• Two points: two points calibration.
• One point: one point calibration.
• Counter: Displays number of pipettings since last calibration.
Service: The piston can be disconnected and reconnected in Service mode. Refer to Maintenance
on page 14.
Name: This function enables user to set a name for the pipette. The name is always shown on the
display when the pipette is in sleep mode. To change the default name:
1. Choose Name from the menu and select Edit. The first digit starts to flash.
2. Change the digit with the scroll key. Move to the next digit with OK. When the last digit is
accepted the name is changed.
Power: With this function the power can be turned off. Pressing any key turns on the power.
Buzzer: The buzzer can be turned on and off with this function.
Version: The software version is displayed.
Backlight: Turn on/off the backlight.
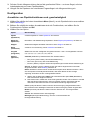
Figure 2 Pipette operation
1 Speed indicator 4 Function 7 Scroll Key
2 Battery indicator 5 Speed-in/-out 8 Tip Ejector Lever
3 Volume indicator 6 Right Selection Key 9 Left Selection Key
Operation
W A R N I N G
Chemical exposure hazard. Obey laboratory safety procedures and wear all of the personal protective
equipment appropriate to the chemicals that are handled. Refer to the current safety data sheets
(MSDS/SDS) for safety protocols.
C A U T I O N
Chemical exposure hazard. Dispose of chemicals and wastes in accordance with local, regional and
national regulations.
English 7

Pipette
1. Choose the Pipette function.
2. Select the pipetting volume simply by pressing the scroll key up or down.
3. Accept the volume with OK. Optionally, select Speed (1 slow to 9 fast) and the speed-in starts to
blink.
4. Select the speed-in with the scroll key and accept with OK.
5. Select the speed-out with the scroll key and accept with OK.
6. Fill a clean reagent reservoir with the liquid to be dispensed.
7. Dip the tip under the surface of the liquid in the reservoir and press the trigger. The liquid is drawn
into the tip.
8. Wait until the liquid is not moving in the tip and withdraw the tip from the liquid touching it against
the edge of the reservoir to remove excess liquid.
9. To deliver the liquid, press the trigger. The blow-out is also included to empty the tip.
10. Change the tip and continue pipetting.
RPipet
With the RPipet function both, reverse and repetitive techniques, are possible.
1. Choose the RPipet function.
2. Press the scroll key up or down to select the pipetting volume.
3. Accept the volume with OK.
4. Select Speed and the speed-in starts to blink.
a. Select the speed-in with the scroll key and accept with OK.
b. Select the speed-out with the scroll key and accept with OK.
Reverse technique
The reverse technique is suitable for dispensing liquids that have a high viscosity or a tendency to
foam easily. The technique is also recommended for dispensing very small volumes.
1. Fill a clean reagent reservoir with the liquid to be dispensed.
2. Dip the tip under the surface of the liquid and press the trigger. This action will fill the tip.
3. Withdraw the tip from the liquid touching it against the edge of the reservoir to remove excess
liquid.
4. Deliver the preset volume by shortly pressing the trigger. Some liquid will remain in the tip and
this should not be included in the delivery. Blowout is displayed.
5. To empty the tip, press the trigger again.
6. Change the tip and continue pipetting.
Repetitive technique
The repetitive technique offers a rapid and simple procedure for repeated delivery of the same
volume.
1. Fill a clean reagent reservoir with the liquid to be dispensed.
2. Dip the tip under the surface of the liquid and press the trigger. This action will fill the tip.
3. Withdraw the tip from the liquid touching it against the edge of the reservoir to remove excess
liquid.
4. Deliver the preset volume by pressing and holding the trigger down. Some liquid will remain in the
tip and this should not be included in the delivery.
5. Dip the tip again to reagent reservoir and release the trigger. This action will fill the tip again.
8
English

6. Continue pipetting by repeating steps 3 and 4.
7. To empty the tip completely, dispense by shortly pressing the trigger. Some liquid will remain in
the tip and this should not be included in the delivery. Blowout is displayed.
8. To empty the tip completely, press the trigger again.
9. Change the tip and continue pipetting.
Stepper
With the Stepper function repeated dispensing of selected volume is possible.
1. Choose the Stepper function.
2. Push the scroll key up or down to select the pipetting volume.
Note: The display shows always the maximum number of steps during volume selection.
3. Accept the volume with OK.
4. Choose the number of steps with the scroll key and accept with OK.
Note: Optionally select the speed.
5. Select Speed and the speed-in starts to blink.
6. Select the speed-in with the scroll key and accept with OK.
7. Select the speed-out with the scroll key and accept with OK.
8. Fill a clean reagent reservoir with the liquid to be dispensed.
9. Dip the tip under the surface of the liquid and press the trigger. This action will fill the tip.
10. Withdraw the tip from the liquid touching it against the edge of the reservoir to remove excess
liquid.
11. Deliver the preset volume by pressing the trigger. The display shows the number of steps left.
12. Continue dispensing by repeating step 9. After the last step, Blowout is displayed.
13. To empty the tip completely, press the trigger.
14. Change the tip and continue pipetting.
Note: The pipette can be emptied at any time by pressing Cancel (left selection key, refer to Figure 2
on page 7).
Dilute
With the Dilute function dispensing of two selected volume is possible.
1. Choose the Dilute function. The first volume (VOL 1) is shown on display.
2. Push the scroll key up or down to select the first volume.
3. Accept the volume with OK.
4. Select the second volume (VOL 2) with the scroll key and accept with OK.
Note: Optionally select the speed.
5. Select Speed and the speed-in starts to blink.
6. Select the speed-in with the scroll key and accept with OK.
7. Select the speed-out with the scroll key and accept with OK.
8. Fill a clean reagent reservoir with the liquid to be dispensed.
9. Dip the tip under the surface of the first liquid in the reservoir and press the trigger. The first
volume is drawn in to the tip. Air (air buffer) is displayed.
10. Withdraw the tip from the liquid touching it against the edge of the reservoir to remove excess
liquid. Press the trigger again to aspirate air buffer.
11. Dip the tip under the surface of the second liquid and press the trigger. The second volume is
drawn in to the tip.
12. Withdraw the tip from the liquid.
English
9

13. To deliver both volumes, press the trigger. The blow-out is also included to empty the tip.
14. Change the tip and continue pipetting.
Program
Programs are stored settings that can be edited, stored and retrieved. Under the Program function
the following volumes are default: 0.2, 0.4, 0.5, 1.0, 1.3, 2.0, 2.3, 2.5 and 5.0 mL. When working with
the mode Program, the scroll key selects the program and it is a very fast way to switch between
different settings. Additional functions such as mixing, counter, etc. are also available in the mode
Program. To change the default volumes, choose Edit.
It is also possible to replace default volumes by additional functions. Refer to Additional functions in
mode Program on page 10.
Additional functions in mode Program
Mix + Pipette
This function adds an automatic mixing step after normal pipetting.
1. Select Program > Edit, then select with the scroll key Mix + Pipette and accept with OK.
2. Select the desired volume with the scroll key and accept with OK.
3. Select the pipetting speeds accordingly. After dispensing the volume, Mix is displayed. By
pressing the trigger the pipette starts to pipette approximately 70% of the selected volume several
times as long as the trigger is held pressed. After releasing the trigger the pipette stops after next
dispensing and Blowout is displayed.
A normal blow-out function is done by pressing the trigger and the pipette is again ready for next
pipetting.
Pipette + Count
This function adds an automatic count number to each pipetting step.
1. Select Program > Edit, then select with the scroll key Pipette + Count and accept with OK.
2. Select the desired volume with the scroll key and accept with OK.
3. Select the pipetting speeds accordingly.
4. Next choose the maximum number of pipettings, the default value is 999.
Note: After the maximum number of pipettings is reached, the counter returns to zero. The counter can be
reset at any time to zero by pressing the scroll key down > OK; scroll key up > OK.
Seq stepper
The sequential stepper mode enables serial dispensing of different volumes (in normal stepper mode
only fixed volume).
1. Select Program > Edit, then select with the scroll key Seq stepper and accept with OK.
2. Select the amount of dispensings (maximum 20) with the scroll key and accept with OK. VOL 1 is
displayed and the highest possible volume is flashing.
3. Select the first volume with the scroll key and accept with OK. Now VOL 2 is displayed and the
highest possible volume is flashing.
4. Select the second volume with the scroll key and accept with OK. After selecting the last volume,
the total volume is shown on the display and speed-in is flashing. Select the pipetting speeds and
the pipette is ready for pipetting.
5. Fill a clean reagent reservoir with the liquid to be dispensed.
6. Dip the tip under the surface of the liquid in the reservoir and press the trigger. This action will fill
the tip and the first volume is displayed.
7. Withdraw the tip from the liquid touching it against the edge of the reservoir to remove excess
liquid.
10
English

8. Deliver the first volume by pressing the trigger. The display shows the next volume.
9. Continue dispensing by repeating step 3. After the last step, Blowout is displayed.
10. To empty the tip completely, press the trigger.
11. Change the tip and continue pipetting.
Note: The pipette can be emptied at any time by pressing Cancel (left selection key, refer to Figure 2
on page 7).
Mix + Dilute
1. Select Program > Edit, then select with the scroll key Mix + Dilute and accept with OK.
2. Select the pipetting first volume by pressing the scroll key up or down.
3. Accept the volume with OK.
4. Select the second volume (VOL 2) with the scroll key and accept with OK.
5. Select the pipetting speeds.
6. Fill a clean reagent reservoir with the liquid to be dispensed.
7. Dip the tip under the surface of the first liquid in the reservoir and press the trigger. The first
volume is drawn in to the tip. Air is displayed.
8. Withdraw the tip from the liquid touching it against the edge of the reservoir to remove excess
liquid. Press the trigger again to aspirate the air buffer.
9. Dip the tip under the surface of the second liquid and press the trigger. The second volume is
drawn in to the tip.
10. Withdraw the tip from the liquid.
11. To deliver the both volumes, press the trigger. Mix is displayed.
12. By pressing the trigger the pipette starts to pipette approximately 70% of the total volume several
times as long as the trigger is held pressed.
13. After releasing the trigger, the pipette stops after the next dispensing and Blowout is displayed.
14. Withdraw the tip from the liquid and press the trigger and hold it down to empty the tip.
15. Release the trigger to return to the ready position.
16. Change the tip and continue pipetting.
Manual
With manual mode it is possible to measure volumes. In manual mode only slower speeds are
available to ensure a quick stop.
1. Select Program > Edit, then select with the scroll key Manual and accept with OK.
2. Then select a limit for the total volume, the default is the maximum volume.
3. Select the pipetting speeds. 0.00 is then displayed.
4. Fill a clean reagent reservoir with the liquid to be dispensed.
5. Dip the tip under the surface of the liquid in the reservoir and press the trigger. The liquid is drawn
in to the tip and the actual volume is shown on the display.
6. The pipetting direction can be changed with the In/Out key (left selection key, refer to Figure 2
on page 7).
7. To deliver the liquid, select the Out key (down direction) and press the trigger.
8. To deliver the rest of the liquid, press the trigger and hold it down and hold it down to empty the
tip completely.
9. Change the tip and continue pipetting.
Note: The volume display can be reset to zero at any time by pressing Reset with the right selection key. Refer
to Figure 2 on page 7.
English
11

Seq + Aspirate
The sequential aspirate mode enables serial aspirating of different volumes.
1. Select Program > Edit, then select with the scroll key Seq + Aspirate and accept with OK.
2. First choose the number of volumes (maximum 20) with the scroll key and accept with OK. VOL 1
is displayed and the highest possible volume is flashing.
3. Select the first volume with the scroll key and accept with OK. Now VOL 2 is displayed and the
highest possible remaining volume is flashing.
4. Select the second volume with the scroll key and accept with OK. After selecting the last volume,
the total volume is shown on display and speed-in is flashing for selecting the pipettings speeds.
After selecting the speeds, the first volume is shown on the display and the pipette is ready for
pipetting.
5. Fill a clean reagent reservoir with the liquid to be dispensed.
6. Dip the tip under the surface of the liquid and press the trigger. This action will take up first
volume and the next volume is displayed.
7. Withdraw the tip from the liquid touching it against the edge of the reservoir to remove excess
liquid.
8. Dip the tip under the surface of the next liquid and press the trigger. This action will take up the
current volume and the next volume appears on the display.
9. Repeat steps 2 and 3 until last volume is drawn into the tip. The total volume is shown on the
display.
10. Deliver the total volume by pressing the trigger and hold it down to empty the tip.
11. Release the trigger to return to the ready position.
12. Change the tip and continue pipetting.
Note: The pipette can be emptied at any time by pressing Cancel left selection key. Refer to Figure 2
on page 7.
Calibration
All Hach TenSette plus are factory calibrated and adjusted to give the volumes as specified with
distilled or deionized water. Normally, the pipettes do not need adjustment, but they are constructed
to permit recalibration and adjustment for liquids of different temperature and viscosity.
Device requirements and test conditions
An analytical balance must be used. The scale graduation value of the balance should be chosen
according to the selected test volume of the pipette. Refer to Table 1.
If the uncertainty of measurement of the balance is known, this may be used instead of the
repeatability and linearity.
Test liquid: Water, distilled or deionized, “grade 3” water conforming ISO 3696. Tests are done in a
draft-free room at a constant (±0.5 °C/ ±33 °F) temperature of water, pipette and air between 15 °C
(59 °F) to 30 °C (86 °F). The relative humidity must be above 50%.
Table 1 Test conditions
Volume range Readable graduation Precision repeatability(s) and
linearity
Uncertainty of measurement
10 to 100 µL 0.01 mg 0.02 mg 0.02 µL
> 100 µL 0.1 mg 0.2 mg 0.2 µL
12 English

Calibration counter
1. Select Menu > Options > Calibrate > Counter to show on the display the number of pipettings
since the last calibration. The counter is reset to zero when the calibration is performed.
Checking the calibration
The pipette calibration is checked with the maximum volume (nominal volume) and with the minimum
volume. A new tip is first pre-wetted 3 to 5 times and a series of ten pipettings are done with both
volumes. A pipette is always adjusted for delivery (Ex) of the selected volume. Measuring volumes
taken from balance is not allowed.
1. Do 10 pipettings with the minimum volume.
2. Do 10 pipettings with the maximum volume.
3. Calculate the accuracy (A) and precision (cv) of both series.
4. Compare the results to the limits in Table 2.
If the calculated results are within the selected limits, the adjustment of the pipette is correct.
Table 2 Maximum permissible errors according ISO 8655
Range Volume (μL) Accuracy Precision
0.2–5 mL 5000 ±40.0 µL ±0.8 % 15.0 s.d. µL 0.3 cv%
200 ±40.0 µL ±20.0 % 15.0 s.d. µL 7.5 cv%
Adjustment
Two point calibration
The two-point calibration is the standard calibration.
1. Do the pipetting series with both maximum and minimum volumes.
2. Calculate the actual results.
3. Select Menu and select Options with the scroll key and accept with OK.
4. Select Calibrate and accept with OK.
5. Select Two points and confirm with OK. The target maximum and target minimum volumes are
shown on the display.
6. Select Edit and change the actual maximum volume with the scroll key and accept with OK.
7. Change the actual minimum volume with the scroll key and accept with OK.
8. Save? is displayed. Accept with Yes.
The adjustment has been changed.
One-point calibration
The one-point calibration can be used if a single specific volume must be calibrated. The calibration
volume can be selected from the entire volume range. Note that the inaccuracy of other volumes
changes also and the performance for other volumes cannot be assured.
1. Do the pipetting series with the calibration volume.
2. Calculate the results.
3. Select Menu and select Options with the scroll key and accept with OK.
4. Select Calibrate and accept with OK.
5. Select One point and confirm with OK. The calibration volume is shown on the display.
6. Select Edit and change the calibration volume with the scroll key and accept with OK.
English
13

7. Change the actual volume with the scroll key and accept with OK.
8. Save? is displayed. Accept with Yes.
The adjustment has been changed.
Formulas for calculating results
Conversion of mass to volume
V = (w + e) × Z
where: V = volume (µL); w = weight (mg); e = evaporation loss (mg); Z = conversion factor for mg/µL
conversion
Evaporation loss can be significant with low volumes. To determine mass loss, dispense water to the
weighing vessel, note the reading and start a stopwatch. See how much the reading decreases
during 30 seconds (e.g. 6 mg = 0.2 mg/s).
Compare this to the pipetting time from tareing to reading. Typically pipetting time might be
10 seconds and the mass loss is 2 mg (10 s x 0.2 mg/s) in this example. If an evaporation trap or lid
on the vessel is used the correction of evaporation is usually unnecessary.
The factor Z is for converting the weight of the water to volume at test temperature and pressure. A
typical value is 1.0032 μl/mg at 22 °C (71.5 °F) and 95 kPa.
Accuracy (systematic error)
Accuracy is the difference between the dispensed volume and the selected volume of a pipette.
A = V – V
0
where: A = accuracy; V = mean volume; V
0
= nominal volume
Accuracy can be expressed as a relative value:
A% = 100% × A / V
0
Precision (random error)
Precision refers to the repeatability of the pipettings. It is expressed as standard deviation (s) or
coefficient of variation (cv).
where:
; S = standards deviation; = mean volume; n = number of measurements
Standard deviation can be expressed as a relative value (cv).
cv = 100% × S /
Maintenance
C A U T I O N
Multiple hazards. Only qualified personnel must conduct the tasks described in this section of the
document.
14 English

Cleaning
The pipette should be checked at the beginning of each day for dust and dirt on the outside surfaces
of the pipette. Particular attention should be paid to the tip cone. No other solvents except 70%
ethanol should be used to clean the pipette.
Pipette lubrication
If the pipette is used daily, it should be checked and lubricated every three months. Do the setps that
follow and refer to Figure 3 and Figure 4.
1. From the menu, select Menu > Options > Service.
2. Press the trigger before disassembling the pipette.
3. Pull down the complete tip cone module.
Note that the tip ejector button is in fully up position.
4. Remove the complete tip cone module by pulling it out
5. Seperate the tip ejector sleeves (top and bottom) by pulling it into two parts.
6. Push the snap fittings to release the cylinder and remove the cylinder.
7. Push forward and clean the piston with a dry napless cloth.
8. Check the the complete tip cone module for foreign particles.
9. Grease the cleaned parts with the lubricant that comes with the pipette.
10. Reassemble the the tip cone module in reverse order.
Note: In order to make the reassembling of the tip cone module easier, position the connecting pieces of the
upper and the lower part accordingly one above the other. Press now both parts together until you hear a “click”
sound.
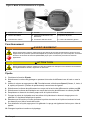
Figure 3 Pipette handle
1 Tip ejector button 2 Trigger
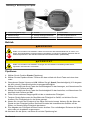
Figure 4 Cone module components
1 Tip ejector sleeve (top side) 4 Cylinder 7 Piston
2 Spring 5 Tip ejector sleeve (bottom side) 8 Connecting cavity
3 O-ring 6 Snap fitting 9 Small fitting
English 15

Storage
When the Hach TenSette plus is not in use, make sure it is stored in an upright position. The use of
the Hach pipette stand (Item no. BBP088) is recommended for this purpose.
Sterilization
W A R N I N G
Burn hazard. Obey safe handling protocols during contact with hot components. Wear the appropriate
protective equipment during maintenance or service activities.
The tip cone module can be sterilized by autoclaving it at 121 °C (250 °F) for 20 minutes. You can
use steam sterilization bags if needed. Disassemble and reassemble the tip cone module. Refer to
Pipette lubrication on page 15.
After autoclaving, the module must be cooled to room temperature for at least two hours. Before
pipetting, make sure that the module is dry. It is recommended to check the calibration after every
sterilization cycle.
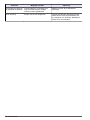
Troubleshooting
Problem Possible cause Solution
Leakage Tip incorrectly attached Attach firmly
Foreign particles between tip and tip cone Clean tip cones. Attach new tips.
Foreign particles between the piston, the
O-ring and the cylinder
Clean and grease the O-ring and cylinder.
Insufficient amount of grease on cylinder
and O-ring
Grease accordingly
O-ring damaged Change the O-ring.
Inaccurate dispensing Incorrect operation Follow the instructions carefully.
Tip incorrectly attached Attach firmly
Calibration altered: caused by misuse, for
example
Recalibrate according to the instructions.
Inaccurate dispensing
with certain liquids
Unsuitable calibration. High viscosity
liquids may require recalibration
Recalibrate with the liquids in question.
Not dispensing Pistons stuck or not connected Remove the tip cone module. Move the
piston by hand or with piston removal tool.
Attach the module in service mode.
16 English

Inhaltsverzeichnis
Technische Daten auf Seite 17 Betrieb auf Seite 22
Allgemeine Informationen auf Seite 17 Kalibrierung auf Seite 28
Installation auf Seite 19 Wartung auf Seite 30
Konfiguration auf Seite 21 Fehlersuche und -behebung auf Seite 32
Rechtsinformation
Hersteller: Thermo Fisher
Vertreiber: Hach Lange GmbH
Die Übersetzung des Handbuchs ist vom Hersteller freigegeben.
Technische Daten
Änderungen vorbehalten.
Technische Daten Details
Gehäuse Pipette: mechanisch und chemisch beständige Materialien (nicht für die
Verwendung im Freien)
Spitzen: Polypropylen, ohne Farbstoffe
Gewicht 210 g (mit Akku)
Akku Lithium-Ionen-Akku, 950 mAh
Ladetemperatur 0 bis 45 °C
Netzadapter Eingangsspannung: 100 – 240 V, 50 – 60 Hz, 180 mA
Ausgangsspannung: 5,0 V; 0,5 A
Betriebstemperatur 15 bis 35 °C
Lagerungstemperatur ≤ 1 Monat: -20 bis 45 °C (relative Luftfeuchtigkeit 60 ± 25 %)
> 1 Monat: -10 bis 20 °C (relative Luftfeuchtigkeit 60 ± 25 %)
Relative Luftfeuchtigkeit 20 bis 85 %, nicht kondensierend
Einsatzhöhe Maximal 2000 m (6562 ft)
Zertifizierungen CE
Garantie 1 Jahr (EU: 2 Jahre)
Allgemeine Informationen
Der Hersteller ist nicht verantwortlich für direkte, indirekte, versehentliche oder Folgeschäden, die
aus Fehlern oder Unterlassungen in diesem Handbuch entstanden. Der Hersteller behält sich
jederzeit und ohne vorherige Ankündigung oder Verpflichtung das Recht auf Verbesserungen an
diesem Handbuch und den hierin beschriebenen Produkten vor. Überarbeitete Ausgaben der
Bedienungsanleitung sind auf der Hersteller-Webseite erhältlich.
Deutsch
17

Sicherheitshinweise
H I N W E I S
Der Hersteller ist nicht für Schäden verantwortlich, die durch Fehlanwendung oder Missbrauch dieses Produkts
entstehen, einschließlich, aber ohne Beschränkung auf direkte, zufällige oder Folgeschäden, und lehnt jegliche
Haftung im gesetzlich zulässigen Umfang ab. Der Benutzer ist selbst dafür verantwortlich, schwerwiegende
Anwendungsrisiken zu erkennen und erforderliche Maßnahmen durchzuführen, um die Prozesse im Fall von
möglichen Gerätefehlern zu schützen.
Bitte lesen Sie dieses Handbuch komplett durch, bevor Sie dieses Gerät auspacken, aufstellen oder
bedienen. Beachten Sie alle Gefahren- und Warnhinweise. Nichtbeachtung kann zu schweren
Verletzungen des Bedieners oder Schäden am Gerät führen.
Stellen Sie sicher, dass die durch dieses Messgerät bereitgestellte Sicherheit nicht beeinträchtigt
wird. Verwenden bzw. installieren Sie das Messsystem nur wie in diesem Handbuch beschrieben.
Bedeutung von Gefahrenhinweisen
G E F A H R
Kennzeichnet eine mögliche oder drohende Gefahrensituation, die, wenn sie nicht vermieden wird, zum Tod oder
zu schweren Verletzungen führt.
W A R N U N G
Kennzeichnet eine mögliche oder drohende Gefahrensituation, die, wenn sie nicht vermieden wird, zum Tod oder
zu schweren Verletzungen führen kann.
V O R S I C H T
Kennzeichnet eine mögliche Gefahrensituation, die zu geringeren oder moderaten Verletzungen führen kann.
H I N W E I S
Kennzeichnet eine Situation, die, wenn sie nicht vermieden wird, das Gerät beschädigen kann. Informationen, die
besonders beachtet werden müssen.
Warnhinweise
Lesen Sie alle am Gerät angebrachten Aufkleber und Hinweise. Nichtbeachtung kann Verletzungen
oder Beschädigungen des Geräts zur Folge haben. Im Handbuch werden auf die am Gerät
angebrachten Symbole in Form von Warnhinweisen verwiesen.
Dieses Symbol am Gerät weist auf Betriebs- und/oder Sicherheitsinformationen im Handbuch hin.
Elektrogeräte, die mit diesem Symbol gekennzeichnet sind, dürfen nicht im normalen öffentlichen
Abfallsystem entsorgt werden. Senden Sie Altgeräte an den Hersteller zurück. Dieser entsorgt die
Geräte ohne Kosten für den Benutzer.
Chemische und biologische Sicherheit
G E F A H R
Chemische und biologische Risiken. Wird das Gerät dazu verwendet, ein Verfahren und/oder eine
chemische Zuleitung zu überwachen, für das vorgeschriebene Grenzwerte und
Überwachungsvorschriften im Bereich der öffentlichen Sicherheit, der Gesundheit oder im Bereich der
Lebensmittel- oder Getränkeherstellung bestimmt wurden, so unterliegt es der Verantwortung des
Benutzers des Geräts, alle solche Bestimmungen zu kennen und diese einzuhalten und für
ausreichende und entsprechende Vorsorgemaßnahmen zur Einhaltung der für den Fall einer
Fehlfunktion des Geräts bestehenden Bestimmung zu sorgen.
18 Deutsch

Beim normalen Betrieb dieses Geräts kann die Nutzung von gesundheitsgefährdenden Chemikalien
oder biologisch schädlichen Proben erforderlich sein.
• Beachten Sie vor dem Umgang mit diesen Stoffen alle, auf den Gebinden der Originallösungen
und im Sicherheitsdatenblatt gedruckten Gefahrenhinweise und Sicherheitsinformationen.
• Entsorgen Sie sämtliche verbrauchte Lösungen in Übereinstimmung mit den nationalen
Vorschriften und Gesetzen.
• Wählen Sie die Art der Schutzausrüstung entsprechend der Konzentration und Menge des
gefährlichen Stoffs am jeweiligen Arbeitsplatz.
Allgemeine Informationen über das Produkt
Die elektronisch gesteuerte Hach TenSette plus eignet sich für eine Vielzahl von Anwendungen mit
Flüssigkeiten. Verwenden Sie die Hach TenSette plus nur mit originalen Hach Pipettenspitzen
(Artikelnr. BBP068). Der Elektromotor und die elektronische Steuerung ermöglichen ein
problemloses und ermüdungsfreies und dennoch schnelles und präzises Pipettieren. Die Pipette
basiert auf dem Luftverdrängungsprinzip (d.h. auf einer Luftschnittstelle). In die Pipette werden
Einweg-Spitzen eingesetzt, die mithilfe eines leichtgängigen Spitzenauswerfers problemlos aus der
Pipette entfernt werden können.
Der einstellbare, mit dem Zeigefinger betätigte Pipettierauslöser ermöglicht eine natürliche
Bewegung der Hand. Die Hach TenSette plus bietet mehrere, für den täglichen Einsatz im Labor
sehr hilfreiche Funktionen wie Vorwärts-, Rückwärts- und Wiederholungspipettieren und Modi für
schrittweise Abgabe oder Verdünnung.
Das eingestellte Abgabevolumen wird deutlich auf der LCD-Anzeige an der Oberseite des Griffs
angezeigt. Der langlebige Lithium-Ionen-Akku wird in einem Schnellladeverfahren aufgeladen. Das
Aufladen ist auch während der Nutzung der Pipette möglich.
Alle Pipetten werden werkseitig kalibriert. Der Pipette liegt ein Pipetteninspektionsbericht bei, in dem
die Bedingungen und Ergebnisse der Kalibrierung aufgeführt sind.
Produktkomponenten
Stellen Sie sicher, dass Sie alle Teile erhalten haben. Wenn Komponenten fehlen oder beschädigt
sind, kontaktieren Sie bitte umgehend den Hersteller oder Verkäufer.
• Hach TenSette plus (im Lieferumfang enthalten: Akku, Artikelnr. BBP089)
• Ladegerät (Netzteil 100 – 240 V, 50/60 Hz, 15 mA und Netzsteckeradapter für EU, GB, USA,
Australien)
• Hängevorrichtung
• Ersatz-O-Ring und eine Tube Schmierfett
• Muster zu Hach Pipettenspitzen
Installation
V O R S I C H T
Mehrere Gefahren. Nur qualifiziertes Personal sollte die in diesem Kapitel des Dokuments
beschriebenen Aufgaben durchführen.
Anschließen an die Stromversorgung
W A R N U N G
Explosions- und Feuergefahr. Eine Substitution der Batterie ist unzulässig. Benutzen Sie nur Batterien,
die vom Geräthersteller geliefert werden.
Deutsch 19

W A R N U N G
Brand- und Explosionsgefahr. Lithiumbatterien können heiß werden, explodieren oder sich entzünden
und schwere Verletzungen verursachen, wenn sie unsachgemäß verwendet werden.
H I N W E I S
Verwenden Sie ausschließlich das Original-Ladegerät für die Hach TenSette plus und ausschließlich den
zugehörigen Akku.
Der Pipettenakku muss vor dem ersten Gebrauch aufgeladen werden. Die Pipette kann mit
angeschlossenem Ladegerät verwendet werden. Die Ladezeit beträgt normalerweise weniger als
eine Stunde. Auf der LCD-Anzeige wird der Ladezustand des Akkus grafisch dargestellt. Wenn diese
Anzeige angibt, dass der Akku leer ist, ist kein weiteres Pipettieren möglich, und der Akku der Pipette
muss erneut aufgeladen werden.
1. Schließen Sie das Kabel des Ladegeräts an die Buchse an der Rückseite der Pipette an.
2. Stecken Sie den Netzkabelstecker des Ladegeräts in eine Steckdose.
Hinweis: Bei einem völlig entleerten Akku kann es einige Minuten dauern, bis sich die Pipette einschaltet.
Einstellen der Auslöserposition
Der mit dem Zeigefinger zu betätigende Auslöser, der den Kolben in Bewegung setzt, kann durch
Drehung um 60 Grad in beide Richtungen von der Mittelposition aus eingestellt werden.
Rechtshändige Anwender drehen den Auslöser normalerweise nach links (gegen den
Uhrzeigersinn), um für den Daumen die günstigste Position zum Auswerfen der Spitze zu erzielen.
Siehe Abbildung 1.
Abbildung 1 Einstellen der Auslöserposition
1 Auslöser 2 Auslöser und Fingerauflage einstellbar
Auswerfen der Spitze
Um die Gefahr einer Kontamination zu vermeiden ist die Pipette mit einem Spitzenauswurf-System
ausgestattet. Das Spitzenauswurf-System besteht aus einer leichtgängigen Spitzenauswerfer-Taste
und einem speziellen Betätigungsmechanismus. Siehe Abbildung 2 auf Seite 22.
Zum Auswerfen der Spitze halten Sie die Pipette über einen geeigneten Abfallbehälter, und drücken
Sie mit dem Daumen den Spitzenauswerfer nach unten.
Hängevorrichtung
Sie können die Hängevorrichtung für die Pipette an einem Tisch, einem Pipettenständer oder einem
anderen geeigneten Ort für die Aufbewahrung der Pipette befestigen.
1. Reinigen Sie die Fläche, auf der Sie die Hängevorrichtung befestigen möchten.
2. Bringen Sie die beiden Klebekissen an der Unterseite der Hängevorrichtung an.
20
Deutsch
Seite wird geladen ...
Seite wird geladen ...
Seite wird geladen ...
Seite wird geladen ...
Seite wird geladen ...
Seite wird geladen ...
Seite wird geladen ...
Seite wird geladen ...
Seite wird geladen ...
Seite wird geladen ...
Seite wird geladen ...
Seite wird geladen ...
Seite wird geladen ...
Seite wird geladen ...
Seite wird geladen ...
Seite wird geladen ...
Seite wird geladen ...
Seite wird geladen ...
Seite wird geladen ...
Seite wird geladen ...
Seite wird geladen ...
Seite wird geladen ...
Seite wird geladen ...
Seite wird geladen ...
Seite wird geladen ...
Seite wird geladen ...
Seite wird geladen ...
Seite wird geladen ...
Seite wird geladen ...
Seite wird geladen ...
Seite wird geladen ...
Seite wird geladen ...
Seite wird geladen ...
Seite wird geladen ...
Seite wird geladen ...
Seite wird geladen ...
Seite wird geladen ...
Seite wird geladen ...
Seite wird geladen ...
Seite wird geladen ...
Seite wird geladen ...
Seite wird geladen ...
Seite wird geladen ...
Seite wird geladen ...
Seite wird geladen ...
Seite wird geladen ...
-
 1
1
-
 2
2
-
 3
3
-
 4
4
-
 5
5
-
 6
6
-
 7
7
-
 8
8
-
 9
9
-
 10
10
-
 11
11
-
 12
12
-
 13
13
-
 14
14
-
 15
15
-
 16
16
-
 17
17
-
 18
18
-
 19
19
-
 20
20
-
 21
21
-
 22
22
-
 23
23
-
 24
24
-
 25
25
-
 26
26
-
 27
27
-
 28
28
-
 29
29
-
 30
30
-
 31
31
-
 32
32
-
 33
33
-
 34
34
-
 35
35
-
 36
36
-
 37
37
-
 38
38
-
 39
39
-
 40
40
-
 41
41
-
 42
42
-
 43
43
-
 44
44
-
 45
45
-
 46
46
-
 47
47
-
 48
48
-
 49
49
-
 50
50
-
 51
51
-
 52
52
-
 53
53
-
 54
54
-
 55
55
-
 56
56
-
 57
57
-
 58
58
-
 59
59
-
 60
60
-
 61
61
-
 62
62
-
 63
63
-
 64
64
-
 65
65
-
 66
66


in anderen Sprachen
- English: Hach TenSette plus User manual
- français: Hach TenSette plus Manuel utilisateur
- Nederlands: Hach TenSette plus Handleiding
Verwandte Artikel

Andere Dokumente
-
Thermo Scientific 4510040 Instructions For Use Manual
-
 Vitlab pipeo Bedienungsanleitung
-
Mettler Toledo Pipette Calibration Module MCP-R Benutzerhandbuch
-
Brand Micro-classic Bedienungsanleitung
-
-
Gilson PIPETMAN P Benutzerhandbuch
-
Gilson PIPETMAN 8X200 Benutzerhandbuch
-
-
-
