
Schnellstartanleitung
DE
Information d‘utilisateur
FR
Gebruikersinformatie
NL
Información de usuario
ES
Informazione degli utenti
IT
Quickstart guide
EN
18-01-2017
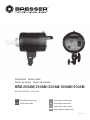
Studioblitz · Studio fl ash
Flash de studio · Flash de estudio
BRM-200AM/250AM/300AM/400AM/500AM
Art. No. F003215 · F003216

DE
Besuchen Sie unsere Website über den folgenden QR Code
oder Weblink um weitere Informationen zu diesem Produkt oder
die verfügbaren Übersetzungen dieser Anleitung zu finden.
EN
Visit our website via the following QR Code or web link to find
further information on this product or the available translations
of these instructions.
FR
Si vous souhaitez obtenir plus d’informations concernant ce
produit ou rechercher ce mode d’emploi en d’autres langues,
rendez-vous sur notre site Internet en utilisant le code QR ou le
lien correspondant.
NL
Bezoek onze internetpagina via de volgende QR-code of
weblink, voor meer informatie over dit product of de beschikbare
vertalingen van deze gebruiksaanwijzing.
ES
¿Desearía recibir unas instrucciones de uso completas sobre
este producto en un idioma determinado? Entonces visite nuestra
página web utilizando el siguiente enlace (código QR) para ver
las versiones disponibles.
IT
Desidera ricevere informazioni esaustive su questo prodotto
in una lingua specifica? Venga a visitare il nostro sito Web al
seguente link (codice QR Code) per conoscere le versioni
disponibili.
www.bresser.de/download/studio_flashes_BRM
www.bresser.de/warranty_terms
GARANTIE · WARRANTy · GARANTíA · GARANzIA

Zu dieser Anleitung | 1
Quickstart_BRM-Flashes_de-en_BRESSER_v012017a 3 / 7
1 Zu dieser Anleitung
HINWEIS
Diese Schnellstart-Anleitung ersetzt nicht die ausführliche Bedienungsanleitung!
Lesen Sie vor Benutzung des Geräts aufmerksam die Sicherheitshinweise und die ausführliche Bedie-
nungsanleitung.
2 Verwendungszweck
– Dieses Gerät ist nicht dafür bestimmt, durch Personen (einschließlich Kinder) mit eingeschränkten
physischen, sensorischen oder geistigen Fähigkeiten oder mangels Erfahrung und/oder mangels
Wissen benutzt zu werden, es sei denn, sie werden durch eine für ihre Sicherheit zuständige Per-
son beaufsichtigt oder erhielten von ihr Anweisungen, wie das Gerät zu benutzen ist.
– Dieses Produkt dient ausschließlich der privaten Nutzung.
– Das Gerät ist nur für den Betrieb in Innenräumen bestimmt!
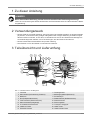
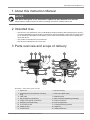
3 Teileübersicht und Lieferumfang
1
2
3
14
13
12
4
1
5
6
8
9
10
11
7
9
24
27
26
25
22
23
15
16
17
18
20
11
8
21
10
19
28
A
B
Abb.1: Teileübersicht für das Blitzgerät
1 Fotozelle 2 Gerätegehäuse
3 Klemmhebel (Aufnahmering Zubehör) 4 Befestigungsdraht (Blitzröhre)
5 Blitzröhre 6 Einstelllampe
7 Nut (S-Bajonettanschluss) 8 Stabaufnahme (Reflektorschirm)
9 Fixierschraube (Stativanschluss) 10 Stativanschluss
11 Klemmschraube (Neigekopf) 12 Sicherungsfach
13 C13-Netzanschlussbuchse 14 Transport-/Tragegriff
15 LAMP-UP-Taste 16 LAMP-Taste
17 EIN/AUS-Schalter 18 LAMP-DOWN-Taste

4 | Zu dieser Anleitung
4 / 7 Quickstart_BRM-Flashes_de-en_BRESSER_v012017a
19 FLASH-DOWN-Taste 20 TEST-Taste
21 Fixierschraube (Stabaufnahme) 22 SOUND-Taste
23 FLASH-UP-Taste 24 SYNC-Anschlussbuchse
25 CELL-Taste 26 Indikatorlampen (1-5) (Blitzsynchronisati-
on)
27 Display 28 C13-Netzkabel mit Euro-Stecker
4 Stromversorgung herstellen
1. Stecken Sie die C13-Kupplung des Netzkabels in die C13-Buchse des Blitzgehäuses.
2. Stecken Sie den Euro-Stecker des Netzkabels in die Steckdose (230V max. Spannung).
3. EIN/AUS-Schalter in Position ‚I‘ bewegen, um das Gerät einzuschalten.
5 Einstelllicht-Modus wählen
1. LAMP-Taste mehrmals drücken, um eine der folgenden Funktion einzustellen. Die gewählte Funk-
tion wird durch Aufleuchten der Indikatorlampe oben oder unten angezeigt.
– Free: Die Leistung des Einstelllichtes kann unabhängig von der Blitzleistung eingestellt wer-
den. Die Indikatorlampe unter der LAMP-Taste leuchtet.
– Prop: Die Die Leistung des Einstelllichtes kann nur in Abhängigkeit zur Blitzleistung eingestellt
werden. Die Indikatorlampe über der LAMP-Taste leuchtet.
2. LAMP-Taste mehrmals drücken bis keine Indikatorlampe leuchtet, um das Einstelllicht vollständig
auszuschalten.
6 Helligkeit des Einstelllichts einstellen
1. LAMP/UP-Taste oder LAMP/DOWN-Taste drücken, um den Wert für die Helligkeit der Einstelllam-
pe zu ändern.
HINWEIS!Der einstellbare Bereich liegt zwischen 1.0 und 6.0, wobei 1.0 der niedrigste Wert und
6.0 der höchste Wert ist.
7 Blitzenergie einstellen
1. FLASH/UP-Taste oder FLASH/DOWN-Taste drücken, um den Wert für die Blitzenergie zu ändern.
HINWEIS!Der einstellbare Bereich liegt zwischen 1.0 und 6.0, wobei 1.0 der niedrigste Wert
und 6.0 der höchste Wert ist.
2. Während des Blitz-Ladevorgangs leuchtet die Indikatorlampe über der TEST-Taste nicht. Leuchtet
die Indikatorlampe, ist der Blitz einsatzbereit.
8 EG-Konformitätserklärung
Eine „Konformitätserklärung“ in Übereinstimmung mit den anwendbaren Richtlinien und ent-
sprechenden Normen ist von der Folux B.V. erstellt worden. Diese kann auf Anfrage jederzeit
eingesehen werden.
9 Garantie
Die reguläre Garantiezeit beträgt 2 Jahre und beginnt am Tag des Kaufs. Um von einer verlängerten,
freiwilligen Garantiezeit wie auf dem Geschenkkarton angegeben zu profitieren, ist eine Registrierung
auf unserer Website erforderlich.
Die vollständigen Garantiebedingungen sowie Informationen zu Garantiezeitverlängerung und Ser-
viceleistungen können Sie unter www.bresser.de/garantiebedingungen einsehen.

About this Instruction Manual | 1
Quickstart_BRM-Flashes_de-en_BRESSER_v012017a 5 / 7
1 About this Instruction Manual
NOTICE
This Quick Start guide is not intended to replace the more detailed user manual.
Please read the safety instructions and the operating instructions carefully before use.
2 Intended Use
– This device is not intended for use by individuals (including children) with limited physical, sensory
or mental capabilities or those lacking in experience and/or knowledge, unless they are supervised
by an individual responsible for their safety or have received instructions from them regarding the
use of the device.
– This product is intended only for private use.
– The device is intended only for indoor use.
3 Parts overview and scope of delivery
1
2
3
14
13
12
4
1
5
6
8
9
10
11
7
9
24
27
26
25
22
23
15
16
17
18
20
11
8
21
10
19
28
A
B
Illustration1: Flash device parts overview
1 Photo cell 2 Device housing
3 Clamping lever (Accessories mounting
ring)
4 Fixing wire (flash tube)
5 Flash tube 6 Modeling lamp
7 Slot (S bayonet connection) 8 Rod connection (reflecting umbrella)
9 Fixing screw (tripod connection) 10 Tripod connection
11 Clamping screw (tilt head) 12 Fuse compartment
13 C13 mains socket 14 Transport/Carrying handle
15 LAMP-UP key 16 LAMP key
17 On/Off switch 18 LAMP-DOWN key

4 | About this Instruction Manual
6 / 7 Quickstart_BRM-Flashes_de-en_BRESSER_v012017a
19 FLASH-DOWN key 20 TEST key
21 Fixing screw (rod connection) 22 SOUND key
23 FLASH-UP key 24 SYNC connection socket
25 CELL key 26 Indicator light (1-5) (flash synchronization)
27 Display 28 C13 power cable with Euro-plug
4 Setting up power supply
1. Put the C13 coupling of the power cable into the C13 socket of the flash device.
2. Put the Euro-plug of the power cable into the wall socket (230V maximum voltage).
3. Move ON/OFF switch to position 'I' to turn on the device.
5 Select modeling light mode
1. Press LAMP key several times to set one of the following functions. The selected function will be
indicated by the indicator light, lighting up above or below the key.
– Free: The modeling light power can be adjusted independently from the flash power. The in-
dicator light below the LAMP key lights.
– Prop: The modeling light power can be adjusted only in dependence to the flash power. The
indicator light above the LAMP key lights.
2. Press LAMP key several times until none of the indicator lights and the modeling light is turned off
completely.
6 Setting the modeling light brightness
1. Press LAMP-UP key or LAMP-DOWN key to change the value for the modeling light brightness.
NOTICE!The setting range is between 1.0 and 6.0, whereby 1.0 is the lowest and 6.0 is the
highest value.
7 Setting the flash power
1. Press FLASH-UP key or FLASH-DOWN key to change value for the flash power.
NOTICE!The setting range is between 1.0 and 6.0, whereby 1.0 is the lowest and 6.0 is the
highest value.
2. During the flash charging process, the indicator above the TEST key will not light. If the indicator
lights, the flash is ready for use.
8 EC Declaration of Conformity
Folux B.V. has issued a "Declaration of Conformity" in accordance with applicable guidelines
and corresponding standards.
9 Warranty
The regular guarantee period is 2 years and begins on the day of purchase. To benefit from an exten-
ded voluntary guarantee period as stated on the gift box, registration on our website is required.
You can consult the full guarantee terms as well as information on extending the guarantee period and
details of our services at www.bresser.de/warranty_terms.


DE
AT
CH
BE
Bei Fragen zum Produkt und eventuellen
Reklamationen nehmen Sie bitte zunächst mit dem
Service-Center Kontakt auf, vorzugsweise per
E-Mail.
E-Mail: [email protected]
Telefon*: +49 28 72 80 74 340
BRESSER GmbH
Kundenservice PSE
Gutenbergstr. 2
46414 Rhede
Deutschland
* Lokale Rufnummer in Deutschland (Die Höhe der Gebühren je Telefonat
ist abhängig vom Tarif Ihres Telefonanbieters); Anrufe aus dem Ausland
sind mit höheren Kosten verbunden.
GB
IE
Please contact the service centre first for any
questions regarding the product or claims,
preferably by e-mail.
e-mail: ser[email protected]
Telephone*: +44 1342 837 098
BRESSER UK Ltd
Unit 1 starborough Farm,
Starborough Road, Nr Marsh Green,
Edenbridge, Kent TN8 5RB
Great Britain
* Number charged at local rates in the UK (the amount you will be charged
per phone call will depend on the tariff of your phone provider); calls from
abroad will involve higher costs.
FR
BE
Si vous avez des questions concernant ce produit
ou en cas de réclamations, veuillez prendre contact
avec notre centre de services (de préférence via
e-mail).
e-mail: [email protected]
Téléphone*: 00 800 6343 7000
BRESSER France SARL
Pôle d'Activités de Nicopolis
260, rue des Romarins
83170 Brignoles
France
* Prix d'un appel local depuis la France ou Belgique
Service
NL
BE
Als u met betrekking tot het product vragen of
eventuele klachten heeft kunt u contact opnemen
met het service centrum (bij voorkeur per e-mail).
e-mail: [email protected]
Teléfono*: +31 528 23 24 76
Folux B.V.
Smirnoffstraat 8
7903 AX Hoogeveen
Nederlands
* Het telefoonnummer wordt in het Nederland tegen lokaal tarief in rekening
gebracht. Het bedrag dat u per gesprek in rekening gebracht zal worden,
is afhankelijk van het tarief van uw telefoon provider; gesprekken vanuit
het buitenland zullen hogere kosten met zich meebrengen.
ES
IT
PT
Si desea formular alguna pregunta sobre el producto
o alguna eventual reclamación, le rogamos que se
ponga en contacto con el centro de servicio técnico
(de preferencia por e-mail).
e-mail: servicio.iberia@bresser-iberia.es
Teléfono*: +34 91 67972 69
BRESSER Iberia SLU
c/Valdemorillo,1 Nave B
P.I. Ventorro del cano
28925 Alcorcón Madrid
España
* Número local de España (el importe de cada llamada telefónica dependen
de las tarifas de los distribuidores); Las llamadas des del extranjero están
ligadas a costes suplementarios.
-
 1
1
-
 2
2
-
 3
3
-
 4
4
-
 5
5
-
 6
6
-
 7
7
-
 8
8


Bresser BRM-300AM studio flash set 3x 300W Bedienungsanleitung
- Typ
- Bedienungsanleitung
- Dieses Handbuch eignet sich auch für
in anderen Sprachen
Verwandte Artikel
-
Bresser F000017 Bedienungsanleitung
-
Bresser BRM-300AM studio flash set 3x 300W Bedienungsanleitung
-
-
Bresser FN-600 Studio Flash Bedienungsanleitung
-
-
Bresser Studio Flashes Set: 2x CM-800 Promotion Package 1 Bedienungsanleitung
-
-
-
Bresser F003196 Bedienungsanleitung
-