*1 Built-in gelatine filter holder Porte de filtre gélatine incorporé Eingebauter Gelatinefilterhalter Soporte de filtro de gelatina incorporado Supporto per filtri in gelatina incorporato
*2 Built-in Incorporé Eingebaut Incorporado Incorporato
Specifications Fiche technique Technische Daten Especificaciones Specifiche tecniche
Angle of view
Angle de champ
Bildwinkel
Augulo de visión
Angolo di campo
Lens construction
Construction
Aufbau
Construcción del objetivo
Struttura dell’obiettivo
Minimum aperture
Ouverture minimale
Kleinste Blende
Abertura mínima
Apertura minima
Max. magnification
Grossissement max.
Stärkste Vergrößerung
Ampliación máx.
Ingrandimento max.
(×)
Min. focusing distance
Distance de mise au point min.
Naheinstellgrenze
Distancia de enfoque mín.
Distanza minima di messa a fuoco
Filter diameter
Diamètre de filtre
Filtergewinde
Diámetro del filtro
Diametro del filtro
Hood
Parasoleil
Gegenlichtblende
Parasol
Paraluce
Max. diameter and length
Diamètre et longueur max.
Max. Durchmesser und Länge
Diámetro y longitud máx.
Diametro e lunghezza max.
Weight
Poids
Gewicht
Peso
Peso
Case
Boîtier
Etui
Estuche
Custodia
Diagonal
Portée diagonale
Diagonal
Diagonal
Diagonale
Vertical
Verticale
Vertikal
Vertical
Verticale
Horizontal
Horizontale
Horizontal
Horizontal
Orizzontale
EF15mm f/2.8 Fish-eye 180° — — 7-8 22 0.14 0.2 m 0.7 ft. *1 *2 73 × 62.2 (2.9” × 2.4”) 330 (11.6 oz.) LP814
EF24mm f/2.8 84° 53° 74° 10-10 22 0.16 0.25 0.8 58 EW-60 II 67.5 × 48.5 (2.7” × 1.9”) 270 (9.5 oz.) LP811
EF28mm f/2.8 75° 46° 65° 5-5 22 0.13 0.3 1 52 EW-65 II 67.4 × 42.5 (2.7” × 1.7”) 185 (6.5 oz.) LP1011
EF35mm f/2 63° 38° 54° 5-7 22 0.23 0.25 0.8 52 EW-65 II 67.4 × 42.5 (2.7” × 1.7”) 210 (7.4 oz.) LP1011
EF50mm f/1.0L USM 46° 27° 40° 9-11 16 0.11 0.6 2 72 ES-79 II 91.5 × 81.5 (3.6” × 3.2”) 985 (34.7 oz.) LP1219
EF50mm f/1.8 46° 27° 40° 5-6 22 0.15 0.45 1.5 52 ES-65 III 67.4 × 42.5 (2.7” × 1.7”) 190 (6.7 oz.) LP1014
EF85mm f/1.2L USM 28°30’ 16° 24° 7-8 16 0.11 0.95 3.2 72 ES-79 II 91.5 × 84 (3.6” × 3.3”) 1025 (36.2 oz.) LP1219
CT1-8540-000 0906SZxx © CANON INC. 2006 PRINTED IN JAPAN 2007.1.1
This device complies with Part 15 of the FCC Rules.
Operation is subject to the following two conditions: (1) This
device may not cause harmful interference, and (2) this
device must accept any interference received, including
interference that may cause undesired operation.
Do not make any changes or modifications to the
equipment unless otherwise specified in the instructions. If
such changes or modifications should be made, you could
be required to stop operation of the equipment.
This equipment has been tested and found to comply with
the limits for a class B digital device, pursuant to part 15 of
the FCC Rules.
These limits are designed to provide reasonable protection
against harmful interference in a residential installation.
This equipment generated, uses and can radiate radio
frequency energy and, if not installed and used in
accordance with the instructions, may cause harmful
interference to radio communications.
However, there is no guarantee that interference will not
occur in a particular installation. If this equipment does
cause harmful interference to radio or television reception,
which can be determined by turning the equipment off and
on, the user is encouraged to try to correct the interference
by one or more of the following measures:
• Reorient or relocate the receiving antenna.
• Increase the separation between the equipment and
receiver.
• Consult the dealer or an experienced radio/TV technician
for help.
This digital apparatus does not exceed the Class B limits
for radio noise emissions from digital apparatus as set out
in the interference-causing equipment standard entitled
“Digital Apparatus”, ICES-003 of the Industry Canada.
Le présent appareil numérique n’émet pas de bruits
radioélectriques dépassant les limites applicables aux
appareils numériques (de la classe B) prescrites dans le
Règlement sur le brouillage radioélectrique édicté par le
ministère des Communications du Canada.
EF Lenses
Instructions
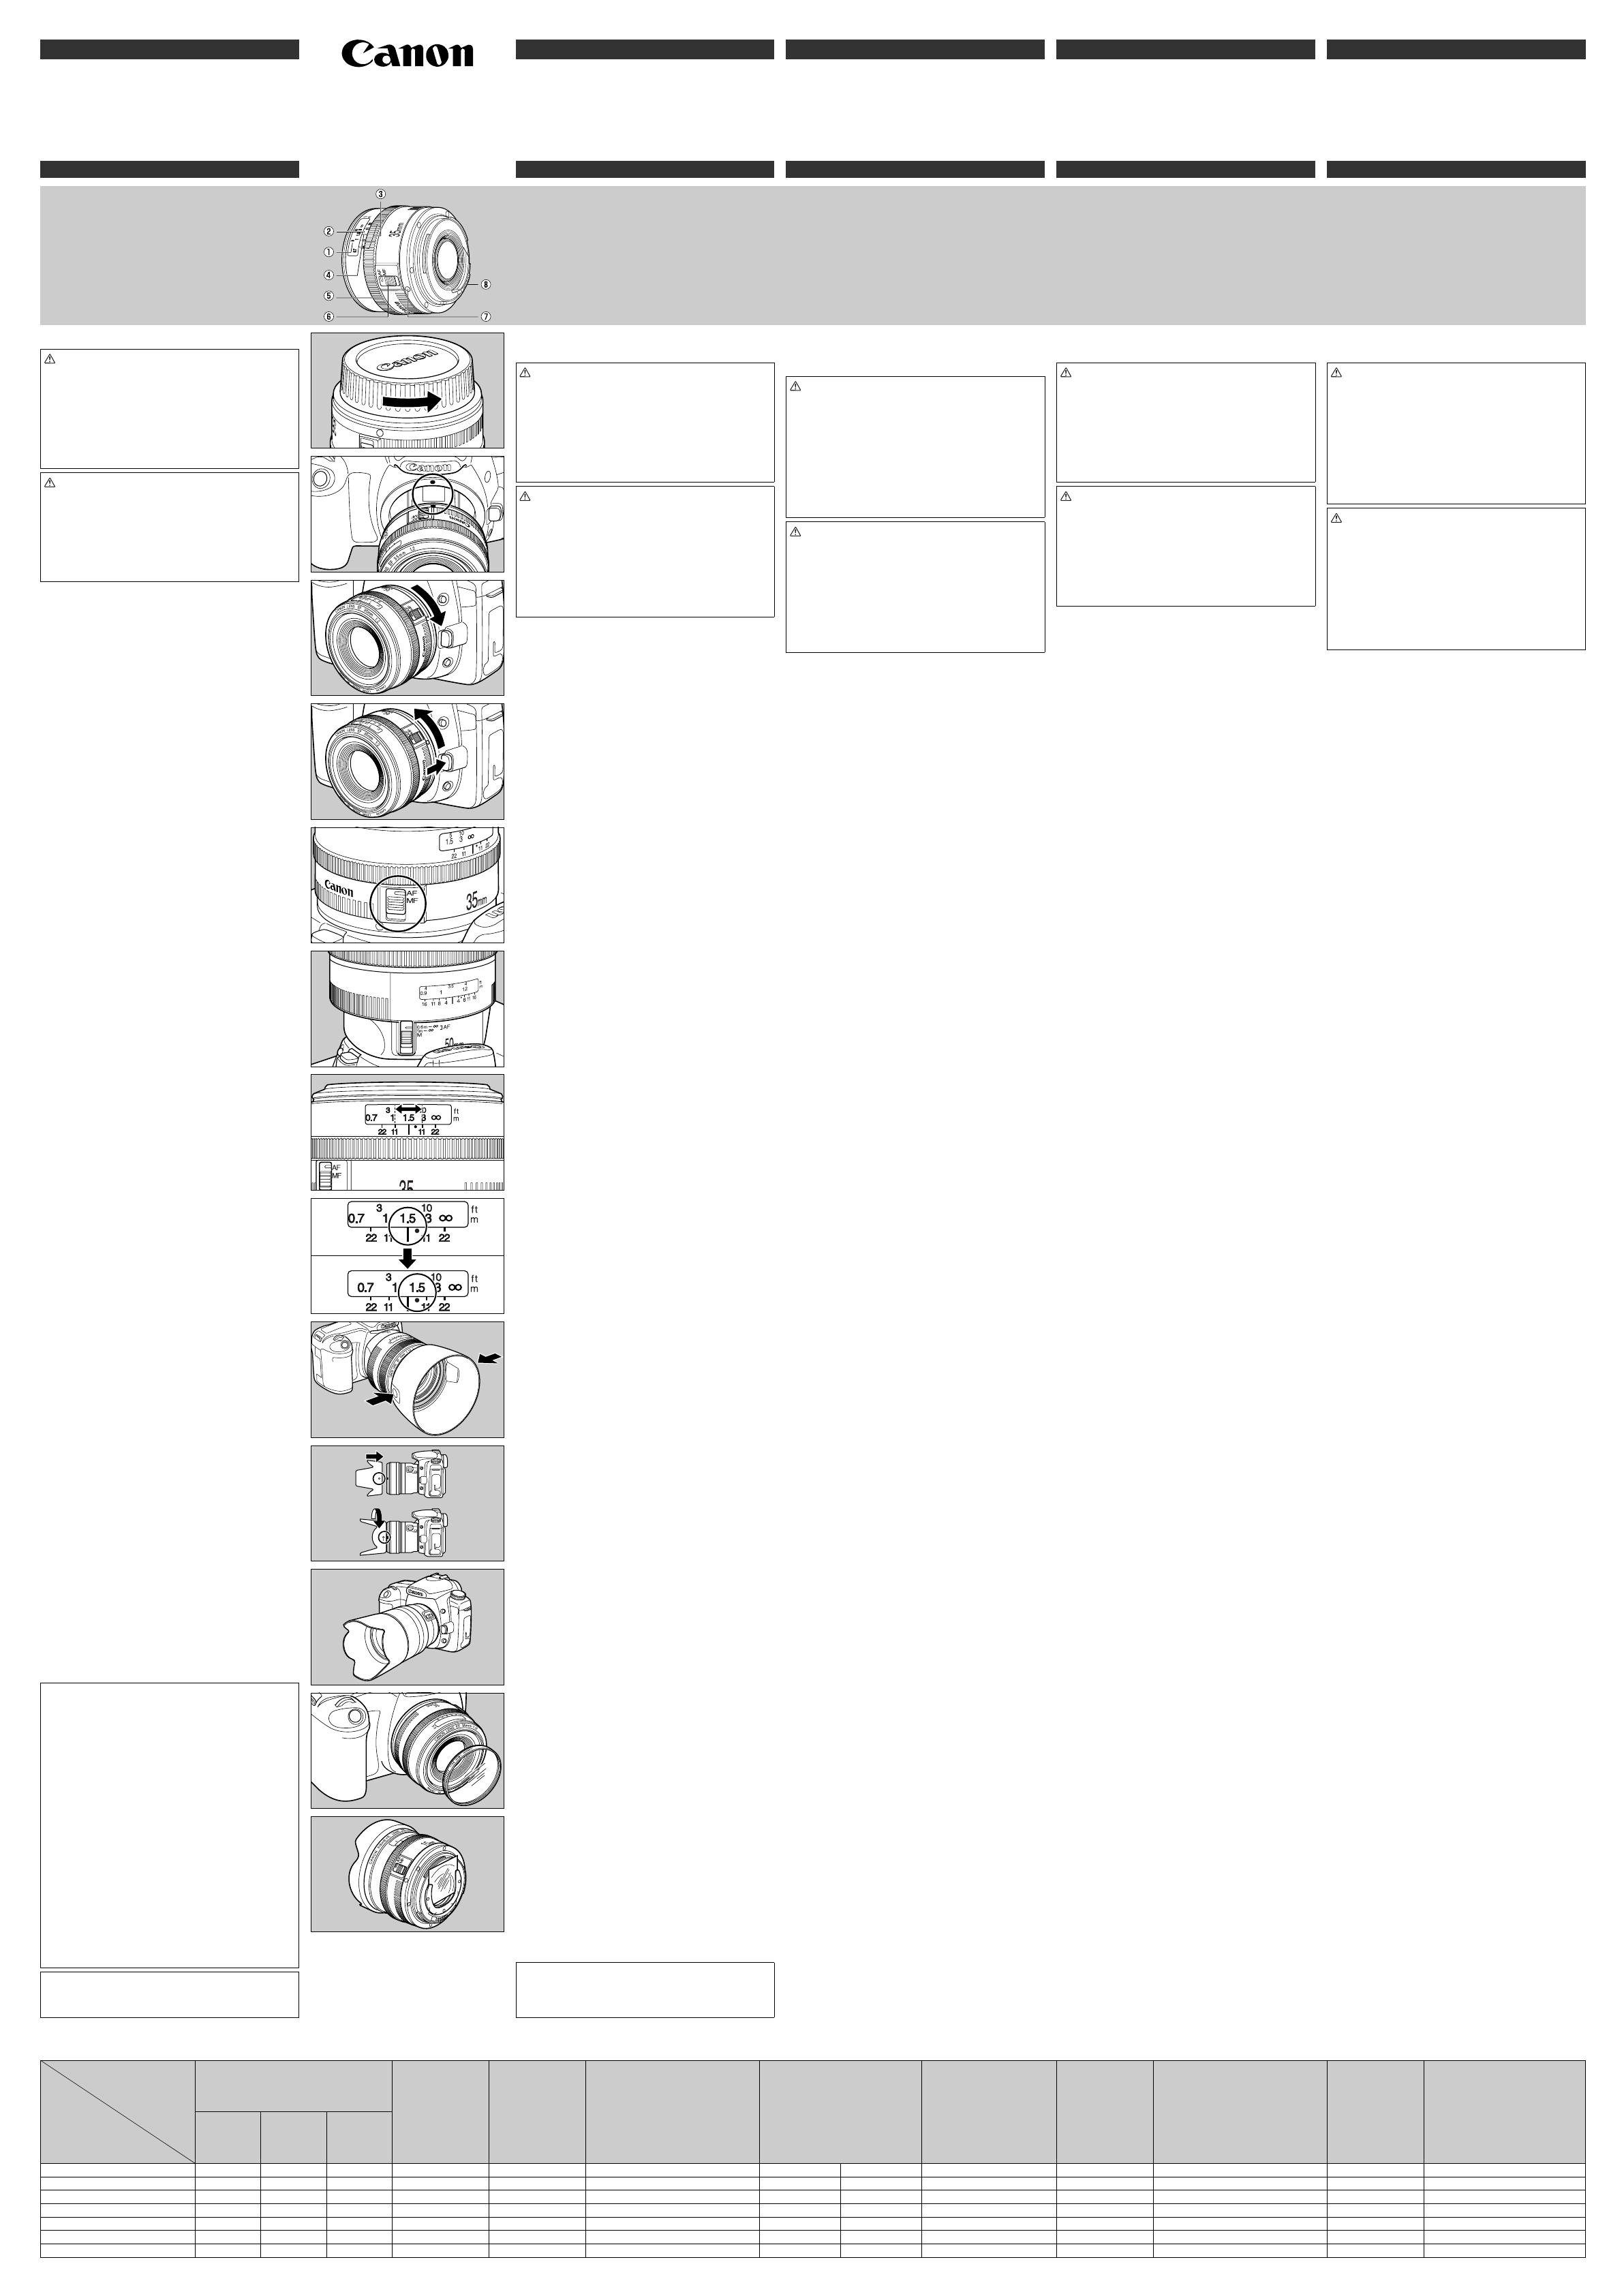
Nomenclature
Distance scale
Infrared index
Depth-of-Field scale
Distance index
Focusing ring
Focus mode switch
Lens mount index
Contacts
Objectifs EF
Mode d’emploi
Nomenclature
Echelle des distances
Repère infrarouge
Repère de profondeur de champ
Repère des distances
Bague de mise au point
Sélecteur de mode de mise au point
Repère de montage d’objectif
Contacts
EF-Objektive
Bedienungsanleitung
Teilebezeichnungen
Entfernungsskala
Infrarot-Index
Schärfentiefe-Skala
Entfernungsindex
Scharfstellring
Fokus-Wahlschalter
Montageindex
Kontakte
EF15mm 1:2,8 Fischauge
EF24mm 1:2,8
EF28mm 1:2,8
EF35mm 1:2
EF50mm 1:1,0L USM
EF50mm 1:1,8
EF85mm 1:1,2L USM
Objetivos EF
Instrucciones
Nomenclatura
Escala de distancias
Indice de infrarrojos
Escala de profundidad de campo
Índice de distancias
Anillo de enfoque
Interruptor del modo de enfoque
Indice de montura del objetivo
Contactos
Wir danken Ihnen für das Vertrauen, das
Sie Canon mit dem Kauf dieses Objektivs
entgegengebracht haben.
Sicherheitsvorkehrungen
1.
Schauen Sie niemals durch das Objektiv oder
die Kamera direkt in die Sonne oder in helles
Licht.
Dies kann zu Erblindung führen! Durch
das abgenommene Objektiv direkt in die Sonne
zu blicken, ist besonders gefährlich!
2.
Aufgesetzt oder von der Kamera abgenommen,
dürfen Sie das Objektiv ohne die schützenden
Objektivdeckel niemals direktem
Sonnenlichteinfall aussetzen.
Das Objektiv
würde die Sonnenstrahlen bündeln und könnte
dadurch einen Brand verursachen!
Zur besonderen Beachtung
Bei Wechsel von einem kalten an einen
warmen Ort kann es an den Linsenoberflächen
und internen Teilen des Objektivs zu
Kondensatbildung kommen.
Um dies zu
vermeiden, schützen Sie das Objektiv mit einem
luftdichten Kunststoffbeutel, und packen das
Objektiv erst dann aus, nachdem es sich an die neue
Temperatur gewöhnt hat. Verfahren Sie genauso,
wenn Sie das Objektiv von einem warmen an einen
kalten Ort bringen.
Umgang mit den Objektiven EF50mm 1:1,0L USM
und EF85mm 1:1,2L USM
• Objektive sind Präzisionsinstrumente und daher
mit Vorsicht zu behandeln. Vor Stößen und
Schlägen schützen.
• Entfernungsskala vor dem Verstauen des Objektivs
auf stellen. Die Gegenlichtblende kann bei
diesen Objektiven nicht umgekehrt aufgesetzt
werden. Gegenlichtblende zum Verstauen des
Objektivs am Objektivdeckel befestigen.
1. Ansetzen und Abnehmen des Objektivs
Anweisungen zum Ansetzen und Abnehmen des
Objektivs entnehmen Sie bitte der Anleitung Ihrer
Kamera.
• Stellen Sie das Objektiv nach dem Abnehmen
hochkant mit der hinteren Seite nach oben ab,
um eine Beschädigung der Kontakte und der
Linsenoberfläche durch Kratzer zu vermeiden.
• Verschmutzungen, Kratzer und Fingerabdrücke
auf den Kontakten können zu Korrosion und
Wackelkontakten führen. Derartige Mängel
beeinträchtigen u. U. die Funktionsfähigkeit von
Kamera und Objektiv.
• Die Objektivkontakte mit einem weichen Tuch von
Verschmutzungen und Fingerabdrücken freihalten.
• Schützen Sie das abgenommene Objektiv mit dem
Deckel gegen Staub. Zum richtigen Aufsetzen
fluchten Sie den Montageindex am Objektiv mit
der Markierung
am Objektivdeckel und drehen
dann den Deckel im Uhrzeigersinn fest. Zum
Abnehmen gegen Sie in umgekehrter Reihenfolge
vor.
2. Einstellen der Scharfeinstellbetriebsart
Zum Fotografieren mit automatischer
Scharfeinstellung stellen Sie den Fokus-Wahlschalter
auf AF (Auto-Fokus) .
Für manuelle Scharfeinstellung stellen Sie den Schalter
auf MF (M) und fokussieren mit dem Scharfstellring.
Wahl des Fokussierbereichs (für EF50mm 1:1,0L
USM)
Bei dieser Objektive lassen sich die zwei folgenden
Fokussierbereiche wählen
.
• 0,6 - : Kurzeste Einstellentfernung bis Unendlich.
• 1 – : 1 m bis Unendlich.
3. Schärfentiefe-Skala
Die Schärfentiefe ist der Bereich vor und hinter
der Brennebene, in dem das Motiv scharf
erscheint. Sie wird dargestellt durch den Abstand
zwischen den Linien der Schärfentiefeskala
unter der Entfernungsskala. Die Zahlen der
Schärfentiefeskala sind F-Werte (Blendenstufen),
sodaß z.B. bei Verwendung des EF35mm 1:2 und einer
Aufnahmeentfernung von 1,5 m und einer Blende von
1:11 der scharfe Bereich von 1,2 m bis 2,8 m reicht.
• Die Schärfentiefeskala gibt Anhaltswerte.
4. Infrarot-Index
Der Infrarot-Index dient zur Berichtigung
der Scharfeinstellung beim Fotografieren mit
Schwarzweiß-Infrarotfilm. Nach der manuellen
Scharfeinstellung drehen Sie den eingestellten
Entfernungs-Index bis zur entsprechenden Infrarot-
Markierung .
Machen Sie die Aufnahmen mit Rotfilter.
• Zur Korrektur der Entfernungseinstellung stellt
man den Fokus-Wahlschalter auf MF (M) und
dreht den Scharfstellring von Hand.
• Die Infrarotindizes wurden für den Einsatz von
Filmmaterial mit eine Spitzenempfindlichkeit von
800 nm zusammen mit einem Rotfilter (wie etwa
Wratten 87) ermittelt.
• Beachten Sie beim Gebrauch von Infrarotfilm auch
die Angaben des Filmherstellers.
5. Gegenlichtblende
EF15mm 1:2,8 Fischauge (Eingebaut)
EF24mm 1:2,8, EF28mm 1:2,8, EF35mm 1:2, EF50mm
1:1,8 (Sonderzubehör)
EF50mm 1:1,0L USM, EF85mm 1:1,2L USM (im
Lieferumfang des Objektivs enthalten)
Bei Einsatz des EF50mm 1:1,0L USM und des
EF85mm 1:1,2L USM empfiehlt sich immer
die Verwendung einer Gegenlichtblende, um
unerwünschten Streulichteinfall zu vermeiden.
Die Gegenlichtblende setzt man wie aus der
Abbildung ersichtlich an das Objektiv an .
• Das EF15mm 1:2,8 Fischauge besitzt eine
eingebaute Gegenlichtblende.
• Zum Aufsetzen der Gegenlichtblende auf
das EF24mm 1:2,8 richten Sie zunächst die
Ansetzmarkierung der Gegenlichtblende auf den
roten Punkt vorn am Objektiv, drehen dann die
Gegenlichtblende im Uhrzeigersinn, bis der rote
Punkt des Objektivs mit der Anschlagmarkierung
der Gegenlichtblende fluchtet , .
6. Filter (separat erhältlich)
Die EF-Objektive besitzen in der vorderen
Objektivfassung ein Gewinde zur Aufnahme von
Schraubfiltern
.
• Es kann nur jeweils ein Filter gleichzeitig
aufgesetzt werden.
• Wird ein Polfilter benötigt, so wählen Sie Canons
PL-C.
Filterhalter für das EF15mm 1:2,8 Fischaugenobjektiv
Dieses Objektiv ist auf der Rückseite mit einem
eingebauten Gelantinefilterhalter ausgestattet
.
Man schneidet die Filterfolien nach der weißen
Markierung auf der Objektivrückseite zu (31 mm ×
31 mm) und schiebt sie in den Halter ein.
Beim Einsatz der EOS-1:
Bei Verwendung des EF50mm 1:1,0L USM kommt
es zu einer leichten Abschattung der Bildecken im
Sucher. Dies hat keinen Einfluß auf die Aufnahme.
Die Objektivlänge wird von der Bajonettfassung
bis zur Vorderseite des Objektivs gemessen. Bei
angebrachten Objektivdeckeln müssen zu dieser
Längenangabe 21,5 mm dazugezählt werden.
(Addieren Sie 16,8 mm für das EF15mm 1:2,8
Fischauge)
Die Angaben für Größe und Gewicht beziehen sich
nur auf das Objektiv.
Änderungen der technischen Daten und des
Designs ohne Vorankündigung vorbehalten.
Obiettivi EF
Istruzioni
Nomenclatura
Scala delle distanze
Indicatore infrarossi
Scala della profondità di campo
Indice della di distanza
Ghiera di messa a fuoco
Selettore modalità di messa a fuoco
Indice attacco obiettivo
Contatti
EF15mm f/2,8 Fish-eye
EF24mm f/2,8
EF28mm f/2,8
EF35mm f/2
EF50mm f/1,0L USM
EF50mm f/1,8
EF85mm f/1,2L USM
Vi ringraziamo di avere acquistato un
obiettivo Canon.
Precauzioni per la sicurezza
1.
Non guardare il sole o una fonte di luce
intensa attraverso l’obiettivo o la fotocamera,
in quanto si potrebbero arrecare seri danni alla
vista. L’osservazione diretta del sole attraverso
l’obiettivo, in particolare, è estremamente
pericolosa.
2.
Evitare di lasciare l’obiettivo esposto alla luce
solare, sia che sia installato sulla fotocamera o
meno, se privo del relativo coperchio.
Le lenti
potrebbero concentrare i raggi solari, generando
delle fiamme.
Precauzioni per l’utilizzo
Quando si trasferisce l’obiettivo da un ambiente
freddo ad un ambiente caldo, è possibile che
si formi della condensa sulla superficie dell’
obiettivo e sui componenti interni.
Per evitare che
questo accada, chiudere l’obiettivo in un sacchetto
di plastica e attendere che sia acclimatato alla
nuova temperatura prima di estrarlo dal sacchetto.
Estrarre l’obiettivo dal sacchetto dopo che si è
riscaldato gradualmente. La stessa procedura deve
essere adottata quando l’obiettivo viene trasferito
da un ambiente caldo ad un ambiente freddo.
Precauzioni per l’utilizzo di EF50mm f/1,0L USM e
EF85mm f/1,2L USM
• Maneggiare l’obiettivo di precisione con cura e
proteggerlo da urti improvvisi e utilizzo improprio.
• Prima di riporre l’obiettivo nell’apposita custodia,
posizionare il paraluce sul coperchio antipolvere e
portare l’obiettivo nella posizione “ ”.
1. Montaggio e smontaggio dell’obiettivo
Per informazioni dettagliate sul montaggio e sullo
smontaggio dell’obiettivo, consultare il manuale di
istruzioni della fotocamera.
• Dopo avere rimosso l’obiettivo dalla fotocamera,
appoggiarlo con la parte posteriore rivolta verso l’
alto in modo da evitare di danneggiare la superficie
della lente o i contatti elettrici.
• Graffi, sporco o impronte sui contatti elettrici
possono dare luogo a problemi di collegamento
e corrosione, il che potrebbe compromettere il
corretto funzionamento della fotocamera e dell’
obiettivo.
• Se vi è sporco o impronte sui contatti elettrici,
pulirli con un panno morbido.
• Quando l’obiettivo non è montato sulla fotocamera,
coprirlo sempre con l’apposito coperchio anti-
polvere. Per fissarlo correttamente, allineare l’
indice di attacco dell’obiettivo all’indicatore sul
coperchio anti-polvere
e ruotare in senso orario.
Per rimuoverlo, eseguire la stessa procedura in
senso inverso
2.
Impostazione della modalità di messa a fuoco
Se si intende scattare foto utilizzando la messa a
fuoco automatica, posizionare il selettore modalità di
messa a fuoco su AF .
Per utilizzare solo la messa a fuoco manuale,
impostare il selettore su MF (M) e ruotare la ghiera di
messa a fuoco.
Impostazione del campo di messa a fuoco (per
EF50mm f/1,0L USM)
Con l’obiettivo è possibile impostare due campi di
messa a fuoco automatica diversi
.
• 0,6 - : Dalla distanza di messa a fuoco ravvicinata
all’infinito.
• 1- : Da 1 m all’infinito.
3. Scala della profondità di campo
La profondità di campo è l’area davanti e dietro
il piano di messa a fuoco di un soggetto la cui l’
immagine appare nitida. La profondità di campo
è indicata dall’area tra le linee della scala della
profondità di campo, nella parte inferiore della scala
delle distanze. I numeri nella scala sono in valori
F/ e, ad esempio, se la distanza di scatto è 1,5 m e il
diaframma è f/11 con EF35mm f/2, l’area nitida si
estenderà da circa 1,2 m a 2,8 m .
• La scala della profondità di campo costituisce un
indicatore approssimativo.
4. Indicatore infrarossi
L’indicatore infrarossi corregge la messa a fuoco
quando si utilizza una pellicola monocromatica all’
infrarosso. Mettere a fuoco manualmente e regolare
la distanza, ruotando la ghiera di messa a fuoco fino
al corrispondente indicatore di infrarosso .
Utilizzare un filtro rosso al momento dello scatto.
• Cambiare la modalità di messa a fuoco in MF
(M) per ruotare la ghiera di messa a fuoco per la
regolazione.
• La posizione degli indicatori infrarossi si basa sull’
utilizzo della pellicola con una sensibilità di picco
di 800 nm e un filtro rosso, ad esempio Wratten 87.
• Seguire le istruzioni del produttore in caso di
utilizzo di una pellicola all’infrarosso.
5. Paraluce
EF15mm f/2,8 Fish-eye (Incorporato)
EF24mm f/2,8, EF28mm f/2,8, EF35mm f/2, EF50mm
f/1,8 (venduto separatamente)
EF50mm f/1,0L USM, EF85mm f/1,2L USM (in
dotazione con l’obiettivo)
Assicurarsi di utilizzare il paraluce per tenere lontana
la luce dei raggi solari per ottenere risultati ottimali
con EF50mm f/1,0L USM e EF85mm f/1,2L USM.
Fissare il paraluce dell’obiettivo come illustrato
.
• Il paraluce EF15mm f/2,8 Fish-eye è incorporato.
• Per montare il paraluce nell’obiettivo EF24mm
f/2,8 allineare il punto di attacco sul paraluce al
punto rosso nella parte anteriore dell’obiettivo,
quindi ruotare il paraluce in senso orario finché il
punto rosso non è allineato all’indicatore di arresto
del paraluce
, .
6. Filtro (venduto separatamente)
Viti del filtro nella parte anteriore dell’obiettivo .
• È possibile montare solo un filtro per volta.
• Se occorre utilizzare un filtro polarizzatore, si
consiglia l’uso del filtro polarizzatore Canon PL-C.
Supporto per il filtro per EF15mm f/2,8 Fish-eye
Questo obiettivo è dotato di un supporto per il filtro
in gelatina incorporato sul lato posteriore
. Per
inserirlo, è sufficiente tagliare il filtro delle stesse
dimensioni (31 mm × 31 mm) delle staffe bianche,
quindi farlo scorrere nel supporto.
Utilizzo EOS-1:
Quando si utilizza EF50mm f/1,0L USM, gli angoli
dell’area dell’immagine diventano leggermente
scuri. Ciò non influirà sull’immagine.
Per lunghezza dell’obiettivo si intende la distanza
tra la superficie di attacco e l’estremità anteriore
dell’obiettivo. Quando sull’obiettivo sono presenti
il coperchio dell’obiettivo e il coperchio anti-
polvere, la lunghezza aumenta di 21,5 mm. (La
lunghezza aumenta di 16,8 mm per EF15mm f/2,8
Fish-eye)
Le misure relative a diametro, lunghezza e peso si
riferiscono al solo corpo dell’obiettivo.
Le specifiche e l’aspetto del prodotto sono soggetti
a modifiche senza preavviso.
Thank you for purchasing a Canon lens.
Safety Precautions
1.
Do not look at the sun or a bright light source
through the lens or camera.
Doing so could
result in loss of vision. Looking at the sun directly
through the lens is especially hazardous.
2.
Whether it is attached to the camera or not, do
not leave the lens under the sun without the
lens cap attached.
This is to prevent the lens from
concentrating the sun’s rays, which could cause a
fire.
Handling Cautions
If the lens is taken from a cold environment
into a warm one, condensation may develop on
the lens surface and internal parts.
To prevent
condensation in this case, first put the lens into an
airtight plastic bag before taking it from a cold to
warm environment. Then take out the lens after it
has warmed gradually. Do the same when taking
the lens from a warm environment into a cold one.
Handling Precautions for EF50mm f/1.0L USM and
EF85mm f/1.2L USM
• Handle these lenses of precision with care and
protect it from sudden shock and abusive handling.
• Before putting the lens in its case, put the lens hood
on the dust cap and set the lens to the “ ” position.
1. Mounting and Detaching the Lens
See your camera’s instructions for details on
mounting and detaching the lens.
• After detaching the lens, place the lens with the
rear end up to prevent the lens surface and contacts
from getting scratched.
• If the contacts get soiled, scratched, or have
fingerprints on them, corrosion or faulty
connections can result. The camera and lens may
not operate properly.
• If the contacts get soiled or have fingerprints on
them, clean them with a soft cloth.
• If you remove the lens, cover it with the dust
cap. To attach it properly, align the lens mount
index and the
index of the dust cap, and turn
clockwise. To remove it, reverse the order.
2. Setting the Focus Mode
To shoot in autofocus mode, set the focus mode
switch to AF .
To use only manual focusing, set the focus mode switch
to MF (M), and focus by turning the focusing ring.
Setting the Focusing Range (for EF50mm f/1.0L
USM)
Two autofocus ranges are selectable with the lens
.
• 0.6- : From closest focusing distance to infinity.
• 1- : From 1m to infinity.
3. Depth-of-Field Scale
The depth of field is the distance in front of and
behind the plane of focus on the subject that appears
sharp. The depth of field is indicated by the area
between the depth-of-field scale lines below the
distance scale. Numbers in the scale are in F values,
and for example, if the shooting distance is 1.5m and
the aperture is f/11 with the EF35mm f/2, the sharp
area will extend from about 1.2m to 2.8m .
• The depth-of-field scale is an approximate indicator.
4. Infrared Index
The infrared index corrects the focus setting when
using monochrome infrared film. Focus on the subject
manually, then adjust the distance setting by moving
the focusing ring to the corresponding infrared index
mark .
Use a red filter also when you take the picture.
• Switch the focus mode to MF (M) to turn the
focusing ring for adjustment.
• The position of the infrared indices is based on film
usage with a peak sensitivity of 800 nm and a red
filter (such as Wratten 87).
• Be sure to observe the manufacturer’s instructions
when using infrared film.
5. Hood
EF15mm f/2.8 Fish-eye (built-in)
EF24mm f/2.8, EF28mm f/2.8, EF35mm f/2, EF50mm
f/1.8 (sold separately)
EF50mm f/1.0L USM, EF85mm f/1.2L USM (supplied
with the lens)
Be sure to use the hood to keep stray light out for best
results with the EF50mm f/1.0L USM and the EF85mm
f/1.2L USM.
Attach the lens hood as illustrated .
• The EF15mm f/2.8 Fish-eye hood is built-in.
• To mount the hood on the EF24mm f/2.8 lens,
align the hood’s attachment position mark with the
red dot on the front of the lens, then turn the hood
clockwise until the lens’s red dot is aligned with
the hood’s stop position mark
, .
6. Filter (sold separately)
The filter screws onto the front of the lens .
• Only one filter may be attached.
• If you need a polarizing filter, use Canon’s PL-C
polarizing filter.
Filter holder for the EF15mm f/2.8 Fish-eye
This lens is constructed with a built-in, gelatin filter
holder in the rear
. To insert, simply cut the filter
to the same dimensions (31mm (1-1/4”) × 31mm
(1-1/4”)) as the white brackets, then slide the filter
into the holder.
EOS-1 usage:
When using the EF50mm f/1.0L USM, the corners
of the picture area experience a slight darkening.
This will not affect the picture.
The lens length is measured from the mount
surface to the front end of the lens. Add 21.5mm
when including the lens cap and dust cap. (Add
16.8mm for EF15mm f/2.8 Fish-eye)
The size and weight listed are for the lens only,
except as indicated.
Product specifications and appearance are subject
to change without notice.
EF15mm f/2.8 Fish-eye
EF24mm f/2.8
EF28mm f/2.8
EF35mm f/2
EF50mm f/1.0L USM
EF50mm f/1.8
EF85mm f/1.2L USM
EF15mm f/2,8 Fish-eye
EF24mm f/2,8
EF28mm f/2,8
EF35mm f/2
EF50mm f/1,0L USM
EF50mm f/1,8
EF85mm f/1,2L USM
Nous vous remercions d’avoir choisi cet
objectif Canon.
Consignes de sécurité
1.
Ne regardez jamais le soleil ou une source
de lumière vive à travers l’objectif ou l’
appareil.
Vous pourriez endommager votre
vue. Viser directement le soleil dans l’objectif est
particulièrement dangereux.
2.
Que l’objectif soit monté ou non sur l’appareil,
ne le laissez pas exposé au soleil sans le munir
de son bouchon.
C’est pour éviter l’effet de loupe
qui pourrait déclencher un incendie.
Précautions d’utilisation
Si l’objectif est amené d’un environnement froid
à un environnement chaud, de la condensation
risque de se déposer sur la surface de l’objectif et
sur les pièces internes.
Pour éviter toute formation
de condensation, commencez par mettre l’objectif
dans une poche en plastique étanche avant de le
sortir dans un environnement chaud. Puis sortez l’
objectif quand il s’est peu à peu réchauffé. Faites
de même quand vous amenez l’objectif d’un
environnement chaud à un environnement froid.
Précautions de manipulation des objectifs
EF50mm f/1,0L USM et EF85mm f/1,2L USM
• Manipuler ces objectifs de haute précision avec le plus
grand soin et les protéger contre les chocs éventuels.
• Veiller à ce que la mise au point soit réglée sur avant
de ranger l’objectif dans l’étui. Avec ces objectifs, lors
de rangement, il est impossible de fixer le parasoleil à l’
envers. Mettre le parasoleil sur le bouchon arrière.
1. Montage et retrait de l’objectif
Reportez-vous au mode d’emploi de votre appareil
photo pour le montage et le retrait de l’objectif.
• Après avoir retiré l’objectif, placez-le côté arrière
dirigé vers le haut. Pour éviter de rayer la surface
de l’objectif et les contacts.
• Si les contacts sont éraflés ou salis par des
empreintes de doigts, ils peuvent être corrodés ou
ne pas être connectés correctement. L’appareil et l’
objectif peuvent ne pas fonctionner correctement.
• Si les contacts sont sales ou s’ils portent des empreintes
de doigts, nettoyez-les avec un chiffon doux.
• Si vous retirez l’objectif, remettez le bouchon
d’objectif dessus. Pour installer le bouchon
correctement, alignez le repère de montage d’objectif
avec le repère
du bouchon d’objectif et tournez-
le dans le sens des aiguilles d’une montre. Pour le
retirer le bouchon, tournez-le dans le sens opposé.
2. Sélection du mode de mise au point
Pour effectuer des prises de vue avec mise au point
automatique, réglez le sélecteur de mode de mise au
point sur AF .
Pour une mise au point manuelle, réglez-le sur MF
(M), et effectuez la mise au point au moyen de la
bague de mise au point.
Réglage de plage de mise au point (pour l’
EF50mm f/1,0L USM)
Il est possible de choisir deux plages de mise au point
AF avec l’objectif
.
• 0,6 - : De la distance minimale de mise au point à
l’infini.
• 1 - : 1 m à l’infini.
3. Repère de profondeur de champ
La profondeur du champ est la distance entre l’avant
et l’arrière du plan de mise au point sur le sujet. La
profondeur du champ est indiquée par la zone entre
les lignes du repère de la profondeur de champ
qui apparaît nette. Les nombres de l’échelle sont
exprimés en valeur F et si, par exemple, la distance de
mise au point est de 1,5 m et que l’ouverture est f/11
avec un objectif EF35mm f/2, la zone de netteté sera
approximativement entre 1,2m et 2,8m .
• Le repère de profondeur de champ est un indicateur
approximatif.
4. Repère infrarouge
Le repère infrarouge corrige le réglage de mise au point
lors de l’utilisation de films infrarouge en noir et blanc.
Effectuez manuellement la mise au point sur le sujet, puis
ajustez le réglage de la distance en déplaçant la bague de
mise au point sur le repère infrarouge correspondant .
Utilisez aussi un filtre rouge lors de la prise de vue.
• Déplacer le sélecteur de mode de mise au point à la
position MF (M) pour tourner la bague de mise au
point pour le réglage.
• Le repère infrarouge de l’objectif est engravé en
rouge. Sa position a été calculée pour les films
sensibles dans les longueurs d’onde de l’ordre de
800 nm et un filter rouge tel que Wratten 87.
• Prenez soin de suivre correctement les
recommandations du fabricant lors de l’utilisation
d’un film infrarouge.
5. Parasoleil
EF15mm f/2,8 Fish-eye (incorporé)
EF24mm f/2,8, EF28mm f/2,8, EF35mm f/2, EF50mm
f/1,8 (vendu séparément)
EF50mm f/1,0L USM, EF85mm f/1,2L USM (fourni
avec l’objectif)
Pour garantir la qualité des résultats avec les objectifs
EF50mm f/1,0L USM et EF85mm f/1,2L USM, bien
installer le parasoleil pour éliminer toute lumière
parasite.
Attacher le parasoleil à l’objectif comme indiqué sur
le schéma .
• Le parasoleil pour l’objectif EF15mm f/2,8 fish-eye
est incorporé.
• Pour fixer le parasoleil sur l’EF24mm f2,8, alignez le
repère de position de fixation du parasoleil et le point
rouge à l’avant de l’objectif, tournez le parasoleil vers
la droite jusqu’à ce que le point rouge soit aligné au
repère de position d’arrêt du parasoleil , .
6. Filtre (vendu séparément)
Le filtre se visse dans le filetage avant de l’objectif .
• Vous ne pouvez pas fixer plus d’un filtre à la fois.
• Si vous avez besoin d’un filtre polarisant, utilisez
le filtre polarisant Canon PL-C.
Porte-filtre pour l’objectif EF15mm f/2,8 fish-eye
Cet objectif est pourvu d’un porte-filtre gélatine
incorporé à sa partie arrière
. Pour installer le filtre
gélatine, il suffit de couper le filtre selon les dimensions
(31 mm × 31 mm) des cadres blancs, prévus à l’arrière
de l’objectif et de le glisser dans le porte-filtre.
Utilisation de l’EOS-1:
Avec un objectif EF50mm f/1,0L USM, les coins de
la zone de cadrage risquent d’apparaître légèrement
assombris. Ce phénomène n’affecte pas l’image.
La longueur de l’objectif est mesurée depuis la
surface de monture jusqu’à l’avant de l’objectif.
Ajoutez 21,5 mm quand le bouchon d’objectif et le
bouchon arrière sont inclus. (Ajouter 16,8 mm pour
EF15mm f/2,8 Fish-eye)
Les dimensions et le poids sont donnés pour l’
objectif seul, sauf où spécifié autrement.
Spécifications et aspect sous réserve de
modifications sans préavis.
EF15mm f/2,8 Ojo de pez
EF24mm f/2,8
EF28mm f/2,8
EF35mm f/2
EF50mm f/1,0L USM
EF50mm f/1,8
EF85mm f/1,2L USM
Muchas gracias por su compra del objetivo
Canon.
Precauciones de seguridad
1.
No mire al sol o a una fuente de luz brillante a
través del objetivo o de la cámara, pues podría
causar ceguera.
Mirar al sol directamente a través
del objetivo es especialmente peligroso.
2.
El objetivo, esté o no instalado en la cámara,
no debe dejarse expuesto a la luz del sol si está
desprovisto de su cubierta.
De este modo se
evita que el objetivo concentre los rayos solares y
pueda causar un incendio.
Precauciones de uso
Si se lleva el objetivo de un lugar frío a uno
caliente, puede condensarse la humedad en la
superficie del objetivo y piezas internas.
Para
evitar la condensación en este caso, primero ponga
el objetivo en una bolsa de plástico herméticamente
cerrada antes de llevarla de un lugar frío a otro
caliente. Saque el objetivo después de que se ha
calentado gradualmente. Haga lo mismo cuando
lleve el objetivo de un lugar caliente a otro frío.
Precausiones de manejo para los EF50mm f/1,0L
USM y EF85mm f/1,2L USM
• Tenga muchísimo cuidado cuando maneje estos
objetivos ultraprecisos y sobre todo no los golpee.
• Antes de guardar el objetivo en su estuche, no
se olvide de poner el enfoque en . Con estos
objetivos, los parasoles no pueden colocarse en
posición invertida al guardar los objetivos. Coloque
el parasol en la tapa contra el polvo.
1. Montaje y desmontaje del objetivo
Con respecto al montaje y desmontaje del objetivo,
consulte las instrucciones entregadas con su cámara.
• Después de desmontar el objetivo, colóquelo con
su parte posterior hacia arriba, para evitar que la
superficie del objetivo y los contactos se rayen.
• Si los contactos se ensucian, rayan o tienen huellas
dactilares, esto puede producir corrosión o
conexiones defectuosas. La cámara y los objetivos
pudieran no funcionar adecuadamente.
• Si los contactos se ensucian o tienen huellas
dactilares, límpielos con un paño suave.
• Si quita el objetivo, cúbralo con la tapa contra el
polvo. Para colocarla adecuadamente, alinee el
índice de montura del objetivo con el índice
de
la tapa contra el polvo, y gírela en sentido horario.
Para sacarla, invierta el orden.
2. Ajuste del modo de enfoque
Para seleccionar el modo de enfoque automático,
ajuste el interruptor del modo de enfoque a AF .
Para utilizar sólo el enfoque manual, ajuste el
interruptor del modo de enfoque a MF (M), y enfoque
girando el anillo de enfoque.
Ajuste de distancia de enfoque (para EF50mm
f/1,0L USM)
Dos distancias de autoenfoque pueden seleccionarse
con esto objetivo
.
• 0,6 - : Desde distancia mínima de enfoque hasta
infinito.
• 1 - : Desde 1 m hasta infinito.
3. Escala de profundidad de campo
La profundidad de campo es la distancia delante y
detrás del plano de enfoque en el sujeto que aparece
nítido. La profundidad de campo es indicada por
el área entre las líneas de profundidad de campo
debajo de la escala de distancia. Los números de
la escala están en valores F y, por ejemplo, si la
distancia de disparo es 1,5m y la abertura es f/11 con
el EF35mm f/2, el área de nitidez se extenderá desde
aproximadamente 1,2m a 2,8m .
• La escala de la profundidad de campo es un
indicador aproximado.
4. Indice de infrarrojos
El índice de infrarrojos corrige el ajuste del enfoque
cuando se utilice una película de infrarrojos en blanco
y negro. Enfoque el sujeto manualmente, y luego
ajuste la distancia moviendo el anillo de enfoque
hasta la marca de índice de infrarrojos .
Utilice también un filtro rojo cuando tome la foto.
• Cambie el modo de enfoque al modo MF (M) para
girar el anillo de enfoque para el ajuste.
• La posición de índices infrarrojos está basada en el
empleo de película con una sensibilidad máxima
de 800 nm y un filtro rojo (p. ej. Wratten 87).
• Asegúrese de observar las instrucciones del
fabricante cuando utilice la película de infrarrojos.
5. Parasol
EF15mm f/2,8 Ojo de pez (incorporado)
EF24mm f/2,8, EF28mm f/2,8, EF35mm f/2, EF50mm
f/1,8 (en venta por separado)
EF50mm f/1,0L USM, EF85mm f/1,2L USM
(suministrado con el objetivo)
Asegúrese de usar el parasol para evitar la luz
parásita y obtener los mejores resultados con el
EF50mm f/1,0L USM y el EF85mm f/1,2L USM.
Monte el parasol según la ilustración .
• El EF15mm f/2,8 ojo de pez lleva parasol
incorporado.
• Para montar el parasol en el objetivo EF24mm
f/2,8, alinee la marca de posición del parasol con
el punto rojo ubicado en la lente delantera del
objetivo y gire el parasol en el sentido de las agujas
del reloj hasta que el punto rojo del objetivo quede
alineado con la marca de posición de detención del
parasol
, .
6. Filtros (en venta por separado)
Los filtros se enroscan en la parte frontal del objetivo .
• Sólo puede instalarse un filtro.
• Si necesita un filtro polarizador, use el filtro
polarizador PL-C de Canon.
Portafiltros para el EF15mm f/2,8 Ojo de pez
Este objetivo viene con un soporte de filtro de
gelatina incorporado en la parte posterior
. Para
insertar el filtro córtelo simplemente con las mismas
dimensiones (31 mm × 31 mm) que los corchetes
blancos, y deslice el filtro en el portafiltros.
El uso de EOS-1:
Cuando se utiliza el EF50mm f/1,0L USM, en las
esquinas de la imagen se puede apreciar un ligero
oscurecimiento. Esto no afecta a la imagen.
La longitud del objetivo ha sido medida desde la
superficie de la montura hasta el extremo delantero
del objetivo. Añada 21,5 mm para incluir la tapa
del objetivo y la tapa contra el polvo. (Añada 16,8
mm para EF15mm f/2,8 Ojo de pez)
El tamaño y el peso corresponden solamente al
objetivo, a menos que se indique de otro modo.
Las especificaciones y el diseño exterior del
producto se encuentran sujetos a cambios sin
previo aviso.
