
ENGLISH
Before Installing
The monitor stand cannot be installed in all models of motor
vehicles. Be sure to confirm first with the sales outlet that it can be
installed in your vehicle.
After setting up the monitor stand, be aware that it is necessary to
make a hole at an installation position inside the car and stabilize
the monitor stand with a screw to prevent it from falling over.
Be sure that customers are always given this installation manual.
WARNING!
• DO NOT INSTALL THE MONITOR IN A LOCATION WHICH
OBSTRUCTS DRIVING, VISIBILITY OR WHICH IS PROHIBITED
BY APPLICABLE LAWS AND REGULATIONS.
If the monitor is installed in a location which obstructs
forward visibility or operation of the air bag or other safety
equipment or which interferes with operation of the vehicle,
it may cause an accident.
• NEVER USE BOLTS OR NUTS FROM THE VEHICLE'S
SAFETY DEVICES FOR INSTALLATION.
If bolts or nuts from the steering wheel, brakes or other
safety devices are used for installation of the monitor, it may
cause an accident.
• ATTACH THE WIRES CORRECTLY.
If the wiring is not correctly performed, it may cause a fire
or an accident. In particular, be sure to run and secure the
lead wire so that it does not get tangled with a screw or the
moving portion of a seat rail.
• USE WITH DC12V NEGATIVE GROUND VEHICLES.
This monitor system is only for use in a DC12V negative
ground vehicle.
It cannot be used in large trucks or diesel vehicles which
are DC24V vehicles.
If it is used in the wrong type of vehicle, it may cause a fire
or accident.
CAUTION!
• Use the specified fuse.
Be sure to always use the specified fuse.
If a fuse other than the specified fuse is used, it may cause a fire
or an accident.
• Do not damage the cord by pinching or pulling it.
Do not pull or damage the cord. If the cord is not treated properly,
it will short out or be severed and may cause a fire or accident.
TQBX0247 [E]
DEUTSCH FRANÇAIS
KV-M70
Installation/Connection Manual
Installierungs-/Anschlußhandbuch
Manuel d’installation/raccordement
J
V
C
Printed in Japan
0998MNMUBNMTS
EN, GE, FR
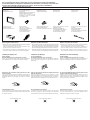
Socket wrench One set
Steckschlüsselsatz
Clé à douille, un jeu de douilles
Cutting pliers, nippers
Drahtzange, Zange
Coupe-fils, pince
Screwdrivers
Schraubenzieher
Tournevis
Cutter
Messer
Couteau
Rubber tape
Gummiband
Ruban caoutchouc
Vinyl tape
Isolierband
Ruban vinyle
Tools for installation / Werkzeug für die Installierung / Outils d’installation
Avant d'installer
Le support du moniteur ne peut pas être installé sur tous les
modèles de véhicules. S'assurer tout d'abord, par consultation avec
le revendeur, si celui-ci peut être installé sur votre véhicule.
Après avoir monté le support de moniteur, il est nécessaire de
percer un trou sur une position d'implantation à l'intérieur du
véhicule et de stabiliser le support de moniteur à l'aide d'une vis
pour l'empêcher de tomber.
Faire en sorte que les clients se voient toujours remettre un
exemplaire de ce manuel d'installation.
MISES EN GARDE!
• N'INSTALLEZ PAS LE MONITEUR DANS UN ENDROIT QUI
GÊNE LA CONDUITE, LA VISIBILITÉ OU QUI EST INTERDIT
PAR LE CODE DE LA ROUTE ET LES RÈGLEMENTS.
Si le tuner de télévision était installé à un emplacement
gênant la visibilité avant, ou le déploiement du sac à air, et
autres dispositifs de sécurité, ou à un emplacement gênant
pour la conduite du véhicule, comme près du levier des
vitesses ou de la pédale du frein, cela risquerait de
provoquer des accidents.
• NE JAMAIS UTILISER POUR L'INSTALLATION DES BOULONS
OU DES ÉCROUS PROVENANT DES DISPOSITIFS DE
SÉCURITÉ DU VÉHICULE.
Si l'on utilisait pour l'utilisation du moniteur des boulons et
des écrous cannibalisés du volant, des freins ou autres
dispositifs de sécurités, cela risquerait de provoquer des
accidents.
• ATTACHER LES CORDONS CORRECTEMENT.
Si le câblage n'est pas exécuté correctement, cela risque
de provoquer un incendie ou autre accident. Veiller, en
particulier, à tirer et attacher les fils de sorte qu'ils me
s'accrochent pas à une vis ou ne se coincent dans les parties
mobiles des rails des sièges.
• USAGE SUR LES VÉHICULES DE 12V CC AVEC NÉGATIF À
LA MASSE.
Ce système de tuner de télévision ne peut être utilisé que
sur les véhicules de 12V CC avec négatif à la masse.
Il ne peut pas être utilisé sur les gros camions ou les
véhicules diesel de 24V CC.
S'il était utilisé sur un type de véhicule inadéquat, cela
risquerait de provoquer un incendie ou autres accidents.
PRÉCAUTIONS!
• Utiliser les fusibles spécifiés.
Veiller à ne jamais utiliser que les fusibles spécifiés.
Si l'on utilisait des fusibles autres que les fusibles spécifiés, cela
risquerait de provoquer un incendie ou autres accidents.
• Ne pas endommager les fils et cordons en les pinçant ou en
les tirant.
Ne pas tirer ni endommager le cordon. Si l'on maltraite un cordon,
il court-circuitera, se sectionnera, et cela risquerait de provoquer
un incendie ou autres accidents.
Video machine
Controller unit
(under the passenger's seat)
Display unit
Videogerät
Display
Unité de commande
(sous le siège du passager)
Appareil vidéo
Unité d'affichage
Vor der Installierung
Der Monitorstand kann nicht in allen Automodellen installiert
werden. Fragen Sie zuerst bei Ihrem Verkäufer, ob Installierung in
Ihrem Auto möglich ist.
Bitte denken Sie daran, daß an der Installierungsposition ein Loch
gebohrt werden muß, um den Monitorstand mit einer Schraube
zu stabilisieren, damit der nicht umfällt.
Stellen Sie bitte sicher, daß dem Kunden dieses
Installierungshandbuch ausgehändigt wird.
WARNUNGEN!
• DEN MONITOR NICHT AN EINER POSITION INSTALLIEREN,
AN DER ER DAS FAHREN ODER DIE SICHT BEHINDERT.
Wenn der Monitor an einer Stelle installiert wird, an der er
die Sicht nach vorn oder die Tätigkeit des Airbags oder
anderer Sicherheitsausrüstung behindert, oder an der er die
Bedienung des Fahrzeugs beeinträchtigt, so kann dies einen
Unfall verursachen.
• ZUR INSTALLIERUNG NIEMALS SCHRAUBEN ODER
MUTTERN DER SICHERHEITSVORRICHTUNGEN DES
FAHRZEUGS VERWENDEN.
Wenn Schrauben oder Muttern von Lenkrad, Bremsen oder
sonstigen Sicherheitsvorrichtungen für die Installierung des
Monitors verwendet werden, so kann dies einen Unfall
verursachen.
• DIE KABEL KORREKT ANBRINGEN.
Wenn die Verdrahtung nicht korrekt durchgeführt wird, kann
dies einen Unfall oder Feuer verursachen. Achten Sie
besonders darauf, die Leitung so zu verlegen, daß sie sich
nicht an Schrauben oder am beweglichen Teil der
Sitzschiene verfängt.
• MIT EINEM FAHRZEUG MIT 12V GLEICHSPANNUNG UND
MINUSPOL AN MASSE VERWENDEN.
Dieses Monitorsystem ist nur für Verwendung mit einem
Fahrzeug mit 12V Gleichspannung und Minuspol an Masse.
Es kann nicht in großen Lastwagen oder Dieselfahrzeugen
mit einer Gleichspannung von 24V verwendet werden.
Verwendung im falschen Fahrzeugtyp kann Feuer oder
Unfälle verursachen.
VORSICHT!
• Die vorgeschriebene Sicherung verwenden.
Verwenden Sie immer nur die vorgeschriebene Sicherung.
Verwendung einer anderen als der vorgeschriebenen Sicherung
kann Feuer oder Unfälle verursachen.
• Das Kabel nicht durch Einklemmen oder Zug beschädigen.
Nicht am Kabel ziehen und es nicht beschädigen. Wenn das
Kabel nicht angemessen behandelt wird, kann es zu Kurzschluß
oder Leiterunterbrechung kommen, und dies kann Feuer oder
Unfälle verursachen.
Steuereinheit
(unter dem Beifahrersitz)

List of component parts (please confirm that you have all parts before starting the installation)
Liste des pièces détachées (vérifier que rien ne manque, avant de passer à l'installation)
Display unit (one)
Display (Ein)
Unité d'affichage (une)
KV-M70
MOBILE COLOR MONITOR SYSTEM
Metal fitting body (one)
Metallpaßkörper (Ein)
Applique de métal (une)
Fall stopper (one)
Fallstopper (Ein)
Pare-chute (un)
Clampers (three)
Klammern (Drei)
Colliers (trois)
Remote-control data conversion
cord (one)
Daten-Adapterkabel für
Fernbedienung (Ein)
Cordon de conversion des données
de télécommande (un)
Controller unit (one)
Steuereinheit (Eine)
Unité de commande (une)
Power cord (one)
(with crimp connector)
Stromversorgungskabel (Ein)
(mit Quetschklemme)
Cordon d'alimentation (un)
(avec connexion sertie)
Monitor stand fastening screws
(
ø
4x12mm) (seven)
Monitorstand-Befestigungs-
schrauben (ø4x12mm) (Sieben)
Vis de fixation du support de
moniteur (ø4x12mm) (sept)
Height adjuster fitting (one)
Höheneinstellung (Eine)
Ferrure de réglage de hauteur (une)
Cable for connecting the display unit
and controller unit (one)
(Length: 5m)
Kabel zur Verbindung von Display und
Steuereinheit (Ein) (Länge: 5m)
Cordon pour connecter l'unité
d'affichage et l'unité de commande
(un) (Longueur: 5m)
After attaching the stand
For the next 24 hours, do not pull at the stand or attach the display
unit (since this will weaken the adhesive strength and could cause
the stand to come off).
For the following 24 hours
When there is lots of moisture (during rainy season or other
similar conditions)
Use a dryer or other device to dry the attachment location before
attaching the stand (if the surface is not dry enough, the adhesive
strength will weaken and the display unit could come off while
driving).
Before installin
When the temperature is low (20 degrees C or lower)
Turn on the car heater and warm up the car before attaching the
stand (warming up the car improves the adhesive strength).
AUTO
Removing the monitor stand
• Remove the screws and slowly detach the monitor stand starting
from the corners of the attachment surface.
(When the temperature is low, turn on the car heater or use a
dryer to warm up the attachment surface.)
• When adhesive tape remains on the attachment surface, use
your finger or other instrument to remove the remaining tape.
Installing the display unit
Nach dem Anbringen des Standes
24 Stunden warten, bevor am Stand gezogen wird oder bevor
das Display angebracht wird (da hierdurch die Klebekraft
verringert wird und der Stand sich möglicherweise lösen kann).
Für die nächsten 24 Stunden
Vor der Installierung
Bei niedriger Temperatur (20°C oder weniger)
Die Fahrzeugheizung einschalten und das Fahrzeug anwärmen,
bevor der Stand angebracht wird (Erwärmen erhöht die
Klebekraft).
AUTO
Entfernen des Monitorstandes
•
Die Schrauben entfernen, und dann den Monitorstand vorsichtig
entfernen, beginnend an den Ecken der Befestigungsoberfläche
.
(Bei niedriger Temperatur die Fahrzeugheizung einschalten,
oder die Befestigungsoberfläche mit einem Föhn erwärmen.)
• Wenn Klebestreifen an der Befestigungsoberfläche zurückbleibt,
ihn mit den Fingern oder angemessenem Werkzeug entfernen.
Installieren des Displays
Après avoir fixé le support
Durant les 24 heures suivantes, ne pas tenter de tirer sur le support
ni d'y fixer l'unité d'affichage, ce qui risque d'affaiblir la force
d'adhésion et d'entraîner la chute du support.
Laisser reposer pendant 24 heures
En cas de forte humidité (durant la saison des pluies ou autres
conditions atmosphériques similaires)
Utiliser un séchoir, ou tout autre appareil adéquat, pour sécher
l'emplacement de la fixation avant d'attacher le support. (Si la
surface n'est pas assez sèche, la force d'adhérence faiblira et l'unité
pourra se détacher en conduisant).
Avant d'installer
Au cas où la température est basse (20°C ou moins)
Mettre le chauffage et chauffer l'habitacle avant d'attacher le
support (le réchauffement améliore les qualités d'adhérence).
AUTO
Dépose du support du moniteur
• Déposer les vis et détacher doucement le support du moniteur
en commençant par les coins de la surface de fixation.
(Lorsque la température est basse, mettre le chauffage de la
voiture ou chauffer la surface de fixation à l'aide d'un séchoir).
• S’il reste du ruban adhésif sur la suface de fixation, enlever le
ruban restant avec les doigts ou avec un instrument quelconque.
Installation de l'unité d'affichage
Wenn es sehr feucht ist (während der Regenzeit oder unter
ähnlichen Umständen)
Einen Föhn oder ein ähnliches Gerät verwenden, um die
Befestigungsoberfläche vor Anbringen des Standes zu trocknen.
(Wenn die Oberfläche nicht ausreichend trocken ist, nimmt die
Klebekraft ab und das Display kann sich beim Fahren lösen.)
Liquid crystal color monitor/Flüssigkristall-Farbmonitor/
Moniteur en couleur à cristaux liquides
Monitor stand/Monitorstand/Support du moniteur
Liste der Bestandteile (vor Beginn der Installierung bitte sicherstellen, daß alle Teile vorhanden sind)

Installing Installieren Installation
Wichtig Important
Loosen Lösen
Desserrer
Ferrure de réglage de hauteur
Height adjuster fitting
Stand fastening screws
Standbefestigungsschrauben
Vis de fixation du support
Tighten Anziehen
Serrer
Tighten Anziehen
Serrer
Loosen Lösen
Monitor fastening screw Monitorbefestigungsschraube
Vis de fixation du moniteur
Monitor stand
Support de moniteur
Stand fastening screws Standbefestigungsschrauben
Vis de fixation du support
Provisionally attach the display unit to the height adjuster
fitting and decide the installation location. (At this point, still
do not remove the cover paper from the double-sided tape.)
Das Display vorläufig an der Höheneinstellung anbringen
und den Installierungsort entscheiden. (Zu dieser Zeit noch
nicht das Schutzpapier vom doppelseitigen Klebestreifen
abziehen.)
Monter provisoirement l'unité d'affichage sur sa ferrure de
réglage de hauteur et choisir son lieu d'implantation.
(À ce stade, il ne faudra pas encore retirer le papier protecteur
du ruban adhésif à double face.).
Important
Bend the attachment surface to match the
shape of the attachment location.
Caution
Select a location where the monitor can be
easily seen but does not obstruct forward
visibility, and where it will not interfere with
opened air bags in vehicles equipped with
an air bag system.
Wichtig
Die Befestigungsoberfläche ent-
sprechend der Form des Instal-
lierungsortes biegen.
Vorsicht
Einen Ort wählen, an dem der Monitor
leicht gesehen werden kann, aber die Sicht
nach vorn und bei mit Airbags
ausgestatteten Fahrzeugen das Öffnen
des Airbags nicht behindert.
Important
Recourber la surface de fixation pour lui faire
épouser la courbure du point d'implantation.
Mise en garde
Choisir un emplacement d'où le moniteur
peut se regarder confortament, mais sans
gêner toutefois la visibilité avant, et où il
ne gênera pas le déploiement éventuel des
sacs à air au cas où le véhicule est équipé
de sacs à air.
Remove the display unit from the height adjuster fitting. Peel
off the cover paper from the monitor stand and attach the
stand to the attachment location.
After attaching, secure with the fastening screws included.
(Be sure to adequately clean any dirt on the attachment location and dry
the surface before attaching. After attaching, push strongly onto the
spot to ensure that the stand is securely attached.)
Das Display von der Höheneinstellung entfernen. Das
Schutzpapier vom Monitorstand abziehen und den
Monitorstand am Installierungsort anbringen.
Anschließend den Monitorstand mit den Befestigungs-
schrauben befestigen.
(Vor dem Anbringen den Installierungsort sorgfältig reinigen und die
Oberfläche trocknen. Nach dem Anbringen fest andrücken, damit der
Stand fest sitzt.)
Retirer l'unité d'affichage de sa ferrure de réglage de hauteur.
Peler la protection de papier du support de moniteur et
attacher le support sur son emplacement.
Après quoi, fixer en place avec les vis de fixation comprises
dans la fourniture.
(Veiller à nettoyer convenablement au préalable l'emplacement de
fixation de toute saleté et à bien sécher sa surface. Après avoir fixé en
place, exercer une forte poussée pour s'assurer que le support est
solidement en place.)
After waiting 24 hours, place the display unit on the height
adjuster fitting.
24 Stunden warten, und dann das Display an der
Höheneinstellung anbringen.
Après avoir laissé reposer pendant 24 heures, placer l'unité
d'affichage sur sa ferrure de réglage de hauteur.
Using the Fall Stopper Verwendung des Fallstoppers Utilisation du Pare-chute
Desserrer
(To install the monitor on a slanted surface of the dashboard)
Assemble the monitor stand and the height adjuster fitting.
Remove the screws from the back side of the monitor stand,
attach the fall stopper to the back side of the monitor stand,
and then secure with the screws.
Decide the location of the monitor stand installation, and
bend the fall stopper as necessary.
After peeling off the cover paper from the monitor stand
back side and from the fall stopper, attach the fall stopper
and the monitor stand to the installation location, and then
secure the monitor stand with the fastening screws included.
After waiting 24 hours, place the display unit on the
height adjuster fitting.
(Für Installation an einer schrägen Armaturenbrettfläche)
Den Monitorstand und die Höheneinstellung zusammen-
bauen.
Die Schrauben von der Rückseite des Monitorstandes
entfernen, den Fallstopper an der Rückseite des
Monitorstandes anbringen, und ihn dann mit den Schrauben
sichern.
Den Installierungsort für den Monitorstand entscheiden
und den Fallstopper wie erforderlich biegen.
Das Schutzpapier von der Rückseite des Monitorstandes und
vom Fallstopper abziehen, den Fallstopper und den
Monitorstand am Installierungsort anbringen, und dann den
Monitorstand mit den mitgelieferten Befestigungsschrauben
sichern.
24 Stunden warten, und dann das Display an der
Höheneinstellung anbringen.
(Pour installer le moniteur sur la surface inclinée du tableau de bord)
Assembler le support de moniteur et la ferrure de réglage
de hauteur.
Déposer les vis de la face arrière du support de moniteur,
accrocher le pare-chute à l'arrière du support de moniteur,
et fixer en place à l'aide des vis.
Déterminer l'emplacement pour l'installation du support de
moniteur, et plier le pare-chute si nécessaire.
Après avoir enlevé le papier de protection du dos du support
de moniteur et du pare-chute, attacher le pare-chute et le
support de moniteur sur l'emplacement d'installation ; fixer
le support de moniteur à l'aide des vis de fixation comprises
dans la fourniture.
Après avoir laissé reposé pendant 24 heures, placer l'unité
d'affichage sur la ferrure de réglage de hauteur.
Loosen
Tighten
Anziehen
Lösen
Serrer
Desserrer
Assemble the monitor stand and the height adjuster fitting. Den Monitorstand und die Höheneinstellung zusammen-
bauen.
Assembler le support de moniteur et la ferrure de réglage
de hauteur.
Höheneinstellung
Monitorstand
Secure with the fastening screws
(in 5 spots)
Mit den Befestigungsschrauben (an
fünf Stellen) sichern
Fixer en place à l'aide des vis de fixation
(en 5 endroits)
Peel off the cover paper from the back side Das Schutzpapier von der Rückseite abziehen
Peler la protection de papier au dos
Installieren Sie das Display auf dem Armaturenbrett (an
einer Stelle, wo es die Sicht nach vorn und Sicherheitsvor-
richtungen wie das Airbag nicht behindert).
Installer l’unité d’affichage sur le dessus du tableau de bord (à un
endroit où elle ne risque pas de réduire la visibilité pendant la
conduite ou de gêner le fonctionnement d’un dispositif de sécurité,
tel qu’un airbag).
Important
Install the display unit on top of the dashboard (in a position where
the display unit will not obstruct visibility during driving or interfere
with the operation of any safety device such as an airbag).
Fall stopper
Peel off the cover paper
Bend
Fasten with screws
Fallstopper
Pare-chute
Biegen
Das Schutzpapier abziehen
Plier
Enlever le papier de couverture
Mit Schrauben befestigen
Fixer avec des vis

VIDEO L - AUDIO - R VIDEO REMOTE
AV
OUTPUT
VIDEO
AV INPUT 2
DISPLAY UNIT
AV INPUT 1
L - AUDIO - R L - AUDIO - R
POWER
KV-M70
MOBILE COLOR MONITOR SYSTEM
VIDEO L - AUDIO - R VIDEO REMOTE
AV
OUTPUT
VIDEO
AV INPUT 2
AV INPUT 1
L - AUDIO - R L - AUDIO - R
VIDEO L - AUDIO - R VIDEO REMOTE
AV
OUTPUT
VIDEO
AV INPUT 2
AV INPUT 1
L - AUDIO - R L - AUDIO - R
KV-V10
OUTPUT
REMOTE
CONTROL
SENSOR INPUT
DC INPUT
DC 12V
INPUT
VIDEO
LAUDIO
AUDIO
MONO
(
L+R
)
R
12
POWER
DISPLAY UNIT
VIDEO
VIDEO REMOTE
VIDEO
L-AUDIO-R
L-AUDIO-R L-AUDIO-R
AV
OUTPUT
AV INPUT 1
AV INPUT 2
Connecting the power source
Notes:
• This monitor system is designed only for use in a DC12V motor vehicle.
• Be sure to fully plug in the connector.
• Install the cord to avoid high-temperature spots and secure with clampers and
tape.
• Be sure to not install the controller unit in the following type of location.
A location which is exposed to water, a location which is stepped on or a location
which is exposed to hot air such as near a heater duct.
• When game devices are connected, the image may be unstable.
• When removing the DIN plug, be sure to press the clip.
Connecting the parking brake connection wire / Anschluß des Handbremsen-Anschlußdrahtes / Raccordement du câble de connexion du frein de stationnement
A crimp connector is attached to the end of the parking brake connection
wire.
Ein Quetschanschluß ist am Ende des Handbremsen-Anschlußdrahtes
angebracht.
Une connexion sertie est fixée à l'extrémité du cordon de connexion du
frein de stationnement.
How to connect the crimp connector / Anschluß des Quetschanschlusses / Raccordement de la connexion sertie
The crimp connector is connected to the power source side wire
of the parking brake lever.
Der Quetschanschluß wird an den stromversorgungsseitigen
Draht des Handbremsenhebels angeschlossen.
La connexion sertie est connectée au cordon côté source
d'alimentation du levier du frein de stationnemement.
When installing the monitor in a location which can be seen by the driver.
Wenn der Monitor an einem Ort angebracht wird, an dem er vom Fahrer gesehen werden kann.
Lorsqu'on installe le moniteur à un emplacement où il peut être vu du conducteur.
Anschluß der Stromversorgung
Hinweise:
• Dieses Monitorsystem ist nur für Verwendung in einem Fahrzeug mit einer
Gleichspannung von 12 V entworfen.
• Den Stecker voll in den Anschluß einschieben.
• Das Kabel so verlegen, daß es Stellen mit hoher Temperatur vermeidet, und es
mit Klammern und Band befestigen.
• Darauf achten, die Steuereinheit nicht an den folgenden Orten zu installieren.
An einem Ort, der Wasser ausgesetzt ist, an einem Ort, an dem auf das Gerät
getreten werden kann, oder an einem Ort, der Warmluft ausgesetzt ist, z.B. in
der Nähe eines Heizungsauslasses.
• Bei Anschluß von Spielvorrichtungen ist das Bild möglicherweise nicht stabil.
• Beim Herausziehen des DIN-Steckers auf die Klemme drücken.
Connexion de la source d'alimentation
Remarques:
• Ce système de moniteur est conçu pour fonctionner sur les véhicules de 12V
CC.
• Veiller à enfoncer le connecteur à fond.
• Installer le cordon en sorte d'éviter les points de fortes températures, et fixer en
place à l'aide de colliers et de ruban.
• Éviter absolument d'installer le tuner aux emplacements suivants :
Là où il serait exposé à l'eau, où il risque d'être piétiné, où il est exposé aux
souffles d'air chaud de la soufflerie du chauffage.
• Au cas où l'on connecte à des jeux vidéo, l'image peut être instable.
• Ne jamais oublier de presser sur le clip pour retirer la fiche DIN.
Plug the connectors in the same color sockets.
Die Stecker an die Buchsen mit der gleichen Farbe
anschließen.
Enficher les connecteurs dans les douilles de même couleur.
AV cord (Sold separately)
AV-Kabel (separat erhältlich)
Cordon AV vendu séparément
Plug the connectors in the same color sockets.
Die Stecker an die Buchsen mit der gleichen Farbe anschließen.
Enficher les connecteurs dans les douilles de même couleur.
Controller unit
Steuereinheit
Unité de commande
AV cord (Sold separately)
AV-Kabel (separat erhältlich)
Cordon AV vendu séparément
How to connect with a mobile video machine or video camera
Anschluß an ein mobiles Videogerät oder eine Videokamera
Raccordement sur un appareil vidéo mobile ou une caméra vidéo
Video camera or car-installed video machine
Videokamera oder im Auto installiertes Videogerät
Caméra vidéo ou appareil vidéo mobile
Comes up to this point
Kommt bis zu diesem Punkt
Arrive jusqu'en ce point
Parking brake connection wire (gray)
Handbremsen-Anschlußdraht (grau)
Cordon de connexion du frein de stationnement (gris)
Power source side
Parking brake lever wire
Stromversorgungsseite
Handbremsenhebeldraht
Côté source d'alimentation
Cordon du levier du frein de stationnemement
Parking brake connection wire (gray)
Handbremsen-Anschlußdraht (grau)
Cordon de connexion au frein de stationnement (gris)
Connect to the vehicle chassis metal together with the
ground wire.
Zusammen mit dem Erdleiter an das Chassismetall
des Fahrzeugs anschließen.
Connecter à une pièce métallique du châssis du
véhicule en même temps que le fil à la masse.
From the controller unit
Von der Steuereinheit
En provenance de l'unité de commande
Vehicle chassis / Fahrzeugchassis /
Châssis du véhicule
Accessory
Crimp connector
Zubehör
Quetschanschluß
Accessoire,
Connexion sertie
Parking brake lever
Handbremsenhebel
Levier du frein de
stationnement
Battery / Batterie /
Batterie
Side brake
Handbremse
Frein de stationnement
Foot brake
Fußbremse
Frein à pied
Parking brake connection wire (gray)
When the parking brake lever is pulled, the Unit is grounded by the chassis.
When the parking brake lever is returned to its original position, it connects to a wire with 12V applied.
The parking brake lever position varies depending on the vehicle model.
The diagram below show typical examples.
Die Position des Handbremsenhebels hängt vom Fahrzeugmodell ab.
Das folgende Diagramm zeigt typische Beispiele.
La position du levier du frein de stationnement varie selon les modèles de véhicules.
Le schéma ci-dessous est un exemple typique.
Vehicle chassis / Fahrzeugchassis /
Châssis du véhicule
Brake light / Bremsleuchte /
Témoin de frein
From the controller unit
Von der Steuereinheit
En provenance de l'unité de tuner
Cordon de connexion du frein de stationnement (gris).
Lorsque le frein de stationnement est serré, il est à la masse par le châssis.
Lorsque le frein de stationnement revient à sa position originale, il est connecté avec un fil de 12V appliqués.
Handbremsen-Anschlußdraht (grau)
Wenn der Handbremsenhebel gezogen wird, so wird das Gerät durch das Chassis geerdet.
Wenn der Handbremsenhebel zu seiner Ausgangsstellung zurückgebracht wird, so wird er an einen unter 12V Spannung stehenden Draht
angeschlossen.
2nd television connected to the AV output terminal
Zweiter Fernseher an die AV-Ausgangsbuchsen
angeschlossen
Deuxième télévision connectée à une borne de sortie AV
AV cord (Sold separately)
AV-Kabel (separat erhältlich)
Cordon AV vendu séparément
Plug the connectors in the same color sockets.
Die Stecker an die Buchsen mit der gleichen
Farbe anschließen.
Enficher les connecteurs dans les douilles de
même couleur.
KV-M70 display unit
Display KV-M70
Unité d'affichage KV-M70
Cable for connecting the display unit and controller unit
(Length: 5m)
Install this cable as far as possible away from the
antenna cable.
Use the cable included with the KV-M70 color monitor
system package.
Kabel für Verbindung von Display und Steuereinheit
(Länge: 5m)
Dieses Kabel so weit wie möglich vom Antennenkabel
entfernt verlegen. Das mit dem Monitorsystem KV-M70
mitgelieferte Kabel verwenden.
Cordon pour connecter l'unité d'affichage et l'unité de
commande.
(Longueur: 5m)
Installer ce cordon aussi loin que possible du cordon
d'antenne.
Utiliser le cordon inclus dans les accessoires fournis
avec le système de moniteur couleur KV-M70.
Display unit
(Be sure to install the display unit at least 1m away from the controller unit.)
Display
(Das Display mindestens 1m entfernt von der Steuereinheit installieren.)
Unité d'affichage.
(veiller à installer l'unité d'affichage à 1m au moins de l'unité de commande)
If interference occurs in AM radio reception, connect this screw to the vehicle chassis metal.
Wenn es beim Empfang von Mittelwellensendungen zu Interferenz kommt, diese Schraube an
das Chassismetall des Fahrzeugs anschließen.
S'il se produit des interférences dans la réception radio AM, connecter cette vis à une pièce
métallique du châssis du véhicule.
Remote output wire (100mA. Max)
12V output when ON. When connected to a JVC car receiver with a remote input wire,
sound output automatically switches over to the monitor when the monitor is turned ON.
Fernbedienungsausgangsleiter (Max. 100mA)
12V Ausgang wenn eingeschaltet. Bei Anschluß an einen JVC-Autoempfänger mit
Ferneingangsanschluß wird der Tonausgang bei Einschalten des Monitors automatisch
zum Monitor umgeschaltet.
Cordon de sortie à distance. (100mA. Max)
Quand sortie 12V ON. Lorsqu'il est connecté à un récepteur autoradio JVC à l'aide d'un
cordon d'entrée à distance, la sortie son commute automatiquement sur le moniteur
lorsque ce dernier est sous tension.
Parking brake connection wire (see below)
Handbremsen-Anschlußdraht (siehe unten)
Cordon de connexion sur le frein de stationnement (voir ci-dessous)
Accessory power source (ACC power source) input wire (DC12V)
Connect to spots where the power source is cut when the engine key is removed.
Do not connect to spots which have a constant power source.
Lay the wire so that it does not get tangled up with screws or the moving parts of a seat
rail.
Eingangsdraht für Zubehör-Stromversorgung (ACC-Stromversorgung) (12V Gs)
An einer Stelle anschließen, an der die Stromversorgung bei Abziehen des
Zündschlüssels unterbrochen wird.
Nicht an einer Stelle anschließen, die immer mit Strom versorgt wird.
Den Draht so verlegen, daß er sich nicht an Schrauben oder an beweglichen Teilen des
Sitzes verfängt.
Cordon d'entrée (12V CC) d'une source d'alimentation accessoire (source d'alimentation
ACC)
Connecter aux points privés de source d'alimentation lorsque la clé de contact est retirée.
Ne pas connecter aux points de source d'alimentation constante.
Faire courir le cordon là où il ne risque pas de s'accrocher aux vis ou de se coincer dans
les parties mobiles du rail du siège.
Ground wire
Connect to the vehicle chassis metal.
Erdleiter
An das Chassismetall des Fahrzeugs anschließen.
Fil à la masse.
Connecter à une partie métallique du châssis du véhicule.
(gray) / (grau) /
(gris)
(blue) / (blau) /
(bleu)
(red) / (rot) /
(rouge)
Fuse (3A) /
Sicherung (3A) /
Fusible (3A)
Do not use any fuse other than a 3A fuse.
Nur eine Sicherung von 3A verwenden.
Ne pas utiliser d'autre fusible qu'un 3A
(black) / (schwarz) /
(noir)
Power cord
Use the cord included with the KV-M70 color monitor system package.
Stromversorgungskabel
Das mit dem Farbmonitorsystem KV-M70 mitgelieferte Kabel verwenden.
Cordon d'alimentation
Utiliser le cordon fourni avec les accessoires du système de moniteur couleur du KV-M70.
Branching cable
Abzweigkabel
Câble de branchement
Controller Unit / Steuereinheit / Unité de commande
Connecting the remote-control data conversion cord
Anschluß des Daten-Adapterkabels für Fernbedienung
Branchement du cordon de conversion des données
de télécommande
Video camera or car-installed video machine
Videokamera oder im Auto installiertes Videogerät
Caméra vidéo ou appareil vidéo mobile
When installing the monitor in a location which cannot be seen by the driver
Wenn der Monitor an einem Ort angebracht wird, an dem er nicht vom Fahrer
gesehen werden kann
Lorsqu'on installe le moniteur à un emplacement où il ne peut pas être vu du
conducteur
Supplied with KV-V10
Mit KV-V10 mitgeliefert
Fourni avec le KV-V10.
Do not use branching cable together with remote-control data
conversion cord, otherwise, it may cause malfunction or failure.
Das Abzweigkabel darf nicht in Verbindung mit dem Daten-
Adapterkabel für die Fernbedienung verwendet werden. Dies kann
zu Störungen oder Ausfall des Geräts führen.
Ne pas utiliser le câble de branchement en même temps que le
cordon de conversion des données de télécommande, car ceci
pourrait provoquer un mauvais fonctionnement ou une panne.
KD-SX1000R etc.
KD-SX1000R usw.
KD-SX1000R, etc.
KV-V10
By connecting this terminal to the remote-control terminal of the JVC Mobile Video Cassette
Recorder KV-V10, the KV-V10 can be remotely operated via the remote-control light receiving
section of the KV-M70. (Be sure to use the KV-V10 remote controller.)
Verbinden dieses Anschlusses mit dem Fernbedienungsanschluß des mobilen JVC-
Videogeräts KV-V10 ermöglicht die Fernbedienung des KV-V10 über den Infrarotempfänger
des KV-M70. (Verwenden Sie ausschließlich die Fernbedienung KV-V10.)
Eb raccordant cette borne à la borne de télécommande de la Machine Vidéo Mobile JVC
KV-V10, la KV-V10 peut être contrôlée à distance par le capteur du faisceau de télécommande
du KV-M70. (Veiller à utiliser la télécommande KV-V10.)
Remote Control
Sensor Input
Terminal
Anschluß Remote
Control Sensor Input
Borne entrée de la
télécommande
-
 1
1
-
 2
2
-
 3
3
-
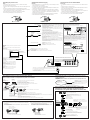 4
4


