Parkside PTSS 1200 B1 Original Instructions Manual
- Kategorie
- Elektrowerkzeuge
- Typ
- Original Instructions Manual

IAN 282495
PLUNGE SAW PTSS 1200 B1
TAUCHSÄGE
Originalbetriebsanleitung
PLUNGE SAW
Translation of the original instructions

GB / IE / NI Translation of the original instructions Page 1
DE / AT / CH Originalbetriebsanleitung Seite 13
Before reading, unfold the page containing the illustrations and familiarise yourself with all functions of
the device.
Klappen Sie vor dem Lesen die Seite mit den Abbildungen aus und machen Sie sich anschließend mit allen
Funktionen des Gerätes vertraut.

B1
A
B1
B
C
8a 9a
14a
14b
X

PTSS 1200 B1
GB
│
IE
│
NI
│
1 ■
Contents
Introduction ......................................................2
Intended use ................................................................ 2
Features ................................................................... 2
Package contents ............................................................ 2
Technical data .............................................................. 2
General Power Tool Safety Warnings ................................3
1. Work area safety .......................................................... 3
2. Electrical safety ........................................................... 3
3. Personal safety ............................................................ 4
4. Power tool use and care .................................................... 4
5. Service .................................................................. 4
Appliance-specific safety instructions for circular saws ............................... 5
Further safety instructions for all saws ............................................ 5
Original accessories/auxiliary equipment ......................................... 7
Operation .......................................................7
Fitting/changing the saw blade ................................................. 7
Connecting the sawdust extraction device ......................................... 7
Check that the blade guard is functioning ......................................... 7
Operation .......................................................7
Switching on and off ......................................................... 7
Setting the cutting depth (dive depth) ............................................. 7
Setting the cutting angle (mitre angle) ............................................ 8
Note the cut line ............................................................. 8
Eccentric screws ............................................................. 8
Sawing (without guide rail) .................................................... 8
Sawing (with guide rail) ....................................................... 9
Plunge cutting with guide rail ................................................... 9
Cleaning and maintenance ........................................10
Disposal ........................................................10
Kompernass Handels GmbH warranty ..............................10
Service .........................................................11
Importer .......................................................11
Translation of the original Conformity Declaration .....................12

PTSS 1200 B1
■ 2
│
GB
│
IE
│
NI
PLUNGE SAW PTSS 1200 B1
Introduction
Congratulations on the purchase of your new appli-
ance. You have selected a highquality product. The
operating instructions are part of this product. They
contain important information on safety, usage and
disposal. Before using the product, familiarise your-
self with all operating and safety instructions. Use
the product only as described and for the specified
areas of application. Please also pass on these
operating instructions to any future owner.
Intended use
This circular saw (hereinafter "appliance" or "ma-
chine") is designed for longitudinal, cross and
plunge cuts in firmly supported solid wood, chip
board, plastics and lightweight construction mate-
rials. Working with metals is not permitted. This ap-
pliance can be used with the provided guide rails
– exclusively for the cutting techniques described.
Any other uses of or modification to the appliance
is deemed to be improper and carries the risk of
serious personal injury. Not for commercial use.
Features
Safety lock-out
ON/OFF switch
Handle
Hex key (small)
Hex key (large)
Motor unit
Chip ejector adapter
Fine adjustment screws for 0° cutting angle
8a
Fine adjustment screw for 45° cutting angle
Baseplate
9a
Markings for cutting line
Eccentric screw (2 x)
Adjustment wheel for cutting
angle adjustment (2 x)
Cutting depth adjustment
Cutting depth scale
Saw blade
14a
Clamping screw/plain washer
14b
Panel cut out
Additional handle
Cutting width marking
Chip ejector (rotatable)
Clamping lever for changing saw blades
Spindle lock
Groove for guide rails
Guide rail
Grub screws
Connector
X flange (factory-fitted)
Package contents
1 circular saw
1 saw blade 165mm / 24 teeth (pre-fitted)
2 guide rails
1 connector
1 chip ejector adapter
2 Hex keys
1 set of operating instructions
Technical data
Rated voltage: 230 V
~
50 Hz
(Alternating current)
Nominal power input: 1200 W
Idle speed: n
0
= 5200 rpm
Sawblade mount: ø 20 mm
Saw blade:
165mm
165 mm
Main blade width: 1.5 mm
Tooth thickness: 2.6 mm
Max. cutting depth: 56 mm at a 90°
mitre angle
42 mm at a 45°
mitre angle
5 mm less with guide rails
Protection class: II /
Accessories: Guide rails 2 x
700mm x 180 mm
max. 65 mm

PTSS 1200 B1
GB
│
IE
│
NI
│
3 ■
Noise emission value:
Noise measurement value determined in accord-
ance with EN 60745. The A-rated noise level of
the power tool is typically as follows:
Sound pressure level: L
PA
= 90.43 dB (A)
Uncertainty: K = 3 dB (A)
Sound power level: L
WA
= 101.43 dB (A)
Uncertainty: K = 3 dB (A)
Wear hearing protection!
Vibration values:
Vibration values (vector total of three directions)
determined in accordance with EN 60745:
Cutting chipboard: a
h,W
= 2.582 m/s
2
Uncertainty K = 1.5 m/s
2
NOTE
► The vibration level specified in these instruc-
tions has been measured in accordance
with a standardised measuring procedure
specified in EN 60745 and can be used to
make equipment comparisons. The specified
vibration emission value can also be used to
make an initial exposure estimate.
WARNING!
► The vibration level varies in accordance with
the use of the power tool and may be higher
than the value specified in these instructions
in some cases. There is a risk of underestima-
tion of the vibration load if the power tool is
used regularly in this manner. Try to keep the
vibration loads as low as possible. Measures
to reduce the vibration load include wearing
gloves and limiting your working time.
All states of operation must be taken into
account (e.g. times when the power tool is
switched off and times where the power tool
is switched on but running without load).
General Power Tool
Safety Warnings
WARNING!
► Read all safety warnings and all instructions.
Failure to follow the warnings and instruc-
tions may result in electric shock, fire and/or
serious injury.
Save all warnings and instructions for future
reference.
The term "power tool" in the warnings refers to your
mains-operated (corded) power tool or battery-
operated (cordless) power tool.
1. Work area safety
a) Keep work area clean and well lit. Cluttered
or dark areas invite accidents.
b) Do not operate power tools in explosive
atmospheres, such as in the presence of
flammable liquids, gases or dust. Power tools
create sparks which may ignite the dust or
fumes.
c) Keep children and bystanders away while
operating a power tool. Distractions can cause
you to lose control.
2. Electrical safety
a) Power tool plugs must match the outlet.
Never modify the plug in any way.
Do not use any adapter plugs with earthed
(grounded) power tools Unmodified plugs
and matching outlets will reduce risk of electric
shock.
b) A
void body contact with earthed or grounded
surfaces, such as pipes, radiators, ranges and
refrigerators. There is an increased risk of elec-
tric shock if your body is earthed or grounded.
c) Do not expose power tools to rain or wet
conditions. Water entering a power tool will
increase the risk of electric shock.
d) Do not abuse the cord. Never use the cord
for carrying, pulling or unplugging the power
tool. Keep cord away from heat, oil, sharp
edges or moving parts. Damaged or entan-
gled cords increase the risk of electric shock.

PTSS 1200 B1
■ 4
│
GB
│
IE
│
NI
e) When operating a power tool outdoors, use
an extension cord suitable for outdoor use.
Use of a cord suitable for outdoor use reduces
the risk of electric shock
f) If operating a power tool in a damp location
is unavoidable, use a residual current device
(RCD) protected supply. Use of an RCD reduc-
es the risk of electric shock.
3. Personal safety
a) Stay alert, watch what you are doing and
use common sense when operating a power
tool. Do not use a power tool while you are
tired or under the influence of drugs, alcohol
or medication. A moment of inattention while
operating power tools may result in serious
personal injury.
b) Use personal protective equipment. Always
wear eye protection Protective equipment such
as dust mask, non-skid safety shoes, hard hat,
or hearing protection, depending on the type
and use of the electric tool, will reduce the risk
of personal injuries.
c) Prevent unintentional starting. Ensure the
switch is in the off position before connecting
to power source and/or battery pack, picking
up or carrying the tool. Carrying power tools
with your finger on the switch or energising
power tools that have the switch on invites
accidents.
d) Remove any adjusting key or wrench before
turning the power tool on. A wrench or a key
left attached to a rotating part of the power tool
may result in personal injury.
e) Do not overreach. Keep proper footing and
balance at all times. This enables better control
of the power tool in unexpected situations.
f) Dress properly. Do not wear loose clothing or
jewellery. Keep your hair, clothing and gloves
away from moving parts. Loose clothes, jewel-
lery or long hair can be caught in moving
parts.
g) If devices are provided for the connection of
dust extraction and collection facilities, ensure
these are connected and properly used.
Use of dust collection can reduce dust-related
hazards.
4. Power tool use and care
a) Do not force the power tool. Use the correct
power tool for your intended application. The
correct power tool will do the job better and
safer at the rate for which it was designed.
b) Do not use the power tool if the switch does
not turn it on and off. Any power tool that can-
not be controlled with the switch is dangerous
and must be repaired.
c) Disconnect the plug from the power source
and/or the battery pack from the power tool
before making any adjustments, changing
accessories, or storing power tools. Such
preventive safety measures reduce the risk of
starting the power tool accidentally.
d) Store idle power tools out of the reach of
children and do not allow persons unfamiliar
with the power tool or these instructions to
operate the power tool. Power tools are
dangerous in the hands of untrained users.
e) Maintain power tools. Check for misalign-
ment or binding of moving parts, breakage of
parts and any other condition that may affect
the power tool’s operation. If damaged, have
the power tool repaired before use. Many
accidents are caused by poorly maintained
power tools.
f) Keep cutting tools sharp and clean. Properly
maintained cutting tools with sharp cutting
edges are less likely to bind and are easier to
control.
g) Use the power tool, accessories and tool bits
etc. in accordance with these instructions, tak-
ing into account the working conditions and
the work to be performed. Use of the power
tool for operations different from those intended
could result in a hazardous situation.
5. Service
a) Have your power tool serviced by a qualified
repair person using only identical replace-
ment parts. This will ensure that the safety of
the power tool is maintained.

PTSS 1200 B1
GB
│
IE
│
NI
│
5 ■
Appliance-specific safety instructions
for circular saws
Cutting procedures
a) Danger! Keep your hands clear of the sawing
area and the saw blade. Hold the auxiliary
handle or motor housing with your other hand.
When both hands are being used to hold the
saw, neither can be injured by the saw blade.
b) Do not reach underneath the workpiece. The
blade guard cannot protect you from the saw
blade below the workpiece.
c) Adapt the cutting depth to the thickness of the
workpiece. Less than a full tooth height should
be visible below the workpiece.
d) Never hold the workpiece to be sawn in your
hand or over your leg. Fasten the workpiece
to a stable working surface. It is important to
fasten the workpiece securely to minimise the
danger of bodily contact, jamming of the saw
blade or loss of control.
e) Hold the power tool by insulated gripping
surfaces only, when performing an operation
where the cutting tool may contact hidden
wiring or its own cord. Contact with a live
wire will also make exposed metal parts of the
power tool live and could give the operator an
electric shock.
f) When making longitudinal cuts, always use
a guide rail or a straight edge guide. This will
improve the accuracy of your cut and reduce
the likelihood of the saw blade jamming.
g) Always use saw blades with the correct size
and shape (diamond versus round) of arbour
holes. Blades that do not match the mounting
hardware of the saw will run eccentrically,
causing loss of control.
h) Never use damaged or incorrect saw blade
washers or screws. The saw blade washers
and screws have been specially designed for
your saw to provide optimum performance and
operational safety.
Further safety instructions for all
saws
Kickback causes and corresponding safety
instructions
– A kickback is a sudden reaction caused as a
result of the saw blade catching, jamming or
being falsely aligned, causing the saw to jump
up uncontrollably and out of the workpiece in
the direction of the operator;
– if the saw blade catches or jams in a narrowing
saw cut, the blade can no longer rotate and the
power of the motor throws the appliance back
in the direction of the operator;
– if the saw blade twists in the saw cut or
becomes misaligned, the teeth at the rear edge
of the saw blade can become caught in the sur-
face of the workpiece, causing the saw blade
to jump out of the cut and the saw to jump
backwards in the direction of the operator.
A kickback is caused by incorrect use or misuse
of the saw. This can be avoided by taking proper
precautions as given below.
a) Hold the saw firmly in both hands and
position your arms so that they can absorb
the force of a kickback. Position your body
to either side of the saw blade, never in line
with the saw blade. If a kickback occurs, the
circular saw may jump backwards. However,
by taking appropriate precautions the operator
can control the kickback forces.
b) If the saw blade jams or you stop working,
switch the saw off and hold it steadily in the
workpiece until the saw blade has completely
stopped turning. Never attempt to remove the
saw from the workpiece or pull it backwards
while the saw blade is still moving as this
could lead to a kickback. Investigate and take
corrective actions to eliminate the cause of
blade binding.

PTSS 1200 B1
■ 6
│
GB
│
IE
│
NI
c) If you want to restart a saw that is still in the
workpiece, centre the saw blade in the cut
and check to ensure that the teeth are not
caught anywhere in the workpiece. If the saw
blade catches it can jump out of the workpiece
or cause a kickback when the saw is restarted.
d) Support large panels or boards to reduce the
risk of the saw blade jamming and causing
a kickback. Large panels tend to bend under
their own weight. Panels must be supported on
both sides, in the vicinity of the saw cut and
also at the edge.
e) Do not use blunt or damaged saw blades.
Saw blades with blunt or misaligned teeth may
cause excessive friction as the saw cut is too
narrow, and this can cause a saw blade jam
and kickback.
f) Blade depth and bevel adjusting locking
levers must be tight and secure before making
cut. If the settings change while sawing, the
saw blade might jam and cause a kickback.
g) Be particularly careful when sawing in
existing walls or other obscured areas. The
inserted saw blade could get caught on hidden
objects and cause a kickback.
Function of the blade guard
a) B
efore every use, check to ensure that the
blade guard closes properly. Do not use the
saw if the blade guard does not move freely
and does not close immediately. Never clamp
or tie the blade guard into the open position. If
the saw accidentally falls to the floor, the blade
guard might bend. Ensure that the blade guard
moves freely and does not touch the saw blade
or other parts at all cutting angles or depths.
b) Check the operation of the blade guard
spring If the guard and the spring are not op-
erating properly, have the appliance serviced
before using it. Damaged parts, sticky deposits
or accumulations of chippings can cause the
blade guard to operate slowly.
c) When making a "plunge cut" which is not at
right angles, secure the saw base plate to
prevent any lateral movement. Lateral move-
ment can cause the saw blade to jam, thus
causing a kickback.
d) Do not leave the saw on the work bench or
floor if the blade guard is not fully covering
the saw blade. An unprotected, coasting saw
blade will move the saw in the opposite direc-
tion to the cutting direction and saw anything
in its path. Be aware of the time it takes for the
blade to stop after switch is released.
Supplementary notes
■ Do not use any grinding discs.
■ Use only saw blades with diameters corre-
sponding to the label on the saw.
WARNING! DANGER DUE TO DUST
EXPOSURE!
► When working for extended periods of time
on wood and, in particular, materials that
produce dust which is hazardous to health,
connect the appliance to an appropriate
external dust extraction appliance.
Wear protective gloves!
Wear a dust mask!
Wear safety goggles!
Wear ear protectors!
■ Do not allow the teeth of the saw blade to
overheat.
■ When sawing plastic, avoid melting the plastic.
WARNING! TOXIC FUMES!
► Working with the tool can produce harmful/
toxic dusts that represent a health hazard for
the person operating the appliance and for
any other people in the area.
■ Materials containing asbestos may not be pro-
cessed. Asbestos is a known carcinogen.

PTSS 1200 B1
GB
│
IE
│
NI
│
7 ■
Original accessories/auxiliary
equipment
■ Use only the additional equipment and acces-
sories specified in the operating instructions.
Using attachments or accessory tools other than
those recommended in the operating instruc-
tions can lead to a risk of injury.
■ Only the original guide rails may be used.
■ All blades used should conform to EN 847-1.
Operation
Fitting/changing the saw blade
Always remove the plug from the power socket
before working on the appliance.
NOTE
► Position the base plate for this operation on
the edge of a stable surface so that the saw
blade
can be lowered.
1. Activate the safety lock-out and push the
motor unit forwards.
2. Open the clamping lever
. Release the safety
lock-out . The motor unit clicks into place. The
movement of the motor unit is blocked upward
and downward.
3. The clamping screw/washer
14a
is now in posi-
tion
14b
.
4. Press the spindle lock button
and use the
Hex key to open the clamping screw/
washer
14a
.
5. Remove saw blade
.
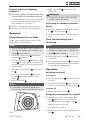
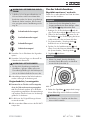
NOTE
► Ensure that the factory-fitted flange X stays in
place during installation and removal (see fig. A).
Fig. A
6. Fitting a saw blade
is carried out in the
reverse order.
WARNING!
► The direction of rotation of the saw blade
and the machine must match.
Connecting the sawdust extraction
device
♦ If required, attach the adapter for dust extrac-
tion to the chip ejector .
♦ Connect an approved dust and chip extraction
device.
Check that the blade guard is
functioning
NOTE
► Position the base plate for this operation on
the edge of a stable surface so that the saw
blade
can be lowered.
♦ Activate the safety lock-out
and lower the
circular saw.
♦ Check whether the saw blade
rubs against
the blade guard and whether it moves back to
its starting position automatically.
Operation
Switching on and off
Switching on:
♦ Push the safety lock-out
upwards and hold it
in position.
♦ Press the ON/OFF switch . Once the saw is
running, you can release the safety lock-out .
Switching off:
♦ Release the ON/OFF switch
.
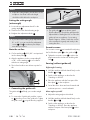
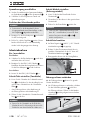
Setting the cutting depth (dive depth)
♦ Undo the screw for the cutting depth adjust-
ment and push the stop to the desired
cutting depth on the cutting depth scale :
– without guide rail, see mark A.
– with guide rail, see mark B.
♦ Retighten the screw for the cutting depth adjust-
ment
.
X

PTSS 1200 B1
■ 8
│
GB
│
IE
│
NI
NOTE
► Adjust the cutting depth to the thickness of the
workpiece. Less than a full tooth height
should be visible below the workpiece.
Setting the cutting angle
(mitre angle)
♦ Loosen the two adjustment wheels for the
cutting angle .
♦ Tilt the motor to the desired cutting angle.
♦ Retighten the adjustment wheels
.
NOTE
► If you have set the cutting angle adjustment to
0° or 45°, you can use the fine adjustment
screws
and
8a
to make any fine adjust-
ment that you require.
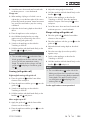
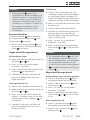
Note the cut line
♦ Cut line markings
9a
of 0°/45° are imprinted
into the base plate .
♦ Align the appliance to the corresponding 0°
or 45° cut line markings
9a
in accordance
with the set cutting angle.
♦ The inclined surfaces are reference points for
this.
♦ Connecting the guide rails
The guide rails will help you to make straight
cuts.
♦ To connect the 2 guide rails, push the connec-
tor
into the groove of the guide rails. Tighten
the grub screws using the Hex key supplied.
NOTE
► The guide rails
have a splinter guard
(black rubber lip). The splinter guard must be
adjusted before making the first cut. Place the
guide rail onto a workpiece. Set a cutting
depth of approx. 10 mm. Switch the circular
saw on and push it gently and evenly in the
cutting direction.
Eccentric screws
The eccentric screws are intended for adjusting
the fit of the base plate on the guide rail .
♦ Tighten the eccentric screws
to reduce the
play between the circular saw and the guide
rails .
Sawing (without guide rail)
Right-angled sawing
♦ Hold the machine with both hands firmly on the
handles
and .
♦ Switch on the appliance as described in
"Switching on and off".
♦ Place the appliance with the front part of the
base plate
on the workpiece.
♦ Swivel the motor down and saw forwards with
moderate pressure – never backwards.
Mitre angles up to 45°
♦ Adjust the cutting angle as described.
♦ Hold the machine with both hands firmly on the
handles
and .
♦ Switch on the appliance as described in
"Switching on and off". Place the appliance
with the front part of the base plate
on the
workpiece.
9a

PTSS 1200 B1
GB
│
IE
│
NI
│
9 ■
♦ Swivel the motor down and saw forwards with
moderate pressure – never backwards.
Plunge cuts
♦ When making a "plunge cut" which is not at
right angles, secure the base plate of the saw to
prevent any lateral movement. Lateral movement
can cause the saw blade to jam, thus causing
a kickback.
♦ Adjust the desired cutting depth as described
above.
♦ Place the appliance on the workpiece.
♦ Avoid kickback and place the rear edge
against a stop (as referenced in the section
"Plunge cutting with guide rail").
♦ Switch on the appliance as described in
"Switching on and off".
♦ Hold the machine with both hands firmly on the
handles
and and pivot it.
NOTE
► The cut width marking
on the side of the
blade guard shows the front and rear cutting
point of a 165 mm at maximum cutting
depth. This applies both to plunge cuts with
guide rail and plunge cuts without guide
rail .
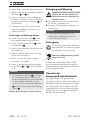
Sawing (with guide rail)
Right-angled sawing with guide rail
♦ Place the guide rail
with the foam rubber
element on the workpiece.
♦ Place the appliance with the groove
onto the
guide rail .
♦ Switch on the appliance as described in
"Switching on and off".
♦ Hold the machine with both hands firmly on the
handles
and and pivot it.
Mitre angles up to 45°
♦ Apply the guide rail
with the foam rubber
element onto the workpiece.
♦ Place the appliance with the groove
onto the
guide rail .
♦ Adjust the cutting angle as described.
♦ Hold the machine with both hands firmly on the
handles
and .
♦ Switch on the appliance as described in
"Switching on and off". Place the appliance
with the front part of the base plate
on the
workpiece.
♦ Swivel the motor down and saw forwards with
moderate pressure – never backwards.
Plunge cutting with guide rail
♦ Place the guide rail with the foam rubber
element on the workpiece.
♦ Place the appliance with the groove
onto the
guide rail .
♦ Adjust the desired cutting depth as described
above.
♦ Place the rear edge (as much as possible)
against a stop.
♦ Switch on the appliance as described in
"Switching on and off".
♦ Hold the machine with both hands firmly on the
handles
and and pivot it.
NOTE
► The cut width marking
on the side of the
blade guard shows the front and rear cutting
point of a 165 mm cutting blade at maximum
cutting depth. This applies both for plunge
cuts with guide rail and plunge cuts
without guide rail .
Further applications are not permitted.

PTSS 1200 B1
■ 10
│
GB
│
IE
│
NI
Cleaning and maintenance
WARNING! RISK OF INJURY! Switch
the appliance off and remove the
power plug before starting any
work on the appliance.
■ The appliance must always be kept clean, dry
and free from oil or grease.
■ Use a soft, dry cloth to clean the housing.
NOTE
► Replacement parts not listed (such as carbon
brushes, switches) can be ordered via our
service hotline.
Disposal
The packaging is made from environmen-
tally friendly material and can be
disposed off at your local recycling plant.
Do not dispose of power tools in
your normal household waste!
European Directive 2012/19/EU requires that
worn-out power tools be collected separately and
recycled in an environmentally compatible manner.
Kompernass Handels GmbH
warranty
Dear Customer,
This appliance has a 3-year warranty valid from
the date of purchase. If this product has any faults,
you, the buyer, have certain statutory rights. Your
statutory rights are not restricted in any way by the
warranty described below.
Warranty conditions
The validity period of the warranty starts from the
date of purchase. Please keep your original receipt
in a safe place. This document will be required as
proof of purchase.
If any material or production fault occurs within
three years of the date of purchase of the product,
we will either repair or replace the product for you
at our discretion. This warranty service is dependent
on you presenting the defective appliance and
the proof of purchase (receipt) and a short written
description of the fault and its time of occurrence.
If the defect is covered by the warranty, your product
will either be repaired or replaced by us. The repair
or replacement of a product does not signify the
beginning of a new warranty period.
Warranty period and statutory claims for
defects
The warranty period is not prolonged by repairs
effected under the warranty. This also applies to
replaced and repaired components. Any damage
and defects present at the time of purchase must
be reported immediately after unpacking. Repairs
carried out after expiry of the warranty period shall
be subject to a fee.

PTSS 1200 B1
GB
│
IE
│
NI
│
11 ■
Scope of the warranty
This appliance has been manufactured in accordance
with strict quality guidelines and inspected meticu-
lously prior to delivery.
The warranty covers material faults or production
faults. The warranty does not extend to product parts
subject to normal wear and tear or fragile parts such
as switches, batteries, baking moulds or parts made
of glass.
The warranty does not apply if the product has been
damaged, improperly used or improperly maintained.
The directions in the operating instructions for the
product regarding proper use of the product are
to be strictly followed. Uses and actions that are
discouraged in the operating instructions or which
are warned against must be avoided.
This product is intended solely for private use and
not for commercial purposes. The warranty shall be
deemed void in cases of misuse or improper handling,
use of force and modifications/repairs which have
not been carried out by one of our authorised
Service centres.
Warranty claim procedure
To ensure quick processing of your case, please
observe the following instructions:
■ Please have the till receipt and the item number
(e.g. IAN 12345) available as proof of purchase.
■ You will find the item number on the type plate,
an engraving on the front page of the instructions
(bottom left), or as a sticker on the rear or
bottom of the appliance.
■ If functional or other defects occur, please
contact the service department listed either by
telephone or by e-mail.
■ You can return a defective product to us free of
charge to the service address that will be provided
to you. Ensure that you enclose the proof of
purchase (till receipt) and information about
what the defect is and when it occurred.
You can download these instructions
along with many other manuals,
product videos and software on
www.lidl-service.com.
Service
WARNING!
► Have the power tool repaired by the
Service centre or a qualified electrician
and only using original replacement parts.
This will ensure that the safety of the appli-
ance is maintained.
► Always ensure that the power plug or
the mains cable is replaced only by the
manufacturer of the appliance or by an
approved customer service provider. This
will ensure that the safety of the appliance is
maintained.
Service Great Britain
Tel.: 0871 5000 720 (£ 0.10/Min.)
E-Mail: k[email protected]
Service Ireland
Tel.: 1890 930 034
(0,08 EUR/Min., (peak))
(0,06 EUR/Min., (off peak))
E-Mail: k[email protected]
IAN 282495
Importer
Please note that the following address is not the
service address. Please use the service address
provided in the operating instructions.
KOMPERNASS HANDELS GMBH
BURGSTRASSE 21
DE - 44867 BOCHUM
GERMANY
www.kompernass.com

PTSS 1200 B1
■ 12
│
GB
│
IE
│
NI
Translation of the original
Conformity Declaration
We, KOMPERNASS HANDELS GMBH,
documents officer: Mr. Semi Uguzlu, BURGSTR.
21, 44867 BOCHUM, GERMANY, hereby de-
clare that this product complies with the following
standards, normative documents and EC directives:
Machinery Directive
(2006/42/EC)
EMC (Electromagnetic Compatibility)
(2014 / 30 / EU)
RoHS Directive
(2011/65/EU)*
*The manufacturer bears the full responsibility for compli-
ance with this conformity declaration. The object of the
declaration described above complies with the require-
ments of the Directive 2011/65/EU of the European
Parliament and Council of 8 June 2011 on the limitations
of use of certain dangerous substances in electrical and
electronic appliances.
Applied harmonised standards:
EN 60745-1: 2009+A11
EN 60745-2-5: 2010
EN ISO 12100: 2010
EN 55014-1: 2006+A1+A2
EN 55014-2: 2015
EN 61000-3-2: 2006+A1+A2
EN 61000-3-3: 2013
Type/appliance designation:
plunge saw PTSS 1200 B1
Year of manufacture: 12 - 2016
Serial number: IAN 282495
Bochum, 08/12/2016
Semi Uguzlu
- Quality Manager -
The right to effect technical changes in the context
of further development is reserved.

PTSS 1200 B1
DE
│
AT
│
CH
│
13 ■
Inhaltsverzeichnis
Einleitung .......................................................14
Bestimmungsgemäßer Gebrauch ............................................... 14
Ausstattung ................................................................14
Lieferumfang ...............................................................14
Technische Daten ...........................................................14
Allgemeine Sicherheitshinweise für Elektrowerkzeuge .................15
1. Arbeitsplatz-Sicherheit ..................................................... 15
2. Elektrische Sicherheit ...................................................... 15
3. Sicherheit von Personen .................................................... 16
4. Verwendung und Behandlung des Elektrowerkzeugs .............................16
5. Service ................................................................. 17
Gerätespezifische Sicherheitshinweise für alle Sägen ...............................17
Weitere Sicherheitshinweise für alle Sägen ....................................... 17
Originalzubehör / -zusatzgeräte ...............................................19
Vor der Inbetriebnahme ..........................................19
Sägeblatt montieren / wechseln ............................................... 19
Spanabsaugung anschließen .................................................. 20
Funktion der Schutzhaube prüfen ...............................................20
Inbetriebnahme .................................................20
Ein- / ausschalten ...........................................................20
Schnitt-Tiefe einstellen (Tauchtiefe) .............................................. 20
Schnitt-Winkel einstellen (Gehrungswinkel) .......................................20
Schnittlinie beachten .........................................................20
Führungsschiene verbinden ................................................... 20
Exzenterschrauben .......................................................... 21
Sägen (ohne Führungsschiene) ................................................21
Sägen (mit Führungsschiene) .................................................. 21
Tauchsägen mit Führungsschiene ...............................................22
Reinigung und Wartung ...........................................22
Entsorgung .....................................................22
Garantie der Kompernaß Handels GmbH ............................22
Service .........................................................24
Importeur ......................................................24
Original-Konformitätserklärung ....................................24

PTSS 1200 B1
■ 14
│
DE
│
AT
│
CH
TAUCHSÄGE PTSS 1200 B1
Einleitung
Wir beglückwünschen Sie zum Kauf Ihres neuen
Gerätes. Sie haben sich damit für ein hochwertiges
Produkt entschieden. Die Bedienungsanleitung ist
Teil dieses Produkts. Sie enthält wichtige Hinweise für
Sicherheit, Gebrauch und Entsorgung. Machen Sie
sich vor der Benutzung des Produkts mit allen Bedien-
und Sicherheitshinweisen vertraut. Benutzen Sie das
Produkt nur wie beschrieben und für die angegebe-
nen Einsatzbereiche. Händigen Sie alle Unterlagen
bei Weitergabe des Produkts an Dritte mit aus.
Bestimmungsgemäßer Gebrauch
Die Tauchsäge (nachfolgend „Gerät“ oder
„Maschine“ genannt) ist zum Sägen von Längs-
und Querschnitten und Tauchschnitten bei fester
Auflage in Vollholz, Spanplatten, Kunststoff und
Leichtbaustoffen geeignet. Das Bearbeiten von
Eisenmetallen ist nicht zulässig. Das Gerät kann
wahlweise mit den mitgelieferten Führungsschie-
nen – ausschließlich für die dazu beschriebenen
Schnitttechniken – benutzt werden. Jede andere
Verwendung oder Veränderung der Maschine gilt
als nicht bestimmungsgemäß und birgt erhebliche
Unfallgefahren. Nicht zum gewerblichen Gebrauch.
Ausstattung
Einschaltsperre
EIN- / AUS-Schalter
Handgriff
Innensechskantschlüssel (klein)
Innensechskantschlüssel (groß)
Motoreinheit
Spanauswurfadapter
Feinjustierschrauben für 0 °-Schnittwinkel
8a
Feinjustierschraube für 45 °-Schnittwinkel
Sägetisch
9a
Schnittlinien-Markierung
Exzenterschraube (2 x)
Einstellrad für Schnittwinkeleinstellung (2 x)
Schnitttiefenverstellung
Schnitttiefenskala
Sägeblatt
14a
Spannschraube / Unterlegscheibe
14b
Montageausschnitt
Zusatzhandgriff
Schnittbreitemarkierung
Spanauswurf (drehbar)
Festellhebel für Sägeblattwechsel
Spindelarretierung
Nut für Führungsschiene
Führungsschiene
Madenschrauben
Verbindungselement
X Flansch (Werkseitig montiert)
Lieferumfang
1 Tauchsäge
1 Sägeblatt 165 mm / 24 Zähne (montiert)
2 Führungsschienen
1 Verbindungselement
1 Spanauswurfadapter
2 Innensechskantschlüssel
1 Bedienungsanleitung
Technische Daten
Bemessungsspannung: 230 V∼, 50 Hz
(Wechselstrom)
Bemessungsaufnahme: 1200 W
Bemessungs-
leerlaufdrehzahl: n
0
5200 min
-1
Sägeblattaufnahme: ø 20 mm
Sägeblatt-
durchmesser:
165mm
Ø 165 mm
Stammblattdicke: 1,5 mm
Zahnstärke: 2,6 mm
max. Schnitttiefe: 56 mm bei 90 °
Gehrungswinkel
42 mm bei 45 °
Gehrungswinkel
Mit Führungssschiene
minus 5 mm
Schutzklasse: II / (Doppelisolierung)
Zubehör: Führungsschiene 2 x
700 mm x 180 mm
max. 65 mm

PTSS 1200 B1
DE
│
AT
│
CH
│
15 ■
Geräuschemissionswert:
Messwert für Geräusch ermittelt entsprechend
EN 60745. Der A-bewertete Geräuschpegel des
Elektrowerkzeugs beträgt typischerweise:
Schalldruckpegel: L
PA
= 90,43 dB (A)
Unsicherheit: K
PA
= 3 dB
Schallleistungspegel: L
WA
= 101,43 dB (A)
Unsicherheit: K
WA
= 3 dB
Gehörschutz tragen!
Schwingungsgesamtwert:
Schwingungsgesamtwerte (Vektorsumme dreier
Richtungen) ermittelt entsprechend EN 60745:
Sägen von Holz: a
h,W
= 2,582 m/s
2
Unsicherheit K = 1,5 m/s
2
HINWEIS
► Der in diesen Anweisungen angegebene
Schwingungspegel ist entsprechend einem in
EN 60745 genormten Messverfahren ge-
messen worden und kann für den Gerätever-
gleich verwendet werden. Der angegebene
Schwingungsemissionswert kann auch zu
einer einleitenden Einschätzung der Ausset-
zung verwendet werden.
WARNUNG!
► Der Schwingungspegel wird sich entspre-
chend dem Einsatz des Elektrowerkzeugs
verändern und kann in manchen Fällen über
dem in diesen Anweisungen angegebenen
Wert liegen. Die Schwingungsbelastung
könnte unterschätzt werden, wenn das
Elektrowerkzeug regelmäßig in solcher Weise
verwendet wird. Versuchen Sie, die Belastung
durch Vibrationen so gering wie möglich zu
halten. Beispielhafte Maßnahmen zur Verrin-
gerung der Vibrationsbelastung sind das Tra-
gen von Handschuhen beim Gebrauch des
Werkzeugs und die Begrenzung der Arbeits-
zeit. Dabei sind alle Anteile des Betriebszyk-
lus zu berücksichtigen (beispielweise Zeiten,
in denen das Elektrowerkzeug abgeschaltet
ist, und solche, in denen es zwar eingeschal-
tet ist, aber ohne Belastung läuft).
Allgemeine
Sicherheitshinweise
für Elektrowerkzeuge
WARNUNG!
► Lesen Sie alle Sicherheitshinweise und Anwei-
sungen. Versäumnisse bei der Einhaltung der
Sicherheitshinweise und Anweisungen können
elektrischen Schlag, Brand und/oder schwere
Verletzungen verursachen.
Bewahren Sie alle Sicherheitshinweise und
Anweisungen für die Zukunft auf.
Der in den Sicherheitshinweisen verwendete Begriff
„Elektrowerkzeug“ bezieht sich auf netzbetriebene
Elektrowerkzeuge (mit Netzkabel) und auf akkube-
triebene Elektrowerkzeuge (ohne Netzkabel).
1. Arbeitsplatz-Sicherheit
a) Halten Sie Ihren Arbeitsbereich sauber und
gut beleuchtet. Unordnung und unbeleuchtete
Arbeitsbereiche können zu Unfällen führen.
b) Arbeiten Sie mit dem Elektrowerkzeug nicht in
explosionsgefährdeter Umgebung, in der sich
brennbare Flüssigkeiten, Gase oder Stäube
befinden. Elektrowerkzeuge erzeugen Funken, die
den Staub oder die Dämpfe entzünden können.
c) Halten Sie Kinder und andere Personen während der
Benutzung des Elektrowerkzeugs fern. Bei Ablenkung
können Sie die Kontrolle über das Gerät verlieren.
2. Elektrische Sicherheit
a) Der Anschlussstecker des Elektrowerkzeuges
muss in die Steckdose passen. Der Stecker darf
in keiner Weise verändert werden. Verwenden
Sie keine Adapterstecker gemeinsam mit schutz-
geerdeten Elektrowerkzeugen. Unveränderte
Stecker und passende Steckdosen verringern das
Risiko eines elektrischen Schlages.
b) Vermeiden Sie Körperkontakt mit geerdeten
Oberflächen, wie von Rohren, Heizungen,
Herden und Kühlschränken. Es besteht ein
erhöhtes Risiko durch elektrischen Schlag, wenn
Ihr Körper geerdet ist.
c) Halten Sie Elektrowerkzeuge von Regen oder
Nässe fern. Das Eindringen von Wasser in ein Elekt-
rogerät erhöht das Risiko eines elektrischen Schlages.

PTSS 1200 B1
■ 16
│
DE
│
AT
│
CH
d) Zweckentfremden Sie das Kabel nicht, um
das Elektrowerkzeug zu tragen, aufzuhängen
oder um den Stecker aus der Steckdose zu
ziehen. Halten Sie das Kabel fern von Hitze,
Öl, scharfen Kanten oder sich bewegenden
Geräteteilen. Beschädigte oder verwickelte Kabel
erhöhen das Risiko eines elektrischen Schlages.
e) Wenn Sie mit einem Elektrowerkzeug im
Freien arbeiten, verwenden Sie nur Verlänge-
rungskabel, die auch für den Außenbereich
geeignet sind. Die Anwendung eines für den
Außenbereich geeigneten Verlängerungskabels
verringert das Risiko eines elektrischen Schlages.
f) Wenn der Betrieb des Elektrowerkzeuges in
feuchter Umgebung nicht vermeidbar ist, ver-
wenden Sie einen Fehlerstromschutzschalter.
Der Einsatz eines Fehlerstromschutzschalters ver-
mindert das Risiko eines elektrischen Schlages.
3. Sicherheit von Personen
a) Seien Sie stets aufmerksam, achten Sie darauf,
was Sie tun und gehen Sie mit Vernunft an die
Arbeit mit einem Elektrowerkzeug. Benutzen
Sie kein Elektrowerkzeug, wenn Sie krank oder
müde oder unter dem Einfluss von Drogen,
Alkohol oder Medikamenten stehen. Ein Moment
der Unachtsamkeit beim Gebrauch des Elektrowerk-
zeuges kann zu ernsthaften Verletzungen führen.
b) Tragen Sie persönliche Schutzausrüstung und
immer eine Schutzbrille. Das Tragen persönlicher
Schutzausrüstung wie Staubmaske, rutschfeste
Sicherheitsschuhe, Schutzhelm oder Gehörschutz,
je nach Art und Einsatz des Elektrowerkzeuges,
verringert das Risiko von Verletzungen.
c) Vermeiden Sie eine unbeabsichtigte Inbetrieb-
nahme. Vergewissern Sie sich, dass das
Elektrowerkzeug ausgeschaltet ist, bevor Sie
es an die Stromversorgung und / oder den
Akku anschließen, es aufnehmen oder tragen.
Wenn Sie beim Tragen des Elektrowerkzeuges den
Finger am Schalter haben oder das Gerät bereits
eingeschaltet an die Stromversorgung anschließen,
kann dies zu Unfällen führen.
d) Entfernen Sie Einstellwerkzeuge oder Schrau-
benschlüssel, bevor Sie das Elektrowerkzeug
einschalten. Ein Werkzeug oder Schlüssel, der
sich in einem drehenden Geräteteil befindet,
kann zu Verletzungen führen.
e) Vermeiden Sie eine abnormale Körperhaltung.
Sorgen Sie für einen sicheren Stand und halten
Sie jederzeit das Gleichgewicht. Dadurch kön-
nen Sie das Elektrowerkzeug in unerwarteten
Situationen besser kontrollieren.
f) Tragen Sie geeignete Kleidung. Tragen Sie
keine weite Kleidung oder Schmuck. Halten
Sie Haare, Kleidung und Handschuhe fern
von sich bewegenden Teilen. Lockere Kleidung,
Schmuck oder lange Haare können von sich
bewegenden Teilen erfasst werden.
g) Wenn Staubabsaug- und -auffangeinrichtun-
gen montiert werden können, vergewissern
Sie sich, dass diese angeschlossen sind und
richtig verwendet werden. Die Verwendung
einer Staubabsaugung kann Gefährdungen
durch Staub verringern.
4. Verwendung und Behandlung des
Elektrowerkzeugs
a) Überlasten Sie das Gerät nicht. Verwenden
Sie für Ihre Arbeit das dafür bestimmte
Elektrowerkzeug. Mit dem passenden Elektro-
werkzeug arbeiten Sie besser und sicherer im
angegebenen Leistungsbereich.
b) Benutzen Sie kein Elektrowerkzeug, dessen
Schalter defekt ist. Ein Elektrowerkzeug, das
sich nicht mehr ein- oder ausschalten lässt, ist
gefährlich und muss repariert werden.
c) Ziehen Sie den Stecker aus der Steckdose
und / oder entfernen Sie den Akku, bevor Sie
Geräteeinstellungen vornehmen, Zubehörtei-
le wechseln oder das Gerät weglegen. Diese
Vorsichtsmaßnahme verhindert den unbeabsich-
tigten Start des Elektrowerkzeuges.
d) Bewahren Sie unbenutzte Elektrowerkzeuge
außerhalb der Reichweite von Kindern auf.
Lassen Sie Personen das Gerät nicht benutzen,
die mit diesem nicht vertraut sind oder diese
Anweisungen nicht gelesen haben. Elektro-
werkzeuge sind gefährlich, wenn sie von
unerfahrenen Personen benutzt werden.
e) Pflegen Sie Elektrowerkzeuge mit Sorgfalt.
Kontrollieren Sie, ob bewegliche Teile
einwandfrei funktionieren und nicht klemmen,
ob Teile gebrochen oder so beschädigt sind,
dass die Funktion des Elektrowerkzeuges
beeinträchtigt ist. Lassen Sie beschädigte

PTSS 1200 B1
DE
│
AT
│
CH
│
17 ■
Teile vor dem Einsatz des Gerätes reparieren.
Viele Unfälle haben ihre Ursache in schlecht
gewarteten Elektrowerkzeugen.
f) Halten Sie Schneidwerkzeuge scharf und
sauber. Sorgfältig gepflegte Schneidwerkzeuge
mit scharfen Schneidkanten verklemmen sich
weniger und sind leichter zu führen.
g) Verwenden Sie Elektrowerkzeug, Zubehör,
Einsatzwerkzeuge usw. entsprechend diesen
Anweisungen. Berücksichtigen Sie dabei die
Arbeitsbedingungen und die auszuführende
Tätigkeit. Der Gebrauch von Elektrowerkzeugen
für andere als die vorgesehenen Anwendungen
kann zu gefährlichen Situationen führen.
5. Service
a) Lassen Sie Ihr Elektrowerkzeug nur von quali-
fiziertem Fachpersonal und nur mit Original-
Ersatzteilen reparieren. Damit wird sicherge-
stellt, dass die Sicherheit des Elektrowerkzeugs
erhalten bleibt.
Gerätespezifische Sicherheitshinweise
für alle Sägen
Sägeverfahren
a) GEFAHR! Kommen Sie mit Ihren Händen nicht
in den Sägebereich und an das Sägeblatt.
Halten Sie mit Ihrer zweiten Hand den
Zusatzgriff oder das Motorgehäuse. Wenn
beide Hände die Säge halten, können diese
vom Sägeblatt nicht verletzt werden.
b) Greifen Sie nicht unter das Werkstück. Die
Schutzhaube kann Sie unter dem Werkstück
nicht vor dem Sägeblatt schützen.
c) Passen Sie die Schnitttiefe an die Dicke des
Werkstücks an. Es sollte weniger als eine volle
Zahnhöhe unter dem Werkstück sichtbar sein.
d) Halten Sie das zu sägende Werkstück
niemals in der Hand oder über dem Bein fest.
Sichern Sie das Werkstück an einer stabilen
Aufnahme. Es ist wichtig, das Werkstück gut zu
befestigen, um die Gefahr von Körperkontakt,
Klemmen des Sägeblattes oder Verlust der
Kontrolle zu minimieren.
e) Fassen Sie das Elektrowerkzeug nur an den
isolierten Griffflächen an, wenn Sie Arbeiten
ausführen, bei denen das Einsatzwerkzeug
verborgene Stromleitungen oder das eigene
Netzkabel treffen kann. Kontakt mit einer
spannungsführenden Leitung setzt auch die Me-
tallteile des Elektrowerkzeugs unter Spannung
und führt zu einem elektrischen Schlag.
f) Verwenden Sie beim Längsschneiden immer
einen Anschlag oder eine gerade Kantenführung.
Dies verbessert die Schnittgenauigkeit und verringert
die Möglichkeit, dass das Sägeblatt klemmt.
g) Verwenden Sie immer Sägeblätter in der
richtigen Größe und mit passender Aufnah-
mebohrung (z.B. sternförmig oder rund).
Sägeblätter, die nicht zu den Montageteilen der
Säge passen, laufen unrund und führen zum
Verlust der Kontrolle.
h) Verwenden Sie niemals beschädigte oder
falsche Sägeblatt-Unterlegscheiben oder
-schrauben. Die Sägeblatt-Unterlegscheiben und
-schrauben wurden speziell für Ihre Säge konstru-
iert, für optimale Leistung und Betriebssicherheit.
Weitere Sicherheitshinweise für alle
Sägen
Rückschlag – Ursachen und entsprechende
Sicherheitshinweise
– Ein Rückschlag ist die plötzliche Reaktion
infolge eines hakenden, klemmenden oder
falsch ausgerichteten Sägeblattes, die dazu
führt, dass eine unkontrollierte Säge abhebt und
sich aus dem Werkstück heraus in Richtung der
Bedienperson bewegt;
– wenn sich das Sägeblatt in dem sich schlie-
ßenden Sägespalt verhakt oder verklemmt,
blockiert es, und die Motorkraft schlägt das
Gerät in Richtung der Bedienperson zurück;
– wird das Sägeblatt im Sägeschnitt verdreht
oder falsch ausgerichtet, können sich die Zähne
der hinteren Sägeblattkante in der Oberfläche
des Werkstücks verhaken, wodurch sich das
Sägeblatt aus dem Sägespalt herausbewegt
und die Säge in Richtung der Bedienperson
zurückspringt.
Ein Rückschlag ist die Folge eines falschen oder
fehlerhaften Gebrauchs der Säge. Er kann durch
geeignete Vorsichtsmaßnahmen, wie nachfolgend
beschrieben, verhindert werden.
Seite wird geladen ...
Seite wird geladen ...
Seite wird geladen ...
Seite wird geladen ...
Seite wird geladen ...
Seite wird geladen ...
Seite wird geladen ...
Seite wird geladen ...
-
 1
1
-
 2
2
-
 3
3
-
 4
4
-
 5
5
-
 6
6
-
 7
7
-
 8
8
-
 9
9
-
 10
10
-
 11
11
-
 12
12
-
 13
13
-
 14
14
-
 15
15
-
 16
16
-
 17
17
-
 18
18
-
 19
19
-
 20
20
-
 21
21
-
 22
22
-
 23
23
-
 24
24
-
 25
25
-
 26
26
-
 27
27
-
 28
28


Parkside PTSS 1200 B1 Original Instructions Manual
- Kategorie
- Elektrowerkzeuge
- Typ
- Original Instructions Manual
in anderen Sprachen
- English: Parkside PTSS 1200 B1
Verwandte Artikel
-
Parkside PTSS 1200 C1 Benutzerhandbuch
-
Parkside PTSS 1200 C2 Translation Of The Original Instructions
-
Parkside 1200 A1 Operation and Safety Notes
-
Parkside A1 Benutzerhandbuch
-
-
-
Parkside 90882 Translation Of Original Operation Manual
-
Parkside PHKSA 18-Li B2 Bedienungsanleitung
-
-
Parkside PKGA 20-Li B1 - IAN 315586 Bedienungsanleitung
Andere Dokumente
-
Pattfield PSC165P1 Bedienungsanleitung
-
Bort BPS-500-P Benutzerhandbuch
-
 alzaTools AT-CJS20V Cordless Jig Saw Benutzerhandbuch
-
Vonroc S_CS503AC Benutzerhandbuch
-
-
Scheppach PL55 Original Instruction Manual
-
-
Vonroc RS502AC Benutzerhandbuch
-
-
Scheppach 490 1802 902 Bedienungsanleitung
