Toro 53cm Super Recycler Lawn Mower Benutzerhandbuch
- Kategorie
- Rasenmäher
- Typ
- Benutzerhandbuch

FormNo.3437-465RevA
53cmSuperRecycler®LawnMower
21690,21691
SuperRecycler®Rasenmäher(53cm)
21690,21691
TondeuseSuperRecycler®53cm
21690,21691
53cmSuperRecycler®gazonmaaier
21690,21691
www.T oro.com.
*3437-465*A


FormNo.3437-454RevA
53cmSuperRecycler
®
LawnMower
ModelNo.21690—SerialNo.405400000andUp
ModelNo.21691—SerialNo.405600000andUp
Operator'sManual
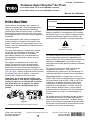
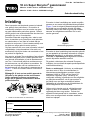
Introduction
Thisrotary-blade,walk-behindlawnmowerisintended
tobeusedbyresidentialhomeowners.Itisdesigned
primarilyforcuttinggrassonwell-maintainedlawnson
residentialproperties.Usingthisproductforpurposes
otherthanitsintendedusecouldprovedangerousto
youandbystanders.
Readthisinformationcarefullytolearnhowtooperate
andmaintainyourproductproperlyandtoavoid
injuryandproductdamage.Youareresponsiblefor
operatingtheproductproperlyandsafely.
Visitwww.Toro.comformoreinformation,including
safetytips,trainingmaterials,accessoryinformation,
helpndingadealer,ortoregisteryourproduct.
Wheneveryouneedservice,genuineToroparts,or
additionalinformation,contactanAuthorizedService
DealerorToroCustomerServiceandhavethemodel
andserialnumbersofyourproductready.Figure1
identiesthelocationofthemodelandserialnumbers
ontheproduct.Writethenumbersinthespace
provided.
Important:Withyourmobiledevice,youcan
scantheQRcodeontheserialnumberdecal(if
equipped)toaccesswarranty,parts,andother
productinformation
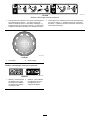
g282693
Figure1
1.Modelandserialnumberlocation
ModelNo.
SerialNo.
Thismanualidentiespotentialhazardsandhas
safetymessagesidentiedbythesafety-alertsymbol
(Figure2),whichsignalsahazardthatmaycause
seriousinjuryordeathifyoudonotfollowthe
recommendedprecautions.
g000502
Figure2
Safety-alertsymbol
Thismanualuses2wordstohighlightinformation.
Importantcallsattentiontospecialmechanical
informationandNoteemphasizesgeneralinformation
worthyofspecialattention.
ThisproductcomplieswithallrelevantEuropean
directives;fordetails,pleaseseetheseparateproduct
specicDeclarationofConformity(DOC)sheet.
GrossorNetTorque:Thegrossornettorque
ofthisenginewaslaboratoryratedbytheengine
manufacturerinaccordancewiththeSocietyof
AutomotiveEngineers(SAE)J1940orJ2723.As
conguredtomeetsafety,emission,andoperating
requirements,theactualenginetorqueonthisclass
ofmowerwillbesignicantlylower.Pleasereferto
theenginemanufacturer’sinformationincludedwith
themachine.
Donottamperwithordisablesafetydevicesonthe
machine,andchecktheirproperoperationregularly.
Donotattempttoadjustortamperwiththeengine
speedcontrol;doingsomaycreateanunsafe
operatingcondition,resultinginpersonalinjury.
©2019—TheToro®Company
8111LyndaleAvenueSouth
Bloomington,MN55420
Registeratwww.T oro.com.
OriginalInstructions(EN)
PrintedinMexico
AllRightsReserved
*3437-454*A

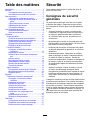
Contents
Introduction...............................................................1
Safety.......................................................................2
GeneralSafety...................................................2
SafetyandInstructionalDecals..........................3
Setup........................................................................5
1AssemblingandUnfoldingtheHandle..............5
2InstallingtheRecoil-StarterRopeinthe
RopeGuide.....................................................7
3AddingOiltotheEngine...................................8
4AssemblingtheGrassBag...............................8
5ChargingtheBattery........................................9
ProductOverview.....................................................9
Specications....................................................9
Attachments/Accessories...................................9
Operation................................................................10
BeforeOperation.................................................10
BeforeOperationSafety...................................10
FillingtheFuelT ank..........................................10
CheckingtheEngine-OilLevel...........................11
AdjustingtheHandleHeight.............................12
AdjustingtheCuttingHeight.............................12
DuringOperation.................................................13
DuringOperationSafety...................................13
StartingtheEngine...........................................14
UsingtheSelf-PropelDrive...............................15
ShuttingOfftheEngine.....................................15
RecyclingtheClippings....................................15
BaggingtheClippings.......................................16
DischargingtheClippings.................................17
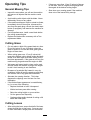
OperatingTips.................................................19
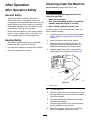
AfterOperation....................................................20
AfterOperationSafety......................................20
CleaningundertheMachine.............................20
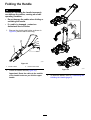
FoldingtheHandle...........................................21
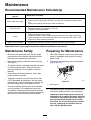
Maintenance...........................................................22
RecommendedMaintenanceSchedule(s)...........22
MaintenanceSafety..........................................22
PreparingforMaintenance...............................22
ServicingtheAirFilter.......................................23
ChangingtheEngineOil...................................23
ChargingtheBattery.........................................24
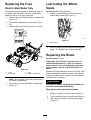
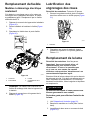
ReplacingtheFuse...........................................25
LubricatingtheWheelGears............................25
ReplacingtheBlade..........................................25
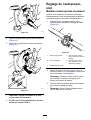
AdjustingtheSelf-PropelDrive.........................26
Storage...................................................................27
StorageSafety..................................................27
PreparingtheMachineforStorage...................27
RemovingtheMachinefromStorage................27
Safety
Thismachinehasbeendesignedinaccordancewith
ENISO5395.
GeneralSafety
Thisproductiscapableofamputatinghandsand
feetandofthrowingobjects.Alwaysfollowallsafety
instructionstoavoidseriouspersonalinjury.
•Read,understand,andfollowtheinstructions
andwarningsinthisOperator’sManualandon
themachineandattachmentsbeforestartingthe
engine.
•Donotputyourhandsorfeetnearmovingpartsor
underthemachine.Keepclearofanydischarge
opening.
•Donotoperatethemachinewithoutallguards
andothersafetyprotectivedevicesinplaceand
functioningproperlyonthemachine.
•Keepbystandersandchildrenoutoftheoperating
area.Donotallowchildrentooperatethemachine.
Allowonlypeoplewhoareresponsible,trained,
familiarwiththeinstructions,andphysically
capabletooperatethemachine.
•Stopthemachine,shutofftheengine,removethe
electric-startbutton(ifequipped),andwaitforall
movingpartstostopbeforeservicing,fueling,or
uncloggingthemachine.
Improperlyusingormaintainingthismachinecan
resultininjury.T oreducethepotentialforinjury,
complywiththesesafetyinstructionsandalways
payattentiontothesafety-alertsymbol
,which
meansCaution,Warning,orDanger—personalsafety
instruction.Failuretocomplywiththeseinstructions
mayresultinpersonalinjuryordeath.
2

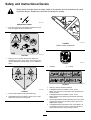
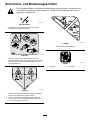
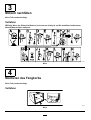
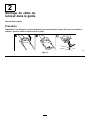
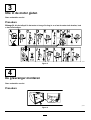
SafetyandInstructionalDecals
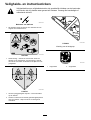
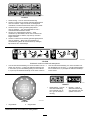
Safetydecalsandinstructionsareeasilyvisibletotheoperatorandarelocatednearanyarea
ofpotentialdanger.Replaceanydecalthatisdamagedormissing.
decaloemmarkt
Manufacturer'sMark
1.Thismarkindicatesthatthebladeisidentiedasapart
fromtheoriginalmachinemanufacturer.
decal104-7908
104-7908
1.Warning—donotoperatethemachinewithoutthe
rear-dischargeplugorbaginplace;donotoperatethe
machinewithouttheside-dischargecoverordeectorin
place.
decal112-8760
112-8760
1.Thrownobjecthazard—keepbystandersaway.
2.Cutting/dismembermenthazardofhandorfoot,mower
blade—stayawayfrommovingparts.
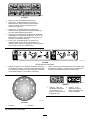
decal115-2884
115-2884
HandlePositionAdjustment
decal115-8411
115-8411
1.Unlocked2.Locked
decal131-4514
131-4514
1.Warning—readtheOperator'sManual.
2.Cutting/dismembermenthazardofhand,mower
blade—stayawayfrommovingparts;keepallguardsand
shieldsinplace.
3.Cutting/dismembermenthazardofhand,mower
blade—disconnectthespark-plugwirebeforeperforming
maintenance.
4.Thrownobjecthazard—keepbystandersaway;shutoffthe
enginebeforeleavingtheoperatingposition;pickupany
debrisbeforemowing.
5.Cutting/dismembermenthazardoffoot,mowerblade—do
notoperateupanddownslopes;operatesidetosideon
slopes;lookbehindyouwhenmovinginreverse.
3

decal133-1900
133-1900
Electric-StartModelOnly
1.ReadtheOperator’sManualformoreinformationonstarting
theengine—1)Inserttheelectric-startbuttonintotheignition;
2)Engagetheblade-controlbar;3)Pushtheelectric-start
buttontostarttheengine.
2.ReadtheOperator’sManualformoreinformationonstopping
theengine—1)Releasetheblade-controlbar;2)Removethe
electric-startbuttonfromtheignition.
decal137-9196
137-9196
1.Lock2.Unlock
Electric-startmodelonly
decal140-4357
140-4357
1.Warning—readthe
Operator’sManualfor
batteryinformation;donot
discardtheleadbattery.
2.Attention—readthe
Operator’sManual
forbatterycharging
information.
4

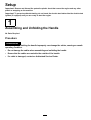
Setup
Important:Removeanddiscardtheprotectiveplasticsheetthatcoverstheengineandanyother
plasticorwrappingonthemachine.
Important:Topreventaccidentalstarting,donotinserttheelectric-startbuttonintotheelectric-start
ignition(ifequipped)untilyouarereadytostarttheengine.
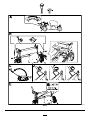
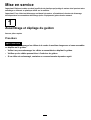
1
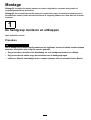
AssemblingandUnfoldingtheHandle
NoPartsRequired
Procedure
WARNING
Assemblingandunfoldingthehandleimproperlycandamagethecables,causinganunsafe
operatingcondition.
•Donotdamagethecableswhenassemblingandunfoldingthehandle.
•Ensurethatthecablesareroutedtotheoutsideofthehandle.
•Ifacableisdamaged,contactanAuthorizedServiceDealer.
5

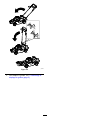
g225815
Figure3
6

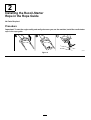
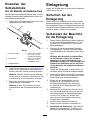
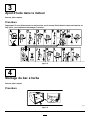
2
InstallingtheRecoil-Starter
RopeintheRopeGuide
NoPartsRequired
Procedure
Important:Tostarttheenginesafelyandeasilywheneveryouusethemachine,installtherecoil-starter
ropeintheropeguide.
g230719
Figure4
7

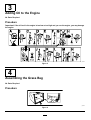
3
AddingOiltotheEngine
NoPartsRequired
Procedure
Important:Iftheoillevelintheengineistoolowortoohighandyouruntheengine,youmaydamage
theengine.
g222533
Figure5
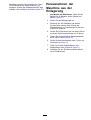
4
AssemblingtheGrassBag
NoPartsRequired
Procedure
g241560
Figure6
8

5
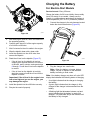
ChargingtheBattery
NoPartsRequired
Procedure
Electric-StartModelOnly
RefertoChargingtheBattery(page24).
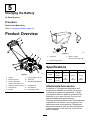
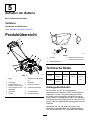
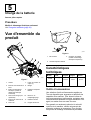
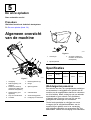
ProductOverview
g189753
Figure7
1.Handle
7.Cutting-heightlever(4)
2.Blade-controlbar
8.Sparkplug
3.Electric-startbutton
(electric-startmodelonly)
9.Side-dischargedeector
4.Washoutport(notshown)10.Oilll/dipstick
5.Fuel-tankcap
11.Reardeector
6.Airlter
12.Recoil-starthandle
g009526
Figure8
1.Grassbag
3.Batterycharger
(electric-startmodelonly)
2.Side-dischargechute
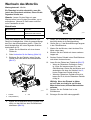
Specications
ModelWeightLengthWidthHeight
38kg
21690
(84lb)173cm58cm97cm
42kg
21691
(92lb)
(68
inches)
(23
inches)
(38
inches)
Attachments/Accessories
AselectionofToroapprovedattachmentsand
accessoriesisavailableforusewiththemachine
toenhanceandexpanditscapabilities.Contact
yourAuthorizedServiceDealerorauthorizedToro
distributororgotowww.T oro.comforalistofall
approvedattachmentsandaccessories.
Toensureoptimumperformanceandcontinuedsafety
certicationofthemachine,useonlygenuineToro
replacementpartsandaccessories.Replacement
partsandaccessoriesmadebyothermanufacturers
couldbedangerous,andsuchusecouldvoidthe
productwarranty.
9

Operation
Note:Determinetheleftandrightsidesofthe
machinefromthenormaloperatingposition.
BeforeOperation
BeforeOperationSafety
GeneralSafety
•Alwaysshutoffthemachine,removethe
electric-startbutton(ifequipped),waitforall
movingpartstostop,andallowthemachinetocool
beforeadjusting,servicing,cleaning,orstoringit.
•Becomefamiliarwiththesafeoperationofthe
equipment,operatorcontrols,andsafetysigns.
•Checkthatallguardsandsafetydevices,suchas
deectorsand/orgrasscatcher,areinplaceand
functioningproperly.
•Alwaysinspectthemachinetoensurethatthe
bladesandbladeboltsarenotwornordamaged.
•Inspecttheareawhereyouwillusethemachine,
andremoveallobjectsthatcouldinterferewith
theoperationofthemachineorthatthemachine
couldthrow.
•Contactwiththemovingbladewillcauseserious
injury.Donotputyourngersunderthehousing
whenadjustingthecuttingheight.
FuelSafety
•Fuelisextremelyammableandhighlyexplosive.
Areorexplosionfromfuelcanburnyouand
othersandcandamageproperty.
–Topreventastaticchargefromignitingthefuel,
placethecontainerand/ormachinedirectlyon
thegroundbeforelling,notinavehicleoron
anobject.
–Fillthefueltankoutdoors,inanopenarea,
whentheengineiscold.Wipeupanyfuelthat
spills.
–Donothandlefuelwhensmokingoraroundan
openameorsparks.
–Donotremovethefuelcaporaddfueltothe
tankwhiletheengineisrunningorhot.
–Ifyouspillfuel,donotattempttostartthe
engine.Avoidcreatingasourceofignitionuntil
thefuelvaporshavedissipated.
–Storefuelinanapprovedcontainerandkeep
itoutofthereachofchildren.
•Fuelisharmfulorfatalifswallowed.Long-term
exposuretovaporscancauseseriousinjuryand
illness.
–Avoidprolongedbreathingofvapors.
–Keepyourhandsandfaceawayfromthe
nozzleandthefuel-tankopening.
–Keepfuelawayfromyoureyesandskin.
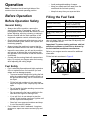
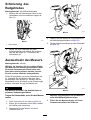
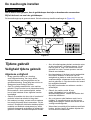
FillingtheFuelTank
TypeUnleadedgasoline
Minimumoctanerating
87(US)or91(research
octane;outsidetheUS)
Ethanol
Nomorethan10%byvolume
MethanolNone
MTBE(methyltertiarybutyl
ether)
Lessthan15%byvolume
OilDonotaddtothefuel
Useonlyclean,fresh(nomorethan30daysold),fuel
fromareputablesource.
Important:Toreducestartingproblems,addfuel
stabilizer/conditionertofreshfuelasdirectedby
thefuel-stabilizer/conditionermanufacturer.
Refertoyourengineowner’smanualforadditional
information.
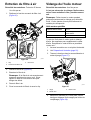
FillthefueltankasshowninFigure9.
g230458
Figure9
10

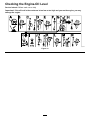
CheckingtheEngine-OilLevel
ServiceInterval:Beforeeachuseordaily
Important:Iftheoillevelinthecrankcaseistoolowortoohighandyouruntheengine,youmay
damagetheengine.
g231765
Figure10
11

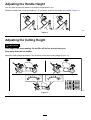
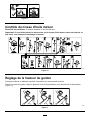
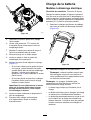
AdjustingtheHandleHeight
Youmayraiseorlowerthehandletoapositioncomfortableforyou.
Rotatethehandlelock,movethehandleto1of3positions,andlockthehandleintoposition(Figure11).
g269975
Figure11
AdjustingtheCuttingHeight
CAUTION
Iftheenginehasbeenrunning,themuferwillbehotandcanburnyou.
Keepawayfromthehotmufer.
Adjustthecuttingheightasdesired.Setallwheelstothesamecuttingheight(Figure12).
g225876
Figure12
12

DuringOperation
DuringOperationSafety
GeneralSafety
•Wearappropriateclothing,includingeye
protection;longpants;substantial,slip-resistant
footwear;andhearingprotection.Tiebacklong
hairanddonotwearlooseclothingorloose
jewelry.
•Useyourfullattentionwhileoperatingthe
machine.Donotengageinanyactivitythat
causesdistractions;otherwise,injuryorproperty
damagemayoccur.
•Donotoperatethemachinewhileill,tired,or
undertheinuenceofalcoholordrugs.
•Thebladeissharp;contactingthebladecanresult
inseriouspersonalinjury.Shutofftheengine,
removetheelectric-startbutton(electric-start
modelonly),andwaitforallmovingpartstostop
beforeleavingtheoperatingposition.
•Whenyoureleasetheblade-controlbar,the
engineshouldshutoffandthebladeshouldstop
within3seconds.Ifnot,stopusingyourmachine
immediatelyandcontactanAuthorizedService
Dealer.
•Keepbystandersoutoftheoperatingarea.Keep
smallchildrenoutoftheoperatingareaandunder
thewatchfulcareofaresponsibleadultwhois
notoperatingthemachine.Stopthemachineif
anyoneentersthearea.
•Alwayslookdownandbehindyoubeforemoving
themachineinreverse.
•Operatethemachineonlyingoodvisibilityand
appropriateweatherconditions.Donotoperate
themachinewhenthereistheriskoflightning.
•Wetgrassorleavescancauseseriousinjuryif
youslipandcontacttheblade.Avoidmowingin
wetconditions.
•Useextremecarewhenapproachingblind
corners,shrubs,trees,orotherobjectsthatmay
blockyourview.
•Donotdirectthedischargematerialtoward
anyone.Avoiddischargingmaterialagainstawall
orobstruction;materialmayricochettowardyou.
Stoptheblade(s)whencrossinggravelsurfaces.
•Watchforholes,ruts,bumps,rocks,orother
hiddenobjects.Uneventerraincouldcauseyou
toloseyourbalanceorfooting.
•Ifthemachinestrikesanobjectorstartsto
vibrate,immediatelyshutofftheengine,remove
theelectric-startbutton(ifequipped),waitforall
movingpartstostop,anddisconnectthewire
fromthesparkplugbeforeexaminingthemachine
fordamage.Makeallnecessaryrepairsbefore
resumingoperation.
•Beforeleavingtheoperatingposition,shutoff
theengine,removetheelectric-startbutton
(electric-startmodelonly),andwaitforallmoving
partstostop.
•Iftheenginehasbeenrunning,itwillbehotand
canseverelyburnyou.Keepawayfromthehot
engine.
•Operatetheengineonlyinwell-ventilatedareas.
Exhaustgasescontaincarbonmonoxide,which
islethalifinhaled.
•Checkthegrasscatchercomponentsandthe
dischargechutefrequentlyforanywearor
deteriorationandreplacethemwithgenuineT oro
partswhennecessary.
SlopeSafety
•Mowacrossthefaceofslopes;neverupand
down.Useextremecautionwhenchanging
directiononslopes.
•Donotmowonexcessivelysteepslopes.Poor
footingcouldcauseaslip-and-fallaccident.
•Mowwithcautionneardrop-offs,ditches,or
embankments.
13

StartingtheEngine
Youcanstarttheengineusingeithertheelectric-startbutton(ifequipped)ortherecoil-starthandle.
StartingtheEngineUsingtheElectric-StartButton
ForElectric-StartModels
1.Holdtheblade-controlbaragainstthehandle(AofFigure13).
2.Iftheelectric-startbuttonhasbeenremoved,insertitintheelectricstarter(BofFigure13).
3.Pushtheelectric-startbuttonuntiltheenginestarts(CofFigure13).
Note:Ifthemachinedoesnotstartafterseveralattempts,contactanAuthorizedServiceDealer.
g233421
Figure13
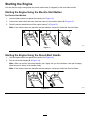
StartingtheEngineUsingtheRecoil-StartHandle
1.Holdtheblade-controlbaragainstthehandle(AofFigure14).
2.Pulltherecoil-starthandle(BofFigure14).
Note:Whenyoupulltherecoil-starthandle,pullitlightlyuntilyoufeelresistance,thenpullitsharply.
Allowtheropetoreturntothehandleslowly.
Note:Ifthemachinedoesnotstartafterseveralattempts,contactanAuthorizedServiceDealer.
g233422
Figure14
14

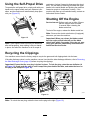
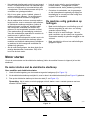
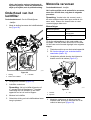
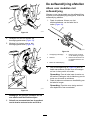
UsingtheSelf-PropelDrive
Tooperatetheself-propeldrive,simplywalkwithyour
handsontheupperhandleandyourelbowsatyour
sides,andthemachinewillautomaticallykeeppace
withyou(Figure15).
g233423
Figure15
Note:Ifthemachinedoesnotfreelyrollbackward
afterself-propelling,stopwalking,holdyourhands
inplace,andallowthemachinetorollacoupleof
centimeters(inches)forwardtodisengagethewheel
drive.Youcanalsotryreachingjustundertheupper
handletothemetalhandleandpushingthemachine
forwardacoupleofcentimeters(inches).Ifthe
machinestilldoesnotrollbackwardeasily,contactan
AuthorizedServiceDealer.
ShuttingOfftheEngine
ServiceInterval:Beforeeachuseordaily—Ensure
thattheengineshutsoffwithin
3secondsafterreleasingthe
blade-controlbar.
Toshutofftheengine,releasetheblade-controlbar.
Note:Removetheelectric-startbutton(ifequipped)
wheneveryouleavethemachine.
Important:Whenyoureleasetheblade-control
bar,theengineshouldshutoffandtheblade
shouldstopwithin3seconds.Iftheydonot,stop
usingyourmachineimmediatelyandcontactan
AuthorizedServiceDealer.
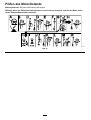
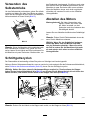
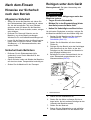
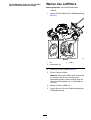
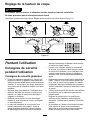
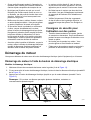
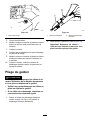
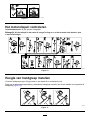
RecyclingtheClippings
Yourmachinecomesfromthefactoryreadytorecyclethegrassandleafclippingsbackintothelawn.
Iftheside-dischargechuteisonthemachine,removeitandlocktheside-dischargedeector;refertoRemoving
theSide-DischargeChute(page18)beforerecyclingtheclippings.
Important:Ensurethattherearplugislockedinplace.Tolocktheplug,raisethereardeector(A
ofFigure16),rmlypushthepluginuntilitsnapsintoplacebehindthetabs,androtatetheleveron
theplugtotheleft(BofFigure16).
g239445
Figure16
Note:T ounlocktherearplug,rotatetheleverontheplugtotheright(Figure16).
15

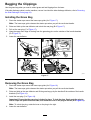
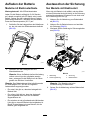
BaggingtheClippings
Usethegrassbagwhenyouwanttocollectgrassandleafclippingsfromthelawn.
Iftheside-dischargechuteisonthemachine,removeitandlocktheside-dischargedeector;refertoRemoving
theSide-DischargeChute(page18).
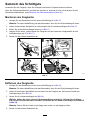
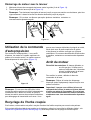
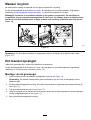
InstallingtheGrassBag
1.Routethestarterropearoundthelower-ropeguide(AofFigure17).
Note:Thelower-ropeguidereleasesthestarterropewhenyoupulltherecoil-starthandle.
2.Raiseandholdupthereardeectorandunlocktherearplug(BofFigure17).
3.Pullouttherearplug(CofFigure17).
4.Hangtheupperfrontedgeofthebagfromthegrass-bagpinsonthenotchesofthehandlebrackets
(DofFigure17).
5.Lowerthereardeector.
g231915
Figure17
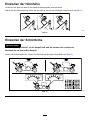
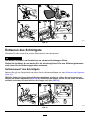
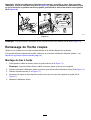
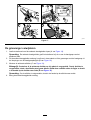
RemovingtheGrassBag
1.Routethestarterropearoundthelower-ropeguide(AofFigure18).
Note:Thelower-ropeguidereleasesthestarterropewhenyoupulltherecoil-starthandle.
2.Raiseandholdupthereardeectorandliftthegrassbagupbythehandleoffthenotchesofthehandle
brackets(BofFigure18).
3.Installtherearplug(CofFigure18).
Important:Ensurethattherearplugislockedinplace.Tolocktheplug,rmlypushtheplugin
untilitsnapsintoplacebehindthetabs,androtatetheleverontheplugtotheleft(DofFigure18).
Note:Tounlocktheplug,rotatetheleverontheplugtotheright.
4.Lowerthereardeector.
16

g231916
Figure18
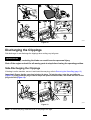
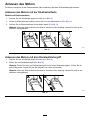
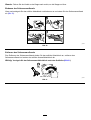
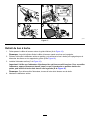
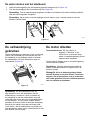
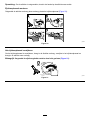
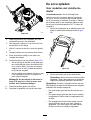
DischargingtheClippings
Side-dischargeorrear-dischargetheclippingswhencuttingverytallgrass.
WARNING
Thebladeissharp;contactingthebladecanresultinseriouspersonalinjury.
Shutofftheengineandwaitforallmovingpartstostopbeforeleavingtheoperatingposition.
Side-DischargingtheClippings
Ifthebagisonthemachine,removeitandinserttherearplug;refertoRemovingtheGrassBag(page16).
Important:Ensurethattherearplugislockedinplace.Tolocktheplug,raisethereardeector
(Figure19),rmlypushthepluginuntilitsnapsintoplacebehindthetabs,androtatetheleveronthe
plugtotheleft(Figure19).
g231918
Figure19
Note:Tounlocktheplug,rotatetheleverontheplugtotheright.
17

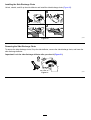
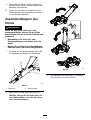
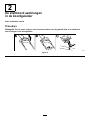
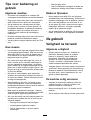
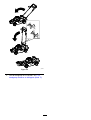
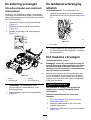
InstallingtheSide-DischargeChute
Unlock,unlatch,andliftupthesidedeectorandinstalltheside-dischargechute(Figure20).
g236532
Figure20
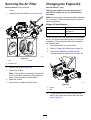
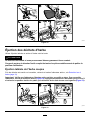
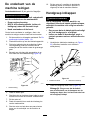
RemovingtheSide-DischargeChute
Toremovetheside-dischargechute,liftupthesidedeector,removetheside-dischargechute,andlowerthe
side-dischargedeector.
Important:Locktheside-dischargedeectorafteryoucloseit(Figure21).
g231921
Figure21
18
Seite laden ...
Seite laden ...
Seite laden ...
Seite laden ...
Seite laden ...
Seite laden ...
Seite laden ...
Seite laden ...
Seite laden ...
Seite laden ...
Seite laden ...
Seite laden ...
Seite laden ...
Seite laden ...
Seite laden ...
Seite laden ...
Seite laden ...
Seite laden ...
Seite laden ...
Seite laden ...
Seite laden ...
Seite laden ...
Seite laden ...
Seite laden ...
Seite laden ...
Seite laden ...
Seite laden ...
Seite laden ...
Seite laden ...
Seite laden ...
Seite laden ...
Seite laden ...
Seite laden ...
Seite laden ...
Seite laden ...
Seite laden ...
Seite laden ...
Seite laden ...
Seite laden ...
Seite laden ...
Seite laden ...
Seite laden ...
Seite laden ...
Seite laden ...
Seite laden ...
Seite laden ...
Seite laden ...
Seite laden ...
Seite laden ...
Seite laden ...
Seite laden ...
Seite laden ...
Seite laden ...
Seite laden ...
Seite laden ...
Seite laden ...
Seite laden ...
Seite laden ...
Seite laden ...
Seite laden ...
Seite laden ...
Seite laden ...
Seite laden ...
Seite laden ...
Seite laden ...
Seite laden ...
Seite laden ...
Seite laden ...
Seite laden ...
Seite laden ...
Seite laden ...
Seite laden ...
Seite laden ...
Seite laden ...
Seite laden ...
Seite laden ...
Seite laden ...
Seite laden ...
Seite laden ...
Seite laden ...
Seite laden ...
Seite laden ...
Seite laden ...
Seite laden ...
Seite laden ...
Seite laden ...
Seite laden ...
Seite laden ...
Seite laden ...
Seite laden ...
Seite laden ...
Seite laden ...
Seite laden ...
Seite laden ...
Seite laden ...
Seite laden ...
Seite laden ...
Seite laden ...
Seite laden ...
-
 1
1
-
 2
2
-
 3
3
-
 4
4
-
 5
5
-
 6
6
-
 7
7
-
 8
8
-
 9
9
-
 10
10
-
 11
11
-
 12
12
-
 13
13
-
 14
14
-
 15
15
-
 16
16
-
 17
17
-
 18
18
-
 19
19
-
 20
20
-
 21
21
-
 22
22
-
 23
23
-
 24
24
-
 25
25
-
 26
26
-
 27
27
-
 28
28
-
 29
29
-
 30
30
-
 31
31
-
 32
32
-
 33
33
-
 34
34
-
 35
35
-
 36
36
-
 37
37
-
 38
38
-
 39
39
-
 40
40
-
 41
41
-
 42
42
-
 43
43
-
 44
44
-
 45
45
-
 46
46
-
 47
47
-
 48
48
-
 49
49
-
 50
50
-
 51
51
-
 52
52
-
 53
53
-
 54
54
-
 55
55
-
 56
56
-
 57
57
-
 58
58
-
 59
59
-
 60
60
-
 61
61
-
 62
62
-
 63
63
-
 64
64
-
 65
65
-
 66
66
-
 67
67
-
 68
68
-
 69
69
-
 70
70
-
 71
71
-
 72
72
-
 73
73
-
 74
74
-
 75
75
-
 76
76
-
 77
77
-
 78
78
-
 79
79
-
 80
80
-
 81
81
-
 82
82
-
 83
83
-
 84
84
-
 85
85
-
 86
86
-
 87
87
-
 88
88
-
 89
89
-
 90
90
-
 91
91
-
 92
92
-
 93
93
-
 94
94
-
 95
95
-
 96
96
-
 97
97
-
 98
98
-
 99
99
-
 100
100
-
 101
101
-
 102
102
-
 103
103
-
 104
104
-
 105
105
-
 106
106
-
 107
107
-
 108
108
-
 109
109
-
 110
110
-
 111
111
-
 112
112
-
 113
113
-
 114
114
-
 115
115
-
 116
116
-
 117
117
-
 118
118
-
 119
119


Toro 53cm Super Recycler Lawn Mower Benutzerhandbuch
- Kategorie
- Rasenmäher
- Typ
- Benutzerhandbuch
in anderen Sprachen
Verwandte Papiere
-
Toro 53cm Super Recycler Lawn Mower Benutzerhandbuch
-
-
-
Toro 55cm Recycler Lawn Mower Benutzerhandbuch
-
-
Toro 53cm Super Bagger Lawn Mower Benutzerhandbuch
-
-