
WIRELESS MICROPHONE UPGRADE KIT FOR
EB112A
EB-MIC
DESIGN
Audio Design GmbH
Am Breilingsweg 3 · D-76709 Kronau/Germany
Tel. +49 7253 - 9465-0 · Fax +49 7253 - 946510
www.audiodesign.de - www.hifonics.de
© Audio Design GmbH, All Rights Reserved

2
Lieferumfang Scope of delivery
UHF transmission rangeUHF-Übertragungsbereich
Verwendungszweck Purpose of use
2 x Kabelloses Funkmikrofon
1 x Mikrofontasche
1 x Upgrade-Platine
4 x Befestigungsschrauben*
4 x Plastikunterlegscheiben*
1 x Einbauanleitung
Für die Mikrofone werden ins-
gesamt 4 AA Batterien benötigt.
* jeweils 2 als Ersatz
823,85 / 863,3 MHz
Dieses Upgrade-Kit dient dazu,
ein HiFonics EB112A Soundsys-
tem mit einem Empfänger für
den drahtlose Mikrofon-Betrieb
auszurüsten. Dazu muss die
Upgrade-Platine im Gehäusein-
nern des Soundsystems instal-
liert werden. Beachten Sie dazu
die folgenden Anweisungen.
HINWEIS: Mit anderen EB-
Soundsystemen von HiFonics
ist das Kit nicht kompatibel.
2 x wireless microphone
1 x microphone bag
1 x upgrade circuit board
4 x fastening screws*
4 x plastic washers*
1 x installation guide
A total of 4 AA batteries are
required for the microphones.
* each 2 as a spare part
823.85 / 863.3 MHz
This upgrade kit is used to equip
a HiFonics EB112A sound sys-
tem with a receiver for wireless
microphone operation. To do
this, the upgrade board must
be installed inside the housing
of the sound system. To do this,
follow the instructions below.
NOTE: The kit is not compatible
with other HiFonics EB sound
systems.

3
Entsorgung
Sicherheitshinweise
Disposal
Safety instructions
Wenn Sie die Geräte samt Zube-
hörentsorgen müssen, beachten
Sie, dass keine elektronischen
Geräte im Hausmüll entsorgt
werden dürfen. Entsorgen Sie
das Gerät in einer geeigneten
Recyclinganlage gemäß den
örtlichen Abfallbestimmungen.
Konsultieren Sie gegebenenfalls
Ihre örtliche Behörde oder Ihren
Händler.
Die Montage und Installation
sollte nur einem ausgebildeten
und technisch versierten Spezi-
alisten durchgeführt werden.
Wenn Sie Probleme mit der Ins-
tallation haben, wenden Sie sich
an Ihren Fachhändler oder an
unsere Service Abteilung unter
Tel. +49 7253 - 94 65 92 oder
als E-Mail zu ampliers@audi-
odesign.de
WICHTIG: Bevor Sie mit der
Montage beginnen, stellen Sie
sicher dass das EB112A Sound-
system ausgeschaltet und vom
Stromnetz getrennt ist (Netzste-
cker ziehen).
If you have to dispose of the de-
vices and accessories, please
note that no electronic devices
may be disposed of with house-
hold waste. Dispose of the
device in a suitable recycling
facility in accordance with local
waste regulations. If necessary,
consult your local authority or
your dealer.
In general, the assembly and
installation should be made by
a trained and technically skilled
specialists.
If you have any problems with
the installation, contact your
specialist dealer or the Audio
Design Service Department un-
der Tel. +49 7253 - 94 65 92 or
by E-Mail to ampliers@audio-
design.de
NOTE: Before you start with
the assembly, make sure that
the EB112A sound system is
switched off and disconnected
from the power supply (pull out
the power plug).

4
Montage Assembly
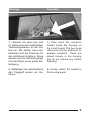
1.) Entnehmen Sie vorsichtig die
grüne Platine aus der Mikrofon-
tasche.
1.) Carefully remove the green
circuit board from the micro-
phone bag.
2.) Die oben gezeigten Teile
werden für die Montage benötigt
2.) The parts shown above are
required for assembly

5
Montage Assembly
4.) Positionieren Sie eine der
Plastikunterlegscheiben auf der
inneren Schallwand oberhalb
des Magneten des Hochton-
horns.
4.) Position one of the plas-
tic washers on the inner bafe
above the horn’s magnet.
3.) Entfernen Sie von der Front
aus gesehen den rechten Tra-
gegriff mit einem geeigneten
Schraubendreher.
3.) When viewed from the front,
remove the right carrying handle
with a suitable screwdriver.

6
Montage Assembly
5.) Verschrauben Sie dann vor-
sichtig die Platine und die Unter-
legscheibe an der Wand.
6.) Richten Sie dann die Plati-
ne entsprechend aus und be-
festigen diese mit der zweiten
Schraube samt Unterlegschei-
be. Achten Sie darauf, dass die
Schrauben nicht zu fest ange-
zogen werden, aber die Platine
sicher befestigt ist.
5.) Then carefully screw the
board and washer to the bafe.
6.) Then align the circuit board
accordingly and secure it with
the second screw and washer.
Make sure that the screws are
not overtightened, but that the
circuit board is securely at-
tached.

7
Montage Assembly
7.) Stecken Sie dann den sich
im Gehäuseinneren bendlichen
Verbindungsstecker an der Pla-
tine ein. Die beiden losen Ka-
belenden sind die Antennen für
den drahtlosen Empfang. Diese
werden lose ins Gehäuse gelegt
und benötigen keine weiter Be-
festigung.
8.) Befestigen Sie abschließend
den Tragegriff wieder am Ge-
häuse.
7.) Then insert the connector
located inside the housing on
the circuit board. The two loose
cable ends are the antennas for
wireless reception. These are
placed loosely in the housing
and do not require any further
fastening.
8.) Finally, attach the handle to
the housing again.

8
Inbetriebnahme Operation
9.) Schrauben Sie unten an
den Mikrofonen die Abdeckung
ab und legen dann jeweils die
Batterien ein. Schalten Sie die
beiden Mikrofone ein. Nachdem
Sie das Soundsystem ebenfalls
eingeschaltet haben, sind die
Mikrofone mit diesem automa-
tisch verbunden.
Unterhalb des Einschaltknopfes
bendet sich der Schalter zur
Eingangsempndlichkeit:
Hi = Hoher Ausgangspegel
Lo = Niedriger Ausgangspegel
Mit dem Regler „MIC VOL“ am
EB112A kann die Lautstärke der
Mikrofone eingestellt werden.
9.) Unscrew the cover at the
bottom of the microphones and
then insert the batteries. Turn on
the two microphones. After you
have also turned on the sound
system, the microphones are
automatically connected to it.
The input sensitivity switch is
located below the power button:
Hi = high output level
Lo = low output level
The volume of the microphones
can be adjusted with the “MIC
VOL” control on the EB112A.
-
 1
1
-
 2
2
-
 3
3
-
 4
4
-
 5
5
-
 6
6
-
 7
7
-
 8
8


in anderen Sprachen
- English: Hifonics EB-MIC User manual
Verwandte Artikel
-
Hifonics ZSB8W Car Subwoofer Passive Benutzerhandbuch
-
Hifonics HFI200A MkII Spezifikation
-
-
Hifonics TRITON I Bedienungsanleitung
-
Hifonics TSI1000-I Bedienungsanleitung
-
Hifonics TSi400-II Bedienungsanleitung
-
Hifonics TRITON IV Bedienungsanleitung
-
-