CONDTROL Fliesen 4D Laser Level Benutzerhandbuch
- Typ
- Benutzerhandbuch

1
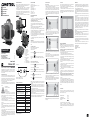
ACCURACY CHECK
Horizontal line
Accuracy check of horizontal line is carried out by 2 walls
located opposite each other at a 5m distance.
1. Put the laser level to one of the walls as close as possible
(Figure A). Move the switch bar to position ON and switch
on both vertical and horizontal planes. Rotate the laser level
so that laser emitters are located opposite to the near wall
and laser lines cross each other. Mark location of laser lines
wall as B1.
2. Rotate the laser level by 90°, measure deviation of a laser
please contact the service center.
3. Repeat actions described in point 2 twice, rotating the laser
level in one direction.
located at the same vertical) (Figure C).
5. Rotate the laser level by 180°and mark location of laser lines
crossing on the opposite wall as A2 (points A1, A2 must be
located at the same vertical) (Figure D).
Attention: please do accuracy check for each horizontal plane
separately.
EN User manual 1
DE Bedienungsanleitung 2
FR Mode d’emploi 3
IT Manuale dell’utente 4
RU Руководство по эксплуатации 5
Fliesen 4D
User manual
Laser level
EN
Congratulations on your purchase of laser level Fliesen 4D
CONDTROL. Safety regulations can be found in this user
manual and should be carefully read before you use the device
for the first time.
SAFETY REGULATIONS
The user manual should be read carefully before you use the
device for the first time. Unintended use of the device can
be dangerous for human’s health and cause serious injury.
temporary use, be sure to enclose user manual to it.
- Do not misuse the device.
- Do not remove warning signs and protect them from abrasion,
because they contain information about safe operation of the
device.
Laser radiation!
Do not stare into beam
Class 2 laser
<1 mW 515 nm
- Do not look into the laser beam or its reflection, with
unprotected eye or through an optical instrument. Do not
point the laser beam at people or animals without the need.
You can dazzle them.
- To protect your eyes close them or look aside.
- Always install the product in such a way, so that the laser line
is below or above the eye level.
- Do not let unauthorized people enter the zone of product
operation.
- Store the product beyond reach of children and unauthorized
people.
spare parts only.
flammable materials.
eyes, flush with clean water during 10 minutes and consult
healthcare practitioner.
PRODUCT DESCRIPTION
Laser level Fliesen 4D CONDTROL is designed for projecting
and controlling of vertical and horizontal planes and lines.
- automatic leveling, which allows to automatically
compensate irregularities within self-leveling range up to 3°.
- locked compensator, to project inclined planes and lines;
Pulse mode allows to increase working range of the laser level
by using the laser receiver or to work when laser is hard to
define in bright lighting conditions.
The laser level is suitable for use at both indoor and outdoor
building areas.
Fliesen 4D
TECHNICAL SPECIFICATIONS
Working range / with receiver* 30/60 m
Accuracy ±0.3 mm/m
Self-leveling range ± 3°
Distance between horizontal
laser line and floor 18 mm
Continuous working time
- with one laser emitter switched on
- with all laser emitters switched on
20 hours
5 hours
Operating temperature -10°C ... +40°C
Storage temperature
Relative humidity 90%
Dust and water protection rate
Tripod thread 1/4’’ and 5/8’’
Laser
< 1 mW
Battery
Dimensions
Weight
* The working range may differ from the declared depending
on the lighting conditions.
Vertical line
Use a plumb bob as a reference of a vertical line. Put the laser
1. Move the switch bar on position ON, and align vertical laser
line with the low point of plumb bob.
service center.
CARE AND MAINTENANCE
Attention! This laser level is a precise optic-mechanical device
as after mechanical influences (falling, bumps), check the
accuracy of the device.
Observation of the following recommendations will extend
the life of the device:
- Store the device, spare parts and accessories away from
children and unauthorized people.
- Transport the device with locked compensator only.
do not let moisture, construction dust and foreign objects get
inside the device.
batteries and then contact the service center.
- Do not store or use the device for a long time in high humidity
conditions.
- Check the accuracy of the device occasionally (check the
paragraph «Accuracy check»).
- Clean the device with a soft wet cloth. Do not use harsh
chemicals, cleaning solvents or cleaning agents.
- Wipe the laser aperture with a soft lint-free cloth and
isopropyl alcohol.
- Remove the Li-ion battery or alkaline batteries from the
device before connecting the charger, otherwise the device
may fail.
Failure to observe the following rules may lead to electrolyte
leakage from the batteries and failure of the device:
- Remove the battery from the device, if it’s not used for a
long time.
- Do not leave discharged battery in the device.
eyes, flush with clean water during 10 minutes and consult the
doctor.
UTILIZATION
for waste recycle. Please send the product to the following
CONDTROL GmbH
Germany
Do not throw the product in municipal waste!
measuring tools and their components must be collected
separately and submitted to environmentally friendly recycle
of wastes.
WARRANTY
All CONDTROL GmbH products go through post-production
control and are governed by the following warranty terms. The
buyer’s right to claim about defects and general provisions of
1) CONDTROL GmbH agrees to eliminate all defects in the
product, discovered while warranty period, that represent the
defect in material or workmanship in full volume and at its own
2) The warranty period is 24 months and starts from the date
of purchase by end consumer (see the original supporting
document).
3) The Warranty doesn’t cover defects resulting from wear
and tear or improper use, malfunction of the product caused
by failure to observe the instructions of this user manual,
untimely maintenance and service and insufficient care, the
use of non-original accessories and spare parts. Modifications
in design of the product relieve the seller from responsibility
for warranty works. The warranty does not cover cosmetic
damage, that doesn’t hinder normal operation of the product.
4) CONDTROL GmbH reserves the right to decide on
replacement or repair of the device.
5) Other claims not mentioned above, are not covered by the
warranty.
6) After holding warranty works by CONDTROL GmbH warranty
inconvenience associated with a defect of the device, rental
United Nations Convention on contracts for the international
CONDTROL GmbH
Germany
Laser level
Kreuzlinienlaser
EN
DE
Niveau laser
FR
DELIVERY PACKAGE
BEFORE START OPERATION
Power supply
rechargeable battery included in the delivery package.
Install/charge the Li-ion battery
Use only the battery included in the delivery package.
battery.
1) Remove the battery from the device.
2) Use charger, included in the delivery package, to connect
the battery will be flashing blue while charging.
3) The battery charging time is about 3 hours.
4) As soon as the charging time runs out, the power indicators
will stop flashing. Disconnect the charger and put the battery
in the battery compartment.
compartment.
OPERATION
mode.
1) Automatic leveling
Move the switch bar to position ON.
The laser level will switch on.
Lower H-line is on.
Short press to switch on/off the pulse mode.
Move the switch bar to position OFF to switch off the laser
level.
2) Projection of inclined planes
Move the switch bar to position OFF.
Press and hold during 3 seconds. Lower H-line is on.
Laser line is flashing every 5 seconds.
press will switch off the laser level.
Press to switch on/off the pulse mode.
Note: To increase the operating time and avoid the risk of
unintentional blinding switch on the laser only before start
operation.
environment temperature the laser line may tremble due to
heterogeneity of the atmosphere. The longer the distance, the
more trembling can be observed.
The width of the laser line increases with the increasing of the
operating distance. The marking should be made along the
portion of the laser line.
object’s surface (e.g. walls, ceilings) depends on the curvature
and slope of the surface relative to the laser plane.
Livello laser
IT
Лазерный нивелир
RU
building areas.
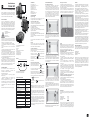
1
8 9
2
5
3
6
4
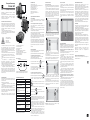
Control panel
1. Switch on/off the laser lines
2. Switch on/off the pulse mode
LASER
button
indicators
charging port
LASER
1 2
LASER
LASER
LASER
A
B
C
D
5m
E
1.5m
1

2
Fliesen 4D
Bedienungsanleitung
Kreuzlinienlaser
DE
TECHNISCHE SPEZIFIKATIONEN
30/60 m
Nivellierung ±0.3 mm/m
Selbstnivellierungsbereich ± 3°
Der Abstand von der unteren
horizontalen Laserlinie bis zum Boden 18 mm
Betriebsdauer
-mit einem eingeschalteten Laserstrahl
-mit allen eingeschalteten Laserstrahlen
20 Stunden
5 Stunden
Betriebstemperatur -10°C ... +40°C
Lagertemperatur
Relative Luftfeuchtigkeit 90%
Wasser- und Staubschutz
Stativgewinde 1/4’’ und 5/8’’
Lasertyp
< 1 mW
Batterien
Abmessungen
Gewicht
* Der Arbeitsbereich kann je nach den Lichtverhältnissen vom
angegebenen abweichen.
Überprüfung der Vertikallinie
1. Stellen Sie den Schalter auf die Position ON und schalten Sie
den vertikalen Laserstrahl ein. Richten Sie vertikale Laserlinie
auf den Tiefpunkt des Senklots.
2. Wenn die Abweichung der Laserlinie von der Referenzlinie
PFLEGE
Achtung!
anderen mechanischen Belastungen ausgesetzt war.
Die Beachtung der folgenden Vorschriften verlängert die
Funktionsdauer des Gerätes:
der Reichweite von Kindern und fremden Personen auf.
transportiert werden.
Sie zuerst die Batterie, wenden Sie sich dann an das
Servicezentrum.
befeuchtet wurde.
Nichtbeachten der folgenden Anweisungen kann zum
Elektrolytauslauf und Gerätebeschädigung führen:
reinigen Sie diese mindestens 10 Minuten lang mit klarem
ENTSORGUNG
CONDTROL GmbH
Deutschland
getrennt zu sammeln und zu einer Recyclingstelle zu bringen.
GARANTIE
1) Die CONDTROL GmbH verpflichtet sich zur kostenlosen
innerhalb der Garantiezeit auf einen Material- oder
Produkten und beginnt ab Datum des Kaufs an den ersten
6) Nach Garantieleistungen durch die CONDTROL GmbH wird
internationalen Warenkauf). Änderungen vorbehalten.
WARTUNG UND REPARATUR
CONDTROL GmbH
Deutschland
die Austrittsfenster der Laserstrahlen und vermeiden Sie
LIEFERUMFANG
Bedienungsanleitung - 1 St.
Kunststoffkoffer - 1 St.
VOR INBETRIEBNAHME
Energieversorgung
Li-Ion-Batterie aufladen/ einsetzen
Wenn die Batterieanzeige auf dem Bedienfeld rot blinkt, muss
der Akku geladen werden.
mitgelieferte Ladekabel.
Akku auf, zu blinken.
Batteriefach.
behalten.
BETRIEB
1) Automatische Nivellierung
Stellen Sie den Schalter auf die Position ON. Der Laser wird
automatisch eingeschaltet.
Der untere horizontale Laserstrahl wird eingeschaltet.
Laserstrahlen einzuschalten.
ein-/auszuschalten.
Stellen Sie den Schalter auf die Position OFF
auszuschalten.
2) Projizierung von geneigten Ebenen
Stellen Sie den Schalter auf die Position OFF.
Der untere horizontale Laserstrahl wird eingeschaltet. Der
Laserstrahl blinkt alle 5 Sekunden.
nacheinander, um erforderliche Laserlinien einzuschalten.
auszuschalten.
Achtung!
Mindestzahl der erforderlichen eingeschalteten Laserlinien
aus.
von der Umgebung abweichenden Temperatur arbeiten, kann
zittern.
Betriebsabstand zunimmt. Das Layout sollte entlang der Achse
Sie den mittleren Teil der Laserlinie.
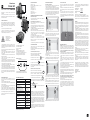
1
8 9
2
5
3
6
4
Bedienfeld
LASER
6 - Batterieanzeige
LASER
1 2
LASER
LASER
LASER
GENAUIGKEITSÜBERPRÜFUNG
Überprüfung der Horizontallinie
Wand und schalten horizontalen und vertikalen Laserstrahl
ein (Abbildung A). Stellen Sie den Schalter auf die Position
die Position der kreuzenden Laserstrahlen als Punkt A1.
Markieren Sie die Position der kreuzenden Laserstrahlen an
des Laserstrahls vom Punkt B1 (Abbildung B). Wenn die
Kundenservice.
Markieren Sie die Position der kreuzenden Laserstrahlen als
liegen.) (Abbildung C).
Wand als Punkt A2 (Punkte A1, A2 sollen in derselben
6.Messen Sie den Abstand dA, dB zwischen Punkten A1, A2
bzw B1, B2 (Abbildung D). Wenn die Differenz zwischen dAund
Kundenservice.
Vorsicht:
D
A
5m
B
C
E
1.5m
Fliesen 4D CONDTROL. Die Sicherheitshinweise finden Sie am
SICHERHEITSHINWEISE
vermeiden Sie deren Unkenntlichmachung, denn sie enthalten
Laserstrahlung!
Nicht in den Strahl blicken!
Laserklasse 2
<1 mW, 515 nm
- Blicken Sie nicht in den Laserstrahl oder seine Reflektion,
einrichten.
befinden.
Dritten verwendet und aufbewahrt werden.
reparieren es nicht. Die Reparatur und Wartung darf nur
von leicht entflammbaren Stoffen.
reinigen Sie diese mindestens 10 Minuten lang mit klarem
PRODUKTBESCHREIBUNG
- gesperrter Kompensator zur Projizierung von geneigten
- automatische Nivellierung, die das Ausgleichen der
bestimmen.
1

3
ENTRETIEN ET UTILISATION
Attention!
Le respect des recommandations suivantes prolongera la
durée de vie de l’appareil:
l’appareil.
piles, puis contactez le centre de service.
- Ne stockez pas et n’utilisez pas l’appareil pendant une longue
Le non-respect des règles suivantes peut entraîner une fuite
d’électrolyte des batteries et endommager l’appareil:
RECYCLAGE
CONDTROL GmbH
Germany
GARANTIE
originale).
d’une mauvaise utilisation, le dysfonctionnement de l’appareil
d’utilisation, une maintenance et un entretien intempestifs
l’appareil.
pas couvertes par la garantie.
des dispositions de la Convention des Nations Unies sur les
CONDTROL GmbH
Germany
CARACTÉRISTIQUES TECHNIQUES
30/60 m
±0.3 mm/m
± 3°
Distance entre la ligne horizontale
18 mm
20 heures
5 heures
-10°C ... +40°C
90%
1/4’’ et 5/8’’
Type du laser
515 nm, <1 mW
batterie Li-on
Poids
*La plage de fonctionnement peut différer de celle indiquée en
fonction des conditions d’éclairage.
ÉTENDUE DE FOURNITURE
PRÉPARATION AU FONCTIONNEMENT DE L’APPAREIL
Alimentation de l’appareil
incluse dans le lot de livraison.
Placement/chargement de la batterie Li-Ion
Utilisez seulement la batterie incluse dans le lot de livraison.
Si le voyant de puissance gauche au bout clignote en bleu, il
faut charger la batterie.
1) Retirez la batterie de l’appareil.
inclus dans le lot de livraison. Au cours du chargement
les voyants d’alimentation sur la batterie clignoteront
successivement en bleu.
3) La charge de la batterie prend 3 heures environ.
d’alimentation sur la batterie cesseront de clignoter.
UTILISATION DE L’APPAREIL
1 Mode de compensation automatique
ON.
Par des appuis brefs sur le bouton activez les
position OFF.
2) Mode de construction des plans inclinés
OFF.
Faites marcher l’appareil par un appui long du bouton
Par des appuis brefs successifs sur le bouton
mode impulsionnel.
Attention : pour prolonger le temps de fonctionnement et
Avec le prolongement de la distance, la ligne laser devient plus
de la ligne laser.
rapport au plan laser.
1
8 9
2
5
3
6
4
Panneau de commande
LASER
LASER
1 2
LASER
LASER
LASER
VERIFICATION DE LA PRÉCISION
Vérification de l’horizontale
fig. D).
Attention:
D
A
5m
B
C
CONDTROL.
cette Notice d’utilisation.
CONSIGNES DE SÉCURITÉ
pour une utilisation temporaire, accompagnez-le de cette
Notice.
Rayonnement laser !
Laser de la classe 2
<1 mW, 515 nm
d’utilisation de l’appareil.
DESCRIPTION DE L’APPAREIL
Le Niveau Laser Fliesen 4D CONDTROL est conçu pour
chantiers ouverts.
Vérification de la verticale
centre de services.
E
1.5m
Mode d’emploi
Niveau laser
FR
Fliesen 4D
1

4
MANUTENZIONE E FUNZIONAMENTO
Attenzione!
meccanico e deve essere trattato con cura. Prima di iniziare
i lavori e anche dopo gli impatti meccanici (cadute, urti),
effettuare la verifica della precisione del dispositivo.
L’osservanza delle seguenti raccomandazioni prolungherà la
durata del dispositivo:
- Conservare il dispositivo, i pezzi di ricambio e gli accessori
fuori dalla portata dei bambini e di persone non autorizzate.
- Spostare il dispositivo solo con il compensatore bloccato.
- Proteggere il dispositivo da urti, cadute, vibrazioni forti,
oggetti estranei all’interno del dispositivo.
- Non conservare e non utilizzare il dispositivo per lunghi
periodi in ambienti umidi.
- Controllare periodicamente la precisione del dispositivo (vedi
paragrafo Controllo di precisione).
- Pulire il dispositivo con un panno morbido e umido. Non
utilizzare prodotti chimici aggressivi, solventi o detergenti.
- Pulire periodicamente l’apertura del laser con un panno
morbido senza pelo con alcool isopropilico.
La mancata osservanza delle seguenti regole può causare la
fuoriuscita di elettroliti dalle batterie e il danneggiamento
del dispositivo:
- Rimuovere le batterie dal dispositivo se esso non viene
utilizzato per un lungo periodo di tempo.
- Non lasciare le batterie scariche nel dispositivo.
pulita per 10 minuti e consultare immediatamente un medico.
UTILIZZAZIONE
devono essere riciclati. Si prega di inviare l’articolo al seguente
CONDTROL GmbH
Deutschland
Non smaltire il dispositivo nei rifiuti urbani
di misura scaduti e i componenti di essi devono essere raccolti
separatamente e spediti per il riciclaggio ecologico dei rifiuti.
GARANZIA
Tutti i prodotti CONDTROL GmbH sono sottoposti a controllo
post-produzione e soggetti alle seguenti condizioni di
relative a difetti e disposizioni generali della legge vigente non
decadono.
1) L’Azienda CONDTROL GmbH si impegna ad eliminare
completamente e a proprie spese tutti i difetti del prodotto
rilevati durante il periodo di garanzia, che rappresentano un
difetto di materiale o di fabbricazione.
documento di accompagnamento).
3) La garanzia non copre i difetti causati dall’usura normale
o dall’uso improprio, il malfunzionamento del prodotto
causato dal mancato rispetto delle istruzioni contenute nel
presente manuale dell’utente, l’assistenza intempestiva e la
cura insufficiente, l’uso di accessori e pezzi di ricambio non
originali. Le modifiche alla costruzione del prodotto esonerano
garanzia non copre i danni estetici che non interferiscono con
il funzionamento normale del prodotto.
4) L’Azienda CONDTROL GmbH si riserva il diritto di prendere la
decisione di sostituzione o riparazione del prodotto.
coperte dalla garanzia.
6) Dopo che CONDTROL GmbH ha eseguito i lavori di garanzia,
il periodo di garanzia non viene esteso.
guadagno o inconvenienti associati a un difetto del prodotto,
il costo del noleggio di apparecchiature alternative per il
periodo di riparazione. Questa garanzia si applica alla legge
tedesca, escluse le disposizioni della Convenzione sui contratti
CONDTROL GmbH
Deutschland
Manuale dell’utente
Livello laser
IT
Fliesen 4D
CARATTERISTICHE TECNICHE
Campo di lavoro / con rivelatore * 30/60 m
Precisione autolivellante ±0.3 mm/m
Gamma autolivellante ± 3°
Distanza dalla linea laser orizzontale
inferiore al pavimento 18 mm
Durata di funzionamento
- con un emettitore laser acceso
- con tutti emettitori laser accesi
20 ore
5 ore
Temperatura di funzionamento -10°C ... +40°C
Temperatura di stoccaggio
90%
e polvere
Tipo di filettatura per montaggio su
treppiede 1/4’’, 5/8’’
Tipo di laser
<1 mW
Batterie
mAh batteria
agli ioni di litio
Peso
* Il campo di funzionamento può variare da quello dichiarato a
seconda delle condizioni di illuminazione.
COMPLETAMENTO
PREPARAZIONE AL LAVORO CON IL DISPOSITIVO
Alimentazione del dispositivo
L’alimentazione dello strumento avviene tramite la batteria
Installazione/ricarica della batteria agli Ioni di litio
Utilizzare solo la batteria in dotazione.
Se l’indicatore di alimentazione più a sinistra lampeggia in blu,
1) Rimuovere la batteria dall’apparecchio.
2) Collegare la batteria alla rete elettrica utilizzando il
caricabatterie in dotazione. Durante la ricarica, gli indicatori
di alimentazione della batteria lampeggeranno in blu
coerentemente.
4) Allo scadere del tempo di ricarica, gli indicatori di
alimentazione della batteria smetteranno di lampeggiare.
Scollegare il caricabatterie e installare la batteria nel vano
batteria.
È consentito di caricare la batteria senza rimuoverla
dall’apparecchio.
LAVORO CON IL DISPOSITIVO
Posizionare l’apparecchio su una superficie solida e
stabile, una piattaforma di sollevamento o un treppiede.
funzionamento dello strumento.
1) Modalità di compensazione automatica
Spostare il motore di blocco in posizione ON.
Premere brevemente i tasti per accendere gli
emettitori laser necessari per il funzionamento. Premere
funzionamento del ricevitore.
del ricevitore.
Per spegnere l’apparecchio, spostare il motore di blocco in
posizione OFF.
2) Modalità di costruzione di piani inclinati
Spostare il motore di blocco in posizione OFF.
Accendere l’apparecchio premendo a lungo il tasto
L’emettitore laser lampeggia ogni 5 secondi.
laser necessari per il funzionamento. Dopo aver acceso tutti
gli emettitori laser, premere brevemente il tasto per
spegnere lo strumento.
a impulsi.
Attenzione: per aumentare il tempo di funzionamento e
selezionare il numero minimo richiesto di moduli laser inclusi.
Durante il lavoro vicino a oggetti o flussi d’aria che differiscono
All’aumentare della distanza, l’effetto si intensifica.
All’aumentare della distanza, la larghezza della linea laser
aumenta. La marcatura deve essere eseguita lungo l’asse della
linea laser. Per ottenere la massima precisione, utilizzare la
sezione centrale della linea laser.
superficie dell’oggetto (ad esempio, su pareti, soffitti, ecc.)
dipende dalla curvatura e dalla pendenza della superficie
rispetto al piano laser.
1
8 9
2
5
3
6
4
Pannello di comando
1. Accensione/spegnimento degli emettitori laser
LASER
1 - Finestre di emettitori laser
LASER
1 2
LASER
LASER
LASER
CONTROLLO DI PRECISIONE
Controllo di orizzontale
2 pareti verticali parallele posizionate l’una di fronte all’altra a
una distanza di 5 m sono necessarie per il controllo.
1. Posizionare il dispositivo il più vicino possibile a una
delle pareti. Accendere l’emettitore verticale e orizzontale,
sbloccare il compensatore. Ruotare il dispositivo con gli
emettitori verso la parete vicina in modo che l’intersezione
delle linee laser sulla parete sia opposta al dispositivo.
Contrassegnare la posizione del punto di intersezione delle
dispositivo, segnare il punto B1.
2. Ruotare il dispositivo di 90°, misurare la deviazione dell’asse
del raggio dal segno B1. Se la deviazione supera 1,5 mm,
contattare il centro di assistenza.
3. Ripetere il punto 2 altre 2 volte, ruotando il dispositivo in
una direzione.
4. Spostare il dispositivo verso la parete opposta,
contrassegnare le intersezioni delle linee laser con il segno B2
(i segni B1, B2 devono essere sullo stesso verticale).
5. Ruotare il dispositivo di 180° e segnare sulla parete opposta
l’intersezione delle linee laser con il segno A2 (i segni A1, A2
devono essere sullo stesso verticale).
6. Misurare le distanze dA, dB tra i segni A1, A2 e B1, B2
rispettivamente. Se la differenza tra i valori dA, dB supera i 3
mm, contattare il centro di assistenza.
D
A
5m
B
C
CONDTROL.
legga attentamente le istruzioni di sicurezza, contenute in
ISTRUZIONE DI SICUREZZA
del Suo dispositivo. Leggere attentamente l’istruzione prima
di utilizzare il dispositivo. Nel caso di trasferimento del
dispositivo in uso temporaneo si assicuri obbligatoriamente di
- Non rimuovere le targhette di avvertimento e proteggerle
sicuro del dispositivo.
Radiazione laser!
Non puntare negli occhi
Laser di classe 2
<1 mW, 515 nm
con l’occhio non protetto che attraverso dispositivi ottici.
Non puntare inutilmente il raggio laser verso le persone o gli
animali. Si può accecarli.
- La protezione degli occhi viene solitamente eseguita
allontanando lo sguardo o chiudendo le palpebre.
passino a una distanza sopra o sotto il livello degli occhi.
- Tenere le persone non autorizzate fuori dall’area operativa
del dispositivo.
- Tenere il dispositivo fuori dalla portata di bambini e persone
non autorizzate.
- Non smontare o riparare il dispositivo da soli. La
manutenzione e la riparazione devono essere affidate
delle parti di ricambio originali.
- È vietato di utilizzare il dispositivo in un ambiente esplosivo,
vicino ai materiali infiammabili.
pulita per 10 minuti e consultare immediatamente un medico.
DESCRIZIONE DEL DISPOSITIVO
e controllare piani e linee verticali e orizzontali.
- con compensazione automatica dell’inclinazione del corpo
dello strumento fino a 3°;
- con compensatore bloccato, per costruire piani e linee ad
angoli arbitrari.
cantieri esterni.
Controllo di verticale
dispositivo ad una distanza di circa 1,5 m dal piombo.
1. Sbloccare il compensatore, accendere l’emettitore verticale,
allineare l’asse della linea laser verticale con il punto inferiore
del piombo.
2. Se la deviazione dell’asse della linea verticale dalla
sospensione supera 0,3 mm per 1 m della lunghezza della
sospensione (ad esempio, per un piombo con una lunghezza
contattare il centro di assistenza.
E
1.5m
1

5
УХОД И ЭКСПЛУАТАЦИЯ
Внимание!
Соблюдение следующих рекомендаций продлит срок
службы прибора:
Несоблюдение следующих правил может привести к
вытеканию электролита из элементов питания и порче
прибора:
ГАРАНТИЙНЫЕ ОБЯЗАТЕЛЬСТВА
УТИЛИЗАЦИЯ
Только для стран-членов ЕС:
СЕРВИС И КОНСУЛЬТАЦИОННЫЕ УСЛУГИ
Руководство по эксплуатации
Лазерный нивелир
RU
Fliesen 4D
ТЕХНИЧЕСКИЕ ХАРАКТЕРИСТИКИ
± 3°
-10°C ... +40°C
90%
*Рабочий диапазон может отличаться от заявленного в
зависимости от условий освещения.
КОМПЛЕКТАЦИЯ
ПОДГОТОВКА К РАБОТЕ С ПРИБОРОМ
Питание прибора
Установка/зарядка литий-ионного аккумулятора
РАБОТА С ПРИБОРОМ
1) Режим автоматической компенсации
ON.
OFF.
2) Режим построения наклонных плоскостей
OFF.
Внимание:
1
8 9
2
5
3
6
4
Панель управления
LASER
LASER
1 2
LASER
LASER
LASER
ПРОВЕРКА ТОЧНОСТИ
Проверка горизонтали
Внимание:
D
A
5м
B
C
Fliesen 4D CONDTROL.
УКАЗАНИЯ ПО ТЕХНИКЕ БЕЗОПАСНОСТИ
ОПИСАНИЕ ПРИБОРА
Проверка вертикали
E
1.5м
1
-
 1
1
-
 2
2
-
 3
3
-
 4
4
-
 5
5


CONDTROL Fliesen 4D Laser Level Benutzerhandbuch
- Typ
- Benutzerhandbuch