Viessmann 4198 Bedienungsanleitung
- Kategorie
- Kaffeezubehör
- Typ
- Bedienungsanleitung

Bedienungsanleitung
Operation Manual
Innovation,
die bewegt!
Ösen-Biegezange
Eyehook bending pliers
4198 H0
4298 TT
4398 N
1. Wichtige Hinweise / Important information ........................................................ 2
2. Einleitung / Introduction ..................................................................................... 2
3. Anwendung / Use ............................................................................................. 3
H0 TT / N

2
1. Wichtige Hinweise
Bitte lesen Sie vor der ersten Anwendung des Produktes
bzw. dessen Einbau diese Bedienungsanleitung auf-
merksam durch. Bewahren Sie diese auf, sie ist Teil des
Produktes.
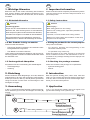
1.1 Sicherheitshinweise
Vorsicht:
Verletzungsgefahr -
Tragen Sie eine Sicherheitsbrille zum Drahtschneiden.
Beachten Sie, dass die Zange dem zu schneidenden
Draht entspricht (Härte und Durchmesser des Drahtes).
Schneiden Sie möglichst in der Mitte der Schneidefläche.
Durch Verschleiß kann es zum Abrutschen und somit zu
Unfällen kommen. In diesem Fall ist die Zange zu erneuern.
1.2 Das Produkt richtig verwenden
Dieses Produkt ist bestimmt:
- Zum Kürzen, Biegen und Richten der Viessmann Ober-
leitungsfahrdrähte vorgesehen
- Zum Betrieb in trockenen Räumen.
Jeder darüber hinausgehende Gebrauch gilt als nicht be-
stimmungsgemäß. Für daraus resultierende Schäden haftet
der Hersteller nicht.
1.3 Packungsinhalt überprüfen
Kontrollieren Sie den Lieferumfang auf Vollständigkeit:
- Ösen-Biegezange
- Anleitung
2. Einleitung
Mit der Viessmann Ösen-Biegezange, Art. 4198, 4298 und
4398 sind Sie in der Lage, die Viessmann Universal-Fahr-
drähte (Art. 415x H0, 425x TT, 435x N) auf die gewünschte
Länge zu kürzen und die Ösen zum Einhängen in den
Auslegern zu biegen.
3. Anwendung
In Abb. 1 wird der Universal-Fahrdraht in seinem ursprüng-
lichen Zustand (A) und nach dem Biegen der Ösen (B)
gezeigt.
1. Important information
Please read this manual completely and attentively before
using the product for the first time. Keep this manual. It is
part of the product.
1.1 Safety instructions
Caution:
Risk of injury -
Wear safety glasses for wire cutting.
Observe the cutting pliers capacities (diameter and
wire hardness).
If possible, cut in the middle of the cutting surface.
Wearout can cause sliding and accidents. In this case,
the pliers must be replaced.
1.2 Using the product for its correct purpose
This product is intended:
- For shorting, bending and straightening of the
Viessmann catenary wires.
- For operation in dry rooms only.
Using the product for any other purpose is not approved
and is considered incorrect. The manufacturer is not re-
sponsible for any damage resulting from the improper use
of this product.
1.3 Checking the package contents
Check the contents of the package for completeness:
- Eyehook bending pliers
- Manual
2. Introduction
With the eyehook bending pliers, items 4198, 4298 and
4398 you can cut back the universal catenary wires (items
415x H0, 425x TT and 435x N) to the desired length. After-
wards you can bend the eyehooks.
3. Application
In g. 1 you can see the catenary wire in its original form
(A) and after bending of the eyehooks (B).
DE EN
Fig. 1
Abb. 1
A
B
gerade Öse
straight eyehook
Öse mit Hinterschnitt
formed eyehook

3
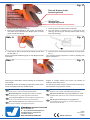
3.1 Biegen der Ösen
1. Kürzen Sie den Fahrdraht symmetrisch zu den Fallsei-
len auf die erforderliche Länge (Abb. 2). Diese ergibt
sich aus der rechnerischen Fahrdrahtlänge (Abstand
zwischen den beiden Aufnahmepunkten der Ausleger,
zwischen die der Fahrdraht gespannt werden soll) plus
einem Biegezuschlag von 2 x 6 mm (H0) bzw. 2 x 5 mm
(TT und N), siehe Abb. 3.
2. Legen Sie den gekürzten Fahrdraht in die Zange ein.
Achten Sie dabei auf die richtige Position von Fahrdraht
und Zange (Abb. 4), wie in Punkt 3 beschrieben.
3.1 Bending the eyehooks
1. Cut the catenary wire symmetrical to the vertical
wires down to the required length (fig. 2). This is the
calculatory length (distance between both connecting
points of the beams, between which you will position
the catenary wire) plus a bending bonus of 2 x 6 mm
(H0) resp. 2 x 5 mm (TT and N), see fig. 3.
2. Put the shortened wire into the pliers. Keep checking the
right position of catenary wire and pliers as specified in
point 3 (fig. 4).
3. Abhängig davon, ob Sie eine Öse mit Hinterschnitt oder
eine gerade Öse erzeugen wollen, ist der Fahrdraht
in die Nut oder auf die gerade Auflagefläche zu legen
(Abb. 5). Das Ende des Fahrdrahtes muss dabei bündig
mit der Außenkante der Zange sein.
3. Depending on whether you want to bend a formed or a
straight eyehook, you have to put the catenary wire into
the groove or onto the plain surface (fig. 5). Make sure
the end of the catenary wire is flush with the outer edge
of the pliers.
gewünschte Fahrdrahtlänge a
desired wire length a
benötigte Ausgangslänge
required initial length
a + 12 mm (H0)
a + 10 mm (TT/N)
=
H0 6 mm
(TT/N 5 mm)
Fig. 3
Abb. 3
H0 6 mm
(TT/N 5 mm)
Fig. 4
Abb. 4
Fig. 2
Abb. 2

Modellbauartikel, kein Spielzeug! Nicht geeignet für
Kinder unter 14 Jahren! Anleitung aufbewahren!
Model building item, not a toy! Not suitable for children
under the age of 14 years! Keep these instructions!
Ce n’est pas un jouet! Ne convient pas aux enfants de moi-
ns de 14 ans! Conservez cette notice d’instructions!
Não é um brinquedo! Não aconselhável para menores de
14 anos! Conservar o manual de instruções!
Modelbouwartikel, geen speelgoed! Niet geschikt voor
kinderen onder 14 jaar! Gebruiksaanwijzing bewaren!
Articolo di modellismo, non è un giocattolo! Non adatto
a bambini al di sotto dei 14 anni! Conservare istruzioni per
l’uso!
Artículo para modelismo ¡No es un juguete! No
recomendado para menores de 14 años! Conserva las
instrucciones de servicio!
DE
EN
FR
NL
IT
ES
PT
Made in Europe
Viessmann
Modelltec
hnik GmbH
Bahnhofstraße 2a
D - 35116 Hatzfeld-Reddighausen
+49 6452 9340-0
www.viessmann-modell.de
4
4. Drücken Sie die Zange kräftig zu.
5. Drehen Sie die Biegezange wie in Abb. 6 und führen
Sie dabei den Fahrdraht am Biegeradius entlang
(siehe rechte Zeichnung).
6. Zange öffnen. Ziehen Sie die Zange seitlich aus der Öse
heraus (Abb. 7).
Diese prinzipielle Arbeitsfolge gilt für das Biegen beider
Ösentypen.
Fig. 6
Abb. 6
4. Close the pliers and press them powerfully.
5. Turn the pliers as shown in fig. 6 and press the
catenary wire along the bending radius while turning
(see right drawing).
Fig. 7
Abb. 7
6. Open the pliers. Pull the pliers sideways out of the pliers
(fig. 7).
This principal working sequence is valid for bending both
types of eyehooks.
Änderungen vorbehalten. Keine Haftung für Druckfehler
und Irrtümer.
Die aktuelle Version der Anleitung finden Sie auf der Viess-
mann Homepage unter der Artikelnummer.
Subject to change without prior notice. No liability for
mistakes and printing errors.
You will find the latest version of the manual on the Viess-
mann website using the item number.
98822
Stand 06/sw
07/2021
Ho/Kf
Fig. 5
Abb. 5
Öse mit Hinterschnitt
formed eyehook
gerade Öse
straight eyehook
Anlagekante
für Fahrdraht
positioncorner for
the catenary wire
-
 1
1
-
 2
2
-
 3
3
-
 4
4


Viessmann 4198 Bedienungsanleitung
- Kategorie
- Kaffeezubehör
- Typ
- Bedienungsanleitung
in anderen Sprachen
- English: Viessmann 4198 Owner's manual
Verwandte Artikel
-
Viessmann 4159 Bedienungsanleitung
-
-
-
-
-
-
-
-
-