
User Guide
English ( 2 – 9 )
Guía del usuario
Español ( 10 – 17 )
Guide d’utilisation
Français ( 18 – 25 )
Guida per l’uso
Italiano ( 26 – 33 )
Benutzerhandbuch
Deutsch ( 34 – 41 )
Appendix
English ( 42 – 43 )

2
User Guide (English)
Introduction
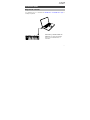
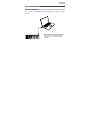
Box Contents
LPK25 mk2
USB Cable
Software Download Card
User Guide
Safety & Warranty Manual
Important: Visit akaipro.com and find the webpage for LPK25 mk2 to download the
free editor software.
Support
For the latest information about this product (documentation, technical
specifications, system requirements, compatibility information, etc.) and product
registration, visit akaipro.com.
For additional product support, visit akaipro.com/support.


4
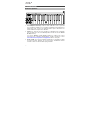
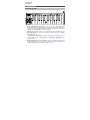
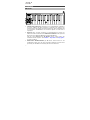
Features
Top Panel
1. USB Port (Rear Panel): Use a standard USB cable to connect this USB port to
your computer. The computer’s USB port provides ample power to LPK25 mk2.
This connection is also used to send and receive MIDI data to and from your
computer.
2. Keyboard: This 25-note keyboard is velocity-sensitive and, in conjunction with
the Octave Down/Up buttons, can access the full range of 127 available MIDI
notes (10 octaves).
The Function and Arp On/Off buttons allow some of its keys to access
additional commands. See Operation > Programs and Arpeggiator to learn
more.

5
3. Octave Down/Up (/): Use these buttons to shift the keyboard’s range down
or up. Press both buttons simultaneously to reset the octave shift to “zero.”
4. Function: Hold down this button and press one of the keys on the keyboard
labeled Program Select (1-8) to load the program of the same number.
5. Sustain: When the Arpeggiator is off, you can hold down the Sustain button to
sustain the currently held notes on the keyboard which will stop when the
Sustain button is released. If the Arpeggiator is active, then this button will
momentarily latch the arpeggiator for as long as the button is held. When
released, the Arpeggiator will disengage latching.
6. Tap Tempo: Tap this button at the desired rate to enter a new tempo for the
internal arpeggiator.
Important: Tap Tempo does not work when LPK25 mk2 is externally synced.
7. Arp On/Off: Press this button to enable or disable the internal arpeggiator. The
arpeggiator affects notes being played on the keyboard only, and its rate is
based on the current tempo and time division settings.
Hold this button down and press a labeled key on the keyboard to enter new
settings for the arpeggiator. See Operation > Arpeggiator to learn more.

6
Operation
Programs
You can store up to 8 programs in LPK25 mk2’s internal memory. Each program
includes all configurable arpeggiator settings, described below in the Arpeggiator
section.
To select a program, press and hold Function, and press a Program Select
numbered key.
To manage your programs, use the LPK25 mk2 editor software. Visit akaipro.com
and find the webpage for LPK25 mk2 to download it.

7
Arpeggiator
While using the arpeggiator, playing a chord causes the individual notes of the chord
to play one at a time in a set order and repeat until the chord is released. The
arpeggiator affects notes being played on the keyboard only.
To enable or disable the arpeggiator, press Arp On/Off. This button controls the
operation of the arpeggiator. The button’s LED on/off state will indicate the
Arpeggiator status. This button has a dual function:
• Press the Arp On/Off button once to activate or deactivate the arpeggiator.
When the button is lit, the arpeggiator is engaged. Press the button again to turn
the arpeggiator off.
• The settings for the arpeggiator can be changed using the Arp On/Off button in
conjunction with the keyboard keys. When the Arp On/Off button is pressed and
held, the keyboard keys with white text labeled above them can be used to
change the parameters of the Arpeggiator.
When the arpeggiator is on, Note On and Note Off messages will only be sent from
the arpeggiator and will not be sent when a key is actually pressed. All of the
pressed keys will tell the arpeggiator which notes to play. If the arpeggiator is
latched, then keys that are released will stay in the arpeggiator. When the
Arpeggiator is turned off, then all notes are released from the arpeggiator.
To momentarily latch the active arpeggiator, press and hold the Sustain button.
When the button is released, the Arpeggiator will disengage latch.

8
The rate of the arpeggiator is based on the current tempo and time division settings.
To set the tempo, press Tap Tempo several times at the desired rate. The
arpeggiator will automatically detect the new tempo.
Important: Tap Tempo does not work when LPK25 mk2 is externally synced.
To set the time division, press and hold Arp On/Off, and press one of these keys
on the keyboard:
1/4 (quarter notes) 1/16 (sixteenth notes)
1/4T (quarter-note triplets) 1/16T (sixteenth-note triplets)
1/8 (eighth notes) 1/32 (thirty-second notes)
1/8T (eighth-note triplets) 1/32T (thirty-second-note triplets)
The arpeggiation type determines the order in which the notes of a chord play,
whether they ascend or descend, etc.
To set the arpeggiation type, press and hold Arp On/Off, and press one of these
keys on the keyboard:
• Up: Notes arpeggiate from the lowest note up to the highest note.
• Down: Notes arpeggiate from the highest note down to the lowest note.
• Excl (Exclusive): Notes arpeggiate from the lowest to the highest note and
back down. Lowest and highest notes are not retriggered when the arpeggio
changes direction.
• Incl (Inclusive): Notes arpeggiate from the lowest to the highest note and back
down. Lowest and highest notes are retriggered when the arpeggio changes
direction.
• Order: Notes will be repeated in the same order in which their keys were
pressed.
• Rand (Random): Plays the held notes in random selection.

9
The arpeggiation range determines the number of octaves across which the arpeggio
will play. After the arpeggio plays at the highest octave in the range, the arpeggio will
repeat from the lowest octave.
To set the arpeggiation range, press and hold Arp On/Off, and press Arp 1, 2, 3,
or 4.
You can set the arpeggiator to follow the tempo of LPK25 mk2’s internal MIDI clock
or the external tempo of the project in your digital audio workstation (DAW).
Press and hold Arp On/Off, and press the Latch key on the keyboard. When the
Arpeggiator is on and Latch is enabled, you can press a combination of keys on the
keyboard and the Arpeggiator will continue to arpeggiate these notes even after you
release the keys. Pressing a new combination of keys will start a new arpeggiation.
To set whether the arpeggiator is internally or externally synced, press and hold
Arp On/Off, and press the Sync key on the keyboard.
To set the Swing value, press and hold Arp On/Off, and press one of these Swings
keys: 50%, 55%, 59%, 61%, or 64%.

10
Guía del usuario (Español)
Introducción
Contenido de la caja
LPK25 mk2, cable USB, tarjeta de descarga de software, guía del usuario, manual
sobre la seguridad y garantía
Importante: Visite akaipro.com y entre a la página web del LPK25 mk2 para
descargarlo el gratis software de edición.
Soporte
Para obtener la información más reciente acerca de este producto (documentación,
especificaciones técnicas, requisitos de sistema, información de compatibilidad,
etc.) y registrarlo, visite akaipro.com.
Para soporte adicional del producto, visite akaipro.com/support.


12
Características
Panel superior
1. Puerto USB (Panel trasero): Utilice un cable USB estándar para conectar este
puerto USB a su ordenador. El puerto USB del ordenador suministra suficiente
corriente al LPK25 mk2. Esta conexión también se utiliza para enviar y recibir
datos MIDI desde y hacia su ordenador.
2. Teclado: Este teclado de 25 notas con post-pulsación es sensible a la velocidad
y, en conjunto con los botones de subir/bajar octava, pueden acceder al rango
completo de las 127 notas MIDI disponibles (10 octavas).
Los botones Function y Arp On/Off (Arpegiador encendido/apagado) permiten
que algunas de sus teclas accedan a comandos adicionales. Consulte
Funcionamiento > Programas y Arpegiador para aprender más.
3. Subir/Bajar octava (/): Utilice estos botones para desplazar el rango del
teclado hacia arriba o abajo. Pulse ambos botones simultáneamente para
resetear el desplazamiento de octavas a "cero".

13
4. Function: Mantenga pulsado este botón y pulse una de las teclas rotuladas
Program Select (1-8) en el TECLADO para recuperar el preset con el mismo
número.
5. Sostenido: Cuando el arpegiador está desactivado, puede mantener pulsado el
botón Sustain para sostener las notas actualmente pulsadas en el teclado las
cuales se detendrán cuando se suelte dicho botón. Si el arpegiador se
encuentra activo, entonces este botón trabará momentáneamente el arpegiador
mientras se mantenga pulsado el botón. Una vez que se suelte el botón, el
arpegiador quedará destrabado.
6. Tap Tempo: Toque ligeramente este botón al ritmo deseado para introducir un
nuevo tempo para el arpegiador interno.
Importante: Tap Tempo no funciona cuando el LPK25 mk2 está sincronizado
externamente.
7. Arpegiador encendido/apagado: Pulse este botón para activar o desactivar el
arpegiador interno. El arpegiador solo afecta a las notas que se están tocando
en el teclado y su velocidad se basa en el tempo actual y los ajustes de división
de tiempo.
Mantenga pulsado este botón y toque una tecla rotulada en el teclado para
introducir ajustes nuevos para el arpegiador. Consulte Funcionamiento >
Arpegiador para aprender más.

14
Funcionamiento
Programas
Puede almacenar hasta 8 programas en la memoria interna del LPK25 mk2. Cada
programa incluye todos los ajustes configurables del arpegiador, descritos más
abajo en la sección Arpegiador.
Para seleccionar un programa, mantenga pulsado Function y pulse una tecla
numerada de selección del programa.
Para administrar sus programas, use el software de edición del LPK25 mk2. Visite
akaipro.com y entre a la página web del LPK25 mk2 para descargarlo.

15
Arpegiador
Cuando se utiliza el arpegiador, al tocar un acorde las notas individuales del acorde
sonarán de a una a la vez en un orden determinado y se repetirán hasta que se deje
de tocar el acorde. El arpegiador solo afecta a las notas que se están tocando en el
teclado.
Para activar o desactivar el arpegiador, pulse Arp On/Off. Este botón controla el
funcionamiento del arpegiador. El estado de encendido/apagado del LED indicará el
estado del arpegiador. Este botón posee una función doble:
• Pulse el botón Arp On/Off una vez para activar o desactivar el arpegiador.
Cuando el botón está iluminado, el arpegiador está activado. Pulse el botón
nuevamente para apagar el arpegiador.
• Los ajustes del arpegiador pueden modificarse utilizando el botón Arp On/Off de
forma conjunta con las teclas del teclado. Cuando se mantiene pulsado el botón
Arp On/Off, las teclas del teclado que tienen un rótulo de texto blanco sobre
ellas se pueden utilizar para modificar los parámetros del arpegiador.
Cuando el arpegiador está activado, los mensajes de activación y desactivación de
nota solo se enviarán desde el arpegiador y no cuando se toque realmente una tecla.
Todas las teclas pulsadas le dirán al arpegiador qué notas reproducir. Si el
arpegiador está trabado, las teclas que se sueltan permanecerán en él. Cuando se
apaga el arpegiador, todas las notas quedan liberadas de él.
Para trabar momentáneamente el arpegiador activo, mantenga pulsado el botón
Sustain. Una vez que se suelte el botón, el arpegiador quedará destrabado.
La frecuencia del arpegiador se basa en el tempo y los ajustes de división de tiempo
actuales.

16
Para ajustar el tempo, pulse Tap Tempo varias veces a la velocidad deseada. El
arpegiador detectará el nuevo tempo automáticamente.
Importante: Tap Tempo no funciona cuando el LPK25 mk2 está sincronizado
externamente.
Para ajustar la división de tiempo, mantenga pulsado Arp On/Offy pulse una de
las siguientes teclas del teclado:
1/4 (negras) 1/16 (semicorcheas)
1/4T (tresillos de negras) 1/16T (tresillos de semicorcheas)
1/8 (corcheas) 1/32 (fusas)
1/8T (tresillos de corcheas) 1/32T (tresillos de fusas)
El tipo de arpegio determina el orden en el que se tocan las notas de un acorde, ya
sea ascendente o descendente, etc.
Para ajustar el tipo de arpegio, mantenga pulsado Arp On/Off y pulse una de las
siguientes teclas del teclado:
• Up: Las notas arpegian desde la más baja a la más alta.
• Down: Las notas arpegian desde la más alta a la más baja.
• Excl (Exclusivo): Las notas arpegian desde la más baja a la más alta y de allí a
la más baja. Las notas más alta y más baja no se redisparan cuando el arpegio
cambia de sentido.
• Incl (Inclusivo): Las notas arpegian desde la más baja a la más alta y de allí a la
más baja. Las notas más alta y más baja se redisparan cuando el arpegio
cambia de sentido.
• Order: Las notas se repiten en el mismo orden en que se pulsaron sus
teclas.
• Rand (Aleatorio): Las notas retenidas se reproducen aleatoriamente.

17
El rango del arpegiador determina la cantidad de octavas a través de las cuales
sonará el arpegio. Luego de que el arpegio haga sonar la octava más alta en el
rango, se repetirá desde la octava más baja.
Para determinar el rango del arpegiador, mantenga pulsado Arp On/Off
(Apagar/Encender arpegiador) y pulse Arp 1, 2, 3 o 4.
Mantenga pulsado Arp On/Off, y pulse la tecla Latch del teclado. Cuando el
arpegiador está encendido y la función de enganche activada, puede pulsar una
combinación de teclas en el teclado y el arpegiador continuará arpegiando esas
teclas aún después de soltarlas. Al pulsar una nueva combinación de teclas se inicia
un nuevo arpegio.
Puede ajustar el arpegiador para que siga el tempo del reloj MIDI interno del LPK25
mk2 o tempo externo del proyecto de su estación de trabajo de audio digital (DAW).
Para configurar si el arpegiador se sincroniza de forma interna o externa,
mantenga pulsado Arp On/Off, y pulse la tecla Sync (Sincronización) del teclado.
Para ajustar el valor de swing, mantenga pulsado Arp On/Off y pulse una de estas
teclas de Swing: 50%, 55%, 59%, 61% o 64%.

18
Guide d’utilisation (Français)
Présentation
Contenu de la boîte
LPK25 mk2, câble USB, carte de téléchargement de logiciel, guide d’utilisation,
consignes de sécurité et informations concernant la garantie
Important : Visitez akaipro.com pour trouver la page Web du LPK25 mk2 afin de le
télécharger le gratuite logiciel d’édition.
Assistance
Pour les toutes dernières informations concernant la documentation, les
spécifications techniques, la configuration requise, la compatibilité et
l’enregistrement du produit, veuillez visiter akaipro.com.
Pour toute assistance supplémentaire, veuillez visiter le site akaipro.com/support.


20
Caractéristiques
Panneau supérieur
1. Port USB (Panneau arriéve) : Utilisez un câble USB afin de relier ce port USB
au port USB d’un ordinateur. Le port USB de l'ordinateur permet d’alimenter le
LPK25 mk2. Cette connexion est également utilisée pour la transmission de
données MIDI vers et depuis votre ordinateur.
2. Clavier : Ce clavier de 25 notes sensibles à la dynamique peut commander
toute la gamme des 127 notes MIDI disponibles à l’aide des touches Octave
/ (10 octaves).
Les touches Function et Arp on/off permettent à certaines des touches
d’accéder à des commandes supplémentaires. Veuillez consulter les sections
Fonctionnement > Programmes et Arpégiateur afin d’en savoir plus.
3. Octave (/) : Ces touches permettent d'augmenter ou de diminuer la plage
d'octaves du clavier. Appuyez sur les deux touches simultanément afin de
remettre le clavier à l’octave du milieu (zéro) par défaut.
Seite wird geladen ...
Seite wird geladen ...
Seite wird geladen ...
Seite wird geladen ...
Seite wird geladen ...
Seite wird geladen ...
Seite wird geladen ...
Seite wird geladen ...
Seite wird geladen ...
Seite wird geladen ...
Seite wird geladen ...
Seite wird geladen ...
Seite wird geladen ...
Seite wird geladen ...
Seite wird geladen ...
Seite wird geladen ...
Seite wird geladen ...
Seite wird geladen ...
Seite wird geladen ...
Seite wird geladen ...
Seite wird geladen ...
Seite wird geladen ...
Seite wird geladen ...
Seite wird geladen ...
-
 1
1
-
 2
2
-
 3
3
-
 4
4
-
 5
5
-
 6
6
-
 7
7
-
 8
8
-
 9
9
-
 10
10
-
 11
11
-
 12
12
-
 13
13
-
 14
14
-
 15
15
-
 16
16
-
 17
17
-
 18
18
-
 19
19
-
 20
20
-
 21
21
-
 22
22
-
 23
23
-
 24
24
-
 25
25
-
 26
26
-
 27
27
-
 28
28
-
 29
29
-
 30
30
-
 31
31
-
 32
32
-
 33
33
-
 34
34
-
 35
35
-
 36
36
-
 37
37
-
 38
38
-
 39
39
-
 40
40
-
 41
41
-
 42
42
-
 43
43
-
 44
44


in anderen Sprachen
- English: Akai LPK25 User guide
- français: Akai LPK25 Mode d'emploi
- español: Akai LPK25 Guía del usuario
- italiano: Akai LPK25 Guida utente