Amana UPRIGHT FREEZER Bedienungsanleitung
- Kategorie
- Mikrowellen
- Typ
- Bedienungsanleitung

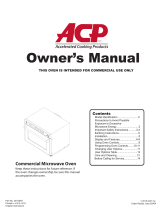
Owner’s Manual
Heavy Duty Commercial
Compact [0.6 Cubic Foot]
Microwave Oven
Keep these instructions for future reference.
If the oven changes ownership, this manual must
accompany oven.
Contents
Model Identication ........................... 2
Important safety InstructIons ... 3
precautIons to avoId possIble
exposure to excessIve
mIcrowave energy ................... 4
Grounding/Earthing Instructions ........ 5
Installation ......................................... 6
Display and Features Style 1 ............ 7
Operation Style 1 .............................. 9
Programming Style 1 ....................... 10
Options Style 1 .................................11
Display and Features Style 2 .......... 12
Operation Style 2 ............................ 13
Programming Style 2 ....................... 15
Options Style 2 ................................ 16
Care and Cleaning .......................... 17
Before Calling for Service ............... 19

2
Model Identication
When contacting ACP, provide product information.
Product information is located on oven serial plate.
Record the following information:
Model Number: _____________________________
Manufacturing Number: _______________________
Serial or S/N Number: ________________________
Date of purchase: ___________________________
Dealer’s name and address: ___________________
__________________________________________
__________________________________________
__________________________________________
Keep a copy of sales receipt for future reference or in
case warranty service is required.
Any questions or to locate an authorized service
agent contact ACP, Inc. ComServ Customer Service
at: Phone 866.426.2621 / 319.368.8195 or email:
[email protected]. Warranty service
must be performed by an authorized servicer. ACP also
recommends contacting an authorized servicer if service
is required after warranty expires.

3
IMPORTANT SAFETY INSTRUCTIONS
SAVE THESE INSTRUCTIONS
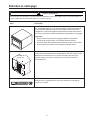
9. DO NOT operate this oven if it has a damaged
cord or plug, if it is not working properly, or if it has
been damaged or dropped.
10. This oven, including power cord, must be serviced
ONLY by qualied service personnel. Special tools
are required to service oven. Contact nearest
authorized service facility for examination, repair,
or adjustment.
11. DO NOT cover or block lter or other openings
on oven.
12. DO NOT store this oven outdoors. DO NOT
use this product near water – for example, near
a kitchen sink, in a wet basement, or near a
swimming pool, and the like.
13. DO NOT immerse cord or plug in water.
14. Keep cord AWAY from HEATED surfaces.
15. DO NOT let cord hang over edge of table or
counter.
16. See door cleaning instructions in “Care and
Cleaning” section of manual on page 17.
17. For commercial use only.
When using electrical oven, basic safety precautions should be followed to reduce the risk of burns, electric shock,
re, or injury to persons or exposure to excessive microwave energy.
!
WARNING
a. DO NOT overcook food. Carefully attend oven if
paper, plastic, or other combustible materials are
placed inside the oven to facilitate cooking.
b. Remove wire twist-ties from paper or plastic bags
before placing bag in oven.
c. KEEP oven DOOR CLOSED, turn oven off, and
disconnect the power cord, or shut off power at
the fuse or circuit breaker panel, if materials inside
the oven should ignite. Fire may spread if door is
opened.
d. DO NOT use the cavity for storage. DO NOT leave
paper products, cooking utensils, or food in the
cavity when not in use.
To reduce the risk of re in the oven cavity:
!
WARNING
1. READ all instructions before using oven.
2. READ AND FOLLOW the specic “PRECAUTIONS
TO AVOID POSSIBLE EXPOSURE TO EXCESSIVE
MICROWAVE ENERGY” on page 4.
3. This oven MUST BE GROUNDED. Connect only to
properly GROUNDED outlet. See “GROUNDING
INSTRUCTIONS” on page 7.
4. Install or locate this oven ONLY in accordance with
the installation instructions in this manual.
5. Some products such as whole eggs and sealed
containers – for example, closed glass jars – may
explode and SHOULD NOT be HEATED in this
oven.
6. Use this oven ONLY for its intended use as
described in this manual. Do not use corrosive
chemicals or vapors in this oven. This type of oven
is specically designed to heat or cook. It is not
designed for industrial or laboratory use.
7. As with any oven, CLOSE SUPERVISION is
necessary when used by CHILDREN.
8. If smoke is observed, switch off or unplug the
appliance and keep the door closed in order to stie
any ames.
This is the safety alert symbol. It is used to alert you to potential personal injury hazards.
Obey all safety messages that follow this symbol to avoid possible injury or death.

4
IMPORTANT SAFETY INSTRUCTIONS
SAVE THESE INSTRUCTIONS
1. Briskly stir or pour liquids before cooking with
microwave energy to prevent spontaneous boiling
or eruption. Do not overheat. If air is not mixed
into a liquid, liquid can erupt in oven or after
removal from oven.
2. Do not deep fat fry in oven. Fat could overheat and
be hazardous to handle.
3. Do not cook or reheat eggs in shell or with an
unbroken yolk using microwave energy. Pressure
may build up and erupt. Pierce yolk with fork or
knife before cooking.
4. Pierce skin of potatoes, tomatoes, and similar
foods before cooking with microwave energy.
When skin is pierced, steam escapes evenly.
5. Do not operate oven without load or food in oven
cavity.
6. Use only popcorn in packages designed and
labeled for microwave use. Popping time varies
depending on oven wattage. Do not continue
to heat after popping has stopped. Popcorn will
scorch or burn. Do not leave oven unattended.
7. Do not use regular cooking thermometers in oven.
Most cooking thermometers contain mercury
and may cause an electrical arc, malfunction, or
damage to oven.
8. Do not heat baby bottles in oven.
9. Do not use metal utensils in oven.
10. Never use paper, plastic, or other combustible
materials that are not intended for cooking.
11. When cooking with paper, plastic, or other
combustible materials, follow manufacturer’s
recommendations on product use.
12. Do not use paper towels which contain nylon
or other synthetic bers. Heated synthetics could
melt and cause paper to ignite.
13. Do not heat sealed containers or plastic bags
in oven. Food or liquid could expand quickly and
cause container or bag to break. Pierce or open
container or bag before cooking.
14. To avoid pacemaker malfunction, consult
physician or pacemaker manufacture about
effects of microwave energy on pacemaker.
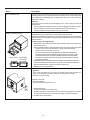
PRECAUTIONS TO AVOID POSSIBLE EXPOSURE TO
EXCESSIVE MICROWAVE ENERGY
a. DO NOT attempt to operate this oven with door
open since open-door operation can result in
harmful exposure to microwave energy. It is
important not to defeat or tamper with safety
interlocks.
b. DO NOT place any object between oven front
face and door or allow soil or cleaner residue to
accumulate on sealing surfaces.
c. DO NOT operate oven if it is damaged. It is
particularly important that oven door close properly
and that there is no damage to: (1) door (bent), (2)
hinges and latches (broken or loosened), (3) door
seals and sealing surfaces.
d. Oven should NOT be adjusted or repaired by
anyone except properly qualied service personnel.
To avoid personal injury or property damage, observe the following:
CAUTION
!

5
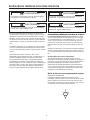
Grounding Instructions
WARNING
To avoid risk of electrical shock or death, this oven
must be grounded.
WARNING
To avoid risk of electrical shock or death, do not alter
the plug.
This oven MUST be grounded. In the event of an
electrical short circuit, grounding reduces the risk of
electric shock by providing an escape wire for the
electric current. This oven is equipped with a cord
having a grounding wire with a grounding plug. The plug
must be plugged into an outlet that is properly installed
and grounded.
Consult a qualied electrician or servicer if grounding
instructions are not completely understood, or if doubt
exists as to whether the oven is properly grounded.
Do not use an extension cord. If the product power
cord is too short, have a qualied electrician install a
three-slot receptacle. This oven should be plugged into
a separate circuit with the electrical rating as shown on
the oven’s serial plate / rating label. When a microwave
oven is on a circuit with other equipment, an increase in
cooking times may be required and fuses can be blown.
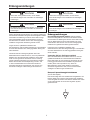
Earthing Instructions
Oven MUST be earthed. Earthing reduces risk of
electric shock by providing an escape wire for the
electric current, if an electrical short occurs. This oven is
equipped with a cord having a earth wire with a earthing
plug. The plug must be plugged into an outlet that is
properly installed and earthed.
Consult a qualied electrician or servicer if earthing
instructions are not completely understood, or if doubt
exists as to whether the oven is properly earthed.
Do not use an extension cord.
If the product power cord is too short, have a qualied
electrician install a new receptacle close enough to the
oven to plug the oven in. This oven should be plugged
into a separate circuit with the electrical rating as
provided in product specications (available on www.
acpsolutions.com). When a microwave oven is on a
circuit with other equipment, an increase in cooking
times may be required and fuses can be blown.
External Equipotential Earthing Terminal
(export only)
Equipment has secondary earthing terminal. Terminal
provides external earthing connection used in addition
to earthing prong on plug. Located on outside of oven
back, terminal is marked with symbol shown below.

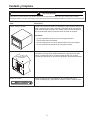
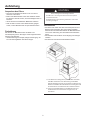
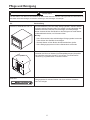
6
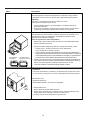
Unpacking Oven
• Inspect oven for damage such as dents in door or
dents inside oven cavity.
• Report any dents or breakage to source of purchase
immediately. Do not attempt to use oven if damaged.
• Remove all materials from oven interior.
• If oven has been stored in extremely cold area, wait a
few hours before connecting power.
Radio Interference
Microwave operation may cause interference to radio,
television. Reduce or eliminate interference by doing the
following:
• Clean door and sealing surfaces of oven according to
instructions in “Care and Cleaning” section.
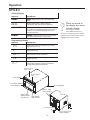
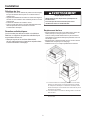
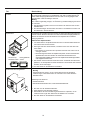
Oven Placement
• Do not install oven next to or above source of heat,
such as pizza oven or deep fat fryer. This could cause
microwave oven to operate improperly and could
shorten life of electrical parts.
• Do not block or obstruct oven lter. Allow access for
cleaning.
• Install oven on level countertop surface.
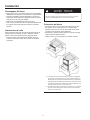
A—Allow at least 7 “ (17.8 cm) of clearance around top and
sides of oven. Proper air ow around oven cools electrical
components. With restricted air ow, oven may not operate
properly and life of electrical parts is reduced.
B—Allow at least 2
9
/16 “ (6.5 cm) between air discharge on
back of oven and back wall.
Oven Clearances
Installation
WARNING
Excessive Weight Hazard
Use two or more people to move and install oven.
Failure to do so can result in back or other injury.

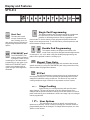
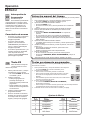
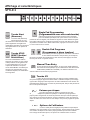
7
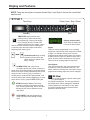
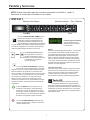
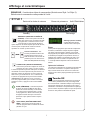
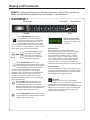
TIME ENTRY pad is used to enter
cooking time for either manual entry
or programming. Cooking time ranges
from 1 second (00:01) to a total of 60
minutes (60:00) over four stages. If more
than 60 minutes of total microwave cooking time
is required, open door and inspect food before
beginning new cooking cycle.
Numbered pads begin cooking
programs or enter times and
power levels for “Manual Time .
Entry” cooking.
POWER LEVEL pad is used to set
microwave power level. When cooking, the
power level can be decreased for foods that require
slower more even cooking. Microwave power levels
range from 0% to 100% in 10% increments. If
cooking time is set and START pad pressed, oven
cooks at 100% power. When programming, to reset
power level to 100%, press POWER LEVEL pad.
START pad begins Manual Time Entry
cooking or restarts an interrupted cooking
cycle. When programming, use to save time
and power level, and to advance to next
user option.
STOP/ RESET pad exits programming
mode and stop cooking during cooking
cycle.
Display (some models)
Some items in display can
be seen but will not glow.
Stages
This oven can be programmed to run 4 cooking
sequences consecutively. Each sequence is called
a stage. For example, the rst cycle could be
programmed to defrost at 60% power, the second
to defrost at 30% power, the third to heat at 100%
power, and the fourth to hold warm at 10% power.
Total time for all cooking stages counts down.
User Options
User Options allow the user to program the oven
to perform in a way convenient to the user. The
beeps, maximum cooking time, and number of pre-
programmed cooking sequences can be changed.
X2 Pad
The X2 Pad increases a preset cooking time
by a percentage of
the original cooking time. The user species the
percentage and it can be changed for individual
cooking sequences. This feature is very useful
for cooking multiple servings of foods such as
potatoes or slices of pizza.
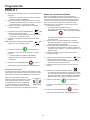
Display and Features
NOTE: There are two styles of controls shown Style 1 and Style 2 choose the control that
matches unit
STYLE 1
Time Entry
Quantity
Power Level
Start
Stop / Reset

8
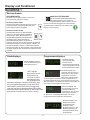
MANUAL TIME ENTRY
Manual Time Entry feature allows the operator
to heat without changing the preprogrammed
pads. Time must be entered and power can be
set before cooking. START pad must be pressed
to begin cooking.
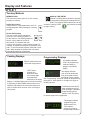
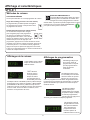
Programming Displays
This display indicates
oven is in programming
mode and ready to
program a numbered
pad(s).
This display indicates
oven is set to double pad
entry and 2 pads must be
pressed to enter a program.
See “Programming” section of manual for programming
procedure or “User Options” to change from single or
double pad entry.
This display shows briey
when programming more
than one stage. It indicates
programming mode for
pad 02. Press Time Entry
to choose stage to be programmed.
This display indicates
programming user
options mode. See
“User Options”
section of manual for
programming procedure.
PI
--
P02
MEMORY PAdS
This oven can of store either 10 or 100 cooking
programs in memory.
Single Pad Cooking
From the factory, it is programmed to store 10
cooking programs. Each pad begins a cooking
program.
Double Pad Cooking
The oven control can be changed to
store up to 100 cooking programs. To
set the control to 100 cooking programs,
see the “User’s Options” section of
this manual. To heat when the oven
is set for 100 programs , press 2 memory pads. For
example, to start the rst program, press pad 0, then
pad 1. To use the second program, press pad 0, then
pad 2. After the pads are pressed, the oven starts
automatically and time counts down.
Cooking Methods
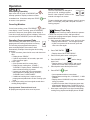
Cooking Displays
READY shows when oven
control will accept entries.
14:37 shows
cooking time.
When more than
one cooking stage
is programmed,
total time for all stages
displays. COOKING Shows when microwave energy
is generated. % MW POWER shows when oven is
operating. 50 indicates the microwave power level
used. If number does not show, oven is cooking at
100% power.
STYLE 1
Display and Features

9
Double Pad Programs
The oven control can be changed to
store up to 100 cooking programs.
See the “User’s Options” section of this
manual to change oven control.
To start a double pad cooking program, press 2 memory
pads. For example, press pad 0 and pad 3 to start a
cooking program.
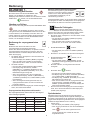
Manual Time Entry
Manual Time Entry feature allows the operator
to enter time and power levels, and heat without
changing the preprogrammed pads. Example: Heat for
30 seconds at 80% power.
1. Open oven door, place food in oven, and close door.
• Display shows “READY”. Fan and light operate.
• If pad is not pressed in 60 seconds, open and
close oven door again.
2. Press TIME ENTRY pad.
• Display shows “00:00” and “READY”.
3. Press 3 and 0 pad to enter cooking time.
4. Press POWER LEVEL
pad to change
power level.
• Display shows “% MW POWER” and current
power level if other than 100 percent power.
5. Press 8 pad to enter desired power level.
6. Press START pad.
• Oven operates and time counts down.
• Display shows cooking time, “COOKING”, “% MW
POWER”.
• Display shows “COOKING” only when microwave
energy is present.
• If power level other than 100 percent power was
programmed, display shows “COOKING” and “%
MW POWER”. Display counts down cooking time.
7. Oven stops cooking and oven signal sounds when
cooking timing elapses and display shows “DONE”.
Operation
Interrupting Operation
Open oven door or press STOP/RESET pad to
interrupt operation. Display continues to show
countdown time. Close door and press START pad
to resume oven operation.
Canceling Mistakes
If oven is not cooking, press STOP/RESET pad to
clear display. If oven is cooking, press STOP/RESET
pad once to stop oven, then again to clear display. If
oven door is open and time shows in display, close oven
door and press STOP/RESET pad to clear display.
Operating Preprogrammed Pads
From the factory, this oven can of store up to 10
preprogrammed cooking sequences in memory.
To heat using a preprogrammed sequence,
press a numbered pad. Oven starts to heat
automatically. Example: Heat using the third cooking
sequence.
1. Open oven door, place food in oven, and close oven
door.
• Display shows “READY”.
• If pad is not pressed in 60 seconds, open and
close oven door again.
2. Press 3 pad.
• Oven operates and time counts down.
• Display shows cooking time, “STAGE 1”,
”COOKING”. Display shows “COOKING” only
when microwave energy is present.
• If power level other than 100 percent power
was programmed, display shows “STAGE 1”,
“COOKING” and “% MW POWER”.
• If additional cooking time is required, press
preprogrammed pads before or after cooking cycle
ends.
3. Oven stops cooking and oven signal sounds when
cooking timing elapses.
Preprogrammed Times and Cook Level
All preprogrammed pads arrive set at full power.
STYLE 1

10
Memory Pads
From the factory, this oven can of store up to 10
cooking programs. Follow instructions below to program
cooking times and power levels for customized cooking.
Example: Program third cooking sequence to heat for 30
seconds at 80% power.
1. Open oven door.
• Display shows “DOOR”.
• If door is closed or STOP/RESET pad is
pressed before nishing programming sequence,
oven exits programming mode.
2. Press and hold pad 1 for approximately 5 seconds.
• After 5 seconds, signal sounds. Display shows
“PROGRAM”.
3. Press 3 pad to select memory pad.
• Display shows cooking time, “STAGE 1” and
power level if other than 100 percent power.
4. Press 3 and 0 pad to enter desired cooking time.
5. Press POWER LEVEL
pad to change
power level.
• Display shows cooking time and current power
level if other than 100 percent power.
6. Press 8 pad to enter desired power level.
Note: Press POWER LEVEL twice to reset to
100% power.
7. Press START
pad to save new cooking time
and power level in oven memory.
• Display shows “PROGRAM”.
• Repeat step 3–8 to program additional pads.
8. Press STOP/RESET pad or close oven door
to exit programming mode.
Double Pad Programs
The oven control can be changed to store up to 100
cooking programs. See the “User’s Options” section of
this manual to change oven control.
To create a double pad program, follow the instructions
above except for a change to step #3. When entering
the cooking program number, press 2 memory pads.
For example, press pads 0 and pad 3 to create a new
cooking program.
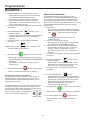
Multiple Cooking Stages
Follow instructions below to program oven to perform
four consecutive cooking cycles without interruption.
Example: Program third cooking sequence to heat for 30
seconds at 80% power, 40 seconds at 50% power, and
10 seconds at 100% power.
1. Open oven door.
• Display shows “READY”.
• If door is closed or STOP/RESET pad is
pressed before nishing programming sequence,
oven exits programming mode.
2. Press pad 1 for approximately 5 seconds.
• After 5 seconds, signal sounds. Display shows
“PROGRAM”.
3. Press 3 pad to select memory pad.
• Display shows “P03”briey then cooking time,
“STAGE 1” and power level if other than 100
percent power.
4. Press 3 and 0 to enter desired cooking time.
5. Press POWER LEVEL
pad to change
power level.
• Display shows “% MW POWER” and current
power level if other than 100 percent power.
6. Press 8 pad to enter desired power level.
7. Press TIME ENTRY
pad.
• Display shows cooking time, and “STAGE 2”
indicating programming stage 2 and power level
for stage shown in display.
• Repeat steps 5–8 to create additional stages.
8. Press START pad to save new cooking time
and power level in oven memory.
9. Press STOP/RESET pad or close oven door
to exit programming mode.
Programming
STYLE 1

11
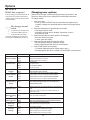
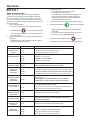
User Options
Follow the instructions below to customized the
microwave oven’s operation. End-of-cycle signal,
maximum cooking time and other options can be
changed to meeting your cooking needs. Example:
Change setting to single digit pad operation.
1. Open oven door.
• If door is closed or STOP/ RESET pad is
pressed before nishing programming sequence,
oven exits programming mode.
2. Press and hold pad 2 for approximately 5 seconds.
• After 5 seconds, signal sounds. Display shows
“OPTIONS”.
3. Press 9 pad.
• See table for options.
• Displays shows “OP:90”.
• “OP” represents optional program mode, rst
number represents option number and second
number represents functions currently selected for
option.
4. Press 9 pad repeatedly to change setting.
5. Press START
pad to save changes.
• Repeat steps 3-5 to change additional options.
• Changes appear after door is closed or STOP/
RESET is pressed.
6. Press STOP/RESET pad or close oven door
to exit programming mode.
Numbered Pads Display Options ( Factory Settings in Bold)
1
End of Cycle Beep
OP:10
OP:11
OP:12
3 second continuous beep
Continuous beep until door is opened
5 beeps bursts until door is opened
2
Speaker Volume
OP:20
OP:21
OP:22
OP:23
Eliminates beep
Sets volume to low
Sets volume to medium
Sets volume to high
3
Key Beep
OP:30
OP:31
Prevents beep when pad is pressed.
Allows beep when pad is pressed.
4
Keyboard Enable
Window
OP:40
OP:41
OP:42
OP:43
15 seconds after oven door is opened, keyboard disabled
30 seconds after oven door is opened, keyboard disabled
1 minute after oven door is opened, keyboard disabled
2 minutes after oven door is opened, keyboard disabled
5
Add Time during
Heating
OP:50
OP:51
Prevents adding heating time while oven is heating.
Allows adding heating time while oven is heating when a
memory pad is pressed.
6
Reset Door Open
OP:60
OP:61
Cancels heating time count down after door is opened during
cycle.
Allows oven to resume heating time countdown after door is
opened during cycle.
7
Maximum Heating
Time
OP:70
OP:71
Allows 60 minutes of heating time.
Allows 10 minutes of heating time.
8
Manual Operation
OP:80
OP:81
Allows use of preprogrammed pads only.
Allows use of manual time entry and preprogrammed pads.
9
Double Digit
Operation
OP:90
OP:91
Allows 10 (0-9) preprogrammed pads.
Allows 100 (00-99) preprogrammed pads.
0
Clean Filter
Message
OP:00
OP:01
OP:02
OP:03
Do not display message.
Display message for 24 hours every 7 days.
Display message for 24 hours every 30 days.
Display message for 24 hours every 90 days.
STYLE 1
Options

12
Single Pad Programming
This feature enables each numbered pad to be programmed
for a specic use, such as cooking a certain number of
potatoes or defrosting and then cooking vegetables or other
frozen foods. To use this feature, simply program the pad to the desired
length of time and power level. To use this feature, press the pad once and
the microwave will begin cooking.
Double Pad Programming
This feature enables 100 programmed entries to be
made. Each entry will be assigned a double digit number,
for example 01, 05, or 20. When using the double pad programming, two
pads must be pressed to start the cooking cycle.
Manual Time Entry
In addition to programmable pads, this microwave also accepts
specic time entry by using the TIME ENTRY pad. Using manual time entry
does not affect the programmed buttons.
X2 Pad
The X2 Pad increases a preset cooking time by a percentage of
the original cooking time. The user species the percentage and it can be
changed for individual cooking sequences. This feature is very useful for
cooking multiple servings of foods such as potatoes or slices of pizza.
Stage Cooking
Stage cooking is a cooking sequence with specic power
stage changes. The user can program up to four different power level
changes and the specic amount of cooking time at each power level. Each
power level/cooking time combination is known as a stage. Up to four stages
can be programmed.
User Options
This microwave can be set for specic user preferences.
Options such as beep volume, maximum cooking time, and the number of
programmable pads can be changed. To change different options, see User
Options in this manual.
Start Pad
The start pad is used
to begin a manual time
entry cooking cycle. It is
also used to save any changes to
programming sequences or user
options.
STOP/RESET pad
The STOP/RESET pad
stops a cooking sequence
in progress, clears out any
remaining time, and also ends a
programming or user option cycle.
When the STOP/RESET pad is
used to end a programming or
option change, the changes are
discarded.
X
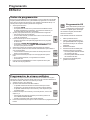
STYLE 2
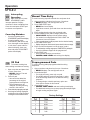
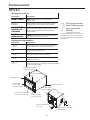
Display and Features

13
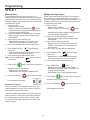
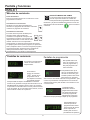
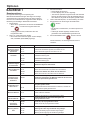
Cooking Display
dISPLAYS dESCRIPTION
READY
READY displays when oven control will accept
entries.
00:00
Displays cooking time. If stage cooking is
programmed, total cooking time is displayed.
COOK LEVEL
COOK LEVEL displays while oven is operating.
The cooking level is displayed above as a number 1
through 9. If no number is displayed, the oven is
cooking at full power.
POWER
POWER is displayed while the oven is generating
microwave energy during a cooking cycle.
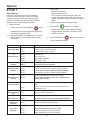
Programming Display
dISPLAYS dESCRIPTION
P:0
Displays when oven is in programming mode for
single pad memory only.
P:
Displays when oven is in programming mode for
double pad memory.
OP: --
Displays when oven is in user option mode. User
options can then be set or specified.
CF:
Displays with a numerical cooking factor when the
X2 pad is pressed.
P:--
1
Displays briefly when programming a specific
cooking stage. Number (1 through 4) indicates
the stage that is being programmed.
There are words in
the display that never
actually display.
The display is used for
many dierent models of
microwaves. Depending on the model,
certain words or symbols may never be
highlighted or become visible.
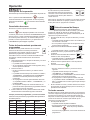
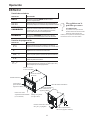
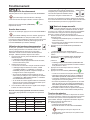
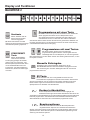
Oven Display
Oven Control
Pads
Self-sealing Base
Door Handle
(Pull to open)
Oven Door Window
(Some Models)
Removeable
Splatter Shield
(Not Shown)
Rear Air Vents
(some models)
5' 6" Power Cord
Oven Cavity Light
(Some Models)
Stainless Steal
Outer Case
STYLE 2
Operation

14
Preprogrammed Pads
To cook food using pads preprogrammed with cooking
sequences.
1. Open oven door and place food in oven. Close door.
• READY displays. Fan and light will turn on.
2. Press desired pad.
• For single pad entry, press only one pad.
• For double pad entry, press the two pads, in order,
of the double digit number for the desired cooking
sequence.
• To change single or double pad entry option see
User Options section in this manual.
3. Oven begins to cook.
• POWER, COOK LEVEL and total cooking time display.
• For additional cooking time, press preprogrammed pad again
to begin cooking sequence again.
X2 Pad
To increase cooking time
when cooking more than one serving.
1. Open oven door and place food
in oven. Close door.
• READY displays. Fan and
light will turn on.
2. Press X2 pad.
• Amount of time added is a
percentage of the original
preprogrammed cooking time.
• The percentage can be
changed. See Programming
section in this manual.
3. Press desired preprogrammed pad.
4. Oven begins cooking. Displayed
cooking time is the total of original
cooking time and added X2 time.
Interrupting
Operation
Open oven door or press
STOP/RESET pad to
interrupt operation. Display
continues to show countdown time.
Close door and press START pad
to resume oven operation.
Canceling Mistakes
• If oven is not cooking, press
STOP/RESET pad to clear display.
• If oven is cooking, press
STOP/RESET pad once to stop
oven, then again to clear display.
• If oven door is open and time
shows in display, close oven
door and press STOP/RESET
pad to clear display.
Factory Settings
Manual Time Entry
To cook food using a specic entered time and power level.
1. Open oven door and place food in oven. Close door.
• READY displays. Fan and light will turn on.
2. Press TIME ENTRY pad.
• READY and 00:00 display.
• If pad does not work, open and close oven door and try
again.
3. Enter cooking time by using the numbered pads.
4. Press POWER LEVEL pad to change power level.
• COOK LEVEL displays with the power setting.
• If a number is not displayed with COOK LEVEL the
microwave is set to full power.
• Press a number pad to adjust power level to desired setting.
5. Press TIME ENTRY pad.
• Display changes to cook time and power level for the next stage.
6. Enter cook time and power level as in steps 3 and 4.
• To add another cooking stage press TIME ENTRY pad again.
• Up to four different stages can be programmed.
7. Press START pad.
• Oven operates and time counts down.
• POWER, COOK LEVEL and cooking time display.
STYLE 2
Operation

15
Programming Pads
Oven is shipped from the factory for single pad programming. To change
the oven default to allow double pad programming, see User Options.
To change the amount of time or the power level for a preset pad:
1. Open oven door.
• READY displays.
• If door is closed or RESET pad is pressed before programming
is complete, changes are discarded and microwave exits
programming mode.
2. Press and hold pad 1 for approximately 5 seconds.
• This begins programming mode.
• Microwave will beep and P:0 displays. Oven is in
programming mode.
3. Press pad to be reprogrammed.
• Press two digits if reprogramming a double pad program.
• COOK LEVEL and cooking time display.
• A number displays with COOK LEVEL if it is less than full power.
4. Enter cooking time by using the number pads.
5. Press POWER LEVEL pad to change power level if desired.
• Use the number pads to change power level to a lower
power setting.
6. Press START pad to set new programming to the pad.
• If START is not pressed, changes will not be saved.
• P:0 displays
7. Press STOP/RESET pad or close oven door to exit
programming mode.
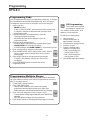
Programming Multiple Stages
Stage cooking allows consecutive cooking cycles without interruption.
Up to four different cooking cycles can be programmed into a memory
pad. To use stage cooking:
1. Follow steps 1 through 5 above.
6. Press TIME ENTRY pad.
• Display briey shows the pad number that is being
programmed and the stage number to the upper right.
• Display changes to cook time and power level for the next stage.
7. Enter cook time and power level as in steps 4 and 5.
• To enter another cooking stage for that pad, press TIME ENTRY
pad again.
• Up to four different stages can be programmed.
8. Press START pad to set new programming changes to the pad.
X2 Programming
This feature allows a preset
percentage of original cook
time, called a cooking factor, to be
added to a cook sequence.
To change the cooking factor:
1. Open oven door.
2. Press and hold pad 1 for
approximately 5 seconds.
3. Press pad to be reprogrammed.
4. Press the X2 pad.
5. Press a numbered pad to
change the cooking factor.
• Pad 5 would change the
cooking factor to 50%.
• Pad 3 would change the
cooking factor to 30%.
6. Press START pad to save changes.
Programming
STYLE 2

16
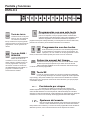
Changing user options
Options such as single or double pad programming, beep volume, and
maximum cooking time can be changed to suit individual preferences.
To change options:
1. Open oven door.
• If door is closed or RESET pad is pressed before programming is
complete, changes are discarded and microwave exits programming
mode.
2. Press and hold pad 2 for approximately 5 seconds.
• This begins options mode.
• Microwave will beep and 0P: displays. Microwave is now in
programming mode.
3. Press number pad that controls option to be changed.
• See table below for options.
• Current option will display.
4. Press number pad again to change the option.
• Each time pad is pressed, option will change.
• Match code displayed with code for desired option.
5. Press START pad to save changes.
• To change additional options, repeat steps 3 and 4.
• Changes appear after door is closed or STOP/RESET pad is pressed.
Numbered Pads Display Options ( Factory Settings in Bold)
1
End of Cycle Beep
OP:10
OP:11
OP:12
3 second continuous beep
Continuous beep until door is opened
5 beeps bursts until door is opened
2
Speaker Volume
OP:20
OP:21
OP:22
OP:23
Eliminates beep
Sets volume to low
Sets volume to medium
Sets volume to high
3
Key Beep
OP:30
OP:31
Prevents beep when pad is pressed.
Allows beep when pad is pressed.
4
Keyboard Enable
Window
OP:40
OP:41
OP:42
OP:43
15 seconds after oven door is opened, keyboard disabled
30 seconds after oven door is opened, keyboard disabled
1 minute after oven door is opened, keyboard disabled
2 minutes after oven door is opened, keyboard disabled
5
Add Time during
Heating
OP:50
OP:51
Prevents adding heating time while oven is heating.
Allows adding heating time while oven is heating when a
memory pad is pressed.
6
Reset Door Open
OP:60
OP:61
Cancels heating time count down after door is opened during
cycle.
Allows oven to resume heating time countdown after door is
opened during cycle.
7
Maximum Heating
Time
OP:70
OP:71
Allows 60 minutes of heating time.
Allows 10 minutes of heating time.
8
Manual Operation
OP:80
OP:81
Allows use of preprogrammed pads only.
Allows use of manual time entry and preprogrammed pads.
9
Double Digit
Operation
OP:90
OP:91
Allows 10 (0-9) preprogrammed pads.
Allows 100 (00-99) preprogrammed pads.
0
Clean Filter
Message
OP:00
OP:01
OP:02
OP:03
Do not display message.
Display message for 24 hours every 7 days.
Display message for 24 hours every 30 days.
Display message for 24 hours every 90 days.
Didn’t like an option?
Factory settings are marked in bold. To
change the oven back to the factory
setting, simply select the option that is
marked in bold.
My changes weren’t
saved.
In order for any changes to be
saved, the START pad must
be pressed after selecting
an option. Shutting the oven door or
pressing the STOP/RESET pad will not
Options
STYLE 2

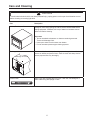
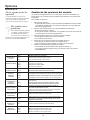
17
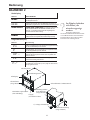
Care and Cleaning
Part Description
Interior, Exterior, and Door
Clean microwave oven with mild detergent in warm water using soft
sponge or cloth. Wring sponge or cloth to remove excess water before
wiping equipment. If desired, boil a cup of water in microwave oven to
loosen soil before cleaning.
Important:
• Do not use abrasive cleansers or cleaners containing ammonia.
These could damage finish.
• Never pour water into microwave oven bottom.
• Do not use water pressure type cleaning systems.
Discharge Air Vents
Check monthly for a buildup of cooking vapors along intake and discharge
louvers on bottom and back of oven. Clean air vents with damp cloth to
ensure proper airflow. Dry thoroughly.
Control Panel
Open oven door to deactivate oven timer. Clean with mild detergent in
warm water using soft sponge or cloth.
Discharge Air Vents
CAUTION
!
To avoid electrical shock which can cause personal injury, unplug power cord or open circuit breaker to oven
before cleaning or removing light bulb.

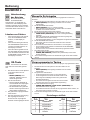
18
noitpircseDtraP
reporp rof ylkeew retlif ekatni ria naelC .rood nevo woleb detacol si retliFretliF ekatnI riA
airow. Wash lter in hot water and mild detergent. Do not use oven
without lter in place. Remove lter to clean.
Important
To avoid overheating and oven damage, clean air lter regularly.
1. Grasp lter tab and pull forward. Filter will release from retaining clips.
2. To reinstall, place bottom of lter in clips and push top of lter into
position.
morf annetna dna ytivac nevo evaworcim fo pot speek dleihs rettalpSsdleihS rettalpS
becoming soiled. Clean soil from shield with damp cloth or clean with mild
detergent and water. Remove splatter shield for easy cleaning.
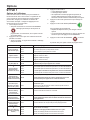
Removing Splatter Shield
1. Unplug oven before removing splatter shield to stop antenna from
rotating.
2. Place ngers behind shield, pull forward, and down.
• When removing and replacing splatter shield, be careful not to bend
antenna.
• If a gap for ngers behi
nd spla
tter shield does not exist, push up on
splatter shield front. Splatter shield may not be installed fully and
cannot be removed until splatter shield front is properly installed.
3. Reinstall splatter shield by placing front tabs over lip at top of oven
cavity front. Lift back of shield until shield snaps into place.
4. Reconnect power to oven.
Changing Oven Light Bulb
Important
To avoid burns and cuts, wear gloves to protect hands should bulb
break. If hot, allow bulb to cool.
Tools and Bulb
• Protective gloves
• Standard screwdriver or ¼-inch socket
1. Unplug oven.
2. Remove screw from side of oven.
3. Remove bulb by turning counterclockwise, being careful not to burn
ngers or break bulb.
4. Reconnect power to oven.
Shield
up side down
Shield in
correctly

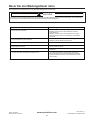
19
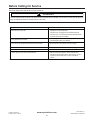
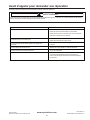
Before Calling for Service
Record all inspections and repair for future reference.
!
WARNING
To avoid electrical shock which can cause severe personal injury or death, do not remove outer case at any time.
Only an authorized servicer should remove outer case.
kcehCmotpmyS
I
f oven does not operate:
• Check fuse or circuit breaker.
• Conrm oven is plugged into dedicated circuit.
• Conrm oven is on grounded and polarized circuit.
Contact electrician to conrm.
If oven light does not work:
• Conrm light bulb is screwed in tightly.
• Conrm light bulb has not failed.
If oven does not accept entries when pad is pressed:
• Open and close oven door. Press pad again.
.nevo ni gulp dna ,etunim 1 rof tiaw ,nevo gulpnU•:snoitcnuflam nevo fI
Check air intake and discharge area for obstrutions.•:yltnettimretni setarepo nevo fI
Oven operates, but does not heat food: • Place one cup cool water in oven. Heat for one
minute. If water temperature does not rise, oven is
operating incorrectly and a service should be
called.
www.acpsolutions.com
2012 ACP Inc.
Cedar Rapids, Iowa 52404
Part No. 20072201
Printed in U.S.A. 05/12

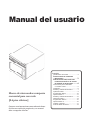
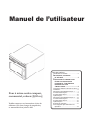
Manual del usuario
Horno de microondas compacto
comercial para uso rudo
[0.6 pies cúbicos]
Conserve estas instrucciones como referencia futura.
Si el horno cambia de propietario, este manual
debe acompañar al horno.
Contenido
Identicación del modelo ..........................2
InstruccIones de segurIdad
Importantes ..............................3
precaucIones para evItar una
posIble exposIcIón a un exceso
de energía de mIcroondas ......... 4
Instrucciones para el aterrizado
o conexión a tierra .................................5
Instalación .................................................6
Pantalla y características Estilo 1 .............7
Operación Estilo 1.....................................9
Programación Estilo 1 .............................10
Opciones Estilo 1 ....................................11
Pantalla y características Estilo 2 ...........12
Operación Estilo 2...................................13
Programación Estilo 2 .............................15
Opciones Estilo 2 ....................................16
Cuidado y limpieza..................................17
Antes de llamar al servicio ......................19
Seite wird geladen ...
Seite wird geladen ...
Seite wird geladen ...
Seite wird geladen ...
Seite wird geladen ...
Seite wird geladen ...
Seite wird geladen ...
Seite wird geladen ...
Seite wird geladen ...
Seite wird geladen ...
Seite wird geladen ...
Seite wird geladen ...
Seite wird geladen ...
Seite wird geladen ...
Seite wird geladen ...
Seite wird geladen ...
Seite wird geladen ...
Seite wird geladen ...
Seite wird geladen ...
Seite wird geladen ...
Seite wird geladen ...
Seite wird geladen ...
Seite wird geladen ...
Seite wird geladen ...
Seite wird geladen ...
Seite wird geladen ...
Seite wird geladen ...
Seite wird geladen ...
Seite wird geladen ...
Seite wird geladen ...
Seite wird geladen ...
Seite wird geladen ...
Seite wird geladen ...
Seite wird geladen ...
Seite wird geladen ...
Seite wird geladen ...
Seite wird geladen ...
Seite wird geladen ...
Seite wird geladen ...
Seite wird geladen ...
Seite wird geladen ...
Seite wird geladen ...
Seite wird geladen ...
Seite wird geladen ...
Seite wird geladen ...
Seite wird geladen ...
Seite wird geladen ...
Seite wird geladen ...
Seite wird geladen ...
Seite wird geladen ...
Seite wird geladen ...
Seite wird geladen ...
Seite wird geladen ...
Seite wird geladen ...
Seite wird geladen ...
Seite wird geladen ...
-
 1
1
-
 2
2
-
 3
3
-
 4
4
-
 5
5
-
 6
6
-
 7
7
-
 8
8
-
 9
9
-
 10
10
-
 11
11
-
 12
12
-
 13
13
-
 14
14
-
 15
15
-
 16
16
-
 17
17
-
 18
18
-
 19
19
-
 20
20
-
 21
21
-
 22
22
-
 23
23
-
 24
24
-
 25
25
-
 26
26
-
 27
27
-
 28
28
-
 29
29
-
 30
30
-
 31
31
-
 32
32
-
 33
33
-
 34
34
-
 35
35
-
 36
36
-
 37
37
-
 38
38
-
 39
39
-
 40
40
-
 41
41
-
 42
42
-
 43
43
-
 44
44
-
 45
45
-
 46
46
-
 47
47
-
 48
48
-
 49
49
-
 50
50
-
 51
51
-
 52
52
-
 53
53
-
 54
54
-
 55
55
-
 56
56
-
 57
57
-
 58
58
-
 59
59
-
 60
60
-
 61
61
-
 62
62
-
 63
63
-
 64
64
-
 65
65
-
 66
66
-
 67
67
-
 68
68
-
 69
69
-
 70
70
-
 71
71
-
 72
72
-
 73
73
-
 74
74
-
 75
75
-
 76
76


Amana UPRIGHT FREEZER Bedienungsanleitung
- Kategorie
- Mikrowellen
- Typ
- Bedienungsanleitung
in anderen Sprachen
Verwandte Artikel
Andere Dokumente
-
Hendi 281444 MICROWAVE PROGRAMMABLE Benutzerhandbuch
-
 Menumaster CR855 Bedienungsanleitung
-
Hendi 281376 Benutzerhandbuch
-
 Menumaster 20152602 Bedienungsanleitung
-
ACP AMSO Series Bedienungsanleitung
-
-
-
-
-
Panasonic ne 1037 Bedienungsanleitung

