Zanussi ZGG95624XA Benutzerhandbuch
- Kategorie
- Kochfelder
- Typ
- Benutzerhandbuch


Contents
Safety information 2
Safety instructions 3
Product description 5
Daily use 6
Hints and tips 7
Care and cleaning 8
Troubleshooting 8
Installation 10
Technical information 13
Energy efficiency 14
Subject to change without notice.
Safety information
Before the installation and use of the appliance, carefully read the
supplied instructions. The manufacturer is not responsible if an
incorrect installation and use causes injuries and damages.
Always keep the instructions with the appliance for future
reference.
Children and vulnerable people safety
• This appliance can be used by children aged from 8 years and
above and persons with reduced physical, sensory or mental
capabilities or lack of experience and knowledge if they have
been given supervision or instruction concerning use of the
appliance in a safe way and understand the hazards involved.
• Do not let children play with the appliance.
• Keep all packaging away from children.
• Keep children and pets away from the appliance when it
operates or when it cools down. Accessible parts are hot.
• If the appliance has a child safety device, we recommend you
activate it.
• Cleaning and user maintenance shall not be made by children
without supervision.
• Children of less than 3 years should be kept away unless
continuously supervised.
General Safety
• The appliance and its accessible parts become hot during use.
Do not touch the heating elements.
• Do not operate the appliance by means of an external timer or
separate remote-control system.
2 www.zanussi.com

• Unattended cooking on a hob with fat or oil can be dangerous
and may result in fire.
• Never try to extinguish a fire with water, but switch off the
appliance and then cover flame e.g. with a lid or a fire blanket.
• Do not store items on the cooking surfaces.
• Metallic objects such as knives, forks, spoons and lids should
not be placed on the hob surface since they can get hot.
• Do not use a steam cleaner to clean the appliance.
• Remove any spillage from the lid before opening. Let the hob
surface cool down before closing the lid.
• If the supply cord is damaged, it must be replaced by the
manufacturer, an authorized Service or similarly qualified
persons in order to avoid a hazard.
• Where the appliance is directly connected to the power supply,
an all-pole isolating switch with a contact gap is required.
Complete disconnection in compliance with the conditions
specified in overvoltage category III must be guaranteed. The
earth cable is excluded from this.
• When you route the mains cable, make sure that the cable
doesn't come into direct contact (for example using insulating
sleeving) with parts that can reach temperatures of more than
50°C above room temperature.
Safety instructions
This appliance is suitable for the following
markets: IT
Installation
WARNING!
Only a qualified person must install
this appliance.
• Remove all the packaging.
• Do not install or use a damaged appliance.
• Obey the installation instruction supplied
with the appliance.
• Keep the minimum distance from the other
appliances and units.
• Always be careful when you move the
appliance because it is heavy. Always wear
safety gloves.
• Seal the cut surfaces with a sealant to
prevent moisture to cause swelling.
• Protect the bottom of the appliance from
steam and moisture.
• Do not install the appliance adjacent to a
door or under a window. This prevents hot
cookware to fall from the appliance when the
door or the window is opened.
• If the appliance is installed above drawers
make sure that the space, between the
bottom of the appliance and the upper
drawer, is sufficient for air circulation.
• The bottom of the appliance can get hot.
Make sure to install a non-combustile
separation panel under the appliance to
prevent access to the bottom.
Electrical Connection
WARNING!
Risk of fire and electrical shock.
www.zanussi.com 3

• All electrical connections should be made by
a qualified electrician.
• The appliance must be earthed.
• Before carrying out any operation make sure
that the appliance is disconnected from the
power supply.
• Make sure that the electrical information on
the rating plate agrees with the power
supply. If not, contact an electrician.
• Make sure the appliance is installed
correctly. Loose and incorrect electricity
mains cable or plug (if applicable) can make
the terminal become too hot.
• Use the correct electricity mains cable.
• Do not let the electricity mains cable tangle.
• Make sure that a shock protection is
installed.
• Use the strain relief clamp on the cable.
• Make sure the mains cable or plug (if
applicable) does not touch the hot appliance
or hot cookware, when you connect the
appliance to the near sockets
• Do not use multi-plug adapters and
extension cables.
• Make sure not to cause damage to the
mains plug (if applicable) or to the mains
cable. Contact our Authorised Service
Centre or an electrician to change a
damaged mains cable.
• The shock protection of live and insulated
parts must be fastened in such a way that it
cannot be removed without tools.
• Connect the mains plug to the mains socket
only at the end of the installation. Make sure
that there is access to the mains plug after
the installation.
• If the mains socket is loose, do not connect
the mains plug.
• Do not pull the mains cable to disconnect
the appliance. Always pull the mains plug.
• Use only correct isolation devices: line
protecting cut-outs, fuses (screw type fuses
removed from the holder), earth leakage trips
and contactors.
• The electrical installation must have an
isolation device which lets you disconnect
the appliance from the mains at all poles.
The isolation device must have a contact
opening width of minimum 3 mm.
Gas connection
• All gas connections should be made by a
qualified person.
• Before installation, make sure that the local
distribution conditions (nature of the gas and
gas pressure) and the adjustment of the
appliance are compatible.
• Make sure that there is air circulation around
the appliance.
• The information about the gas supply is on
the rating plate.
• This appliance is not connected to a device,
which evacuates the products of
combustion. Make sure to connect the
appliance according to current installation
regulations. Pay attention to requirements
regarding adequate ventilation.
Use
WARNING!
Risk of injury, burns and electrical
shock.
• Remove all the packaging, labelling and
protective film (if applicable) before first use.
• Use this appliance in a household
environment.
• Do not change the specification of this
appliance.
• Make sure that the ventilation openings are
not blocked.
• Do not let the appliance stay unattended
during operation.
• Set the cooking zone to “off” after each use.
• Do not put cutlery or saucepan lids on the
cooking zones. They can become hot.
• Do not operate the appliance with wet hands
or when it has contact with water.
• Do not use the appliance as a work surface
or as a storage surface.
• When you place food into hot oil, it may
splash.
WARNING!
Risk of fire and explosion
• Fats and oil when heated can release
flammable vapours. Keep flames or heated
objects away from fats and oils when you
cook with them.
• The vapours that very hot oil releases can
cause spontaneous combustion.
• Used oil, that can contain food remnants,
can cause fire at a lower temperature than
oil used for the first time.
• Do not put flammable products or items that
are wet with flammable products in, near or
on the appliance.
WARNING!
Risk of damage to the appliance.
4 www.zanussi.com

• Do not keep hot cookware on the control
panel.
• Do not let cookware to boil dry.
• Be careful not to let objects or cookware fall
on the appliance. The surface can be
damaged.
• Do not activate the cooking zones with
empty cookware or without cookware.
• Do not put aluminium foil on the appliance.
• Use only stable cookware with the correct
shape and diameter larger than the
dimensions of the burners.
• Make sure cookware is centrally positioned
on the burners.
• Make sure the flame does not go out when
you quickly turn the knob from the maximum
to the minimum position.
• Use only the accessories supplied with the
appliance.
• Do not install a flame diffuser on the burner.
• The use of a gas cooking appliance results
in the production of heat and moisture.
Provide good ventilation in the room where
the appliance is installed.
• Prolonged intensive use of the appliance
may call for additional ventilation, for
example opening of a window, or more
effective ventilation, for example increasing
the level of mechanical ventilation where
present.
• This appliance is for cooking purposes only.
It must not be used for other purposes, for
example room heating.
• Do not let acid liquids, for example vinegar,
lemon juice or limescale remover, touch the
hob. This can cause matt patches.
Care and cleaning
• Clean regularly the appliance to prevent the
deterioration of the surface material.
• Deactivate the appliance and let it cool
down before you clean it.
• Disconnect the appliance from the electrical
supply before maintenance.
• Do not use water spray and steam to clean
the appliance.
• Clean the appliance with a moist soft cloth.
Only use neutral detergents. Do not use
abrasive products, abrasive cleaning pads,
solvents or metal objects.
• Do not clean the burners in the dishwasher.
Disposal
WARNING!
Risk of injury or suffocation.
• Contact your municipal authority for
information on how to discard the appliance
correctly.
• Disconnect the appliance from the mains
supply.
• Cut off the mains cable and discard it.
• Flat the external gas pipes.
Service
• To repair the appliance contact an
Authorised Service Centre.
• Use original spare parts only.
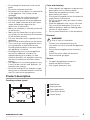
Product description
Cooking surface layout
4
5
21
3
1
Rapid burner
2
Auxiliary burner
3
Semi-rapid burner
4
Triple Crown burner
5
Control knobs
www.zanussi.com 5

Control knob
Symbol Description
no gas supply / off position
Symbol Description
ignition position / maximum
gas supply
minimum gas supply
Daily use
WARNING!
Refer to Safety chapters.
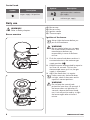
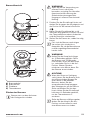
Burner overview
A
B
D
C
C
D
A
B
A) Burner cap
B) Burner crown
C) Ignition candle
D) Thermocouple
Ignition of the burner
Always light the burner before you
put on the cookware.
WARNING!
Be very careful when you use open
fire in the kitchen environment. The
manufacturer declines any
responsibility in case of the flame
misuse.
1. Push the control knob down and turn it
counterclockwise to the maximum gas
supply position ( ).
2. Keep the control knob pushed for equal or
less than 10 seconds. This lets the
thermocouple warm up. If not, the gas
supply is interrupted.
3. Adjust the flame after it is regular.
If after some tries the burner does
not light, check if the crown and its
cap are in correct positions.
WARNING!
Do not keep the control knob
pushed for more than 15 seconds. If
the burner does not light after 15
seconds, release the control knob,
turn it into off position and try to light
the burner again after minimum 1
minute.
6 www.zanussi.com

CAUTION!
In the absence of electricity you can
ignite the burner without electrical
device; in this case approach the
burner with a flame, turn the control
knob counter-clockwise to maximum
gas supply position and push it
down. Keep the control knob
pushed for equal or less than 10
seconds to let the thermocouple
warm up.
If the burner accidentally goes out,
turn the control knob to the off
position and try to light the burner
again after minimum 1 minute.
The spark generator can start
automatically when you switch on
the mains, after installation or a
power cut. It is normal.
Turning the burner off
To put the flame out, turn the knob to the off
position .
WARNING!
Always turn the flame down or
switch it off before you remove the
pans from the burner.
Hints and tips
WARNING!
Refer to Safety chapters.
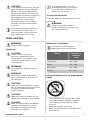
Cookware
CAUTION!
Do not use cast iron pans,
potstones, earthenware, grill or
toaster plates. The stainless steel
can become tarnished if it is too
much heated.
WARNING!
Do not put the same pan on two
burners.
WARNING!
Do not put unstable or damaged
pots on the burner to prevent from
spill and injury.
CAUTION!
Make sure that the bottoms of pots
do not stand above the control knob,
otherwise the flame heats the
control knob up.
CAUTION!
Make sure that pot handles are not
above the front edge of the cooktop.
CAUTION!
Make sure that the pots are placed
centrally on the burner in order to
get maximum stability and to get
lower gas consumption.
Diameters of cookware
Use cookware with diameters
applicable to the size of burners.
Burner Diameter of
cookware
(mm)
Triple Crown 180 - 260
Rapid 180 - 260
Semi-rapid 120 - 220
Auxiliary 80 - 160
Lid (separated kit only for predisposed
hobs)
• The lid protects the hob from dust when
closed and collects splashes of grease
when opened. Do not use it for other
functions.
• Keep the lid clean all the time.
• Make sure that the hob is cold before you
close the lid.
www.zanussi.com 7

• Glass lids can shatter when hot.
Care and cleaning
WARNING!
Refer to Safety chapters.
General information
• Clean the hob after each use.
• Always use cookware with clean bottom.
• Scratches or dark stains on the surface have
no effect on how the hob operates.
• Use a special cleaner applicable for the
surface of the hob.
• Wash stainless steel parts with water, and
then dry them with a soft cloth.
Pan supports
The pan supports are not resistant
to washing in a dishwasher. They
must be washed by hand.
1. Remove the pan supports to easily clean
the hob.
Be very careful when you
replace the pan supports to
prevent the hob top from
damage.
2. The enamel coating occasionally can have
rough edges, so be careful when you wash
the pan supports by hand and dry them. If
necessary, remove stubborn stains with a
paste cleaner.
3. After you clean the pan supports, make sure
that they are in correct positions.
4. For the burner to operate correctly, make
sure that the arms of the pan supports are
aligned with the centre of the burner.
Cleaning the hob
• Remove immediately: melted plastic,
plastic foil, and food with sugar. If not, the
dirt can cause damage to the hob.
• Remove when the hob is sufficiently
cool: limescale rings, water rings, fat stains,
shiny metallic discoloration. Clean the hob
with a moist cloth and some detergent. After
cleaning, rub the hob dry with a soft cloth.
• To clean the enamelled parts, cap and
crown, wash them with warm soapy water
and dry them carefully before you put them
back.
Cleaning the spark plug
This feature is obtained through a ceramic
ignition candle with a metal electrode. Keep
these components well clean to prevent difficult
lighting and check that the burner crown holes
are not obstructed.
Periodic maintenance
Speak to your local Authorised Service Centre
periodically to check the conditions of the gas
supply pipe and the pressure adjuster, if fitted.
Troubleshooting
WARNING!
Refer to Safety chapters.
8 www.zanussi.com

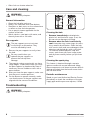
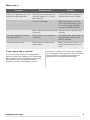
What to do if...
Problem Possible cause Remedy
There is no spark when you try to
activate the spark generator.
The hob is not connected to an
electrical supply or it is connec-
ted incorrectly.
Check if the hob is correctly con-
nected to the electrical supply.
The fuse is released. Make sure that the fuse is the
cause of the malfunction. If the
fuse releases again and again,
contact a qualified electrician.
Burner cap and crown are placed
incorrectly.
Place the burner cap and crown
correctly.
The flame extinguishes immedi-
ately after ignition.
Thermocouple is not heated up
sufficiently.
After lightning the flame, keep the
knob pushed for equal or less
than 10 seconds.
The flame ring is uneven. Burner crown is blocked with
food residues.
Make sure that the injector is not
blocked and the burner crown is
clean.
If you cannot find a solution...
If you cannot find a solution to the problem
yourself, contact your dealer or an Authorised
Service Centre. Give the data from the rating
plate. Make sure, you operated the hob
correctly. If not the servicing by a service
technician or dealer will not be free of charge,
also during the warranty period. The instructions
about the Service Centre and conditions of
guarantee are in the guarantee booklet.
www.zanussi.com 9

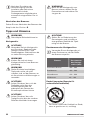
Labels supplied with the accessories
bag
Stick the adhesive labels as indicated below:
MOD.
PROD.NO.
SER.NO
DATA
MOD.
PROD.NO.
SER.NO
DATA
MOD.
PROD.NO.
SER.NO.
03 IT
MADE IN ITALY
TYPE
IP20
0049
A B C
A) Stick it on Guarantee Card and send this
part (if applicable).
B) Stick it on Guarantee Card and keep this
part (if applicable).
C) Stick it on instruction booklet.
Installation
WARNING!
Refer to Safety chapters.
Before the installation
Before you install the hob, write down the
information bellow from the rating plate. The
rating plate is on the bottom of the hob.
Model .......................................
PNC .........................................
Serial number ...........................
Gas Connection
WARNING!
The following instructions about
installation, maintenance and
ventilation must be carried out by
qualified personnel in compliance
with the regulation in force (UNI-CIG
7129 - 7131). Make sure that the
kitchen is well ventilated: keep
natural ventilation holes open (at
least 100 cm²) or install a
mechanical extractor hood.
Choose fixed connections or use a flexible pipe
in stainless steel in compliance with the
regulation in force. If you use flexible metallic
pipes, be careful they do not come in touch with
mobile parts or they are not squeezed. Also be
careful when the hob is put together with an
oven.
10 www.zanussi.com

Make sure that the gas supply
pressure of the appliance obeys the
recommended values.
If the supplied pressure has not the specified
value, it is necessary to assemble a proper
pressure regulator in compliance with the
standard UNI EN 88. For Liquid Gas (LPG) the
use of pressure regulator is allowed only if they
are in compliance with UNI EN 12864. The
adjustable connection is fixed to the
comprehensive ramp by means of a threaded
nut G 1/2". Screw the parts without force,
adjust the connection in the necessary direction
and tighten everything.
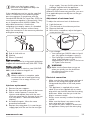
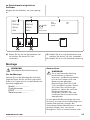
A B C
A) End of shaft with nut
B) Washer
C) Elbow (if needed)
Rigid connection:
Carry out connection by using metal rigid pipes
(copper with mechanical end) (UNI-CIG 7129).
Flexible connection:
Use a flexible pipe in stainless steel (UNI-CIG
9891) with a maximum length 2 m.
WARNING!
When installation is complete, make
sure that the seal of each pipe fitting
is correct. Use a soapy solution, not
a flame!
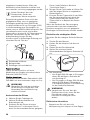
Injectors replacement
1. Remove the pan supports.
2. Remove the caps and crowns of the burner.
3. With a socket spanner 7 remove the
injectors and replace them with the ones
which are necessary for the type of gas you
use (see table in "Technical Information"
chapter).
4. Assemble the parts, follow the same
procedure backwards.
5. Replace the rating plate (it is near the gas
supply pipe) with the one for the new type
of gas supply. You can find this plate in the
package supplied with the appliance.
If the supply gas pressure is changeable or
different from the necessary pressure, you must
fit an applicable pressure adjuster on the gas
supply pipe.
Adjustment of minimum level
To adjust the minimum level of the burners:
1. Light the burner.
2. Turn the knob on the minimum position.
3. Remove the knob.
4. With a thin screwdriver, adjust the bypass
screw position (A).
A
5. If you change:
• from natural gas G20 20 mbar to liquid
gas, fully tighten the bypass screw in.
• from liquid gas to natural gas G20 20
mbar, undo the bypass screw
approximately 1/4 of a turn (1/2 of a turn
for Triple Crown burner).
WARNING!
Make sure the flame does not go out
when you quickly turn the knob from
the maximum position to the
minimum position.
Electrical connection
• Make sure that the rated voltage and type of
power on the rating plate agree with the
voltage and the power of the local power
supply.
• This appliance is supplied with a mains
cable. It has to be supplied with a correct
plug which can hold the load that the rating
plate rates. Make sure that you install the
plug in a correct socket.
• Always use a correctly installed shockproof
socket.
• Make sure that there is an access to the
mains plug after the installation.
• Do not pull the mains cable to disconnect
the appliance. Always pull the mains plug.
www.zanussi.com 11

• There is a risk of fire when the appliance is in
connection with an extension cable, an
adapter or a multiple connection. Make sure
that the ground connection agrees with the
standards and regulations.
• Do not let the power cable to heat up to a
temperature higher than 90° C.
To prevent contact between the cable and the
appliance below the hob use the clamps which
are on the side of the cabinet.
A
A) Rigid copper pipe or flexible pipe of
stainless steel
Connection cable
To replace the connection cable use only the
special cable or its equivalent. The cable type
is: H05V2V2-F T90.
Make sure that the cable section is applicable
to the voltage and the working temperature. The
yellow / green earth wire must be approximately
2 cm longer than the brown (or black) phase
wire.
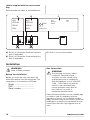
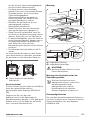
Building In
min. 55 mm
min. 650 mm
830 mm
min. 150 mm
30 mm
480 mm
10 mm
27 mm
27 mm
A
3 mm
A
B
A) supplied seal
B) supplied brackets
CAUTION!
Install the appliance only on a
worktop with flat surface.
Installing hob under the hood
If you install the hob under a hood,
please see the installation
instructions of the hood for the
minimum distance between the
appliances.
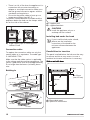
Possibilities for insertion
The panel installed below the hob must be easy
to remove and let an easy access in case a
technical assistance intervention is necessary.
Kitchen unit with door
min 20 mm
(max 150 mm)
30 mm
60 mm
B
A
A) Removable panel
B) Space for connections
12 www.zanussi.com

Kitchen unit with oven
The electrical connection of the hob and the
oven must be installed separately for safety
reasons and to let easy remove oven from the
unit.
Technical information
Hob dimensions
Width 894 mm
Depth 510 mm
Bypass diameters
BURNER Ø BYPASS 1/100 mm
Triple Crown 56
Rapid 42
Semi-rapid 32
Auxiliary 28
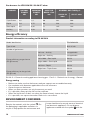
Other technical data
TOTAL POWER:
Gas original: G20 (2H) 20 mbar = 13 kW
Gas replacement: G30 (3+) 28-30 mbar = 931 g/h
G31 (3+) 37 mbar = 914 g/h
Electric supply: 230 V ~ 50 Hz
Appliance category: II2H3+
Gas connection: G 1/2"
Appliance class: 3
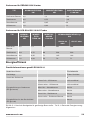
Gas burners for NATURAL GAS G20 20 mbar
BURNER NORMAL POWER kW MINIMUM POWER kW INJECTOR MARK
1/100 mm
Triple Crown 4,0 1,4 146
Rapid 3,0 0,75 119
Semi-rapid 2,0 0,45 96
Auxiliary 1,0 0,33 70
www.zanussi.com 13

Gas burners for LPG G30/G31 28-30/37 mbar
BURNER NORMAL
POWER
kW
MINIMUM
POWER
kW
INJECTOR
MARK 1/100
mm
NOMINAL GAS FLOW g/h
G30 28-30
mbar
G31 37 mbar
Triple Crown 4,0 1,4 98 291 286
Rapid 2,8 0,75 86 204 200
Semi-rapid 2,0 0,45 71 145 143
Auxiliary 1,0 0,33 50 73 71
Energy efficiency
Product information according to EU 66/2014
Model identification ZGG95624XA
Type of hob Built-in hob
Number of gas burners 6
Energy efficiency per gas burner
(EE gas burner)
Left rear - Auxiliary not applicable
Right rear - Auxiliary not applicable
Left middle - Semi-rapid 54.0%
Right middle - Semi-rapid 54.0%
Left front - Rapid 52.0%
Right front - Triple Crown 52.0%
Energy efficiency for the gas hob
(EE gas hob)
53.0%
EN 30-2-1: Domestic cooking appliances burning gas - Part 2-1 : Rational use of energy - General
Energy saving
• Before use, make sure that the burners and pan supports are assembled correctly.
• Use cookware with diameters applicable to the size of burners.
• Center the pot on the burner.
• When you heat up water, use only the amount you need.
• If it is possible, always put the lids on the cookware.
• When the liquid starts to boil, turn down the flame to barely simmer the liquid.
• If it is possible, use a pressure cooker. Refer to its user manual.
ENVIRONMENT CONCERNS
Recycle the materials with the symbol . Put
the packaging in applicable containers to
recycle it. Help protect the environment and
human health and to recycle waste of electrical
and electronic appliances. Do not dispose
appliances marked with the symbol with the
14 www.zanussi.com

household waste. Return the product to your
local recycling facility or contact your municipal
office.
www.zanussi.com 15

Inhaltsverzeichnis
Sicherheitsinformationen 16
Sicherheitsanweisungen 17
Gerätebeschreibung 20
Täglicher Gebrauch 20
Tipps und Hinweise 22
Reinigung und Pflege 23
Fehlersuche 24
Montage 25
Technische Daten 28
Energieeffizienz 29
Änderungen vorbehalten.
Sicherheitsinformationen
Lesen Sie vor der Montage und dem Gebrauch des Geräts zuerst
die Gebrauchsanleitung. Der Hersteller übernimmt keine
Verantwortung für Verletzungen und Beschädigungen durch
unsachgemäße Montage. Bewahren Sie die Gebrauchsanleitung
griffbereit auf.
Sicherheit von Kindern und schutzbedürftigen
Personen
• Das Gerät kann von Kindern ab 8 Jahren und Personen mit
eingeschränkten physischen, sensorischen oder geistigen
Fähigkeiten oder mit mangelnder Erfahrung und/oder
mangelndem Wissen nur dann verwendet werden, wenn sie
durch eine für ihre Sicherheit zuständige Person beaufsichtigt
werden oder in die sichere Verwendung des Geräts
eingewiesen wurden und die mit dem Gerät verbundenen
Gefahren verstanden haben.
• Kinder dürfen nicht mit dem Gerät spielen.
• Alle Verpackungsmaterialien von Kindern fernhalten.
• Halten Sie Kinder und Haustiere während des Betriebs oder
der Abkühlphase vom Gerät fern. Zugängliche Teile sind heiß.
• Falls Ihr Gerät mit einer Kindersicherung ausgestattet ist,
empfehlen wir, diese einzuschalten.
• Wartung oder Reinigung des Geräts dürfen nicht von Kindern
ohne Aufsicht erfolgen.
• Halten Sie Kinder unter 3 Jahren vom Gerät fern, wenn sie nicht
ständig beaufsichtigt werden.
16 www.zanussi.com

Allgemeine Sicherheit
• Das Gerät und die zugänglichen Geräteteile werden während
des Betriebs heiß. Berühren Sie nicht die Heizelemente.
• Schalten Sie das Gerät nicht über eine externe Zeitschaltuhr
oder eine separate Fernsteuerung ein.
• Kochen mit Fett oder Öl auf einem unbeaufsichtigten Kochfeld
ist gefährlich und kann zu einem Brand führen.
• Versuchen Sie nicht einen Brand mit Wasser zu löschen,
sondern schalten Sie das Gerät aus und bedecken Sie die
Flamme mit einem Deckel oder einer Feuerlöschdecke.
• Legen Sie keine Gegenstände auf dem Kochfeld ab.
• Legen Sie keine Metallgegenstände wie Messer, Gabeln, Löffel
oder Topfdeckel auf die Oberfläche des Kochfelds, da diese
heiß werden können.
• Benutzen Sie zum Reinigen des Geräts keinen Dampfreiniger.
• Entfernen Sie ggf. Spritzer oder ausgelaufene Flüssigkeiten
vom Abdeckblech, bevor Sie es öffnen. Lassen Sie das
Kochfeld vollständig abkühlen, bevor Sie das Abdeckblech
zuklappen.
• Wenn das Netzkabel beschädigt ist, muss es vom Hersteller,
seinem autorisierten Kundenservice oder einer gleichermaßen
qualifizierten Person ausgetauscht werden, um
Gefahrenquellen zu vermeiden.
• Ist das Gerät direkt an die Stromversorgung angeschlossen,
wird ein allpoliger Netztrennschalter mit einem Kontaktabstand
benötigt. Es muss eine vollständige Trennung entsprechend
der Überspannungskategorie III gewährleistet sein. Dies gilt
nicht für das Erdungskabel.
• Wenn Sie das Netzkabel verlegen, achten Sie darauf, dass es
keinen direkten Kontakt mit Teilen hat, die Temperaturen
erreichen können, die mehr als 50 °C über der Raumtemperatur
liegen. Verwenden Sie ansonsten Isolierschläuche.
Sicherheitsanweisungen
Dieses Gerät ist für folgende Märkte geeignet:
IT
www.zanussi.com 17

Montage
WARNUNG!
Nur eine qualifizierte Fachkraft darf
den elektrischen Anschluss des
Geräts vornehmen.
• Entfernen Sie das Verpackungsmaterial.
• Stellen Sie ein beschädigtes Gerät nicht auf
und benutzen Sie es nicht.
• Halten Sie sich an die mitgelieferte
Montageanleitung.
• Die Mindestabstände zu anderen Geräten
und Küchenmöbeln sind einzuhalten.
• Seien Sie beim Umsetzen des Geräts
vorsichtig, denn es ist schwer. Tragen Sie
stets Sicherheitshandschuhe.
• Dichten Sie die Ausschnittskanten mit einem
Dichtungsmittel ab, um ein Aufquellen durch
Feuchtigkeit zu verhindern.
• Schützen Sie die Geräteunterseite vor
Dampf und Feuchtigkeit.
• Installieren Sie das Gerät nicht direkt neben
einer Tür oder unter einem Fenster. So kann
heißes Kochgeschirr nicht herunterfallen,
wenn die Tür oder das Fenster geöffnet wird.
• Wird das Gerät über Schubladen eingebaut,
achten Sie darauf, dass zwischen dem
Geräteboden und der oberen Schublade ein
ausreichender Abstand für die Luftzirkulation
vorhanden ist.
• Der Boden des Geräts kann heiß werden.
Achten Sie darauf eine feuerfeste
Trennplatte unter dem Gerät anzubringen,
damit der Boden nicht zugänglich ist.
Elektrischer Anschluss
WARNUNG!
Brand- und Stromschlaggefahr.
• Alle elektrischen Anschlüsse sind von einem
geprüften Elektriker vorzunehmen.
• Das Gerät muss geerdet sein.
• Vor der Durchführung jeglicher Arbeiten
muss das Gerät von der elektrischen
Stromversorgung getrennt werden.
• Stellen Sie sicher, dass die elektrischen
Daten auf dem Typenschild den Daten Ihrer
Stromversorgung entsprechen. Wenden Sie
sich andernfalls an eine Elektrofachkraft.
• Achten Sie darauf, dass das Gerät
ordnungsgemäß montiert wird. Wenn
freiliegende oder ungeeignete Netzkabel
oder Netzstecker (fall vorhanden) verwendet
werden, kann der Anschluss überhitzen.
• Stellen Sie sicher, dass Sie das richtige
Kabel für den elektrischen Netzanschluss
verwenden.
• Achten Sie darauf, dass das Netzkabel nicht
lose hängt oder sich verheddert.
• Sorgen Sie dafür, dass ein
Berührungsschutz installiert wird.
• Verwenden Sie die Zugentlastung für das
Kabel.
• Stellen Sie beim elektrischen Anschluss des
Gerätes sicher, dass das Netzkabel oder
ggf. der Netzstecker nicht mit dem heißen
Gerät oder heißem Kochgeschirr in
Berührung kommt.
• Verwenden Sie keine Mehrfachsteckdosen
oder Verlängerungskabel.
• Achten Sie darauf, Netzstecker (falls
vorhanden) und Netzkabel nicht zu
beschädigen. Wenden Sie sich zum
Austausch des beschädigten Netzkabels an
unseren autorisierten Kundendienst oder
eine Elektrofachkraft.
• Alle Teile, die gegen direktes Berühren
schützen sowie die isolierten Teile müssen
so befestigt werden, dass sie nicht ohne
Werkzeug entfernt werden können.
• Stecken Sie den Netzstecker erst nach
Abschluss der Montage in die Steckdose.
Stellen Sie sicher, dass der Netzstecker
nach der Montage noch zugänglich ist.
• Falls die Steckdose lose ist, schließen Sie
den Netzstecker nicht an.
• Ziehen Sie nicht am Netzkabel, wenn Sie
das Gerät von der Stromversorgung trennen
möchten. Ziehen Sie stets am Netzstecker.
• Verwenden Sie nur geeignete
Trennvorrichtungen: Überlastschalter,
Sicherungen (Schraubsicherungen müssen
aus dem Halter entfernt werden können),
Fehlerstromschutzschalter und Schütze.
• Die elektrische Installation muss eine
Trenneinrichtung aufweisen, mit der Sie das
Gerät allpolig von der Stromversorgung
trennen können. Die Trenneinrichtung muss
mit einer Kontaktöffnungsbreite von
mindestens 3 mm ausgeführt sein.
Gasanschluss
• Der Gasanschluss muss von einer Fachkraft
ausgeführt werden.
• Vergewissern Sie sich vor der Montage des
Geräts, dass das von Ihrem Gaswerk
gelieferte Gas (Gasart und Gasdruck) mit
der Einstellung des Geräts kompatibel ist.
18 www.zanussi.com

• Stellen Sie sicher, dass die Luft um das
Gerät zirkulieren kann.
• Informationen über die Gasversorgung
finden Sie auf dem Typenschild.
• Das Gerät darf nicht an einen Abzug für
Verbrennungsprodukte angeschlossen
werden. Das Gerät muss gemäß der aktuell
geltenden Installationsbestimmungen
angeschlossen werden. Halten Sie die
Bestimmungen hinsichtlich der Belüftung
ein.
Gebrauch
WARNUNG!
Verletzungs-, Verbrennungs- und
Stromschlaggefahr.
• Entfernen Sie vor dem ersten Gebrauch das
gesamte Verpackungsmaterial, die Aufkleber
und Schutzfolie (falls vorhanden).
• Das Gerät ist für die Verwendung im
Haushalt vorgesehen.
• Nehmen Sie keine technischen Änderungen
am Gerät vor.
• Die Lüftungsöffnungen dürfen nicht
abgedeckt werden.
• Lassen Sie das Gerät bei Betrieb nicht
unbeaufsichtigt.
• Schalten Sie die Kochzonen nach jedem
Gebrauch aus.
• Legen Sie kein Besteck und keine
Topfdeckel auf die Kochzonen. Sie werden
heiß.
• Bedienen Sie das Gerät nicht mit feuchten
oder nassen Händen oder wenn es mit
Wasser in Kontakt gekommen ist.
• Benutzen Sie das Gerät nicht als Arbeits-
oder Abstellfläche.
• Wenn Sie Nahrungsmittel in heißes Öl
geben, kann dieses spritzen.
WARNUNG!
Brand- und Explosionsgefahr!
• Erhitzte Öle und Fette können brennbare
Dämpfe freisetzen. Halten Sie Flammen und
erhitzte Gegenstände beim Kochen mit
Fetten und Ölen von diesen fern.
• Die von sehr heißem Öl freigesetzten
Dämpfe können eine Selbstzündung
verursachen.
• Bereits verwendetes Öl kann
Lebensmittelreste enthalten und schon bei
niedrigeren Temperaturen eher einen Brand
verursachen als frisches Öl.
• Platzieren Sie keine entflammbaren Produkte
oder Gegenstände, die mit entflammbaren
Produkten benetzt sind, im Gerät, auf dem
Gerät oder in der Nähe des Geräts.
WARNUNG!
Das Gerät könnte beschädigt
werden.
• Stellen Sie kein heißes Kochgeschirr auf das
Bedienfeld.
• Lassen Sie das Kochgeschirr nicht
leerkochen.
• Lassen Sie keine Gegenstände oder
Kochgeschirr auf das Gerät fallen. Die
Oberfläche könnte beschädigt werden.
• Schalten Sie die Kochzonen niemals ein,
wenn sich kein Kochgeschirr darauf
befindet, oder wenn das Kochgeschirr leer
ist.
• Legen Sie keine Alufolie auf das Gerät.
• Verwenden Sie nur standfestes
Kochgeschirr mit der richtigen Form und
einem Durchmesser, der größer als der der
Brenner ist.
• Achten Sie darauf das Kochgeschirr mittig
auf die Brenner zu stellen.
• Vergewissern Sie sich, dass die Flamme
nicht erlischt, wenn Sie den Einstellknopf
schnell von der höchsten zur niedrigsten
Stufe drehen.
• Verwenden Sie ausschließlich das mit dem
Gerät gelieferte Zubehör.
• Setzen Sie keinen Wärmeverteiler auf den
Brenner.
• Beim Gebrauch eines Gaskochfelds
entsteht Wärme und Feuchtigkeit. Sorgen
Sie für eine ausreichende Belüftung in dem
Raum, in dem das Gerät aufgestellt ist.
• Bei längerer Benutzung des Geräts kann
eine zusätzliche Belüftung erforderlich
werden (Öffnen eines Fensters oder
Erhöhung der Absaugleistung der
Abzugshaube, falls vorhanden).
• Dieses Gerät ist nur zum Kochen bestimmt.
Jeder andere Gebrauch ist als
bestimmungsfremd anzusehen, zum Beispiel
das Beheizen eines Raums.
• Lassen Sie keine säurehaltigen Flüssigkeiten
wie Essig, Zitronensaft oder kalklösende
Reinigungsmittel mit dem Kochfeld in
Berührung kommen. Diese könnten matte
Flecken verursachen.
www.zanussi.com 19

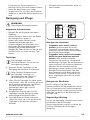
Reinigung und Pflege
• Reinigen Sie das Gerät regelmäßig, um eine
Abnutzung des Oberflächenmaterials zu
verhindern.
• Schalten Sie das Gerät vor dem Reinigen
aus und lassen Sie es abkühlen.
• Trennen Sie das Gerät vor
Wartungsarbeiten von der
Spannungsversorgung.
• Reinigen Sie das Gerät nicht mit einem
Wasser- oder Dampfstrahl.
• Reinigen Sie das Gerät mit einem weichen,
feuchten Tuch. Verwenden Sie
ausschließlich Neutralreiniger Benutzen Sie
keine Scheuermittel, scheuernde
Reinigungsschwämmchen, Lösungsmittel
oder Metallgegenstände.
• Reinigen Sie die Brenner nicht im
Geschirrspüler.
Entsorgung
WARNUNG!
Verletzungs- und Erstickungsgefahr.
• Für Informationen zur ordnungsgemäßen
Entsorgung des Geräts wenden Sie sich an
die zuständige kommunale Behörde vor Ort.
• Trennen Sie das Gerät von der
Stromversorgung.
• Schneiden Sie das Netzkabel ab, und
entsorgen Sie es.
• Drücken Sie die äußeren Gasrohre flach.
Service
• Wenden Sie sich zur Reparatur des Geräts
an einen autorisierten Kundendienst.
• Verwenden Sie ausschließlich
Originalersatzteile.
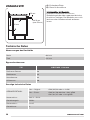
Gerätebeschreibung
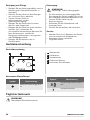
Kochfeldanordnung
4
5
21
3
1
Starkbrenner
2
Hilfsbrenner
3
Normalbrenner
4
Dreikronen-Brenner
5
Kochzonen-Einstellknöpfe
Kochzonen-Einstellknopf
Symbol Beschreibung
Keine Gaszufuhr/ausgeschal-
tet
Symbol Beschreibung
Zündstellung/maximale Gaszu-
fuhr
minimale Gaszufuhr
Täglicher Gebrauch
WARNUNG!
Siehe Kapitel Sicherheitshinweise.
20 www.zanussi.com
Seite wird geladen ...
Seite wird geladen ...
Seite wird geladen ...
Seite wird geladen ...
Seite wird geladen ...
Seite wird geladen ...
Seite wird geladen ...
Seite wird geladen ...
Seite wird geladen ...
Seite wird geladen ...
Seite wird geladen ...
Seite wird geladen ...
-
 1
1
-
 2
2
-
 3
3
-
 4
4
-
 5
5
-
 6
6
-
 7
7
-
 8
8
-
 9
9
-
 10
10
-
 11
11
-
 12
12
-
 13
13
-
 14
14
-
 15
15
-
 16
16
-
 17
17
-
 18
18
-
 19
19
-
 20
20
-
 21
21
-
 22
22
-
 23
23
-
 24
24
-
 25
25
-
 26
26
-
 27
27
-
 28
28
-
 29
29
-
 30
30
-
 31
31
-
 32
32


Zanussi ZGG95624XA Benutzerhandbuch
- Kategorie
- Kochfelder
- Typ
- Benutzerhandbuch
in anderen Sprachen
- English: Zanussi ZGG95624XA User manual
Verwandte Artikel
-
Zanussi ZGG96624XA Benutzerhandbuch
-
-
-
Zanussi ZGG65414SA Benutzerhandbuch
-
-
-
-
Zanussi ZGO96524BA Benutzerhandbuch
-
-
Andere Dokumente
-
Electrolux EGS7658SOX Benutzerhandbuch
-
-
Electrolux PQ645UOX Benutzerhandbuch
-
Electrolux EGG7253NOX Benutzerhandbuch
-
-
-
-
-
IKEA MATMÄSSIGG Benutzerhandbuch
-
ARTHUR MARTIN BSE577021M Benutzerhandbuch