Seite wird geladen ...

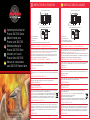
This safe is supplied with a secure electronic lock and an emergency manual override lock, for use only if
the batteries are discharged or new batteries are being installed. The override key must not be stored inside
the safe.
Please remove the grey plastic cover over the keyhole (3) insert the key and turn clockwise, open the door
by turning knob clockwise. With the door in open position insert 4 x AA batteries into battery compartment 2.
1. FIRST OPENING AND MANUAL OVERRIDE
2. SETTING PERSONAL CODE AND OPENING
With the door in the open position. Press the red reset button (1) on the back of the door. Enter your personal
code (It is recommended to use four numbers) and press button “E” to confirm. You will hear a bleep tone.
4. LOW POWER WARNING
Replace batteries immediately when the red warning light is illuminated 4. Once the new batteries have
been inserted reset the personal code following step 2.
3. WARNING
Before closing the door check that the new codes are in operation. Enter your new personal code and press
button “E” to confirm. The green indicator will light followed by a beep tone. The safe is now ready for use.
Follow instructions in item 1.
5. MANUAL OVERRIDE
6. REPLACEMENT BATTERIES
When the batteries are low the red indicator light will be illuminated when the keypad buttons are pressed.
The lock uses 4 x AA batteries located in the battery holder (2).
Please replace these as soon as possible. On replacing the batteries you must reset your personal code,
following the instructions in step 2.
Used batteries should not be disposed of with normal domestic waste.
These should be disposed of at approved collection points.
You may also return used batteries to your Retailer at their expense (where applicable).
Use the two 6mm bolts to bolt the safe to a suitable wall.
8. INSTALLATION
1 - Reset Button
2 - Battery Compartment
3 - Override Key Lock
4 - Red Low Power Warning Light
Keypad and Mechanical Override Lock
Safe Door in the open position
1
Wall/Base Fixing Holes
1 – Tasto Reset
2 – Vano Pile
3 – Serratura Chiave Maestra
4 – Segnale Rosso Avviso Pile Scariche
Fori fissaggio per pavimento/parete
Sportello cassaforte in posizione aperta
2
Base muro Fori di ssaggio
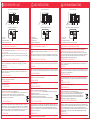
Remove the grey plastic cover from between the circular handle and the keypad. Now insert the override
key and turn clockwise. Turn the circular handle and open the safe door. On the inside of the door you will
see the cover to the battery pack, remove this; take out the dead batteries and replace with new ones.
Replace the cover to the battery pack; close the door and turn the override key anti- clockwise. Remove the
key and replace the grey plastic cover.
7. HOW TO REPLACE BATTERIES
Entfernen Sie die graue, runde Plastikabdeckung zwischen dem Drehgriff und der Tastatur. Stecken Sie den
Notschlüssel in das Notschloss und drehen ihn im Uhrzeigersinn. Drehen Sie den Griff und öffnen die Tür.
Auf der Innenseite der Tür, im Türdeckel, finden Sie das Batteriefach. Entfernen Sie den Deckel, entnehmen
Sie die leeren Batterien und setzen Sie die neuen ein. Setzen Sie den Batteriefachdeckel wieder ein,
schließen Sie die Tür und drehen den Notschlüssel entgegen dem Uhrzeigersinn. Ziehen Sie den Schlüssel
jetzt wieder aus dem Schloss. Drücken Sie die graue, runde Plastikabdeckung wieder auf die dafür
vorgesehene Stelle.
7. ANLEITUNG FÜR DEN BATTERIEWECHSEL
Rimuovere il coperchio rotondo in plastica situato tra la maniglia rotonda e la tastierina. Ora inserire la
chiave fornita e girare in senso orario. Girare la maniglia rotonda ed aprire la cassaforte. All’interno dello
sportello è posizionato il coperchio dell’alloggiamento pile, rimuovere lo stesso; togliere le pile esaurite e
sostituire con pile nuove. Riposizionare il coperchio dell’alloggiamento pile; chiudere lo sportello e girare la
chiave in senso anti-orario. Togliere la chiave e riposizionare il coperchio rotondo in plastica.
7. COME SOSTITUIRE LE PILE
1
2
1
2
USER INSTRUCTIONS
ISTRUZIONI PER L’USO
Questa cassaforte è fornita di chiusura elettronica e di chiusura manuale d’emergenza, da usare solo in
caso di pile esaurite o durante la sostituzione delle pile. La chiave master non deve essere custodita
all’interno della cassaforte.
Rimuovere dalla serratura il coperchio rotondo in plastica (3) inserire la chiave e ruotare in senso orario,
aprire lo sportello girando il pomello in senso orario. Con lo sportello aperto, inserire le 4 pile AA nel vano
pile (2).
1. PRIMA APERTURA E CHIAVE MANUALE
3. ATTENZIONE
Prima di chiudere lo sportello controllare che i nuovi codici siano operativi. Digitare il nuovo codice
personale e premere il tasto “E” per confermare. Si accenderà una luce verde seguita da un “beep”. La
cassaforte è ora pronta per l’uso.
5. APERTURA MANUALE
Seguire le istruzioni al punto 1.
4. AVVISO PILE SCARICHE
Quando si accende la luce rossa (4), sostituire le pile immediatamente. Una volta inserite le pile nuove,
re-impostare il codice personale seguendo il punto 2.
2. IMPOSTARE IL CODICE PERSONALE E APRIRE
Con lo sportello aperto, premere il tasto reset rosso (1) all’interno dello sportello. Digitare il codice
personale (Si raccomanda di usare un codice a quattro cifre) e premere il tasto “E” per confermare.
Si sentirà un “beep”.
BEDIENUNGSANLEITUNG
8. INSTALLAZIONE
Utilizzare le due viti da 6 mm per fissare la cassaforte a parete adatta.
6. SOSTITUZIONE PILE
Quando le pile si stanno scaricando, l’indicatore rosso si accenderà ogni qualvolta si usa la tastierina. La
serratura richiede 4 pile AA situate nell’apposito alloggiamento (2).
Sostituire le pile il più presto possibile. Dopo la sostituzione delle pile è necessario re-impostare il codice
personale, seguendo le istruzioni al punto 2. Non eliminare le pile usate insieme ai rifiuti
domestici. Eliminare le pile nei centri di raccolta preposti. E’ possibile restituire le pile usate al
proprio rivenditore a sue spese (dove indicato).
Dieser Safe wird mit einem hochsicheren elektronischen Tastenschloss, inkl. einem Notschloss,
ausgeliefert. Dieses Schloss darf nur im Falle leerer bzw. schwacher Batterien benutzt werden. Die
dazugehörenden Notschlüssel dürfen unter keinen Umständen im Safe aufbewahrt werden.
Bitte entfernen Sie die runde Plastikabdeckung von dem Notschloss und stecken den Schlüssel in das
Schloss. Anschließend drücken Sie den Schlüssel ein wenig ins Schloss und drehen ihn im Uhrzeigersinn.
Die Tür lässt sich öffnen, indem man den Drehgriff im Uhrzeigersinn dreht. Bei geöffneter Tür die
mitgelieferten 4xAA Batterien in das Batteriefach einsetzen (2).
1. ERSTMALIGES ÖFFNEN & MANUELLES ÖFFNEN
2. PERSÖNLICHEN CODE EINSTELLEN
Bei geöffneter Tür auf der Rückseite den roten Reset-Knopf (1) drücken. Bitte geben Sie nun Ihren persönli-
chen Code ein. Empfehlenswert ist eine vierstellige Zahl. Bestätigen Sie den Code mit der Taste E. Sie
werden einen Piepton hören.
3. VORSICHT
Bevor Sie die Tür schließen, vergewissern Sie sich, dass der neue Code auch funktioniert. Geben Sie Ihren
persönlichen Code ein und bestätigen Sie diesen mit der Taste E. Das grüne Licht wird mit einen Piepton
aufleuchten. Ihr Tresor ist nun betriebsbereit.
5. MANUELLES ÖFFNEN
Bitte folgen Sie der Bedienungsanleitung Punkt 1
4. BATTERIENWARNUNG
Sobald die rote LED aufleuchtet wechseln Sie bitte so schnell wie möglich die Batterien. Nach jedem
Batteriewechsel muss das Schloss neu programmiert werden, bitte folgen Sie der Bedienungsanleitung
Punkt 2.
8. INSTALLATION
Benutzen Sie die zwei 6mm Schrauben/Bolzen um den Safe an einer geeigneten Wand zu befestigen.
6. BATTERIEWECHSEL
Wenn die Batterien schwach sind, leuchtet das rote Licht bei der Betätigung der Tastatur. Das Schloss
funktioniert mit 4xAA Batterien , die sich im Batteriefach befinden (2).
Bitte wechseln Sie diese so bald wie möglich aus. Nach jedem Batteriewechsel muss das
Schloss neu programmiert werden, bitte folgen Sie der Bedienungsanleitung Punkt 2
Altbatterien gehören nicht in den Hausmüll. Die Batterien sollten zur Entsorgung zu einer
geeigneten Sammelstelle gebracht werden. Sie können Ihre gebrauchten Batterien auch
unentgeltlich an die Verkaufsstelle (Versandlager) schicken.
1 – Reset – Knopf
2 – Batteriefach
3 – Schutzfolie am Schlüsselloch
4 – Rote Warnleuchte (leuchtet auf bei zu geringer Spannung)
Eingabe-/Bedieneinheit und mechanisches Notschloss
Safetür in OFFEN-Position
Version 2/RS/Oct 14
3
1
4
7
C
2
5
8
0
3
6
9
E
4
Wand/Boden Verankerungsbohrungen
3
1
4
7
C
2
5
8
0
3
6
9
E
4
3
1
4
7
C
2
5
8
0
3
6
9
E
4
-
 1
1
-
 2
2


Phoenix SS0721EBD Bedienungsanleitung
- Typ
- Bedienungsanleitung
in anderen Sprachen
- English: Phoenix SS0721EBD Operating instructions
- français: Phoenix SS0721EBD Mode d'emploi
- español: Phoenix SS0721EBD Instrucciones de operación
- italiano: Phoenix SS0721EBD Istruzioni per l'uso
Verwandte Artikel
-
Phoenix SS0720E Series Bedienungsanleitung
-
-
-
-
-
-
Phoenix FS1290 Series Bedienungsanleitung
-
-
-
Andere Dokumente
-
Arregui AWA Smart Safe Benutzerhandbuch
-
OneConcept 100303 Series Benutzerhandbuch
-
 Fichet-Bauche Complice Installation and Use Manual
-
 HMF 4612112 Benutzerhandbuch
-
-
Megasat FP Series Benutzerhandbuch
-
Aeg-Electrolux SKE160 Bedienungsanleitung
-
Olympia GOsafe 200 - Fingerprint Lock Bedienungsanleitung
-
Dormakaba LA GARD 700 Series Installationsanleitung

