Watchguard Firebox X Peak Schnellstartanleitung
- Typ
- Schnellstartanleitung


1
Username
Password
LiveSecurity Service
Registering with LiveSecurity
®
Service
Getting Started
Package Contents
Console
Steps for Installation
Registering with LiveSecurity
®
Service
Gathering network information
Setting up the management station
Cabling the Firebox X Peak
Using the Quick Setup Wizard
Deploying the Firebox X Peak into your network
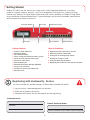
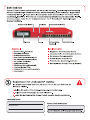
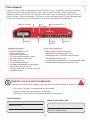
LCD Display
ork Netw Activity LightsNavigation Buttons
Network Interfaces
Trusted Interface
Power Light
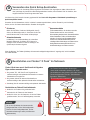
You must activate this product and get a Feature Key to enable the device.
1. Log on to http://www.watchguard.com/activate
2. Follow the onscreen instructions.
3. Download the Feature Key for the product you are registering.
■
■
■
■
■
■
✔ Firebox X Peak appliance
✔ QuickStart Guide
✔ User documentation
✔ Three straight-thru Ethernet cables (green)
✔ One Cross-over Ethernet cable (red)
✔ One Serial cable (blue)
✔ Rack-mounting kit
✔ WatchGuard System Manager CD-ROM
✔ License key certificate
✔ LiveSecurity Service activation card
✔ Warranty card
Firebox X Peak Serial Number
Found on the back of your Firebox under the barcode.
Firebox®X Peak™ has the security you really need. A fully integrated appliance, it contains
powerful layered network security, intuitive management and premium support through
LiveSecurity®Service. This QuickStart Guide covers the initial installation of Firebox X Peak. Refer
to your Hardware Guide and WatchGuard® System Manager User Guide for hardware specifications
and comprehensive setup instructions.
2

________ . ________ . ________ . ________
Default Gateway
________ . ________ . ________ . ________ /_____
External Interface
________ . ________ . ________ . ________ /_____
Trusted Interface
________ . ________ . ________ . ________ /_____
Optional Interface
________ . ________ . ________ . ________
Management Station used for installation
________ . ________ . ________ . ________ /_____
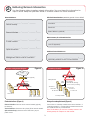
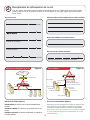
Gathering Network Information
2
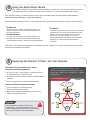
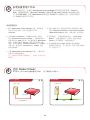
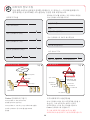
Using a Secondary Network (Figure 2)
You can have a secondary network on the trusted interface. A
secondary network is a separate logical network connected to
the Firebox interface by a switch or hub.
Note: The IP address you use for a secondary network is the
default gateway for computers on that network.
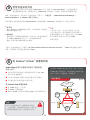
Firebox Interfaces (Figure 1)
External Interface: Connects to the external network (typically
the Internet).
Trusted Interface: Connects to the private LAN or internal network.
Optional Interface(s): Connects to the DMZ where you put
public servers.
Additional Trusted IP Addresses
Network Addresses
_____________________________________________
Username
_____________________________________________
_____________________________________________
Password
Static Address (optional)
PPPoE on External Interface provided by your ISP if it uses PPPoE
_____________________________________________
Host ID (optional)
Secondary Network on the Trusted Interface
DHCP Hostname/ID on External Interface
Secondary Network
Figure 2
10.10.10.254 (Primary)
172.16.1.10
172.16.1.15
172.16.1.20
Trusted Interface
Hub/
Switch
10.10.10.1
10.10.10.5
10.10.10.25
Primary Network
Secondary Network
172.16.1.254 (Secondary)
External
Network Configuration Diagram
Router (optional)
Trusted
HTTP
Server
SMTP
Server
FTP
Server
Figure 1
Optional
10.10.10.35
Internet
Use the following tables to gather network information. You must have this information for
steps 5 and 6. Keep the QuickStart Guide in a secure location for future reference.
3

Setting Up the Management Station
Install the Management Software.
3
4
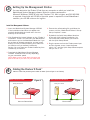
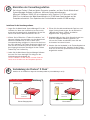
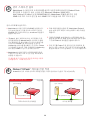
Cabling the Firebox
®
X Peak
™
Trusted Interface
Management Station
Informationormation
Over Local Area Network
With Crossover Cable
1. Insert the WatchGuard System Manager CD-ROM.
If the installation wizard does not appear auto-
matically, double-click the install.exe in the root
directory of the CD-ROM.
2. Click Download the Latest Software on the “Firebox X
Installation” screen. This launches your Web browser
and connects you to the WatchGuard Web site. If you
do not have an Internet connection, you can install
directly from the CD-ROM; however, your Firebox will
not function until you activate LiveSecurity
Service. You must have your Firebox feature key from
LiveSecurity to continue.
3. Download the WatchGuard System Manager
software. Download time will vary depending
on your connection speed.
NOTE: Make sure you write down the name and
path of the file as you save it to your hard drive.
4. Execute the self-extracting file, and follow the
screens until the “WatchGuard Firebox X Set-up:
Set-up Complete” screen.
5. By default, the Quick Setup Wizard launches
at the end of the software installation. You
must cable the Firebox before you continue
with the Quick Setup Wizard.
6. Plug the power cord into the Firebox power input
and into a power source. Leave the power
switch “off” until the Quick Setup Wizard requests
that you turn it “on.”
Cross-over Ethernet Cable Ethernet Cable
Trusted Interface
Management Station
Figure 3 Figure 4
Cable the Firebox X to your management station as follows. (Refer to gures 3 and 4 below.)
You can administer the Firebox X Peak from any computer on which you install the
WatchGuard System Manager software. Minimum system requirements:
Microsoft®Windows®2000/XP with Intel®Pentium®III 1 GHz or higher, and 512 MB RAM
is required. A hard disk with 25 MB of free disk space is required to install WatchGuard
modules, plus 15 MB minimum for log files.
4

Internet
Trusted
Interface
Optional
Interface
External
Inter face
Router
Internet
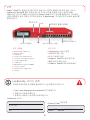
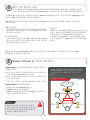
NO!
NO!
NO!
WARNING!
Deploying the Firebox® X Peak
™
into Your Network
Using the Quick Setup Wizard
After you nish setting up the management station and cabling the Firebox X Peak, use the Quick Setup Wizard to create a
basic conguration le. This enables the Firebox X Peak to function as a simple but immediately effective rewall.
The Firebox X Peak can now be used as a basic
rewall with the following properties:
■ All TCP, UDP port 53, and ping trafc is allowed from trusted
or optional interfaces to external interfaces.
■
All trafc from external interfaces to trusted or optional interfaces
is blocked.
■
Can be managed from the trusted or optional interface.
Deploy the Firebox X Peak into your network:
Do not connect Firebox interfaces to one
another; for example by connecting them to the
same hub or switch. This is known as a “Looped
Configuration.”
Network Deployment Error
Use the information you collected in step 2 and the Feature Key from LiveSecurity Service to complete the wizard. Note the following:
Figure 5
Make sure the computers protected by the Firebox use the
Firebox as their default gateway.
Setup Wizard is a basic conguration. You must now
create a conguration le that meets your security policy
needs. Please refer to the user documentation.
5
■
Passphrases
Passphrases are case-sensitive and must be at least eight
characters long. They can be any combination of letters,
numbers, and special characters. You will create two
passphrases. The status passphrase is used for
read-only connections to the Firebox. The conguration
passphrase is used for read-write connections to
the Firebox.
6
Important!
The conguration le created using the Quick
■
Place the Firebox in its permanent location.
■
Connect the Firebox to your network.
■
If the Quick Setup Wizard is not already launched, launch it from the Windows desktop by selecting Start > All Programs >
WatchGuard System Manager > Quick Setup Wizard.
■
IP Addressing
When entering an IP address, type the digits, periods, and
slashes in sequence. Do not use the Tab or Arrow keys to
jump past the periods.
■
Secondary Networks
See gure 2 for a description of secondary networks. You
can enter the IP address of your secondary network in the
“add a secondary IP address” screen of the Quick Setup Wizard.
When you see “The Firebox QuickSetup Wizard has completed successfully” dialog box in the Quick Setup Wizard, you have successfully
completed the installation of your Firebox.
5

You have successfully installed, congured, and deployed your new Firebox X Peak on your network. What’s next? Below are some
things to remember as a new customer.
What’s Next?
+1.206.613.0456
(all other countries)
www.watchguard.com/support
1.877.232.3531
(U.S. and Canada)
Customizing your security policy
You customize your network security by adding policies — application layer lters (called proxies) and packet lters — that broaden or restrict
what you allow in and out of your rewall. Each policy brings trade-offs between network security and accessibility. When you select policies,
balance the needs of your organization with the requirement that computer assets be protected from attack. Some common policies that
organizations typically add are the following:
■
HTTP (Web)
■
SMTP (E-mail)
■
DNS (Domain Name Service)
■
FTP (File Transfer Protocol)
Please refer to the Fireware Conguration Guide for a comprehensive list of policy types you can add. You can also learn more about creating
custom policies, rewall and signature based intrusion prevention, and Web content ltering.
What to expect from your LiveSecurity® Service
Your Firebox X includes a subscription to our award-winning LiveSecurity
®
Service. Your subscription:
✔
Provides up-to-date network protection with the latest software upgrades.
✔
Solves problems with comprehensive technical support as well as provides step-by-step tutorials and Frequently Asked Questions (FAQs).
✔
Reduces downtime with alerts and conguration tips to combat the newest threats and vulnerabilities.
✔
Develops your expertise with detailed interactive training resources.
✔
Keeps you prepared for upcoming security threats with editorials and analysis from industry experts.
✔
Extends your network security with bundled software, utilities, and special offers.
TECHNICAL SUPPORT
6

Benutzername
Kennwort
7

Standardgateway
Externe Schnittstelle
Vertrauenswürdige Schnittstelle
Optionale Schnittstelle
Verwaltungsstation für die Installation
Zusammenstellen der Netzwerkinformationen
2
Verwenden eines sekundären Netzwerks (Abbildung 2)
Die vertrauenswürdige Schnittstelle kann ein sekundäres
Netzwerk umfassen. Ein sekundäres Netzwerk ist ein
separates logisches Netzwerk, das über einen Switch oder
einen Hub mit der Firebox-Schnittstelle verbunden ist.
Hinweis: Die für ein sekundäres Netzwerk verwendete
IP-Adresse ist der Standardgateway für die Computer in
diesem Netzwerk.
Firebox-Schnittstellen (Abbildung 1)
Externe Schnittstelle: Verbindung mit dem externen Netzwerk
(normalerweise dem Internet).
Vertrauenswürdige Schnittstelle: Verbindung mit dem privaten
LAN oder internen Netzwerk.
Optionale Schnittstelle(n): Verbindung mit dem
Umkreisnetzwerk, das öffentliche Server umfasst.
Weitere vertrauenswürdige IP-Adressen
Netzwerkadressen
_____________________________________________
PPPoE für die externe Schnittstelle, die bei Verwendung von
PPPoE von Ihrem Internetdienstanbieter bereitgestellt wird.
DHCP-Hostname/ID der externen Schnittstelle
Sekundäres Netzwerk
Abbildung 2
10.10.10.254 (Primär)
172.16.1.10
172.16.1.15
172.16.1.20
Vertrauenswürdige Schnittstelle
Hub/
Switch
10.10.10.1
10.10.10.5
10.10.10.25
Primäres Netzwerk
Sekundäres Netzwerk
172.16.1.254 (Sekundär)
Extern
Netzwerkkonfigurationsdiagramm
Router (optional)
HTTP
Server
SMTP
Server
FTP
Server
Abbildung 1
Optional
10.10.10.35
Internet
Verwenden Sie folgende Tabellen zum Zusammenstellen der Netzwerkinformationen, die Sie
zum Ausführen der Schritte 5 und 6 benötigen. Bewahren Sie die Schnellstartbroschüre an
einem sicheren Ort auf.
Vertrauenswürdig
Benutzername
Kennwort
Statische Adresse (optional)
Host-ID (optional)
Sekundäres Netzwerk für die vertrauenswürdige Schnittstelle
_____________________________________________
8

Einrichten der Verwaltungsstation
Installieren Sie die Verwaltungssoftware.
3
4
Verkabelung der Firebox®X Peak
™
Vertrauenswürdige
Schnittstelle
Verwaltungsstation
Informationormation
Über LAN
Mit Übergangskabel
1. Legen Sie die WatchGuard System-Manager-CD in das
Laufwerk ein. Wenn der Installations-Assistent nicht
automatisch angezeigt wird, doppelklicken Sie auf die
Datei install.exe im Stammverzeichnis der CD.
2. Klicken Sie im Bildschirm “Firebox X Installation” auf
Neueste Software herunterladen, um die WatchGuard-
Website im Webbrowser zu öffne. Wenn keine
Internetverbindung verfügbar ist, können Sie direkt von
der CD installieren. Die Firebox funktioniert jedoch erst,
nach Sie den LiveSecurity Service aktiviert haben. Um
den Vorgang fortzusetzen, benötigen Sie den Firebox
Feature Key von LiveSecurity.
3. Laden Sie die WatchGuard System-Manager-Software
herunter. Die hierzu benötigte Zeit hängt von der
Verbindungsgeschwindigkeit ab.
Hinweis: Notieren Sie den Namen und den Pfad der
Datei, wenn Sie diese auf der Festplatte speichern.
4. Führen Sie die selbstextrahierende Datei aus und
folgen Sie den Anweisungen, bis der Bildschirm
“WatchGuard Firebox X Setup: Installation
abgeschlossen” angezeigt wird.
5. Standardmäßig wird der Quick Setup-Assistent am
Ende der Softwareinstallation gestartet. Sie
müssen die Firebox anschließen, bevor Sie den
Assistenten fortsetzen können.
6. Stecken Sie das Netzkabel in die Firebox-Netzbuchse
und eine Stromquelle ein. Schalten Sie die Firebox
nicht ein, bis Sie vom Quick Setup-Assistenten dazu
aufgefordert werden.
Ethernet-Übergangskabel Ethernetkabel
Verwaltungsstation
Abbildung 3 Abbildung 4
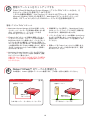
Schließen Sie die Firebox X wie folgt an die Verwaltungsstation an (siehe Abbildung 3 und 4).
Sie können Firebox X Peak auf jedem Computer verwalten, auf dem Sie die WatchGuard
System-Manager-Software installieren. Minimale Systemanforderungen:
Microsoft®Windows®2000/XP mit mindestens Intel®Pentium®III 1 GHz und 512 MB
RAM. Zum Installieren der WatchGuard-Module ist 25 MB freier Speicherplatz auf der
Festplatte erforderlich. Zum Speichern der Protokolldateien werden 15 MB benötigt.
Vertrauenswürdige
Schnittstelle
9

Internet
Optionale
Schnittstelle
Externe
Schnittstelle
Router
Internet
NEIN!
NEIN!
NEIN!
WARNUNG!
Bereitstellen von Firebox®X Peak
™
im Netzwerk
Verwenden des Quick Setup-Assistenten
Nachdem Sie die Verwaltungsstation eingerichtet und Firebox X Peak angeschlossen haben, können Sie mit
dem Quick Setup-Assistenten eine Basiskongurationsdatei erstellen, damit Firebox X Peak als einfache, aber
umgehend effektive Firewall eingesetzt werden kann.
Firebox X Peak kann nun als Basisrewall mit folgenden
Eigenschaften verwendet werden:
■ Der gesamte TCP-, UDP-Port 53 und Pingverkehr von
vertrauenswürdigen oder optionalen Schnittstellen zu externen
Schnittstellen wird zugelassen.
■
Der gesamte Verkehr von externen Schnittstellen zu
vertrauenswürdigen oder optionalen Schnittstellen wird blockiert.
■
Verwaltung über die vertrauenswürdige oder optionale Schnittstelle.
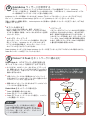
Bereitstellen von Firebox X Peak im Netzwerk:
Die Firebox-Schnittstellen dürfen nicht
miteinander verbunden werden (z.B. durch
Anschließen an den gleichen Hub oder Switch).
Diese Konfiguration wird als "Schleifenkon-
figuration" bezeichnet.
Bereitstellungsfehler im Netzwerk
Verwenden Sie die Informationen, die Sie in Schritt 2 zusammengestellt haben, und den Feature Key von LiveSecurity
Service, um den Assistenten abzuschließen. Beachten Sie folgendes:
Abbildung 5
Stellen Sie sicher, dass die Computer, die von der Firebox
geschützt werden, diese als Standardgateway verwenden.
5
■
Kennwortausdrücke
Für Kennwortausdrücke, die mindestens aus acht
Zeichen bestehen müssen, muss die Groß-/
Kleinschreibung beachtet werde. Kennwortausdrücke
können Buchstaben, Zahlen und Sonderzeichen
enthalten. Sie müssen zwei Kennwortausdrücke
erstellen. Der Statuskennwortausdruck wird für
schreibgeschützte Verbindungen zur Firebox und der
Kongurationskennwortausdruck wird für Lese/
Schreibverbindungen zur Firebox verwendet.
6
Wichtig!
Die mit dem QuickSetup-Assistenten erstellte
Kongurationsdatei ist eine Basiskonguration.
Erstellen Sie eine Kongurationsdatei, die Ihre
Sicherheitsanforderungen erfüllt (siehe Benutzer-
dokumentation).
■
Stellen Sie die Firebox an die gewünschte Stelle.
■
Verbinden Sie die Firebox mit dem Netzwerk.
■
Sie können den Quick Setup-Assistenten gegebenenfalls über Start > Alle Programme > WatchGuard System-Manager >
Quick Setup Wizard starten.
■
IP-Adressen
Geben Sie die Ziffern, Punkte und Schrägstriche einer IP-
Adresse der Reihenfolge nach ein. Verwenden Sie die Tab-
oder Pfeiltasten nicht, um die Punkte zu überspringen.
■
Sekundäre Netzwerke
In Abbildung 2 ist eine Beschreibung des sekundären
Netzwerks dargestellt. Sie können die IP-Adresse im
Dialogfeld "Eine sekundäre IP-Adresse hinzufügen" des
Quick Setup-Assistenten eingeben.
Wenn die Meldung “Der Firebox QuickSetup-Assistent wurde erfolgreich abgeschlossen” angezeigt wird, ist die Installation
der Firebox beendet.
Vertrauenswürdige
Schnittstelle
10

Sie haben Ihre neue Firebox X Peak erfolgreich installiert, konguriert und bereitgestellt. Was nun? Als Neukunde sollten Sie folgendes beachten.
Was nun?
+1.206.613.0456
(alle anderen Länder)
www.watchguard.com/support
1.877.232.3531
(USA und Kanada)
Anpassen der Sicherheitsrichtlinie
Sie können die Netzwerksicherheit über Richtlinien anpassen (Proxys und Paketlter), die den Verkehr über den Firewall erweitern oder einschränken. Jede
Richtlinie erfordert Kompromisse zwischen der Netzwerksicherheit und der Zugänglichkeit. Beim Auswählen von Richtlinien müssen Sie die Anforderungen Ihrer
Organisation mit der Anforderung für den Schutz der Computer abwägen. Folgende allgemeine Richtlinien werden normalerweise hinzugefügt:
■
HTTP (Web)
SMTP (E-Mail)
DNS (Domain Name Service)
FTP (File Transfer Protocol)
■
■
■
Im Fireware-Kongurationshandbuch nden Sie eine umfassende Liste der Richtlinientypen, die hinzugefügt werden können. Sie
erhalten außerdem weitere Informationen zum Erstellen von benutzerdenierten Richtlinien, das Verhindern von Angriffen basierend auf
Firewalls und Signaturen, und zu Webinhaltltern.
Ihr LiveSecurity® Service
Ihre Firebox X umfasst ein Abonnement für unseren preisgekrönten LiveSecurity® Service:
✔
Aktueller Netzwerkschutz mit den neuesten Softwareupdates.
Beheben von Problemen durch sowohl umfassenden technischen Support als auch schrittweisen Lernprogrammen und häug gestellten
Fragen (FAQs, Frequently Asked Questions).
Verringert Ausfallzeiten durch Warnungen und Kongurationstipps, um die neuesten Gefährdungen und Schwachstellen zu bekämpfen.
Erweitert Ihre Kenntnisse mit interaktiven Trainingsressourcen.
Bereitet Sie auf Sicherheitsgefährdungen durch Analysen von Experten vor.
Erweitert die Netzwerksicherheit mit Software, Dienstprogrammen und besonderen Angeboten.
✔
✔
✔
✔
✔
TECHNISCHER SUPPORT
11

Se encuentra en la parte posterior de su Firebox
debajo del código de barras.
1
Nombre de usuario
Contraseña
Servicio LiveSecurity
Registro con el servicio LiveSecurity
®
Para empezar
Contenido del paquete
Consola
Pasos para la instalación
Registro con el servicio LiveSecurity®
Recopilación de información de la red
Configuración de la estación de administración
Cableado del Firebox X Peak
Uso del Quick setup Wizard para la configuración rápida
Implementación del Firebox X Peak en su red
Pantalla LCD
Luces de actividad de redBotones de navegacin
Interfaz de red
Interfaz de
conanza
Luz de
alimentación
Debe activar este producto y obtener una Clave de función para habilitar el dispositivo.
1. Inicie sesión en http://www.watchguard.com/activate
2. Siga las instrucciones que aparecen en pantalla.
3. Descargue la Clave de función del producto que está registrando.
■
■
■
■
■
■
✔ Dispositivo Firebox X Peak
✔ Guía de inicio rápido
✔ Documentación del usuario
✔ Tres cables Ethernet directos (verdes)
✔ Un cable Ethernet cruzado (rojo)
✔ Un cable serial (azul)
✔ Set de montaje para Rack
✔ CD- ROM de WatchGuard System Manager
✔ Certificado de clave de licencia
✔ Tarjeta de activación del servicio LiveSecurity
✔ Tarjeta de garantía
Número de serie Firebox X Peak
Firebox®X Peak™ tiene la seguridad que realmente necesita. Un dispositivo totalmente integrado,
contiene poderosa seguridad de red en capas, administración intuitiva y soporte de primera
mediante LiveSecurity®Service. Esta Guía de inicio rápido cubre la instalación inicial de Firebox X
Peak. Consulte su Guía de hardware y su Guía del usuario de WatchGuard® System Manager para
conocer las especificaciones de hardware e instrucciones detalladas de configuración.
12

Puerta de enlace predeterminada (default gateway)
Interfaz de confianza
Interfaz opcional
Estación de administración usada para la instalación
Recopilación de información de la red
2
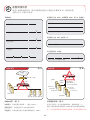
Uso de una red secundaria (figura 2)
Puede tener una red secundaria en la interfaz de conanza. Una
red secundaria es una red lógica independiente conectada a
la interfaz de Firebox mediante un switch o un concentrador.
Nota: La dirección IP que usa para la red secundaria es la puerta
de enlace predeterminada para las computadoras de esa red
(default Gateway).
Interfaces de Firebox (figura 1)
Interfaz externa: Se conecta a la red externa (habitualmente,
Internet).
Interfaz de
confianza : Se conecta a la red LAN privada o la red
interna.
Interfaces opcionales: Se conecta al DMZ donde se colocan los
servidores públicos.
Direcciones IP de confianza adicionales
Direcciones de red
Nombre de usuario
Contraseña
Dirección estática (opcional)
PPPoE en la Interfaz externa suministrado por su ISP si usa PPPoE
Id. de host (opcional)
Red secundaria en la interfaz de confianza
Nombre de host DHCP/Id. en la interfaz externa
Red secundaria
Figura 2
10.10.10.254 (Principal)
172.16.1.10
172.16.1.15
172.16.1.20
Interfaz de conanza
Concentrador/
Switch
10.10.10.1
10.10.10.5
10.10.10.25
Red principal
Red secundaria
172.16.1.254 (Secundaria)
Externo
Diagrama de configuración de la red
Ruteador (opcional)
De
conanza
Servidor
HTTP
Servidor
SMTP
Servidor
FTP
Figura 1
Opcional
10.10.10.35
Internet
Use las tablas siguientes para recopilar información de la red. Debe tener esta información
para los pasos 5 y 6. Conserve la Guía de inicio rápido en un lugar seguro para consultarla
en el futuro.
13

Configuración de la estación de administración
Instalación del software de administración.
3
4
Cableado del Firebox®X Peak
™
Interfaz de conanza
Estación de administración
Informationormation
Sobre una Red de área local
Con cable cruzado
1. Introduzca el CD- ROM de WatchGuard System
Manager. Si el asistente para la instalación no
aparece automáticamente, haga doble clic en
install.exe en el directorio raíz del CD-ROM.
2. Haga clic en "Download the later Software"
en la pantalla "Firebox X installation". Esto
iniciará su navegador Web y lo conecta al sitio
Web de WatchGuard. Si no tiene una conexión a
Internet, puede instalar directamente del CD-ROM,
pero su Firebox no funcionará hasta que active el
servicio LiveSecurity. Debe tener su clave de función
de Firebox obtenida de LiveSecurity para continuar.
3. Descargue el software de WatchGuard System
Manager. El tiempo de descarga variará en función
de su velocidad de conexión.
NOTA: Asegúrese de anotar el nombre y la ruta del
archivo al guardarlo en su disco duro.
4. Ejecute el archivo autoextraíble y siga las pantallas
hasta llegar a la que indica "Watchguard Firebox X
Set-up: Set-up Complete".
5. De manera predeterminada, el Asistente para la
configuración rápida (Quick Setup Wizard) se inicia
al terminar la instalación del software. Debe cablear
el Firebox antes de continuar con el Asistente para la
configuración rápida (Quick Setup Wizard).
6. Conecte el cable de alimentación en la entrada de
corriente del Firebox y en una fuente de alimentación.
Deje apagado (“off”) el interruptor de corriente hasta
que el Asistente para la configuración rápida (Quick
Setup Wizard) le pida que lo encienda (“on”).
Cable Ethernet cruzado
Cable Ethernet
Interfaz de conanza
Management Station
Figura 3 Figura 4
Cablee el Firebox X a su estación de administración de la siguiente forma. (Consulte las guras 3 y 4 que están debajo.)
Usted puede administrar el Firebox X Peak desde cualquier computadora en la que instale
el software WatchGuard System Manager. Requisitos mínimos del sistema: Microsoft®
Windows®2000/XP con Intel®Pentium®III 1 GHz o superior y 512 MB de RAM. Se
requiere un disco duro con 25 MB de espacio libre para instalar los módulos de Watch-
Guard, más un mínimo de 15 MB para los archivos de registro.
14

Internet
Interfaz de
confianza
Interfaz
opcional
Interfaz
externa
Ruteador
Internet
¡NO!
¡ADVERTENCIA!
Implementación del Firebox®X Peak
™
en su red
Uso del Asistente para la configuración rápida (Quick Setup Wizard)
Después de terminar de instalar la estación de administración y de cablear el Firebox X Peak, use el Asistente para la
conguración rápida con objeto de crear un archivo de conguración básica. Esto permite que el Firebox X Peak funcione
como un Firewall simple pero inmediatamente efectivo.
El Firebox X Peak puede usarse ahora como Firewall
básico con las propiedades siguientes:
■ Se permite todo el tráco TCP, UDP puerto 53 y ping de las
interfaces de conanza u opcionales a las interfaces externas.
■ Se bloquea todo el tráco de interfaces externas a las interfaces
de conanza u opcionales.
■ Se puede administrar desde la interfaz de conanza u opcional.
Implementación del Firebox X Peak en su red:
■ Coloque el Firebox en su ubicación permanente.
■ Conecte el Firebox X Peak a su red.
■ Asegúrese de que las computadoras protegidas por el Firebox
usen a éste como su puerta de enlace predeterminada (default
gateway).
No conecte las interfaces de Firebox entre sí,
por ejemplo, conectándolas al mismo
concentrador o switch. Esto se conoce como
“Configuración de lazo”.
Error de implementación en la red
Use la información que reunió en el paso 2 y la Clave de función del servicio LiveSecurity para completar el asistente. Tenga presente
lo siguiente:
Figura 5
5
■
Frases de contraseña
Las frases de contraseña diferencian entre minúsculas y
mayúsculas y deben ser de al menos ocho caracteres. Pueden
ser cualquier combinación de letras, números y caracteres
especiales. Usted creará dos frases de contraseña. La frase de
contraseña de estado (status passphrase) se usa para conexiones
de sólo lectura con el Firebox. La frase de contraseña
de conguración (conguration passphrase) se usa para conexiones
de lectura y escritura con el Firebox.
6
¡Importante!
El archivo de conguración creado con el Asistente
para la conguración rápida (Quick Setup Wizard) es una
conguración básica. Ahora debe crear un archivo de
conguración que satisfaga las necesidades de su política
de seguridad. Consulte la documentación del usuario.
Si no se ha iniciado todavía el Asistente para la conguración rápida (Quick Setup Wizard), inícielo desde el escritorio de Windows
seleccionando Inicio > Todos los programas > WatchGuard System Manager > Asistente para la configuración rápida
(Quick Setup Wizard).
■
Direcciones IP
Al introducir una dirección IP, escriba los digitos, puntos y diagonales
en secuencia. No use las teclas de Tabulación o Flechas para saltar
los puntos.
■
Redes secundarias
Ver la gura 2 para tener una descripción de las redes secundarias.
Usted puede introducir la dirección IP de su red secundaria
en la pantalla "add a Secondary IP address" del Asistente para
la conguración rápida (Quick Setup Wizard).
Cuando vea el cuadro de diálogo “The Firebox QuickSetup Wizard has completed sucessfully” en el Asistente para la conguración rápida
(Quick Setup Wizard), habrá terminado correctamente la instalación de su Firebox.
¡NO!
¡NO!
15

Usted ha instalado, congurado y puesto en actividad correctamente en su red su nuevo Firebox X Peak. ¿Y ahora qué? A
continuación hay algunas cosas que debe recordar como nuevo cliente.
¿Y ahora qué?
+1.206.613.0456
(todos los demás países)
www.watchguard.com/support
1.877.232.3531
(EE. UU. y Canadá)
Personalización de su política de seguridad
Se personaliza la seguridad de la red agregando políticas, ltros de capas de aplicación Ilamados proxys y ltros de paquetes, que
amplían o restringen lo que usted permite que entre o salga de su Firewall. Cada política tiene equilibrios entre la seguridad y
la accesibilidad de la red. Cuando selecciona políticas, equilibre las necesidades de su organización con el requisito de que los activos
de cómputo deben estar protegidos contra ataques. Algunas políticas comunes que las organizaciones suelen agregar son las siguientes:
■
HTTP (Web)
SMTP (correo electrónico)
DNS (Servicio de nombres de dominio)
FTP (Protocolo de transferencia de archivos)
■
■
■
Consulte la Guía de conguración de Fireware para ver una lista completa de los tipos de políticas que puede agregar. También puede
aprender más sobre cómo crear políticas personalizadas, prevención de intrusiones mediante Firewall y basada en rmas, y ltrado de
contenido de la Web.
Qué puede esperar de su servicio LiveSecurity®
Su Firebox X incluye una suscripción a nuestro galardonado servicio LiveSecurity®. Su suscripción:
✔
Proporciona protección de red actualizada con las más recientes actualizaciones de software.
Resuelve problemas con soporte técnico integral, y proporciona tutoriales paso a paso y Preguntas más frecuentes (P+F).
Reduce el tiempo de inactividad con alertas y sugerencias de conguración para combatir las más novedosas amenazas
y vulnerabilidades.
Desarrolla su experiencia profesional con recursos de capacitación interactiva detallada.
Lo mantiene preparado para las próximas amenazas de seguridad mediante editoriales y análisis de expertos de la industria.
Amplía la seguridad de su red con software empaquetado, utilidades y ofertas especiales.
✔
✔
✔
✔
✔
SOPORTE TÉCNICO
16

1
࡙ࠩฬ
ࡄࠬࡢ࠼
LiveSecurity Service
LiveSecurity® Service ߦ⊓㍳ߔࠆ
ߪߓߦ
ࡄ࠶ࠤࠫߩౝኈ
ࠦࡦ࠰࡞
ࠗࡦࠬ࠻࡞ߩᚻ㗅
LCD ࠺ࠖࠬࡊࠗ
ࡀ࠶࠻ࡢࠢࠕࠢ࠹ࠖࡆ࠹ࠖࡦࡊ࠽ࡆ࡚ࠥࠪࡦࡏ࠲ࡦ
ࡀ࠶࠻ࡢࠢࠗࡦ࠲ࡈࠚࠗࠬ
ା㗬ߐࠇߚࠗࡦ࠲ࡈࠚࠗࠬ
㔚Ḯࡦࡊ
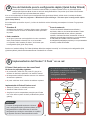
ⵝ⟎ࠍ↪ߔࠆߚߦߪޔຠߩ࡙ࠩ⊓㍳ࠍⴕޔേࠠࠍᚻߔࠆᔅⷐ߇ࠅ߹ߔޕ
1. ࡉ࠙ࠩߢ www.watchguard.com/activate ߦࠕࠢࠬߒ߹ߔޕ
2. ↹㕙ߩᜰ␜ߦᓥߞߡߊߛߐޕ
3. ⊓㍳ߔࠆຠߩേࠠࠍ࠳࠙ࡦࡠ࠼ߒߡߊߛߐޕ
✔ Firebox X Peak ⵝ⟎
✔ ࠢࠗ࠶ࠢࠬ࠲࠻ࠟࠗ࠼
✔ ࡙ࠩ࠼ࠠࡘࡔࡦ࠹࡚ࠪࡦ
✔ ࠬ࠻࠻ࠬ࡞ࠗࠨࡀ࠶࠻ࠤࡉ࡞ (✛)ޔ3 ᧄ
✔ ࠢࡠࠬࠝࡃࠗࠨࡀ࠶࠻ࠤࡉ࡞ (⿒)ޔ1 ᧄ
✔ ࠪࠕ࡞ࠤࡉ࡞ (㕍)ޔ1 ᧄ
✔ ขࠅઃߌ↪ࠠ࠶࠻
✔ WatchGuard System Manager CD-ROM
✔ ࠗࡦࠬࠠ⸽ᦠ
✔ LiveSecurity Service ⊓㍳ࠞ࠼
✔ ⸽ࠞ࠼
■ LiveSecurity® Service ߦ⊓㍳ߔࠆ
■ ࡀ࠶࠻ࡢࠢᖱႎࠍ㓸ߔࠆ
■ ▤ℂࠬ࠹࡚ࠪࡦࠍ࠶࠻ࠕ࠶ࡊߔࠆ
■ Firebox X Peak ߩࠤࡉ࡞ࠍធ⛯ߔࠆ
■ QuickSetup ࠙ࠖࠩ࠼ࠍ↪ߔࠆ
■ Firebox X Peak ࠍࡀ࠶࠻ࡢࠢߦ⚵ߺㄟ
Firebox X Peak ࠪࠕ࡞⇟ภ
(Firebox ⢛㕙ߩࡃࠦ࠼ߩਅߦࠅ߹ߔ)ޕ
Firebox ®X Peak™ ߪޔࡀ࠶࠻ࡢࠢ⼔ߦᤚ㕖ߣ߽߃ߚࠠࡘ࠹ࠖࠍឭଏߒ߹ߔޕቢోߦ
⛔วߐࠇߚⵝ⟎ߦߪޔࡄࡢࡈ࡞ߥᄙ㊀ࡀ࠶࠻ࡢࠢ㨯ࠠࡘ࠹ࠖߣࠊ߆ࠅ߿ߔ▤ℂᯏ⢻߇
ࠊࠅޔLiveSecurity®Service ߦࠃࠆᙣಾৼካߥࠨࡐ࠻߇ឭଏߐࠇ߹ߔޕߎߩࠢࠗ࠶ࠢࠬ࠲࠻
ࠟࠗ࠼ߪޔFirebox X Peak ߩೋᦼࠗࡦࠬ࠻࡞ߦߟߡ⺑ߒߡ߹ߔޕࡂ࠼࠙ࠚࠕߩ᭽
ߣ⸳ቯߩᣇᴺߦߟߡߪޔࡂ࠼࠙ࠚࠕࠟࠗ࠼߅ࠃ߮ WatchGuard® System Manager ࡙ࠩ
ࠟࠗ࠼ࠍෳᾖߒߡߊߛߐޕ
17

࠺ࡈࠜ࡞࠻ࠥ࠻࠙ࠚࠗ
ᄖㇱࠗࡦ࠲ࡈࠚࠗࠬ
ା㗬ߐࠇߚࠗࡦ࠲ࡈࠚࠗࠬ
ࠝࡊ࡚ࠪࡦߩࠗࡦ࠲ࡈࠚࠗࠬ
ࠗࡦࠬ࠻࡞ߩߚߩ▤ℂࠬ࠹࡚ࠪࡦ
ࡀ࠶࠻ࡢࠢᖱႎࠍ㓸ߔࠆ
2
ࠞࡦ࠳ࡀ࠶࠻ࡢࠢࠍ↪ߔࠆ (࿑ 2)
ା㗬ߐࠇߚࠗࡦ࠲ࡈࠚࠗࠬߦࠞࡦ࠳
ࡀ࠶࠻ࡢࠢࠍ↪ߔࠆߎߣ߇ߢ߈߹ߔޕࠞࡦ࠳
ࡀ࠶࠻ࡢࠢߪޔࠬࠗ࠶࠴߹ߚߪࡂࡉߢ
Firebox
ࠗࡦ࠲ࡈࠚࠗࠬߦធ⛯ߐࠇߚߩ⺰ℂࡀ࠶࠻ࡢ
ࠢߢߔޕ
ᵈᗧ: ࠞࡦ࠳ࡀ࠶࠻ࡢࠢߦ↪ߔࠆ IP ࠕ࠼ࠬߪޔ
ߘߩࡀ࠶࠻ࡢࠢߩࠦࡦࡇࡘ࠲ߩ࠺ࡈࠜ࡞࠻ࠥ࠻࠙ࠚ
ࠗߢߔޕ
Firebox ࠗࡦ࠲ࡈࠚࠗࠬ (࿑ 1)
ᄖㇱࠗࡦ࠲ࡈࠚࠗࠬ: ᄖㇱࡀ࠶࠻ࡢࠢ
(ㅢᏱߪࠗࡦ࠲ࡀ࠶࠻) ߦធ⛯ߒ߹ߔޕ
ା㗬ߐࠇߚࠗࡦ࠲ࡈࠚࠗࠬ: ࡊࠗࡌ࠻ VLAN
߹ߚߪౝㇱࡀ࠶࠻ࡢࠢߦធ⛯ߒ߹ߔޕ
ࠝࡊ࡚ࠪࡦߩࠗࡦ࠲ࡈࠚࠗࠬ: ࡄࡉ࠶ࠢ
ࠨࡃߩ⸳⟎႐ᚲߦ DMZ ࠍធ⛯ߒ߹ߔޕ
ㅊടߩା㗬ߐࠇߚ ID ࠕ࠼ࠬ
ࡀ࠶࠻ࡢࠢࠕ࠼ࠬ
࡙ࠩฬ
ࡄࠬࡢ࠼
㕒⊛ࠕ࠼ࠬ (ࠝࡊ࡚ࠪࡦ)
PPPoE ࠍ↪ߔࠆ႐วޔISP ߩឭଏߔࠆᄖㇱࠗࡦ࠲ࡈ
ࠚࠗࠬߩ PPPoE
ࡎࠬ࠻ID (ࠝࡊ࡚ࠪࡦ)
ା㗬ߐࠇߚࠗࡦ࠲ࡈࠚࠗࠬߩࠞࡦ࠳
ࡀ࠶࠻ࡢࠢ
DHCP ࡎࠬ࠻ฬ/ᄖㇱࠗࡦ࠲ࡈࠚࠗࠬߩ ID
ࠞࡦ࠳ࡀ࠶࠻ࡢࠢ
࿑ 2
10.10.10.254 (ࡊࠗࡑ)
172.16.1.10
172.16.1.15
172.16.1.20
ା㗬ߐࠇߚࠗࡦ࠲ࡈࠚࠗࠬ
ࡂࡉ/
ࠬࠗ࠶࠴
10.10.10.1
10.10.10.5
10.10.10.25
ࡊࠗࡑࡀ࠶࠻ࡢࠢ
ࠞࡦ࠳ࡀ࠶࠻ࡢࠢ
172.16.1.254 (ࠞࡦ࠳)
ᄖㇱ
ࡀ࠶࠻ࡢࠢߩ᭴ᚑ࿑
࡞࠲ (ࠝࡊ࡚ࠪࡦ)
HTTP
ࠨࡃ
SMTP
ࠨࡃ
FTP
ࠨࡃ
࿑ 1
ࠝࡊ࡚ࠪࡦ
10.10.10.35
ࠗࡦ࠲ࡀ࠶࠻
ਅߩࠍ↪ߒߡޔࡀ࠶࠻ࡢࠢᖱႎࠍ㓸ߒ߹ߔޕߎߩᖱႎߪޔᚻ㗅 5 ߣ 6 ߢ↪ߒ߹
ߔޕࠢࠗ࠶ࠢࠬ࠲࠻ࠟࠗ࠼ߪᓟߩෳ⠨ᢥ₂ߣߒߡޔోߥ႐ᚲߦ▤ߒߡߊߛߐޕ
ା㗬ߐࠇߚ
18

▤ℂࠬ࠹࡚ࠪࡦࠍ࠶࠻ࠕ࠶ࡊߔࠆ
▤ℂ࠰ࡈ࠻࠙ࠚࠕߩࠗࡦࠬ࠻࡞
3
4
Firebox®X Peak™ ߩࠤࡉ࡞ࠍធ⛯ߔࠆ
ା㗬ߐࠇߚࠗ
ࡦ࠲ࡈࠚࠗࠬ
▤ℂࠬ࠹࡚ࠪࡦ
Informationormation
ࡠࠞ࡞ࠛࠕࡀ࠶࠻ࡢࠢߩ႐ว
ࠢࡠࠬࠝࡃࠤࡉ࡞ߩ႐ว
1. WatchGuard System Manager CD-ROM ࠍᝌߒ߹ߔޕ
ࠗࡦࠬ࠻࡞࠙ࠖࠩ࠼߇⥄േ⊛ߦ㐿ᆎߒߥ႐
วߪޔCD-ROM ߩ࡞࠻࠺ࠖࠢ࠻ߦࠆ
install.exe ࠍ࠳ࡉ࡞ࠢ࠶ࠢߒ߹ߔޕ
2. [Firebox X ߩࠗࡦࠬ࠻࡞] ↹㕙ߩ [ᦨᣂ࠰ࡈ࠻࠙ࠚ
ࠕ] ࠍࠢ࠶ࠢߒ߹ߔޕ࠙ࠚࡉࡉ࠙ࠩ߇േߒޔ
WatchGuard ߩࠨࠗ࠻ߦធ⛯ߒ߹ߔޕࠗࡦ࠲ࡀ࠶࠻
ߦࠕࠢࠬߢ߈ߥ႐วߪޔCD-ROM ߆ࠄ⋥ធࠗࡦ
ࠬ࠻࡞ߔࠆߎߣ߽ߢ߈߹ߔ߇ޔLiveSecurity Service
߳ߩ⊓㍳߇ᷣ߹ߢ Firebox ߪᯏ⢻ߒ߹ߖࠎޕ⛯ⴕߔ
ࠆߦߪޔLiveSecurity ߆ࠄ Firebox േࠠࠍขᓧߒ
ߥߌࠇ߫ߥࠅ߹ߖࠎޕ
3. WatchGuard System Manager ࠰ࡈ࠻࠙ࠚࠕࠍ࠳࠙ࡦ
ࡠ࠼ߒ߹ߔޕ࠳࠙ࡦࡠ࠼ߦⷐߔࠆᤨ㑆ߪޔធ⛯
ࠬࡇ࠼ߦࠃߞߡ⇣ߥࠅ߹ߔޕ
ᵈᗧ: ࠳࠙ࡦࡠ࠼ߒߚࡈࠔࠗ࡞ࠍ࠼ࠗࡉߦሽߔ
ࠆ㓙ߦߪޔࡈࠔࠗ࡞ฬߣࡄࠬࠍᦠ߈⇐ߡ߅ߊࠃ߁
ߦߒߡߊߛߐޕ
4. ⥄േ⸃ಓࡈࠔࠗ࡞ࠍታⴕߒޔ[WatchGuard Firebox
X ߩ࠶࠻ࠕ࠶ࡊ: ࠶࠻ࠕ࠶ࡊߩቢੌ] ↹㕙߇
␜ߐࠇࠆ߹ߢޔ↹㕙ߩᜰ␜ߦᓥ߹ߔޕ
5. ࠰ࡈ࠻࠙ࠚࠕߩࠗࡦࠬ࠻࡞ߩᦨᓟߦ Quick Setup
࠙ࠖࠩ࠼߇േߒ߹ߔޕQuick Setup ࠙ࠖࠩ࠼
ࠍ⛯ߌࠆ೨ߦޔFirebox ߩࠤࡉ࡞ࠍធ⛯ߒߡ߅
ߡߊߛߐޕ
6. 㔚Ḯࠦ࠼ࠍ Firebox ߣࠦࡦࡦ࠻ߦធ⛯ߒ߹ߔޕ
Quick Setup ࠙ࠖࠩ࠼ߩᜰ␜߇ࠆ߹ߢޔ㔚Ḯ
ߪࠇߥߢߊߛߐޕ
ࠢࡠࠬࠝࡃࠗࠨࡀ࠶࠻ࠤࡉ࡞ ࠗࠨࡀ࠶࠻ࠤࡉ࡞
ା㗬ߐࠇߚࠗ
ࡦ࠲ࡈࠚࠗࠬ
▤ℂࠬ࠹࡚ࠪࡦ
࿑ 3 ࿑ 4
ᰴߩⷐ㗔ߢޔFirebox X ࠍ▤ℂࠬ࠹࡚ࠪࡦߦធ⛯ߒ߹ߔޕ(ਅߩ࿑ 3 ߣ࿑ 4 ࠍෳᾖߒߡߊߛߐ)ޕ
Firebox X Peak ߪ WatchGuard System Manager ࠰ࡈ࠻࠙ࠚࠕ߇ࠗࡦࠬ࠻࡞ߐࠇߚޔߤ
ߩࠦࡦࡇࡘ࠲߆ࠄߢ߽▤ℂߔࠆߎߣ߇ߢ߈߹ߔޕ
ࠪࠬ࠹ࡓߩᦨૐᔅⷐ᧦ઙIntel®Pentium®III 1 GHz એߩࡊࡠ࠶ࠨޔ512 MB RAMޔ
Microsoft®Windows®2000/XP ߇ᔅⷐߢߔޕWatchGuard ࡕࠫࡘ࡞ߩࠗࡦࠬ࠻࡞ߦ
25MBޔࡠࠣࡈࠔࠗ࡞ߦዋߥߊߣ߽ 15MB ߩࡂ࠼࠺ࠖࠬࠢⓨ߈㗔ၞ߇ᔅⷐߢߔޕ
19

Internet
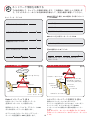
Network Deployment Error
߃߫ޔFirebox ࠗࡦ࠲ࡈࠚࠗࠬࠍหߓࡂࡉ
߿ࠬࠗ࠶࠴ߦធ⛯ߔࠆߣޟ࡞ࡊ᭴ᚑޠߦߥࠆ
ߚޔFirebox ࠗࡦ࠲ࡈࠚࠗࠬࠍߦធ⛯
ߒߥߢߊߛߐޕ
ା㗬ߐࠇߚ
ࠗࡦ࠲
ࡈࠚࠗࠬ
ࠝࡊ࡚ࠪ
ࡦߩࠗࡦ
࠲ࡈࠚ
ࠗࠬ
ᄖㇱࠗࡦ࠲ࡈࠚࠗࠬ
࡞࠲
ࠗࡦ࠲ࡀ࠶࠻
ࠛ ࠛ
⼊๔
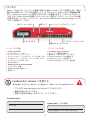
Firebox® X Peak ࠍࡀ࠶࠻ࡢࠢߦ⚵ߺㄟ
QuickSetup ࠙ࠖࠩ࠼ࠍ↪ߔࠆ
▤ℂࠬ࠹࡚ࠪࡦߩ࠶࠻ࠕ࠶ࡊߣ Firebox X Peak ߩࠤࡉ࡞ߩធ⛯߇⚳ੌߒߚࠄޔQuickSetup
࠙ࠖࠩ࠼ࠍ↪ߒߡޔၮᧄ⸳ቯࡈࠔࠗ࡞ࠍᚑߒ߹ߔޕߎߩᚻ㗅ߦࠃࠅޔFirebox X Peak ߪࠪࡦࡊ࡞
߆ߟലᨐ⊛ߥࡈࠔࠗࠕ࠙ࠜ࡞ߣߒߡ⋥ߜߦᯏ⢻ߒ߹ߔޕ
Firebox X Peak ߪޔએਅߩࡊࡠࡄ࠹ࠖ⸳ቯࠍ↪ߒၮ
ᧄࡈࠔࠗࠕ࠙ࠜ࡞ߣߒߡ↪ߔࠆߎߣ߇ߢ߈߹ߔޕ
ࡀ࠶࠻ࡢࠢ߳ߩዉࠛ
ᚻ㗅 2 ߢ㓸ߒߚᖱႎࠍ↪ߒޔLiveSecurity Service ߆ࠄേࠠࠍขᓧߒߡ࠙ࠖࠩ࠼ࠍቢੌߒ߹ߔޕએਅߩὐ
ߦ⇐ᗧߒߡߊߛߐޕ
࿑ 5
5
■
ࡄࠬࡈ࠭
ࡄࠬࡈ࠭ߪࠕ࡞ࡈࠔࡌ࠶࠻ߩᄢዊᢥሼࠍߒޔ
8 ᢥሼએߢߥߌࠇ߫ߥࠅ߹ߖࠎޕࠄࠁࠆᢥሼޔ
ᢙሼޔ․ᱶᢥሼࠍ⚵ߺวࠊߖࠆߎߣ߇ߢ߈߹ߔޕ2
ߟߩࡄࠬࡈ࠭ࠍᚑߒ߹ߔޕࠬ࠹࠲ࠬࡄࠬ
ࡈ࠭ߪޔFirebox ߳ߩ⺒ߺขࠅኾ↪ធ⛯ߦ↪ߐ
ࠇ߹ߔޕ⸳ቯࡄࠬࡈ࠭ߪޔFirebox ߳ߩ⺒ߺขࠅ
ߣᦠ߈ㄟߺߩធ⛯ߦ↪ߐࠇ߹ߔޕ
6
㊀ⷐ㗄:
QuickSetup ࠙ࠖࠩ࠼ߢᚑߐࠇߚ⸳ቯࡈ
ࠔࠗ࡞ߪၮᧄ⸳ቯߢߔߩߢޔࠠࡘ࠹ࠖ
ࡐࠪߩ࠾࠭ߦᔕߓߚ⸳ቯࡈࠔࠗ࡞ࠍᚑߒ
ߡߊߛߐޕߒߊߪޔ࡙ࠩ࠼ࠠࡘࡔࡦ࠹
࡚ࠪࡦࠍෳᾖߒߡߊߛߐޕ
■ ߔߴߡߩ TCPޔUDP ࡐ࠻ 53ޔ߅ࠃ߮ ping ࠻ࡈࠖ࠶ࠢ
ߪޔା㗬ߐࠇߚࠗࡦ࠲ࡈࠚࠗࠬ߹ߚߪࠝࡊ࡚ࠪࡦߩࠗࡦ
࠲ࡈࠚࠗࠬ߆ࠄޔᄖㇱࠗࡦ࠲ࡈࠚࠗࠬߦㅍାߐࠇࠆ
႐วߦ⸵นߐࠇ߹ߔޕ
■
ᄖㇱࠗࡦ࠲ࡈࠚࠗࠬ߆ࠄା㗬ߐࠇߚࠗࡦ࠲ࡈࠚࠗ
ࠬ߹ߚߪࠝࡊ࡚ࠪࡦߩࠗࡦ࠲ࡈࠚࠗࠬߦㅍାߐࠇࠆߔ
ߴߡߩ࠻ࡈࠖ࠶ࠢߪޔᜎุߐࠇ߹ߔޕ
■
ା㗬ߐࠇߚࠗࡦ࠲ࡈࠚࠗࠬ߹ߚߪࠝࡊ࡚ࠪࡦߩࠗࡦ࠲
ࡈࠚࠗࠬ߆ࠄ▤ℂߢ߈߹ߔޕ
Firebox X Peak ࠍࡀ࠶࠻ࡢࠢߦ⚵ߺㄟ:
Firebox ࠍ࠺ࡈࠜ࡞࠻ࠥ࠻࠙ࠚࠗߦ⸳ቯߒޔࠦࡦࡇࡘ
࠲ࠍ⼔ߒߡߊߛߐޕ
■
Firebox ࠍ⸳⟎႐ᚲߦขࠅઃߌ߹ߔޕ
■
Firebox ࠍࡀ࠶࠻ࡢࠢߦធ⛯ߒ߹ߔޕ
■
QuickSetup ࠙ࠖࠩ࠼߇㐿ᆎߒߡߥߌࠇ߫ޔWindows ࠺ࠬࠢ࠻࠶ࡊߩ [ࠬ࠲࠻] ࡔ࠾ࡘߩ [ࡊࡠࠣࡓ] ࠍ
ࡐࠗࡦ࠻ߒޔ[WatchGuard System Manager] ࠍࡐࠗࡦ࠻ߒߡ [QuickSetup ࠙ࠖࠩ࠼] ࠍࠢ࠶ࠢߒ߹ߔޕ
■
IP ࠕ࠼ࠬߩഀࠅᒰߡ
IP ࠕ࠼ࠬࠍജߔࠆ㓙ߦߪޔᢙሼޔࡇࠝ࠼ 㧔.㧕ޔ
ᢳ✢ (/) ߩ㗅ߦ࠲ࠗࡊߒߡߊߛߐޕࡇࠝ࠼߆ࠄᰴߩ
ࡇࠝ࠼ߦ⒖േߔࠆ႐วޔTab ࠠ߹ߚߪ⍫ශࠠࠍ↪
ߒߥߢߊߛߐޕ
■
ࠞࡦ࠳ࡀ࠶࠻ࡢࠢ
ࠞࡦ࠳ࡀ࠶࠻ࡢࠢߦߟߡߩ⺑ߪޔ࿑ 2 ࠍෳ
ᾖߒߡߊߛߐޕQuickSetup ࠙ࠖࠩ࠼ߩ [ࠞࡦ࠳
IP ࠕ࠼ࠬߩㅊട] ↹㕙ߢޔࠞࡦ࠳ࡀ࠶࠻ࡢࠢ
ߩ IP ࠕ࠼ࠬࠍജߔࠆߎߣ߇ߢ߈߹ߔޕ
Firebox QuickSetup ࠙ࠖࠩ࠼ߩ [Firebox QuickSetup ࠙ࠖࠩ࠼߇ቢੌߒ߹ߒߚ] ࠳ࠗࠕࡠࠣࡏ࠶ࠢࠬ߇␜ߐࠇࠆߣޔ
Firebox ߩࠗࡦࠬ࠻࡞߇ቢੌߒߚߎߣߦߥࠅ߹ߔޕ
ࠛ
20
Seite wird geladen ...
Seite wird geladen ...
Seite wird geladen ...
Seite wird geladen ...
Seite wird geladen ...
Seite wird geladen ...
Seite wird geladen ...
Seite wird geladen ...
Seite wird geladen ...
Seite wird geladen ...
Seite wird geladen ...
Seite wird geladen ...
-
 1
1
-
 2
2
-
 3
3
-
 4
4
-
 5
5
-
 6
6
-
 7
7
-
 8
8
-
 9
9
-
 10
10
-
 11
11
-
 12
12
-
 13
13
-
 14
14
-
 15
15
-
 16
16
-
 17
17
-
 18
18
-
 19
19
-
 20
20
-
 21
21
-
 22
22
-
 23
23
-
 24
24
-
 25
25
-
 26
26
-
 27
27
-
 28
28
-
 29
29
-
 30
30
-
 31
31
-
 32
32


