TFA 38.2015 Bedienungsanleitung
- Kategorie
- Sportuhren
- Typ
- Bedienungsanleitung
Dieses Handbuch eignet sich auch für

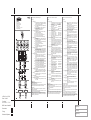
2.1
1.0
2.0
3.1 3.2
3.3
3.4
3.0
4.0
5.1
5.0
6.0
MONTH - DATE DATE - MONTH
9.0
A
B
C
2.2 2.3 2.4
5.2
5.3
5.5
5.4
5.6
12 hour 24 hour
R
GOLD
Kat.-Nr. 38.2015
Bedienungsanleitung
Operating Instructions
Mode d’emploi
Istruzioni per l’uso
Instrucciones para el manejo
Gebruiksaanwijzing
Mode d’emploi HiTRAX GOLD Chronomètre
Operation:
1.0 Réglage
1.1 Affichage normal: heure, minute, seconde, jour de la
semaine.
(1=lundi, 2 = mardi, 3=mercredi, 4=jeudi, 5=vendredi,
6=samedi, S=dimanche)
1.2 Maintenir la touche A appuyée: affichage du mois,
de la date et du jour de la semaine
1.3 Maintenir la touche B appuyée: affichage de l’heure
de l’alarme en heures et en minutes
1.4 Appuyer sur la touche C 1 fois: passer de l’affichage
normal en mode chronographe
2.0 Alarme et signal des heures marche/arrêt
2.1 Affichage normal: maintenir la touche B appuyée,
appuyer sur la touche A 1 fois: signal des heures
marche
2.2 Appuyer sur la touche A encore 1 fois: alarme marche
2.3 Appuyer sur la touche A encore 1fois: signal des
heures arrêt
2.4 Appuyer sur la touche A encore 1 fois: alarme arrêt
2.5 Relâcher la touche B: revenir en affichage normal
3.0 Mode chronographe
3.1 Affichage normal: appuyer sur la touche C 1 fois,
passer en mode chronographe
3.2 Appuyer sur la touche A: fonction marche/arrêt. Le
comptage s’effectue en 1/100 secondes.
3.3 Appuyer sur la touche B pendant le comptage: prendre
le temps intermédiaire, le chronographe continue de
compter
3.4 Appuyer sur la touche B encore 1 fois: passer en
affichage chronographe
3.5 Appuyer sur la touche A: terminer le comptage,
appuyer sur la touche B: remise à zéro de l’affichage
4.0 Réglage de l’heure de l’alarme
4.1 Affichage normal: maintenir la touche C appuyée
pendant 3 sec., "Lundi" et l’affichage des heures
clignote. Régler avec la touche B l’heure souhaitée.
4.2 Appuyer sur la touche A 1 fois: "Lundi" et l’affichage
des minutes clignote. Avec la touche B, régler les
minutes souhaitées.
4.3 Appuyer sur la touche C: passer en affichage normal
5.0 Réglage de l’heure
5.1 Affichage normal: maintenir la touche C appuyée
d’abord pendant 3 sec., puis appuyer 1 fois. "Mardi"
et l’affichage des secondes clignote. Avec la touche
B, régler sur zéro.
5.2 Appuyer sur la touche A 1 fois: l’affichage des minutes
clignote. Avec la touche B, régler les minutes
souhaitées.
5.3 Appuyer sur la touche A 1fois: l’affichage des heures
clignote. Avec la touche B, régler l’heure souhaitée.
5.4 Appuyer sur la touche A 1 fois: l’affichage du mois
clignote. Avec la touche B, régler le mois souhaité.
5.5 Appuyer sur la touche A 1fois: l’affichage de la date
clignote. Avec la touche B, régler la date souhaitée.
5.6 Appuyer sur la touche A 1fois: l’affichage du jour de
la semaine clignote. Avec la touche B, régler le jour
de la semaine souhaité.
5.7 Appuyer sur la touche C: passer en affichage normal
6.0 Système 12/24 heures
6.1 Affichage normal: maintenir la touche B appuyée,
appuyer sur la touche C 1 fois: A ou P s’affiche ou
disparaît sur l’écran.
6.2 Pour le système 12 heures: sélectionner A ou P.
7.0 Test d’alarme
7.1 Affichage normal: maintenir les touches B et A
appuyces en même temps: l’alarme sonne.
8.0 Débrancher l’alarme
8.1 Affichage normal: appuyer sur la touche B: l’alarme
s’arrête.
9.0 Changer l’affichage mois/date
9.1 Affichage normal: maintenir la touche A appuyée,
puis appuyer sur la touche B 1 fois.
Changement de batterie :
Batterie: 1 x CR 2032
Veuillez contacter un magasin spécialisé pour échanger la batterie.
Ne jetez pas les piles usagées à la poubelle. Déposez-les dans les
lieux de collecte prévus à cet effet.
Entretien:
Evitez d’exposer l’appareil à des températures extrêmes, vibrations
ou chocs.
Pour le nettoyage du display et du boîtier, utilisez un chiffon doux
humide. N’utilisez pas de dissolvants ou d´agents abrasifs
N’effectuez en aucun cas des réparations par vos propres moyens.
Rapportez l’appareil au point de vente. Avant tout réclamation, veuillez
faire échanger la pile. Nous déclinons toute responsabilité en cas de
manipulation incompétente ou d´ouverture de l´appareil.
Bedienungsanleitung HiTRAX GOLD Stoppuhr
Bedienung
1.0 Normalmodus
1.1 Normalanzeige: Stunde, Minute, Sekunde, Wochentag.
(1=Montag, 2 = Dienstag, 3=Mittwoch, 4=Donnerstag,
5=Freitag, 6=Samstag, S=Sonntag)
1.2 Taste A gedrückt halten: Anzeige von Monat, Datum
und Wochentag
1.3 Taste B gedrückt halten: Anzeige der Alarmzeit in
Stunden und Minuten
1.4 Taste C 1 x drücken: Wechsel zwischen
Normalanzeige und Stoppuhrmodus
2.0 Alarm und Stundensignal an/aus
2.1 Normalanzeige: Taste B gedrückt halten, Taste A 1
x drücken: Stundensignal an
2.2 Taste A noch 1 x drücken: Alarm an
2.3 Taste A noch 1 x drücken: Stundensignal aus
2.4 Taste A noch 1 x drücken: Alarm aus
2.5 Taste B loslassen: Wechsel auf Normalanzeige
3.0 Stoppuhrmodus
3.1 Normalanzeige: Taste C 1 x drücken, Wechsel in den
Stoppuhrmodus
3.2 Taste A drücken: Start/Stopp-Funktion. Die Zählung
erfolgt in 1/100 Sekunden.
3.3 Taste B während der Zählung drücken: Zwischenzeit
nehmen, Stoppuhr zählt weiter
3.4 Taste B noch 1 x drücken: Wechsel auf
Stoppuhranzeige
3.5 Taste A drücken: Zählung beenden, Taste B drücken:
Zurückstellen der Anzeige auf Null
4.0 Einstellen der Alarmzeit
4.1 Normalanzeige: Taste C 3 sec. lang gedrückt halten,
"Montag" und Stundenanzeige blinkt. Mit Taste B die
gewünschte Stunde einstellen.
4.2 Taste A 1 x drücken: "Montag" und Minutenanzeige
blinkt. Mit Taste B die gewünschten Minuten einstellen.
4.3 Taste C drücken: Wechsel auf Normalanzeige
5.0 Einstellen der Uhrzeit
5.1 Normalanzeige: Taste C erst 3 sec. lang gedrückt
halten, dann 1 x drücken. "Dienstag" und
Sekundenanzeige blinkt. Mit der Taste B auf Null
stellen.
5.2 Taste A 1 x drücken: Die Minutenanzeige blinkt. Mit
Taste B die gewünschten Minuten einstellen.
5.3 Taste A 1 x drücken: Die Stundenanzeige blinkt. Mit
Taste B die gewünschte Stunde einstellen.
5.4 Taste A 1 x drücken: Die Monatsanzeige blinkt. Mit
Taste B den gewünschten Monat einstellen.
5.5 Taste A 1 x drücken: Die Datumsanzeige blinkt. Mit
Taste B das gewünschte Datum einstellen.
5.6 Taste A 1 x drücken: Die Wochentagsanzeige blinkt.
Mit Taste B den gewünschten Wochentag einstellen.
5.7 Taste C drücken: Wechsel auf Normalanzeige
6.0 12/24-Stunden-Zeitsystem
6.1 Normalanzeige: Taste B gedrückt halten, Taste C 1
x drücken: A bzw. P erscheint oder verschwindet auf
dem Display.
6.2 Für das 12-Stunden-System: A bzw. P auswählen.
7.0 Alarmtest
7.1 Normalanzeige: Taste B und A gleichzeitig gedrückt
halten: der Alarm ertönt.
8.0 Alarm ausschalten
8.1 Normalanzeige: Taste B drücken: der Alarm hört auf.
9.0 Monat/Datum Anzeigewechsel
9.1 Normalanzeige: Taste A gedrückt halten, dann Taste
B 1 x drücken.
Batteriewechsel:
Batterie: 1 x CR 2032
Bitte lassen Sie den Batteriewechsel von einem
Fachgeschäft durchführen.
Verbrauchte Batterien gehören nicht in den Hausmüll. Geben Sie diese
bitte bei entsprechenden Sammelstellen oder im Handel ab.
Instandhaltung:
Setzen Sie das Gerät keinen extremen Temperaturen, Vibrationen
und Erschütterungen aus.
Reinigen Sie das Gerät mit einem weichen, leicht feuchten Tuch. Keine
Scheuer- oder Lösungsmittel verwenden!
Bitte unternehmen Sie keine eigenen Reparaturversuche. Bei
Reklamationen wenden Sie sich an Ihren Händler. Vor der Reklamation
bitte Batterie austauschen lassen. Bei Öffnung oder unsachgemäßer
Behandlung erlischt die Garantie.
Operating Instructions HiTRAX GOLD Stopwatch
Operation:
1.0 Control of watch
1.1 Normal display shows hour, minute, second and day
of week (1=Monday, 2 = Tuesday, 3=Wednesday,
4=Thursday, 5=Friday, 6=Saturday, S=Sunday)
1.2 Hold A-Button: Display shows
month, date and day of week
1.3 Hold B-Button: Display shows
alarm time in hour and minute
1.4 Push C-Button once: Change between
Normal Display and Chronograph Mode
2.0 Alarm and Chime On/Off
2.1 In Normal Display hold B-Button, and push A-Button
once: Chime will be on
2.2 Push A-Button once again: Alarm will be on
2.3 Push A-Button once again: Chime will be off
2.4 Push A-Button once again: Alarm will be off
2.5 Release B-Button, the display changes to Normal
Display immediately.
3.0 Chronograph Mode
3.1 In Normal Display push C-Button once, chronograph
function will be set.
3.2 Start/Stop: Push A-Button to start/stop counting. It
operates in cumulative counting up to 1/100 second.
3.3 Lap Time: While in counting, push B-Button once, the
Lap Time will be display. The chronograph keeps
counting. Push B-Button once again to return to
counting display.
3.4 Reset: Push A-Button to stop counting and then push
B-Button to reset the digits to zero.
4.0 Alarm Time Setting
4.1 In Normal Display, hold C-Button for more three
seconds. Monday flag and hour digits will flash. Hour
digits advance through depression of B-Button.
4.2 Push A-Button once: Monday flag and Minute digits
of the alarm time will flash. Minute digits advance as
above.
4.3 If push of C-Button during any changing time, Normal
Display will be appeared.
5.0 Normal Time Setting
5.1 In Normal Display, hold C-Button for more three
seconds and then push C-Button once. Tuesday flag
and second digits will flash. Push B-Button once to
reset the second to zero.
5.2 Push of A-Button once:
Minute digits flash and advance by depression of B-
Button.
5.3 Push of A-Button once again: Hour digits flash
and advance as above.
5.4 Push of A-Button once again: Month digits flash
and advance as above.
5.5 Push of A-Button once again: Date digits flash
and advance as above.
5.6 Push of A-Button once again: Flag of weekday
flash and advance as above.
5.7 If push of C-Button during any changing time, Normal
Display will be appeared.
6.0 12/24 Hours Reversal Option
6.1 In Normal Display, hold B-Button and then Push C-
Button once. A or P mark will be appeared or
disappeared.
6.2 12 hours mode, A or P will be present on the display.
7.0 Alarm Test
7.1 In Normal Display, hold B-Button and A-Button
together, the alarm will “Beep” and alarm sounded.
8.0 Alarm Sound Off
8.1 For “Beep, Beep” alarm sounded, push B-Button to
stop the “Beep”
9.0 Month/Date Position Interchange
9.1 In Normal Display hold A-Button and then push B-
Button once.
Battery change:
Batterie: 1 x CR 2032
Please contact a specialized dealer for battery change. Thereby the
sealing ring must not be damaged.
Do not dispose of empty batteries in household waste. Take them to
special local collection sites.
Maintenance:
Do not expose the instrument to extreme temperatures, vibration or
shock
Clean it with a soft damp cloth. Do not use solvents or scouring agents.
Please do not try to repair the unit. Contact the original point of
purchase. Please let change the battery before complaining. No
guarantee if the instrument is handled or opened improperly.
APN ref. no: A35016
Date: 19-08-03
Vendor ref:
no. of color: 1C+1C
B&W artwork attached:
Presentation
Testing
Production/Shipment
Prepared by:
Verified by:
Approved by:

Instrucciones para el manejo HiTRAX GOLD cronómetro
Manejo:
1.0 Manejo
1.1 Indicación normal: hora, minuto, segundo, día de la
semana (1= lunes, 2= martes, 3=miércoles, 4=jueves,
5=viernes, 6=sábado, S=domingo).
1.2 Mantener pulsada la tecla A: indicación del mes,
fecha y día de la semana
1.3 Mantener pulsada la tecla B: indicación del horario
de alarma en segundos
1.4 Pulsar 1 vez la tecla C 1: cambio entre indicación
normal y modo de cronómetro
2.0 Alarma y señal de hora conectada/desconectada
2.1 Indicación normal: mantener pulsada la tecla B, Pulsar
1 vez la tecla A: señal de hora conectada
2.2 Pulsar una vez más la tecla A: alarma conectada
2.3 Pulsar una vez más la tecla A: señal de hora
desconectada
2.4 Pulsar una vez más la tecla A: alarma desconectada
2.5 Soltar tecla B: cambio a indicación normal
3.0 Modo de cronómetro
3.1 Indicación normal: pulsar una vez la tecla C 1, cambio
al modo de cronómetro
3.2 Pulsar tecla A: función de arranque/stop. El conteo
se efectúa en 1/100 segundos.
3.3 Pulsar tecla B durante el conteo: tomar tiempo
intermedio, el cronómetro continúa contando
3.4 Pulsar una vez más la tecla B: cambio a indicación
de cronómetro
3.5 Pulsar tecla A: Conteo terminado, pulsar tecla B:
poner el indicador a cero
4.0 Regulación del horario de alarma
4.1 Indicación normal: mantener pulsada la tecla C durante
3 seg., "lunes" y la indicación de las horas parpadea.
Regular con la tecla B la hora deseada.
4.2 Pulsar una vez la tecla A 1: "lunes" y la indicación de
minutos parpadea. Regular los minutos deseados
con la tecla B.
4.3 Pulsar la tecla C: cambio a la indicación normal
5.0 Regulación del horario
5.1 Indicación normal: mantener primero pulsada la tecla
C durante 3 segundos, seguidamente pulsar 1 vez.
"martes" y la indicación de segundos parpadea.
Colocar a cero con la tecla B.
5.2 Pulsar una vez la tecla A: la indicación de minutos
parpadea. Regular los minutos deseados con la tecla
B.
5.3 Pulsar una vez la tecla A: la indicación de las horas
parpadea. Regular la hora deseada con la tecla B.
5.4 Pulsar una vez la tecla A: la indicación del mes hace
intermitencia. Regular el mes deseado con la tecla
B.
5.5 Pulsar una vez la tecla A: la indicación de la fecha
parpadea. Regular la fecha deseada con la tecla B.
5.6 Pulsar una vez la tecla A: la indicación del día de la
semana parpadea. Regular con la tecla B el día de
la semana deseada.
5.7 Pulsar la tecla C: cambio a indicación normal
6.0 12/24 sistema de horario de horas
6.1 Indicación normal: mantener pulsada la tecla B, pulsar
una vez la tecla C: A, si bien, P aparece o desaparece
en el display.
6.2 Seleccionar para el sistema de 12 horas: seleccionar
A, si bien, P.
7.0 Test de alarma
7.1 Indicación normal: mantener pulsadas al mismo
tiempo las teclas B y A: el alarma suena.
8.0 Desconectar alarma
8.1 Indicación normal: pulsar tecla B: el alarma finaliza.
9.0 Mes/fecha cambio de indicación
9.1 Indicación normal: mantener pulsada la tecla A,
seguidamente pulsar una vez la tecla B.
Cambio de pila:
Batteria: 1 x CR 2032
Por favor, encargue cambiar la pila siempre a un establecimiento
especializado.
Las pilas agotadas no deben verterse en la basura doméstica.
Sírvase entregarla en los centros de recogida o bien en el comercio
especializado.
Conservación:
No exponga el aparato a temperaturas, vibraciones y sacudidas
extremas.
Limpie el aparato con un trapo suave, ligeramente humectado. ¡No
utilizar ningún medio abrasivo o disolvente!
Por favor, no emprenda ningún intento propio de reparaciones. En
caso de reclamaciones diríjase a su comerciante. Antes de la
reclamación, por favor, encargue cambiar la pila. En caso de abertura
o trato inadecuado expirará la garantía.
Gebruiksaanwijzing HiTRAX GOLD stopwatch
Bediening
1.0 Bediening
1.1 Normale aanwijzing: uur, minuut, seconde, weekdag.
(1=maandag, 2=dinsdag, 3=woensdag, 4=donderdag,
5=vrijdag, 6=zaterdag, S=zondag)
1.2 Toets A ingedrukt houden: aanwijzing van maand,
datum en weekdag
1.3 Toets B ingedrukt houden: aanwijzing van de alarmtijd
in uren en minuten
1.4 Toets C 1 x indrukken: wisseling tussen normale
aanwijzing en stopwatchmodus
2.0 Alarm en uursignaal aan/uit
2.1 Normale aanwijzing: Toets B ingedrukt houden, op
toets A 1 x drukken: uursignaal aan
2.2 Nog 1 x op toets A drukken: alarm aan
2.3 Nog 1 x op toets A drukken: uursignaal uit
2.4 Nog 1 x op toets A drukken: alarm uit
2.5 Toets B los laten: Wisseling naar normale aanwijzing
3.0 Stopwatchmodus
3.1 Normale aanwijzing: Op toets C 1 x drukken, wisseling
naar de stopwatchmodus
3.2 Op toets A drukken: start/stop-functie. De telling
verloopt in 1/100 seconden
3.3 Tijdens de telling op toets B drukken: tussentijd nemen,
stopwatch telt door
3.4 Nog 1 x op toets B drukken: Wisseling naar
stopwatchaanwijzing
3.5 Op toets A drukken: telling beëindigen, op toets B
drukken: terugzetten van de aanwijzing op nul
4.0 Instellen van de alarmtijd
4.1 Normale aanwijzing: Toets C 3 sec. lang ingedrukt
houden, "Maandag" en uuraanwijzing knippert. Met
toets B het gewenste uur instellen.
4.2 1 x op toets A drukken: "Maandag" en
minuutaanwijzing knippert. Met toets B de gewenste
minuten instellen.
4.3 Op toets C drukken: Wisseling naar normale
aanwijzing
5.0 Instellen van de tijd
5.1 Normale aanwijzing: Eerst 3 sec. lang op toets C
drukken, dan 1 x drukken. "Dinsdag" en seconde-
aanwijzing knippert. Met de toets B op nul zetten.
5.2 1 x op toets A drukken: De minuutaanwijzing knippert.
Met toets B de gewenste minuten instellen.
5.3 1 x op toets A drukken: De uuraanwijzing knippert.
Met toets B het gewenste uur instellen.
5.4 1 x op toets A drukken: De maandaanwijzing knippert.
Met toets B de gewenste maand instellen.
5.5 1 x op toets A drukken: De datumaanwijzing knippert.
Met toets B de gewenste datum instellen.
5.6 1 x op toets A drukken: De weekdagaanwijzing
knippert. Met toets B de gewenste weekdag instellen.
5.7 Op toets C drukken: Wisseling naar normale
aanwijzing
6.0 12/24-uur-tijdsysteem
6.1 Normale aanwijzing: Toets B ingedrukt houden, 1 x
op toets C drukken: A resp. P verschijnt of verdwijnt
op de display.
6.2 Voor het 12-uur-systeem: A resp. P uitkiezen.
7.0 Alarmtest
7.1 Normale aanwijzing: Toets B en A tegelijkertijd
ingedrukt houden: het alarm weerklinkt.
8.0 Alarm uitschakelen
8.1 Normale aanwijzing: Op toets B drukken: het alarm
houdt op.
9.0 Maand/datum positieverandering
9.1 Normale aanwijzing: Toets A ingedrukt houden, dan
1 x op toets B drukken.
Batterijvervanging
Batterij: 1 x CR 2032
Laat de batterij a.u.b. door een gespecialiseerde zaak vervangen
Lege batterijen horen niet bij het huisvuil. Geef deze a.u.b. bij bevoegde
verzamelplaatsen of bij de winkel af.
Instandhouding:
Stel het apparaat niet aan extreme temperaturen, trillingen en schokken
bloot.
Maak het apparaat met een zachte, enigszins vochtige doek schoon.
Geen schuur- of oplosmiddelen gebruiken!
Voer geen eigen reparatiepogingen uit. Bij reclamaties dient u zich tot
uw dealer te richten. Vóór de reclamatie a.u.b. de batterij laten
vervangen. Bij het openen of onvakkundige behandeling vervalt de
garantie.
Istruzioni per l’uso HiTRAX GOLD cronometro
Uso:
1.0 Comando
1.1 Visualizzazione normale: ora, minuto, secondo, giorno
della settimana.
(1=lunedì, 2 = martedì, 3=mercoledì, 4=giovedì,
5=venerdì, 6=sabato, S=domenica)
1.2 Tenere premuto il tasto A : visualizzazione di mese,
data e giorno della settimana
1.3 Tenere premuto il tasto B: visualizzazione dell’ora di
sveglia in ore e minuti
1.4 Premere 1 x il tasto C: cambio tra visualizzazione
normale e modalità cronometro
2.0 Sveglia e segnale ora on/off
2.1 Visualizzazione normale: tenere premuto il tasto B,
premere 1 x il tasto A: segnale dell’ora on
2.2 Premere ancora 1 x il tasto A: sveglia on
2.3 Premere ancora 1 x il tasto A: segnale dell’ora off
2.4 Premere ancora 1 x il tasto A: sveglia off
2.5 Lasciare il tasto B: cambio su visualizzazione normale
3.0 Modalità cronometro
3.1 Visualizzazione normale: premere 1 x il tasto C,
cambio in modalità cronometro
3.2 Premere il tasto A: funzione Start/Stop. Il conteggio
avviene in secondi 1/100.
3.3 Premere il tasto B durante il conteggio: prendere il
tempo parziale, il cronometro continua a contare
3.4 Premere ancora 1 x il tasto B: cambio su
visualizzazione cronometro
3.5 Premere il tasto A: terminare il conteggio, premere il
tasto B: spostamento indietro della visualizzazione
sullo zero
4.0 Regolazione dell’ora di sveglia
4.1 Visualizzazione normale: tenere premuto per 3 sec.
il tasto C, " lunedì " e visualizzazione dell’ora
lampeggiano. Con il tasto B regolare l’ora desiderata.
4.2 Premere 1 x il tasto A: " lunedì " e visualizzazione
minuti lampeggiano. Con il tasto B regolare i minuti
desiderati.
4.3 Premere il tasto C: cambio su visualizzazione normale
5.0 Regolazione dell’ora
5.1 Visualizzazione normale: tenere prima premuto per
3 sec. tasto C, quindi premere 1 x. " Martedì " e
visualizzazione dei secondi lampeggiano. Con il tasto
B mettere su zero.
5.2 Premere 1 x il tasto A: la visualizzazione dei minuti
lampeggia. Con il tasto B regolare i minuti desiderati.
5.3 Premere 1 x il tasto A: la visualizzazione dell’ora
lampeggia. Con il tasto B regolare l’ora desiderata.
5.4 Premere 1 x il tasto A: la visualizzazione del mese
lampeggia. Con il tasto B regolare il mese desiderato.
5.5 Premere 1 x il tasto A: la visualizzazione della data
lampeggia. Con il tasto B regolare la data desiderata.
5.6 Premere 1 x il tasto A: la visualizzazione del giorno
della settimana lampeggia. Con il tasto B regolare il
giorno della settimana desiderato.
5.7 Premere il tasto C: cambio su visualizzazione normale
6.0 Sistema orario 12/24 ore
6.1 Visualizzazione normale: tenere premuto il tasto B,
premere 1 x il tasto C: A o P compare o scompare
sul display.
6.2 Per il sistema 12 ore: selezionare A o P.
7.0 Prova sveglia
7.1 Visualizzazione normale: tenere premuti
contemporaneamente i tasti B e A: la sveglia squilla.
8.0 Spegnere sveglia
8.1 Visualizzazione normale: premere il tasto B: la sveglia
cessa.
9.0 Cambio di posizione mese/data
9.1 Visualizzazione normale: tenere premuto il tasto A,
quindi premere 1 x il tasto B.
Sostituzione batteria:
Batteria: 1 x CR 2032
Si prega di far effettuare la sostituzione della batteria da un negozio
specializzato.
Non gettare le pile esaurite tra i rifiuti domestici. Riporle negli appositi
contenitori per la raccolta.
Manutenzione:
Evitare di posizionare gli apparecchi in zone soggette a temperatura
estrema, a vibrazioni e a urti
Quando si pulisce il display e l'involucro, usare solo un panno soffice
inumidito con acqua. Non usare solventi o abrasivi.
Non effettuare riparazioni sugli apparecchi. Per favore riportarli al punto
vendita originale. Si prega di far effettuare la sostituzione della batteria
da un negozio specializzato. Nel caso di uso scorretto o di apertura
dell'apparecchio non assumiamo alcuna garanzia.
APN ref. no: A35016
Date: 19-08-03
Vendor ref:
no. of color: 1C+1C
B&W artwork attached:
Presentation
Testing
Production/Shipment
Prepared by:
Verified by:
Approved by:
-
 1
1
-
 2
2


TFA 38.2015 Bedienungsanleitung
- Kategorie
- Sportuhren
- Typ
- Bedienungsanleitung
- Dieses Handbuch eignet sich auch für
Verwandte Artikel
-
TFA 38.2014 Bedienungsanleitung
-
TFA Digital Stopwatch Benutzerhandbuch
-
-
-
-
-
-
-
TFA 98.1039 Bedienungsanleitung
