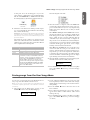
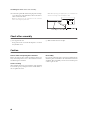
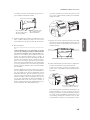
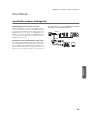
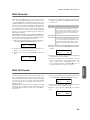
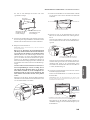
Korg C-520 Benutzerhandbuch
- Kategorie
- Digitale Klaviere
- Typ
- Benutzerhandbuch
Dieses Handbuch eignet sich auch für

Address
KORG, Inc.
4015-2, Yanokuchi
Inagi-shi, Tokyo
206-0812, Japan
Web servers
www.korg.com
www.korg.co.uk
www.korgcanada.com
www.korgfr.net
www.korg.de
www.korg.it
www.letusa.es
www.korgpa.com
www.korg.co.jp
GHG01803
User’s Manual
ua
a
a
Use s a
C-520
EFG I 1
EFG I 1


English
User’s Manual
Français
Mode d’emploi
Deutsch
Bedienungseinleitung
Italiano
Manuale di istruzioni


User’s Manual
DIGITAL PIANO

PRECAUTIONS
Location
Using the unit in the following locations can result in a malfunction.
• In direct sunlight
• Locations of extreme temperature or humidity
• Excessively dusty or dirty locations
• Locations of excessive vibration
Power supply
Please connect the designated AC adapter to an AC outlet of the correct volt-
age. Do not connect it to an AC outlet of voltage other than that for which
your unit is intended.
Interference with other electrical devices
This product contains a microcomputer. Radios and televisions placed
nearby may experience reception interference. Operate this unit at a suitable
distance from radios and televisions.
Handling
To avoid breakage, do not apply excessive force to the switches or controls.
Care
If the exterior becomes dirty, wipe it with a clean, dry cloth. Do not use liq-
uid cleaners such as benzene or thinner, or cleaning compounds or flamma-
ble polishes.
Keep this manual
After reading this manual, please keep it for later reference.
Keeping foreign matter out of your equipment
• Never set any container with liquid in it near this equipment. if liquid gets
into the equipment, it could cause a breakdown, fire, or electrical shock.
• Be careful not to let metal objects get into the equipment. If something
does slip into the equipment, unplug the AC adapter from the wall outlet.
Then contact your nearest Korg dealer or the store where the equipment was
purchased.
DISCLAIMER
The information contained in this manual has been carefully revised and
checked through. Due to our constant efforts to improve our products, the
specifications might differ to those in the manual. Korg is not responsible for
any eventual differences found between the specifications and the contents
of the instruction manual - the specifications being subject to change with-
out prior notice
WARRANTY
KORG products are manufactured according to the strictest electrical and
mechanical regulations that exist in various countries of the world. These
products are warranted by the KORG distributor only in each country. Any
KORG product that is not sold with the manufacturer’s or distributor’s war-
ranty, or without a serial number, cannot benefit from servicing under the
warranty. This regulation is for the consumer’s own protection.
DATA RESET
When the instrument is turned off, any unsaved parameters or songs are
reset.
CE MARK FOR EUROPEAN HARMONIZED STANDARDS
The CE mark that is attached to our company’s products of AC mains oper-
ated apparatus until December 31, 1996 means it conforms to the EMC
Directive (89/336/EEC) and to the CE mark Directive (93/68/EEC).
The CE mark that is attached after January 1, 1997 means it conforms to the
EMC Directive (89/336/EEC), to the CE mark Directive (93/68/EEC) and to
the Low Voltage Directive (73/23/EEC).
In addition, the CE mark that is attached to our company’s products of Bat-
tery operated apparatus means it conforms to the EMC Directive (89/336/
EEC) and to the CE mark Directive (93/68/EEC).
THE FCC REGULATION WARNING (FOR THE U.S.A.
ONLY)
This equipment has been tested and found to comply with the limits for a
Class B digital device, pursuant to Part 15 of the FCC Rules. These limits are
designed to provide reasonable protection against harmful interference in a
residential installation. This equipment generates, uses, and can radiate
radio frequency energy and, if not installed and used in accordance with the
instructions, may cause harmful interference to radio communications.
However, there is no guarantee that interference will not occur in a particu-
lar installation. If this equipment does cause harmful interference to radio or
television reception, which can be determined by turning the equipment off
and on, the user is encouraged to try to correct the interference by one or
more of the following measures:
• Reorient or relocate the receiving antenna.
• Increase the separation between the equipment and receiver.
• Connect the equipment into an outlet on a circuit different from
that to which the receiver is connected.
• Consult the dealer or an experienced radio/TV technician for help.
Unauthorized changes or modification to this system can void the user’s
authority to operate this equipment.
UPDATING THE SOFTWARE
The system software of your C-520 can be updated. From time to time, Korg
might release new versions including bug fixes and new features. Please
check our website for more information.
ASSISTANCE AND SERVICE FOR MUSICIANS
For repairs, contact your nearest Authorized KORG Service Center. For more
information on KORG products, and to find software and accessories for
your piano, please contact your local Authorized KORG distributor.
KORG ON THE INTERNET
Korg Inc.: www.korg.co.jp
Korg USA: www.korg.com
Korg UK: www.korg.co.uk
Korg Canada: www.korgcanada.com
Korg Italy: www.korgpa.com
© 2006 Korg Inc. Printed in Japan.

>
5
English
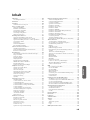
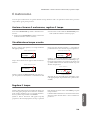
Contents
Introduction . . . . . . . . . . . . . . . . . . . . . . . . . . . . . . . . . . . . . . . . 6
Main features . . . . . . . . . . . . . . . . . . . . . . . . . . . . . . . . . . . . . . . . . . . . . .6
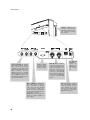
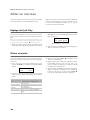
Control panel . . . . . . . . . . . . . . . . . . . . . . . . . . . . . . . . . . . . . . . 8
Connections . . . . . . . . . . . . . . . . . . . . . . . . . . . . . . . . . . . . . . . 11
Connecting to external audio devices . . . . . . . . . . . . . . . . . . . . . . . . .11
Before you begin . . . . . . . . . . . . . . . . . . . . . . . . . . . . . . . . . . . 12
Open the key cover . . . . . . . . . . . . . . . . . . . . . . . . . . . . . . . . . . . . . . . . 12
Turning the instrument on . . . . . . . . . . . . . . . . . . . . . . . . . . . . . . . . . . 12
Using the music stand . . . . . . . . . . . . . . . . . . . . . . . . . . . . . . . . . . . . . . 12
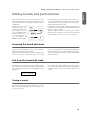
Adjusting the volume . . . . . . . . . . . . . . . . . . . . . . . . . . . . . . . . . . . . . . 13
Using the headphones . . . . . . . . . . . . . . . . . . . . . . . . . . . . . . . . . . . . . . 13
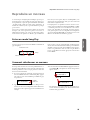
Listening to the Demo . . . . . . . . . . . . . . . . . . . . . . . . . . . . . . . . . . . . . . 13
Basic functions . . . . . . . . . . . . . . . . . . . . . . . . . . . . . . . . . . . . . 15
Playing a single sound (Single mode) . . . . . . . . . . . . . . . . . . . . . . . . . 15
Playing two sounds at the same time (Layer mode) . . . . . . . . . . . . . . 16
Playing different sounds with the left and right hand (Split mode) .17
Using the pedals . . . . . . . . . . . . . . . . . . . . . . . . . . . . . . . . . . . . . . . . . . . 18
Transposing . . . . . . . . . . . . . . . . . . . . . . . . . . . . . . . . . . . . . . . . . . . . . .18
Changing the brilliance . . . . . . . . . . . . . . . . . . . . . . . . . . . . . . . . . . . . . 19
Turning the effects on/off . . . . . . . . . . . . . . . . . . . . . . . . . . . . . . . . . . . 19
Using performances . . . . . . . . . . . . . . . . . . . . . . . . . . . . . . . . . 20
Choosing performances . . . . . . . . . . . . . . . . . . . . . . . . . . . . . . . . . . . . 20
Changing the sounds assigned to a performance . . . . . . . . . . . . . . . .21
Editing a performance . . . . . . . . . . . . . . . . . . . . . . . . . . . . . . . . . . . . . . 21
The metronome . . . . . . . . . . . . . . . . . . . . . . . . . . . . . . . . . . . . 22
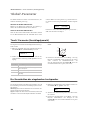
Starting and stopping the metronome, adjusting the tempo . . . . . . . 22
Tempo and time signature display . . . . . . . . . . . . . . . . . . . . . . . . . . . . 22
Adjusting the tempo . . . . . . . . . . . . . . . . . . . . . . . . . . . . . . . . . . . . . . .22
Choosing a time signature . . . . . . . . . . . . . . . . . . . . . . . . . . . . . . . . . .23
Drum patterns . . . . . . . . . . . . . . . . . . . . . . . . . . . . . . . . . . . . . . . . . . . . 23
Adjusting the metronome level . . . . . . . . . . . . . . . . . . . . . . . . . . . . . . 24
Adjusting the drum pattern’s reverb . . . . . . . . . . . . . . . . . . . . . . . . . . 24
Selecting the accent . . . . . . . . . . . . . . . . . . . . . . . . . . . . . . . . . . . . . . . . 25
Saving the metronome settings . . . . . . . . . . . . . . . . . . . . . . . . . . . . . .25
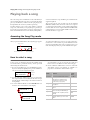
Playing back a song . . . . . . . . . . . . . . . . . . . . . . . . . . . . . . . . . 26
Accessing the Song Play mode . . . . . . . . . . . . . . . . . . . . . . . . . . . . . . .26
How to select a song . . . . . . . . . . . . . . . . . . . . . . . . . . . . . . . . . . . . . . . 26
How to start playback . . . . . . . . . . . . . . . . . . . . . . . . . . . . . . . . . . . . . . 27
Starting from a different measure . . . . . . . . . . . . . . . . . . . . . . . . . . . . 27
Muting/unmuting a recorder’s part . . . . . . . . . . . . . . . . . . . . . . . . . . . 28
Changing the song’s tempo . . . . . . . . . . . . . . . . . . . . . . . . . . . . . . . . .28
Play along with the song . . . . . . . . . . . . . . . . . . . . . . . . . . . . . . . . . . . .28
Cycle Play . . . . . . . . . . . . . . . . . . . . . . . . . . . . . . . . . . . . . . . . . . . . . . . .29
Recording a song . . . . . . . . . . . . . . . . . . . . . . . . . . . . . . . . . . . 30
Quick recording procedure . . . . . . . . . . . . . . . . . . . . . . . . . . . . . . . . . 30
Step 1: Entering the Record mode . . . . . . . . . . . . . . . . . . . . . . . . . . . .30
Step 2: Selecting sounds . . . . . . . . . . . . . . . . . . . . . . . . . . . . . . . . . . . .31
Step 3: Setting the record options . . . . . . . . . . . . . . . . . . . . . . . . . . . .32
Step 4: Setting the time signature and tempo . . . . . . . . . . . . . . . . . . .33
Step 5: Recording . . . . . . . . . . . . . . . . . . . . . . . . . . . . . . . . . . . . . . . . . .33
Step 6: Second-pass recording . . . . . . . . . . . . . . . . . . . . . . . . . . . . . . .34
Changing sounds to a recorded song . . . . . . . . . . . . . . . . . . . . . . . . . . 34
Changing tempo to a recorded song . . . . . . . . . . . . . . . . . . . . . . . . . .35
Pedal Punch recording . . . . . . . . . . . . . . . . . . . . . . . . . . . . . . . . . . . . . 35
Auto Punch recording . . . . . . . . . . . . . . . . . . . . . . . . . . . . . . . . . . . . . . 35
Saving the song . . . . . . . . . . . . . . . . . . . . . . . . . . . . . . . . . . . . . . . . . . .36
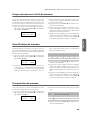
Editing a song . . . . . . . . . . . . . . . . . . . . . . . . . . . . . . . . . . . . . 37
Setting Cycle Play . . . . . . . . . . . . . . . . . . . . . . . . . . . . . . . . . . . . . . . . . . 37
Erasing a track . . . . . . . . . . . . . . . . . . . . . . . . . . . . . . . . . . . . . . . . . . . . 37
Cutting measures at the end of the song . . . . . . . . . . . . . . . . . . . . . . .38
Quantizing the song . . . . . . . . . . . . . . . . . . . . . . . . . . . . . . . . . . . . . . .38
Transposing the song . . . . . . . . . . . . . . . . . . . . . . . . . . . . . . . . . . . . . .39
Deleting the song . . . . . . . . . . . . . . . . . . . . . . . . . . . . . . . . . . . . . . . . . .39
Saving the song after editing . . . . . . . . . . . . . . . . . . . . . . . . . . . . . . . . . 39
Editing sounds and performances . . . . . . . . . . . . . . . . . . . . . 41
Accessing the Sound edit mode . . . . . . . . . . . . . . . . . . . . . . . . . . . . . 41
Exit from the Sound edit mode . . . . . . . . . . . . . . . . . . . . . . . . . . . . . . 41
Saving a sound . . . . . . . . . . . . . . . . . . . . . . . . . . . . . . . . . . . . . . . . . . . 41
Saving a performance . . . . . . . . . . . . . . . . . . . . . . . . . . . . . . . . . . . . . . 42
Setting the volume . . . . . . . . . . . . . . . . . . . . . . . . . . . . . . . . . . . . . . . . 43
Adjusting the panning . . . . . . . . . . . . . . . . . . . . . . . . . . . . . . . . . . . . . 43
Adjusting the effects . . . . . . . . . . . . . . . . . . . . . . . . . . . . . . . . . . . . . . . 44
Setting the reverb effect . . . . . . . . . . . . . . . . . . . . . . . . . . . . . . . . . . . . 44
Setting the chorus or modulation effect . . . . . . . . . . . . . . . . . . . . . . . 45
Setting the insert effects . . . . . . . . . . . . . . . . . . . . . . . . . . . . . . . . . . . . 45
Setting the octave transposition . . . . . . . . . . . . . . . . . . . . . . . . . . . . . 46
Adjusting the fine tune . . . . . . . . . . . . . . . . . . . . . . . . . . . . . . . . . . . . 47
Programming the pedals . . . . . . . . . . . . . . . . . . . . . . . . . . . . . . . . . . . 47
Selecting a scale . . . . . . . . . . . . . . . . . . . . . . . . . . . . . . . . . . . . . . . . . . . 48
Resetting the current sound and performance . . . . . . . . . . . . . . . . . 49
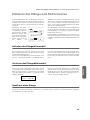
Global settings . . . . . . . . . . . . . . . . . . . . . . . . . . . . . . . . . . . . . 50
Touch settings . . . . . . . . . . . . . . . . . . . . . . . . . . . . . . . . . . . . . . . . . . . . 50
Turning the internal speakers on or off . . . . . . . . . . . . . . . . . . . . . . . 50
Master tuning . . . . . . . . . . . . . . . . . . . . . . . . . . . . . . . . . . . . . . . . . . . . 51
Brilliance . . . . . . . . . . . . . . . . . . . . . . . . . . . . . . . . . . . . . . . . . . . . . . . . 51
Default split point . . . . . . . . . . . . . . . . . . . . . . . . . . . . . . . . . . . . . . . . 51
Assigning functions to the pedals . . . . . . . . . . . . . . . . . . . . . . . . . . . . 52
Quarter Tone (SubScale realtime programming) . . . . . . . . . . . . . . . 53
Fast Play . . . . . . . . . . . . . . . . . . . . . . . . . . . . . . . . . . . . . . . . . . . . . . . . 53
Mute Level . . . . . . . . . . . . . . . . . . . . . . . . . . . . . . . . . . . . . . . . . . . . . . . 53
Turning the keyboard on or off (Local Control) . . . . . . . . . . . . . . . . 54
MIDI Clock . . . . . . . . . . . . . . . . . . . . . . . . . . . . . . . . . . . . . . . . . . . . . . 54
MIDI IN Channels . . . . . . . . . . . . . . . . . . . . . . . . . . . . . . . . . . . . . . . . 54
MIDI OUT Channels . . . . . . . . . . . . . . . . . . . . . . . . . . . . . . . . . . . . . . 55
MIDI Filters . . . . . . . . . . . . . . . . . . . . . . . . . . . . . . . . . . . . . . . . . . . . . 56
Data transfer via the USB port . . . . . . . . . . . . . . . . . . . . . . . . . . . . . . 56
Erasing songs from the User Song album . . . . . . . . . . . . . . . . . . . . . 57
General Reset . . . . . . . . . . . . . . . . . . . . . . . . . . . . . . . . . . . . . . . . . . . . 58
System version number . . . . . . . . . . . . . . . . . . . . . . . . . . . . . . . . . . . . 58
MIDI . . . . . . . . . . . . . . . . . . . . . . . . . . . . . . . . . . . . . . . . . . . . . 59
What is MIDI? . . . . . . . . . . . . . . . . . . . . . . . . . . . . . . . . . . . . . . . . . . . 59
What is MIDI Over USB? . . . . . . . . . . . . . . . . . . . . . . . . . . . . . . . . . . 59
What can you do with MIDI? . . . . . . . . . . . . . . . . . . . . . . . . . . . . . . . 59
MIDI connections . . . . . . . . . . . . . . . . . . . . . . . . . . . . . . . . . . . . . . . . 59
Standard MIDI settings . . . . . . . . . . . . . . . . . . . . . . . . . . . . . . . . . . . . 60
Using the C-520 as a multitimbral tone generator . . . . . . . . . . . . . . 60
Program Change . . . . . . . . . . . . . . . . . . . . . . . . . . . . . . . . . . . . . . . . . . 60
Control Change . . . . . . . . . . . . . . . . . . . . . . . . . . . . . . . . . . . . . . . . . . 61
Installing the Korg USB MIDI Driver . . . . . . . . . . . . . . . . . . . . 62
Connecting the C-520 to a personal computer . . . . . . . . . . . . . . . . . 62
KORG USB-MIDI Driver system requirements . . . . . . . . . . . . . . . . 62
Please note before use . . . . . . . . . . . . . . . . . . . . . . . . . . . . . . . . . . . . . 62
Windows: Installing the KORG USB-MIDI Driver . . . . . . . . . . . . . 63
Mac OS X: Installing KORG USB-MIDI Driver . . . . . . . . . . . . . . . . 63
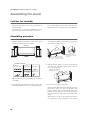
Assembling the stand . . . . . . . . . . . . . . . . . . . . . . . . . . . . . . . 64
Cautions for assembly . . . . . . . . . . . . . . . . . . . . . . . . . . . . . . . . . . . . . 64
Assembling procedure
. . . . . . . . . . . . . . . . . . . . . . . . . . . . . . . . . . . . . 64
Check after assembly . . . . . . . . . . . . . . . . . . . . . . . . . . . . . . . . . . . . . . 66
Caution . . . . . . . . . . . . . . . . . . . . . . . . . . . . . . . . . . . . . . . . . . . . . . . . . 66
Error messages . . . . . . . . . . . . . . . . . . . . . . . . . . . . . . . . . . . . . 67
Troubleshooting . . . . . . . . . . . . . . . . . . . . . . . . . . . . . . . . . . . 68
Polyphony . . . . . . . . . . . . . . . . . . . . . . . . . . . . . . . . . . . . . . . . . 68
Technical specifications . . . . . . . . . . . . . . . . . . . . . . . . . . . . . . 69
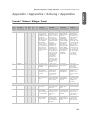
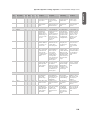
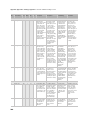
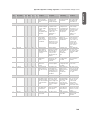
Appendix / Appendice / Anhang / Appendice . . . . . . . . . . . 277
Sounds / Timbres / Klänge / Suoni . . . . . . . . . . . . . . . . . . . . . . . . . . 277
Performances / ‘Performance’-Speicher . . . . . . . . . . . . . . . . . . . . . 283
Effects / Effets / Effekte / Effetti . . . . . . . . . . . . . . . . . . . . . . . . . . . . . 285
Songs / Morceaux / Songs / Brani musicali . . . . . . . . . . . . . . . . . . . 286
MIDI Implementation Chart . . . . . . . . . . . . . . . . . . . . . . . . . 288

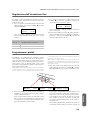
Introduction
> Main features
6
Introduction
Main features
Wide range of sounds
Forty different and expressive high-quality sounds, including
a Stereo Concert Grand Piano. You can use the Layer and Split
functions to simultaneously play a combination of two
sounds. Sounds and sound combinations can be freely modi-
fied.
Performances
Sound combination can also be saved into performances, giv-
ing you an additional set of 30 timbres (3 banks of 10 perfor-
mances). Performances also store a custom split point, for
custom combinations of sounds over the keyboard.
Four zones keyboard
The new high-quality, realistic Korg RH3 keyboard features
four zones with different weights. This gives you the same re-
alism and feeling as a grand piano keyboard.
Touch control
You can choose from nine different settings to adjust how the
sound will respond to your keyboard playing dynamics.
Pedal effects
The C-520 provides the same three pedals as a grand piano,
controlling the soft, sostenuto, and damper functions respec-
tively. The damper pedal simulates the natural string reso-
nances and noises of an acoustic piano, by means of the
innovative Korg EPx (Piano eXperience) technology. Both the
damper and soft pedals let you vary the amount of the effect by
how far you press down on them (“half-pedal” function). In
addition, pedals can be freely assigned to other functions, like
starting the recorder or changing the speed of the rotary speak-
er.
Piano eXperience
While existing piano sampling techniques have resembled an
audio snapshot, our new “Piano eXperience” technology is
more of a hologram, accurately reproducing every dimension-
al detail of the sound. All piano sampling for the C-520 is done
in stereo to preserve the natural imaging of the sound. Differ-
ent dynamic levels are captured to extend the instrument's ex-
pressive vocabulary.
Going even further, the C-520 uses the sound of the key being
released and the hammer returning, as well as the sympathetic
damper resonance of the strings to create all of the subtle shad-
ings that create a superior instrument sound. This attention to
detail defines the sound of the new C-520, providing an instru-
ment that can interpret every nuance of touch into a meaning-
ful musical gesture.
Piano eXperience (or EPx) effects are particularly evident in
sounds like GrandPiano, BriteGrand and MelloPiano.
One-hundred eighty-five songs
The C-520 includes a huge library of songs, based on famous
pieces and lesson books. These songs are perfectly suitable for
piano lessons, being recorded into two separate parts (left
hand on Part 1, right hand on Part 2) that you can easily turn
off and play on the keyboard. In addition, you can change the
metronome’s tempo and let a defined passage play in cycle.
SongBook included
The SongBook album is also included as a printed music book
– a great resource for practicing and playing along with your
preferred tunes.
Onboard recorder
A multi-track, easy-to-use onboard recorder, lets you record
your own songs, or read Standard MIDI Files that you can
transfer via the integrated USB port from an external comput-
er.
Metronome
The built-in metronome allows you to select the time signa-
ture, tempo, and volume, and use a bell sound as the accent. It
can even give you a drum accompaniment in a musical style of
your choice (drum patterns).
Data transfer via USB
When connected to a personal computer via the USB port, the
C-520’s internal memory can be seen as a USB disk. This way,
you can backup your data, or transfer files between the C-520
and the personal computer.
MIDI capabilities
The C-520 supports the MIDI protocol, the standard that al-
lows music data to be transferred between musical instru-
ments and computers. MIDI allows two or more devices to
control or be controlled by each other, and also allows you to
use the C-520 as a 16-part multitimbral tone generator.
MIDI over USB
The USB port also carries MIDI data, so that you can connect
the C-520 directly to your personal computer with a single ca-
ble and without the need of a dedicated MIDI interface. A ded-
icated KORG USB MIDI Driver is freely available for full use
of the C-520’s MIDI features.

Introduction
> Main features
7
English
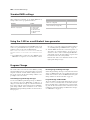
Temperaments
In addition to the Equal temperament, the C-520 allows you to
select nine alternative temperaments, for historically accurate
performance of classical music, or experimenting. When se-
lecting an acoustic piano sound, the typical Stretched Tuning
is automatically selected.
Adjustable pitch
The Transpose function lets you change the pitch of the piano,
and the Master Tuning function allows you to make fine tune
adjustments.
Effects
The C-520 provides built-in digital effects that can simulate
the natural ambience of a concert hall (reverb) and add rich-
ness to the sound (chorus). In addition, each sound includes
an insert effect (delay, phaser, equalizer, rotary speaker,
etc…), that is specially suited to each particular sound.
Powerful integrated amplification
The C-520 includes a powerful, 2
×
35 Watt amplifier, with
four speakers in bass reflex box. This gives the most authentic
sound reproduction, together with enough volume deliver the
full power of an acoustic piano.
Two sets of headphones
You can connect two stereo headphones, to play with your
teacher or another musician. Connecting a headphone set au-
tomatically disconnects the speakers, so there is no risk to dis-
turb others when practicing by night.

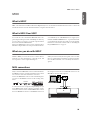
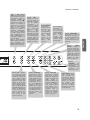
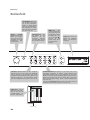
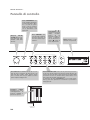
Control panel
>
8
Control panel
MASTER VOLUME
knob:
Adjusts the vol-
ume for the speakers,
the Output and the
Phones connectors
PERFORMANCE button:
Enters/exits Performance
mode. While in this mode,
the sound selection buttons
are used to choose perfor-
mances instead of single
sounds. See page 20.
VARIATION button:
Selects one of the avail-
able variations of the cur-
rently selected sound, or
one of the three perfor-
mance banks.
SPLIT button:
Turns Split mode on or off. When in
Split mode, a sound is assigned to your right hand,
and a different one to the left hand. Keep it pressed
and play a note on the keyboard to choose a differ-
ent split point. See page 17.
SOUND SELECTION buttons:
Press a button to select a sound (Sin-
gle mode). You can press two buttons at the same time, to play
two sounds at the same time on the keyboard (Layer mode). Press
SPLIT to play a sound with your right hand, and a different one
with your left hand (Split mode). See page 15.
When the PERFORMANCE indicator is turned on (Performance
mode), these buttons allow for selection of performances. See
page 20.
/
(Scroll) but-
tons: Move the cursor
in the display, from
one parameter to the
following or the previ-
ous one. The cursor is
indicated by a point-
ing arrow (
) next to
a parameter’s name.
Display:
Shows the vari-
ous sound names and
parameters.
Power LED
POWER switch:
On/Off
switch. When in the
Standbay position, the
piano is turned off.

Control panel
>
9
English
+/YES / -/NO (Value) but-
tons:
Change the value of
the parameters appearing
in the display. The editable
parameter is shown by the
cursor (
) placed on its
left, or (when editing text)
with the character/cipher in
edit flashing. By keeping
them pressed, the values
start changing automati-
cally, first slowly, then
slightly faster. By pressing
them together, the param-
eter is reset to its default
value.
While in the Main page,
these buttons can be used
to select a different varia-
tion of the current sound.
EDIT button:
Press it
to access the Edit
mode relevant to the
current type of data
selected in the dis-
play. Four Edit modes
are available: Sound
(see page 41), Perfor-
mance (see page 41),
Song (see page 37)
and Global (see
page 50). Global edit
mode can be
accessed by keeping
the EDIT button
pressed for more
than one second).
EXIT button:
Press it to
exit Edit mode, or to
return to the Main page
from other pages. When
exiting from the Edit
mode, the Save proce-
dure will be recalled.
When a drum pattern is
assigned to the Metro-
nome, and it is running,
this button doubles as a
Fill In control (see
page 23, page 33).
REVERB button:
Turns the reverb
on/off. This adds
ambience to the
sound. Keep it
pressed for more
than one second
to access the
Reverb edit page
(see page 19).
METRONOME button:
Turns the metronome click
on/off. The tempo and
time signature depend on
the chosen values, or the
selected song (see
page 22).
TRANSPOSE button:
Press this button to
open the Transpose
page and change the
master transpose value.
When the indicator is
turned on, transposi-
tion is active. Changes
made after pressing this
button are not saved to
memory, and are reset
when turning the
instrument off. See
page 18.
CHORUS button:
Turns the chorus
on/off. This makes
the sound richer.
Keep it pressed
for more than
one second to
access the Chorus
edit page (see
page 19).
BRILLIANCE button:
Press this button to
open the Brilliance
page and change the
brilliance value. When
the indicator is turned
on, a brilliance varia-
tion is active. Changes
made after pressing this
button are not saved to
memory, and are reset
when turning the
instrument off. See
page 19.
DEMO button:
Turns
the Demo mode on/off,
to listen to the demo
songs. Select the songs
with the sound selec-
tion buttons (see
page 13). You can play
together with the demo
songs.
RECORDER but-
tons:
Control the
playback or record-
ing of the songs.
See page 26,
page 30.
TEMPO/MET.SET but-
tons:
Adjust the met-
ronome tempo. The +
button makes it
faster, while the –
button makes it
slower. Pressed
together, they give
access to metronome
editing. See page 22.

Control panel
>
10
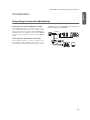
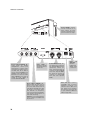
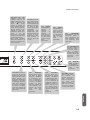
MIDI (IN, OUT) connectors:
Connectors that are used to
connect other MIDI devices
(sequencer, keyboards, etc.).
OUT: Data output (to be
connected to the MIDI IN
connector of another MIDI
device). IN: Data input (to be
connected to the MIDI OUT
connector of another MIDI
device).
Pedals connec-
tor:
Connect the
supplied pedals
to this connector.
OUTPUT (L/MONO, R) connec-
tors:
Audio outputs. Connect
these connectors to an external
amplifying system. (With a hi-fi
system use the LINE, AUX, CD or
TAPE connectors, not the
PHONO connector). To amplify
the C-520 in mono, connect the
single L/MONO connector. Use
the MASTER VOLUME knob to
set the output volume.
USB connector:
Type B (slave),
USB 1.1-compliant, standard
connector. Connects to a per-
sonal computer (PC or Mac).
Can be used for data transfer
(see page 56), or USB Over
MIDI use (see page 59).
AC ADAPTER
connector:
Connect the
supplied AC/
DC adapter to
this connec-
tor.
PHONES connector:
Con-
nect one or two pairs of
headphones to these jacks.
The integrated speakers
will turn off.
INPUT (L/MONO, R) connectors:
Line audio inputs. Connect to
these connectors an external
audio source, such as a CD, MP3
or tape player, or another key-
board. To connect a microphone,
you need an external microphone
preamplifier or a mixer.
Warning:
Avoid connecting the
output of a power amplifier to
these inputs!

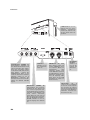
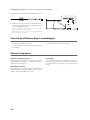
Connections
> Connecting to external audio devices
11
English
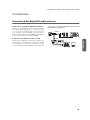
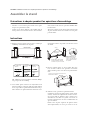
Connections
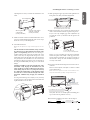
Connecting to external audio devices
Connecting to an external amplification system
Use the OUTPUT connectors, if you like to connect your C-
520 to a high-quality mixer, stereo hi-fi, or a couple of active
monitors. When using a stereo hi-fi, connect the OUTPUTs to
the LINE, AUX, CD or TAPE inputs (never use the PHONO
inputs). For mono amplification, connect only the L/MONO
output.
Connecting other audio devices to the C-520
Use the INPUT connectors, to connect a computer, mixer,
drum machine, synthesizer, MP3 or tape player, to your C-
520, and hear their sound run through its speakers. For mono
amplification, connect only the L/MONO output.
Do not con-
nect the output of a power amplifier!
L/MONO
R
AUX IN
INPUT
OUTPUT

Before you begin
> Open the key cover
12
Before you begin
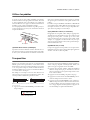
Open the key cover
Gently lift the center of the sliding key cover by the indented
portion, and support it while you slide it carefully and fully
into the C-520. Before you open the key cover, make sure that
no foreign objects such as papers or coins are on the top of the
key cover itself, otherwise, these objects may fall into the in-
strument.
To close the key cover, gently lift the center by the indented
portion, and slide it forward.
Note:
Be careful not to pinch your fingers or hand while open-
ing or closing the key cover.
Note:
The key cover may be damaged if you use excessive force
when opening or closing it.
Turning the instrument on
Insert the DC plug of the supplied AC adapter into the DC in-
let of the C-520, then connect the AC plug to a wall socket.
After having connected the power cable, press the POWER
switch. When the instrument is turned on, the buttons on the
control panel and the display will light up. Also, an LED on the
front of the instrument, also visible when the key cover is
closed, will light up.
To turn the instru-
ment off, press the
POWER switch
again.
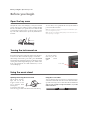
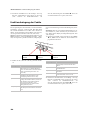
Using the music stand
Opening and closing the music stand
Tilt the music stand up-
right, and use the two
stoppers located on the
rear to hold the music
stand in place.
To lower the music stand,
release the stoppers and rest the music stand on the flat top.
Using the score holders
To keep a music book open, use the two score holders in front
of the music stand. Push on the shorter side to make them slide
up. Push on the longer side to make them slide down.
Do not
apply excessive strength or weight to the holders, or you will
risk to break them.
Power LED

Before you begin
> Adjusting the volume
13
English
Adjusting the volume
Rotate the MASTER VOLUME knob towards the right to in-
crease the volume; towards the left to decrease the volume. The
maximum value is “10”; the minimum (silence) is “0”. This
control adjusts the output level of the headphones, the internal
speakers and of the OUTPUTs.
It does not control the volume of an audio device connected to
the INPUT connectors. Use the audio device’s own controls to
set its volume.
It is always better to start with a low volume and then increase
gradually.
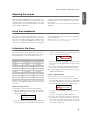
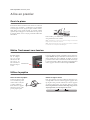
Using the headphones
For playing or practicing during night hours, or when you
don’t want to be heard by others in the same room, connect
one or two pairs of high-quality headphones (32
Ω
impedance
suggested) to the appropriate PHONES connectors. These
connectors are standard 1/4” phone jacks. If your headphones
have a mini-jack adapter, grasp the adapter when plugging in
or out the headphones.
Warning:
When using headphones, protect your hearing by
avoiding extended listening at high volumes.
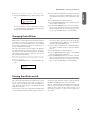
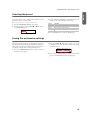
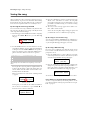
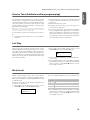
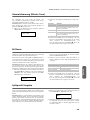
Listening to the Demo
The C-520 contains 20 pre-recorded demo songs. Listen to
them to experience the rich sound and expressive potential of
this instrument. Here is a list of the available demo songs:
During the demo playback you can’t use any other buttons.
However, you can still play the keyboard to play along with the
demo songs.
Listen to all songs at once
You can listen to all demo songs with a single command.
1. Press the DEMO button. The sound selection indicators
will blink sequentially from left to right. The Demo page
will appear in the display:
2. Wait some seconds, without pressing any button. The first
demo song will begin to play. The indicator corresponding
to the demo song currently in play will turn on. The name
of the song will be shown in the display:
All demo songs will be played back one after the other.
After the last song, the playback will begin again from the
first song.
3. To pause the current song, press the PLAY/PAUSE button.
Press it again to restart playback from the same position.
4. To stop the playback and exit the demo mode, press the
DEMO or the EXIT button.
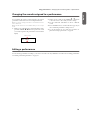
Listen to a specified song
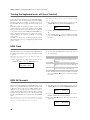
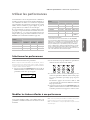
You can select just one demo song to be played back.
1. First of all, you must select one of the demo song banks.
• To select the first bank (Bk1, songs 1-10), press the DEMO
button once. The indicators will blink sequentially, from
left to right. The Demo page will appear in the display:
• To select the second bank (Bk2, songs 11-20), press the +/
YES button.
• To return to the first bank, press the -/NO button.
2. Press one of the sound selection buttons to select the cor-
responding demo song in the selected bank. The demo is
based on the sound associated with the button. The indi-
cator on the selected demo button will stay on, while the
other indicators will turn off.
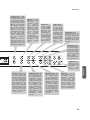
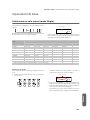
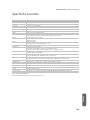
Button Bank 1 (1-10) Bank 2 (11-20)
PIANO 1 GrandPiano1 GrandPiano2
PIANO 2 Honky-Tonk Piano Pad
E.PIANO 1 El. Piano 1 El. Piano 2
E.PIANO 2 Digi Piano Vintage EP
HARPSI/CLAV Harpsichord Clav.
VIBES/GUITAR Vibes Ac. Guitar
ORGAN 1 Jazz Organ1 Jazz Organ2
ORGAN 2 Full Pipe Pipe Flute
STRING/CHOIR Strings Choir
BASS Ac. Bass El. Bass
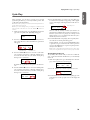
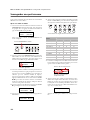
DEMO:-----------
Bk1 Press Sound
DEMO:GrandPiano1
Bk1 Press Sound
DEMO:-----------
Bk1 Press Sound

Before you begin > Listening to the Demo
14
3. After the end of the selected song, all the songs will be
played back in cycle.
4. If you want to select a different song, press one of the
sound selection buttons.
5. To pause the current song, press the PLAY/PAUSE button.
Press it again to restart playback from the same position.
6. To stop the current song without exiting from the Demo
mode, press STOP. Choose a different song and wait for it
to start playing back.
7. To stop the playback and exit the demo mode, press the
DEMO or EXIT button.

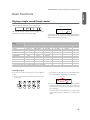
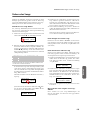
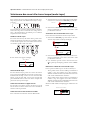
Basic functions > Playing a single sound (Single mode)
15
English
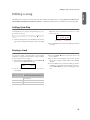
Basic functions
Playing a single sound (Single mode)
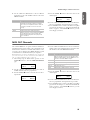
When you turn the instrument on, it is in Single mode.
The single Grand Piano sound is selected, and plays over the
full keyboard. Its name is shown in the display:
You can replace it with any of the 40 sounds supplied with the
instrument. See the list of sounds in the following table (more
details on each sound are on page 277):
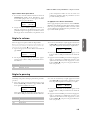
Selecting a sound
You can use the sound selection buttons to select a different
sound.
1. Press one of the sound selection buttons in order to select
a sound type.
The indicator on the button you pressed will light. The
name of the selected sound will appear in the display:
2. Use the VARIATION button to select one of the available
variations of the base sound (see table above). When the
last variation has been selected, press it again to select the
base sound again.
As an alternative, use the +/YES button to scroll the sound
variation list forward; the -/NO button to scroll it back-
wards.
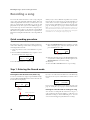
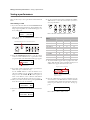
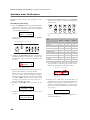
Main
GrandPiano 4/4
120
Main sound
Button
Sound
Var. 1 Var. 2 Var. 3 Var. 4 Var. 5 Var. 6
PIANO 1 GrandPiano* BriteGrand* Rock Piano Piano&Str.
PIANO 2 Honky-Tonk MelloGrand* Piano&Pad Elec.Grand M1 Piano
E.PIANO 1 Tine EP 1 SuitTineEP DynoTineEP Tine EP 2
E.PIANO 2 Dig. EP 1 Dig. EP 2 Reed EP TremReedEP
HARPSI/CLAV Harpsi 8' Harpsi 16' Clav Synth Clav
VIBES/GUITAR Vibes 1 Vibes 2 Nylon Gtr.
ORGAN1 Jazz Organ Perc.Org.1 Perc.Org.2
ORGAN2 Church Org Pipe Flute Pipe Tutti
STRINGS/CHOIR Strings Slow Str. String Pad Choir ScatVoices Vocal Pad
BASS Ac. Bass El. Bass Fretless B Bass&Ride
* Note: The EPx effects are not available when you are in Layer mode.
12345
678910
GrandPiano 4/4
120
Sound name

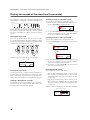
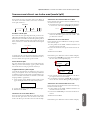
Basic functions > Playing two sounds at the same time (Layer mode)
16
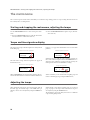
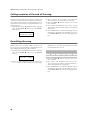
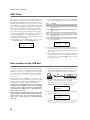
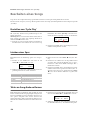
Playing two sounds at the same time (Layer mode)
You can play two sounds at the same time on the keyboard. It
is like having two “overlapping” sounds. This is called the Lay-
er mode.
Keep in mind that, when in Layer mode, the total number of
voices that you can play at the same time is reduced, depend-
ing on the total number of oscillators used by the selected
sounds.
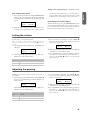
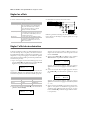
Entering the Layer mode
To access Layer mode from any other mode, press together
two sound selection buttons. The lowest-numbered sound in
the following diagram will be the Main sound, while the high-
est-numbered sound will be the Layer sound:
The name of the two sounds will appear in the display:
Exit from the Layer mode
To exit Layer mode, press a single sound selection button, or
the SPLIT button. You will return to the Single mode, with a
single sound playing on the keyboard, or to the Split mode,
with a sound on the left and one on the right of the split point.
Selecting a different pair of sounds
To select different sounds, press a different pair of sound selec-
tion buttons. The last selected variation of the sounds corre-
sponding to the new buttons will be selected.
Selecting a variation of the Main sound
You can select a variation of the current Main sound.
1. Be sure the cursor is in the first line of the display. If it isn’t,
use the SCROLL
button to move it there:
2. Use the VARIATION button to select a different sound
variation. As an alternative, use the +/YES and -/NO but-
tons to choose a different sound variation.
Selecting a variation of the Layer sound
You can select a variation of the current Layer sound.
1. Use the SCROLL
button to move the cursor to the Lay-
er sound.
2. Use the VARIATION button to select a different sound
variation. As an alternative, use the +/YES and -/NO but-
tons to choose a different sound variation.
3. If you desire so, use the SCROLL
buttons to move the
cursor back to the Main sound.
Balancing layered sounds
You can adjust the sound’s volume balance.
• Keep the Main sound button pressed, to increase its vol-
ume and (after the maximum value has been reached)
decrease the volume of the Layer sound. Release the but-
ton when done.
• Keep the Layer sound button pressed, to increase its vol-
ume and (after the maximum value has been reached)
decrease the volume of the Main sound. Release the but-
ton when done.
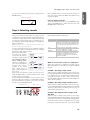
While the volume is changing, a meter is shown in the display:
Layer
Main
12345
678910
GrandPiano 4/4
Strings 120
Main sound
Layer sound
GrandPiano 4/4
Strings 120
Cursor
GrandPiano 4/4
Strings 120
GrandPiano 4/4
Strings 120
Scroll
M:90
L:127
Main sound’s volume
Layer sound’s volume

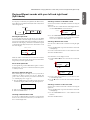
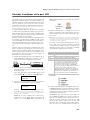
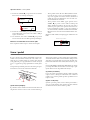
Basic functions > Playing different sounds with your left and right hand (Split mode)
17
English
Playing different sounds with your left and right hand
(Split mode)
You can play a sound with your right hand (the Main sound),
and a different one with the left hand (the Left sound). This is
called the Split mode.
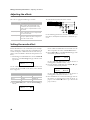
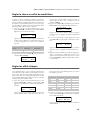
Entering the Split mode
To access Split mode from any other mode, press the SPLIT
button. The Main sound of the Single or Layer mode will be as-
signed to the right half of the keyboard (Main area, shown in
the first line of the display), and a Bass sound will be assigned
to the left half of the keyboard (Left area, shown in the second
line of the display).
While the Ac.Bass sound will be chosen as the Left sound the
first time you enter Split mode, the last selected sound will be
assigned if you return to Split mode later.
Exit from the Split mode
To exit Split mode, press the SPLIT button again to return to
the Single mode, or press two sound selection buttons together
to enter Layer mode.
Choosing a different split point
If the selected split point is too high or too low, you can choose
a different one. Please note that you can set a default split
point, to have it ready each time you turn the instrument on
(see “Default split point” on page 51).
1. Keep the SPLIT button pressed. The current split point is
shown in the display while you keep the button pressed.
2. Play a note to set a different split point.
3. Release the SPLIT button.
Selecting a different Main sound
You can select a different Main sound after accessing the Split
mode. Use the sound selection buttons as you would do to se-
lect a sound in Single mode.
Selecting a variation of the Main sound
You can select a variation of the Main sound after accessing the
Split mode.
1. Be sure the cursor is in the first line of the display. If it isn’t,
use the SCROLL
button to move it there:
2. Use the VARIATION button to select a different sound
variation. As an alternative, use the +/YES and -/NO but-
tons to choose a different sound variation.
Selecting a different Left sound
You can select a different Left sound after accessing the Split
mode.
1. Keep the SPLIT button pressed. The indicator of the Left
sound lights up.
2. Use the sound selection buttons to select a different sound.
3. Release the SPLIT button.
As an alternative, use the display controls:
1. Use the SCROLL
buttons to move the cursor to the Left
sound.
2. Use the sound selection buttons as you would do to select
a sound in Single mode.
3. Use the
buttons to move the cursor back to the Main
sound.
Selecting a variation of the Left sound
You can select a variation of the Left sound after accessing the
Split mode.
1. Keep the SPLIT button pressed. The indicator of the Left
sound lights up.
2. Use the VARIATION button to select a different sound
variation.
3. Release the SPLIT button.
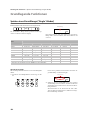
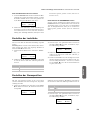
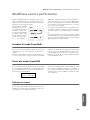
Split Point
Main
Left
GrandPiano 4/4
Ac.Bass 120
Main sound
Left sound
SplitPoint: F#3
GrandPiano 4/4
Ac.Bass 120
Cursor
GrandPiano 4/4
Ac.Bass 120
GrandPiano 4/4
Ac.Bass 12
Scroll

Basic functions > Using the pedals
18
As an alternative, use the display controls:
1. Use the SCROLL
buttons to move the cursor to the Left
sound.
2. Use the VARIATION button to select a different sound
variation. As an alternative, use the +/YES and -/NO but-
tons to choose a different sound variation.
3. If you want, use the SCROLL
buttons to move the cur-
sor back to the Main sound.
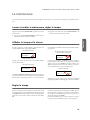
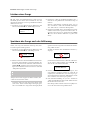
Balancing sounds in Split mode
You can adjust the sound’s volume balance.
• Keep the Main sound button (the one whose indicator is
turned on) pressed, to increase its volume and (after the
maximum value has been reached) decrease the volume of
the Left sound. Release the button when done.
• Keep the SPLIT button pressed, or press the SCROLL
button to move the cursor to the second line of the dis-
play. The indicator of the Left sound lights up. Then, keep
the Left sound button pressed, to increase its volume and
(after the maximum value has been reached) decrease the
volume of the Main sound. Release the button when done.
While the volume is changing, a meter is shown in the display:
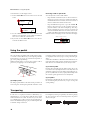
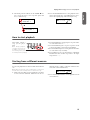
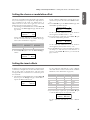
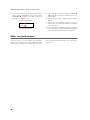
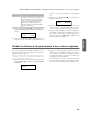
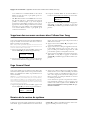
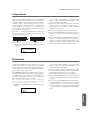
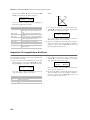
Using the pedals
The C-520 has three assignable pedals, usually acting as damp-
er, sostenuto, and soft. However, you can assign the pedals dif-
ferent functions (see page 47 for sound-level assignment, or
page 52 for global programming).
With the default settings, you can use these pedals to add ex-
pression to your playing, as on a traditional piano.
(1) Damper pedal
The damper pedal simulates the natural string resonances of
an acoustic piano. Pressing this pedal will sustain the sound,
producing a richly resonant decay. You can control the damp-
er’s depth by how far down you press on the pedal (“half-ped-
aling”).
Sounds like GrandPiano, BriteGrand and MelloGrand also
trigger EPx effects while in Single and Split mode. However,
these effects are not available when you are in Layer mode.
(2) Sostenuto pedal
Pressing this pedal will apply the damper effect only to the
notes that are already being held down on the keyboard, and
will sustain only those notes. The damper effect will not be ap-
plied to any additional notes that you play while holding down
the Sostenuto pedal (apart for the notes already held).
(3) Soft pedal
Pressing this pedal will make the tone softer. You can control
the soft effect depth by how far down you press on the pedal
(“half-pedaling”)
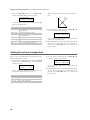
Transposing
In some cases, a song may be written in a difficult key (e.g.,
many black keys), or you may wish to shift the pitch to match
another instrument or vocalist. In such cases, you can trans-
pose (shift the pitch) so that you can use an easier fingering, or
use the same familiar fingering to play at a different pitch. This
is called the Transpose function.
For example if you transpose upward by one semitone, playing
the notes shown at the lower left will produce the pitches
shown at the right.
GrandPiano 4/4
Ac.Bass 120
GrandPiano 4/4
Ac.Bass 12
Scroll
M:108
L:127
Main sound’s volume
Left sound’s volume
1
2
3
Soft
Sostenuto
Damper
Seite wird geladen ...
Seite wird geladen ...
Seite wird geladen ...
Seite wird geladen ...
Seite wird geladen ...
Seite wird geladen ...
Seite wird geladen ...
Seite wird geladen ...
Seite wird geladen ...
Seite wird geladen ...
Seite wird geladen ...
Seite wird geladen ...
Seite wird geladen ...
Seite wird geladen ...
Seite wird geladen ...
Seite wird geladen ...
Seite wird geladen ...
Seite wird geladen ...
Seite wird geladen ...
Seite wird geladen ...
Seite wird geladen ...
Seite wird geladen ...
Seite wird geladen ...
Seite wird geladen ...
Seite wird geladen ...
Seite wird geladen ...
Seite wird geladen ...
Seite wird geladen ...
Seite wird geladen ...
Seite wird geladen ...
Seite wird geladen ...
Seite wird geladen ...
Seite wird geladen ...
Seite wird geladen ...
Seite wird geladen ...
Seite wird geladen ...
Seite wird geladen ...
Seite wird geladen ...
Seite wird geladen ...
Seite wird geladen ...
Seite wird geladen ...
Seite wird geladen ...
Seite wird geladen ...
Seite wird geladen ...
Seite wird geladen ...
Seite wird geladen ...
Seite wird geladen ...
Seite wird geladen ...
Seite wird geladen ...
Seite wird geladen ...
Seite wird geladen ...
Seite wird geladen ...
Seite wird geladen ...
Seite wird geladen ...
Seite wird geladen ...
Seite wird geladen ...
Seite wird geladen ...
Seite wird geladen ...
Seite wird geladen ...
Seite wird geladen ...
Seite wird geladen ...
Seite wird geladen ...
Seite wird geladen ...
Seite wird geladen ...
Seite wird geladen ...
Seite wird geladen ...
Seite wird geladen ...
Seite wird geladen ...
Seite wird geladen ...
Seite wird geladen ...
Seite wird geladen ...
Seite wird geladen ...
Seite wird geladen ...
Seite wird geladen ...
Seite wird geladen ...
Seite wird geladen ...
Seite wird geladen ...
Seite wird geladen ...
Seite wird geladen ...
Seite wird geladen ...
Seite wird geladen ...
Seite wird geladen ...
Seite wird geladen ...
Seite wird geladen ...
Seite wird geladen ...
Seite wird geladen ...
Seite wird geladen ...
Seite wird geladen ...
Seite wird geladen ...
Seite wird geladen ...
Seite wird geladen ...
Seite wird geladen ...
Seite wird geladen ...
Seite wird geladen ...
Seite wird geladen ...
Seite wird geladen ...
Seite wird geladen ...
Seite wird geladen ...
Seite wird geladen ...
Seite wird geladen ...
Seite wird geladen ...
Seite wird geladen ...
Seite wird geladen ...
Seite wird geladen ...
Seite wird geladen ...
Seite wird geladen ...
Seite wird geladen ...
Seite wird geladen ...
Seite wird geladen ...
Seite wird geladen ...
Seite wird geladen ...
Seite wird geladen ...
Seite wird geladen ...
Seite wird geladen ...
Seite wird geladen ...
Seite wird geladen ...
Seite wird geladen ...
Seite wird geladen ...
Seite wird geladen ...
Seite wird geladen ...
Seite wird geladen ...
Seite wird geladen ...
Seite wird geladen ...
Seite wird geladen ...
Seite wird geladen ...
Seite wird geladen ...
Seite wird geladen ...
Seite wird geladen ...
Seite wird geladen ...
Seite wird geladen ...
Seite wird geladen ...
Seite wird geladen ...
Seite wird geladen ...
Seite wird geladen ...
Seite wird geladen ...
Seite wird geladen ...
Seite wird geladen ...
Seite wird geladen ...
Seite wird geladen ...
Seite wird geladen ...
Seite wird geladen ...
Seite wird geladen ...
Seite wird geladen ...
Seite wird geladen ...
Seite wird geladen ...
Seite wird geladen ...
Seite wird geladen ...
Seite wird geladen ...
Seite wird geladen ...
Seite wird geladen ...
Seite wird geladen ...
Seite wird geladen ...
Seite wird geladen ...
Seite wird geladen ...
Seite wird geladen ...
Seite wird geladen ...
Seite wird geladen ...
Seite wird geladen ...
Seite wird geladen ...
Seite wird geladen ...
Seite wird geladen ...
Seite wird geladen ...
Seite wird geladen ...
Seite wird geladen ...
Seite wird geladen ...
Seite wird geladen ...
Seite wird geladen ...
Seite wird geladen ...
Seite wird geladen ...
Seite wird geladen ...
Seite wird geladen ...
Seite wird geladen ...
Seite wird geladen ...
Seite wird geladen ...
Seite wird geladen ...
Seite wird geladen ...
Seite wird geladen ...
Seite wird geladen ...
Seite wird geladen ...
Seite wird geladen ...
Seite wird geladen ...
Seite wird geladen ...
Seite wird geladen ...
Seite wird geladen ...
Seite wird geladen ...
Seite wird geladen ...
Seite wird geladen ...
Seite wird geladen ...
Seite wird geladen ...
Seite wird geladen ...
Seite wird geladen ...
Seite wird geladen ...
Seite wird geladen ...
Seite wird geladen ...
Seite wird geladen ...
Seite wird geladen ...
Seite wird geladen ...
Seite wird geladen ...
Seite wird geladen ...
Seite wird geladen ...
Seite wird geladen ...
Seite wird geladen ...
Seite wird geladen ...
Seite wird geladen ...
Seite wird geladen ...
Seite wird geladen ...
Seite wird geladen ...
Seite wird geladen ...
Seite wird geladen ...
Seite wird geladen ...
Seite wird geladen ...
Seite wird geladen ...
Seite wird geladen ...
Seite wird geladen ...
Seite wird geladen ...
Seite wird geladen ...
Seite wird geladen ...
Seite wird geladen ...
Seite wird geladen ...
Seite wird geladen ...
Seite wird geladen ...
Seite wird geladen ...
Seite wird geladen ...
Seite wird geladen ...
Seite wird geladen ...
Seite wird geladen ...
Seite wird geladen ...
Seite wird geladen ...
Seite wird geladen ...
Seite wird geladen ...
Seite wird geladen ...
Seite wird geladen ...
Seite wird geladen ...
Seite wird geladen ...
Seite wird geladen ...
Seite wird geladen ...
Seite wird geladen ...
Seite wird geladen ...
Seite wird geladen ...
Seite wird geladen ...
Seite wird geladen ...
Seite wird geladen ...
Seite wird geladen ...
Seite wird geladen ...
Seite wird geladen ...
Seite wird geladen ...
Seite wird geladen ...
Seite wird geladen ...
Seite wird geladen ...
Seite wird geladen ...
Seite wird geladen ...
Seite wird geladen ...
Seite wird geladen ...
Seite wird geladen ...
Seite wird geladen ...
Seite wird geladen ...
Seite wird geladen ...
Seite wird geladen ...
Seite wird geladen ...
Seite wird geladen ...
Seite wird geladen ...
Seite wird geladen ...
Seite wird geladen ...
Seite wird geladen ...
Seite wird geladen ...
Seite wird geladen ...
Seite wird geladen ...
Seite wird geladen ...
Seite wird geladen ...
Seite wird geladen ...
Seite wird geladen ...
Seite wird geladen ...
Seite wird geladen ...
Seite wird geladen ...
Seite wird geladen ...
Seite wird geladen ...
Seite wird geladen ...
Seite wird geladen ...
-
 1
1
-
 2
2
-
 3
3
-
 4
4
-
 5
5
-
 6
6
-
 7
7
-
 8
8
-
 9
9
-
 10
10
-
 11
11
-
 12
12
-
 13
13
-
 14
14
-
 15
15
-
 16
16
-
 17
17
-
 18
18
-
 19
19
-
 20
20
-
 21
21
-
 22
22
-
 23
23
-
 24
24
-
 25
25
-
 26
26
-
 27
27
-
 28
28
-
 29
29
-
 30
30
-
 31
31
-
 32
32
-
 33
33
-
 34
34
-
 35
35
-
 36
36
-
 37
37
-
 38
38
-
 39
39
-
 40
40
-
 41
41
-
 42
42
-
 43
43
-
 44
44
-
 45
45
-
 46
46
-
 47
47
-
 48
48
-
 49
49
-
 50
50
-
 51
51
-
 52
52
-
 53
53
-
 54
54
-
 55
55
-
 56
56
-
 57
57
-
 58
58
-
 59
59
-
 60
60
-
 61
61
-
 62
62
-
 63
63
-
 64
64
-
 65
65
-
 66
66
-
 67
67
-
 68
68
-
 69
69
-
 70
70
-
 71
71
-
 72
72
-
 73
73
-
 74
74
-
 75
75
-
 76
76
-
 77
77
-
 78
78
-
 79
79
-
 80
80
-
 81
81
-
 82
82
-
 83
83
-
 84
84
-
 85
85
-
 86
86
-
 87
87
-
 88
88
-
 89
89
-
 90
90
-
 91
91
-
 92
92
-
 93
93
-
 94
94
-
 95
95
-
 96
96
-
 97
97
-
 98
98
-
 99
99
-
 100
100
-
 101
101
-
 102
102
-
 103
103
-
 104
104
-
 105
105
-
 106
106
-
 107
107
-
 108
108
-
 109
109
-
 110
110
-
 111
111
-
 112
112
-
 113
113
-
 114
114
-
 115
115
-
 116
116
-
 117
117
-
 118
118
-
 119
119
-
 120
120
-
 121
121
-
 122
122
-
 123
123
-
 124
124
-
 125
125
-
 126
126
-
 127
127
-
 128
128
-
 129
129
-
 130
130
-
 131
131
-
 132
132
-
 133
133
-
 134
134
-
 135
135
-
 136
136
-
 137
137
-
 138
138
-
 139
139
-
 140
140
-
 141
141
-
 142
142
-
 143
143
-
 144
144
-
 145
145
-
 146
146
-
 147
147
-
 148
148
-
 149
149
-
 150
150
-
 151
151
-
 152
152
-
 153
153
-
 154
154
-
 155
155
-
 156
156
-
 157
157
-
 158
158
-
 159
159
-
 160
160
-
 161
161
-
 162
162
-
 163
163
-
 164
164
-
 165
165
-
 166
166
-
 167
167
-
 168
168
-
 169
169
-
 170
170
-
 171
171
-
 172
172
-
 173
173
-
 174
174
-
 175
175
-
 176
176
-
 177
177
-
 178
178
-
 179
179
-
 180
180
-
 181
181
-
 182
182
-
 183
183
-
 184
184
-
 185
185
-
 186
186
-
 187
187
-
 188
188
-
 189
189
-
 190
190
-
 191
191
-
 192
192
-
 193
193
-
 194
194
-
 195
195
-
 196
196
-
 197
197
-
 198
198
-
 199
199
-
 200
200
-
 201
201
-
 202
202
-
 203
203
-
 204
204
-
 205
205
-
 206
206
-
 207
207
-
 208
208
-
 209
209
-
 210
210
-
 211
211
-
 212
212
-
 213
213
-
 214
214
-
 215
215
-
 216
216
-
 217
217
-
 218
218
-
 219
219
-
 220
220
-
 221
221
-
 222
222
-
 223
223
-
 224
224
-
 225
225
-
 226
226
-
 227
227
-
 228
228
-
 229
229
-
 230
230
-
 231
231
-
 232
232
-
 233
233
-
 234
234
-
 235
235
-
 236
236
-
 237
237
-
 238
238
-
 239
239
-
 240
240
-
 241
241
-
 242
242
-
 243
243
-
 244
244
-
 245
245
-
 246
246
-
 247
247
-
 248
248
-
 249
249
-
 250
250
-
 251
251
-
 252
252
-
 253
253
-
 254
254
-
 255
255
-
 256
256
-
 257
257
-
 258
258
-
 259
259
-
 260
260
-
 261
261
-
 262
262
-
 263
263
-
 264
264
-
 265
265
-
 266
266
-
 267
267
-
 268
268
-
 269
269
-
 270
270
-
 271
271
-
 272
272
-
 273
273
-
 274
274
-
 275
275
-
 276
276
-
 277
277
-
 278
278
-
 279
279
-
 280
280
-
 281
281
-
 282
282
-
 283
283
-
 284
284
-
 285
285
-
 286
286
-
 287
287
-
 288
288
-
 289
289
-
 290
290
-
 291
291
-
 292
292
-
 293
293
-
 294
294
-
 295
295
-
 296
296
-
 297
297
-
 298
298


Korg C-520 Benutzerhandbuch
- Kategorie
- Digitale Klaviere
- Typ
- Benutzerhandbuch
- Dieses Handbuch eignet sich auch für
in anderen Sprachen
- English: Korg C-520 User manual
- français: Korg C-520 Manuel utilisateur
- italiano: Korg C-520 Manuale utente
Verwandte Artikel
-
Korg SP-100 Bedienungsanleitung
-
-
-
-
-
Korg D1 Bedienungsanleitung
-
Korg G1 Air Bedienungsanleitung
-
-
Korg LP-380U Bedienungsanleitung
-