Thrane&Thrane EXPLORER 300 Getting Started
- Typ
- Getting Started


GB
GETTING STARTED
Congratulations on the purchase of your EXPLORER 300.
Before you start, please check that the following items are present:
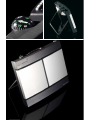
• EXPLORER 300 terminal with built-in antenna
• Battery
• AC/DC adapter
• LAN cable
• Getting Started kit including Quick Guide, electronic manual, etc.
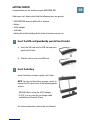
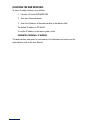
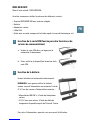
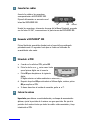
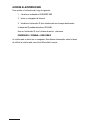
1 Insert the SIM card (provided by your Airtime Provider)
a. Insert the SIM card into the SIM slot and press
gently until it locks.
b. Slide the lock to secure the SIM card.
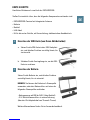
2 Insert the battery
Insert the battery and press gently until it locks.
NOTE: You can use the battery as power source, or
connect the DC input to one of the following power
sources:
• 100-240 V Mains using the AC/DC adapter
• 12 V DC in a car using the car charger cable
available from Thrane & Thrane
For further information, refer to the User Manual.

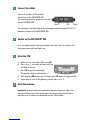
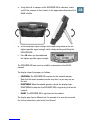
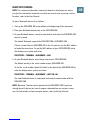
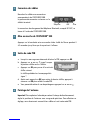
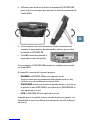
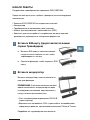
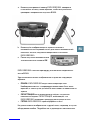
3 Connect the cables
Connect the cables to the relevant
connectors on the EXPLORER 300.
The connector panel is located on the side
of the EXPLORER 300.
One connector, the Bluetooth phone charging connector marked DC OUT, is
placed at the back of the EXPLORER 300.
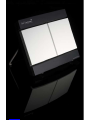
4 Switch on the EXPLORER® 300
Push the power button next to the display and hold it for 1-2 seconds until
the green power indicator lights up.
5 Enter the PIN
a. When you are asked for a PIN, press OK.
b. Press or a number of times until the
first digit is correct.
c. Press OK to go to the next digit.
The previous digit is indicated by a *.
d. After pressing OK to enter the last digit, press OK again to apply the PIN.
e. If you want to turn off the pointing sound, press or .
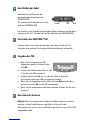
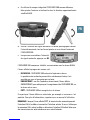
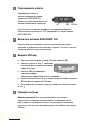
6 Point the antenna
Important! To obtain optimum bandwidth and operating time, adjust the
position of the antenna with great precision. Do not adjust the antenna
position until all cables are connected and the PIN entered.
Power
Phone LAN

GB
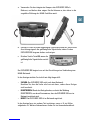
a. Using the built-in compass of the EXPLORER 300 as reference, rotate
and tilt the antenna so that it points in the approximate direction of the
BGAN satellite.
b. Use the displayed signal strength and the pointing sound to find the
highest possible signal strength, while slowly rotating and tilting the
EXPLORER 300.
c. Press OK when you have obtained
the highest possible signal strength.
The EXPLORER 300 now starts to establish a connection to the BGAN
network.
The display shows the progress as follows:
• SEARCHING: The EXPLORER 300 searches for the network operator.
Note that the search procedure can be very short, so you may not see
this text.
•
REGISTERING: When the network operator is found, the display shows
REGISTERING to show that the EXPLORER 300 is registering itself on the
network.
• READY: The EXPLORER 300 is registered on the network.
The display may show a different text, for example if an error has occurred.
For further information, refer to the User Manual.

NOTE: When the display shows READY, the terminal automatically activates
the LAN interface if the cable is connected and the interface is enabled. If
you are not going to use the LAN connection, remove the cable or disable
the LAN interface to avoid being charged for any transmission through this
interface.
You are now ready to make phone calls, browse the Internet or check your
e-mails, send files, run a video conference and much more.
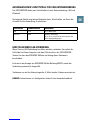
MAKING A CALL FROM THE EXPLORER® 300
If you are using a Bluetooth handset, the handset must be paired and placed close
to the EXPLORER 300. For information on pairing, see the section BLUETOOTH
PAIRING at the end of this document.
To make a call from the EXPLORER 300, dial
00 <country code> <phone number> followed by # or off-hook key.
Example: To call Thrane & Thrane in Denmark: (+45 39558800), dial
00 45 39558800 followed by # or off-hook key.
MAKING A CALL TO THE EXPLORER® 300
To make a call to the EXPLORER 300, dial
+870 <mobile number>
+ is 00 for Europe and many other countries.

GB
CHOOSING AN INTERFACE FOR DATA CONNECTION
The EXPLORER 300 has two types of interface for data connection: LAN interface
and Bluetooth interface.
The following table shows some characteristics of each interface, to help you
choose the right interface for your application.
Interface Power Consumption Range
LAN High Up to 100 m of cable
Bluetooth Medium Wireless connection.
Up to 25 m depending on the transmitter in the
computer and on the transmission conditions.
MAKING A LAN CONNECTION
To make a LAN connection, simply connect the LAN cable between your computer
and the LAN connector on the EXPLORER 300, and start up the EXPLORER 300 as
described in the beginning of this document.
As soon as the display of the EXPLORER 300 shows READY, the connection is
established automatically.
You are now ready to browse the Internet, check e-mails, send files etc.
NOTE: For information on configuration, refer to the User Manual.

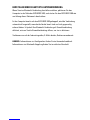
MAKING A BLUETOOTH DATA CONNECTION
To make a Bluetooth connection, place the computer close to the EXPLORER 300
and start up the EXPLORER 300 as described in the beginning of this document.
If the computer is already paired with the EXPLORER 300, the connection is
established automatically when both devices are ready and have discovered each
other. Note, however, that if your Bluetooth connection is defined as a dial-up
connection, you have to open the dial-up connection to activate the connection.
You are now ready to browse the Internet, check e-mails, send files etc.
NOTE: For information on configuration, refer to the User Manual. For information
on Bluetooth pairing, refer to the next section.

GB
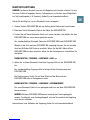
BLUETOOTH PAIRING
NOTE: This section only describes how to pair devices in which you can enter a
passkey. For information on devices in which you cannot enter a passkey, such as
headsets, refer to the User Manual.
To pair a Bluetooth device, do as follows:
1. Start up the EXPLORER 300 as described in the beginning of this document.
2. Place your Bluetooth device close to the EXPLORER 300.
3. On your Bluetooth device, search for new devices and select the EXPLORER 300
when it is found.
The default Bluetooth name of the EXPLORER 300 is EXPLORER 300.
If there is more than one EXPLORER 300 in the list, you can use the MAC address
to locate the correct one. To see the MAC address of your EXPLORER 300, enter
the display menu system and select
PROPERTIES > TERMINAL > HARDWARE > MAC.
4. On your Bluetooth device, enter the passkey of your EXPLORER 300.
The default passkey is the serial number of your EXPLORER 300.
To see the serial number, look at the label on the back of the EXPLORER 300 or
enter the display menu system and select
PROPERTIES > TERMINAL > HARDWARE > UNIT SER. NO.
The new Bluetooth device is now paired and ready to communicate with the
EXPLORER 300.
NOTE: Maximum 2 devices can be paired with the EXPLORER 300. If you have
already paired 2 devices you have to unpair a device before you can pair a new
one. For information on how to unpair devices, refer to the User Manual.

ACCESSING THE WEB INTERFACE
To access the web interface, do as follows:
1. Connect a PC to the EXPLORER 300.
2. Start your Internet browser.
3. Enter the IP address of the web interface in the address field.
The default IP address is 192.168.0.1.
To see the IP address in the menu system, select
PROPERTIES>TERMINAL> IP ADDRESS.
The web interface now opens in your browser. For information on how to use the
web interface, refer to the User Manual.

DE
ERSTE SCHRITTE
Herzlichen Glückwunsch zum Kauf des EXPLORER 300.
Stellen Sie zunächst sicher, dass die folgenden Komponenten vorhanden sind:
• EXPLORER 300-Terminal mit integrierter Antenne
• Batterie
• Netzteil
• LAN-Kabel
• Kit für die ersten Schritte, mit Kurzanleitung, elektronischem Handbuch etc.
1 Einsetzen der SIM-Karte (von Ihrem Netzbetreiber)
a. Setzen Sie die SIM-Karte in den SIM-Steckplatz
ein, und drücken Sie diese vorsichtig hinein, bis
sie einrastet.
b. Schieben Sie die Verriegelung ein, um die SIM-
Karte zu arretieren.
2 Einsetzen der Batterie
Setzen Sie die Batterie ein, und drücken Sie diese
vorsichtig hinein, bis sie einrastet.
HINWEIS: Sie können die Batterie als Stromquelle
verwenden, oder den Netzanschluss mit einer der
folgenden Stromquellen verbinden:
• Netzspannung mit 100 bis 240 V (über Netzteil)
• 12-V-Gleichstromanschluss in einem Fahrzeug
(über das Kfz-Adapterkabel von Thrane & Thrane)
Weitere Informationen finden Sie im Anwenderhandbuch.

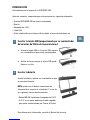
3 Anschließen der Kabel
Verbinden Sie die Kabel mit den
entsprechenden Anschlüssen des
EXPLORER 300.
Die Anschlussleiste befindet sich an der
Seite des EXPLORER 300.
Ein Anschluss zum Aufladen von Bluetooth-fähigen Telefonen mit der Kenn-
zeichnung „DC OUT“ befindet sich auf der Rückseite des EXPLORER 300.
4 Einschalten des EXPLORER® 300
Drücken Sie die Taste neben der Anzeige, und halten Sie diese 1 bis 2
Sekunden lang gedrückt, bis die grüne Netzkontrollleuchte aufleuchtet.
5 Eingeben der PIN
a. Wenn Sie zur Eingabe einer PIN
aufgefordert werden, drücken Sie die
Taste OK.
b. Drücken Sie wiederholt die Taste oder
bis die erste Ziffer korrekt ist.
c. Drücken Sie die Taste OK, um zur nächsten Ziffer zu wechseln.
An Stelle der vorherigen Ziffer erscheint das Symbol *.
d. Wenn Sie zur Eingabe der letzten Ziffer die Taste OK gedrückt haben,
drücken Sie erneut OK, um die PIN anzuwenden.
e. Wenn Sie die Hinweistöne deaktivieren möchten, drücken Sie die Taste
oder .
6 Ausrichten der Antenne
Wichtig! Wenn Sie die optimale Bandbreite und Betriebsdauer erreichen
möchten, richten Sie die Antenne sorgfältig aus. Passen Sie die
Antennenposition erst an, wenn alle Kabel angeschlossen sind und die PIN
eingegeben wurde.
Netz
Telefon LAN

DE
a. Verwenden Sie den integrierten Kompass des EXPLORER 300 als
Referenz, und drehen bzw. neigen Sie die Antenne so, dass diese in die
ungefähre Richtung des BGAN-Satelliten weist.
b. Ermitteln Sie mit Hilfe der angezeigten Signalstärke und des akustischen
Ausrichtungssignals die größtmögliche Signalstärke, indem Sie den
EXPLORER 300 langsam drehen und neigen.
c. Drücken Sie die Taste OK, wenn die
größtmögliche Signalstärke erreicht
ist.
Der EXPLORER 300 beginnt nun mit der Einrichtung einer Verbindung zum
BGAN-Netzwerk.
In der Anzeige wird der Fortschritt wie folgt dargestellt:
• SUCHEN: Der EXPLORER 300 sucht nach dem Netzwerk.
Beachten Sie, dass die Suche sehr kurz sein kann, sodass dieser Text gar
nicht erscheint.
•
REGISTRIEREN: Wurde das Netz gefunden, erscheint die Meldung
REGISTRIEREN, um darauf hinzuweisen, dass der EXPLORER 300 nun im
Netzwerk registriert wird.
• BEREIT: Der EXPLORER 300 ist im Netzwerk registriert.
In der Anzeige kann ein anderer Text erscheinen, wenn z. B. ein Fehler
aufgetreten ist. Weitere Informationen finden Sie im Anwenderhandbuch.

HINWEIS: Erscheint die Meldung BEREIT, aktiviert das Terminal automatisch die
LAN-Schnittstelle, wenn das Kabel angeschlossen und die Schnittstelle aktiviert
ist. Wenn Sie die LAN-Verbindung nicht nutzen möchten, entfernen Sie das
Kabel, oder deaktivieren Sie die LAN-Schnittstelle, um Verbindungskosten für
diese Schnittstelle zu vermeiden.
Sie können nun Anrufe tätigen, auf das Internet zugreifen, Ihre E-Mails
abrufen, Dateien versenden, eine Videokonferenz starten und vieles mehr.
TELEFONIEREN ÜBER DEN EXPLORER® 300
Wenn Sie ein Bluetooth-Handset verwenden, muss dieses mit dem EXPLORER 300
gekoppelt und in dessen Nähe platziert werden. Weitere Informationen hierzu
finden Sie im Abschnitt BLUETOOTH-KOPPLUNG am Ende dieses Dokuments.
Wenn Sie über den EXPLORER 300 telefonieren möchten, wählen Sie die Nummer
00 <Ländercode> <Rufnummer> gefolgt vom Zeichen # oder der Ruftaste.
Beispiel: Für einen Anruf bei Thrane & Thrane in Dänemark (+45 39558800)
wählen Sie 00 45 39558800 gefolgt von der Taste # oder der Ruftaste.
ANRUFEN DES EXPLORER® 300
Wenn Sie den EXPLORER 300 anrufen möchten, wählen Sie die Nummer
+870 <Mobilfunkrufnummer>
+ steht in Europa und vielen anderen Ländern für 00.

DE
AUSWÄHLEN EINER SCHNITTSTELLE FÜR EINE DATENVERBINDUNG
Der EXPLORER 300 bietet zwei Schnittstellen für eine Datenverbindung: LAN und
Bluetooth.
Die folgende Tabelle zeigt einige Merkmale dieser Schnittstellen, um Ihnen die
Auswahl für Ihre Anwendung zu erleichtern.
Schnittstelle Stromverbrauch Reichweite
LAN Hoch Bis zu 100 m Kabel
Bluetooth Mittel Wireless-Verbindung.
Bis zu 25 m, je nach Sender am Computer und
Übertragungsbedingungen.
HERSTELLEN EINER LAN-VERBINDUNG
Wenn Sie eine LAN-Verbindung herstellen möchten, verbinden Sie einfach das
LAN-Kabel mit Ihrem Computer und dem LAN-Anschluss des EXPLORER 300.
Starten Sie dann den EXPLORER 300 wie am Anfang dieses Dokuments
beschrieben.
Erscheint in der Anzeige des EXPLORER 300 die Meldung BEREIT, wurde die
Verbindung automatisch hergestellt.
Sie können nun auf das Internet zugreifen, E-Mails abrufen, Dateien versenden etc.
HINWEIS: Informationen zur Konfiguration finden Sie im Anwenderhandbuch.

HERSTELLEN EINER BLUETOOTH-DATENVERBINDUNG
Wenn Sie eine Bluetooth-Verbindung herstellen möchten, platzieren Sie den
Computer in der Nähe des EXPLORER 300, und starten Sie den EXPLORER 300 wie
am Anfang dieses Dokuments beschrieben.
Ist der Computer bereits mit dem EXPLORER 300 gekoppelt, wird die Verbindung
automatisch hergestellt, wenn beide Geräte bereit sind und sich gegenseitig
erkannt haben. Ist jedoch Ihre Bluetooth-Verbindung als Einwahlverbindung
definiert, müssen Sie die Einwahlverbindung öffnen, um sie zu aktivieren.
Sie können nun auf das Internet zugreifen, E-Mails abrufen, Dateien versenden etc.
HINWEIS: Informationen zur Konfiguration finden Sie im Anwenderhandbuch.
Informationen zur Bluetooth-Kopplung finden Sie im nächsten Abschnitt.

DE
BLUETOOTH-KOPPLUNG
HINWEIS: In diesem Abschnitt wird nur die Kopplung von Geräten erläutert, für die
Sie einen Schlüssel eingeben können. Informationen zu Geräten ohne Möglichkeit
zur Schlüsseleingabe (z. B. Headsets) finden Sie im Anwenderhandbuch.
Gehen Sie wie folgt vor, um ein Bluetooth-Gerät zu koppeln:
1. Starten Sie den EXPLORER 300 wie am Anfang dieses Dokuments beschrieben.
2. Platzieren Sie Ihr Bluetooth-Gerät in der Nähe des EXPLORER 300.
3. Suchen Sie mit Ihrem Bluetooth-Gerät nach neuen Geräten, und wählen Sie den
EXPLORER 300 aus, wenn dieser gefunden wurde.
Der standardmäßige Bluetooth-Name des EXPLORER 300 lautet EXPLORER 300.
Werden in der Liste mehrere EXPLORER 300 angezeigt, können Sie das korrekte
Gerät mit Hilfe der MAC-Adresse ermitteln. Wenn Sie die MAC-Adresse Ihres
EXPLORER 300 einsehen möchten, öffnen Sie das Anzeigemenü, und wählen Sie
die Option
EIGENSCHAFTEN > TERMINAL > HARDWARE > MAC aus.
4. Geben Sie an Ihrem Bluetooth-Gerät den Zugangsschlüssel des EXPLORER 300
ein.
Der standardmäßige Zugangsschlüssel entspricht der Seriennummer des
EXPLORER 300.
Die Seriennummer finden Sie auf dem Etikett auf der Rückseite des
EXPLORER 300 oder im Anzeigemenü unter
EIGENSCHAFTEN > TERMINAL > HARDWARE > SERIENNUMMER.
Das neue Bluetooth-Gerät ist nun gekoppelt und kann mit dem EXPLORER 300
kommunizieren.
HINWEIS: Mit dem EXPLORER 300 können maximal zwei Geräte gekoppelt
werden. Sind bereits zwei Geräte gekoppelt, müssen Sie zunächst die Kopplung
eines Geräts aufheben.
Informationen zum Aufheben der Kopplung finden Sie im Anwenderhandbuch.

ZUGREIFEN AUF DAS WEB-INTERFACE
Gehen Sie wie folgt vor, um auf das Web-Interface zuzugreifen:
1. Verbinden Sie einen PC mit dem EXPLORER 300.
2. Starten Sie Ihren Internet-Browser.
3. Geben Sie die IP-Adresse des Web-Interface im Adressfeld ein.
Die standardmäßige IP-Adresse lautet 192.168.0.1.
Wenn Sie die IP-Adresse im Menüsystem anzeigen möchten, wählen Sie die
Option
EIGENSCHAFTEN >TERMINAL> IP-ADRESSE aus.
Das Web-Interface wird nun im Browser geöffnet. Informationen zur Verwendung
des Web-Interface finden Sie im Anwenderhandbuch.

FR
MISE EN ROUTE
Merci d’avoir acheté l’EXPLORER 300.
Avant de commencer, vérifiez la présence des éléments suivants :
• Terminal EXPLORER 300 avec antenne intégrée
• Batterie
• Adaptateur secteur
• Câble LAN
• Kit de mise en route comprenant le Guide rapide, le manuel électronique, etc.
1 Insertion de la carte SIM (fournie par votre fournisseur de
services de communications)
a. Insérez la carte SIM dans son logement et
enclenchez-la doucement.
b. Faites coulisser le dispositif de fermeture de la
carte SIM.
2 Insertion de la batterie
Insérez la batterie et enclenchez-la doucement.
REMARQUE : vous pouvez utiliser la batterie
comme source d’alimentation ou connecter l’entrée
CC à l’une des sources d’alimentation suivantes :
• Alimentation 100-240 V, à l’aide de l’adaptateur
secteur.
• CC 12 V dans une voiture, à l’aide du câble de
chargement disponible auprès de Thrane & Thrane.
Pour plus d’informations, reportez-vous au manuel d’utilisation.

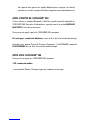
3 Connexion des câbles
Branchez les câbles aux connecteurs
correspondants de l’EXPLORER 300.
Le panneau de connexion se trouve sur le
côté du terminal.
Le connecteur de chargement de téléphone Bluetooth, marqué DC OUT, se
trouve à l’arrière de l’EXPLORER 300.
4 Mise en marche de l’EXPLORER® 300
Appuyez sur la touche de mise en marche située à côté de l’écran pendant 1
à 2 secondes jusqu’à ce que le voyant vert s’allume.
5 Saisie du code PIN
a. Lorsqu’un message vous demande d’entrer le PIN, appuyez sur OK.
b. Appuyez sur ou sur jusqu’à ce que
le premier chiffre voulu s’affiche.
c. Appuyez sur OK pour passer à la saisie du
chiffre suivant.
Le chiffre précédent est accompagné du
signe *.
d. Après avoir appuyé sur OK pour entrer le dernier chiffre, appuyez à
nouveau sur OK pour valider le code PIN.
e. Vous pouvez désactiver le son de pointage en appuyant sur ou sur .
6 Pointage de l’antenne
Important ! Pour optimiser la bande passante et le temps de fonctionnement,
réglez la position de l’antenne avec une grande précision. Pour effectuer ce
réglage, vous devez avoir connecté tous câbles et saisi votre code PIN.
Alim.
Téléphone LAN
Seite wird geladen ...
Seite wird geladen ...
Seite wird geladen ...
Seite wird geladen ...
Seite wird geladen ...
Seite wird geladen ...
Seite wird geladen ...
Seite wird geladen ...
Seite wird geladen ...
Seite wird geladen ...
Seite wird geladen ...
Seite wird geladen ...
Seite wird geladen ...
Seite wird geladen ...
Seite wird geladen ...
Seite wird geladen ...
Seite wird geladen ...
Seite wird geladen ...
Seite wird geladen ...
Seite wird geladen ...
Seite wird geladen ...
Seite wird geladen ...
Seite wird geladen ...
Seite wird geladen ...
-
 1
1
-
 2
2
-
 3
3
-
 4
4
-
 5
5
-
 6
6
-
 7
7
-
 8
8
-
 9
9
-
 10
10
-
 11
11
-
 12
12
-
 13
13
-
 14
14
-
 15
15
-
 16
16
-
 17
17
-
 18
18
-
 19
19
-
 20
20
-
 21
21
-
 22
22
-
 23
23
-
 24
24
-
 25
25
-
 26
26
-
 27
27
-
 28
28
-
 29
29
-
 30
30
-
 31
31
-
 32
32
-
 33
33
-
 34
34
-
 35
35
-
 36
36
-
 37
37
-
 38
38
-
 39
39
-
 40
40
-
 41
41
-
 42
42
-
 43
43
-
 44
44


Thrane&Thrane EXPLORER 300 Getting Started
- Typ
- Getting Started
in anderen Sprachen
- English: Thrane&Thrane EXPLORER 300
- français: Thrane&Thrane EXPLORER 300
- español: Thrane&Thrane EXPLORER 300
Andere Dokumente
-
Plantronics Explorer 380 serie Bedienungsanleitung
-
Terratec CONNECT A1 Quick Setup Gui Bedienungsanleitung
-
Terratec Grabster AV 300 MX Benutzerhandbuch
-
Terratec T3 Bedienungsanleitung
-
Korenix JetPort 5801 Quick Installation Manual
-
Asus RT-AC66U WEU7417 Benutzerhandbuch
-