
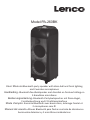
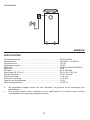
Model:PA-260BK
User Manual-Bluetooth party speaker with disco ball and front lighng
and 2 wireless microphones
Handleiding- Bluetooth-feestluidspreker met discobal en frontverlichng en
2 draadloze microfoons
Bedienungsanleitung- Bluetooth-Partylautsprecher mit Disco-Kugel,
Frontbeleuchtung und 2 Drahtlosmikrofone
Mode d’emploi- Enceinte Bluetooth avec boule disco, éclairage frontal et
2 microphones sans fil
Manual del usuario-Altavoz Bluetooth para fiestas con bola de discoteca e
iluminación delantera y 2 micrófonos inalámbricos

2
Index
English....................................................................................................................3
Nederlands ...........................................................................................................13
Deutsch.................................................................................................................25
Français................................................................................................................37
Español.................................................................................................................49
Version : 1.0

3
English
CAUTION:
Usage of controls or adjustments or performance of procedures other than those
specified herein may result in hazardous radiaon exposure.
PRECAUTIONS BEFORE USE
KEEP THESE INSTRUCTIONS IN MIND:
1. Do not cover or block any venlaon openings. When placing the device on a shelf,
leave 5 cm (2”) free space around the whole device.
2. Install in accordance with the supplied user manual.
3. Keep the device away from heat sources such as radiators, heaters, stoves, candles
and other heat-generang products or naked flame. The device can only be used
in moderate climates. Extremely cold or warm environments should be avoided.
Working temperature between 0° and 35°C.
4. Avoid using the device near strong magnec fields.
5. Electrostac discharge can disturb normal usage of this device. If so, simply reset
and restart the device following the instrucon manual. During file transmission,
please handle with care and operate in a stac-free environment.
6. Warning! Never insert an object into the product through the vents or openings.
High voltage flows through the product and inserng an object can cause electric
shock and/or short circuit internal parts. For the same reason, do not spill water or
liquid on the product.
7. Do not use in wet or moist areas such as bathrooms, steamy kitchens or near
swimming pools.
8. The device shall not be exposed to dripping or splashing and make sure that no
objects filled with liquids, such as vases, are placed on or near the apparatus.
9. Do not use this device when condensaon may occur. When the unit is used in a
warm wet room with damp, water droplets or condensaon may occur inside the
unit and the unit may not funcon properly; let the unit stand in power OFF for
1 or 2 hours before turning on the power: the unit should be dry before geng
any power.
10. Although this device is manufactured with the utmost care and checked several
mes before leaving the factory, it is sll possible that problems may occur, as with
all electrical appliances. If you noce smoke, an excessive build-up of heat or any
other unexpected phenomena, you should disconnect the plug from the main
power socket immediately.
11. This device must operate on a power source as specified on the specificaon label.
If you are not sure of the type of power supply used in your home, consult your
dealer or local power company.
12. Keep away from animals. Some animals enjoy bing on power cords.
13. To clean the device, use a so dry cloth. Do not use solvents or petrol based fluids.
To remove severe stains, you may use a damp cloth with dilute detergent.
14. The supplier is not responsible for damage or lost data caused by malfuncon,
misuse, modificaon of the device or baery replacement.

4
15. Do not interrupt the connecon when the device is formang or transferring files.
Otherwise, data may be corrupted or lost.
16. If the unit has USB playback funcon, the USB memory sck should be plugged
into the unit directly. Don’t use an USB extension cable because it can cause
interference resulng in failing of data.
17. The rang label has been marked on the boom or back panel of the device.
18. This device is not intended for use by people (including children) with physical,
sensory or mental disabilies, or a lack of experience and knowledge, unless
they’re under supervision or have received instrucons about the correct use of
the device by the person who is responsible for their safety.
19. This product is intended for non professional use only and not for commercial or
industrial use.
20. Make sure the unit is adjusted to a stable posion. Damage caused by using this
product in an unstable posion vibraons or shocks or by failure to follow any
other warning or precauon contained within this user manual will not be covered
by warranty.
21. Never remove the casing of this device.
22. Never place this device on other electrical equipment.
23. Do not allow children access to plasc bags.
24. Only use aachments/accessories specified by the manufacturer.
25. Refer all servicing to qualified service personnel. Servicing is required when the
device has been damaged in any way, such as the power supply cord or the plug,
when liquid has been spilled or objects have fallen into the device, when the
device has been exposed to rain or moisture, does not operate normally, or has
been dropped.
26. Long exposure to loud sounds from personal music players may lead to temporary
or permanent hearing loss.
27. If the product is delivered with power cable or AC power adaptor:
If any trouble occurs, disconnect the AC power cord and refer servicing to
qualified personnel.
Don’t step on or pinch the power adaptor. Be very careful, parcularly
near the plugs and the cable’s exit point. Do not place heavy items on the
power adaptor, which may damage it. Keep the enre device out of
children’s reach! When playing with the power cable, they can seriously
injure themselves.
Unplug this device during lightning storms or when unused for a long period.
The socket outlet must be installed near the equipment and must be easily
accessible.
Do not overload ac outlets or extension cords. Overloading can cause fire or
electric shock.
Devices with class 1 construcon should be connected to a main socket
outlet with a protecve earthed connecon.
Devices with class 2 construcon do not require an earthed connecon.

5
Always hold the plug when pulling it out of the main supply socket. Do not
pull the power cord. This can cause a short circuit.
Do not use a damaged power cord or plug or a loose outlet. Doing so may
result in fire or electric shock.
28. If the product contains or is delivered with a remote control containing coin/cell
baeries:
Warning:
“Do not ingest baery, Chemical Burn Hazard” or equivalent working.
[The remote control supplied with] This product contains a coin/buon
cell baery. If the baery is swallowed, it can cause severe internal burns
in just 2 hours and can lead to death.
Keep new and used baeries away from children.
If the baery compartment does not close securely, stop using the
product and keep it away from children.
If you think baeries might have been swallowed or placed inside any
part of the body, seek immediate medical aenon.
29. Cauon about the use of Baeries:
Danger of explosion if baery is incorrectly replaced. Replace only with
the same or equivalent type.
Baery cannot be subjected to high or low extreme temperatures, low
air pressure at high altude during use, storage or transportaon.
Replacement of a baery with an incorrect type that can result in an
explosion or the leakage of flammable liquid or gas.
Disposal of a baery into fire or a hot oven, or mechanically crushing or
cung of a baery, that can result in an explosion.
Leaving a baery in an extremely high temperature surrounding
environment that can result in an explosion or that leakage of flammable
liquid or gas.
A baery subjected to extremely low air pressure that may result in an
explosion or the leakage of flammable liquid or gas.
Aenon should be drawn to the environmental aspects of baery
disposal.
INSTALLATION
• Unpack all parts and remove protecve material.
• Do not connect the unit to the mains before checking the mains voltage and before
all other connecons have been made.

6
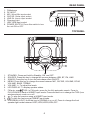
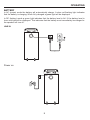
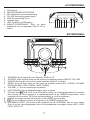
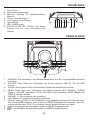
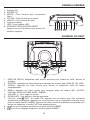
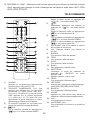
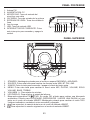
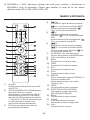
REAR PANEL
1. FMAntenna
2. DC INPUT
3. MIC: Wired Mic input socket
4. GUITAR: Guitar input socket
5. LINE-IN: Line-in input socket
6. Charging Light
7. USB: USB input socket
8. POWER SWITCH: Press this switch to turn
the unit ON or OFF
TOP
PANEL
1. STANDBY: Press and hold for Standby, ON, and OFF.
2. SOURCE: Press this key to change the sources between USB, BT, FM, LINE.
3. X.BASS: Press the key to turn the extra bass effect ON/OFF.
4. MENU: Press this key to change the menu between MIC, GUITAR, VOLUME, ECHO
VOLUME, BASS, TREBLE.
5. VOLUME -/+: To adjust the levels.
6. LED DISPLAY: To display speaker status.
7. FM auto -scan/ /TWS: In FM mode, press for the fully automatic search. Press to
PLAY/PAUSE a track at USB/BT input mode. Press and hold on to change the TWS (true
wireless stereo) mode on or off.
8. : To play the previous song at USB/BT input mode.
9. : To play the next song at USB/BT input mode.
10. DISCOBALL/LIGHT: Hold this key to DISOBALL on or off. Press to change the front
speaker light mode between LED1,LED2,LED3,LED4,OFF.

7
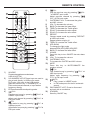
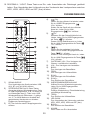
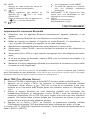
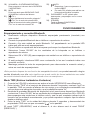
REMOTE CONTROL
1) SOURCE
Presstochangethesourcebetween
USB,AUX,BT,FM
2) 0~9 NUMERIC KEYS These keys are used to
play a track directly in USB source mode.
Eg:To play 12th track in the USB playlist
press the numeric key"1" followed by"2". In
FM,to select saved channel,or input station
frequency directly
3) BTPresstoenterBluetoothpairingmode.
4) /CH+
Play the next song by pressing " /CH+" at
USB/BT input mode.
Adjust next channel by pressing " /CH+" at
FM input mode.
5) /TU-
Fast rewind a song by pressing " /TU-" at
USBinput mode.
Adjustradio frequencyby pressing " /TU-"at
FM input mode.
6) /CH-
Play the previous song by pressing " /CH-
" at USB BT input mode.
Adjust previous channel by pressing "
/CH-" at FM input mode.
7) GUITER/MIC VOL- To decrease the guiter
and MIC volume.
8) VOL- To decrease the volume.
9) BASS-To decrease the bass effect.
10)TREB-To decrease the Treble effect.
11)ECHO-To decrease the echo effect.
12)ECHO+To increase the echo effect
13)REPEAT
Choose repeat mode by pressing "REPEAT"
at USB input mode.
Repeat random,single, all.
14)TREB+To increase the Treble effect.
15)LED SHOW
To change the light mode
betweenLED1,LED2,LED3,LED4,OFF.
16)BASS+To increase the bass effect.
17)X.BASS
Press this key to turn ON/OFF the extra bass
effect.
18)VOL+ To increase the volume.
19)GUITER/MIC VOL+
To increase the GUITER and MIC volume.
20)MUTE
Press this key to MUTE/UNMUTE the
speaker volume.
21)/TU+
Fast forward song by pressing " /TU+" at
USB input mode.
Adjust radio frequency by pressing "
/TU+" at FM input mode.
22)/AUTO
●Play / pause in USB/BT mode.
●In FM mode press for the full automatic
search.
23)DISCONNECT In BT, Press to disconnect
and pair with a new device.
24)STANDBY
Stand by ON/OFF key.

8
OPERATING
Bluetooth pair and connect
Turn off any Bluetooth devices previously paired (linked) with this unit.
Turn on the Bluetooth feature on your phone or music player.
Turn on and set this unit to Bluetooth mode.The flashing :“bt” on LED display indicates it
is in pairing mode.
Set your phone or music player to search for Bluetooth devices.
Select “Lenco PA-260" from search results on your phone or music player.
Select OK orYES to pair this unit with your phone or music player.
If protected, enter 0000 for passkey steady blue light indicates successful connection.
Hold pair key to disconnect current convection and eater pairing mode.
“This product has a bluetooth receptionfunction, you can not transmit any bluetooth
sound with it: this means that you can receive wirelessly a bluetooth sound signal from an
external source like a smartphone.”
TWS (True Wireless Stereo) mode
1. Turn on 2 PA-260 equipments and select both unit INPUTmode as Bluetooth.
2. Press "TWS" key on speaker setfor 2 seconds, it will show " " on display, TWS is
connecting to another speaker equipment and will connect successfully afterasound
indication or display shows "bt".
3. Turn on your Bluetooth feature on your mobile phone to search Bluetooth devices and
select “Lenco PA-260" from the search result, select OK or YES to pair this unit with your
mobile phones and a steady blue light will indicate the connection is successful and can
play any music from your mobile phones.
4. Press "TWS" key on speaker unit for 2 seconds and it will turn off TWS features after
shows " " on display.
(The "LEFT" channel will be the speakerA, the other speaker will be the "RIGHT" channel.)
FM Radio Operation
1. Before using the radio functions, you must attach the supplied antenna. Adjust the
antenna to obtain optimum reception.
Press [SOURCE] repeatedly to select FM mode.
2. Press the CH+/CH- key on the remote control or Hold the key “ / ” on the top panel
to skip to the preset station.
3. Press the TU+/TU- key on the remote control or press the key “ / ” on the top panel
to adjust the radio frequency manually.
The number key on the remote control can directly select the frequency. Such as enter
“8,8,1” keys for 88.1MHz, “1,0,4,0" keys for 104.0MHz.
4. Press the PLAY key on the remote control or Press the key “ ” on the top panel, the
machine will scan radio channels from low-frequency to high-frequency by itself and
memorize the channels one by one.

9
OPERATING
BATTERY
In AC (power) mode the battery will automatically charge. A slow red flashing light indicates
that the battery is charging. When fully charged a green light will be displayed.
In DC (battery) mode a green light indicates that the battery level is full. If the battery level is
low a red light will be displayed. This indicates that the battery must immediately be charged or
the speaker will turn off.
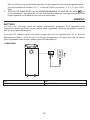
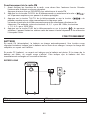
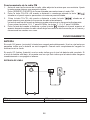
LINE IN
Power on

10
OPERATING
SPECIFICATION
Frequency Response .....................................................................25Hz-20KHz
Power Source.................................................................................100-240V~, 60/50Hz
Power Consumption.......................................................................120W
Output power..................................................................................150W
Microphone.................................................................................... Wireless 864 & 865MHz
Bluetooth........................................................................................ V5.0
FM radio.........................................................................................87.5-108 MHz
Unit Size (W x D x H) .....................................................................30.5x30x78.5cm
Tweeter size................................................................................... 1 x 1 inch
Woofer size .................................................................................... 1 x 8 inch
Subwoofer size............................................................................... 1 x 8 inch
Unit weight.....................................................................................11kg
Working Temperature .................................................................... 10-40 ºC
The specification presents only as a reference. The value of weight and size are
approximation.
Our product is improved ceaselessly and the specification and function may be changed
without prior notice.
Power supply adaptor (For EU only)
Manufacturer: GUANGZHOU GUANG ER ZHONG ELECTRONIC TECHNOLOGY CO.,LTD
Model number: GPUSW2003000WD00
Use only the power supply listed in the user instructions
Information Valueandprecision
Manufacturersnameortrademark,commercialregistration
andaddress
ModelIdentifier 20V/3A
InputvoltageAC100-240V,DC20V
InputACfrequency 50/60Hz
Outputvoltage20V
Outputcurrent 3A
OutputPower 60W
Averageactiveefficiency 88%
Efficiencyatlowload(10%) 85%
NoloadPowerconsumption 0.15W

11
OPERATING
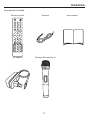
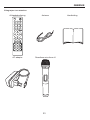
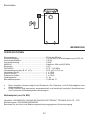
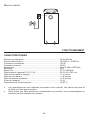
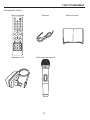
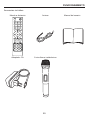
Accessories-included
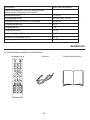
Remote control Antenna User manual
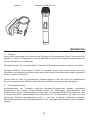
AC adapter Wireless Microphone x2

12
OPERATING
1. Guarantee
Lenco offers service and warranty in accordance to European law, which means that in case of
repairs (both during and after the warranty period) you should contact your local dealer.
Importantnote: It is not possible to send products that need repairs to Lenco directly.
Important note: If this unit is opened or accessed by a non-official service center in any way,
the warranty expires.
This device is not suitable for professional use. In case of professional use, all warranty
obligations of the manufacturer will be voided.
2. Disclaimer
Updates to Firmware and/or hardware components are made regularly. Therefore some of the
instruction, specifications and pictures in this documentation may differ slightly from your
particular situation. All items described in this guide for illustration purposes only and may not
apply to particular situation. No legal right or entitlements may be obtained from the description
made in this manual.
3. Disposal of the Old Device
This symbol indicates that the relevant electrical product or battery should
not be disposed of as general household waste in Europe. To ensure the
correct waste treatment of the product and battery, please dispose them
in accordance to any applicable local laws of requirement for disposal of
electrical equipment or batteries. In so doing, you will help to conserve
natural resources and improve standards of environmental protection in
treatment and disposal of electrical waste (Waste Electrical and
Electronic Equipment Directive).
4. CE Marking
Hereby, Lenco Benelux B.V., Thermiekstraat 1a, 6361 HB Nuth, The Netherlands, declares
that this product is in compliance with the essential EU directive requirements.
The declaration of conformity may be consulted via techdoc@commaxxgroup.com
5. Service
For more information and helpdesk support, please visit www.lenco.com
Lenco Benelux BV, Thermiekstraat 1a, 6361 HB, The Netherlands.

13
Nederlands
LET OP:
Gebruik van bedieningen of afstellingen of uitvoer van procedures anders dan
gespecificeerd in deze documentae kan leiden tot blootstelling aan schadelijke straling.
VOORZORGSMAATREGELEN VOOR GEBRUIK
ONTHOUD DE VOLGENDE INSTRUCTIES:
1. Bedek of blokkeer de venlaeopeningen niet. Laat 5 cm ruimte rondom het
gehele apparaat vrij als u het op een plank plaatst.
2. Installeer het product volgens de meegeleverde gebruikershandleiding.
3. Houd het apparaat uit de buurt van hiebronnen, zoals radiatoren, verwarmingen,
kachels, kaarsen en andere hiegenererende producten of open vuur. Het
apparaat kan alleen worden gebruikt in een gemagd klimaat. Extreem koude of
warme omgevingen dienen te worden vermeden. Bedrijfstemperatuur tussen 0 °C
en 35 °C.
4. Gebruik dit apparaat niet in de buurt van krachge magnesche velden.
5. Elektrostasche ontlading kan normaal gebruik van dit apparaat verstoren. U hoe
het apparaat in dit geval slechts te reseen en opnieuw op te starten volgens de
gebruikershandleiding. Wees voorzichg jdens bestandsoverdracht en gebruik
het product in een omgeving zonder stasche interferene.
6. Waarschuwing! Steek nooit een voorwerp via de venlae- of andere openingen in
het product. Er is hoogspanning in het product aanwezig en als u er een object
insteekt, kan dat een elektrische schok veroorzaken en/of kortsluing in de interne
onderdelen. Mors om dezelfde reden geen water of vloeistof op het product.
7. Gebruik het toestel NIET in vochge ruimtes, zoals badkamers, stomerige keukens
of in de buurt van zwembaden.
8. Het apparaat mag niet worden blootgesteld aan druppels en speers en zorg
ervoor dat er geen met vloeistof gevulde voorwerpen, zoals vazen, op of in de
buurt van het apparaat worden geplaatst.
9. Gebruik dit apparaat niet wanneer condensae kan optreden. Wanneer het
apparaat in een warme en vochge kamer wordt gebruikt, dan kunnen er
waterdruppeltjes of condensae binnenin het apparaat worden gevormd
waardoor het apparaat mogelijk niet meer goed werkt; houd en apparaat 1 of
2 uur op UIT staan voordat u de voeding weer inschakelt: het apparaat dient droog
te zijn voordat deze stroom ontvangt.
10. Alhoewel dit apparaat met grote zorg gefabriceerd en verschillende keren
geïnspecteerd is voordat het de fabriek verlaat, is het nog steeds mogelijk dat er
problemen optreden, zoals met alle elektrische apparaten. Als u rook, een
overmage hieontwikkeling of enig ander onverwacht verschijnsel, moet u
onmiddellijk de stekker van het netsnoer uit het stopcontact halen.
11. Dit apparaat moet werken op een voedingsbron, zoals aangegeven op het
specificaeplaatje. Als u twijfelt over het type voeding dat gebruikt wordt in uw
huis, raadpleeg dan uw dealer of plaatselijk energiebedrijf.
12. Buiten bereik van dieren houden. Sommige dieren bijten graag op voedingskabels.

14
13. Gebruik een zacht, droog doekje om het apparaat te reinigen. Gebruik geen
oplosmiddelen of op benzine gebaseerde vloeistoffen.
U kunt een vochg doekje met verdund schoonmaakmiddel gebruiken om
hardnekkige vlekken te verwijderen.
14. De leverancier is niet verantwoordelijk voor schade of verloren gegevens
veroorzaakt door storing, misbruik, modificae van het apparaat of
baerijvervanging.
15. Onderbreek nooit de verbinding wanneer het apparaat formaeert of bestanden
overdraagt. De gegevens kunnen anders corrupt of verloren raken.
16. Indien het apparaat een USB-afspeelfunce hee, moet de USB-geheugensck
rechtstreeks op het apparaat worden aangesloten. Gebruik geen USB-verlengkabel,
omdat die kan leiden tot storingen met foueve gegevens als gevolg.
17. Het nominale specificaelabel is te vinden op het paneel aan de onder- of
achterkant van het apparaat.
18. Dit apparaat is niet bestemd voor gebruik door mensen (inclusief kinderen) met
fysieke, zintuiglijke of geestelijke gebreken of gebrek aan kennis en ervaring, tenzij
zij onder toezicht staan of instruces hebben over het juiste gebruik van het
apparaat hebben gekregen van de persoon die verantwoordelijk is voor hun
veiligheid.
19. Dit product is alleen voor niet-professioneel gebruik bedoeld en niet voor
commercieel of industrieel gebruik.
20. Verzeker u ervan dat het apparaat in een stabiele posie staat opgesteld.
Beschadigingen veroorzaakt door het gebruik van dit apparaat in een onstabiele
posie, trillingen of schokken of door het niet opvolgen van andere
waarschuwingen of voorzorgsmaatregelen beschreven in deze gebruikshandleiding
worden niet gedekt door de garane.
21. Verwijder nooit de behuizing van dit apparaat.
22. Plaats dit apparaat nooit op andere elektrische apparatuur.
23. Geef kinderen geen gelegenheid in aanraking met plasc zakken te komen.
24. Gebruik uitsluitend uitbreidingen/accessoires gespecificeerd door de fabrikant.
25. Laat alle reparaes over aan gekwalificeerd onderhoudspersoneel. Onderhoud is
vereist als het apparaat hoe dan ook is beschadigd, zoals bijvoorbeeld het
netsnoer of de stekker, wanneer er vloeistof of een voorwerp in het apparaat is
terechtgekomen, wanneer het apparaat is blootgesteld aan regen of vocht, als het
niet normaal werkt of is gevallen.
26. Langdurige blootstelling aan harde geluiden van persoonlijke muziekspelers kan
leiden tot jdelijk of permanent gehoorverlies.
27. Als het product wordt geleverd met voedingskabel of AC-stroomadapter:
Als er problemen optreden, koppel de wisselstroomvoedingskaart dan los en
laat reparaes over aan bevoegd personeel.
Nooit op de stroomadapter stappen of deze indrukken. Wees voornamelijk
voorzichg in de buurt van de stekkers en het punt waar de kabel uit het
apparaat komt. Plaats geen zware voorwerpen op de stroomadapter, om
beschadiging ervan te voorkomen. Houd het gehele apparaat buiten bereik

15
van kinderen! Wanneer kinderen met de voedingskabel spelen, kunnen zij
ernsg letsel oplopen.
Haal de stekker uit het stopcontact jdens onweer of wanneer u deze
langere jd niet gebruikt.
Het stopcontact moet in de buurt van de apparatuur zijn geïnstalleerd en
eenvoudig te bereiken zijn.
Overbelast stopcontacten of verlengsnoeren niet. Overbelasng kan brand of
een elektrische schok veroorzaken.
Apparaten met een Klasse 1 structuur dienen te worden aangesloten op een
stopcontact met een beschermende aardverbinding.
Apparaten met een Klasse 2 structuur vereisen geen aardverbinding.
Houd aljd de stekker vast wanneer u deze uit het stopcontact trekt. Trek
nooit aan de voedingskabel. Dit kan tot een kortsluing leiden.
Gebruik nooit een beschadigde voedingskabel of stekker of een los
stopcontact. Dit vormt namelijk een risico op brand of elektrische schokken.
28. Indien het product knoopcelbaerijen bevat of wordt geleverd met een
afstandsbediening die knoopcelbaerijen bevat:
Waarschuwing:
"Baerij niet inslikken, chemisch brandgevaar" of gelijkwaardige werking.
[De afstandsbediening meegeleverd met] Dit product bevat een munt-
/knoopcelbaerij. Als de baerij wordt ingeslikt, kan deze in slechts 2 uur
ernsge interne brandwonden veroorzaken en tot de dood leiden.
Houd nieuwe en gebruikte baerijen buiten bereik van kinderen.
Als de baerijhouder niet goed kan worden gesloten, dient u het product
niet meer te gebruiken en buiten bereik van kinderen te houden.
Als u denkt dat baerijen zijn ingeslikt of binnenin een willekeurig
lichaamsdeel terecht zijn gekomen, dient u onmiddellijk medische hulp te
zoeken.
29. Waarschuwing m.b.t. het gebruik van baerijen:
Als de baerij onjuist wordt geplaatst, bestaat er explosiegevaar. Vervang de
baerij alleen door een zelfde of vergelijkbare soort baerij.
Stel de baerij niet bloot aan extreem hoge of lage temperaturen of een lage
luchtdruk op grote hoogte jdens gebruik, opslag of transport.
Vervanging van een baerij door een incorrect type kan leiden tot een
ontploffing of de lekkage van ontvlambare vloeistoffen of gas.
Verwijdering van een baerij in vuur of een hete oven of het mechanisch
verpleeren of snijden van een baerij kan leiden tot een ontploffing.
Laat een baerij nooit achter in omgevingen met extreem hoge
temperaturen, anders kan dit leiden tot een ontploffing of de lekkage van
ontvlambare vloeistoffen of gas.
Stel een baerij nooit bloot aan een extreem lage luchtdruk, anders kan dit
leiden tot een ontploffing of de lekkage van ontvlambare vloeistoffen of gas.
Aandacht voor het milieu is nodig bij het verwijderen van de baerijen.

16
INSTALLATIE
• Pak alle onderdelen uit en verwijder de beschermende materialen.
• Sluit het apparaat niet aan op het stopcontact, voordat u de netspanning hebt
gecontroleerd en voordat alle andere aansluingen zijn gemaakt.

17
ACHTERPANEEL
1. FM-antenne
2. GELIJKSPANNINGSTOEVOER
3. MIC: Bedrade microfoonaansluiting
4. GUITAR: Aansluiting gitaaringang
5. LINE-IN: Aansluiting Lijn-in
6. Oplaadlampje
7. USB: Aansluiting USB-ingang
8. AAN/UIT-SCHAKELAAR: Druk op deze
schakelaar om het apparaat AAN of UIT te
zetten
BOVENPANEEL
1. STANDBY: Houd ingedrukt voor Stand-by, AAN en UIT.
2. SOURCE: Druk op deze toets om de bronnen te wisselen tussen USB, BT, FM, LINE.
3. X.BASS: Druk op de toets om het extra baseffect AAN/UIT te zetten.
4. MENU: Druk op deze toets om het menu te wisselen tussen MIC, GITAAR, VOLUME,
ECHOVOLUME, LAGE TONEN, HOGE TONEN.
5. VOLUME -/+: Om de niveaus aan te passen.
6. LED-SCHERM: Om de luidsprekerstatus weer te geven.
7. FM auto-scan/ /TWS: Druk in de FM-modus hierop om volledig automatisch te zoeken.
Druk hierop om een nummer af te spelen/pauzeren in de USB/BT-invoermodus. Houd
ingedrukt om de modus TWS (true wireless stereo) in of uit te schakelen.
8. : Om het vorige nummer af te spelen in de USB/BT-invoermodus.
9. : Om het volgende nummer af te spelen in de USB/BT-invoermodus.
10. DISCOBALL/LIGHT: Houd deze toets ingedrukt om de DISCOBAL aan of uit te zetten.
Druk in om de verlichtingsmodus van de voorluidspreker te wijzigen tussen LED1, LED2,
LED3, LED4, UIT.

18
AFSTANDSBEDIENING
1) SOURCE
Druk hierop om de bron te wijzigen tussen
USB, AUX, BT, FM
2) CIJFERTOETSEN 0 ~ 9 Deze toetsen
worden gebruikt om een track rechtstreeks
in de USB-bronmodus af te spelen. Bijv.:
Druk op de cijfertoets "1" gevolgd door "2”
om de 12e track in de USB-afspeellijst af te
spelen. In FM, om een opgeslagen kanaal
te selecteren of om de zenderfrequentie
rechtstreeks in te voeren
3) BT Druk hierop om de Bluetooth-
koppelingsmodus te openen.
4) /CH+
Speel het volgende nummer af door te
drukken op " /CH+” in de USB/BT-
invoermodus.
Pas het volgende kanaal aan door te
drukken op " /CH+" in de FM-
invoermodus.
5) /TU-
Een nummer terugspoelen door te drukken
op " /TU-" in de USB-invoermodus.
Pas de radiofrequentie aan door te drukken
op " /TU-” in de FM-invoermodus.
6) /CH-
Speel het vorige nummer af door te drukken
op " /CH-" in de USB/BT-invoermodus.
Pas het vorige kanaal aan door te drukken
op " /CH-" in de FM-invoermodus.
7) GUITAR/MIC VOL- Om het volume van de
gitaar en MIC te verlagen.
8) VOL-
Om het volume te verlagen.
9) BAS-
Om het effect van de lage tonen te
verminderen.
10) TREB-
Om het effect van de hoge tonen te
verminderen.
11)ECHO-
Om het echo-effect te verminderen.
12)ECHO+
Om het echo-effect te verhogen
13)HERHALEN
Kies de herhaalmodus door te drukken op
"REPEAT” in de USB-invoermodus.
Herhalenwillekeurig, enkel, allemaal.
14)TREB+
Om het effect van de hoge tonen te
verhogen.
15)LED SHOW
Om de lichtmodus te wijzigen tussen LED1,
LED2, LED3, LED4, UIT.
16)BAS+
Om het effect van de lage tonen te
verhogen.
17)X.BASS
Druk op deze toets om het extra baseffect
AAN/UIT te zetten.
18)VOL+
Om het volume te verhogen.
19)GUITAR/MIC VOL+
Om het volume van GUITAR en MIC te
verhogen.
20)MUTE
Druk op deze toets om het
luidsprekervolume te DEMPEN/AAN TE
ZETTEN.
21)/TU +
Een nummer vooruitspoelen door te
drukken op " /TU+" in de USB-
invoermodus.
Pas de radiofrequentie aan door te drukken

19
op " /TU+" in de FM-invoermodus.
22)/AUTO
●Afspelen/pauzeren in de modus
USB/BT.
●Druk in de FM-modus hierop om
volledig automatisch te zoeken.
23)LOSKOPPELEN in BT, Druk hierop om de
verbinding te verbreken en met een nieuw
apparaat te koppelen.
24)STAND-BY
Toets Stand-by AN/UIT key.
GEBRUIK
Bluetooth koppelen en verbinden
Schakel alle eerdere met dit apparaat gekoppelde Bluetooth-apparaten uit (gekoppeld).
Activeer de Bluetooth functie op uw telefoon of muziekspeler.
Zet dit apparaat aan en stel deze in op de Bluetooth modus. Het knipperen: “bt” op het
LED-display geeft aan dat het in de koppelingsmodus is.
Zoek met uw telefoon of muziekspeler naar Bluetooth apparaten.
Selecteer “Lenco PA-260" in de zoekresultaten op uw telefoon of muziekspeler.
Selecteer OK (OKÉ) of YES (JA) om dit apparaat met uw telefoon of muziekspeler te
verbinden.
Voer 0000 in als er om een wachtwoord gevraagd wordt en een vast blauw licht geeft
aan dat de verbinding gelukt is.
Houd de koppelingstoets ingedrukt om de huidige convectie- en eater-koppelingsmodus
te verbreken.
“Dit product is voorzien van een Bluetooth-ontvangstfunctie,u kunt er geen Bluetooth-
audio mee sturen: dit betekent dat u van een externe bron zoals een smartphone draadloos
een Bluetooth-audiosignaal kunt ontvangen.”
Modus TWS (True Wireless Stereo)
1. Schakel 2 PA-260 speakers in en selecteer beide INVOER-modus van het apparaat als
Bluetooth.
2. Druk gedurende 2 seconden op de toets "TWS” op de luidsprekerset, het zal " ” op het
display tonen. TWS maakt verbinding met een andere luidspreker en zal succesvol
worden verbonden na een geluidstoon of als het display "bt" weergeeft.
3. Schakel uw Bluetooth-functie op uw mobiele telefoon in om Bluetooth-apparaten te
zoeken en selecteer “Lenco PA-260” in het zoekresultaat, selecteer OK of JA om dit
apparaat te koppelen met uw mobiele telefoon. Een constant blauw lampje geeft aan dat
de verbinding tot stand is gebracht en alle muziek van uw mobiele telefoon kan afspelen.
4. Druk gedurende 2 seconden op de toets "TWS" op de luidspreker en de TWS-functies
worden uitgeschakeld nadat " " op het display wordt weergegeven.
(Het "LINKER"-kanaal is luidspreker A, de andere luidspreker is het "RECHTER"-kanaal.)
Bediening FM-radio
1. U moet de meegeleverde antenne aansluiten voordat u de radiofuncties kunt gebruiken.
Pas de antenne aan voor een optimale ontvangst.
Druk herhaaldelijk op [SOURCE] om de FM-modus te selecteren.
2. Druk op de toets CH+/CH- op de afstandsbediening of houd de toets “ / ”
op het bovenpaneel ingedrukt om naar het voorkeurstation te gaan.
3. Druk op de toets TU+/TU- op de afstandsbediening of druk op de toets “ / ” op het
bovenpaneel om de radiofrequentie handmatig aan te passen.

20
Met de cijfertoets op de afstandsbediening kan de frequentie direct worden geselecteerd.
Voer bijvoorbeeld de toetsen “8, 8, 1” in voor 88,1 MHz, en toetsen “1, 0, 4, 0” voor 104,0
MHz.
4. Druk op de toets PLAY op de afstandsbediening of druk op de toets “ ” op
het bovenpaneel. Het apparaat zal zelf radiokanalen scannen van lage frequentie naar
hoge frequentie en de kanalen een voor een onthouden.
GEBRUIK
BATTERIJ
In modus AC (voeding) wordt de batterij automatisch opgeladen. Een langzaam rood
knipperend lampje geeft aan dat de batterij wordt opgeladen. Wanneer opgeladen, wordt er
een groen lampje weergegeven.
In modus DC (batterij) geeft een groen lampje aan dat het batterijniveau vol is. Als het
batterijniveau laag is, wordt er een rood lampje weergegeven. Dit geeft aan dat de batterij
direct opgeladen moet worden, anders gaat de luidspreker uit.
LIJNINGANG
EN NL
LINE IN LIJNINGANG
Seite wird geladen ...
Seite wird geladen ...
Seite wird geladen ...
Seite wird geladen ...
Seite wird geladen ...
Seite wird geladen ...
Seite wird geladen ...
Seite wird geladen ...
Seite wird geladen ...
Seite wird geladen ...
Seite wird geladen ...
Seite wird geladen ...
Seite wird geladen ...
Seite wird geladen ...
Seite wird geladen ...
Seite wird geladen ...
Seite wird geladen ...
Seite wird geladen ...
Seite wird geladen ...
Seite wird geladen ...
Seite wird geladen ...
Seite wird geladen ...
Seite wird geladen ...
Seite wird geladen ...
Seite wird geladen ...
Seite wird geladen ...
Seite wird geladen ...
Seite wird geladen ...
Seite wird geladen ...
Seite wird geladen ...
Seite wird geladen ...
Seite wird geladen ...
Seite wird geladen ...
Seite wird geladen ...
Seite wird geladen ...
Seite wird geladen ...
Seite wird geladen ...
Seite wird geladen ...
Seite wird geladen ...
Seite wird geladen ...
-
 1
1
-
 2
2
-
 3
3
-
 4
4
-
 5
5
-
 6
6
-
 7
7
-
 8
8
-
 9
9
-
 10
10
-
 11
11
-
 12
12
-
 13
13
-
 14
14
-
 15
15
-
 16
16
-
 17
17
-
 18
18
-
 19
19
-
 20
20
-
 21
21
-
 22
22
-
 23
23
-
 24
24
-
 25
25
-
 26
26
-
 27
27
-
 28
28
-
 29
29
-
 30
30
-
 31
31
-
 32
32
-
 33
33
-
 34
34
-
 35
35
-
 36
36
-
 37
37
-
 38
38
-
 39
39
-
 40
40
-
 41
41
-
 42
42
-
 43
43
-
 44
44
-
 45
45
-
 46
46
-
 47
47
-
 48
48
-
 49
49
-
 50
50
-
 51
51
-
 52
52
-
 53
53
-
 54
54
-
 55
55
-
 56
56
-
 57
57
-
 58
58
-
 59
59
-
 60
60


in anderen Sprachen
- français: Lenco PA-260BK Manuel utilisateur
- español: Lenco PA-260BK Manual de usuario
- Nederlands: Lenco PA-260BK Handleiding
Verwandte Artikel
-
Lenco PA-260BK Benutzerhandbuch
-
-
-
Lenco CD-300 Benutzerhandbuch
-
Lenco SPR-070 Benutzerhandbuch
-
-
Lenco BTP-400 Benutzerhandbuch
-
-
-
Lenco PMX-240 Benutzerhandbuch