
CP-SS30
User manual
Active bookshelf speakers
EN PLESDE RUFR IT NL

Trademarks:
The Bluetooth® word mark and logos are registered trademarks owned
by Bluetooth SIG, Inc.
All product and company names are trademarks™ or registered®
trademarks of their respective holders. Use of them does not imply any
a liation with or endorsement by them.

Trademarks:
The Bluetooth® word mark and logos are registered trademarks owned
by Bluetooth SIG, Inc.
All product and company names are trademarks™ or registered®
trademarks of their respective holders. Use of them does not imply any
a liation with or endorsement by them.
1
23
1
LINE
1
2
5
3
4
6
6
1
2

2
1
2
3
5
6
8
9
7
10
13
12
14
15
11
4
3

EN
Important safety instructions
Please follow all safety instructions and heed all warnings.
Keep this manual for future reference.
This symbol instructs the user to consult the user manual
for further safety, operation, and maintenance related
information.
This symbol indicates presence of uninsulated “dangerous
voltage” within the product and may be of sucient
magnitude as to constitute a risk of electric shock to persons.
Refers to alternating current (AC)
This symbol indicates that the rated voltage marked with the
symbol is AC voltage.
Refers to class II equipment.
This symbol indicates that this product has a double
insulation system and does not require a safety connection to
electrical earth (ground).
Precautions
Damage
• Please inspect the unit for damage after unpacking. If it is damaged in
any way do not operate the unit and consult your dealer.
CAUTION
RISK OF ELECTRIC SHOCK
DO NOT OPEN
To prevent the risk of electric shock, do not remove back cover. No
user serviceable parts inside; please refer servicing to qualied service
personnel.
Power connection and accessibility
• Do not handle the power cord with wet hands as it may cause an
electric shock. If the power plug does not t into your outlet, do not
force the plug into an electrical socket. Switch o the unit completely
before unplugging. Disconnect the power cord if it is not used for a
long time. Ensure that the power plug is always easily accessible. Do not
attach extension cables.
Power source
• Ensure that the unit is plugged into an AC 100-240V 50/60Hz power
outlet. Using higher voltage may cause the unit to malfunction or even
catch re.
Fused moulded power plug (non rewireable) - UK, Malta, Cyprus and
Ireland only.
• The power lead on this equipment is supplied with a moulded plug
incorporating a 3 Amp fuse. The value of the fuse is indicated on the pin
face of the plug and if it requires replacing, a fuse approved to BS1362
of the same rating must be used.
Power cord protection
• Do not damage the power cord, do not place any heavy objects on it, do
not stretch it or bend it. Damage to the power cord can result in re or
electric shock. If the power cord is damaged, it must be replaced by the
manufacturer, a service agent or similarly qualied persons.
Child safety
• Always follow basic safety precautions when using this product,
especially when children are present. Children should be supervised to
ensure that they do not play with the product.
Location
• When in use this product should be placed on a at, stable surface with
no part of the main unit overhanging an edge.
Ventilation
• Slots and openings in the cabinet are provided for ventilation and to
ensure reliable operation of the product protecting it from overheating.
These openings must not be blocked or covered. Ensure a minimum
distance of 5 cm around the product for sucient ventilation. Never
let anyone push anything into holes, slots or any other openings in the
product’s casing as this could result in an electric shock.
Heat and operating temperature
• Do not install near any heat sources such as radiators, heat registers,
stoves, or other apparatus (including ampliers) that produce heat.
Avoid exposure to direct sunlight.
Naked ames
• To prevent the risk of re, keep candles or open ames away from this
product.
Water, moisture, and liquid entry
• To prevent the risk of re or electric shock, do not expose this product
to rain, water or moisture. Do not place objects lled with liquids on or
near this product.
Storms and lightning
• Storms are dangerous for all electric products. If the power is struck by
lightning, the product might get damaged, even if it is turned o. You
should disconnect all the cables and connectors of the product before
a storm.
Maintenance
• Unplug the power cable from the power source before cleaning the
product. Use a soft and clean cloth to clean the outside of the unit.
Never clean it with chemicals or detergent.
Service and repair
• This product does not contain any parts that are serviceable by the
user. Exposing the internal parts inside the device may endanger your
life. In case of a fault, contact the manufacturer or authorised service
department. The manufacturers guarantee does not extend to faults
caused by repairs carried out by unauthorised third parties.
Batteries
Installation
• Do not use any batteries other than those specied. Observe the correct
polarity when inserting the batteries.
Use and maintenance
• Do not expose batteries to high temperatures, e.g. near re or in direct
sunshine. When the product is not to be used for a long time (more than
a month), remove the batteries from the product to prevent them from
leaking. If the batteries leak, wipe away the leakage inside the battery
compartment and replace the batteries with new ones.
Child safety
• Always ensure the battery compartment is closed and secured.
• Batteries are easily swallowed by young children and can cause severe
internal burns and lead to death. Keep batteries away from children.
Seek immediate medical advice if you believe a battery has been
swallowed.
Environmental conditions
• Keep batteries away from low air pressure or high temperatures as this
may result in an explosion or the leakage of a ammable liquid or gas.
Disposal
• Please dispose of batteries correctly by following the guidance in this
manual (see section “Disposal of this equipment and batteries”). Do
CAUTION
RISK OF ELECTRIC SHOCK
DO NOT OPEN
CAUTION
RISK OF ELECTRIC SHOCK
DO NOT OPEN

4
not throw them into re, do not disassemble them and do not try to
recharge non-rechargeable batteries; they could leak or explode.
Disposal of this equipment and batteries
Information for users on collection and disposal of old equipment and
used batteries.
This symbol means that the product contains batteries
covered by European Directive 2013/56/EU which cannot
be disposed of with normal household waste. Cd, Hg and
Pb underneath the wheelie bin symbol shows whether the
battery contains, cadmium (Cd), mercury (Hg) or lead (Pb).
This symbol on a product means that the product is
covered by European Directive 2012/19/EU and must not
be disposed of or dumped with your other household
waste.
This symbol means that the product is designed and
manufactured so that it can be recycled and reused.
These symbols on the products, packaging, and/or accompanying
documents mean that used electrical and electronic products and
batteries should not be mixed with general household waste. Household
users should contact either the retailer where they purchased this product,
or their local government oce, for details of where and how they can
take these items for environmentally safe recycling.
CE and UKCA statement:
• Hereby, Sharp Consumer Electronics Poland sp. z o.o. declares that
this audio device is in compliance with the essential requirements and
other relevant provisions of RED Directive 2014/53/EU and UK Radio
Equipment Regulations 2017.
• The full CE text and UKCA declaration of conformity are available at
sharpconsumer.eu and then entering download section of your model
and choosing “Declaration of Conformity“.

EN
What is included in the box:
• CP-SS30 bookshelf speakers
• Remote control (incl. batteries)
• Speaker connection cable (3m)
• RCA audio cable
• AUX audio cable
• Power cable
• User documentation
Controls
(Refer to 1 on page 1).
1. Removeable speaker grilles
2. LED indicator
• Standby - Red
• Bluetooth - Blue
• Aux in - Green
• RCA - Cyan
• Optical Mode - Yellow
• USB - Purple
3. / Volume/ source/ power control
• Long press to turn on or enter standby mode.
• Short press to change the mode (Bluetooth, Aux-in, RCA, Optical,
USB).
• Rotate to adjust the volume level.
Inputs/outputs
(Refer to 2 on page 1).
1. USB input
2. Optical input
3. RCA line inputs
4. Aux in
5. ~AC power input
6. Audio output for connecting passive left speaker
Remote control
(Refer to 3 on page 2).
1. Press to power on or enter standby.
2. LOUD Loudness compensation increases the low and high frequen-
cies when listening at low volume.
3. Press to mute the sound. Press again to resume sound, or press
+/- to resume sound.
4. In Bluetooth and USB mode, short press for previous track, long
press to rewind.
5. In Bluetooth and USB mode, short press to play/pause.
6. In Bluetooth and USB mode, short press for next track, long press
to fast forward.
7. Short press to enter Bluetooth mode.
Long press to disconnect from paired device.
8. AUX Short press to change audio source to Aux.
9. RCA Short press to change audio source to RCA.
10. OPT Short press to change audio source to Optical.
11. USB Short press to enter USB mode.
12. EQ Short press to conrm current EQ mode.
Continue pressing to cycle through the EQ presets.
13. +/– Press to adjust the volume.
14. BASS +/– Press to adjust the custom EQ bass level.
15. TRE +/– Press to adjust the custom EQ treble level.
Remote control operation
FIRST-TIME USE: The unit has a pre-installed lithium CR2025 battery.
Remove the clear isolating tab to activate the remote control battery.
The supplied remote control allows the unit to be operated from a
distance.
• Even if the remote control is operated within the eective range of
6m, remote control operation may be impossible if there are obstacles
between the unit and the remote control.
• If the remote control is operated near other products which generate
infrared rays, or if other remote control devices using infra-red rays are
used near the unit, it may operate incorrectly. Conversely, the other
products may operate incorrectly.
Remote control battery replacement
12
4
3
12
4
3
The remote control requires a CR2025, 3V Lithium battery.
1. Push the tab on the side of the battery tray towards the centre.
2. Slide the battery tray out of the remote control.
3. Remove the old battery. Place a new CR2025 battery into the tray with
the correct polarity (+/-) as indicated.
4. Slide the tray back into the slot in the remote control until it clicks in
to place.
Initial set-up
Placement of speakers
To enjoy stereo sound, place the "active" speaker unit (the unit with
controls on the front and inputs on the back) on the right hand side. The
other "passive" speaker should be on the left. We recommend the speakers
should be positioned at least 50cm apart. Ensure the speakers are not
obstructed.
Speaker connection
Before powering the unit, connect the left and right speakers using the
speaker connection cable provided. Please observe the polarity when
connecting the speakers: Connect the red cable to the red output, and the
clear cable to the black output on both speakers.
Connect to power
Risk of product damage! Ensure that the power supply voltage
corresponds to the voltage printed on the back or the underside of the
unit.
Connect the power cable to the ~AC power input of the unit and then
insert the plug in to a power socket.

6
Using your bookshelf speakers
Standby/ON
• When you rst connect the unit to the power socket, the unit will be in
STANDBY mode. The indicator will light up red.
• Press on the remote control to switch the speakers between ON and
standby.
• Disconnect the plug from the power wall socket if you want to switch
the unit o completely.
NOTE: The speakers will go into standby mode after 15 minutes of inactivity.
Select modes
Press the volume control on the unit to cycle through the source options,
or use the remote control to select the desired mode.
Red: Standby
Blue: Bluetooth
Green: Aux
Cyan: RCA
Yellow: Optical
Purple: USB
Adjust the volume
ū Use the volume knob on the unit or +/– on the remote control to
adjust the volume.
ū To mute the sound, press on the remote control. To resume the sound,
press or +/– on the remote control, or rotate the volume control
on the unit.
ū While adjusting the volume, the status indicator ashes quickly.
ū When the volume level reaches its maximum level, if you press + again,
the indicator ashes once. When the volume level reaches its minimum
level, if you press – again, the LED indicator ashes once.
Equaliser (EQ) settings
You can adjust the sound of the bookshelf speakers using the equaliser
presets. Press on the remote control once to conrm current EQ mode.
Continue pressing to cycle through the EQ presets.
• Classic - Green LED indicator ashes for 2 seconds
• POP -Yellow LED indicator ashes for 2 seconds
• Rock - Blue LED indicator ashes for 2 seconds
• Movie - Purple LED indicator ashes for 2 seconds
• Voice - Cyan LED indicator ashes for 2 seconds
• Custom - White LED indicator ashes for 2 seconds
Custom settings
• Press the button to enter Custom settings or press either the BASS
or TREB button +/- buttons once, a white light will ash for 2 seconds.
• Use the BASS/TREB buttons on the remote control to increase (+) or
decrease (-) the EQ level. The selected EQ level is indicated by the speed
at which the LED indicator on the speaker ashes. A ashing red LED
indicates an increased level, a white LED (not ashing) indicates the
level is at/0, a ashing green LED indicates a decreased level.
LED colour EQ level Speed LED ashing
RED
+3 Fast
+2 Medium
+1 Slow
White 0 On
Green
-1 Slow
-2 Medium
-3 Fast
NOTE: New EQ changes are saved as default. You have 3 seconds between
each key press to make any changes before the EQ mode exits.
AUX/OPTICAL/RCA
1. Ensure that the unit is connected to the TV or audio device.
2. While the unit is powered on, ensure the correct source is selected
either using the remote control or by pressing the volume control
on the unit.
3. Operate your audio device directly for playback features.
4. Use the volume control on the unit or +/– on the remote control
to adjust the volume level.
NOTE: Please ensure RCA and AUX input are set to mininum
50% volume on the source device. Volume can be adjusted via
the speaker, the remote control or the source device.
Bluetooth mode
Pair Bluetooth-enabled devices
The rst time you connect your Bluetooth device to these speakers, you
need to pair your device to these speakers.
NOTE:
ū The operational range between these speakers and a Bluetooth device
is approximately 8 meters (without any object between the Bluetooth
device and the unit).
ū Before you connect a Bluetooth device to these speakers, ensure you
know the device’s capabilities.
ū Compatibility with all Bluetooth devices is not guaranteed.
ū Any obstacle between these speakers and a Bluetooth device can
reduce the operational range.
ū If the signal strength is weak, your Bluetooth receiver may disconnect,
but it will re-enter pairing mode automatically.
1. With the unit powered on, press on the remote control or press the
volume control on the unit to select Bluetooth mode. The indicator
light will ash blue.
2. Activate your Bluetooth device and select the search mode.
“SHARP CP-SS30” will appear on your Bluetooth device list.
ū If you cannot nd the unit, press and hold on the remote control.
3. Select “SHARP CP-SS30“ from the list of devices. An audio prompt will
sound when it has been successfully connected, and the indicator will
light a solid blue.
4. Begin playing music from the connected Bluetooth device.
To disconnect the Bluetooth function, you can:
ū Switch to another function on the unit.
ū Disable the Bluetooth function on your device. An audio prompt will
sound when it has been successfully disconnected.
ū Press and hold on the remote control.
TIPS:
• Enter “0000“ for the password if necessary.
• If no other Bluetooth device pairs with the speakers in 2 minutes, the
speakers will reconnect to the previous connection.
• The speakers will also be disconnected when your device is moved
beyond the operational range.
• If you want to reconnect your device to this speakers, place it within the
operational range.
• If the device is moved beyond the operational range, when it is brought
back, please check if the device is still connected to the speakers.
• If the connection is lost, follow the instructions above to pair your
device to the speakers again.
Listen to music from Bluetooth device
ū If the connected Bluetooth device supports Advanced Audio
Distribution Prole (A2DP), you can listen to the music stored on the
device through the speakers.

EN
ū If the device also supports Audio Video Remote Control Prole (AVRCP),
you can use the speaker‘s remote control to manage playback of music
stored on the device.
1. Pair your device with the speakers.
2. Play music via your device (if it supports A2DP).
3. Use the supplied remote control to control play (if it supports AVRCP).
ū To pause/resume play, press on the remote control.
ū To skip to a track, press / buttons on the remote control.
ū Long press / to rewind/fast forward within the track.
USB mode
• Press the volume control on the speaker repeatedly or USB on the
remote control to select USB mode. Connect the USB memory device
containing MP3 les (ash drives up to 64GB supported).
• Press to start playback.
• Turn o the unit before removing the USB memory device.
NOTE
SHARP will not be held liable for any loss of data while the USB memory device
is connected to this unit. Always back up your music before playing on this
product.
USB functions (remote control)
ū To play or pause.
ū Skip to next song | Press and hold to fast forward.
ū Skip to beginning of song | Press and hold to quickly rewind.
NOTE:
ūIf the speakers were switched to standby whilst in USB mode, playback will
resume from the same point when the unit is switched back on.
ūUSB playback will be done in order of how audio tracks are saved on the
USB drive.
Troubleshooting
To keep the warranty valid, never try to repair the system yourself. If you
encounter problems when using this unit, review the following before
requesting service.
No power
Ensure that the AC cord is properly connected.
Ensure that there is power at the AC outlet.
Press on the remote control or speaker to turn the unit on.
No sound
Increase the volume. Press + on the remote control or turn the volume
knob on the speaker clockwise.
Press on the remote control to ensure the speakers are not muted.
Short press to select a dierent input source.
When connected to a digital source (Optical), if there is no audio:
ū Try setting the TV output to PCM or
ū Connect directly to your Blu-ray/other source, some TVs do not pass
through digital audio.
Your TV may be set to variable audio output. Conrm that the audio
output setting is set to FIXED or STANDARD, not VARIABLE. Consult your
TV’s user manual for more detailed information.
Ensure that the volume on your source device is turned up and that the
device is not muted.
Remote control does not work
Ensure the battery isolation tab is removed from the back of the remote
control.
Before you press any playback control button, rst select the correct
source.
Reduce the distance between the remote control and the unit.
Insert the battery with its polarities (+/-) aligned as indicated.
Replace the battery.
Aim the remote control directly at the sensor on the front of the right
speaker.
I hear buzzing or humming
Ensure all cables and wires are securely connected.
Connect a dierent source device (TV, record player, etc) to see if the
buzzing persists. If it does not, the problem may be with the original
device.
Connect your device to a dierent input.
If buzzing can be heard whilst using the Aux source, ensure the source
device connected to the Aux input is properly grounded (this can normally
be done by connecting the source device to an earthed mains power
supply).
I can’t nd the Bluetooth name of this unit on my Bluetooth device
Ensure the Bluetooth function is activated on your Bluetooth device.
Re-pair the unit with your Bluetooth device.

8
Wichtige Sicherheitsanweisungen
Bitte befolgen Sie alle Sicherheitshinweise und beachten
Sie alle Warnungen. Bewahren dieses Handbuch zum
Nachschlagen zu einem späteren Zeitpunkt auf.
Dieses Symbol verweist den Benutzer darauf, das
Benutzerhandbuch für zusätzliche Informationen bezüglich
Sicherheit, Betrieb und Wartung zu lesen.
Dieses Symbol kennzeichnet eine nicht isolierte „gefährliche
Spannung“ im Inneren des Produkts. Diese kann so stark sein,
dass für Personen die Gefahr eines Stromschlags besteht.
Bezieht sich auf Wechselstrom (AC)
Dieses Symbol kennzeichnet, dass es sich bei der mit
dem Symbol gekennzeichneten Nennspannung um
Wechselspannung handelt.
Bezieht sich auf ein Gerät der KlasseII.
Dieses Symbol kennzeichnet, dass es sich um ein Produkt mit
doppelter Isolierung handelt, das keine sichere Verbindung
zur elektrischen Masse benötigt (Erdung).
Vorsichtsmaßnahmen
Schäden
• Bitte überprüfen Sie das Gerät nach dem Auspacken auf Schäden. Ist das
Produkt in irgendeiner Weise beschädigt, bedienen Sie das Gerät nicht–
wenden Sie sich an Ihren Händler.
VORSICHT
GEFAHR AUF STROMSCHLAG
NICHT ÖFFNEN
Um das Risiko eines Stromschlags auszuschließen, entfernen Sie nicht
die Abdeckung auf der Rückseite. In diesem Gerät gibt es keine Teile, die
vom Benutzer gewartet werden können. Bitte überlassen Sie die Wartung
qualiziertem Fachpersonal.
Stromanschluss und Zugänglichkeit
• Fassen Sie das Netzkabel nicht mit nassen Händen an. Dies kann
einen elektrischen Schlag verursachen. Wenn der Stecker nicht in die
Steckdose passt, dürfen Sie einen nicht passenden Stecker nicht mit
Gewalt in eine Steckdose zu drücken. Ehe Sie das Gerät ausstecken,
schalten Sie es bitte vollständig aus. Trennen Sie das Stromkabel,
wenn es längere Zeit nicht verwendet wird. Stellen Sie sicher, dass
der Netzstecker immer leicht zugänglich ist. Schließen Sie keine
Verlängerungskabel an.
Spannungsversorgung
• Stellen Sie sicher, dass das Gerät an eine Steckdose mit AC 100-240V
50/60Hz angeschlossen wird. Eine höhere Spannung kann zu
Fehlfunktionen oder sogar zu einem Brand führen.
Spritzgussstecker (nicht neu verdrahtbar)– nur Großbritannien,
Malta, Zypern und Irland.
• Das Stromkabel dieses Geräts ist mit einem Spritzgussstecker mit einer
3-Ampere-Sicherung ausgestattet. Der Sicherungswert wird auf der
Stiftäche des Steckers angegeben. Sollte ein Austausch erforderlich
sein, muss eine nach BS1362 zugelassene Sicherung der gleichen
Nennleistung eingesetzt werden.
Netzkabelschutz
• Das Stromkabel darf nicht beschädigt werden. Stellen Sie keine
schweren Objekte darauf ab und dehnen oder verbiegen sie es nicht.
Schäden am Stromkabel können zu einem Feuer oder Stromschlag
führen. Wenn das Netzkabel beschädigt ist, muss es vom Hersteller,
einem Servicetechniker oder einer ähnlich qualizierten Person
ausgetauscht werden.
Kindersicherheit
• Halten Sie sich während der Nutzung dieses Produkts immer an die
allgemeinen Sicherheitshinweise, insbesondere, wenn Kinder in der
Nähe sind. Kinder sollten beaufsichtigt werden, um sicherzustellen, dass
sie nicht mit dem Produkt spielen.
Ort
• Bei Einsatz sollten Sie dieses Produkt auf eine ebene, stabile Oberäche
stellen und dabei darf kein Teil der Haupteinheit eine Kante überragen.
Belüftung
• Die Schlitze und Önungen im Gehäuse dienen der Belüftung und zur
Gewährleistung eines zuverlässigen Betriebs des Geräts, damit es vor
Überhitzung geschützt wird. Diese Önungen dürfen nicht blockiert
oder abgedeckt werden. Sorgen Sie für einen Mindestabstand von 5cm
rund um das Produkt, um eine ausreichende Belüftung sicherzustellen.
Lassen Sie niemals zu, dass jemand– und dies gilt ganz besonders für
Kinder– etwas in die Löcher, Spalten oder anderen Önungen des
Produktgehäuses stopft, da dies zu einem Stromschlag führen kann.
Wärme und Betriebstemperatur
• Stellen Sie das Produkt nicht in der Nähe von Heizquellen, wie etwa
Heizungen, Heizregister, Öfen oder anderen Apparaten (einschließlich
Verstärker) auf, die Hitze produzieren. Vermeiden Sie direkte
Sonneneinstrahlung.
Oene Flammen
• Halten Sie Kerzen oder oene Flammen von diesem Produkt fern, um
eine Brandgefahr zu vermeiden.
Eindringen von Wasser, Feuchtigkeit und Flüssigkeiten
• Dieses Produkt darf weder Regen, Wasser noch Feuchtigkeit ausgesetzt
werden das Risiko von Feuer oder Stromschlägen zu vermeiden. Stellen
Sie keine mit Flüssigkeit gefüllten Objekte auf oder in die Nähe dieses
Produkts.
Gewitter und Blitze
• Gewitter sind für alle elektrischen Produkte gefährlich. Wenn die
Stromversorgung vom Blitz getroen wird, kann das Gerät, auch wenn
es ausgeschaltet ist, beschädigt werden. Bei einem herannahenden
Gewitter sollten Sie alle Kabel und Stecker des Geräts ausstecken.
Wartung
• Trennen Sie vor dem Reinigen des Produkts das Stromkabel von der
Stromquelle. Verwenden Sie einen weichen und sauberen Lappen, um
die Außenächen des Geräts zu reinigen. Verwenden Sie beim Reinigen
niemals Chemikalien oder Reinigungsmittel.
Service und Reparatur
• Dieses Produkt enthält keine Teile, die vom Benutzer gewartet
werden können. Teile aus dem Inneren des Geräts freizulegen kann
lebensgefährlich sein. Setzen Sie sich im Fall eines Defekts mit dem
Hersteller oder der autorisierten Kundenabteilung in Verbindung.
Die Garantie der Hersteller gilt nicht für Defekte, die durch von nicht
autorisierten Dritten durchgeführte Reparaturen entstehen.
Batterien
Montage
• Verwenden Sie immer nur die angegebenen Batterien. Achten Sie beim
Einlegen der Batterien auf die richtige Polarität.
CAUTION
RISK OF ELECTRIC SHOCK
DO NOT OPEN
CAUTION
RISK OF ELECTRIC SHOCK
DO NOT OPEN

DE
Nutzung und Wartung
• Setzen Sie Batterien keinen hohen Temperaturen aus, z.B. in der Nähe
von Feuer oder direkte Sonneneinstrahlung. Wenn das Produkt für
längere Zeit nicht verwendet wird (länger als einen Monat), sollten
Sie die Batterien aus dem Produkt nehmen, um ein Auslaufen zu
verhindern. Wenn die Batterien auslaufen, wischen Sie die ausgelaufene
Flüssigkeit im Batteriefach weg und ersetzen die Batterien durch neue.
Kindersicherheit
• Vergewissern Sie sich immer, dass das Batteriefach geschlossen und
gesichert ist.
• Batterien können von kleinen Kindern leicht verschluckt werden und
dabei schwere innere Verbrennungen verursachen und sogar zum
Tod führen. Halten Sie Batterien von Kindern fern. Suchen Sie sofort
einen Arzt auf, wenn Sie der Meinung sind, dass jemand eine Batterie
verschluckt hat.
Umweltbedingungen
• Batterien dürfen keinem niedrigen Luftdruck und keinen hohen
Temperaturen ausgesetzt werden. Dies kann zu einer Explosion oder
dem Austreten einer brennbaren Flüssigkeit oder eines entammbaren
Gases führen.
Entsorgung
• Entsorgen Sie die Batterien bitte ordnungsgemäß und befolgen Sie
dabei die Anweisungen in diesem Handbuch (lesen Sie dazu den
Abschnitt „Entsorgung dieses Geräts und von Batterien“). Werfen Sie
Batterien nicht ins Feuer, bauen Sie sie nicht auseinander und versuchen
Sie nicht, nicht wiederauadbare Batterien aufzuladen; sie könnten
undicht werden oder explodieren.
Entsorgung dieses Geräts und von
Batterien
Informationen für Benutzer hinsichtlich der Sammlung und Entsorgung
von Altgeräten und gebrauchten Batterien.
Dieses Symbol bedeutet, dass Batterien in dem
Produkt enthalten sind, die unter die Europäische
Richtlinie2013/56/EU fallen, und diese Batterien können
nicht im normalen Hausmüll entsorgt werden. Cd, Hg und
Pb unter der dem Symbol der Mülltonne auf Rollen zeigt
an, ob die Batterie Cadmium (Cd), Quecksilber (Hg) oder
Blei (Pb) enthält.
Dieses Symbol auf einem Produkt bedeutet, dass das
Produkt unter die Europäische Richtlinie2012/19/EU fällt
und nicht zusammen mit dem übrigen Hausmüll entsorgt
oder deponiert werden darf.
Dieses Symbol bedeutet, dass die Herstellung des
Produkts so konzipiert ist, dass es recycelt und
wiederverwendet werden kann.
Diese Symbole auf den Produkten, Verpackungen und/oder
Begleitdokumenten bedeuten, dass gebrauchte elektrische und
elektronische Produkte und Batterien nicht mit dem allgemeinen
Hausmüll vermischt werden dürfen. Haushaltskunden sollten
sich bezüglich Informationen, wie sie diese Gegenstände einem
umweltverträglichen Recycling zuführen können, entweder an den
Händler wenden, bei dem sie dieses Produkt gekauft haben, oder an ein
lokales Regierungsamt.
Informationen gültig für Deutschland
• Altgeräte sind getrennt zu sammeln und zu entsorgen. Besitzer von
Altgeräten tragen damit zur sicheren Entsorgung bei und helfen,
mögliche umwelt- oder gesundheitsschädlichen Folgen zu vermeiden.
• Entnehmbare Altbatterien und Altakkumulatoren, die zerstörungsfrei
zu entnehmen sind, sind vor der Entsorgung zu entfernen und getrennt
zu behandeln.
• Informationen über geschaene Sammel- bzw. Rückgabemöglichkeiten
sowie die Verpichtungen des Handels/der Vertreiber gegenüber
Endnutzern zur kostenfreien Rücknahme von Altgeräten nden
Sie auf der lokalen Website des Herstellers des Produktes (www.
sharpconsumer.eu), oder wenden Sie sich an den Händler, von dem das
Produkt bezogen wurde.
• Achtung: Die Verantwortung für das Löschen von personenbezogenen
Daten, die sich auf dem zu entsorgenden Gerät benden, liegt beim
Endnutzer!
• Das Symbol mit der durchgestrichenen Mülltonne weist darauf hin, dass
Produkte, deren Batterien/Akkumulatoren und/oder Verpackungen
getrennt vom Hausmüll gesammelt und entsorgt werden müssen. Der
schwarze Balken zeigt an, dass das Produkt nach dem 13. August 2005
auf den Markt gebracht wurde.
CE- und UKCA-Erklärung:
• Sharp Consumer Electronics Poland Sp. z o.o. erklärt hiermit, dass
dieses Audiogerät den wesentlichen Anforderungen und weiteren
entsprechenden Vorschriften der RED-Verordnung 2014/53/EU und der
britischen Funkgeräteverordnung von 2017 entspricht.
• Der vollständige Text der UKCA-Konformitätserklärung ist unter
folgendem Link verfügbar: www.sharpconsumer.com, und anschließend
önen Sie den Download-Abschnitt Ihres Modells und wählen
„Konformitätserklärung“.

10
Was bendet sich im Karton:
• CP-SS30-Regalboxen
• Fernbedienung (inkl. Batterien)
• Lautsprecher-Anschlusskabel (3m)
• RCA-Audiokabel
• AUX-Audiokabel
• Stromkabel
• Benutzerdokumentation
Steuerelemente
(Beziehen Sie sich auf 1 auf Seite1).
1. Abnehmbare Lautsprechergitter
2. LED-Anzeige
• Stand-by– Rot
• Bluetooth– Blau
• Aux in– Grün
• Cinch– Cyan
• Optischer Modus– Gelb
• USB– Lila
3. / Lautstärke / Quelle / Leistungssteuerung
• Lange drücken zum Einschalten oder zum Schalten in den Stand-by-
Modus.
• Kurz drücken zum Ändern des Modus (Bluetooth, Aux-in, Cinch,
Optisch, USB).
• Lautstärke durch Drehen regeln.
Eingänge / Ausgänge
(Beziehen Sie sich auf 2 auf Seite1).
1. USB-Eingang
2. Optischer Eingang
3. Cinch-Line-Eingänge
4. Aux in
5. ~AC Eingangsleistung
6. Audioausgang zum Anschluss des passiven linken Lautsprechers
Fernbedienung
(Beziehen Sie sich auf 3 auf Seite2).
1. Drücken zum Einschalten oder zum Schalten in den Stand-by-
Modus.
2. LAUT Der Lautstärkeausgleich hebt beim Hören mit geringer Laut-
stärke die tiefen und hohen Frequenzen an.
3. Drücken, um den Ton stumm zu schalten. Erneut drücken, um den
Ton erneut einzuschalten, oder drücken Sie dazu +/-.
4. Im Bluetooth- und USB-Modus kann der vorherige Titel durch
kurzes Drücken aufgerufen werden, durch langes Drücken können
Sie zurückspulen.
5. Im Bluetooth- und USB-Modus drücken Sie kurz, um die Wiederga-
be/Pause zu starten.
6. Im Bluetooth- und USB-Modus kann der nächste Titel durch
kurzes Drücken aufgerufen werden, durch langes Drücken können
Sie vorspulen.
7. Kurz drücken, um den Bluetooth-Modus aufzurufen.
Lange drücken, um die Verbindung zum gekoppelten Gerät zu
trennen.
8. AUX Kurz drücken, um die Audioquelle auf Aux umzuschalten.
9. RCA Drücken, um die Audioquelle auf Cinch (RCA) umzuschalten.
10. OPT Kurz drücken, um die Audioquelle auf Optisch umzuschalten.
11. USB Kurz drücken, um den USB-Modus aufzurufen.
12. EQ Kurz drücken, um den aktuellen EQ-Modus zu bestätigen.
Drücken Sie weiter, um durch die EQ-Voreinstellungen zu schalten.
13. +/– Drücken, um Lautstärke einstellen.
14. BASS +/– Drücken, um den benutzerdenierten EQ-Basspegel
einzustellen.
15. TRE +/– Drücken, um den benutzerdenierten EQ-Höhenpegel
einzustellen.
Fernsteuerungsbetrieb
ERSTMALIGE VERWENDUNG: Die Einheit verfügt über eine vor-
installierte CR2025 Lithiumbatterie. Entfernen Sie die durchsichtige
Isolierabdeckung, um die Batterie der Fernbedienung zu aktivieren.
Dank der mitgelieferten Fernbedienung kann das Gerät aus der Ferne
bedient werden.
• Selbst wenn die Fernbedienung innerhalb des eektiven Bereichs von
6 m bedient wird, kann ihr Betrieb unmöglich sein, wenn sich zwischen
der Einheit und der Fernbedienung Hindernisse benden.
• Wenn die Fernbedienung in der Nähe von anderen Produkten, die
Infrarotstrahlen generieren, betrieben wird, oder wenn andere Fernsteu-
erungsgeräte, die Infrarotstrahlen verwenden, in der Nähe der Einheit
verwendet werden, arbeitet diese womöglich nicht ordnungsgemäß.
Umgekehrt arbeiten auch die anderen Geräte womöglich fehlerhaft.
Batterie der Fernbedienung austauschen
12
4
3
12
4
3
Die Fernbedienung benötigt eine CR2025, 3V Lithiumbatterie.
1. Drücken Sie den Verschluss an der Seite des Batteriefachs in Richtung
Mitte.
2. Schieben Sie das Batteriefach aus der Fernbedienung.
3. Entfernen Sie die alte Batterie. Setzen Sie eine neue CR2025 Batterie
mit der entsprechend den Angaben korrekten Polarität (+/-) in das
Fach.
4. Schieben Sie das Fach wieder in die Fernbedienung, bis sie mit einem
Klickgeräusch einrastet.
Ersteinrichtung
Aufstellung der Lautsprecher
Um Stereoton zu genießen, stellen Sie die „aktive“ Lautsprechereinheit
(das ist die Einheit, bei der sich die Bedienelemente auf der Vorderseite
und die Eingänge auf der Rückseite benden) auf die rechte Seite. Der
andere „passive“ Lautsprecher sollte auf der linken Seite stehen. Wir emp-
fehlen, dass die Lautsprecher mit einem Abstand von mindestens 50cm
voneinander aufgestellt werden. Stellen Sie sicher, dass die Lautsprecher
nicht blockiert werden.

DE
Lautsprecheranschluss
Vor dem Einschalten des Geräts schließen Sie den linken und den rechten
Lautsprecher mit dem mitgelieferten Lautsprecheranschlusskabel an. Bitte
achten Sie beim Anschluss der Lautsprecher auf die Polarität: Schließen Sie
das rote Kabel an den roten Ausgang und das durchsichtige Kabel an den
schwarzen Ausgang der beiden Lautsprecher an.
An eine Stromquelle anschließen
Risiko von Geräteschäden! Stellen Sie sicher, dass die Stromversorgungs-
spannung der auf der Rückseite oder Unterseite der Einheit angegebenen
Spannung entspricht.
Schließen Sie das Stromkabel an den Netzeingang ~AC der Einheit und
anschließend an eine Netzsteckdose an.
Verwendung Ihrer Regalboxen
Stand-by/EIN
• Wenn Sie das Gerät das erste Mal an eine Netzsteckdose anschließen,
bendet es sich im STAND-BY-Modus. Die Anzeige leuchtet rot auf.
• Drücken Sie auf der Fernbedienung, um die Lautsprecher ein- oder in
den Stand-by zu schalten.
• Ziehen Sie den Stecker aus der Wandsteckdose, wenn Sie die Einheit
vollständig abschalten möchten.
HINWEIS: Die Lautsprecher schalten nach 15Minu-
ten Inaktivität in den Stand-by-Modus.
Modi wählen
Drücken Sie die Lautstärkeregelung am Gerät, um durch die Quellenop-
tionen zu schalten, oder wählen Sie den gewünschten Modus mit der
Fernbedienung.
Rot: Stand-by
Blau: Bluetooth
Grün: Aux
Cyan: RCA
Gelb: Optisch
Violett: USB
Lautstärkeregelung
ū Verwenden Sie den Lautstärkeregler am Gerät oder +/– auf der
Fernbedienung, um die Lautstärke einzustellen.
ū Um den Ton stumm zu schalten, drücken Sie auf der Fernbedienung.
Um den Ton wieder einzuschalten, drücken Sie oder +/– auf der
Fernbedienung oder drehen Sie den Lautstärkeregler am Gerät.
ū Während des Einstellens der Lautstärke blinkt die Statusanzeige.
ū Wenn die Lautstärke beim erneuten Drücken von + ihre maximale
Stufe erreicht, blinkt die Anzeige einmal auf. Wenn die Lautstärke beim
erneuten Drücken von – ihre minimale Stufe erreicht, blinkt die LED-
Anzeige einmal auf.
Equalizer-Einstellungen (EQ)
Sie können den Ton der Regalboxen mit den Equalizer-Voreinstellungen
anpassen. Drücken Sie auf der Fernbedienung einmal, um den
aktuellen EQ-Modus zu bestätigen. Drücken Sie weiter, um durch die EQ-
Voreinstellungen zu schalten.
• Classic– Grüne LED-Anzeige blinkt 2Sekunden lang
• POP– Gelbe LED-Anzeige blinkt 2Sekunden lang
• Rock– Blaue LED-Anzeige blinkt 2Sekunden lang
• Film– Lila LED-Anzeige blinkt 2Sekunden lang
• Sprache– Cyanfarbene LED-Anzeige blinkt 2Sekunden lang
• Benutzerdeniert– Weiße LED-Anzeige blinkt 2Sekunden lang
Benutzerdenierte Einstellungen
• Drücken Sie die Taste , um die benutzerdenierten Einstellungen
aufzurufen, oder drücken Sie die Tasten BASS oder TREB +/- einmal, ein
weißes Licht blinkt 2 Sekunden lang.
• Verwenden Sie die Tasten BASS/TREB auf der Fernbedienung, um den
EQ-Pegel zu erhöhen (+) oder zu verringern (-). Der gewählte EQ-Pegel
wird durch die Geschwindigkeit angezeigt, mit der die LED-Anzeige am
Lautsprecher blinkt. Eine blinkende rote LED zeigt einen erhöhten Pegel
an, eine weiße LED (nicht blinkend) zeigt an, dass der Pegel gleich/0 ist,
eine blinkende grüne LED zeigt einen verringerten Pegel an.
LED-Farbe EQ-Pegel Geschwindigkeits-LED
blinkt
ROT
+3 Schnell
+2 Mittel
+1 Langsam
Weiß 0 An
Grün
-1 Langsam
-2 Mittel
-3 Schnell
HINWEIS: Neue EQ-Änderungen werden als Standard gespeichert.
Sie haben zwischen jedem Tastendruck 3 Sekunden Zeit, um Än-
derungen vorzunehmen, bevor der EQ-Modus beendet wird.
AUX/OPTISCH/CINCH
1. Stellen Sie sicher, dass die Einheit an den Fernseher oder das Audio-
gerät angeschlossen ist.
2. Achten Sie bei eingeschaltetem Gerät darauf, dass die richtige Quelle
ausgewählt ist. Dies ist entweder über die Fernbedienung oder durch
Drücken des Lautstärkereglers am Gerät möglich.
3. Sie können Ihr Audiogerät direkt für Wiedergabefunktionen nutzen.
4. Verwenden Sie den Lautstärkeregler am Gerät oder +/– auf der
Fernbedienung, um die Lautstärke anzupassen.
HINWEIS: Vergewissern Sie sich bitte, dass die Cinch- und AUX-
Eingänge am Quellgerät auf eine Mindestlautstärke von 50% einge-
stellt sind. Die Lautstärke kann sowohl über den Lautsprecher als auch
über die Fernbedienung oder das Quellgerät eingestellt werden.
Bluetooth-Modus
Bluetooth-fähige Geräte koppeln
Wenn Sie Ihr Bluetooth-Gerät das erste Mal mit diesen Lautsprechern
verbinden, müssen Sie Ihr Gerät mit diesen Lautsprechern koppeln.
HINWEIS:
ū Der Betriebsbereich zwischen diesen Lautsprechern und einem
Bluetooth-Gerät beträgt ungefähr 8 Meter (ohne ein Objekt zwischen
dem Bluetooth-Gerät und der Einheit).
ū Bevor Sie ein Bluetooth-Gerät mit diesen Lautsprechern verbinden,
müssen Sie die Eigenschaften des Geräts kennen.
ū Eine Kompatibilität mit allen Bluetooth-Geräten kann nicht garantiert
werden.
ū Jedes Hindernis zwischen diesen Lautsprechern und einem Bluetooth-
Gerät kann den Betriebsbereich reduzieren.
ū Wenn die Signalstärke schwach ist, könnte Ihr Bluetooth-Empfänger
möglicherweise nicht verbunden sein, dieser geht jedoch automatisch
wieder in den Kopplungsmodus.
1. Während das Gerät eingeschaltet ist, drücken Sie auf der Fernbe-
dienung oder drücken Sie den Lautstärkeregler am Gerät, um den
Bluetooth-Modus auszuwählen. Die Anzeigeleuchte blinkt blau.
2. Aktivieren Sie Ihr Bluetooth-Gerät und wählen Sie den Suchmodus.
„SHARP CP-SS30“ erscheint in der Bluetooth-Geräteliste.

12
ū Wenn Sie das Gerät nicht nden können, halten Sie zum Suchen
auf der Fernbedienung gedrückt.
3. Wählen Sie aus der Geräteliste „SHARP CP-SS30“ aus. Wenn die Ver-
bindung erfolgreich hergestellt wurde, ertönt ein Tonsignal und die
Anzeige leuchtet dauerhaft blau.
4. Beginnen Sie mit dem Abspielen von Musik vom verbundenen
Bluetooth-Gerät.
Um die Bluetooth-Funktion zu deaktivieren, können
Sie Folgendes tun:
ū Wechseln Sie zu einer anderen Funktion auf der Einheit.
ū Deaktivieren Sie die Bluetooth-Funktion auf Ihrem Gerät. Es ertönt ein
Audiosignal, wenn die Verbindung erfolgreich getrennt wurde.
ū Halten Sie auf der Fernbedienung gedrückt.
TIPPS:
• Geben Sie, wenn nötig „0000“ als Passwort ein.
• Wenn innerhalb von zwei Minuten kein anderes Bluetooth-Gerät mit
den Lautsprechern gekoppelt wird, kehren die Lautsprecher zur vorheri-
gen Verbindung zurück.
• Die Lautsprecher werden auch getrennt, wenn Ihr Gerät den Betriebs-
bereich verlässt.
• Wenn Sie Ihr Gerät wieder mit diesen Lautsprechern verbinden möch-
ten, platzieren Sie es innerhalb des Betriebsbereichs.
• Wenn das Gerät den Betriebsbereich verlässt und dann zurückge-
bracht wird, prüfen Sie bitte, ob das Gerät noch mit den Lautsprechern
verbunden ist.
• Wenn die Verbindung verloren ist, folgen Sie bitte den oben angege-
benen Instruktionen, um Ihr Gerät wieder mit den Lautsprechern zu
koppeln.
Musik vom Bluetooth-Gerät hören
ū Wenn das verbundene Bluetooth-Gerät Advanced Audio Distribution
Prole (A2DP) unterstützt, können Sie über die Lautsprecher die auf
dem Gerät gespeicherte Musik hören.
ū Wenn das Gerät auch Audio Video Remote Control Prole (AVRCP)
unterstützt, können Sie die Fernbedienung der Lautsprecher nutzen, um
die auf dem Gerät gespeicherte Musik zu verwalten.
1. Koppeln Sie Ihr Gerät mit den Lautsprechern.
2. Spielen Sie über Ihr Gerät Musik ab (wenn es A2DP unterstützt).
3. Verwenden Sie zum Abspielen die mitgelieferte Fernbedienung
(wenn diese AVRCP unterstützt).
ū Drücken Sie zum Pausieren/weiter Abspielen auf der Fernbe-
dienung.
ū Um einen Track zu überspringen, drücken Sie die Tasten / auf
der Fernbedienung.
ū Drücken Sie lange auf / , um im Lied zurückzuspulen/vorzu-
spulen.
USB-Modus
• Drücken Sie wiederholt den Lautstärkeregler am Lautsprecher oder USB
auf der Fernbedienung, um den USB+-Modus auszuwählen. Schließen
Sie den USB-Stick mit den MP3-Dateien an (unterstützt werden Laufwer-
ke mit bis zu 64 GB).
• Drücken Sie , um die Wiedergabe zu starten.
• Schalten Sie den Lautsprecher aus, bevor Sie den USB-Stick entfernen.
HINWEIS
SHARP haftet nicht für Datenverlust, wenn das USB-Speichergerät an dieses
Gerät angeschlossen ist. Sie sollten Ihre Musikdateien immer erst sichern,
bevor Sie sie auf diesem Gerät abspielen.
ū Zum Abspielen oder Pausieren.
ū Zum nächsten Lied springen | Zum Vorspulen drücken und halten.
ū Zum Anfang des Lieds springen | Zum schnellen Zurückspulen
drücken und halten.
HINWEIS:
ūWenn Sie die Lautsprecher im USB-Modus in den Stand-by-Modus geschal-
tet haben, wird die Wiedergabe beim erneuten Einschalten des Geräts an
der gleichen Stelle fortgesetzt.
ūDie USB-Wiedergabe erfolgt in der Reihenfolge, in welcher die Audiotitel auf
dem USB-Laufwerk gespeichert sind.
Problembehandlung
Damit die Garantie ihre Gültigkeit behält, dürfen Sie nie versuchen, das
System selbst zu reparieren. Wenn Sie Probleme bei der Verwendung der
Einheit haben, beschäftigen Sie sich zuerst mit Folgendem, bevor Sie Hilfe
anfordern.
Kein Strom
Stellen Sie sicher, dass das Wechselstromkabel ordnungsgemäß ange-
schlossen ist.
Stellen Sie sicher, dass die Steckdose ordnungsgemäß funktioniert.
Drücken Sie auf der Fernbedienung oder dem Lautsprecher, um das
Gerät einzuschalten.
Kein Ton
Erhöhen Sie die Lautstärke. Drücken Sie + auf der Fernbedienung oder
drehen Sie den Lautstärkeregler am Lautsprecher im Uhrzeigersinn.
Drücken Sie auf der Fernsteuerung, um sicherzustellen, dass die Laut-
sprecher nicht auf stumm geschaltet sind.
Drücken Sie kurz auf , um eine andere Eingangsquelle auszuwählen.
Bei der Verbindung mit einer digitalen Quelle (Optisch) gibt es keinen Ton:
ū Versuchen Sie, den Ausgang des Fernsehers auf PCM zu setzen, oder
ū Verbinden Sie ihn direkt mit Ihrem Blu-Ray-Player/einer anderen Quelle.
Einige Fernseher geben digitales Audio nicht weiter.
Ihr Fernseher ist womöglich für einen variablen Audio-Ausgang einge-
stellt. Bestätigen Sie, dass die Einstellung des Audio-Ausgangs auf FIXED
oder STANDARD gesetzt ist, nicht auf VARIABLE. Ziehen Sie für weitere
Informationen das Handbuch Ihres Fernsehers zu Rate.
Vergewissern Sie sich, dass die Lautstärke Ihres Quellengeräts aufgedreht
und das Gerät nicht stummgeschaltet ist.
Fernbedienung funktioniert nicht
Vergewissern Sie sich, dass die Isolierlasche der Batterie auf der Rückseite
der Fernbedienung entfernt wurde.
Bevor Sie eine Wiedergabetaste drücken, müssen Sie zuerst die richtige
Quelle auswählen.
Reduzieren Sie den Abstand zwischen der Fernbedienung und der Einheit.
Setzen Sie die Batterie entsprechend der angezeigten Polarität (+/-) ein.
Ersetzen Sie die Batterie.
Zielen Sie mit der Fernbedienung direkt auf den Sensor vorne am rechten
Lautsprecher.
Ich höre ein Summen oder Brummen
Stellen Sie sicher, dass alle Kabel und Drähte fest angeschlossen sind.
Schließen Sie ein anderes Quellengerät an (Fernseher, Schallplattenspie-
lerusw.), um zu prüfen, ob das Summen auch in diesem Fall auftritt. Wenn
dies nicht der Fall ist, liegt das Problem womöglich am ursprünglichen
Gerät.
Schließen Sie Ihr Gerät an einen anderen Eingang an.
Wenn der Brummton während der Nutzung der Aux-Quelle zu hören ist,
sollten Sie sicherstellen, dass das Quellgerät, das an den Aux-Eingang an-
geschlossen ist, ordnungsgemäß geerdet ist (normalerweise erfolgt dies,
indem das Quellgerät an ein geerdetes Stromnetz angeschlossen wird).
Ich kann den Bluetooth-Namen dieser Einheit nicht auf meinem
Bluetooth-Gerät nden
Vergewissern Sie sich, dass die Bluetooth-Funktion auf Ihrem Bluetooth-
Gerät aktiviert ist.
Koppeln Sie die Einheit wieder an Ihr Bluetooth-Gerät.

ES
Instrucciones de seguridad importantes
Siga todas las instrucciones de seguridad y preste atención
a todas las advertencias. Conserve el manual para futuras
consultas.
Este símbolo indica al usuario que consulte el manual de
instrucciones para cuestiones relacionadas con la seguridad,
el uso y la información de mantenimiento.
Este símbolo indica la presencia de "tensión peligrosa" no
aislada dentro del producto, que puede constituir un riesgo
de descarga eléctrica para las personas.
Hace referencia a corriente alterna (CA)
El símbolo indica que la tensión nominal marcada con el
símbolo es tensión de CA.
Se reere a equipos de claseII.
Este símbolo indica que el producto incorpora un sistema
de aislamiento doble y no requiere una conexión segura a
masa (tierra).
Precauciones
Daños
• Inspeccione la unidad tras desembalarla para buscar posibles daños.
Si el producto presenta algún daño, no lo utilice y consulte a su
distribuidor.
ADVERTENCIA
RIESGO DE DESCARGA ELÉCTRICA
NO ABRIR
Para evitar el riesgo de descarga eléctrica, no retire la tapa posterior. El
producto no incluye piezas reparables por el usuario. Diríjase a personal
cualicado para realizar reparaciones.
Conexión eléctrica y accesibilidad
• No toque el cable de alimentación con las manos mojadas, ya que
podrían producirse descargas eléctricas. Si el enchufe no encaja en
la toma, no lo fuerce. Apague completamente la unidad antes de
desenchufarla. Desconecte el cable de alimentación si la unidad no se
va a utilizar durante un periodo prolongado de tiempo. Asegúrese de
que el enchufe de alimentación resulta fácilmente accesible. No utilice
alargadores.
Fuente de alimentación
• Asegúrese de que la unidad está conectada a una toma de corriente
de CA de 100-240V y 50/60Hz. El uso de una tensión superior puede
causar el mal funcionamiento de la unidad o incluso presentar un riesgo
de incendio.
Enchufe moldeado con fusible (no reemplazable) - Solo Reino Unido,
Malta, Chipre e Irlanda.
• El cable de alimentación de este equipo se suministra con un enchufe
moldeado que incorpora un fusible de 3amp. El valor de este fusible
se indica en la parte de las clavijas del enchufe y, si fuera necesario
sustituirlo, se debe utilizar un fusible del mismo valor nominal
homologado conforme al estándar BS1362.
Protección del cable de alimentación
• No dañe el cable de alimentación, no coloque objetos pesados encima,
no lo estire ni lo doble. Los daños en el cable de alimentación pueden
ocasionar incendios o descargas eléctricas. Si el cable de alimentación
presenta algún daño, deberá ser sustituido por el fabricante, un servicio
técnico o personas con una cualicación similar.
Seguridad infantil
• Respete siempre las precauciones básicas de seguridad cuando utilice
este producto, especialmente si hay niños presentes. Los niños deben
ser supervisados para asegurarse de que no juegan con el producto.
Ubicación
• Cuando se use, este producto debe disponerse sobre una supercie
plana y estable sin que ninguna de sus partes sobresalga de los bordes.
Ventilación
• Los oricios y las aperturas de la carcasa del producto se proporcionan
para nes de ventilación con la intención de garantizar un uso able
y protegerlo contra el sobrecalentamiento. Estas aberturas no deben
bloquearse ni cubrirse. Asegúrese de dejar una distancia mínima de
5cm en torno al producto para garantizar una ventilación adecuada. No
permita que se introduzcan elementos en los oricios o ranuras, ni en
ninguna abertura de la carcasa del producto, ya que podrían dar lugar
adescargas eléctricas.
Calor y temperatura de funcionamiento
• No instale el aparato cerca de una fuente de calor, como radiadores,
salidas de aire caliente, estufas u otros aparatos (incluidos
amplicadores) que produzcan calor. Evite la exposición directa al sol.
Llamas descubiertas
• Para evitar el riesgo de incendio, mantenga las velas y llamas
descubiertas lejos del producto.
Entrada de agua, humedad y líquidos
• Para evitar el riesgo de incendio o descarga eléctrica, no exponga este
producto a lluvia, agua ni humedad. No coloque objetos que contengan
líquidos sobre el producto o en sus proximidades.
Tormentas y rayos
• Las tormentas son peligrosas para todos los productos eléctricos. Si los
cables de alimentación son alcanzados por un rayo, el producto puede
resultar dañado, incluso si no está encendido. Deben desconectarse
todos los cables y conectores del aparato antes de una tormenta.
Mantenimiento
• Desenchufe el cable de alimentación de la toma de corriente antes
de limpiar el producto. Utilice un paño suave y limpio para limpiar la
parte exterior de la unidad. No utilice nunca productos químicos ni
detergentes.
Servicio y reparación
• Este producto no contiene ninguna pieza que pueda ser reparada por el
usuario. La exposición de ciertas partes internas del dispositivo puede
poner en peligro su vida. En caso de avería, póngase en contacto con
el fabricante o el servicio técnico autorizado. La garantía del fabricante
no cubre las averías resultantes de reparaciones llevadas a cabo por
terceros.
Pilas
Instalación
• No utilice pilas diferentes a las especicadas. Tenga en cuenta la
polaridad correcta al insertar las pilas.
Uso y mantenimiento
• No exponga las pilas a altas temperaturas, por ejemplo, no las sitúe
cerca de una fuente de fuego o directamente bajo la luz del sol Si el
producto no se va a utilizar durante un largo periodo de tiempo (más
de un mes), retire las pilas para evitar fugas. Si las pilas presentan fugas,
limpie la parte interior del compartimento de las pilas y sustitúyalas por
pilas nuevas.
CAUTION
RISK OF ELECTRIC SHOCK
DO NOT OPEN
CAUTION
RISK OF ELECTRIC SHOCK
DO NOT OPEN

14
Seguridad infantil
• Asegúrese siempre de que el compartimento de las pilas está bien
cerrado.
• Los niños pueden tragarse con facilidad las pilas, que pueden causar
graves quemaduras internas y ocasionar la muerte. Mantenga las pilas
lejos del alcance de los niños. Consulte inmediatamente a un médico si
sospecha de ingestión de una pila.
Condiciones ambientales
• Mantenga alejadas las pilas de condiciones de baja presión de aire
oaltas temperaturas, ya que pueden provocar una explosión o a una
fuga de gas o líquido inamable.
Eliminación
• Elimine de forma correcta las pilas siguiendo la guía incluida en este
manual (consulte la sección "Eliminación de este equipo y de las pilas").
No las arroje al fuego, no las desmonte y no intente recargar pilas no
recargables; podrían producirse ltraciones o explotar.
Eliminación de este equipo y de las pilas
Información dirigida a los usuarios relativa a la recogida y eliminación de
equipos antiguos y pilas usadas.
Este símbolo indica que el producto contiene pilas
previstas en la Directiva Europea 2013/56/UE que no
deben eliminarse con la basura doméstica normal. Los
signos Cd, Hg y Pb que aparecen debajo del símbolo de la
papelera con ruedas indican que la pila contiene cadmio
(Cd), mercurio (Hg) o plomo (Pb).
Este símbolo indica que el producto está previsto en la
Directiva Europea 2012/19/UE y que no debe eliminarse
con la basura doméstica normal.
Este símbolo indica que el producto se ha diseñado
yfabricado para poder reciclarse y reutilizarse.
Estos símbolos incluidos en los productos, los embalajes o los documentos
acompañantes indican que los productos eléctricos y electrónicos, y las
pilas no deben mezclarse con la basura doméstica general. Los usuarios
deben ponerse en contacto con el establecimiento comercial en el que
compraron el producto o en las ocinas públicas locales para obtener
detalles sobre dónde y cómo puede reciclar estos artículos de forma
respetuosa con el medio ambiente.
Declaración de CE y de CA del Reino
Unido:
• Por la presente, Sharp Consumer Electronics Polandsp.zo.o. declara
que este equipo cumple los requisitos esenciales y otras disposiciones
pertinentes de la Directiva RED 2014/53/UE y los reglamentos sobre
equipos de radio del Reino Unido de 2017.
• El texto completo de la CE y la declaración de conformidad de la UKCA
están disponible en sharpconsumer.eu. Una vez en la página, entre
en la sección de descarga de su modelo y seleccione "Declaración de
conformidad".

ES
Contenido de la caja
• Altavoces de estantería CP-SS30
• Mando a distancia (incluye pilas)
• Cable de conexión para el altavoz (3m)
• Cable de audio RCA
• Cable de audio AUX
• Cable de alimentación
• Documentación de usuario
Controles
(Consulte 1 en la página1).
1. Extraiga las rejillas de los altavoces
2. Indicador LED
• En espera - Color rojo
• Bluetooth - Color azul
• Entrada auxiliar - Color verde
• RCA - Color cian
• Modo óptico - Color amarillo
• USB - Color morado
3. / Control de volumen/fuente/potencia
• Mantenga pulsado para encender o activar el modo en espera.
• Pulse para cambiar el modo (Bluetooth, entrada auxiliar, RCA, modo
óptico y USB).
• Gírelo para ajustar el nivel de volumen.
Entradas/salidas
(Consulte 2 en la página1).
1. Entrada de USB
2. Entrada óptica
3. Entradas de línea RCA
4. Entrada AUX
5. Entrada de alimentación de ~CA
6. Salida de audio para conectar un altavoz izquierdo pasivo
Mando a distancia
(Consulte 3 en la página2).
1. Pulse para encender o activar el modo en espera.
2. LOUD La compensación de intensidad aumenta las frecuencias bajas
y altas cuando se escucha a bajo volumen.
3. Pulse para silenciar el sonido. Pulse para reanudar el sonido o
pulse +/- para reanudar el sonido.
4. En el modo Bluetooth y USB, pulse para la siguiente pista y man-
tenga pulsado para rebobinar.
5. En el modo Bluetooth y USB, pulse para reproducir/poner en
pausa.
6. En el modo Bluetooth y USB, pulse para la siguiente pista y man-
tenga pulsado para avanzar.
7. Pulse para entrar en el modo de Bluetooth.
Mantenga pulsado para desconectar del dispositivo emparejado.
8. AUX Pulse para cambiar la fuente de audio a Aux.
9. RCA Pulse para cambiar la fuente de audio a RCA.
10. OPT Pulse para cambiar la fuente de audio a modo óptico.
11. USB Pulse para entrar en el modo USB.
12. EQ Pulse para conrmar el modo de ecualizador actual.
Continúe pulsando para recorrer los preajustes del ecualizador.
13. +/– Pulse para ajustar el volumen.
14. BASS +/– Pulse para ajustar el nivel de graves personalizado del
ecualizador.
15. TRE +/– Pulse para ajustar el nivel de agudos personalizado del
ecualizador.
Funcionamiento del mando a distancia
PRIMER USO: La unidad lleva preinstalada una batería de litio CR2025. Retire
la pestaña aislante transparente para activar la pila del mando a distancia.
El mando a distancia suministrado permite utilizar la unidad a distancia.
• Incluso si se utiliza dentro de un rango de distancia de 6m, el mando
a distancia puede no responder adecuadamente si existen obstáculos
entre este y la unidad.
• Si el mando a distancia se utiliza cerca de otros productos que generan
rayos infrarrojos o si otros dispositivos de control remoto utilizan rayos
infrarrojos cerca de la unidad, el mando a distancia podría no funcionar
correctamente. También podría ocurrir que otros productos no funcio-
nen correctamente.
Colocación de la pila del mando a distancia
12
4
3
12
4
3
El mando a distancia requiere una pila de litio CR2025 de 3V.
1. Presione la pestaña situada al lado de la tapa de la pila en dirección
al centro.
2. Retire la tapa de la pila fuera del mando a distancia deslizándola.
3. Retire la pila antigua. Coloque una nueva pila CR2025 en la tapa de la
pila con la polaridad correcta (+/-) como se indica.
4. Deslice la tapa en la ranura del mando a distancia hasta oír un
chasquido.
Conguración inicial
Ubicación de los altavoces
Para disfrutar de sonido estéreo, coloque la unidad de altavoz "activa"
(la unidad con controles en la parte frontal y las entradas en la parte
posterior) en el lado derecho. El otro altavoz "pasivo" debe situarse a la
izquierda. Recomendamos disponer los altavoces a una distancia de al
menos 50cm. Asegúrese de que los altavoces no está obstruidos.
Conexión de los altavoces
Antes de encender la unidad, conecte los altavoces izquierdo y derecho,
con ayuda del cale de conexión de altavoces suministrado. Observe la
polaridad al conectar los altavoces: conecte el cable rojo a la salida de
color rojo y el cable claro a la salida de color negro de ambos altavoces.
Conexión a la corriente
Riesgo de daños en el producto. Asegúrese de que la tensión de
alimentación se corresponde con la tensión indicada en la parte posterior
o inferior de la unidad.

16
Conecte el cable de corriente a la entrada de la toma de ~CA de la unidad
y, a continuación, introduzca el enchufe en una toma de corriente.
Uso de los altavoces de estante
Modo en espera/encendido
• La unidad se encenderá en modo en espera cuando se conecte por
primera vez a una toma de corriente. El indicador se iluminará en color
rojo.
• Pulse el botón del mando a distancia para alternar entre el modo
encendido y en espera de los altavoces.
• Desconecte el enchufe de la toma de alimentación si desea apagar la
unidad completamente.
NOTA: Los altavoces enterarán en el modo en
espera tras 15minutos de inactividad.
Selección de modos
Pulse el control del volumen de la unidad para recorrer las opciones de la
fuente o utilizar el mando a distancia para seleccionar el modo deseado.
Rojo: en espera
Azul: Bluetooth
Verde: Aux
Cian: RCA
Amarillo: modo óptico
Morado: USB
Ajuste del volumen
ū Use el control de volumen de la unidad o el botón +/– del mando a
distancia para ajustar el volumen.
ū Para silenciar el sonido, pulse el botón del mando a distancia. Para
reanudar el sonido, pulse o +/– en el mando a distancia o gire el
control del volumen de la unidad.
ū Al ajustar el volumen, el indicador de estado parpadea rápidamente.
ū Si pulsa el botón + cuando el volumen ha alcanzado su nivel máximo, el
indicador parpadeará una vez. Si pulsa el botón – cuando el volumen ha
alcanzado su nivel mínimo, el indicador parpadeará una vez.
Ajustes del ecualizador (EQ)
Puede ajustar el sonido de los altavoces de estante utilizando los
preajustes del ecualizador. Pulse en el mando a distancia una vez para
conrmar el modo de ecualizador actual. Continúe pulsando para recorrer
los preajustes del ecualizador.
• Clásico: en indicador LED de color verde parpadeará durante dos
segundos
• POP: en indicador LED de color amarillo parpadeará durante dos
segundos
• Rock: en indicador LED de color azul parpadeará durante dos segundos
• Película: en indicador LED de color morado parpadeará durante dos
segundos
• Voz: en indicador LED de color cian parpadeará durante dos segundos
• Personalizado: en indicador LED de color blanco parpadeará durante
dos segundos
Ajustes personalizados
• Pulse el botón para acceder a los ajustes personalizados o pulse los
botones BASS o TREB +/- una vez. Una luz blanca parpadeará durante
dos segundos.
• Utilice los botones BASS/TREB del mando a distancia para aumentar (+)
o reducir (-) el nivel del ecualizador. El nivel del ecualizador seleccionado
se indica mediante la velocidad a la que el indicador LED parpadea en el
altavoz. Un LED de color rojo parpadeante indica un nivel aumentado,
un LED blanco (no parpadeante) indica que el nivel es plano/cero y un
nivel LED verde parpadeante indica un nivel reducido
Color del LED Nivel del
ecualizador
Velocidad de parpadeo
del LED
Rojo
+3 Rápido
+2 Medio
+1 Lento
Blanco 0 Activado
Verde
-1 Lento
-2 Medio
-3 Rápido
NOTA: Los nuevos cambios del ecualizador se guardan como
predeterminados. Dispone de tres segundos entre cada pulsación de tecla
para realizar los cambios antes de que el modo de ecualizador se aplique.
AUX/OPTICO/RCA
1. Asegúrese de que la unidad está conectada al televisor o el
dispositivo de audio.
2. Con la unidad encendida, asegúrese de seleccionar la fuente correcta
ya sea usando el mando a distancia o pulsando el control de volumen
de la unidad.
3. Utilice el dispositivo de audio directamente para aplicar funciones de
reproducción.
4. Use el control de volumen de la unidad o el botón +/– de la
unidad o del mando a distancia para ajustar el volumen.
NOTA: Asegúrese de que las entradas RCA y AUX están establecidas en
el volumen mínimo del 50% en el dispositivo fuente. El volumen puede
ajustarse a través del altavoz, el mando a distancia y el dispositivo fuente.
Modo Bluetooth
Emparejamiento de dispositivos Bluetooth
La primera vez que conecte su dispositivo Bluetooth a los altavoces,
necesitará emparejarlo con estos.
NOTA:
ū El rango operativo entre los altavoces y un dispositivo Bluetooth es
de aproximadamente 8metros (sin ningún objeto entre el dispositivo
Bluetooth y la unidad).
ū Antes de conectar un dispositivo Bluetooth a los altavoces, asegúrese de
conocer las funciones del dispositivo.
ū No se garantiza la compatibilidad con todos los dispositivos Bluetooth.
ū Cualquier obstáculo entre los altavoces y un dispositivo Bluetooth
puede reducir el rango operativo.
ū Si la señal es débil, su receptor Bluetooth puede desconectarse, pero
volverá a entrar en modo de emparejamiento automáticamente.
1. Con la unidad encendida, pulse el botón del mando a distancia o el
control de volumen de la unidad para seleccionar el modo Bluetooth.
El indicador luminoso parpadeará en color azul.
2. Active el dispositivo Bluetooth y seleccione el modo de búsqueda.
Aparecerá "SHARP CP-SS30" en la lista del dispositivo Bluetooth.
ū Si no puede encontrar la unidad, mantenga pulsado el botón del
mando a distancia.
3. Seleccione "Sharp CP-SS30" en la lista. Un oirá un mensaje sonoro
cuando la conexión se haya completado correctamente y el indicador
brillará en color azul.
4. Empiece a reproducir música desde el dispositivo Bluetooth
conectado.

ES
Para desconectar la función Bluetooth, puede:
ū Cambiar a otra función de la unidad.
ū Desactivar la función Bluetooth del dispositivo. Se oirá un mensaje
sonoro cuando la desconexión se haya completado correctamente.
ū Mantener pulsado el botón del mando a distancia.
CONSEJO:
• Introduzca "0000" como contraseña si fuera necesario.
• Si no se empareja otro dispositivo Bluetooth con los altavoces en los
siguientes dos minutos, los altavoces se reconectarán a la conexión
previa.
• Los altavoces también se desconectarán cuando el dispositivo deje de
estar en el rango operativo.
• Si desea conectar su dispositivo a los altavoces, sitúelo dentro del rango
operativo.
• Si el dispositivo vuelve a situarse dentro del rango operativo después de
dejar de estarlo, compruebe si sigue conectado a los altavoces.
• Si se pierde la conexión, siga las instrucciones anteriores para volver a
emparejar el dispositivo a los altavoces.
Escuchar música desde un dispositivo Bluetooth
ū Si el dispositivo Bluetooth conectado admite Advanced Audio
Distribution Prole (A2DP), puede escuchar la música almacenada en
dicho dispositivo a través de los altavoces.
ū Si el dispositivo también admite Audio Video Remote Control Prole
(AVRCP), puede utilizar el mando a distancia del altavoz para reproducir
música almacenada en el dispositivo.
1. Empareje el dispositivo con los altavoces.
2. Reproduzca música a través del dispositivo (si admite A2DP).
3. Use el mando a distancia suministrado para controlar la reproducción
(si admite AVRCP).
ū Para pausar la reproducción y reanudarla, pulse el botón del
mando a distancia.
ū Para saltar una pista, pulse los botones / del mando a
distancia.
ū Mantenga pulsado / para retroceder o avanzar en modo
rápido dentro de una pista.
Modo USB
• Pulse el control del volumen del altavoz varias veces o el botón USB del
mando a distancia para seleccionar el modo USB. Conecte el dispositivo
de memoria USB con los archivos MP3 (se admiten unidades de hasta
64GB).
• Pulse para iniciar la reproducción.
• Apague la unidad antes de retirar el dispositivo de memoria USB.
NOTA
SHARP no se hace responsable de la pérdida de datos durante la conexión de
la memoria USB a este producto. Realice siempre una copia de seguridad de
su música antes de reproducirla en este producto.
Funciones USB (mando a distancia)
ū : permite reproducir/poner en pausa
ū: permite saltar a la siguiente canción | Mantenga pulsado para
avanzar rápidamente.
ū: permite saltar a la siguiente canción | Mantenga pulsado para
rebobinar rápidamente.
NOTA:
ūSi se ponen los altavoces en espera con el modo USB activado, la
reproducción se reanudará desde el mismo punto cuando la unidad vuelva
a encenderse.
ūSe realizará la reproducción USB en el orden en el que se guardaron las
pistas de audio en la unidad USB.
Resolución de problemas
Para conservar la validez de la garantía, no intente reparar el sistema por
sí mismo. Si observa problemas al usar esta unidad, revise los siguientes
elementos antes de dirigirse al servicio técnico.
Falta de alimentación
Asegúrese de que el cable de CA está adecuadamente conectado.
Asegúrese de que la toma de CA tiene corriente.
Pulse el botón del mando a distancia o del altavoz para encender la
unidad.
No se oye sonido
Aumente el volumen. Pulse el botón + del mando a distancia o gire el
control de volumen del altavoz hacia la derecha.
Pulse el botón del mando a distancia para asegurarse de que los
altavoces no se han silenciado.
Pulse para seleccionar una señal de entrada diferente.
Si no hay audio al conectar a una fuente digital (modo óptico):
ū Pruebe a ajustar la salida del televisor a PCM o
ū Conecte directamente a su dispositivo Blu-ray u otra fuente; algunos
televisores no transmiten audio digital.
Su televisor puede estar establecido en salida de audio variable. Conrme
que el ajuste de salida de audio está congurado en FIXED o STANDARD,
no en VARIABLE. Consulte el manual de usuario del televisor para obtener
más información.
Asegúrese de que el volumen de su dispositivo fuente está activado y de
que el dispositivo no está en silencio.
El mando a distancia no funciona
Asegúrese de retirar la pestaña de aislamiento de la pila de la parte
posterior del mando a distancia.
Antes de pulsar cualquier botón de control de reproducción, seleccione la
fuente correcta.
Reduzca la distancia entre el mando a distancia y la unidad.
Inserte la pila con las polaridades (+/-) alineadas como se indica.
Sustituya la pila.
Dirija el mando distancia directamente hacia el sensor en la parte frontal
del altavoz derecho.
Oigo como zumbidos y silbidos
Asegúrese de que todos los cables están correctamente conectados.
Conecte un dispositivo fuente diferente (televisor, reproductor, etc.) para
comprobar si el zumbido continúa. Si se deja de oír, el problema puede
estar en el dispositivo original.
Conecte el dispositivo a una entrada diferente.
Si se oye un zumbido mientras se utiliza la fuente auxiliar, asegúrese
de que el dispositivo fuente conectado a la entrada auxiliar está
correctamente conectado a tierra (esta operación se puede realizar
normalmente conectando el dispositivo fuente a una toma de
alimentación con toma de tierra).
No puedo encontrar el nombre Bluetooth de esta unidad en mi
dispositivo Bluetooth
Asegúrese de que la función Bluetooth está activada en su dispositivo
Bluetooth.
Vuelva a emparejar la unidad con su dispositivo Bluetooth.

18
Consignes de sécurité importantes
Veuillez suivre toutes les consignes de sécurité et tenir
compte de tous les avertissements. Gardez ce manuel à titre
de référence.
Ce symbole indique à l'utilisateur de consulter le manuel
d'utilisation pour plus d'informations sur la sécurité, le
fonctionnement et la maintenance.
Ce symbole indique la présence d'une tension dangereuse
non isolée à l'intérieur du produit, et pouvant être d'une
magnitude susante pour constituer un risque de choc
électrique pour les personnes.
Se rapporte au courant alternatif (CA)
Ce symbole indique que la tension nominale indiquée par le
symbole est une tension alternative.
Se rapporte aux équipements de classe II.
Ce symbole indique que ce produit est doté d'un système de
double isolation et ne nécessite pas de connexion de sécurité
à la terre (masse).
Précautions
Dégâts
• Veuillez inspecter l'appareil après le déballage. S'il est endommagé de
quelque manière que ce soit, n'utilisez pas l'appareil et consultez votre
revendeur.
ATTENTION
RISQUE D’ÉLECTROCUTION
NE PAS OUVRIR
Pour éviter tout risque de choc électrique, ne pas retirer le couvercle
arrière. Aucune pièce interne ne peut être réparée par l'utilisateur ; veuillez
coner la réparation à un personnel qualié.
Connexion électrique et accessibilité
• Ne maniez pas le cordon d'alimentation avec des mains mouillées. Cela
pourrait provoquer un choc électrique. Si la che électrique ne rentre
pas dans votre prise murale, ne forcez pas pour la faire rentrer. Éteignez
complètement l'appareil avant de le débrancher. Déconnectez le
cordon d'alimentation si l'appareil n'est pas utilisé pendant une période
prolongée. Assurez-vous que la che d'alimentation est toujours
facilement accessible. N'utilisez pas de rallonge électrique.
Alimentation électrique
• Assurez-vous que l'appareil est bien branché dans une prise électrique
100-240VCA 50-60Hz. L'utilisation d'une tension plus élevée peut
entraîner un dysfonctionnement de l'appareil voire un incendie.
Fiche d'alimentation moulée à fusible (non recâblable) - Royaume-
Uni, Malte, Chypre et Irlande uniquement.
• Le câble d'alimentation de cet équipement est fourni avec une che
moulée comprenant un fusible de 3ampères. La valeur du fusible est
indiquée sur la face de la che et, s'il doit être remplacé, un fusible
approuvé selon la normeBS1362 de même valeur doit être utilisé.
Protection du cordon d'alimentation
• N'endommagez pas le cordon d'alimentation, ne placez pas
d'objets lourds sur celui-ci, ne l'étirez pas et ne le tordez pas. Un
cordon d'alimentation endommagé peut être source d'incendie ou
d'électrocution. Si le cordon d'alimentation est endommagé, il doit
être remplacé par le fabricant, un agent du service après-vente ou des
personnes autrement qualiées.
Sécurité enfant
• Suivez toujours les précautions basiques de sécurité durant l'utilisation
de ce produit, particulièrement lorsque des enfants sont présents.
Surveillez les enfants an de vous assurer qu'ils ne jouent pas avec le
produit.
Emplacement
• Lors de son utilisation, ce produit doit être placé sur une surface plane
et stable, sans qu'aucune partie de l'unité principale ne dépasse d'un
bord.
Ventilation
• Le boîtier dispose de fentes et d'ouvertures pour la ventilation, pour
garantir un fonctionnement able du produit et protéger celui-ci contre
la surchaue. Ces ouvertures ne doivent pas être obstruées ou bloquées.
Assurez une distance minimum de 5cm autour du produit an de
garantir une ventilation susante. Ne laissez jamais une personne
faire rentrer un objet dans les trous, fentes ou toute autre ouverture du
boîtier du produit, cela pouvant causer une électrocution fatale.
Chaleur et température de fonctionnement
• N'installez pas l'appareil à proximité de sources de chaleur telles que
des radiateurs, des chauages, des cuisinières ou d'autres appareils (y
compris des amplicateurs) produisant de la chaleur. Évitez l'exposition
directe au soleil.
Flammes nues
• Pour éviter tout risque d'incendie, éloignez les bougies ou les ammes
nues de ce produit.
Entrée d'eau, d'humidité et de liquide
• Pour éviter les risques d'incendie ou de choc électrique, n'exposez
pas ce produit à la pluie, à l'eau ou à l'humidité. Ne placez pas d'objets
remplis de liquide sur ou à proximité de ce produit.
Orages et éclairs
• Les orages sont dangereux pour tous les appareils électriques.
Si l'alimentation est frappée par la foudre, le produit peut être
endommagé, même s'il était éteint. Vous devez débrancher tous les
câbles et connecteurs du produit avant un orage.
Entretien
• Débranchez le câble d'alimentation de la source de courant avant de
nettoyer le produit. Utilisez un chion doux et propre pour nettoyer
l'extérieur de l'appareil. Ne nettoyez jamais l'appareil avec des produits
chimiques ou détergents.
Entretien et réparations
• Ce produit ne contient aucune pièce réparable par l'utilisateur.
L'exposition aux pièces internes situées à l'intérieur de l'appareil peut
mettre votre vie en danger. En cas de défaut, contactez le fabricant ou
le département de service après-vente autorisé. La garantie du fabricant
ne couvre pas les défauts provoqués par des réparations eectuées par
des tiers non autorisés.
Piles
Installation
• N'utilisez pas de piles autres que celles spéciées. Observez la polarité
correcte en insérant les piles.
Utilisation et maintenance
• N'exposez pas les piles à des températures élevées, par exemple près
d'un feu ou en plein soleil. Lorsque vous ne prévoyez pas d'utiliser le
produit pendant une longue période (plus d'un mois), retirez les piles
du produit pour éviter les fuites. Si les piles fuient, nettoyez les fuites à
l'intérieur du compartiment à piles et remplacez les piles par des piles
neuves.
CAUTION
RISK OF ELECTRIC SHOCK
DO NOT OPEN
CAUTION
RISK OF ELECTRIC SHOCK
DO NOT OPEN
Seite wird geladen ...
Seite wird geladen ...
Seite wird geladen ...
Seite wird geladen ...
Seite wird geladen ...
Seite wird geladen ...
Seite wird geladen ...
Seite wird geladen ...
Seite wird geladen ...
Seite wird geladen ...
Seite wird geladen ...
Seite wird geladen ...
Seite wird geladen ...
Seite wird geladen ...
Seite wird geladen ...
Seite wird geladen ...
Seite wird geladen ...
Seite wird geladen ...
Seite wird geladen ...
Seite wird geladen ...
Seite wird geladen ...
Seite wird geladen ...
Seite wird geladen ...
Seite wird geladen ...
Seite wird geladen ...
Seite wird geladen ...
Seite wird geladen ...
Seite wird geladen ...
-
 1
1
-
 2
2
-
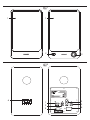 3
3
-
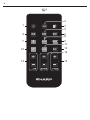 4
4
-
 5
5
-
 6
6
-
 7
7
-
 8
8
-
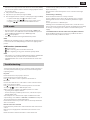 9
9
-
 10
10
-
 11
11
-
 12
12
-
 13
13
-
 14
14
-
 15
15
-
 16
16
-
 17
17
-
 18
18
-
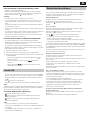 19
19
-
 20
20
-
 21
21
-
 22
22
-
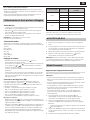 23
23
-
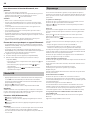 24
24
-
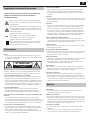 25
25
-
 26
26
-
 27
27
-
 28
28
-
 29
29
-
 30
30
-
 31
31
-
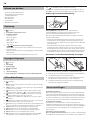 32
32
-
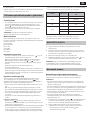 33
33
-
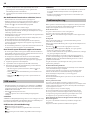 34
34
-
 35
35
-
 36
36
-
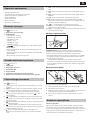 37
37
-
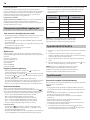 38
38
-
 39
39
-
 40
40
-
 41
41
-
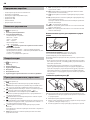 42
42
-
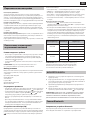 43
43
-
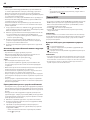 44
44
-
 45
45
-
 46
46
-
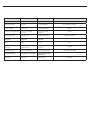 47
47
-
 48
48


in anderen Sprachen
- français: Sharp CP-SS30(BK) Le manuel du propriétaire
- español: Sharp CP-SS30(BK) El manual del propietario
- italiano: Sharp CP-SS30(BK) Manuale del proprietario
- Nederlands: Sharp CP-SS30(BK) de handleiding
- polski: Sharp CP-SS30(BK) Instrukcja obsługi
Verwandte Artikel
Andere Dokumente
-
Yamaha Wireless Streaming Amplifire WXA-50 Benutzerhandbuch
-
Yamaha RX-V463 Bedienungsanleitung
-
Yamaha RX-V563 Bedienungsanleitung
-
-
-
Yamaha RX V3900 - AV Network Receiver Benutzerhandbuch
-
Yamaha DSP-Z7 Bedienungsanleitung
-
-
Yamaha RX-V363 - AV Receiver Bedienungsanleitung