
Haarschneider
Smart Trimm
04523
Gebrauchsanleitung
DE
Operating instructions
EN
Mode d’emploi
FR
Gebruiksaanwijzing
NL
04523_DE-EN-FR-NL_210x135_V1.indb 104523_DE-EN-FR-NL_210x135_V1.indb 1 20.09.2021 16:10:0420.09.2021 16:10:04

SEITE 3
DE
PAGE 9
EN
PAGE 15
FR
PAGINA 21
NL
04523_DE-EN-FR-NL_210x135_V1.indb 204523_DE-EN-FR-NL_210x135_V1.indb 2 20.09.2021 16:10:0420.09.2021 16:10:04

Haarschneider Smart Trimm DE
3
INHALTSVERZEICHNIS
Auf einen Blick 4
Symbole 5
Signalwörter 5
Lieferumfang 5
Bestimmungs gemäßer Gebrauch 5
Sicherheitshinweise 5
BatterieN einlegen / wechseln 6
Benutzung 7
Reinigung und Aufbewahrung 7
Entsorgung 7
Technische Daten 8
Liebe Kundin, lieber Kunde,
wir freuen uns, dass du dich für den MAXXMEE Haarschneider Smart
Trimm entschieden hast. Der Griff ist besonders schmal, griffig dank der
Rillen und auf bis zu 7 cm ausziehbar - ideal auch zum Trimmen des schwer
erreichbaren Nacken & Rückenhaars. Mit den 5 verschiedenen Aufsätzen
bestimmst du deine Haarlänge zudem selbst. Die schräge Klinge des Ge-
rätes ermöglicht eine Anwendung wie bei einem Rasiermesser - für präzise
Konturen und Linien.
Solltest du Fragen zum Gerät sowie zu Ersatz- / Zubehörteilen haben, kon-
taktiere den Kundenservice über unsere Website:
www.dspro.de/kundenservice
Wir wünschen dir viel Freude an deinem MAXXMEE Haarschneider Smart
Trimm.
Informationen zur Gebrauchsanleitung
Lies vor dem ersten Gebrauch des Gerätes diese Gebrauchsanleitung sorg-
fältig durch und bewahre sie für spätere Fragen und weitere Nutzer auf. Sie
ist ein Bestand teil des Gerätes. Hersteller und Importeur übernehmen keine
Haftung, wenn die Angaben in dieser Gebrauchsanleitung nicht beachtet
werden.
04523_DE-EN-FR-NL_210x135_V1.indb 304523_DE-EN-FR-NL_210x135_V1.indb 3 20.09.2021 16:10:0420.09.2021 16:10:04

DE
4
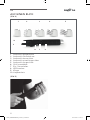
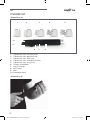
AUF EINEN BLICK
(Bild A)
4
6
1 Aufsatz für Körperhaare
2 Aufsatz für Gesichtshaar
3 Aufsatz für kurzes Haar
4 Aufsatz für mittel-langes Haar
5 Aufsatz für langes Haar
6 Griff, ausziehbar
7 Ein- / Ausschalter
8 LED-Leuchte
9 Klinge
10 Haupteinheit
(Bild B)
1 2 3 5
78
9
10
04523_DE-EN-FR-NL_210x135_V1.indb 404523_DE-EN-FR-NL_210x135_V1.indb 4 20.09.2021 16:10:1720.09.2021 16:10:17

Haarschneider Smart Trimm DE
5
SYMBOLE
Gefahrenzeichen: Diese
Symbole zeigen mögliche
Gefahren an. Die dazu-
gehörenden Sicherheits-
hinweise aufmerksam lesen
und befolgen.
Ergänzende Informationen
Gebrauchsanleitung vor
Benutzung lesen!
Gleichstrom
Schutzklasse III
SIGNALWÖRTER
Signalwörter bezeichnen Gefähr-
dungen bei Nichtbeachtung der
dazugehörigen Hinweise.
WARNUNG mittleres Risiko, kann
schwere Verletzung
oder Tod zur Folge
haben
HINWEIS kann Risiko von Sach-
schäden zur Folge
haben
LIEFERUMFANG
1 x Haupteinheit
1 x Aufsatz für langes Haar (20 mm)
1 x Aufsatz für mittel-langes Haar
(19 mm)
1 x Aufsatz für kurzes Haar (13 mm)
1 x Aufsatz für Gesichtshaar (6 mm)
1 x Aufsatz für Körperhaare (2 mm)
1 x Reinigungspinsel
1 x Gebrauchsanleitung
Den Lieferumfang auf Vollstän-
digkeit und die Bestandteile auf
Transportschäden überprüfen. Bei
Schäden nicht verwenden, sondern
den Kundenservice kontaktieren.
Eventuelle Folien, Aufkleber oder
Transportschutz vom Gerät abneh-
men.
Niemals das Typenschild und
eventuelle Warnhinweise entfernen!
L Für die Benutzung sind 2 Bat-
terien (1,5 V; AA) notwendig.
Diese sind nicht im Lieferum-
fang enthalten.
BESTIMMUNGS-
GEMÄßER GEBRAUCH
■Dieses Gerät ist zum Trimmen
von Kopf- und Körperhaaren
bestimmt.
■Nicht für die Nassrasur geeignet!
■Das Gerät ist für den privaten
Gebrauch, nicht für eine gewerb-
liche Nutzung konzipiert.
■Das Gerät nur wie in der Ge-
brauchsanleitung beschrieben
nutzen. Jede weitere Verwen-
dung gilt als bestimmungswidrig.
SICHERHEITSHINWEISE
WARNUNG – Verletzungs-
gefahr
■Gerät und Verpackungsmaterial
von Kindern und Tieren fernhal-
ten. Es besteht Verletzungs- und
Erstickungsgefahr!
■Das Gerät ist kein Spielzeug!
■Batterien können bei Verschlu-
cken lebensgefährlich sein. Batte-
rien und Gerät für Kinder und
Tiere unerreichbar aufbewahren.
Wurde eine Batterie verschluckt,
muss sofort medizinische Hilfe in
Anspruch genommen werden. Es
besteht Verätzungsgefahr durch
Batteriesäure.
■Sollte eine Batterie auslaufen,
Körperkontakt mit der Batterie-
säure vermeiden. Schutzhand-
04523_DE-EN-FR-NL_210x135_V1.indb 504523_DE-EN-FR-NL_210x135_V1.indb 5 20.09.2021 16:10:1920.09.2021 16:10:19

DE
6
schuhe tragen. Bei Kontakt mit
Batteriesäure die betroffenen
Stellen sofort mit reichlich klarem
Wasser spülen und umgehend
medizinische Hilfe in Anspruch
nehmen. Es besteht Verätzungs-
gefahr durch Batteriesäure.
■Nicht zu viel Druck mit dem Gerät
ausüben! Es besteht Verletzungs-
gefahr!
■Das Gerät nicht verwenden bei
bzw. auf:
○Verletzungen und Schwellungen;
○Akne, Muttermalen und Warzen;
○erkrankter, entzündeter, (son-
nen-)verbrannter, gereizter oder
sehr empfindlicher Haut;
○Haut, auf die kurz vorher Creme,
Öl oder andere brennbare bzw.
alkoholische Produkte aufgetra-
gen wurden.
Bei Unsicherheit, ob das Gerät
benutzt werden darf, Rückspra-
che mit einem Arzt halten.
■Das Gerät nicht benutzen, wenn
es beschädigt ist.
■Das Gerät zunächst auf dem Arm
oder Bein testen. Sollten Hautir-
ritationen auftreten, nicht weiter
benutzen!
HINWEIS – Risiko von Material-
und Sachschäden
■Es darf keine Flüssigkeit in das
Gerät eindringen. Nicht in Was-
ser tauchen! Niemals beim Baden
oder Duschen verwenden!
■Eine ausgelaufene Batterie sofort
aus dem Gerät entfernen.
■Nur den in den technischen
Daten angegebenen Batterietyp
verwenden.
■Immer alle Batterien ersetzen.
Niemals verschiedene Batterie-
Typen, -Marken oder Batterien
mit unterschiedlichen Kapazitä-
ten verwenden.
■Die Batterien aus dem Gerät
herausnehmen, wenn diese
verbraucht sind oder das Gerät
länger nicht benutzt wird. So
werden Schäden durch Auslau-
fen vermieden.
■Das Gerät vor Hitze, Feuer,
direktem Sonnenlicht, Minus-
temperaturen, lang anhaltender
Feuchtigkeit, Nässe und Stößen
schützen.
■Das Produkt niemals in Wasser
oder andere Flüssigkeiten tau-
chen! Es ist lediglich spritzwas-
sergeschützt.
■Keine Veränderungen am Gerät
vornehmen. Nicht ver suchen, es
eigenständig zu reparieren oder
Teile zu ersetzen. In Schadensfäl-
len den Kundenservice kontak-
tieren.
■Nur Original-Zubehörteile des
Herstellers verwenden, um die
Funktionsweise des Gerätes nicht
zu beeinträchtigen und eventuelle
Schäden zu verhindern.
BATTERIEN
EINLEGEN / WECHSELN
Vor dem Einlegen der Batterien prü-
fen, ob die Kontakte im Gerät und
an den Batterien sauber sind, und
ggf. reinigen.
1. Vergewissern, dass das Gerät
ausgeschaltet ist.
2. Den Griff (6) des Haartrimmers so
weit herausziehen bis er sich von
der Haupteinheit (10) lösen lässt.
3. An der Unterseite der Hauptein-
heit die Abdeckung des Batterie-
fachs gegen den Uhrzeigersinn
drehen und abnehmen.
4. Zwei 1,5V-Batterien, AA in das
Batteriefach einlegen. Auf die
richtige Polarität (+ / –) achten.
04523_DE-EN-FR-NL_210x135_V1.indb 604523_DE-EN-FR-NL_210x135_V1.indb 6 20.09.2021 16:10:1920.09.2021 16:10:19

Haarschneider Smart Trimm DE
7
5. Die Abdeckung des Batterie-
fachs im Uhrzeigersinn schließen.
Dabei darauf achten, dass die
Abdeckung des Batteriefachs in
den dafür vorgesehenen Aus-
sparungen sitzt. Die Abdeckung
muss hörbar einrasten.
Die Batterien bei nachlassender Leis-
tung des Gerätes ersetzen.
BENUTZUNG
L Bei der Verwendung eines
Aufsatzes an verschiedenen
Körperstellen (z. B. Gesicht,
Intimbereich), den Aufsatz
zwischen den Behandlungen
gründlich reinigen.
• Aufsätze anbringen und ab-
nehmen – Den gewünschten
Aufsatz(1, 2, 3, 4, 5) auswählen
und auf die Haupteinheit (10)
aufstecken. Der Aufsatz muss
hörbar einrasten.
Um den Aufsatz abzunehmen, die-
sen einfach nach oben abziehen.
• An / Aus-Schalten – Den
Ein- / Ausschalter (7) drücken, um
das Gerät einzuschalten. Beim
Anschalten geht automatisch die
LED-Leuchte (8) an. Diese sorgt
für bessere Sicht beim Trimmen.
Den Ein- / Ausschalter erneut drü-
cken, um das Gerät auszuschal-
ten. Die LED-Leuchte erlischt.
• Verlängern – Am unteren Ende
der Haupteinheit vorsichtig zie-
hen. Der Griff (6) verlängert sich,
damit Körperstellen, wie Nacken
und Schulter, besser erreicht
werden können (Bild B).
• Verwendung – Beim Trimmen
den Aufsatz (2, 3, 4, 5) in Haar-
wuchsrichtung durch die Haare
führen, ähnlich wie beim Käm-
men der Haare.
Beim Rasieren den Aufsatz (1) im
45°-Winkel zur Haut halten und
langsam gegen die Haarwuchs-
richtung über die Haare führen.
REINIGUNG UND
AUFBEWAHRUNG
Beachten!
■Niemals ätzende oder scheuern-
de Reinigungsmittel verwenden.
Diese können die Oberfläche
beschädigen.
• Mit dem Reinigungspinsel Haare
und Hautschüppchen von der
Klinge(9) und den Aufsätzen (1,
2, 3, 4, 5) entfernen.
• Das Gerät bei Bedarf mit einem
feuchten Tuch abwischen. Die
Aufsätze können auch unter
fließendem Wasser gereinigt
werden.
• Alles muss vollständig trocken
sein, bevor es wieder zusammen-
gesetzt wird.
• Das Gerät an einem saube-
ren, trockenen, für Kinder und
Tiere unzugänglichen Ort auf-
bewahren.
ENTSORGUNG
Das Verpackungsmaterial
umweltgerecht entsorgen
und der Wertstoffsammlung
zuführen.
04523_DE-EN-FR-NL_210x135_V1.indb 704523_DE-EN-FR-NL_210x135_V1.indb 7 20.09.2021 16:10:1920.09.2021 16:10:19

DE
8
Dieses Gerät unterliegt
der europäischen Richtlinie
2012 / 1 9 / EU für Elektro- und
Elektronik-Altgeräte (WEEE).
Dieses Gerät nicht als nor-
malen Hausmüll, sondern
umweltgerecht über einen
behördlich zugelassenen Ent-
sorgungsbetrieb entsorgen.
TECHNISCHE DATEN
Artikelnummer: 04523
ID Gebrauchsanleitung: Z 04523 M DS V1.1 0921 mh
Modellnummer:
BG-F-0123
IP-Schutzart: IP44
Stromversorgung: 3 V DC (2 x 1,5 V-Batterie, AA)
Schutzklasse:
III
Alle Rechte vorbehalten.
04523_DE-EN-FR-NL_210x135_V1.indb 804523_DE-EN-FR-NL_210x135_V1.indb 8 20.09.2021 16:10:2120.09.2021 16:10:21

Smart Trim Hair Trimmer EN
9
LIST OF CONTENTS
At A Glance 10
Symbols 11
Signal Words 11
Items Supplied 11
Intended Use 11
Safety Notices 11
Inserting / Replacing Batteries 12
Use 13
Cleaning and Storage 13
Disposal 13
Technical Data 14
Dear Customer,
We are delighted that you have chosen the MAXXMEE Smart Trim Hair Trim-
mer. The handle is particularly slim and easy to grip thanks to the grooves
and can be extended up to 7 cm - also ideal for trimming neck & back hair
that is difficult to reach. The 5 different attachments also allow you to decide
how long your hair should be. The angled blade of the device allows it to be
used like a razor - for precise contours and lines.
If you have any questions about the device and about spare parts/accesso-
ries, contact the customer service department via our website:
www.dspro.de/kundenservice
We hope you have a lot of fun with your MAXXMEE Smart Trim Hair Trimmer.
Information About the Operating Instructions
Before using the device for the first time, please read through these operat-
ing instructions carefully and keep them for future reference and other users.
They form an integral part of the device. The manufacturer and importer do
not accept any liability if the information in these operating instructions is not
complied with.
04523_DE-EN-FR-NL_210x135_V1.indb 904523_DE-EN-FR-NL_210x135_V1.indb 9 20.09.2021 16:10:2120.09.2021 16:10:21

EN
10
AT A GLANCE
(Picture A)
4
6
1 Attachment for body hair
2 Attachment for facial hair
3 Attachment for short hair
4 Attachment for medium-length hair
5 Attachment for long hair
6 Handle, extendable
7 On / Off switch
8 LED light
9 Blade
10 Main unit
(Picture B)
1 2 3 5
78
9
10
04523_DE-EN-FR-NL_210x135_V1.indb 1004523_DE-EN-FR-NL_210x135_V1.indb 10 20.09.2021 16:10:3220.09.2021 16:10:32

Smart Trim Hair Trimmer EN
11
SYMBOLS
Danger symbols: These
symbols indicate possible
dangers. Read the associat-
ed safety notices carefully
and follow them.
Supplementary information
Read the operating instruc-
tions before use!
Direct current
Protection class III
SIGNAL WORDS
Signal words indicate hazards if the
associated notices are not followed.
WARNING medium risk, may result
in serious injury or
death
NOTICE may result in risk of
damage to material
ITEMS SUPPLIED
1 x main unit
1 x attachment for long hair (20 mm)
1 x attachment for medium-length
hair (19 mm)
1 x attachment for short hair (13 mm)
1 x attachment for facial hair (6 mm)
1 x attachment for body hair (2 mm)
1 x cleaning brush
1 x operating instructions
Check the items supplied for com-
pleteness and the components for
transport damage. If you find any
damage, do not use the device but
contact our customer service depart-
ment.
Remove any possible films, stickers
or transport protection from the de-
vice.
Never remove the rating plate
and any possible warnings!
L 2 batteries (1.5 V; AA) are
required to use the device.
These are not supplied with
the device.
INTENDED USE
■This device is intended to be
used for trimming hair on the
head and body.
■Not suitable for wet shaving!
■The device is for personal use
only and is not intended for com-
mercial applications.
■The device should only be used
as described in the operating
instructions. Any other use is
deemed to be improper.
SAFETY NOTICES
WARNING – Danger of
Injury
■Keep the device and packaging
material away from children and
animals. There is a risk of injury
and suffocation!
■The device is not a toy!
■Batteries can be deadly if
swallowed. Batteries and the
device should be kept out of the
reach of children and animals.
If a battery is swallowed, imme-
diate medical attention must
be sought. There is a danger of
burns from battery acid.
■If a battery leaks, avoid physical
contact with the battery acid.
Wear protective gloves. If you do
touch battery acid, rinse the af-
fected areas with abundant clear
water straight away and seek
medical assistance immediately.
04523_DE-EN-FR-NL_210x135_V1.indb 1104523_DE-EN-FR-NL_210x135_V1.indb 11 20.09.2021 16:10:3520.09.2021 16:10:35

EN
12
There is a danger of burns from
battery acid.
■Do not exert too much pressure
with the device! There is a danger
of injury!
■Do not use the device with or on:
○injuries and areas of swelling;
○acne, birthmarks and warts;
○infected, inflamed, (sun-)burnt,
irritated or very sensitive skin;
○skin which has only just had
cream, oil or other combustible
or alcoholic products applied
to it.
If you are unsure whether the
device may be used, consult
adoctor.
■Do not use the device if it is
damaged.
■Test the device first on your arm
or leg. If skin irritations occur,
stop using it!
NOTICE – Risk of Damage to
Material and Property
■No liquid must get into the device.
Do not immerse in water! Never
use while bathing or showering!
■Remove a dead battery from the
device immediately.
■Use only the battery type speci-
fied in the technical data.
■Always replace all batteries
together. Never use batteries of
different types or brands, or bat-
teries with different capacities.
■Take the batteries out of the device
when they are dead or if you will
not be using the device for apro-
longed period. This will prevent
any damage caused by leaks.
■Protect the device from heat,
flames, direct sunlight, sub-zero
temperatures, persistent mois-
ture, wet conditions and impacts.
■Never immerse the device in wa-
ter or other liquids! They are only
splashproof.
■Do not make any modifications
to the device. Do not attempt to
repair it yourself or to replace any
individual parts. In the event of
any damage, contact the custom-
er service department.
■Use only original accessories from
the manufacturer in order to guar-
antee that there is no interference
that may prevent the device from
working and to avoid possible
damage.
INSERTING /
REPLACING BATTERIES
Before inserting the batteries, check
whether the contacts in the device
and on the batteries are clean, and
clean them if necessary.
1. Make sure that the device is
switched off.
2. Pull out the handle (6) of the hair
trimmer sufficiently far that it
can be detached from the main
unit(10).
3. On the bottom of the main unit,
twist the cover of the battery
compartment anticlockwise and
take it off.
4. Insert two 1.5V batteries, AA into
the battery compartment. Make
sure the polarity (+ / –) is correct.
5. Close the cover of the battery
compartment clockwise. When
you do this, make sure that the
cover of the battery compartment
sits in the recesses which are
provided for it. The cover must
be heard to engage in place.
Replace the batteries when the pow-
er of the device starts to wane.
04523_DE-EN-FR-NL_210x135_V1.indb 1204523_DE-EN-FR-NL_210x135_V1.indb 12 20.09.2021 16:10:3520.09.2021 16:10:35

Smart Trim Hair Trimmer EN
13
USE
L When an attachment is used
on different body parts (e.g.
the face, genital area), thor-
oughly clean the attachment
between the treatments.
• Attaching and detaching attach-
ments – Select the attachment
you want(1, 2, 3, 4, 5) and plug
it onto the main unit (10). The
attachment must engage audibly.
To detach the attachment, simply
pull it up and off.
• Switching on / off – Press the
On / Off switch (7) to switch on
the device. When it is switched
on, the LED light (8) switches
on automatically. This gives you
abetter view when trimming.
Press the On / Off switch again
to switch off the device. The LED
light goes out.
• Extending – Pull carefully on the
bottom end of the main unit. The
handle (6) is extended so that ar-
eas of the body such as the neck
and shoulders are easier to reach
(Picture B).
• Use – When trimming guide the
attachment (2, 3, 4, 5) through
the hair in the direction of hair
growth, similar to combing your
hair.
When shaving hold the attach-
ment (1) at a 45° angle to the skin
and guide it slowly over the hair
counter to the direction of hair
growth.
CLEANING AND
STORAGE
Please Note!
■Never use any caustic or abrasive
cleaning agents. These may dam-
age the surface.
• Use the cleaning brush to remove
hair and flakes of skin from the
blade(9) and the attachments (1,
2, 3, 4, 5).
• Wipe down the device with a
damp cloth if necessary. The
attachments can also be cleaned
under running water.
• Everything must be completely
dry before it is reassembled.
• Store the device in a clean, dry
place so that it is out of the reach
of children and animals.
DISPOSAL
Dispose of the packaging
material in an environmentally
friendly manner so that it can
be recycled.
This device is governed
by the European Directive
2012/19/EU on waste electri-
cal and electronic equipment
(WEEE). Do not dispose of
this device as normal domes-
tic waste, but rather in an
environmentally friendly man-
ner via an officially approved
waste disposal company.
04523_DE-EN-FR-NL_210x135_V1.indb 1304523_DE-EN-FR-NL_210x135_V1.indb 13 20.09.2021 16:10:3520.09.2021 16:10:35

EN
14
TECHNICAL DATA
Article number: 04523
ID of operating instructions: Z 04523 M DS V1.1 0921 mh
Model number:
BG-F-0123
IP protection type:
IP44
Power supply: 3 V DC (2 x 1.5 V battery, AA)
Protection class:
III
All rights reserved.
04523_DE-EN-FR-NL_210x135_V1.indb 1404523_DE-EN-FR-NL_210x135_V1.indb 14 20.09.2021 16:10:3620.09.2021 16:10:36

Tondeuse Smart Trim FR
15
SOMMAIRE
Aperçu général 16
Symboles 17
Mentions d’avertissement 17
Composition 17
Utilisation conforme 17
Consignes de sécurité 17
Mise en place/ remplacement des piles 19
Utilisation 19
Nettoyage et rangement 19
Mise au rebut 20
Caractéristiques techniques 20
Chère cliente, cher client,
Nous vous félicitons d'avoir fait l'acquisition de la tondeuse Smart Trim
MAXXMEE. Son manche particulièrement mince est rainuré pour une bonne
prise en main et extensible jusqu’à 7cm – l’idéal également pour les zones
difficilement accessibles de la nuque et du dos. Grâce aux 5embouts dif-
férents, à vous de déterminer la longueur de coupe des cheveux. La lame
inclinée de l’appareil permet une utilisation comme avec un rasoir – pour des
contours et des lignes précises.
Pour toute question concernant cet appareil et ses pièces de rechange et ac-
cessoires, veuillez contacter le service après-vente à partir de notre site Web:
www.dspro.de/kundenservice
Nous espérons que votre tondeuse Smart Trim MAXXMEE vous donnera
entière satisfaction!
Informations sur le mode d’emploi
Veuillez lire attentivement le présent mode d’emploi avant la première
utilisation de l’appareil et le conserver précieusement pour toute question
ultérieure ainsi que pour les autres utilisateurs. Il fait partie intégrante de
l’appareil. Le fabricant et l’importateur déclinent toute responsabilité en cas
de non-observation des instructions consignées dans le mode d’emploi.
04523_DE-EN-FR-NL_210x135_V1.indb 1504523_DE-EN-FR-NL_210x135_V1.indb 15 20.09.2021 16:10:3720.09.2021 16:10:37

FR
16
APERÇU GÉNÉRAL
(Illustration A)
4
6
1 Embout de rasage du corps
2 Embout de rasage du visage
3 Embout de taille courte
4 Embout de taille mi-longue
5 Embout de taille longue
6 Manche, extensible
7 Interrupteur marche/ arrêt
8 Lampe à DEL
9 Lame
10 Corps de l’appareil
(Illustration B)
1 2 3 5
78
9
10
04523_DE-EN-FR-NL_210x135_V1.indb 1604523_DE-EN-FR-NL_210x135_V1.indb 16 20.09.2021 16:10:4920.09.2021 16:10:49

Tondeuse Smart Trim FR
17
SYMBOLES
Symboles de danger: ces
symboles signalent des
possibles dangers. Lire et
observer attentivement
les consignes de sécurité
correspondantes.
Informations complémen-
taires
Consulter le mode d'em-
ploi avant utilisation!
Courant continu
Classe de protection III
MENTIONS D’AVERTIS-
SEMENT
Les mentions d’avertissement
désignent les risques qu’implique le
non-respect des consignes corres-
pondantes.
AVERTISSE-
MENT
Risque moyen
pouvant induire des
blessures graves,
voire mortelles
AVIS Risque de dégâts
matériels
COMPOSITION
1x corps de l'appareil
1 x embout de taille longue (20mm)
1 x embout de taille mi-longue
(19mm)
1 x embout de taille courte (13mm)
1 x embout de rasage du visage
(6mm)
1 x embout de rasage du corps
(2mm)
1x pinceau de nettoyage
1 x mode d’emploi
S’assurer que l’ensemble livré est
complet et que les composants
ne présentent pas de dommages
imputables au transport. En cas de
dommages, ne pas utiliser l’appareil
et contacter le service après-vente.
Enlever de l’appareil les éventuels
films protecteurs, adhésifs et protec-
tions de transport.
Ne jamais ôter
la plaque signalétique de l’appareil
ni les éventuelles mises en garde
apposées.
L L’utilisation requiert 2piles
(1,5 V de type AA). Celles-ci
sont non fournies.
UTILISATION
CONFORME
■Cet appareil est destiné au ra-
sage des poils et des cheveux.
■Non approprié au rasage humide
traditionnel!
■L’appareil est conçu pour un usage
domestique, non professionnel.
■Il doit être utilisé uniquement tel
qu'indiqué dans le présent mode
d'emploi. Toute autre utilisa-
tion est considérée comme non
conforme.
CONSIGNES DE
SÉCURITÉ
AVERTISSEMENT – Risque
de blessure!
■Tenir l’appareil et son emballage
hors de portée des enfants et des
animaux. Ils risqueraient de se
blesser et de s'étouffer avec!
■Cet appareil n’est pas un jouet.
■L'ingestion de piles peut être mor-
telle. Conserver l’appareil et les
piles hors de portée des enfants
et des animaux. En cas d’ingestion
04523_DE-EN-FR-NL_210x135_V1.indb 1704523_DE-EN-FR-NL_210x135_V1.indb 17 20.09.2021 16:10:5220.09.2021 16:10:52

FR
18
d’une pile, faire immédiatement
appel aux secours médicaux.
Risque de brûlures causées par
l’électrolyte des piles!
■Si une pile a coulé, éviter tout
contact du corps avec l’électro-
lyte. Porter des gants de protec-
tion. En cas de contact avec l'élec-
trolyte, rincer immédiatement et
abondamment à l'eau claire les
zones touchées, puis faire appel
sans attendre aux secours médi-
caux. Risque de brûlures causées
par l’électrolyte des piles!
■Ne pas exercer de trop forte
pression en se servant de l’appa-
reil. Risque de blessure!
■Ne pas utiliser l'appareil sur:
○des blessures et des œdèmes;
○de l'acné, des grains de beauté,
des verrues;
○un épiderme blessé, atteint
d’une affection, enflammé,
brûlé (par le soleil) ou très
sensible;
○un épiderme où a été appliqué
peu de temps avant de la lotion,
de l'huile ou d'autres produits
inflammables ou contenant de
l'alcool.
Si l’aptitude à utiliser l’appareil
est incertaine, s’en entretenir
avec un médecin.
■Ne pas utiliser l'appareil s'il est
endommagé.
■D'abord tester l’appareil sur un
bras ou une jambe. Ne plus utili-
ser l'appareil en cas d'irritations
cutanées.
AVIS – Pour éviter tout risque de
dégâts matériels
■Aucun liquide ne doit pénétrer
dans l'appareil. Ne pas l'im-
merger dans l'eau! Ne jamais
l'utiliser pendant le bain ou sous
la douche!
■Toute pile qui fuit doit être immé-
diatement retirée de l’appareil.
■Utiliser uniquement le type de
pile indiqué dans les caractéris-
tiques techniques.
■Remplacer toujours toutes les
piles en même temps. Ne jamais
utiliser de piles de différents
types, marques ou capacités.
■Retirer les piles de l'appareil lors-
qu'elles sont usagées ou que l’ap-
pareil ne sera plus utilisé pendant
une assez longue période. Ceci
évite ainsi les dommages dus
àd'éventuelles fuites de piles.
■Veiller à ce que l’appareil ne soit
pas soumis à des chocs; le main-
tenir loin de toute flamme, ne pas
l'exposer au rayonnement direct
du soleil, à des températures
négatives ou trop longtemps
àl'humidité et ne pas le mouiller.
■Ne jamais immerger l’appareil
dans l’eau ni tout autre liquide!
Il est seulement dotés d’une pro-
tection antiéclaboussures.
■Ne procéder à aucune modifica-
tion sur l’appareil. Ne pas essayer
de le réparer par soi-même ou
d'en remplacer des pièces.
En cas de dommage, contacter le
service après-vente.
■Utiliser uniquement des acces-
soires d'origine du fabricant pour
ne pas entraver le bon fonction-
nement de l'appareil et éviter tout
éventuel dommage.
04523_DE-EN-FR-NL_210x135_V1.indb 1804523_DE-EN-FR-NL_210x135_V1.indb 18 20.09.2021 16:10:5220.09.2021 16:10:52

Tondeuse Smart Trim FR
19
MISE EN PLACE/ REM-
PLACEMENT DES PILES
Avant de mettre les piles en place,
vérifier si les contacts au sein de l’ap-
pareil et sur les piles sont propres;
les nettoyer le cas échéant.
1. S’assurer que l’appareil est éteint.
2. Déployer le manche(6) de la ton-
deuse jusqu’à ce qu'il se désoli-
darise du corps de l’appareil(10).
3. Sur la face inférieure du corps
de l’appareil, tourner le cache
du compartiment à piles dans le
sens inverse des aiguilles d’une
montre pour le retirer.
4. Insérer deux piles de 1,5V de type
AA dans le compartiment àpiles.
Respecter la bonne polarité (+/–).
5. Fermer le compartiment à piles
en tournant le cache dans le sens
des aiguilles d'une montre. Veiller
à ce que le cache du comparti-
ment à piles vienne se loger dans
les évidements prévus à cet effet.
Le cache doit s'enclencher de
façon bien audible.
Remplacer les piles lorsque l’appareil
perd de sa puissance.
UTILISATION
L En cas d'utilisation d’un em-
bout sur différentes zones du
corps (par ex. visage, parties
intimes), soigneusement
nettoyer l’embout entre les
applications.
• Mise en place et retrait des
embouts – Choisir l’embout(1, 2,
3, 4, 5) désiré et le placer sur le
corps de l’appareil(10). L'embout
doit s'enclencher en produisant
un déclic audible.
Pour retirer l’embout, il suffit de le
tirer vers le haut.
• Mise en marche/ arrêt – Appuyer
sur l’interrupteur marche/ ar-
rêt(7) afin d’enclencher l’appareil.
À la mise en marche, la lampe
àDEL(8) s’allume automatique-
ment. Celle-ci permet de mieux
voir pendant le rasage.
Appuyer une nouvelle fois sur
l'interrupteur marche/ arrêt pour
arrêter l'appareil. La lampe à DEL
s'éteint.
• Allongement – Tirer délicatement
l’extrémité du corps de l’appareil.
Le manche(6) s’allonge afin de
mieux accéder aux zones telles
que la nuque et les épaules (Illus-
tration B).
• Utilisation – Pendant la coupe,
guider l’embout(2, 3, 4, 5) dans
le sens du poil/ de la pousse des
cheveux, comme pour les peigner.
Utilisation –Pendant le rasage, te-
nir l’embout(1) à 45° par rapport
à la peau et le guider lentement
sur la peau à rebrousse-poil.
NETTOYAGE ET
RANGEMENT
À observer!
■Ne jamais utiliser de produits de
nettoyage corrosifs ou abrasifs
qui risqueraient d’endommager
les surfaces.
• À l’aide du pinceau de net-
toyage, éliminer les poils et les
cellules mortes de la lame(9) et
des embouts (1, 2, 3, 4, 5).
• Au besoin, nettoyer l'appareil
avec un chiffon humide. Les em-
bouts peuvent se nettoyer aussi
sous l'eau courante.
• L’ensemble doit être entière-
ment sec avant d'être à nouveau
assemblé.
04523_DE-EN-FR-NL_210x135_V1.indb 1904523_DE-EN-FR-NL_210x135_V1.indb 19 20.09.2021 16:10:5220.09.2021 16:10:52

FR
20
• Ranger l’appareil dans un endroit
sec et propre, hors de portée des
enfants et des animaux.
MISE AU REBUT
Se débarrasser des matériaux
d’emballage dans le respect
de l’environnement en les dé-
posant à un point de collecte
prévu à cet effet.
Cet appareil est assujetti
à la directive européenne
2012/19/UE applicable aux
déchets d’équipements
électriques et électroniques
(DEEE). Cet appareil ne doit
pas être jeté avec les ordures
ménagères et doit être mis au
rebut dans le respect de l’en-
vironnement par une entre-
prise de recyclage agréée.
CARACTÉRISTIQUES TECHNIQUES
Référence article: 04523
Identifiant mode d’emploi: Z 04523 M DS V1.1 0921 mh
Numéro de modèle:
BG-F-0123
Indice de protection:
IP44
Alimentation électrique: 3 V cc (2x piles de 1,5V, AA)
Classe de protection:
III
Tous droits réservés.
04523_DE-EN-FR-NL_210x135_V1.indb 2004523_DE-EN-FR-NL_210x135_V1.indb 20 20.09.2021 16:10:5420.09.2021 16:10:54
Seite wird geladen ...
Seite wird geladen ...
Seite wird geladen ...
Seite wird geladen ...
Seite wird geladen ...
Seite wird geladen ...
Seite wird geladen ...
Seite wird geladen ...
-
 1
1
-
 2
2
-
 3
3
-
 4
4
-
 5
5
-
 6
6
-
 7
7
-
 8
8
-
 9
9
-
 10
10
-
 11
11
-
 12
12
-
 13
13
-
 14
14
-
 15
15
-
 16
16
-
 17
17
-
 18
18
-
 19
19
-
 20
20
-
 21
21
-
 22
22
-
 23
23
-
 24
24
-
 25
25
-
 26
26
-
 27
27
-
 28
28


in anderen Sprachen
- English: MAXXMEE 04523 Installation guide
- français: MAXXMEE 04523 Guide d'installation
- Nederlands: MAXXMEE 04523 Installatie gids
Verwandte Artikel

Andere Dokumente
-
Silvercrest SHBS 1000 B1 Operating Instructions Manual
-
Silvercrest SHBS 3.7 B1 - IAN 273441 Bedienungsanleitung
-
-
Philips SatinPerfect HP6578 Benutzerhandbuch
-
Philips HP6576/00 Benutzerhandbuch
-
Philips HP6578/10 Benutzerhandbuch
-
Panasonic ERGB96 Bedienungsanleitung
-
Solac CP7396 Bedienungsanleitung
-
-
Carrera 622 Benutzerhandbuch