Auriol 282650 Operation and Safety Notes
- Kategorie
- Wetterstationen
- Typ
- Operation and Safety Notes
Dieses Handbuch ist auch geeignet für

RADIO-CONTROLLED WEATHER STATION
FUNK-WETTERSTATION
Bedienungs- und Sicherheitshinweise
RADIO-CONTROLLED
WEATHER STATION
Operation and Safety Notes
RÁDIÓVEZÉRELT
IDŐJÁRÁSÁLLOMÁS
Kezelési és biztonsági utalások
RADIJSKO VODENA
VREMENSKA POSTAJA
Navodila za upravljanje in varnostna opozorila
BEZDRÁTOVÁ METEOSTANICE
Pokyny pro obsluhu a bezpečnostní pokyny
METEOST ANICA
Pokyny pre obsluhu a bezpečnostné pokyny
IAN 282650

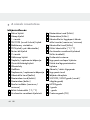
GB Operation and Safety Notes Page 5
HU Kezelési és biztonsági utalások Oldal 41
SI Navodila za upravljanje in varnostna opozorila Stran 78
CZ Pokyny pro obsluhu a bezpečnostní pokyny Strana 115
SK Pokyny pre obsluhu a bezpečnostné pokyny Strana 151
DE / AT / CH Bedienungs- und Sicherheitshinweise Seite 188

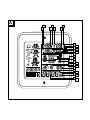
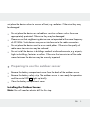
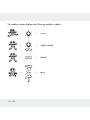
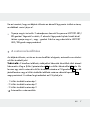
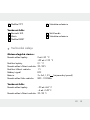
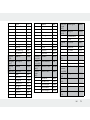
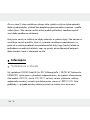
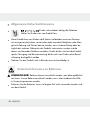
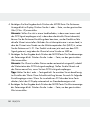
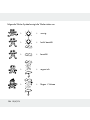
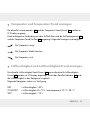
A
17
19
15
20
14
2
16
18
13
11
10
1
12
9
3
6
8
5
7
4
26 25 23 22
27 24 21

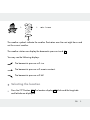
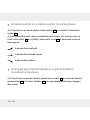
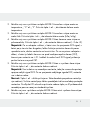
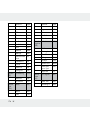
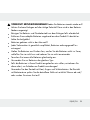
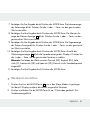
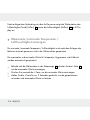
B
28
30
32
31
29
33

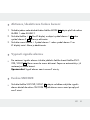
5 GB
Introduction ............................................................................................Page 7
Intended use .................................................................................................Page 7
Parts description ........................................................................................... Page 8
Technical data ..............................................................................................Page 9
Included items ..............................................................................................Page 10
Safety ..........................................................................................................Page 10
General Safety Information .........................................................................Page 11
Safety Instructions for Batteries ...................................................................Page 11
Before use ................................................................................................Page 12
Setting up the devices ..................................................................................Page 12
Preparing to use the outdoor sensor ...........................................................Page 13
Preparing the weather station for use ......................................................... Page 14
Operation ................................................................................................Page 16
Receiving the DCF radio time signal ...........................................................Page 16
Setting the 12 / 24 hour mode / °C / °F / hPa / inHg /
time zone / time / date / language manually ..............................................Page 17
Setting the alarm time ..................................................................................Page 19
Activating / deactivating the alarm function ............................................... Page 20
Switching off the alarm signal ..................................................................... Page 21
SNOOZE function .......................................................................................Page 21
Preparing to use the weather forecasting function .....................................Page 21
Selecting the location ...................................................................................Page 23
Selecting the location manually ..................................................................Page 24
Lunar phases.................................................................................................Page 28

6 GB
Reading the barometric pressure for the last 12 hours .............................Page 28
Adjusting the air pressure indication ...........................................................Page 29
Setting the channel .......................................................................................Page 30
Displaying temperature and temperature trend .........................................Page 31
Displaying the humidity and humidity trend ...............................................Page 31
Displaying the maximum / minimum temperature / humidity .....................Page 32
Temperature and frost alarm .......................................................................Page 33
Activating / deactivating the the temperature and frost alarm .................. Page 33
Background lighting .....................................................................................Page 34
Battery state display .....................................................................................Page 34
Changing the batteries ................................................................................Page 34
Troubleshooting .................................................................................Page 35
Cleaning and care .............................................................................Page 36
Disposal ..................................................................................................... Page 37
Warranty ..................................................................................................Page 38
Information.............................................................................................Page 39
Declaration of Conformity ........................................................................... Page 39

7 GB
Radio-controlled weather station
Introduction
We congratulate you on the purchase of your new product. You have chosen a
high quality product. The instructions for use are part of the product. They contain
important information concerning safety, use and disposal. Before using the prod-
uct, please familiarise yourself with all of the safety information and instructions for
use. Only use the product as described and for the specified applications. If you
pass the product on to anyone else, please ensure that you also pass on all the
documentation with it.
Intended use
The weather station displays the indoor and outdoor temperatures in Celsius (°C) or
Fahrenheit (°F) and their maximum and minimum values. It also displays the indoor and
outdoor humidity (%RH) as well as their maximum and minimum values. Additional
display values of weather station include the weather forecast, the time in 12 / 24-hour
clock modes and the date. The weather station displays the sunrise and sunset times
for that day and the lunar phase as well. In addition, the weather station has two
different alarm functions. The product is only suitable for use in private households
and is not intended for commercial use.

8 GB
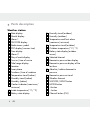
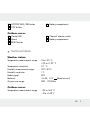
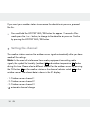
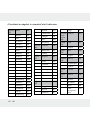
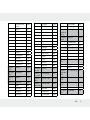
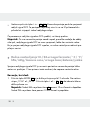
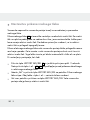
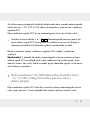
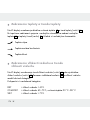
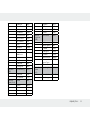
Parts description
Weather station:
1
Date display
2
Month display
3
Alarm 1
4
SNOOZE display
5
Radio tower symbol
6
DST display (summer time)
7
Time display
8
Alarm 2
9
Day of week display
10
Sunrise / time of sunrise
11
Tidal range display
12
Location
13
Lunar phase
14
Sundown / time of sundown
15
Temperature trend (indoor)
16
Humidity trend (indoor)
17
Humidity (indoor)
18
Comfort indicator (maximum /
minimum)
19
Inside temperature (°C / °F)
20
Battery state display
21
Humidity trend (outdoor)
22
Humidity (outdoor)
23
Temperature and frost alarm
(maximum / minimum)
24
Temperature trend (outdoor)
25
Outdoor temperature (°C / °F)
26
Battery state display (outdoor
sensor)
27
Selected channel
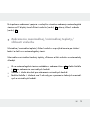
28
Barometric pressure bar display
29
Barometric pressure display of the
last hour
30
Absolute / relative barometric
pressure
31
Barometric pressure trend
32
Weather forecast
33
SNOOZE / LIGHT button
34
MODE button
35
+ button
36
– button
37
Channel button (CH)

9 GB
38
HISTORY ABS / REL button
39
CITY button
40
Battery compartment
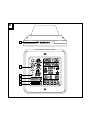
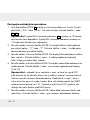
Outdoor sensor:
41
Control LED
42
Mount
43
RESET button
44
Channel selector switch
45
Battery compartment
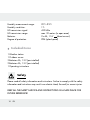
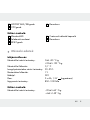
Technical data
Weather station:
Temperature measurement range: 0 to +50 °C
+32 to +122 °F
Temperature resolution: 0.1 °C
Humidity measurement range: 20 %–95 %
Humidity resolution: 1 %
Radio signal: DCF
Batteries: 3 x AA, 1.5 V
(direct current)
Air pressure range: 850 - 1050 hPa
Outdoor sensor:
Temperature measurement range: –20 to +65 °C
–4 to +149 °F

10 GB
Humidity measurement range: 20 %–95 %
Humidity resolution: 1 %
HF transmission signal: 433 MHz
HF transmission range: max. 30 metres (in open area)
Batteries: 2 x AA, 1.5 V
(direct current)
Degree of protection: IPX4 (splash-proof)
Included items
1 Weather station
1 Outdoor sensor
3 Batteries AA, 1.5 V (pre-installed)
2 Batteries AA, 1.5 V (pre-installed)
1 Operating instructions
Safety
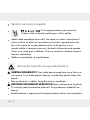
Please read all safety information and instructions. Failure to comply with the safety
information and instructions may result in an electric shock, fire and / or severe injuries.
KEEP ALL THE SAFETY ADVICE AND INSTRUCTIONS IN A SAFE PLACE FOR
FUTURE REFERENCE!

11 GB
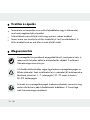
General Safety Information
Children frequently underestimate the dangers.
Children should be kept away from the product at all times.
This product can be used by children aged from 8 years and above and
persons with reduced physical, sensory or mental capabilities or lack of experi-
ence and knowledge if they have been given supervision or instruction con-
cerning use of the product in a safe way and understand the hazards involved.
Children shall not play with the product. Cleaning and user maintenance shall
not be made by children without supervision.
Do not use the product if it is damaged.
Safety Instructions for Batteries
DANGER TO LIFE! Batteries can be swallowed, which may represent a danger
to life. If a battery has been swallowed, medical help is required immediately.
Remove the batteries from the product if they have not been used for a long period.
CAUTION! DANGER OF EXPLOSION! The batteries must never be recharged
!
When inserting the battery, ensure the correct polarity! This is shown in the
battery compartments.
If necessary, clean the contacts on the batteries and on the product before
inserting them.

12 GB
Remove spent batteries from the device immediately. There is an increased
danger of leaks!
Batteries must not be disposed of in the normal domestic waste!
Every consumer is obliged to dispose of batteries properly in accordance with
the regulations!
Keep batteries away from children. Do not throw batteries into a fire. Never
short-circuit them or take them apart.
Always replace all the batteries at the same time.
Use only batteries of the same type.
If the batteries in your product have leaked, remove them immediately to pre-
vent damage to the product!
Avoid contact with the skin, eyes and mucous membranes. In the event of contact
with fluid leaking from a battery, thoroughly flush the affected area with water
and / or seek the advice of a doctor!
Before use
Setting up the devices
Put the batteries first into the outdoor sensor.
CAUTION! When choosing where to position the weather station, make sure
that it is not exposed to direct sunlight, vibrations, dust, heat, cold or moisture. Do

13 GB
not place the devices close to sources of heat, e.g. radiators. Otherwise they may
be damaged.
Do not place the devices on valuable or sensitive surfaces unless these are
appropriately protected. Otherwise they may be damaged.
Please ensure that neighbouring devices are not operated at the same frequency
of 433 MHz. Such devices may cause interference to the radio connection.
Do not place the devices next to or on metal plates. Otherwise the quality of
radio wave transmission may be reduced.
Do not install the devices in buildings made of reinforced concrete, e.g. airports,
high-rise buildings, factories or cellars. Otherwise the transmission of the radio
waves between the devices may be severely impaired.
Preparing to use the outdoor sensor
Remove the battery compartment cover from the back of the outdoor sensor.
Remove the battery safety strip. The outdoor sensor is now ready for operation
and the control LED
41
lights up briefly.
Close the battery compartment cover.
Installing the Outdoor Sensor:
Note: You will need an electric drill for this step.

14 GB
Find an appropriate place for the outdoor sensor.
Note: Please ensure that you install the outdoor sensor within a radius of 30 m
from the weather station. Check that there are no obstacles between the outdoor
sensor and the weather station. Otherwise there may be interference of the
transmission of data.
For wall mounting:
Hang the outdoor sensor with the mount
42
on one screw.
Preparing the weather station for use
Removing the battery safety strip:
Open the battery compartment
40
on the back of the weather station.
Pull out the battery safety strip.
Then close the battery compartment.
As soon as the battery safety strip has been removed, the weather station starts to
receive the radio signal.
Note: Do not move the weather station while it is receiving the signal. This may
disrupt reception.

15 GB
Connecting the weather station with the outdoor sensor and the
DCF radio signal:
After removal of the battery safety strip the weather station attempts to establish a
connection with the outdoor sensor. This process can take a few minutes. The
symbol
will keep flashing for few minutes. On successful connection with the outdoor sensor,
the selected channel symbol
27
appears in the LC display with the channel of the
outdoor sensor (if necessary you can change the channel of the outdoor sensor as
shown in the section “Setting the channel”). If the connection with the outdoor sen-
sor is not established automatically, this can be done manually as follows:
1. Press the channel button (CH)
37
. The icon of the selected channel
27
will
flash in the LC-display.
2. Then press the RESET button
43
of the sensor.
As soon as the weather station has established a connection with the outdoor sensor
it automatically begins to receive the DCF radio signal. This process takes several
minutes and is indicated in the LC display by a flashing radio tower symbol
5
.
When the DCF radio signal is being successfully received, the radio tower symbol
is shown permanently in the display. If at the time of putting the device into opera-
tion it is not possible to synchronise with the atomic clock, you can also carry out
the clock adjustments manually (“Setting the 12 / 24 hour mode / °C / °F / hPa /
inHg / time zone / time / date / language manually”).

16 GB
Radio signal (DCF):
The DCF signal (time signal transmitter) consists of time pulses emitted by one of
the most accurate clocks in the world close to Frankfurt / Main, Germany.
In ideal conditions, your weather station can pick up this signal over a distance of
up to approx. 2000 km around Frankfurt / Main. Reception of the radio signal
generally takes approx. 3–10 minutes.
Reception can be considerably impaired by obstacles (e.g. concrete walls) or sources
of interference (e.g. other electrical devices). In the event of reception problems,
change the position of the weather station (e.g. to somewhere near a window).
Operation
Receiving the DCF radio time signal
After a connection with the outdoor sensor is established or 3 minutes after the battery
safety strip is removed, the weather station automatically begins to search for the
DCF radio signal. The search is shown in the LC display by the radio tower symbol
5
flashing.
Note: In buildings made of reinforced concrete the reception of the radio signal
may be severely impaired (see “Setting up the devices”).

17 GB
In order to correct any deviations from the exact time, the clock is automatically
synchronised with the DCF radio signal every day at 1:00, 2:00 and 3:00.
Reception of the DCF radio signal can also be started manually on the weather station.
Press the + and – button
35
,
36
at the same time. The weather station attempts
to receive the DCF radio signal. This process takes several minutes and is indi-
cated in the LC display by a flashing radio tower symbol.
If the connection with the DCF radio signal cannot be established, the search is stopped.
Note: If the clock of the weather station cannot receive the DCF radio signal due
to errors, too great a distance from the transmitter or similar reasons, it is possible
to set the time manually. If reception of the DCF signal is successful, the manual
settings are overwritten.
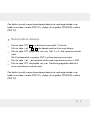
Setting the 12 / 24 hour mode / °C / °F / hPa / inHg /
time zone / time / date / language manually
The reception of DCF radio signal where the weather station has been positioned may
become degraded or interrupted. If this happens you can set the device manually.
Follow these steps:
1.
Press and hold down the MODE button
34
for about 3 seconds. “12 Hr” or “24 Hr”
blinks in the display. Press the + or – button
35
,
36
to choose the desired hour format.

18 GB
Note: The AM symbol in the time display
7
stands for before noon in the
12 hour mode. The PM symbol in the time display stands for after noon in
12 hour mode.
2. Confirm your setting by pressing the MODE button. The temperature unit “°C “
or “°F” flashes in the display. Press the + or – button to choose the desired
temperature unit.
3. Confirm your setting by pressing the MODE button. The barometric pressure’s
unit flashes in the display. Press the + or – button to set the desired unit (hPa /
inHg).
4. Confirm your setting by pressing the MODE button. The time zone indicator
flashes in the display. Press the + or – button to set the desired value (-2 to +2).
Note: Should you be in a country in which the DCF signal can be received but
the time is different to your current local time, you can use the time zone setting
to have the product display your current local time. If you find yourself in a coun-
try in which, for example, the local time is an hour ahead of Central European
Time (CET), you set the time zone to +01. The product is now still controlled by
DCF but shows the time as one hour ahead of CET.
5. Confirm your setting by pressing the MODE button. The hour value of the time
display flashes. Press the + or – button to set the desired value.
Note: The time and date settings will be done automatically if the weather
station receives the DCF signal. You should manually adjust the time and date
if you have no reception of DCF.
Tip: Hold the + or – button pressed down. This will speed up the process of
setting the values. You can also use this fast setting option for subsequent settings.

19 GB
If you do not press any button for 20 seconds, the LCD automatically reverts to
the standard display.
6. Confirm your setting by pressing the MODE button. The minute indicator of the
time display blinks. Press the + or – button to set the desired value.
7. Confirm your setting by pressing the MODE button. The year indicator flashes
in the time display. Press the + or – button to set the desired value.
8. Confirm your setting by pressing the MODE button. The month indicator flashes
in the date display
1
. Press the + or – button to set the desired value.
9. Confirm your setting by pressing the MODE button. The day indicator flashes
in the date display. Press the + or – button to set the desired value.
10. Confirm your setting by pressing the MODE button. At the place of the day of
the week display
9
, the language indicator of this display flashes. Press the +
or – button to choose the desired language.
Note: You have the choice of German (GE), English (EN), Italian (IT), French
(FR) and Spanish (SP) (German is set as the standard language).
11. Confirm your setting by pressing the MODE button.
Setting the alarm time
1. Press the MODE button
34
briefly in order to get to alarm mode. The currently
set waking time appears in the LC display.
2. Press and hold down the MODE button for about 2 seconds. The hours display
flashes.

20 GB
3. Press the + or – button
35
,
36
to set the desired value.
4. Confirm your setting by pressing the MODE button. The minutes display flashes.
Repeat step 3 to set the minutes.
5. Confirm your setting by pressing the MODE button.
Tip: Hold the + or – button pressed down. This will speed up the process of
setting the values. You can also use this fast setting option for subsequent settings.
If you do not press any button for 20 seconds, the LCD automatically reverts to
the standard display.
Note: You can set two different alarms separately.
6. Press the MODE button twice briefly if the weather station is in time display
7
mode. Press the MODE button once briefly if the weather station is in ALARM 1
mode. This brings you now to ALARM 2 mode.
7. Repeat steps 2–5 to set the value for ALARM 2.
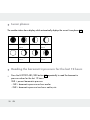
Activating / deactivating the alarm function
1. Briefly press the MODE button
34
briefly once or twice to reach ALARM 1 or
ALARM 2 mode.
2. Press the + button
35
. The ALARM 1 symbol
3
or ALARM 2 symbol
8
appears
in the LC display. The alarm has been activated.
3. Press the button + again. The ALARM 1 or ALARM 2 symbol in the LC display
goes out. The alarm has been deactivated.
Seite laden ...
Seite laden ...
Seite laden ...
Seite laden ...
Seite laden ...
Seite laden ...
Seite laden ...
Seite laden ...
Seite laden ...
Seite laden ...
Seite laden ...
Seite laden ...
Seite laden ...
Seite laden ...
Seite laden ...
Seite laden ...
Seite laden ...
Seite laden ...
Seite laden ...
Seite laden ...
Seite laden ...
Seite laden ...
Seite laden ...
Seite laden ...
Seite laden ...
Seite laden ...
Seite laden ...
Seite laden ...
Seite laden ...
Seite laden ...
Seite laden ...
Seite laden ...
Seite laden ...
Seite laden ...
Seite laden ...
Seite laden ...
Seite laden ...
Seite laden ...
Seite laden ...
Seite laden ...
Seite laden ...
Seite laden ...
Seite laden ...
Seite laden ...
Seite laden ...
Seite laden ...
Seite laden ...
Seite laden ...
Seite laden ...
Seite laden ...
Seite laden ...
Seite laden ...
Seite laden ...
Seite laden ...
Seite laden ...
Seite laden ...
Seite laden ...
Seite laden ...
Seite laden ...
Seite laden ...
Seite laden ...
Seite laden ...
Seite laden ...
Seite laden ...
Seite laden ...
Seite laden ...
Seite laden ...
Seite laden ...
Seite laden ...
Seite laden ...
Seite laden ...
Seite laden ...
Seite laden ...
Seite laden ...
Seite laden ...
Seite laden ...
Seite laden ...
Seite laden ...
Seite laden ...
Seite laden ...
Seite laden ...
Seite laden ...
Seite laden ...
Seite laden ...
Seite laden ...
Seite laden ...
Seite laden ...
Seite laden ...
Seite laden ...
Seite laden ...
Seite laden ...
Seite laden ...
Seite laden ...
Seite laden ...
Seite laden ...
Seite laden ...
Seite laden ...
Seite laden ...
Seite laden ...
Seite laden ...
Seite laden ...
Seite laden ...
Seite laden ...
Seite laden ...
Seite laden ...
Seite laden ...
Seite laden ...
Seite laden ...
Seite laden ...
Seite laden ...
Seite laden ...
Seite laden ...
Seite laden ...
Seite laden ...
Seite laden ...
Seite laden ...
Seite laden ...
Seite laden ...
Seite laden ...
Seite laden ...
Seite laden ...
Seite laden ...
Seite laden ...
Seite laden ...
Seite laden ...
Seite laden ...
Seite laden ...
Seite laden ...
Seite laden ...
Seite laden ...
Seite laden ...
Seite laden ...
Seite laden ...
Seite laden ...
Seite laden ...
Seite laden ...
Seite laden ...
Seite laden ...
Seite laden ...
Seite laden ...
Seite laden ...
Seite laden ...
Seite laden ...
Seite laden ...
Seite laden ...
Seite laden ...
Seite laden ...
Seite laden ...
Seite laden ...
Seite laden ...
Seite laden ...
Seite laden ...
Seite laden ...
Seite laden ...
Seite laden ...
Seite laden ...
Seite laden ...
Seite laden ...
Seite laden ...
Seite laden ...
Seite laden ...
Seite laden ...
Seite laden ...
Seite laden ...
Seite laden ...
Seite laden ...
Seite laden ...
Seite laden ...
Seite laden ...
Seite laden ...
Seite laden ...
Seite laden ...
Seite laden ...
Seite laden ...
Seite laden ...
Seite laden ...
Seite laden ...
Seite laden ...
Seite laden ...
Seite laden ...
Seite laden ...
Seite laden ...
Seite laden ...
Seite laden ...
Seite laden ...
Seite laden ...
Seite laden ...
Seite laden ...
Seite laden ...
Seite laden ...
Seite laden ...
Seite laden ...
Seite laden ...
Seite laden ...
Seite laden ...
Seite laden ...
Seite laden ...
Seite laden ...
Seite laden ...
Seite laden ...
Seite laden ...
Seite laden ...
Seite laden ...
Seite laden ...
Seite laden ...
Seite laden ...
Seite laden ...
-
 1
1
-
 2
2
-
 3
3
-
 4
4
-
 5
5
-
 6
6
-
 7
7
-
 8
8
-
 9
9
-
 10
10
-
 11
11
-
 12
12
-
 13
13
-
 14
14
-
 15
15
-
 16
16
-
 17
17
-
 18
18
-
 19
19
-
 20
20
-
 21
21
-
 22
22
-
 23
23
-
 24
24
-
 25
25
-
 26
26
-
 27
27
-
 28
28
-
 29
29
-
 30
30
-
 31
31
-
 32
32
-
 33
33
-
 34
34
-
 35
35
-
 36
36
-
 37
37
-
 38
38
-
 39
39
-
 40
40
-
 41
41
-
 42
42
-
 43
43
-
 44
44
-
 45
45
-
 46
46
-
 47
47
-
 48
48
-
 49
49
-
 50
50
-
 51
51
-
 52
52
-
 53
53
-
 54
54
-
 55
55
-
 56
56
-
 57
57
-
 58
58
-
 59
59
-
 60
60
-
 61
61
-
 62
62
-
 63
63
-
 64
64
-
 65
65
-
 66
66
-
 67
67
-
 68
68
-
 69
69
-
 70
70
-
 71
71
-
 72
72
-
 73
73
-
 74
74
-
 75
75
-
 76
76
-
 77
77
-
 78
78
-
 79
79
-
 80
80
-
 81
81
-
 82
82
-
 83
83
-
 84
84
-
 85
85
-
 86
86
-
 87
87
-
 88
88
-
 89
89
-
 90
90
-
 91
91
-
 92
92
-
 93
93
-
 94
94
-
 95
95
-
 96
96
-
 97
97
-
 98
98
-
 99
99
-
 100
100
-
 101
101
-
 102
102
-
 103
103
-
 104
104
-
 105
105
-
 106
106
-
 107
107
-
 108
108
-
 109
109
-
 110
110
-
 111
111
-
 112
112
-
 113
113
-
 114
114
-
 115
115
-
 116
116
-
 117
117
-
 118
118
-
 119
119
-
 120
120
-
 121
121
-
 122
122
-
 123
123
-
 124
124
-
 125
125
-
 126
126
-
 127
127
-
 128
128
-
 129
129
-
 130
130
-
 131
131
-
 132
132
-
 133
133
-
 134
134
-
 135
135
-
 136
136
-
 137
137
-
 138
138
-
 139
139
-
 140
140
-
 141
141
-
 142
142
-
 143
143
-
 144
144
-
 145
145
-
 146
146
-
 147
147
-
 148
148
-
 149
149
-
 150
150
-
 151
151
-
 152
152
-
 153
153
-
 154
154
-
 155
155
-
 156
156
-
 157
157
-
 158
158
-
 159
159
-
 160
160
-
 161
161
-
 162
162
-
 163
163
-
 164
164
-
 165
165
-
 166
166
-
 167
167
-
 168
168
-
 169
169
-
 170
170
-
 171
171
-
 172
172
-
 173
173
-
 174
174
-
 175
175
-
 176
176
-
 177
177
-
 178
178
-
 179
179
-
 180
180
-
 181
181
-
 182
182
-
 183
183
-
 184
184
-
 185
185
-
 186
186
-
 187
187
-
 188
188
-
 189
189
-
 190
190
-
 191
191
-
 192
192
-
 193
193
-
 194
194
-
 195
195
-
 196
196
-
 197
197
-
 198
198
-
 199
199
-
 200
200
-
 201
201
-
 202
202
-
 203
203
-
 204
204
-
 205
205
-
 206
206
-
 207
207
-
 208
208
-
 209
209
-
 210
210
-
 211
211
-
 212
212
-
 213
213
-
 214
214
-
 215
215
-
 216
216
-
 217
217
-
 218
218
-
 219
219
-
 220
220
-
 221
221
-
 222
222
-
 223
223
-
 224
224
-
 225
225
-
 226
226
-
 227
227


Auriol 282650 Operation and Safety Notes
- Kategorie
- Wetterstationen
- Typ
- Operation and Safety Notes
- Dieses Handbuch ist auch geeignet für
in anderen Sprachen
- slovenčina: Auriol 282650
Verwandte Papiere
-
Auriol Z31130 Operation and Safety Notes
-
-
-
-
-
-
-
-
-