
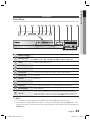
5.1CH Blu-ray™
Home Entertainment System
user manual
imagine the possibilities
Thank you for purchasing this Samsung product.
To receive more complete service,
please register your product at
www.samsung.com/register
HT-D5500
HT-D5530
HT-D5550
HT-D5500_ELS_0314.indd 1HT-D5500_ELS_0314.indd 1 2011-03-14 7:40:412011-03-14 7:40:41
Seite laden ...
Seite laden ...
Seite laden ...
Seite laden ...
Seite laden ...
Seite laden ...
Seite laden ...
Seite laden ...

10 English
Getting Started
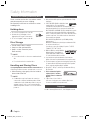
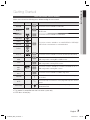
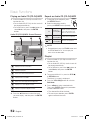
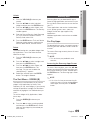
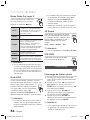
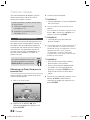
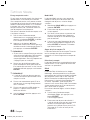
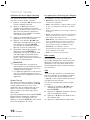
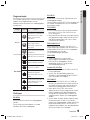
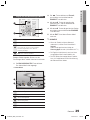
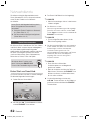
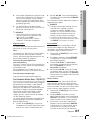
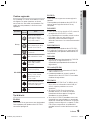
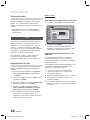
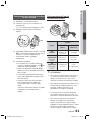
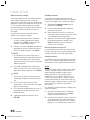
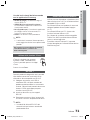
Disc Format
Using JPEG disc
CD-R/-RW, DVD-RW/-R recorded with UDF or JOLIET format can be played back.
Only JPEG fi les with the ".jpg", ".JPG", ".jpeg" or "JPEG" extension can be displayed.
Progressive JPEG is supported.
DVD-RW/-R (V)
This is a format that is used for recording data on a DVD-RW or DVD-R disc. The disc can be played by this
product once it has been fi nalized.
If a disc that has been recorded in Video Mode by a different maker’s recorder but has not been fi nalized, it
cannot be played by this product.
•
•
•
•
•
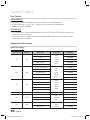
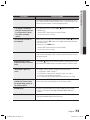
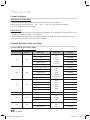
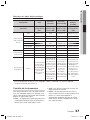
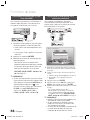
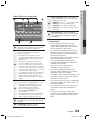
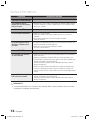
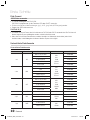
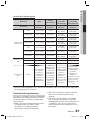
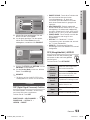
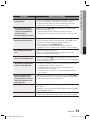
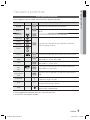
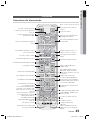
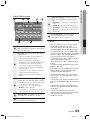
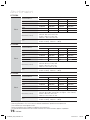
Supported File Formats
Video File Support
File Extension Container Video Codec Audio Codec Resolution
*.avi
AVI
DivX 3.11/4.x/5.1/6.0
MP3
AC3
LPCM
ADPCM
DTS Core
1920x1080
XviD
1920x1080
H.264 BP/MP/HP
1920x1080
MPEG4 SP/ASP
1920x1080
Motion JPEG
1920x1080
*.mkv
MKV
DivX 3.11/4.x/5.1/6.0
MP3
AC3
LPCM
ADPCM
DTS Core
1920x1080
XviD
1920x1080
H.264 BP/MP/HP
1920x1080
MPEG4 SP/ASP
1920x1080
Motion JPEG
1920x1080
*.asf
ASF
DivX 3.11/4.x/5.1/6.0
MP3
AC3
LPCM
ADPCM
WMA
1920x1080
XviD
1920x1080
H.264 BP/MP/HP
1920x1080
MPEG4 SP/ASP
1920x1080
Motion JPEG
1920x1080
*.wmv
ASF Window Media Video v9
WMA 1920x1080
*.mp4
MP4
H.264 BP/MP/HP
MP3
ADPCM
AAC
1920x1080
MPEG4 SP/ASP
1920x1080
XVID
1920x1080
*.3gp
3GPP
H.264 BP/MP/HP
ADPCM
AAC
HE-AAC
1920x1080
MPEG4 SP/ASP
1920x1080
HT-D5500_ELS_0314.indd 10HT-D5500_ELS_0314.indd 10 2011-03-14 7:40:512011-03-14 7:40:51

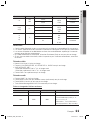
English 11
01 Getting Started
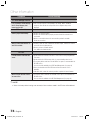
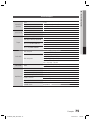
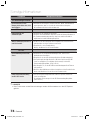
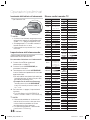
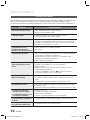
File Extension Container Video Codec Audio Codec Resolution
*.vro
VRO
VOB
MPEG2
AC3
MPEG
LPCM
1920x1080
MPEG1
352x288
*.mpg
*.mpeg
PS
MPEG1
AC3
MPEG
LPCM
AAC
352x288
MPEG2
1920x1080
H.264
1920x1080
*.ts
*.tp
*.trp
TS
MPEG2
AC3
AAC
MP3
DD+
HE-AAC
1920x1080
H.264
1920x1080
VC1
1920x1080
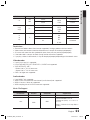
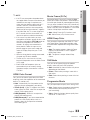
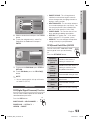
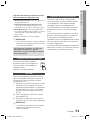
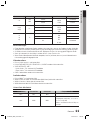
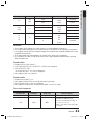
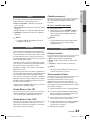
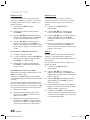
Restrictions
Some of the Codecs above listed are not supported if having a problem with the contents.
Video source with incorrect container information or if corrupt will not be played properly.
AV source with more than the standard bit rate or frame rate may not be played properly.
If the index table is corrupt, the Seek (Jump) function will not be supported.
If you play a video via the network, it may not be played properly depending on the network status.
Video decoder
Up to H.264 Level 4.1 supported.
H.264 FMO/ASO/RS, VC1 SP/MP/AP L4, AVCHD not supported.
XVID, MPEG4 SP, ASP :
- Below 1280 x 720: 60 frame max
- Above 1280 x 720: 30 frame max
GMC 2 or higher not supported.
Audio decoder
Up to WMA 7,8,9 supported.
WMA 9 PRO with more than two channels (multi-channel) not supported.
WMA 9 Lossless, Voice not supported.
WMA sampling rate at 22050Hz mono not supported.
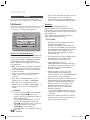
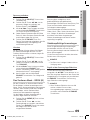
Music File Support
File Extension Container Audio Codec Support Range
*.mp3
MP3
MP3 -
*.wma
WMA
WMA
Compliant with WMA version 10
* Sampling rates (in kHz) - 8, 11, 16, 22, 32,
44.1, 48
* Bit rates - All bit-rates in the range 5kbps to
384kbps
•
•
•
•
•
•
•
•
•
•
•
•
•
HT-D5500_ELS_0314.indd 11HT-D5500_ELS_0314.indd 11 2011-03-14 7:40:512011-03-14 7:40:51

12 English
Getting Started
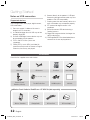
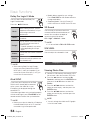
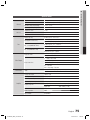
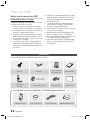
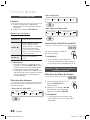
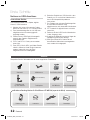
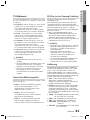
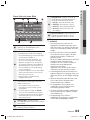
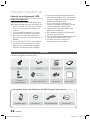
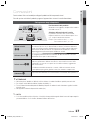
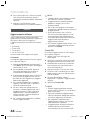
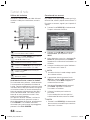
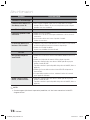
Accessories
Check for the supplied accessories below.
Video Cable FM Antenna iPod Dock User's Manual
FUNCTION
TV SOURCE
POWER
DISC MENU MENU TITLE MENU
MUTE
SFE MODE
VOL
TUNING
/CH
TOOLS
RETURN
EXIT
INFO
AB
HUB
CD
TUNER
MEMORY
S/W LEVEL
DĺD
MO/ST
D SOUND
DSP
PL
vTuner
SMART SEARCH
REPEATFULL SCREEN
123
456
78
0
9
POPUP
TV
BD
RECEIVER SLEEP
TARDS DISPLAY
PTY- PTY SEARCH PTY+
iPod SYNC
(For Power cord)
Remote Control/
Batteries (AAA size)
Toroidal Ferrite Core ASC Microphone Soft Cloth
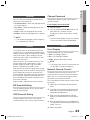
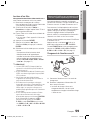
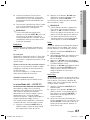
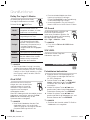
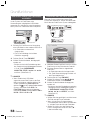
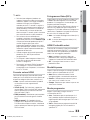
Notes on USB connection
Supported devices:
USB storage media, MP3 player, digital camera,
USB card reader
Does not support if a folder or fi le name is
longer than 125 characters.
A subtitle fi le bigger than 300 KB may not be
properly displayed.
A certain USB/digital camera device may not
be compatible with the product.
FAT16 and FAT32 fi le systems are
supported.
Photo (JPEG), music (MP3) and video fi le
should have their names in Korean or English.
Otherwise, the fi le may not played.
1)
2)
3)
4)
5)
Connect directly to the product's USB port.
Connecting through another cable may raise
problems with USB compatibility.
Inserting more than one memory device to a
multi-card reader may not operate properly.
PTP protocol for digital camera is not
supported.
Do not disconnect USB device during a
"loading" process.
Bigger the image resolution, the longer the
delay to displaying.
DRM applied MP3 fi les downloaded from a
commercial site are not played back.
6)
7)
8)
9)
10)
11)
Wireless Dock Cradle for iPod/iPhone : HT-WDC10 (sold separately)
STANDB
Y
L
IN
K
CHARGE
Wireless Transmitter Charging Cradle DC Power Cord DC Power Adapter
HT-D5500_ELS_0314.indd 12HT-D5500_ELS_0314.indd 12 2011-03-14 7:40:512011-03-14 7:40:51
Seite laden ...
Seite laden ...
Seite laden ...

16 English
Getting Started
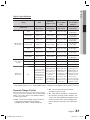
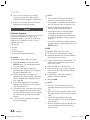
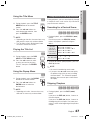
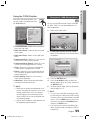
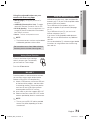
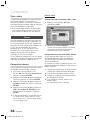
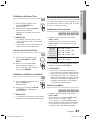
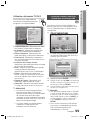
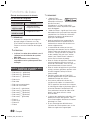
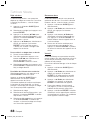
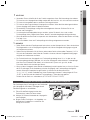
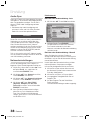
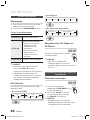
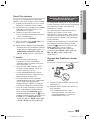
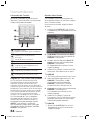
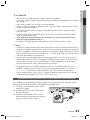
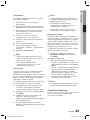
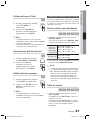
Installing batteries in the Remote Control
NOTE
Make sure to match the “+” and “–” ends of
the batteries with the diagram inside the
compartment.
Assuming typical TV usage, the batteries last
for about one year.
The remote control can be used up to
approximately 7 meters in a straight line.
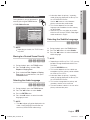
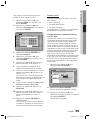
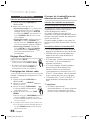
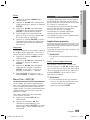
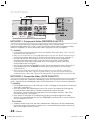
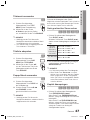
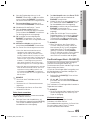
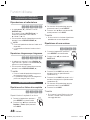
Setting the Remote Control
You can control certain functions of your TV with
this remote control.
When operating a TV with the remote control
Press the TV button to set the remote control
to TV mode.
Press the POWER button to turn on the TV.
While holding down the POWER button, enter
the code corresponding to your brand of TV.
If there is more than one code listed for
your TV in the table, enter one at a time to
determine which code works.
Example : For a Samsung TV
While holding down the POWER button, use the
number buttons to enter 00, 15, 16, 17 and 40.
If the TV turns off, the setting is complete.
You can use the TV POWER, VOLUME,
CHANNEL, and Numeric buttons (0~9).
NOTE
The remote control may not work on some
brands of TV's. Also, some operations may not
be possible, depending on your brand of TV.
The remote control will work with Samsung TVs
by default.
✎
1.
2.
3.
•
•
4.
•
✎
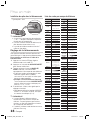
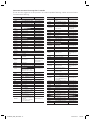
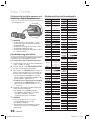
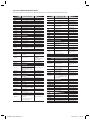
TV Brand Code List
* Battery size: AAA
Brand Code
Admiral
(M.Wards)
56, 57, 58
A Mark
01, 15
Anam
01, 02, 03, 04, 05,
06, 07, 08, 09, 10,
11, 12, 13, 14
AOC
01, 18, 40, 48
Bell &
Howell
(M.Wards)
57, 58, 81
Brocsonic
59, 60
Candle
18
Cetronic
03
Citizen
03, 18, 25
Cinema
97
Classic
03
Concerto
18
Contec
46
Coronado
15
Craig
03, 05, 61, 82, 83, 84
Croslex
62
Crown
03
Curtis
Mates
59, 61, 63
CXC
03
Daewoo
02, 03, 04, 15, 16,
17, 18, 19, 20, 21,
22, 23, 24, 25, 26,
27, 28, 29, 30, 32,
34, 35, 36, 48, 59, 90
Daytron
40
Dynasty
03
Emerson
03, 15, 40, 46, 59, 61,
64, 82, 83, 84, 85
Fisher
19, 65
Funai
03
Futuretech
03
General
Electric (GE)
06, 40, 56, 59,
66, 67, 68
Hall Mark
40
Hitachi
15, 18, 50, 59, 69
Inkel
45
JC Penny
56, 59, 67, 86
JVC
70
KTV
59, 61, 87, 88
KEC
03, 15, 40
KMC
15
LG
(Goldstar)
01, 15, 16, 17, 37, 38,
39, 40, 41, 42, 43, 44
Luxman
18
LXI
(Sears)
19, 54, 56, 59,
60, 62, 63, 65, 71
Magnavox
15, 17, 18, 48, 54,
59, 60, 62, 72, 89
Marantz
40, 54
Matsui
54
MGA
18, 40
Brand Code
Mitsubishi/
MGA
18, 40, 59, 60, 75
MTC
18
NEC
18, 19, 20, 40, 59, 60
Nikei
03
Onking
03
Onwa
03
Panasonic
06, 07, 08, 09, 54,
66, 67, 73, 74
Penney
18
Philco
03, 15, 17, 18, 48,
54, 59, 62, 69, 90
Philips
15, 17, 18, 40,
48, 54, 62, 72
Pioneer
63, 66, 80, 91
Portland
15, 18, 59
Proton
40
Quasar
06, 66, 67
Radio
Shack
17, 48, 56, 60,
61, 75
RCA/
Proscan
18, 59, 67, 76, 77,
78, 92, 93, 94
Realistic
03, 19
Sampo
40
Samsung
00, 15, 16, 17, 40,
43, 46, 47, 48, 49,
59, 60, 98
Sanyo
19, 61, 65
Scott
03, 40, 60, 61
Sears
15, 18, 19
Sharp
15, 57, 64
Signature
2000
(M.Wards)
57, 58
Sony
50, 51, 52, 53, 55
Soundesign
03, 40
Spectricon
01
SSS
18
Sylvania
18, 40, 48, 54,
59, 60, 62
Symphonic
61, 95, 96
Tatung
06
Techwood
18
Teknika
03, 15, 18, 25
TMK
18, 40
Toshiba
19, 57, 63, 71
Vidtech
18
Videch
59, 60, 69
Wards
15, 17, 18, 40,
48, 54, 60, 64
Yamaha
18
York
40
Yupiteru
03
Zenith
58, 79
Zonda
01
Dongyang
03, 54
HT-D5500_ELS_0314.indd 16HT-D5500_ELS_0314.indd 16 2011-03-14 7:40:542011-03-14 7:40:54
Seite laden ...

18 English
Connections
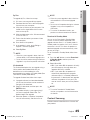
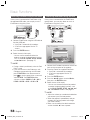
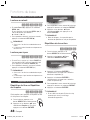
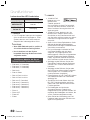
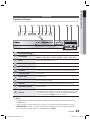
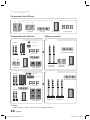
Speaker Components
Speaker Components Assembled Speakers
FRONT
(L) (R)
CENTRE
STAND
STAND BASE
SUBWOOFER
HT-D5530
HT-D5530
CENTRE SPEAKER
SUBWOOFER FRONT SPEAKER
SCREW (5X15): 2EA
SCREW (4X20): 8EA
NOTE
Refer to page 19 to install the Speakers on the Tallboy Stand.
✎
SPEAKER CABLE
SURROUND
SPEAKER
SURROUND
(L) (R)
FRONT
SURROUND
CENTRE
SUBWOOFER
SPEAKER CABLE
HT-D5500
(L)
(L) (R)
(R)
CENTRE
STAND
STAND BASE
HT-D5550
SCREW (5X15): 4EA
SCREW (4X20): 16EA
SPEAKER CABLE
HT-D5550
SUBWOOFER
FRONT
SPEAKER
FRONT
(L) (R)
SUBWOOFERSURROUND
(L) (R)
CENTRE
SPEAKER
SURROUND
SPEAKER
HT-D5500_ELS_0314.indd 18HT-D5500_ELS_0314.indd 18 2011-03-14 7:40:552011-03-14 7:40:55
Seite laden ...

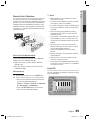
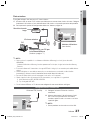
20 English
Connections
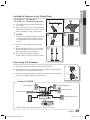
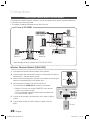
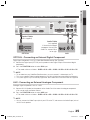
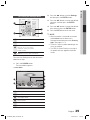
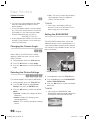
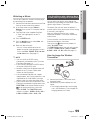
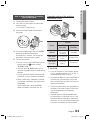
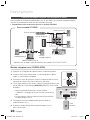
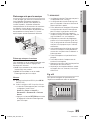
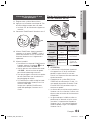
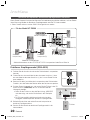
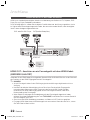
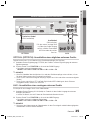
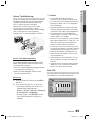
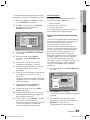
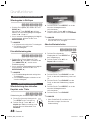
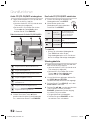
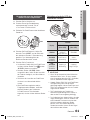
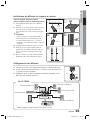
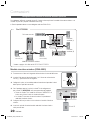
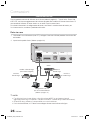
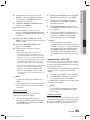
Connecting the Optional Wireless Receiver Module
To connect the surround speakers wirelessly, you have to purchase the wireless receiver module and
TX card from your Samsung retailer.
This product should be connected with the SWA-5000 only.
Wireless Receiver Module (SWA-5000)
Press down the terminal tab on the back of the speaker.
Insert the black wire into the black terminal (–) and the red wire into the
red terminal (+), and then release the tab.
Connect the connecting plugs to the back of the product by matching the
colours of the speaker plugs to the speaker jacks.
With the product turned off, insert the TX card into the
TX Card Connection (WIRELESS) on the back of the product.
Hold the TX card so that the label "WIRELESS" faces upward
and insert the card into the port.
The TX card enables communication between the product and
the wireless receiver module.
Connect the left and right surround speakers to the wireless Receiver
module.
Plug the power cord of the wireless Receiver module in the wall
outlet .
•
1.
2.
3.
4.
•
•
5.
6.
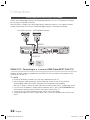
FRONT
SPEAKERS OUT
SPEAKER IMPEDANCE : 3
VIDEO OUTN
SURROUND
SUBWOOFER
CENTER FRONT SURROUND
PONENT OUT
VIDEO OUT
NT OUT
FRONT
SPEAKERS OUT
SPEAKER IMPEDANCE : 3
SURROUND
SUBWOOFER
CENTER FRONT
SURROUND
Front Speaker (R)
Subwoofer
Centre Speaker
Wireless Receiver Module
Surround
Speaker (L)
In Case of HT-D5500
Front Speaker (L)
Surround
Speaker (R)
* Refer to page 18 for the speakers of HT-D5530/HT-D5550.
Black
Red
FM ANT
WIRELESS
VID
E
AUX IN
COMPONENT OU
T
FM ANT
V
ID
E
AUX
IN
COMPONENT OU
T
TX card
HT-D5500_ELS_0314.indd 20HT-D5500_ELS_0314.indd 20 2011-03-14 7:41:182011-03-14 7:41:18
Seite laden ...
Seite laden ...
Seite laden ...
Seite laden ...
Seite laden ...
Seite laden ...
Seite laden ...
Seite laden ...
Seite laden ...
Seite laden ...
Seite laden ...

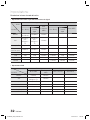
32 English
Setup
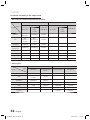
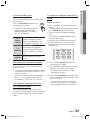
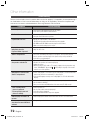
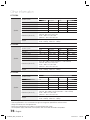
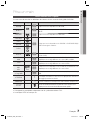
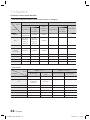
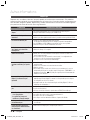
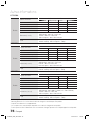
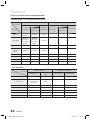
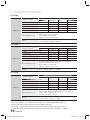
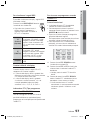
Resolution according to the output mode
Blu-ray Disc/E-contents/Digital Contents playback
Output
Setup
HDMI / connected HDMI / not connected
HDMI Mode
Component/
VIDEO Mode
Component Mode
VIDEO Mode
Blu-ray Disc
E-contents/
Digital
contents
Blu-ray Disc
E-contents/
Digital
contents
BD Wise
Resolution of
Blu-ray Disc
1080p@60F 576i/480i - - -
Auto
Max.
Resolution of
TV input
Max.
Resolution of
TV input
576i/480i - - -
1080p@60F 1080p@60F 1080p@60F 576i/480i - - -
Movie Frame :
Auto (24Fs)
1080p@24F 1080p@24F 576i/480i - - -
1080i 1080i 1080i 576i/480i 576i/480i 1080i 576i/480i
720p 720p 720p 576i/480i 576i/480i 720p 576i/480i
576p/480p 576p/480p 576p/480p 576i/480i 576i/480i 576p/480p 576i/480i
576i/480i - - - 576i/480i 576i/480i 576i/480i
DVD playback
Output
Setup
HDMI / connected HDMI / not connected
HDMI Mode
Component/VIDEO
Mode
Component Mode VIDEO Mode
BD Wise 576i/480i 576i/480i - -
Auto
Max. Resolution of
TV input
576i/480i - -
1080p@60F 1080p@60F 576i/480i - -
1080i 1080i 576i/480i 576p/480p 576i/480i
720p 720p 576i/480i 576p/480p 576i/480i
576p/480p 576p/480p 576i/480i 576p/480p 576i/480i
576i/480i - - 576i/480i 576i/480i
•
•
HT-D5500_ELS_0314.indd 32HT-D5500_ELS_0314.indd 32 2011-03-14 7:41:342011-03-14 7:41:34
Seite laden ...

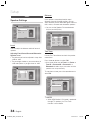
34 English
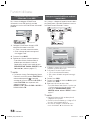
Setup
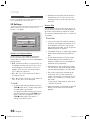
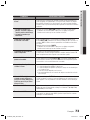
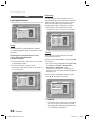
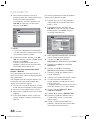
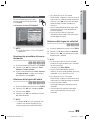
Distance
If the speakers cannot be placed at equal
distances from the listening position, you can
adjust the delay time of the audio signals from the
front, centre, surround and subwoofer speakers.
You can set the Speaker Distance between
1ft(0.3m) and 30ft(9.2m).
Settings
Display
Audio
Network
System
Language
Security
General
Support
Distance
>
Move
<
Change
'
Return
Front L
◄
10(ft) 3.0(m) |
Front R : 10(ft) 3.0(m)
Center : 10(ft) 3.0(m)
Surround L : 10(ft) 3.0(m)
Surround R : 10(ft) 3.0(m)
Subwoofer : 10(ft) 3.0(m)
Test Tone : Off
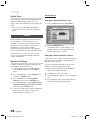
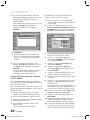
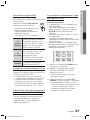
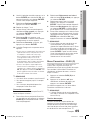
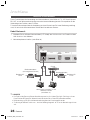
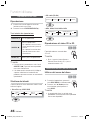
Test Tone
Use the Test Tone feature to check the speaker
connections.
Press the ◄, ► buttons to select ON.
A test tone will be sent to Front L Center
Front R Surround R Surround L
Subwoofer in order so you can make sure the
speakers are set up correctly.
To stop the test tone, press the ◄, ► buttons to
select Off.
Settings
Display
Audio
Network
System
Language
Security
General
Support
Speaker Settings
>
Move
"
Enter
'
Return
Level
Distance
Test Tone
◄
On
|
NOTE
When HDMI Audio is ON (audio is produced
through TV speakers), the Test Tone
function is not available.
•
•
✎
Audio
Speaker Settings
Settings
Display
Audio
Network
System
Language
Security
General
Support
Speaker Settings
>
Move
"
Enter
'
Return
Level |
Distance
Test Tone : Off
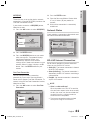
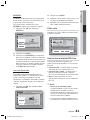
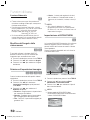
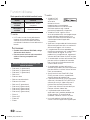
Level
You can adjust the balance and level for each
speaker.
Adjusting Front/Centre/Surround/Subwoofer
Speaker Level
• The volume level can be adjusted in steps from
+6dB to -6dB.
• The sound gets louder as you move closer to
+6dB and quieter as you get closer to -6dB.
Settings
Display
Audio
Network
System
Language
Security
General
Support
Level
>
Move
<
Change
'
Return
Front L
◄
0 dB |
Front R :
0 dB
Center :
0 dB
Surround L : 0 dB
Surround R :
0 dB
Subwoofer :
0 dB
Test Tone :
Off
HT-D5500_ELS_0314.indd 34HT-D5500_ELS_0314.indd 34 2011-03-14 7:41:352011-03-14 7:41:35
Seite laden ...
Seite laden ...
Seite laden ...
Seite laden ...
Seite laden ...
Seite laden ...
Seite laden ...
Seite laden ...
Seite laden ...
Seite laden ...
Seite laden ...
Seite laden ...
Seite laden ...
Seite laden ...
Seite laden ...
Seite laden ...
Seite laden ...
Seite laden ...

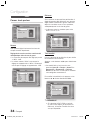
English 53
04 Basic Functions
TRACK 002
03:56
TRACK 004
04:02
TRACK 006
03:40
TRACK 008
03:52
1/2 Page
Audio CD | Music
Close Edit Mode
( )
Page Tools
"
Select
'
Return
TRACK 001
00:43
TRACK 003
04:41
TRACK 005
03:43
TRACK 007
04:06
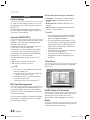
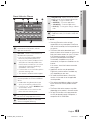
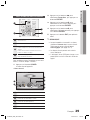
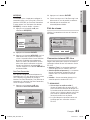
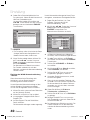
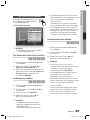
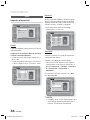
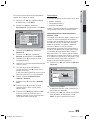
Selected Items : 3
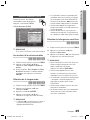
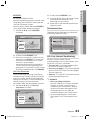
Select a desired track and press the TOOLS
button.
To play the selected track(s), select Play
Selected in the Tools menu and press
ENTER.
+
00:13 / 00:43
TRACK 001
Audio CD
"
Enter Tools
'
Return
TRACK 001
00:43
TRACK 002
03:56
TRACK 003
04:41
1/3
Music
To return to the Edit Mode, press STOP or
RETURN.
To exit Edit Mode, press the YELLOW(C)
button.
NOTE
You can create a playlist with up to 99 tracks
on Audio CD (CD-DA).
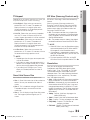
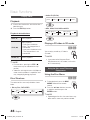
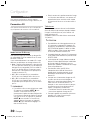
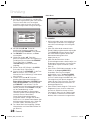
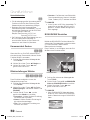
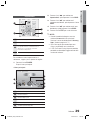
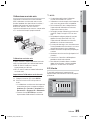
Sound Mode
DSP(Digital Signal Processor) Function
You can select mode to optimize the sound for
sound based on your tastes.
Press the DSP button.
SMART SOUND MP3 ENHANCER
POWER BASS VIRTUAL 7.1
USER EQ DSPOFF
5.
6.
7.
8.
✎
• SMART SOUND : This will regulate and
stabilize the volume level against a drastic
volume change when changing channels or
during a scene transition.
• MP3 ENHANCER : This also helps enhance
your sound experience (ex. mp3 music). You
can upscale your MP3 level sound(24 kHz,
8bit) to CD level sound(44.1 kHz, 16bit).
• POWER BASS : This function stresses low
tones providing thudding sound effects.
• VIRTUAL 7.1 : Applies the 7.1 CH sound
effect using the 5.1 CH speaker system.
• USER EQ : You can confi gure the equalizer
settings manually to your preference.
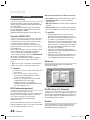
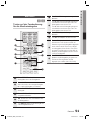
SFE(Sound Field Effect) MODE
You can set the SFE mode best suited
for the type of music you are listening
to.
Press the SFE MODE button.
Symphony
Hall in Boston
(Hall 1)
Provides a clear vocal as if
listening in a concert hall.
Phillharmonic
Hall in
Bratislava
(Hall 2)
Provides also a clear vocal as if
listening in a concert hall but,
less powerful than HALL1.
Jazz Club in
Seoul B
Recommended setting for Jazz.
Church in
Seoul
Gives the feel of being in a
grand church.
Amphitheater
(Rock)
Recommended setting for
Rock.
Off
Select this for normal listening.
DSP
SFE MODE
HT-D5500_ELS_0314.indd 53HT-D5500_ELS_0314.indd 53 2011-03-14 7:41:592011-03-14 7:41:59
Seite laden ...
Seite laden ...
Seite laden ...
Seite laden ...
Seite laden ...
Seite laden ...
Seite laden ...
Seite laden ...
Seite laden ...
Seite laden ...

64 English
Network Services
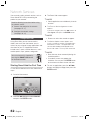
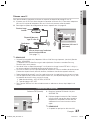
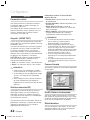
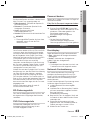
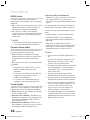
Using the Keypad
Through your remote, you can use the On-
Screen Keypad to enter letters, numbers, and
symbols.
. , –
abc def
123
ghi jkl mno
456
pqrs tuv wxyz
789
Shift Delete
0
b
Input Method
/
Language: English
T9
ab Ab AB 1
1
4 5
2
6
3
1
The current keypad.
Use to enter letters, numbers, and symbols.
2
Press the FULL SCREEN button on the remote
control to shift the input mode.
: ab, Ab, AB, numbers or icons.
3
Displays the current input mode.
4
Press the GREEN (B) button on the remote
control to change the input method. (T9 or ABC)
5
Press the TOOLS button on the remote control
to change the language.
6
Press the REPEAT button on the remote control
to delete a character.
Entering Text, Numbers and Symbols
To enter text, press the number button on the
remote that corresponds to the letter you want to
enter. Press the button rapidly to enter a letter
that is not the fi rst letter listed on the On-Screen
keypad button. For example, if you want to enter
the letter b, press the 2 button on your remote
rapidly twice. To enter the fi rst letter listed on a
button, press, release, and then wait.
To move within the text, use the Arrow buttons.
To delete text, move the cursor to the right of the
character you want to delete, and then press the
REPEAT button. To change case or enter
numbers or punctuation, press the FULL
SCREEN button.
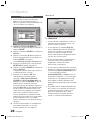
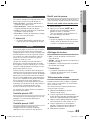
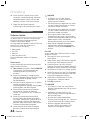
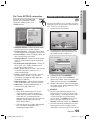
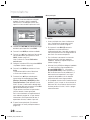
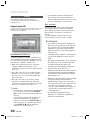
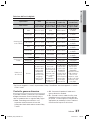
Creating an Account
To establish your own, exclusive, confi guration of
Smart Hub, create your own Smart TV Account.
To create an account, follow these steps:
Press the RED (A) button on your remote
control. The Login screen appears.
xxxxxxxx
Contents 1
xxxxxxxx
Contents 6
xxxxxxxx
Contents 5
xxxxxxxx
Contents 4
xxxxxxxx
Contents 3
xxxxxxxx
Contents 2
xxxxxxxx
Contents 7
xxxxxxxx
Contents 8
xxxxxxxx
Contents 9
xxxxxxxx
Contents 10
xxxxxxxx
Contents 11
xxxxxxxx
Contents 12
xxxxxxxx
Contents 1
xxxxxxxx
Contents 2
xxxxxxxx
Contents 3
xxxxxxxx
Contents 4
xxxxxxxx
Contents 5
Contents 1 Contents 2 Contents 3 Contents 4
a
Login
b
Sort by
Edit Mode
d
Settings
Search
Your Video
Recommended
Samsung Apps
Login
Login Cancel
Create Account Find Password
Remember Smart TV Account Password
%
Smart TV ID
Password
Press [ENTER]
Press [ENTER]
Press the ▲▼◄► buttons to select Smart
TV ID, and then press the ENTER button.
On the next screen, select Smart TV
Account, and then press the ENTER
button. An entry screen and keypad appear.
Use the keypad to enter your e-mail
address. This will serve as your ID.
NOTE
The keypad works like the keypad on a cell
phone.
When done, press the ENTER button to
select OK, and then press the ENTER
button again. The Create Account screen re-
appears.
Select Password, and then press the
ENTER button. The Password screen and a
keypad appear.
Use the keypad to enter a password.
The password can be any combination of
letters, numbers, and symbols.
NOTE
Press the RED (A) button on your remote to
show or hide the password as you enter it.
1.
2.
3.
4.
✎
5.
6.
7.
✎
HT-D5500_ELS_0314.indd 64HT-D5500_ELS_0314.indd 64 2011-03-14 7:42:212011-03-14 7:42:21
Seite laden ...
Seite laden ...
Seite laden ...
Seite laden ...
Seite laden ...
Seite laden ...
Seite laden ...
Seite laden ...
Seite laden ...
Seite laden ...

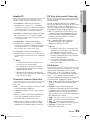
English 75
06 Other information
Specifi cations
General
Weight 3.5 kg
Dimensions 429.3 (W) x 58.4 (H) x 325.1 (D) mm
Operating Temperature Range +5°C to +35°C
Operating Humidity Range 10 % to 75 %
FM Tuner
Signal/noise ratio
55 dB
Usable sensitivity 12 dB
Total harmonic distortion
0.5 %
Disc
BD (Blu-ray Disc) Reading Speed : 9.834 m/sec
DVD (Digital Versatile Disc)
Reading Speed : 6.98 ~ 7.68 m/sec.
Approx. Play Time (Single Sided, Single Layer Disc) : 135 min.
CD : 12cm (COMPACT DISC)
Reading Speed : 4.8 ~ 5.6 m/sec.
Maximum Play Time : 74 min.
CD : 8cm (COMPACT DISC)
Reading Speed : 4.8 ~ 5.6 m/sec.
Maximum Play Time : 20 min.
Video Output
Composite Video
1 channel : 1.0 Vp-p (75 Ω load)
Blu-ray Disc : 576i/480i DVD : 576i/480i
Component Video
Y : 1.0 Vp-p (75 Ω load)
Pr : 0.70 Vp-p (75 Ω load)
Pb : 0.70 Vp-p (75 Ω load)
BD : 576i/480i
DVD : 576p/480p, 576i/480i
Video/Audio
HDMI
1080p, 1080i, 720p, 576p/480p
PCM multichannel audio, Bitstream audio, PCM audio
Amplifier
Front speaker output 165W x 2(3
Ω
)
Centre speaker output 170W(3
Ω
)
Surround speaker output 165W x 2(3
Ω
)
Subwoofer speaker output 170W(3
Ω
)
Frequency response
Analogue input 20Hz~20kHz (±3dB)
Digital input 20Hz~40kHz (±-4dB)
S/N Ratio 70dB
Channel separation 60dB
Input sensitivity (AUX)500mV
HT-D5500_ELS_0314.indd 75HT-D5500_ELS_0314.indd 75 2011-03-14 7:42:252011-03-14 7:42:25
Seite laden ...

Area Contact Centre
Web Site
`
North America
Canada 1-800-SAMSUNG (726-7864) www.samsung.com
Mexico 01-800-SAMSUNG (726-7864) www.samsung.com
U.S.A 1-800-SAMSUNG (726-7864) www.samsung.com
`
Latin America
Argentine 0800-333-3733 www.samsung.com
Brazil 0800-124-421 / 4004-0000 www.samsung.com
Chile 800-SAMSUNG (726-7864) www.samsung.com
Colombia 01-8000112112 www.samsung.com
Costa Rica 0-800-507-7267 www.samsung.com
Dominica 1-800-751-2676 www.samsung.com
Ecuador 1-800-10-7267 www.samsung.com
El Salvador 800-6225 www.samsung.com
Guatemala 1-800-299-0013 www.samsung.com
Honduras 800-7919267 www.samsung.com
Jamaica 1-800-234-7267 www.samsung.com
Nicaragua 00-1800-5077267 www.samsung.com
Panama 800-7267 www.samsung.com
Peru 0-800-777-08 www.samsung.com
Puerto Rico 1-800-682-3180 www.samsung.com
Trinidad &
Tobago
1-800-SAMSUNG (726-7864) www.samsung.com
Venezuela 0-800-100-5303 www.samsung.com
`
Europe
Albania 42 27 5755 -
Austria
0810 - SAMSUNG (7267864,
€ 0.07/min)
www.samsung.com
Belgium 02-201-24-18
www.samsung.com/
be (Dutch)
www.samsung.com/
be_fr (French)
Bosnia 05 133 1999 -
Bulgaria 07001 33 11 www.samsung.com
Croatia 062 SAMSUNG (062 726 7864) www.samsung.com
Czech
800-SAMSUNG (800-726786)
www.samsung.com
Samsung Zrt., česká organizační
složka, Oasis Florenc, Soko-
lovská394/17, 180 00, Praha 8
Denmark 70 70 19 70 www.samsung.com
Finland 030 - 6227 515 www.samsung.com
France 01 48 63 00 00 www.samsung.com
Germany
01805 - SAMSUNG (726-7864
€ 0,14/Min)
www.samsung.com
Hungary 06-80-SAMSUNG (726-7864) www.samsung.com
Italia 800-SAMSUNG (726-7864) www.samsung.com
Kosovo +381 0113216899 -
Luxemburg 261 03 710 www.samsung.com
Macedonia 023 207 777 -
Montenegro 020 405 888 -
Netherlands
0900-SAMSUNG
(0900-7267864) (€ 0,10/Min)
www.samsung.com
Norway 815-56 480 www.samsung.com
Poland
0 801 1SAMSUNG (172678)
/ 022-607-93-33
www.samsung.com
Portugal 80820-SAMSUNG (726-7864) www.samsung.com
Rumania
1. 08010 SAMSUNG (72678) -
doar din reţeaua Romtelecom,
tarif local
2. 021.206.01.10 - din orice
reţea, tarif normal
www.samsung.com
Area Contact Centre
Web Site
Serbia
0700 Samsung (0700 726
7864)
www.samsung.com
Slovakia 0800-SAMSUNG (726-7864) www.samsung.com
Spain 902-1-SAMSUNG (902 172 678) www.samsung.com
Sweden 0771 726 7864 (SAMSUNG) www.samsung.com
Switzerland
0848-SAMSUNG (7267864,
CHF 0.08/min)
www.samsung.com/ch
www.samsung.com/
ch_fr/(French)
U.K 0330 SAMSUNG (7267864) www.samsung.com
Eire 0818 717100 www.samsung.com
Lithuania 8-800-77777 www.samsung.com
Latvia 8000-7267 www.samsung.com
Estonia 800-7267 www.samsung.com
`
CIS
Russia 8-800-555-55-55 www.samsung.com
Georgia 8-800-555-555 -
Armenia 0-800-05-555 -
Azerbaijan 088-55-55-555 -
Kazakhstan
8-10-800-500-55-500
(GSM: 7799)
www.samsung.com
Uzbekistan 8-10-800-500-55-500 www.samsung.com
Kyrgyzstan 00-800-500-55-500 www.samsung.com
Tadjikistan 8-10-800-500-55-500 www.samsung.com
Ukraine 0-800-502-000
www.samsung.ua
www.samsung.com/
ua_ru
Belarus 810-800-500-55-500 -
Moldova 00-800-500-55-500 -
`
Asia Pacifi c
Australia 1300 362 603 www.samsung.com
New Zealand
0800 SAMSUNG (0800 726 786)
www.samsung.com
China
400-810-5858 / 010-6475 1880
www.samsung.com
Hong Kong (852) 3698 4698
www.samsung.com/hk
www.samsung.com/
hk_en/
India
3030 8282 / 1800 110011 /
1800 3000 8282 / 1800 266 8282
www.samsung.com
Indonesia
0800-112-8888 /
021-5699-7777
www.samsung.com
Japan 0120-327-527 www.samsung.com
Malaysia 1800-88-9999 www.samsung.com
Philippines
1-800-10-SAMSUNG(726-7864) /
1-800-3-SAMSUNG(726-7864) /
1-800-8-SAMSUNG(726-7864) /
02-5805777
www.samsung.com
Singapore 1800-SAMSUNG (726-7864) www.samsung.com
Thailand 1800-29-3232 / 02-689-3232 www.samsung.com
Taiwan 0800-329-999 www.samsung.com
Vietnam 1 800 588 889 www.samsung.com
`
Middle East
Bahrain 8000-4726 www.samsung.com
Egypt 08000-726786 www.samsung.com
Jordan 800-22273 www.samsung.com
Morocco 080 100 2255 www.samsung.com
Oman 800-SAMSUNG (726-7864) www.samsung.com
Saudi Arabia 9200-21230 www.samsung.com
Turkey 444 77 11 www.samsung.com
U.A.E 800-SAMSUNG (726-7864) www.samsung.com
`
Africa
Nigeria 0800-SAMSUNG (726-7864) www.samsung.com
South Africa 0860-SAMSUNG (726-7864 ) www.samsung.com
Contact SAMSUNG WORLD WIDE
If you have any questions or comments relating to Samsung products, please contact the SAMSUNG
customer care centre.
HT-D5500_ELS_0314.indd 77HT-D5500_ELS_0314.indd 77 2011-03-14 7:42:262011-03-14 7:42:26
Seite laden ...
Seite laden ...

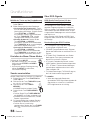
2 Français
Consignes de sécurité
Avertissements de sécurité
POUR RÉDUIRE LES RISQUES D’ÉLECTROCUTION, NE RETIREZ JAMAIS LE CAPOT (NI L’ARRIÈRE).
LES PIÈCES DE CE PRODUIT NE SONT PAS RÉPARABLES PAR L’UTILISATEUR. VEUILLEZ CONTACTER UN
TECHNICIEN QUALIFIÉ POUR TOUTE RÉPARATION.
ATTENTION
RISQUE D’ÉLECTROCUTION
NE PAS OUVRIR
Ce symbole indique la présence d’une
tension dangereuse dans l’appareil,
présentant un risque d’électrocution ou
de blessures.
ATTENTION :
POUR ÉVITER TOUT
RISQUE D’ÉLECTROCUTION, LA BROCHE
LA PLUS LARGE DE LA FICHE DOIT ÊTRE
TOTALEMENT INSÉRÉE DANS LE TROU
PLUS LARGE.
Ce symbole indique les directives
importantes qui accompagnent le
produit.
AVERTISSEMENT
Afi n de réduire tout risque d’incendie ou
d’électrocution, n’exposez jamais cet appareil
à la pluie ou à l’humidité.
ATTENTION
Évitez toute projection d’eau sur l’appareil et ne posez
jamais d’objet contenant un liquide dessus (ex : un vase).
La fi che permet de débrancher l’appareil et doit toujours
être facilement accessible.
Cet appareil doit toujours être branché à une prise de
courant alternatif reliée à la terre.
Pour débrancher l'appareil, il convient de retirer la fi che de
la prise murale, il faut donc que cette dernière soit
facilement accessible.
•
•
•
•
•
CLASS 1 LASER PRODUCT
KLASSE 1 LASER PRODUKT
LUOKAN 1 LASER LAITE
KLASS 1 LASER APPARAT
PRODUCTO LÁSER CLASE 1
PRODUIT LASER DE CLASSE 1
Le lecteur de disque compact est homologué
comme produit LASER DE CLASSE 1.
L'utilisation des commandes, les réglages ou
l'exécution de procédures autres que celles
spécifi ées ci-dessus peuvent conduire à une
exposition à des radiations dangereuses.
ATTENTION
DES RAYONS LASER INVISIBLES SONT PRÉSENTS
LORSQUE L'APPAREIL EST OUVERT OU QUE LES
DISPOSITIFS DE VERROUILLAGE SONT CIRCONVENUS.
ÉVITEZ L'EXPOSITION AUX RAYONS.
•
HT-D5500_FRA_0314.indd 2HT-D5500_FRA_0314.indd 2 2011-03-14 7:42:512011-03-14 7:42:51
Seite laden ...
Seite laden ...
Seite laden ...
Seite laden ...
Seite laden ...
Seite laden ...
Seite laden ...

10 Français
Prise en main
Format du disque
Utilisation d'un disque JPEG
Les CD-R/-RW, DVD-RW/-R enregistrés au format UDF ou JOLIET peuvent être lus.
Seuls les fi chiers ayant les extensions « .jpg », « .JPG », « .jpeg » ou « JPEG » peuvent être affi chés.
Le JPEG progressif est pris en charge.
DVD-RW/-R (V)
Il s’agit d’un format utilisé pour l’enregistrement de données sur un disque DVD-RW ou DVD-R ; une
fois fi nalisé, le disque peut être lu par l'appareil.
Si un disque a été enregistré en mode Video (Vidéo) par un enregistreur d’un autre fabricant mais n’a
pas été fi nalisé, il ne pourra pas être lu par cet appareil.
•
•
•
•
•
Formats de fi chiers pris en charge
Prise en charge des fi chiers vidéo
Extension de fichier
Conteneur Codec vidéo Codec audio Résolution
*.avi
AVI
DivX 3.11/4.x/5.1/6.0
MP3
AC3
LPCM
ADPCM
Noyau DTS
1920x1080
XviD
1920x1080
H.264 BP/MP/HP
1920x1080
MPEG4 SP/ASP
1920x1080
Motion JPEG
1920x1080
*.mkv
MKV
DivX 3.11/4.x/5.1/6.0
MP3
AC3
LPCM
ADPCM
Noyau DTS
1920x1080
XviD
1920x1080
H.264 BP/MP/HP
1920x1080
MPEG4 SP/ASP
1920x1080
Motion JPEG
1920x1080
*.asf
ASF
DivX 3.11/4.x/5.1/6.0
MP3
AC3
LPCM
ADPCM
WMA
1920x1080
XviD
1920x1080
H.264 BP/MP/HP
1920x1080
MPEG4 SP/ASP
1920x1080
Motion JPEG
1920x1080
*.wmv
ASF Window Media Video v9
WMA 1920x1080
*.mp4
MP4
H.264 BP/MP/HP
MP3
ADPCM
AAC
1920x1080
MPEG4 SP/ASP
1920x1080
XVID
1920x1080
*.3gp
3GPP
H.264 BP/MP/HP
ADPCM
AAC
HE-AAC
1920x1080
MPEG4 SP/ASP
1920x1080
HT-D5500_FRA_0314.indd 10HT-D5500_FRA_0314.indd 10 2011-03-14 7:42:562011-03-14 7:42:56
Seite laden ...
Seite laden ...
Seite laden ...

14 Français
Prise en main
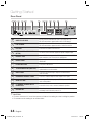
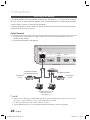
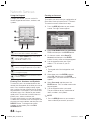
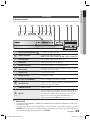
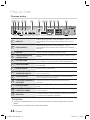
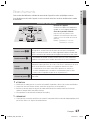
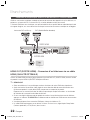
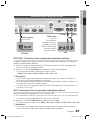
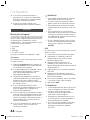
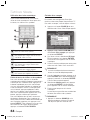
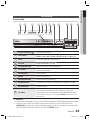
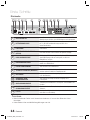
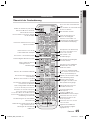
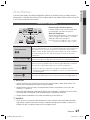
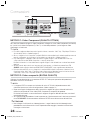
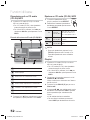
Panneau arrière
FRONT
SPEAKERS OUT
SPEAKER IMPEDANCE : 3
FM ANT
WIRELESS
VIDEO OUTAUX IN
SURROUND
SUBWOOFER
CENTER FRONT
SURROUND
COMPONENT OUT
iPod HDMI OUT
DIGITAL
AUDIO IN
OPTICAL
HDMI IN
LAN
WIRELESS LAN
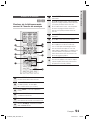
2 3 4 5 6 7 8 9
10 11 12 13
1
1
BORNE LAN
Permet d'accéder aux services réseau (voir pages 62~71), à la
fonctionnalité BD-LIVE et aux mises à niveau logicielles via la connexion
réseau.
2
PRISE LAN SANS FIL
Permet d'accéder aux services réseau (voir pages 62~71), à la
fonctionnalité BD-LIVE et aux mises à niveau logicielles via un adaptateur
LAN sans fi l.
3
PRISE iPod
Permet de connecter la station d'accueil dock de l'iPod.
4
PRISE EXTERNE ENTRÉE AUDIO
NUMÉRIQUE (OPTIQUE)
Permet de connecter un équipement externe capable d’émettre une sortie
numérique.
5
PRISE SORTIE HDMI
À l'aide du câble HDMI, reliez cette borne de sortie HDMI à la borne
d'entrée HDMI du téléviseur pour obtenir une qualité d'image optimale.
6
PRISES ENTRÉE HDMI
Reçoivent les signaux vidéo et audio numériques simultanément au moyen
d’un câble HDMI.
7
PRISE ANTENNE FM
Permet de connecter l'antenne FM.
8
CONNEXION DE CARTE DE
TRANSMISSION (SANS FIL)
La carte de transmission autorise la communication entre le produit et le
module récepteur sans fi l.
9
PRISES ENTRÉE AUX
Permettent la connexion à la sortie analogique 2 canaux d'un appareil
externe (un magnétoscope par exemple).
10
PRISES SORTIE COMPOSANTE et
SORTIE VIDÉO
Permettent la connexion d’un téléviseur muni d’entrées vidéo en
composante.
11
PRISE SORTIE VIDÉO
Reliez la prise ENTRÉE VIDÉO du téléviseur à la prise SORTIE VIDÉO de ce
produit.
12
CONNECTEURS DE SORTIE
D'ENCEINTE 5,1 CANAUX
Permettent de connecter les enceintes avant, centrale, ambiophoniques et
le caisson de graves.
13
VENTILATEUR
Le ventilateur fournit de l’air frais au produit pour empêcher sa surchauffe
et s’active dès que l’alimentation est branchée.
ATTENTION
Prévoyez un espace libre de 10 cm au minimum tout autour du ventilateur lorsque vous installez le
produit.
N'obstruez pas le ventilateur ou les orifi ces de ventilation.
!
HT-D5500_FRA_0314.indd 14HT-D5500_FRA_0314.indd 14 2011-03-14 7:42:582011-03-14 7:42:58
Seite laden ...

16 Français
Prise en main
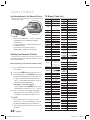
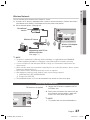
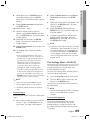
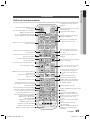
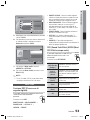
Installation des piles dans la télécommande
REMARQUE
Assurez-vous que la position des extrémités «
+ » et « – » des piles correspond à la position
illustrée dans le compartiment.
Pour une utilisation normale du téléviseur, les
piles devraient durer environ un an.
La portée de la télécommande est d'environ 7
mètres en ligne droite.
Réglage de la télécommande
Vous pouvez contrôler certaines fonctions de
votre téléviseur à l’aide de cette télécommande.
Pour contrôler un téléviseur à l’aide de la
télécommande
Appuyez sur la touche TV pour régler la
télécommande sur le mode TV.
Appuyez sur la touche de MARCHE/ARRÊT
pour allumer le téléviseur.
Tout en maintenant la touche MARCHE/
ARRÊT enfoncée, saisissez le code
correspondant à la marque de votre téléviseur.
Si plusieurs codes correspondant à votre
téléviseur fi gurent dans le tableau,
saisissez-les les uns après les autres pour
trouver le code approprié.
Exemple : Pour un téléviseur Samsung
Tout en maintenant le bouton MARCHE/ARRÊT
enfoncé, utilisez les touches numériques pour
entrer 00, 15, 16, 17 et 40.
Si le téléviseur s’éteint, cela signifi e que le
réglage est terminé.
Vous pouvez utiliser les touches MARCHE/
ARRÊT TV, VOLUME, CHAÎNE, ainsi que
les touches numériques (0 à 9).
REMARQUE
Il est possible que la télécommande ne
fonctionne pas avec certaines marques de
téléviseur. Il se peut également que certaines
fonctions ne soient pas disponibles en fonction
de la marque de votre téléviseur.
Par défaut, la télécommande fonctionne avec les
téléviseurs Samsung.
✎
1.
2.
3.
•
•
4.
•
✎
Liste des codes par marque de téléviseur
* Type de piles : AAA
Marque Code
Admiral
(M.Wards)
56, 57, 58
A Mark
01, 15
Anam
01, 02, 03, 04, 05,
06, 07, 08, 09, 10,
11, 12, 13, 14
AOC
01, 18, 40, 48
Bell &
Howell
(M.Wards)
57, 58, 81
Brocsonic
59, 60
Candle
18
Cetronic
03
Citizen
03, 18, 25
Cinema
97
Classic
03
Concerto
18
Contec
46
Coronado
15
Craig
03, 05, 61, 82, 83, 84
Croslex
62
Crown
03
Curtis
Mates
59, 61, 63
CXC
03
Daewoo
02, 03, 04, 15, 16,
17, 18, 19, 20, 21,
22, 23, 24, 25, 26,
27, 28, 29, 30, 32,
34, 35, 36, 48, 59, 90
Daytron
40
Dynasty
03
Emerson
03, 15, 40, 46, 59, 61,
64, 82, 83, 84, 85
Fisher
19, 65
Funai
03
Futuretech
03
General
Electric (GE)
06, 40, 56, 59,
66, 67, 68
Hall Mark
40
Hitachi
15, 18, 50, 59, 69
Inkel
45
JC Penny
56, 59, 67, 86
JVC
70
KTV
59, 61, 87, 88
KEC
03, 15, 40
KMC
15
LG
(Goldstar)
01, 15, 16, 17, 37, 38,
39, 40, 41, 42, 43, 44
Luxman
18
LXI
(Sears)
19, 54, 56, 59,
60, 62, 63, 65, 71
Magnavox
15, 17, 18, 48, 54,
59, 60, 62, 72, 89
Marantz
40, 54
Matsui
54
MGA
18, 40
Marque Code
Mitsubishi/
MGA
18, 40, 59, 60, 75
MTC
18
NEC
18, 19, 20, 40, 59, 60
Nikei
03
Onking
03
Onwa
03
Panasonic
06, 07, 08, 09, 54,
66, 67, 73, 74
Penney
18
Philco
03, 15, 17, 18, 48,
54, 59, 62, 69, 90
Philips
15, 17, 18, 40,
48, 54, 62, 72
Pioneer
63, 66, 80, 91
Portland
15, 18, 59
Proton
40
Quasar
06, 66, 67
Radio
Shack
17, 48, 56, 60,
61, 75
RCA/
Proscan
18, 59, 67, 76, 77,
78, 92, 93, 94
Realistic
03, 19
Sampo
40
Samsung
00, 15, 16, 17, 40,
43, 46, 47, 48, 49,
59, 60, 98
Sanyo
19, 61, 65
Scott
03, 40, 60, 61
Sears
15, 18, 19
Sharp
15, 57, 64
Signature
2000
(M.Wards)
57, 58
Sony
50, 51, 52, 53, 55
Soundesign
03, 40
Spectricon
01
SSS
18
Sylvania
18, 40, 48, 54,
59, 60, 62
Symphonic
61, 95, 96
Tatung
06
Techwood
18
Teknika
03, 15, 18, 25
TMK
18, 40
Toshiba
19, 57, 63, 71
Vidtech
18
Videch
59, 60, 69
Wards
15, 17, 18, 40,
48, 54, 60, 64
Yamaha
18
York
40
Yupiteru
03
Zenith
58, 79
Zonda
01
Dongyang
03, 54
HT-D5500_FRA_0314.indd 16HT-D5500_FRA_0314.indd 16 2011-03-14 7:43:002011-03-14 7:43:00
Seite laden ...

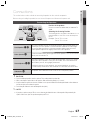
18 Français
Branchements
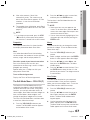
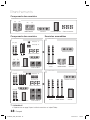
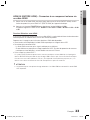
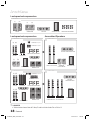
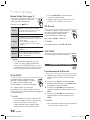
Composants des enceintes
Composants des enceintes Enceintes assemblées
(G) (D)
CENTRALE
BASE DU SOCLE
CAISSON DE GRAVES
HT-D5530
HT-D5530
REMARQUE
Reportez-vous en page 19 pour installer les enceintes sur le pied Tallboy.
✎
CÂBLE D’ENCEINTE
AMBIOPHONIQUE
(G) (D)
HT-D5500
(G)
(G) (D)
(D)
HT-D5550
HT-D5550
(G) (D)
(G) (D)
AVANT
AMBIOPHONIQUE
CENTRALE
CAISSON DE GRAVES
CÂBLE D’ENCEINTE
AVANT
SOCLE
VIS (5X15) : X2
VIS (4
X20) : X8
AVANT
SOCLE
AMBIOPHONIQUE
CAISSON DE GRAVES
BASE DU SOCLE
CENTRALE
VIS (5X15) : X4
VIS (4X20) : X16
CÂBLE D’ENCEINTE
ENCEINTE CENTRALE
ENCEINTE
AMBIOPHONIQUE
CAISSON DE
GRAVES
ENCEINTE
AVANT
ENCEINTE CENTRALE
ENCEINTE
AMBIOPHONIQUE
CAISSON DE
GRAVES
ENCEINTE
AVANT
HT-D5500_FRA_0314.indd 18HT-D5500_FRA_0314.indd 18 2011-03-14 7:43:012011-03-14 7:43:01
Seite laden ...

20 Français
Branchements
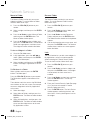
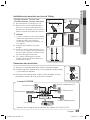
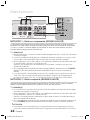
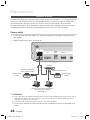
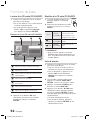
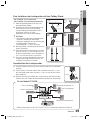
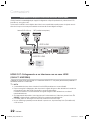
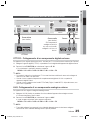
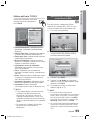
Connexion du module récepteur sans fi l proposé en option
Pour raccorder les enceintes ambiophoniques sans fi l, vous devez vous procurer le module récepteur
sans fi l et la carte émettrice auprès de votre revendeur Samsung.
Ce produit devrait être uniquement connecté au système SWA-5000.
Module récepteur sans fi l (SWA-5000)
Appuyez sur la languette de la borne située à l’arrière de l'enceinte.
Insérez le fi l noir dans la borne noire (–) et le fi l rouge dans la borne
rouge (+), puis relâchez la languette.
Branchez les fi ches de connexion situées à l’arrière du produit en faisant
concorder les couleurs des fi ches et des prises d’enceinte.
Tandis que le produit est hors tension, insérez la carte émettrice dans le port
de connexion de la carte émettrice (WIRELESS) (SANS FIL) situé à l’arrière
du produit.
Tenez la carte émettrice de façon à ce que l’étiquette
« WIRELESS » soit dirigée vers le haut et insérez la carte dans le
port.
La carte émettrice autorise la communication entre le produit et
le module récepteur sans fi l.
Raccordez les enceintes ambiophoniques gauche et droite au
module récepteur sans fi l.
Branchez le cordon d’alimentation du module récepteur sans fi l
dans la prise murale.
•
1.
2.
3.
4.
•
•
5.
6.
Noir
Rouge
FRONT
SPEAKERS OUT
SPEAKER IMPEDANCE : 3
VIDEO OUTN
SURROUND
SUBWOOFER
CENTER FRONT
SURROUND
PONENT OUT
VIDEO OUT
NT OUT
FRONT
SPEAKERS OUT
SPEAKER IMPEDANCE : 3
SURROUND
SUBWOOFER
CENTER FRONT
SURROUND
Pour le modèle HT-D5500
* Reportez-vous en page 18 pour les enceintes des modèles HT-D5530/HT-D5550.
Enceinte avant (D)
Caisson de graves
Enceinte centrale
Module récepteur sans fil
Enceinte
ambiophonique (G)
Enceinte avant (G)
Enceinte
ambiophonique (D
)
FM ANT
WIRELESS
VID
E
AUX IN
COMPONENT OU
T
FM ANT
V
ID
E
AUX
IN
COMPONENT OU
T
Carte
émettrice
HT-D5500_FRA_0314.indd 20HT-D5500_FRA_0314.indd 20 2011-03-14 7:43:232011-03-14 7:43:23
Seite laden ...
Seite laden ...
Seite laden ...
Seite laden ...
Seite laden ...
Seite laden ...
Seite laden ...
Seite laden ...
Seite laden ...
Seite laden ...
Seite laden ...

32 Français
Confi guration
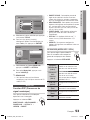
Résolution selon le mode de sortie
Lecture du disque Blu-ray/des e-contenus/des contenus numériques
Sortie
Confi guration
HDMI / connecté HDMI / non connecté
Mode HDMI
Mode
Composante/
VIDÉO
Mode Composante
Mode VIDÉO
Disque Blu-ray
E-content/
Contenus
numériques
Disque Blu-ray
E-content/
Contenus
numériques
BD Wise
Résolution du
disque Blu-ray
1080p/60F 576i/480i - - -
Auto
Résolution
optimale de
l'entrée du
téléviseur
Résolution
optimale de
l'entrée du
téléviseur
576i/480i - - -
1080p/60F 1080p/60F 1080p/60F 576i/480i - - -
Fréquence
cinéma :
Auto (24 ips)
1080p/24F 1080p/24F 576i/480i - - -
1080i 1080i 1080i 576i/480i 576i/480i 1080i 576i/480i
720p 720p 720p 576i/480i 576i/480i 720p 576i/480i
576p/480p 576p/480p 576p/480p 576i/480i 576i/480i 576p/480p 576i/480i
576i/480i - - - 576i/480i 576i/480i 576i/480i
Lecture DVD
Sortie
Confi guration
HDMI / connecté HDMI / non connecté
Mode HDMI
Mode Composante/
VIDÉO
Mode Composante Mode VIDÉO
BD Wise 576i/480i 576i/480i - -
Auto
Résolution optimale
de l'entrée du
téléviseur
576i/480i - -
1080p@60F 1080p/60F 576i/480i - -
1080i 1080i 576i/480i 576p/480p 576i/480i
720p 720p 576i/480i 576p/480p 576i/480i
576p/480p 576p/480p 576i/480i 576p/480p 576i/480i
576i/480i - - 576i/480i 576i/480i
•
•
HT-D5500_FRA_0314.indd 32HT-D5500_FRA_0314.indd 32 2011-03-14 7:43:402011-03-14 7:43:40
Seite laden ...
Seite laden ...
Seite laden ...
Seite laden ...
Seite laden ...
Seite laden ...
Seite laden ...
Seite laden ...
Seite laden ...
Seite laden ...
Seite laden ...
Seite laden ...
Seite laden ...
Seite laden ...
Seite laden ...
Seite laden ...
Seite laden ...
Seite laden ...
Seite laden ...
Seite laden ...
Seite laden ...
Seite laden ...
Seite laden ...
Seite laden ...
Seite laden ...
Seite laden ...
Seite laden ...
Seite laden ...
Seite laden ...
Seite laden ...
Seite laden ...
Seite laden ...
Seite laden ...
Seite laden ...
Seite laden ...
Seite laden ...
Seite laden ...
Seite laden ...
Seite laden ...
Seite laden ...
Seite laden ...
Seite laden ...
Seite laden ...
Seite laden ...
Seite laden ...
Seite laden ...
Seite laden ...
Seite laden ...
Seite laden ...
Seite laden ...
Seite laden ...
Seite laden ...
Seite laden ...
Seite laden ...
Seite laden ...
Seite laden ...
Seite laden ...
Seite laden ...
Seite laden ...
Seite laden ...
Seite laden ...
Seite laden ...
Seite laden ...
Seite laden ...
Seite laden ...
Seite laden ...
Seite laden ...
Seite laden ...
Seite laden ...
Seite laden ...
Seite laden ...
Seite laden ...
Seite laden ...
Seite laden ...
Seite laden ...
Seite laden ...
Seite laden ...
Seite laden ...
Seite laden ...
Seite laden ...
Seite laden ...
Seite laden ...
Seite laden ...
Seite laden ...
Seite laden ...
Seite laden ...
Seite laden ...
Seite laden ...
Seite laden ...
Seite laden ...
Seite laden ...
Seite laden ...
Seite laden ...
Seite laden ...
Seite laden ...
Seite laden ...
Seite laden ...
Seite laden ...
Seite laden ...
Seite laden ...
Seite laden ...
Seite laden ...
Seite laden ...
Seite laden ...
Seite laden ...
Seite laden ...
Seite laden ...
Seite laden ...
Seite laden ...
Seite laden ...
Seite laden ...
Seite laden ...
Seite laden ...
Seite laden ...
Seite laden ...
Seite laden ...
Seite laden ...
Seite laden ...
Seite laden ...
Seite laden ...
Seite laden ...
Seite laden ...
Seite laden ...
Seite laden ...
Seite laden ...
Seite laden ...
Seite laden ...
Seite laden ...
Seite laden ...
Seite laden ...
Seite laden ...
Seite laden ...
Seite laden ...
Seite laden ...
Seite laden ...
Seite laden ...
Seite laden ...
Seite laden ...
Seite laden ...
Seite laden ...
Seite laden ...
Seite laden ...
Seite laden ...
Seite laden ...
Seite laden ...
Seite laden ...
Seite laden ...
Seite laden ...
Seite laden ...
Seite laden ...
Seite laden ...
Seite laden ...
Seite laden ...
Seite laden ...
Seite laden ...
Seite laden ...
Seite laden ...
Seite laden ...
Seite laden ...
Seite laden ...
Seite laden ...
Seite laden ...
Seite laden ...
Seite laden ...
Seite laden ...
Seite laden ...
Seite laden ...
Seite laden ...
Seite laden ...
Seite laden ...
Seite laden ...
Seite laden ...
Seite laden ...
Seite laden ...
Seite laden ...
Seite laden ...
Seite laden ...
Seite laden ...
Seite laden ...
Seite laden ...
Seite laden ...
Seite laden ...
Seite laden ...
Seite laden ...
Seite laden ...
Seite laden ...
Seite laden ...
Seite laden ...
Seite laden ...
Seite laden ...
Seite laden ...
Seite laden ...
Seite laden ...
Seite laden ...
Seite laden ...
Seite laden ...
Seite laden ...
Seite laden ...
Seite laden ...
Seite laden ...
Seite laden ...
Seite laden ...
-
 1
1
-
 2
2
-
 3
3
-
 4
4
-
 5
5
-
 6
6
-
 7
7
-
 8
8
-
 9
9
-
 10
10
-
 11
11
-
 12
12
-
 13
13
-
 14
14
-
 15
15
-
 16
16
-
 17
17
-
 18
18
-
 19
19
-
 20
20
-
 21
21
-
 22
22
-
 23
23
-
 24
24
-
 25
25
-
 26
26
-
 27
27
-
 28
28
-
 29
29
-
 30
30
-
 31
31
-
 32
32
-
 33
33
-
 34
34
-
 35
35
-
 36
36
-
 37
37
-
 38
38
-
 39
39
-
 40
40
-
 41
41
-
 42
42
-
 43
43
-
 44
44
-
 45
45
-
 46
46
-
 47
47
-
 48
48
-
 49
49
-
 50
50
-
 51
51
-
 52
52
-
 53
53
-
 54
54
-
 55
55
-
 56
56
-
 57
57
-
 58
58
-
 59
59
-
 60
60
-
 61
61
-
 62
62
-
 63
63
-
 64
64
-
 65
65
-
 66
66
-
 67
67
-
 68
68
-
 69
69
-
 70
70
-
 71
71
-
 72
72
-
 73
73
-
 74
74
-
 75
75
-
 76
76
-
 77
77
-
 78
78
-
 79
79
-
 80
80
-
 81
81
-
 82
82
-
 83
83
-
 84
84
-
 85
85
-
 86
86
-
 87
87
-
 88
88
-
 89
89
-
 90
90
-
 91
91
-
 92
92
-
 93
93
-
 94
94
-
 95
95
-
 96
96
-
 97
97
-
 98
98
-
 99
99
-
 100
100
-
 101
101
-
 102
102
-
 103
103
-
 104
104
-
 105
105
-
 106
106
-
 107
107
-
 108
108
-
 109
109
-
 110
110
-
 111
111
-
 112
112
-
 113
113
-
 114
114
-
 115
115
-
 116
116
-
 117
117
-
 118
118
-
 119
119
-
 120
120
-
 121
121
-
 122
122
-
 123
123
-
 124
124
-
 125
125
-
 126
126
-
 127
127
-
 128
128
-
 129
129
-
 130
130
-
 131
131
-
 132
132
-
 133
133
-
 134
134
-
 135
135
-
 136
136
-
 137
137
-
 138
138
-
 139
139
-
 140
140
-
 141
141
-
 142
142
-
 143
143
-
 144
144
-
 145
145
-
 146
146
-
 147
147
-
 148
148
-
 149
149
-
 150
150
-
 151
151
-
 152
152
-
 153
153
-
 154
154
-
 155
155
-
 156
156
-
 157
157
-
 158
158
-
 159
159
-
 160
160
-
 161
161
-
 162
162
-
 163
163
-
 164
164
-
 165
165
-
 166
166
-
 167
167
-
 168
168
-
 169
169
-
 170
170
-
 171
171
-
 172
172
-
 173
173
-
 174
174
-
 175
175
-
 176
176
-
 177
177
-
 178
178
-
 179
179
-
 180
180
-
 181
181
-
 182
182
-
 183
183
-
 184
184
-
 185
185
-
 186
186
-
 187
187
-
 188
188
-
 189
189
-
 190
190
-
 191
191
-
 192
192
-
 193
193
-
 194
194
-
 195
195
-
 196
196
-
 197
197
-
 198
198
-
 199
199
-
 200
200
-
 201
201
-
 202
202
-
 203
203
-
 204
204
-
 205
205
-
 206
206
-
 207
207
-
 208
208
-
 209
209
-
 210
210
-
 211
211
-
 212
212
-
 213
213
-
 214
214
-
 215
215
-
 216
216
-
 217
217
-
 218
218
-
 219
219
-
 220
220
-
 221
221
-
 222
222
-
 223
223
-
 224
224
-
 225
225
-
 226
226
-
 227
227
-
 228
228
-
 229
229
-
 230
230
-
 231
231
-
 232
232
-
 233
233
-
 234
234
-
 235
235
-
 236
236
-
 237
237
-
 238
238
-
 239
239
-
 240
240
-
 241
241
-
 242
242
-
 243
243
-
 244
244
-
 245
245
-
 246
246
-
 247
247
-
 248
248
-
 249
249
-
 250
250
-
 251
251
-
 252
252
-
 253
253
-
 254
254
-
 255
255
-
 256
256
-
 257
257
-
 258
258
-
 259
259
-
 260
260
-
 261
261
-
 262
262
-
 263
263
-
 264
264
-
 265
265
-
 266
266
-
 267
267
-
 268
268
-
 269
269
-
 270
270
-
 271
271
-
 272
272
-
 273
273
-
 274
274
-
 275
275
-
 276
276
-
 277
277
-
 278
278
-
 279
279
-
 280
280
-
 281
281
-
 282
282
-
 283
283
-
 284
284
-
 285
285
-
 286
286
-
 287
287
-
 288
288
-
 289
289
-
 290
290
-
 291
291
-
 292
292
-
 293
293
-
 294
294
-
 295
295
-
 296
296
-
 297
297
-
 298
298
-
 299
299
-
 300
300
-
 301
301
-
 302
302
-
 303
303
-
 304
304
-
 305
305
-
 306
306
-
 307
307
-
 308
308
-
 309
309
-
 310
310
-
 311
311
-
 312
312


Samsung HT-D5500 Benutzerhandbuch
- Kategorie
- Blu-Ray-Player
- Typ
- Benutzerhandbuch
in anderen Sprachen
- English: Samsung HT-D5500 User manual
- français: Samsung HT-D5500 Manuel utilisateur
- italiano: Samsung HT-D5500 Manuale utente
Verwandte Papiere
-
Samsung HT-D6759W Benutzerhandbuch
-
-
-
-
-
-
-
-
-
Sonstige Unterlagen
-
Marantz DV-4001 Benutzerhandbuch
-
Sony SRS-GU10iP Bedienungsanleitung
-
Apple ZM034-4948-A Benutzerhandbuch
-
-
-
Trevi IPD 8450 T Benutzerhandbuch
-
Alpine IVE-W560BT-R Bedienungsanleitung
-
Hama 00055749 Bedienungsanleitung
-
Logic3 MIP199K Benutzerhandbuch
-
Saitek iFreedom A-250 wireless speaker Benutzerhandbuch