IMG Stage Line TWIST-252 Bedienungsanleitung
- Kategorie
- Stroboskope
- Typ
- Bedienungsanleitung

BEDIENUNGSANLEITUNG • INSTRUCTION MANUAL • MODE D’EMPLOI
ISTRUZIONI PER L’USO • GEBRUIKSAANWIJZING • MANUAL DE INSTRUCCIONES • INSTRUKCJA OBSŁUGI
SIKKERHEDSOPLYSNINGER • SÄKERHETSFÖRESKRIFTER • TURVALLISUUDESTA
MOVING HEAD
LYRE DMX
TWIST-252 Best.-Nr. 38.1910

2
wwwwww..iimmggssttaaggeelliinnee..ccoomm
Bevor Sie einschalten ...
Wir wünschen Ihnen viel Spaß mit Ihrem neuen Gerät von
„img Stage Line“. Dabei soll Ihnen diese Bedienungsan-
leitung helfen, alle Funktionsmöglichkeiten kennen zu ler-
nen. Die Beachtung der Anleitung vermeidet außerdem
Fehlbedienungen und schützt Sie und Ihr Gerät vor even-
tuellen Schäden durch unsachgemäßen Gebrauch.
Den deutschen Text finden Sie auf den Seiten 4–9.
Before you switch on ...
We wish you much pleasure with your new “img Stage
Line” unit. With these operating instructions you will be
able to get to know all functions of the unit. By following
these instructions false operations will be avoided, and
possible damage to yourself and your unit due to im-
proper use will be prevented.
You will find the English text on the pages 4–9.
D
A
CH
GB
Przed uruchomieniem ...
Życzymy zadowolenia z nowego produktu “img Stage
Line”. Dzięki tej instrukcji obsługi będą Państwo w
stanie poznać wszystkie funkcje tego urządzenia.
Stosując się do instrukcji unikną Państwo błędów i
ewentualnego uszkodzenia urządzenia na skutek nie-
prawidłowego użytkowania.
Tekst polski znajduje się na stronach 22 – 24.
Voordat u inschakelt ...
Wij wensen u veel plezier met uw nieuw toestel van “img
Stage Line”. Met behulp van bijgaande gebruiksaan-
wijzing zal u alle functiemogelijkheden leren kennen.
Door deze instructies op te volgen zal een slechte wer-
king vermeden worden, en zal een eventueel letsel aan
uzelf en schade aan uw toestel tengevolge van onzorg-
vuldig gebruik worden voorkomen.
U vindt de nederlandstalige tekst op de pagina’s 16–21.
PL
B
NL
Antes de cualquier instalación ...
Tenemos de agradecerle el haber adquirido un aparato
“img Stage Line” y le deseamos un agradable uso. Este
manual quiere ayudarle a conocer las multiples facetas
de este aparato. La observación de las instrucciones
evita operaciones erróneas y protege Vd. y vuestro apa-
rato contra todo daño posible por cualquier uso inade-
cuado.
La versión española se encuentra en las páginas 16–21.
Inden De tænder for apparatet ...
Vi ønsker Dem god fornøjelse med Deres nye “img
Stage Line” apparat. Læs oplysningerne for en sikker
brug af apparatet før ibrugtagning. Følg sikkerhedsop-
lysningerne for at undgå forkert betjening og for at be-
skytte Dem og Deres apparat mod skade på grund af for-
kert brug.
Sikkerhedsoplysningerne finder De på side 26.
E
DK
Förskrift
Vi önskar dig mycket nöje med din nya enhet från “img
Stage Line”. Läs gärna säkerhetsinstruktionerna innan
du använder enheten. Genom att följa säkerhetsinstruk-
tionerna kan många problem undvikas, vilket annars kan
skada enheten.
Du finner säkerhetsinstruktionerna på sidan 26.
S FIN
Avant toute mise en service ...
Nous vous remercions d’avoir choisi un appareil “img
Stage Line” et vous souhaitons beaucoup de plaisir à
l’utiliser. Cette notice a pour objectif de vous aider à
mieux connaître les multiples facettes de l’appareil. En
outre, en respectant les conseils donnés, vous éviterez
toute mauvaise manipulation de sorte que vous-même et
votre appareil soient protégés de tout dommage.
La version française se trouve pages 10–15.
Prima di accendere ...
Vi auguriamo buon divertimento con il Vostro nuovo
apparecchio “img Stage Line”. Le istruzioni per l’uso Vi
possono aiutare a conoscere tutte le possibili funzioni. E
rispettando quanto spiegato nelle istruzioni, evitate di
commettere degli errori, e così proteggete Voi stessi, ma
anche l’apparecchio, da eventuali rischi per uso impro-
prio.
Il testo italiano lo potete trovare alle pagine 10–15.
F
B
CH
I
Ennen virran kytkemistä ...
Toivomme, että uusi “img Stage Line”-laitteesi tuo sinulle
paljon iloa ja hyötyä. Ole hyvä ja lue käyttöohjeet ennen
laitteen käyttöönottoa. Luettuasi käyttöohjeet voit käyt-
tää laitetta turvallisesti ja vältyt laitteen väärinkäytöltä.
Käyttöohjeet löydät sivulta 27.

3
DMX512 ADRESS SETTING
SHOW MODE
SLAVE MODE
COLOR MODE
PAN INVERSION
TILT INVERSION
DISPLAY INVERSION
FOCUS ADJUST
SELF-TEST
FIXTURE HOURS
RESET
MENU
DOWN
UP
ENTER
DMX
MASTER
SLAVE
SOUND
MENU
DOWN
UP
ENTER
DMX
MASTER
SLAVE
SOUND
230V~
50Hz
510 VA
POWER
USE ONLY WITH A 250V FUSE
DMX OUT
PUSH
DMX IN
REMOTE
CONTROL
MIC
SENSITIVITY
1
m
567 89101112 1314151617
➀
3
1
2
3
4
MODE
FUNCTION
STAND
BY
LC-3
CONTROLLER
18
19
20
➁

Bitte klappen Sie die Seite 3 heraus. Sie sehen
dann immer die beschriebenen Bedienelemente
und Anschlüsse.
1 Übersicht der Bedienelemente und
Anschlüsse
1.1 TWIST-252
1 Schwenkkopf
2 Dreharm
3 Tragegriffe
4 Montageplatte für die Befestigung an einer Tra-
verse
5 Halterung für die Netzsicherung
Eine durchgebrannte Sicherung nur durch eine
gleichen Typs ersetzen.
6 Netzbuchse zum Anschluss an eine Steckdose
(230V~/50Hz) über das beiliegende Verbin-
dungskabel
7 Ein-/Ausschalter POWER; leuchtet, sobald das
Gerät an einer Netzsteckdose angeschlossen ist
8 Display
9 Taste MENU zum Aufrufen des Einstellmenüs
10 Tasten UP und DOWN zur Auswahl einer Ein-
stellung im Menü
11 Taste ENTER zum Bestätigen einer Menüein-
stellung
12 Kontroll-LEDs für den Betriebsmodus:
DMX = leuchtet bei am Eingang DMX IN (14)
anliegendem DMX-Steuersignal
MASTER = Master-Modus (Kap. 6.1 und 6.2);
Steuerung über die Fernbedienung
LC-3 oder das eingebaute Mikrofon
SLAVE = Slave-Modus (Kap. 6.1.1); Steue-
rung über einen zweiten TWIST-252
SOUND = leuchtet kurz auf, wenn das Gerät
durch ein Musiksignal die Farbe, das
Muster oder die Bewegung ändert
13 DMX-Signal-Ausgang (3-pol. XLR);
1 = Masse, 2 = DMX
-
, 3 = DMX+
14 DMX-Signal-Eingang (3-pol. XLR);
1 = Masse, 2 = DMX
-
, 3 = DMX+
15 Anschlussbuchse für die Fernbedienung LC-3
16 Regler für die Empfindlichkeit des Mikrofons (17)
Durch Drehen im Uhrzeigersinn erhöht sich die
Empfindlichkeit.
17 Mikrofon zur Musiksteuerung
1.2 Fernbedienung LC-3
Die Fernbedienung ist als Zubehör erhältlich und
gehört nicht zum Lieferumfang des TWIST-252.
18 Taste STAND BY für die Funktion Blackout
(Schwenkkopf in die Ausgangsposition und
Blende geschlossen)
19 Taste FUNCTION:
im Modus Show 1 oder 2 zum Aktivieren eines
Strobe-Effekts (solange die Taste gedrückt wird)
im Slow-Modus zum Wechsel der 10 Farben und
danach zum Wechsel auf das nächste Muster
20 Taste MODE zum Umschalten zwischen
Modus Show 1 (LED leuchtet nicht)
Slow-Modus (LED leuchtet)
Modus Show 2 (LED blinkt)
Hinweis: Zur Steuerung über die Fernbedienung darf
am Eingang DMX IN (14) kein DMX-Signal anliegen.
2 Hinweise für den sicheren Gebrauch
Dieses Gerät entspricht der Richtlinie für elektro-
magnetische Verträglichkeit 89/336/EWG und der
Niederspannungsrichtlinie 73/23/EWG.
Beachten Sie unbedingt die folgenden Punkte:
●
Das Gerät ist nur zur Verwendung in Innenräumen
geeignet. Schützen Sie es vor Tropf- und Spritz-
wasser, hoher Luftfeuchtigkeit und Hitze (zulässi-
ger Einsatztemperaturbereich 0–40°C).
●
Während des Betriebs wärmt sich der Schwenk-
kopf (1) stark auf. Um Verbrennungen zu vermei-
den, berühren Sie den Kopf nicht während des Be-
triebs bzw. lassen Sie ihn nach dem Ausschalten
einige Minuten abkühlen, bevor Sie ihn berühren.
●
Stecken Sie nichts durch die Lüftungsöffnungen.
Dies kann zu einem elektrischen Schlag führen!
●
Nehmen Sie das Gerät nicht in Betrieb bzw. zie-
hen Sie sofort den Netzstecker aus der Steck-
dose, wenn:
1. sichtbare Schäden am Gerät, z.B. am Ge-
häuse, an der Linse, am UV-Filter oder an der
Netzanschlussleitung, vorhanden sind,
2. nach einem Sturz oder Ähnlichem der Verdacht
auf einen Defekt besteht,
3. Funktionsstörungen auftreten.
●
Ziehen Sie den Netzstecker nie an der Zuleitung
aus der Steckdose, fassen Sie immer am Stecker
an.
●
Fassen Sie beim Transport des Gerätes nur an
den Tragegriffen (3) an. Auf keinen Fall das Gerät
am Schwenkkopf (1) oder Dreharm (2) tragen.
●
Verwenden Sie für die Reinigung des Gehäuses
nur ein trockenes, weiches Tuch, niemals Wasser
oder Chemikalien. Für die Linse kann auch ein
handelsübliches Glasreinigungsmittel verwendet
werden.
●
Wird das Gerät zweckentfremdet, nicht richtig
montiert, falsch bedient oder nicht fachgerecht re-
pariert, kann keine Garantie für das Gerät und
keine Haftung für daraus resultierende Sach- oder
Personenschäden übernommen werden.
●
Soll das Gerät endgültig aus dem Betrieb genom-
men werden, übergeben Sie es zur umweltge-
rechten Entsorgung einem örtlichen Recycling-
betrieb.
Achtung!
Das Gerät wird mit lebensgefährlicher Netzspan-
nung (230V~) versorgt. Nehmen Sie deshalb nie
selbst Eingriffe im Gerät vor. Durch unsachge-
mäßes Vorgehen besteht die Gefahr eines elek-
trischen Schlages. Lassen Sie das Gerät in einer
Fachwerkstatt reparieren.
Please unfold page 3. Thus you will always
be able to see the operating elements and
connections described.
1 Operating Elements and Connections
1.1 TWIST-252
1 Panning head
2 Rotary arm
3 Carrying handles
4 Mounting plate for fixing the unit to a traverse
5 Mains fuse holder
Only replace a blown fuse by one of the same
type
6 Mains jack for connection to a mains socket
(230V~/50 Hz) via the supplied connection cable
7 POWER switch; lights up as soon as the unit is
connected to the mains socket
8 Display
9 Button MENU for calling the adjusting menu
10 Buttons UP and DOWN to select a setting in the
menu
11 Button ENTER to confirm a menu setting
12 Indicating LEDs for the operating mode:
DMX = lights up in case of a DMX control sig-
nal present at the input DMX IN (14)
MASTER = master mode (chapters 6.1 and 6.2);
control via the remote control LC-3
or the integrated microphone
SLAVE = slave mode (chapter 6.1.1); control
via a second TWIST-252
SOUND = shortly lights up if the colour, the pat-
tern, or the movement of the unit is
changed by music control
13 DMX signal output (3-pole XLR);
1 = ground, 2 = DMX
-
, 3 = DMX+
14 DMX signal input (3-pole XLR);
1 = ground, 2 = DMX
-
, 3 = DMX+
15 Connection jack for the remote control LC-3
16 Control for the sensitivity of the microphone (17)
By turning the control clockwise, the sensitivity is
increased.
17 Microphone for music control
1.2 Remote control LC-3
The remote control is available as an accessory and
is not supplied with the TWIST-252.
18 Button STAND BY for the function Blackout
(panning head in the initial position and iris
closed)
19 Button FUNCTION:
in the mode Show 1 or Show 2 to activate a
strobe effect (as long as the button is pressed)
in the Slow mode to change the colour (10 col-
ours available) and then to change to the next
pattern
20 Button MODE to switch between
mode Show 1 (LED does not light up)
Slow mode (LED lights up)
mode Show 2 (LED flashes)
Note: For the control via the remote control, no DMX
signal must be present at the input DMX IN (14).
2 Safety Notes
This unit corresponds to the directive for electro-
magnetic compatibility 89/336/EEC and to the low
voltage directive 73/23/EEC.
Please observe the following items in any case:
●
The unit is suitable for indoor use only. Protect it
against dripping water and splash water, high air
humidity, and heat (admissible ambient tempera-
ture range 0–40°C).
●
During operation the panning head (1) heats up
very much. To avoid burns, do not touch the head
during operation or let it cool down for some min-
utes after switching-off before touching it.
●
Do no insert anything into the air vents. This may
result in an electric shock!
●
Do not operate the unit or immediately disconnect
the mains plug from the mains socket
1. if there is visible damage to the unit, e.g. to the
housing, the lens, the UV filter, or the mains
cable,
2. if a defect might have occurred after the unit
was dropped or suffered a similar accident,
3. if malfunctions occur.
●
Never pull the mains cable for disconnecting the
mains plug from the mains socket, always seize
the plug.
●
During transportation of the unit only seize the
carrying handles (3). Never carry the unit by the
panning head (1) or rotary arm (2).
●
For cleaning the housing only use a dry, soft cloth,
never use chemicals or water. For the lens also a
commercial detergent for glass may be used.
●
No guarantee for the unit and no liability for result-
ing damage to property or resulting personal inju-
ries will be accepted if the unit is used for other
purposes than originally intended, if it is not cor-
rectly mounted or operated or not repaired in an
expert way.
●
If the unit is to be put out of operation definitively,
take it to a local recycling plant for a disposal
which is not harmful to the environment.
●
Important for U.K. Customers!
The wires in this mains lead are coloured in ac-
cordance with the following code:
green/yellow = earth
blue = neutral
brown = live
Attention!
The unit is supplied with hazardous mains volt-
age (230V~). Leave servicing to skilled person-
nel only. Inexpert handling may cause an electric
shock hazard. In any case the unit must be re-
paired by skilled personnel.
4
GB
D
A
CH

3 Einsatzmöglichkeiten
Das Lichteffektgerät TWIST-252 ist besonders für
den professionellen Einsatz auf der Bühne und in
Diskotheken geeignet. Es projiziert verschiedene,
farbige Muster und sorgt somit für eine ideale
Dancefloor-Atmosphäre. Die Steuerung des Gerä-
tes kann über das integrierte Mikrofon, über die
Fernbedienung LC-3 (separat als Zubehör erhält-
lich) oder über ein DMX-Lichtsteuergerät erfolgen.
4 Leuchtmittel einsetzen
Das Lichteffektgerät wird ohne Leuchtmittel gelie-
fert. Es wird eine Entladungslampe vom Typ MSD
250W mit einem Sockel GY9,5 benötigt.
Auf keinen Fall dürfen Lampen eines anderen
Typs verwendet werden!
Aus dem Sortiment von „img Stage Line“ kann fol-
gendes Leuchtmittel eingesetzt werden:
Den Glaskolben der Lampe nie mit den Fingern
berühren! Hautfett und -schweiß mindern die
Leuchtkraft und brennen sich ein.
1) Die obere Gehäuseschale des Schwenkkopfs
abschrauben. Die beiden Schrauben links und
rechts neben dem Aufdruck „Bulb Access“ zwi-
schem dem Lüfter und der Schwenkkopfrück-
seite entfernen. Jetzt kann der Lichtabschirmwin-
kel abgenommen werden und die Lampenfas-
sung wird sichtbar.
2) Bei einem Lampenwechsel die alte Lampe aus
der Fassung entfernen.
3) Die neue Lampe mit einem sauberen, fussel-
freien Tuch anfassen und in die Fassung
stecken. Dazu mithilfe eines Schraubendrehers
die Haltefedern am Sockel vorsichtig zur Seite
drücken. Den Lampensockel so führen, dass die
Anschlussstifte genau auf die Kontaktlöcher der
Fassung zeigen.
4) Den Lichtabschirmwinkel und die Gehäuse-
schale wieder festschrauben. Nach der Inbetrieb-
nahme mit den drei Justiermuttern auf der
Schwenkkopfrückseite (durch , und ge-
kennzeichnet) maximale Helligkeit und gleich-
mäßige Ausleuchtung des Lichtspots einstellen.
●
Die hier aufgeführte Lampe enthält in geringen
Mengen umweltrelevante Schadstoffe (z.B.
Quecksilber) und muss deshalb in Europa als
Sondermüll entsorgt werden. In anderen Ländern
sind die jeweiligen nationalen Vorschriften zu
beachten.
●
Die Lampe muss spätestens nach der 1,25fachen
mittleren Lebensdauer gewechselt werden, da
mit fortschreitender Nutzungsdauer das Risiko
eines Lampenplatzers infolge von Gefügeverän-
derungen des Quarzglases deutlich ansteigt.
Das Gerät ist mit einem Betriebsstunden-
zähler ausgestattet. Dieser kann zur Bestimmung
der Lampenbrenndauer genutzt werden. Notieren
Sie sich bei einem Lampenwechsel den Zähler-
stand – siehe Kapitel 6.4 „Betriebsparameter ver-
ändern“, Menüpunkt Betriebsstundenzähler.
●
Nach einem Lampenplatzer während des Be-
triebs sollte die unmittelbare Umgebung der
Lampe vorsichtshalber verlassen werden, um
eine Gesundheitsgefährdung durch frei werdende
Quecksilberdämpfe völlig auszuschließen; für
eine gute Raumdurchlüftung sorgen.
5 Montage
Der TWIST-252 kann auf einer festen, ebenen
Fläche aufgestellt werden. Die Montageplatte (4)
dazu bei Bedarf abschrauben. Das Gerät lässt sich
mithilfe der Montageplatte aber auch kopfüber an
einer Traverse montieren. Zur Befestigung werden
stabile Montageschellen benötigt. Die Schellen an
den Langlöchern der Montageplatte festschrauben
und zusammen mit dem Gerät an die Traverse. Die
Montagestelle muss ausreichend stabil sein und
eine Last von min. 30kg pro Gerät tragen können.
6 Bedienung
Das beiliegende Netzkabel an die Netzbuchse (6)
anschließen und den Stecker in eine Steckdose
(230V~/50Hz) stecken. Sobald das Gerät an der
Netzspannung angeschlossen ist, leuchtet der Netz-
schalter (7). Mit dem Netzschalter das Gerät ein-
schalten. Der Schwenkkopf und alle Steuermotoren
fahren in eine definierte Ausgangsstellung. Während-
dessen wird im Display (8) die Software-Version
Wichtig!
1. Zur Vermeidung von Wärmestaus im Gerät muss
die Montagestelle so gewählt werden, dass bei
Betrieb eine ausreichende Luftzirkulation ge-
währleistet ist. Das Gerät muss einen Mindest-
abstand von 1m zu angrenzenden Flächen
haben und die Lüftungsöffnungen am Gehäuse
dürfen auf keinen Fall abgedeckt werden.
2. Achten Sie auch unbedingt auf einen ausrei-
chenden Abstand zu leicht entflammbaren oder
hitzeempfindlichen Materialien.
3. Wird das Gerät als schwebende Last über Per-
sonen installiert, muss es zusätzlich gesichert
werden (z.B. durch ein Fangseil). Die beilie-
gende Schrauböse in die Gewindebuchse in der
Mitte der Geräteunterseite festschrauben und
an dieser das Fangseil anbringen. Das andere
Ende des Fangseils so befestigen, dass der
Fallweg des Gerätes nicht mehr als 20cm be-
tragen kann.
C
B
A
Vorsicht!
1. Ziehen Sie vor dem Einsetzen bzw. Herausneh-
men der Lampe unbedingt den Netzstecker!
2. Da die Lampe im Betrieb sehr heiß wird, müs-
sen das Gehäuse und die Lampe nach dem
Betrieb erst abkühlen (Abkühlzeit min. 15Minu-
ten), bevor Sie die Lampe auswechseln können.
3. Blicken Sie niemals bei geöffnetem Gerät direkt
in die brennende Entladungslampe. Die hohe
Helligkeit und die UV-Strahlung können zu
Augenschäden führen.
As the colours of the wires in the mains lead of this
appliance may not correspond with the coloured
markings identifying the terminals in your plug,
proceed as follows:
1. The wire which is coloured green and yellow
must be connected to the terminal in the plug
which is marked with the letter E or by the earth
symbol , or coloured green or green and
yellow.
2. The wire which is coloured blue must be con-
nected to the terminal which is marked with the
letter N or coloured black.
3. The wire which is coloured brown must be con-
nected to the terminal which is marked with the
letter L or coloured red.
Warning – This appliance must be earthed.
3 Applications
The light effect unit TWIST-252 is especially suited
for professional stage and disco applications. It pro-
jects various, coloured patterns, thus providing an
ideal dancefloor atmosphere. The control of the unit
can be made via the integrated microphone, via the
remote control LC-3 (separately available as an
accessory) or via a DMX light control unit.
4 Inserting the Lamp
The light effect unit is supplied without lamp. A
discharge lamp of type MSD 250W with a base
GY9,5 is required.
Never use lamps of another type!
The following lamp may be used from the “img
Stage Line” product range:
Never touch the glass bulb of the lamp with your fin-
gers! Finger marks reduce the light intensity and
burn in.
1) Screw off the upper housing shell of the panning
head. Remove the two screws on the left and on
the right of the print “Bulb Access” between the
fan and the rear side of the panning head. Now
the light screening angle plate can be removed
and the lampholder becomes visible.
2) For a lamp replacement pull the old lamp out of
the lampholder.
3) Seize the new lamp with a clean cloth without fluffs
and place it into the lampholder. For this purpose
push the retaining springs at the base carefully to
the side by means of a screw driver. Guide the
lamp base so that the connection pins precisely
point to the contact holes of the lampholder.
4) Retighten the light screening angle plate and the
housing shell by screws. After setting into opera-
tion adjust the maximum brightness and uniform
illumination of the light spot with the three adjust-
ing nuts on the rear side of the panning head
(marked by , and ).
●
The lamp quoted here contains slight quantities
of harmful substances which may affect the envi-
ronment (e.g. mercury) and must therefore be
disposed of as a special waste in Europe. In
other countries the respective national regula-
tions have to be observed.
●
The lamp must be replaced at least after its
1.25 fold average lifetime because with increas-
ing service life the risk of a lamp explosion will
considerably increase due to structural transfor-
mation of the quartz glass.
The unit is provided with a working hour
meter. This may be used to determine the lighting
time of the lamp. Note down the count of the
meter when replacing the lamp – see chapter 6.4
“Changing the operating parameters”, menu item
of working hour meter.
●
After a lamp explosion during operation, persons
should leave the immediate surroundings of the
lamp as a precaution to completely exclude a
health risk by the mercury vapours being re-
leased; ensure a good ventilation of the room.
5 Mounting
The TWIST-252 may be set up on a firm, even sur-
face. If required, screw off the mounting plate (4).
However, it can also be mounted upside down to a
traverse by means of the mounting plate. For fixing,
stable mounting clips are required. Tightly screw the
clips to the long holes of the mounting plate and
together with the unit to the traverse. The mounting
place must be of sufficient stability and be capable
of carrying a load of 30kg per unit as a minimum.
Important!
1. To prevent heat accumulation within the unit, the
mounting place must be selected in such a way
that a sufficient air circulation will be ensured
during operation. The unit must have a mini-
mum distance of 1m to adjoining surfaces and
the air vents at the housing must not be covered
in any case.
2. Pay in any case attention to a sufficient distance
to easily flammable material or material sensi-
tive to heat.
3. If the unit is installed as a suspended load
above persons, it must additionally be secured
(e.g. by a safety rope). Screw the supplied
safety lug into the thread jack in the centre of the
lower side of the unit and attach the safety rope
to it. Fix the other end of the safety rope in such
a way that the maximum falling distance of the
unit is 20cm.
C
B
A
Caution!
1. Disconnect in any case the mains plug before
inserting or removing the lamp!
2. As the lamp heats up very much during operation,
let the housing and the lamp first cool down after
operation (minimum cooling down time 15 min-
utes) before you are able to replace the lamp.
3. Never look directly into the lit discharge lamp
when the unit is opened. The high brightness
and the UV radiation may cause eye damage.
5
GB
D
A
CH
Artikel Best.-Nr. mittlere Lebensdauer
HLO-250MSD 05.0005 3000h
Item Order No. Average Lifetime
HLO-250MSD 05.0005 3000h

angezeigt. Danach ist der TWIST-252 betriebsbe-
reit. Nach dem Betrieb das Gerät mit dem Netz-
schalter ausschalten.
Hinweis: Als Lichtquelle dient eine Entladungs-
lampe. Wird das Gerät nur kurz ausgeschaltet oder
nur kurz von der Stromversorgung getrennt, leuchtet
die Lampe nicht sofort wieder auf. Sie muss erst
einige Zeit abkühlen, um erneut zünden zu können.
6.1 Musiksteuerung
1) Um den TWIST-252 über das integrierte Mikrofon
(17) zu steuern, den Eingang DMX IN (14) nicht
anschließen. Wenn an ihm kein DMX-Steuersig-
nal anliegt, leuchtet die gelbe LED MASTER (12)
und das Display (8) signalisiert (Show 1)
oder (Show 2).
Wichtig!
Für die Musiksteuerung die Funktion Blackout
über das Menü oder mit der Fernbedienung LC-3
(Taste STAND BY) ausschalten, anderenfalls
bleibt der Schwenkkopf in seiner Ausgangsposi-
tion und der Lichtstrahl abgeblendet.
a) Die Taste MENU (9) viermal drücken, so dass
im Display (blackout mode) erscheint.
b) Die Taste ENTER (11) drücken. Das Display
blinkt und zeigt (yes blackout).
c) Mit der Taste DOWN oder UP (10) auf
(no blackout) umschalten.
d) Zum Speichern die Taste ENTER drücken.
Das Display zeigt für einige Sekunden .
Danach erscheint wieder die gewählte Be-
triebsart. Wird die Taste ENTER nicht inner-
halb von 8 Sekunden betätigt, schaltet das
Gerät auf die vorherige Einstellung zurück.
e) Zum Starten des Programmablaufs das Gerät
mit dem Netzschalter POWER (7) kurz aus-
und wieder einschalten.
2) Die Betriebsart Show 1 ist für die Aufstellung des
Gerätes auf dem Fußboden vorgesehen. Der
Rotationswinkel um die waagerechte Achse
beträgt hierbei max. 210°. Bei der Betriebsart
Show 2, die für die Deckenmontage vorgesehen
ist, beträgt der Winkel max. 90°.
a) Zum Umschalten zwischen Show 1 und 2 die
Taste MENU (9) zweimal drücken, so dass im
Display (show mode) erscheint.
b) Die Taste ENTER (11) drücken. Das Display
blinkt.
c) Mit der Taste DOWN oder UP (10) zwischen
für Show 1 und für Show 2 um-
schalten.
d) Zum Speichern die Taste ENTER drücken.
Das Display zeigt für einige Sekunden .
Danach erscheint wieder die gewählte Be-
triebsart und der Programmablauf startet.
Wird die Taste ENTER nicht innerhalb von
8 Sekunden betätigt, schaltet das Gerät auf
die vorherige Einstellung zurück.
3) Den Regler SENSITIVITY (16) für die Mikrofon-
empfindlichkeit so einstellen, dass die Dynamik
der Musik optimal durch die Bewegungen des
Lichtstrahls sowie durch den Wechsel der Licht-
muster und Farben wiedergegeben wird. Die
größte Empfindlichkeit ist bei ganz nach rechts
gedrehtem Regler eingestellt.
Wenn eine Farb-, Muster- oder Bewegungs-
änderung durch ein Musiksignal erfolgt, leuchtet
jeweils kurz die grüne LED SOUND (12) auf.
Hinweis: Bei Veränderung der Lautstärke an der
Musikanlage muss auch die Mikrofonempfind-
lichkeit über den Drehregler entsprechend ange-
passt werden.
6.1.1 Zusammenschalten mehrerer TWIST-252
Es lassen sich mehrere Geräte zusammenschalten,
um so über das Mikrofon des Hauptgerätes (Master)
alle weiteren Nebengeräte (Slave) im gleichen
Rhythmus zu steuern.
1) Den Anschluss DMX OUT (13) des Hauptgerätes
über ein 3-poliges XLR-Kabel (z.B. Serie MEC-...
oder MECN-... aus dem Sortiment von „img
Stage Line“) mit dem Anschluss DMX IN (14) des
ersten Nebengerätes verbinden.
2) Den Anschluss DMX OUT des ersten Neben-
gerätes mit dem Anschluss DMX IN des zweiten
Nebengerätes verbinden usw.
3) Sobald an den Nebengeräten die Steuersignale
vom Hauptgerät anliegen, leuchtet bei ihnen die
rote LED SLAVE (12) konstant. Die Bewegungen
der Nebengeräte können mit dem Hauptgerät
synchron laufen oder genau entgegengesetzt
(z.B. wenn nur ein Nebengerät eingesetzt wird).
a) Zum Umschalten zwischen synchroner und
entgegengesetzter Bewegung die Taste MENU
(9) am Nebengerät dreimal drücken, so dass
im Display (slave mode) angezeigt wird.
b) Die Taste ENTER (11) drücken. Das Display
blinkt.
c) Mit der Taste DOWN oder UP (10) zwischen
(normal) für synchrone und
(2 light show) für entgegengesetzte Bewe-
gung umschalten.
d) Zum Speichern die Taste ENTER drücken.
Das Display zeigt für einige Sekunden .
Danach erscheint wieder die gewählte Be-
triebsart ( für synchrone bzw. für
entgegengesetzte Bewegung) und der Pro-
grammablauf startet. Wird die Taste ENTER
nicht innerhalb von 8 Sekunden betätigt,
schaltet das Gerät auf die vorherige Einstel-
lung zurück.
6.2 Fernbedienung LC-3
Über die als Zubehör erhältliche Fernbedienung
LC-3 können verschiedene Funktionen gesteuert
werden.
1) Die Fernbedienung an die Buchse REMOTE
CONTROL (15) anschließen.
2) Der DMX-Eingang (14) darf nicht angeschlossen
sein; die gelbe LED MASTER (12) muss leuchten.
3) Über den DMX-Ausgang (13) können weitere
TWIST-252 angeschlossen werden (siehe Kapi-
tel 6.1.1), um diese mit der Fernbedienung syn-
chron zum Hauptgerät zu steuern.
6 Operation
Connect the supplied mains cable to a mains socket
(6) and the plug to a mains socket (230V~/50Hz). As
soon as the unit is connected to the mains voltage,
the POWER switch (7) lights up. Switch on the unit
with the POWER switch. The panning head and all
control motors go to a defined initial position. While
doing this, the display (8) shows the software version.
Then the TWIST-252 is ready for operation. After
operation, switch off the unit with the POWER switch.
Note: A discharge lamp serves as a light source. If
the unit is only shortly switched off or disconnected
from the power supply only for a short time, the lamp
does not immediately light up again. It must cool
down for some time to be able to ignite again.
6.1 Music control
1) To control the TWIST-252 via the integrated
microphone (17), do not connect the input DMX
IN (14). If no DMX control signal is present at this
input, the yellow LED MASTER (12) lights up and
the display (8) signalizes (Show 1) or
(Show 2).
Important!
For the music control switch off the function
Blackout via the menu or with the remote control
LC-3 (button STAND BY), otherwise the panning
head remains in its initial position and the light
beam is stopped down.
a) Press the button MENU (9) four times so that
the display shows (blackout mode).
b) Press the button ENTER (11). The display
flashes and shows (yes blackout).
c) Switch to (no blackout) with the button
DOWN or UP (10).
d) To memorize, press the button ENTER. The
display shows for some seconds. Then
the selected operating mode reappears. If the
button ENTER is not actuated within 8 sec-
onds, the unit switches back to the previous
adjustment.
e) To start the programme sequence, shortly
switch the unit off and on again with the
POWER switch (7).
2) The operating mode Show 1 is provided for plac-
ing the unit on the floor. The rotation angle
around the horizontal axis is 210° as a maximum.
For the operating mode Show 2 provided for ceil-
ing mounting, the angle is 90° as a maximum.
a) To switch between Show 1 and Show 2 press
the button MENU (9) twice so that the display
shows (show mode).
b) Press the button ENTER (11). The display
flashes.
c) With the button DOWN or UP (10) switch be-
tween for Show 1 and for Show 2.
d) To memorize, press the button ENTER. The
display shows for some seconds. Then
the selected operating mode reappears and
the programme sequence starts. If the button
ENTER is not actuated within 8 seconds, the
unit switches back to the previous adjustment.
3) Adjust the control SENSITIVITY (16) for the
microphone sensitivity so that the dynamic power
of the music is reproduced in an optimum way by
the movements of the light beam as well as by
the change of the light patterns and colours. The
highest sensitivity is set if the control is fully
turned to the right.
If the colour, the pattern, or the movement is
changed by music control, the green LED
SOUND (12) shortly lights up in each case.
Note: If the volume of the music system chang-
es, the microphone sensitivity must be adapted
accordingly via the rotary control.
6.1.1 Interconnecting several TWIST-252 units
Several units can be interconnected in order to con-
trol all further auxiliary units (slave units) to the same
rhythm via the microphone of the main unit (master
unit).
1) Connect the output DMX OUT (13) of the main
unit via a 3-pole XLR cable (e.g. series MEC-... or
MECN-... of the “img Stage Line” product range)
to the input DMX IN (14) of the first auxiliary unit.
2) Connect the connection DMX OUT of the first
auxiliary unit to the connection DMX IN of the
second auxiliary unit, etc.
3) As soon as the control signals from the main unit
are present at the auxiliary units, the red LED
SLAVE (12) constantly lights up at these units.
The movements of the auxiliary units may be syn-
chronized with the main unit or be exactly oppo-
site to it (e.g. if only one auxiliary unit is used).
a) To switch between synchronous and opposite
movement, press the button MENU (9) on the
auxiliary unit three times so that the display
shows (slave mode).
b) Press the button ENTER (11). The display
flashes.
c) With the button DOWN or UP (10) switch be-
tween (normal) for synchronous move-
ment and (2 light show) for opposite
movement.
d) To memorize, press the button ENTER. The
display shows for some seconds. Then
the selected operating mode ( for syn-
chronous movement or for opposite
movement) reappears and the programme
sequence starts. If the button ENTER is not
actuated within 8 seconds, the unit switches
back to the previous adjustment.
6.2 Remote control LC-3
Via the remote control LC-3 available as an acces-
sory different functions may be controlled:
1) Connect the remote control to the jack REMOTE
CONTROL (15).
2) The input DMX IN (14) must not be connected;
the yellow LED MASTER (12) must light up.
3) Via the output DMX OUT (13) it is possible to
connect further TWIST-252 units (see chapter
6.1.1) to control them synchronously to the main
unit with the remote control.
6
GB
D
A
CH

4) Mit der Taste STAND BY (18) lässt sich die Funk-
tion Blackout ein- und ausschalten. Bei einge-
schalteter Funktion leuchtet die LED neben der
Taste. Der Schwenkkopf fährt in die Ausgangspo-
sition und die Blende wird geschlossen.
5) Mit der Taste MODE (20) den Betriebsmodus
wählen:
1. Modus Show 1 (LED neben der Taste leuchtet
nicht)
2. Slow-Modus (LED leuchtet kontinuierlich)
3. Modus Show 2 (LED blinkt)
a) Im Modus Show 1 (Rotationswinkel um die
waagerechte Achse max. 210°) und Modus
Show 2 (Rotationswinkel max. 90°) erfolgen
die Bewegung des Lichtstrahls sowie der
Wechsel der Farben und Muster musikge-
steuert. Durch Gedrückthalten der Taste
FUNCTION (19) lässt sich einer der drei
Stroboskop-Effekte aktivieren:
1. Strobe-Effekt mit wechselnden Farben und
Mustern
2. Strobe-Effekt mit weißem Licht; bei den
Nebengeräten ist der Effekt synchron
3. Strobe-Effekt mit weißem Licht; bei den
Nebengeräten ist der Effekt entgegenge-
setzt
Beim erneuten Drücken der Taste FUNCTION
ist jeweils der nächste Strobe-Effekt aktiviert.
b) Im Slow-Modus wird nur die Bewegung des
Lichtstrahls musikgesteuert. Der Wechsel der
Farben und Muster erfolgt durch die Taste
FUNCTION. Mit jedem Tastendruck wird zur
nächsten Farbe gewechselt. Nachdem alle 10
Farben durchlaufen sind, wird mit einem wei-
teren Tastendruck das nächste Muster ange-
wählt.
6.3 Bedienung über ein Lichtsteuergerät
Zur Bedienung über ein Lichtsteuergerät ist der
TWIST-252 mit 16 DMX-Kanälen ausgestattet. In
der Tabelle Abb.3 sind die Funktionen und zuge-
hörigen DMX-Werte angegeben.
4) With the button STAND BY (18) the function
Blackout can be switch on and off. With the func-
tion switched on, the LED next to the button lights
up. The panning head goes to the initial position
and the iris is closed.
5) Select the operating mode with the button MODE
(20):
1. Mode Show 1 (LED next to the button does
not light up)
2. Slow mode (LED lights up continuously)
3. Mode Show 2 (LED flashes)
a) In the mode Show 1 (rotation angle around
the horizontal axis 210° as a maximum) and
mode Show 2 (rotation angle 90° as a maxi-
mum) the movement of the light beam and the
change of colours and patterns are music-
controlled. By keeping the button FUNCTION
(19) pressed it is possible to activate one of
the three stroboscopic effects:
1. Strobe effect with changing colours and
patterns
2. Strobe effect with white light; with the auxil-
iary units, the effect is synchronous
3. Strobe effect with white light; with the auxil-
iary units, the effect is opposite
With each pressing of the button FUNCTION
the next strobe effect is activated in each
case.
b) In the Slow mode only the movement of the
light beam is controlled by the music. The
change of the colours and patterns is made by
the button FUNCTION. With each pressing of
the button the unit changes to the next colour.
After all 10 colours are run through, the next
pattern is selected with another pressing of
the button.
6.3 Operation via a light control unit
For operation via a light control unit, the TWIST-252
is equipped with 16 DMX channels. Table fig. 3 indi-
cates the functions and corresponding DMX values.
7
GB
D
A
CH
➂
Belegung der DMX-Kanäle
1)
Die angegebenen DMX-Werte für die Farbauswahl beziehen sich auf
den Farb-Modus „einfarbig“. Bei der Einstellung „zweifarbig“ (siehe Kap.
6.4) ist auch eine Zwischenstellung mit zwei Farben möglich.
2)
Um die Reset-Funktion zu aktivieren, Kanal 8 und Kanal 16 auf den
DMX-Wert 255 einstellen.
➂
Configuration of the DMX channels
1)
The DMX values indicated for the colour selection refer to the colour
mode “single-coloured”. For the adjustment “bicoloured” (see chapter
6.4) also an interim position between two colours is possible.
2)
To activate the reset function, adjust channel 8 and channel 16 to the
DMX value 255.
Kanal Funktion DMX-Wert
1 Schwenkkopfdrehung (Pan) 540° 000 – 255
2 Schwenkkopfneigung (Tilt) 270° 000 – 255
3
Pan- und Tilt-Geschwindigkeit
schnell → langsam
000 – 255
4
Dimmer
dunkel → hell
000 – 255
5
kein Effekt
Stroboskop langsam → schnell
Wackeleffekt langsam → schnell
000 – 015
016 – 135
136 – 255
6
Farbe
1)
Weiß
Blau
Orange
Grün
Hellblau
Rot
Rosa
UV-Violett
Gelb
Hellgrün
ständiger Farbwechsel
langsam → schnell
000 – 012
013 – 025
026 – 038
039 – 051
052 – 063
064 – 076
077 – 089
090 – 102
103 – 115
116 – 127
128 – 255
8
Reset
2)
255
7 keine Funktion
—
Kanal Funktion DMX-Wert
11
Prisma aus
Prisma ein
000 – 127
128 – 255
10
Gobo-Rotation
Stopp
Rechtsrotation schnell → langsam
Stopp
Linksrotation langsam → schnell
Stopp
000 – 009
010 – 120
121 – 134
135 – 245
246 – 255
12
Prisma-Rotation
Stopp
Rechtsrotation schnell → langsam
Stopp
Linksrotation langsam → schnell
Stopp
000 – 009
010 – 120
121 – 134
135 – 245
246 – 255
13 Fokuseinstellung 000 – 255
14
vorprogrammierter Showablauf
kein Showablauf, DMX-Steuerung
Show 1, automatischer Ablauf
Show 2, automatischer Ablauf
Show 1, musikgesteuert
Show 2, musikgesteuert
000 – 031
032 – 127
128 – 223
224 – 239
240 – 255
16
Reset
2)
255
15
vorprogrammierte Lichtstrahlmuster
für den über Kanal 14 gewählten Ablauf
nur autom. Farb- und Gobowechsel
Gobo-Rotation
Stroboskop
Wackeleffekt
Prisma
Prisma-Rotation
Stroboskop + Prisma-Rotation
000 – 047
048 – 095
096 – 143
144 – 191
192 – 207
208 – 239
240 – 255
9
Gobo
kein Gobo
Gobo A
Gobo B
Gobo C
Gobo D
Gobo E
Gobo F
Gobo G
ständiger Wechsel
langsam → schnell
000 – 015
016 – 031
032 – 047
048 – 063
064 – 079
080 – 095
096 – 111
112 – 127
128 – 255
Channel Function DMX Value
1 rotation of panning head (pan) 540° 000 – 255
2 tilting of panning head (tilt) 270° 000 – 255
3
pan and tilt speed
fast → slow
000 – 255
4
dimmer
dark → bright
000 – 255
5
no effect
stroboscope slow → fast
wobbling effect slow → fast
000 – 015
016 – 135
136 – 255
6
colour
1)
white
blue
orange
green
light-blue
red
pink
UV-violet
yellow
light-green
continuous change of colours
slow → fast
000 – 012
013 – 025
026 – 038
039 – 051
052 – 063
064 – 076
077 – 089
090 – 102
103 – 115
116 – 127
128 – 255
8
reset
2)
255
7 no function
—
9
gobo
no gobo
gobo A
gobo B
gobo C
gobo D
gobo E
gobo F
gobo G
continuous change
slow → fast
000 – 015
016 – 031
032 – 047
048 – 063
064 – 079
080 – 095
096 – 111
112 – 127
128 – 255
Channel Function DMX Value
11
prism off
prism on
000 – 127
128 – 255
10
gobo-rotation
stop
rotation to the right fast → slow
stop
rotation to the left slow → fast
stop
000 – 009
010 – 120
121 – 134
135 – 245
246 – 255
12
prism rotation
stop
rotation to the right fast → slow
stop
rotation to the left slow → fast
stop
000 – 009
010 – 120
121 – 134
135 – 245
246 – 255
13 focus adjustment 000 – 255
14
preprogrammed show sequence
no show sequence, DMX control
Show 1, automatic sequence
Show 2, automatic sequence
Show 1, music-controlled
Show 2, music-controlled
000 – 031
032 – 127
128 – 223
224 – 239
240 – 255
16
reset
2)
255
15
preprogrammed light beam patterns
for the sequence selected via channel 14
only auto. change of colours and gobos
gobo rotation
stroboscope
wobbling effect
prism
Prisma-Rotation
stroboscope + prism rotation
000 – 047
048 – 095
096 – 143
144 – 191
192 – 207
208 – 239
240 – 255

1) Den DMX-Eingang (14) mit dem DMX-Ausgang
des Lichtsteuergerätes verbinden.
Zum Anschluss sollten spezielle Kabel für
hohen Datenfluss verwendet werden. Die Ver-
wendung normaler Mikrofonkabel ist nur bei
einer Gesamtkabellänge bis 100m zu empfeh-
len. Die besten Übertragungsergebnisse werden
mit einem abgeschirmten Mikrofonkabel von 2 x
0,25mm
2
oder einem speziellen Datenübertra-
gungskabel erreicht. Bei Leitungslängen ab
150m wird das Zwischenschalten eines DMX-
Aufholverstärkers empfohlen (z.B. SR-103DMX
von „img Stage Line“).
2) Den DMX-Ausgang (13) mit dem DMX-Eingang
des nächsten Lichteffektgerätes verbinden. Des-
sen Ausgang wieder mit dem Eingang des nach-
folgenden Gerätes verbinden usw., bis alle Licht-
effektgeräte in einer Kette angeschlossen sind.
Die DMX-Ausgangsbuchse besitzt eine Ver-
riegelung. Zum Herausziehen des Steckers den
PUSH-Hebel drücken.
3) Den DMX-Ausgang des letzten Lichteffektgerätes
der Kette mit einem 120-Ω-Widerstand (0,25W)
abschließen: An die Pins 2 und 3 eines XLR-
Steckers den Widerstand anlöten und den Ste-
cker in den DMX-Ausgang stecken.
4) Um den TWIST-252 von einem Lichtsteuergerät
bedienen zu können, muss die DMX-Start-
adresse für den 1. DMX-Kanal eingestellt wer-
den. Ist z.B. am Steuergerät die Adresse 17 für
die Steuerung der Schwenkkopfdrehung vorge-
sehen, am TWIST-252 die Startadresse 17 ein-
stellen.
a) Die Taste MENU (9) einmal drücken, so dass
im Display (address) angezeigt wird.
b) Die Taste ENTER (11) drücken. Das Display
blinkt.
c) Mit der Taste DOWN oder UP (10) die ent-
sprechende Adresse einstellen (1–497).
d) Zum Speichern die Taste ENTER drücken.
Das Display zeigt für einige Sekunden .
Danach erscheint wieder die gewählte Start-
adresse. Wird die Taste ENTER nicht inner-
halb von 8 Sekunden betätigt, schaltet das
Gerät auf die vorherige Adresse zurück.
Nach dem Einstellen der Startadresse für den
1. Kanal sind die Kanäle 2–16 den darauf fol-
genden Adressen zugeordnet. Beispiel:
Startadresse 17 = Kanal für die Drehung des
Schwenkkopfes
Adresse 18 = Kanal für die Schwenkkopfneigung
Adresse 19 = Kanal für die Geschwindigkeit
…
Adresse 31 = Kanal zur Auswahl der vorpro-
grammierten Lichtstrahlmuster
Adresse 32 = Kanal für Reset
5) Nach dem Einstellen der Startadresse lässt sich
der TWIST-252 über das angeschlossene Steu-
ergerät bedienen. Die eingestellte Startadresse
wird vom Display stets angezeigt, sobald Steuer-
signale vom DMX-Steuergerät empfangen wer-
den. Zusätzlich leuchtet die rote LED DMX (12).
6.4 Betriebsparameter verändern
Durch Aufrufen des Menüs lassen sich die folgenden
Parameter verändern. Die hier dargestellte Reihen-
folge entspricht der Reihenfolge der Menüpunkte.
Einstellung der Startadresse (Kap. 6.3)
. . .
Show-Modus (Kap. 6.1)
Show 1
Show 2
Slave-Modus (Kap. 6.1.1)
normal
2 Light Show
Blackout-Modus
Blackout ein (yes blackout)
Liegt kein DMX-Steuersignal
an der Buchse DMX IN (14)
an, fährt der Schwenkkopf in
die Ausgangsposition und die
Blende wird geschlossen.
Blackout aus (no blackout)
Eine Musiksteuerung allein
durch das Mikrofon (17) ist
möglich.
Farb-Modus
einfarbig (normal)
Die Farbscheibe rastet exakt
bei einer Farbe ein.
zweifarbig (split colour)
Eine Zwischenstellung mit
zwei Farben ist möglich.
Schwenkkopfdrehung (Pan)
normal
Drehung entgegengesetzt
Schwenkkopfneigung (Tilt)
normal
Bewegung entgegengesetzt
Displaydarstellung
normal
um 180° gedreht
(für die Deckenmontage)
Mit der Taste ENTER die Einstellung um-
schalten. Das Display blinkt 8 Sekunden
lang. Danach blendet sich das Menü aus.
1) Connect the DMX input (14) to the DMX output of
the light control unit.
For the connection, special cables for high
data flow should be used. The use of standard
microphone cables can only be recommended for
a total cable length of up to 100m. The best trans-
mission results are obtained with a screened
microphone cable of 2 x 0.25mm
2
or a special
data transmission cable. For cable lengths ex-
ceeding 150m it is recommended to insert a DMX
level matching amplifier (e.g. SR-103DMX from
“img Stage Line”).
2) Connect the DMX output (13) to the DMX input of
the next light effect unit. Connect its output to the
input of the following unit, etc. until all light effect
units are connected in one row.
The DMX output jack has a latching. To pull
out the plug, press the PUSH lever.
3) Terminate the DMX output of the last light effect
unit in the row with a 120Ω resistor (0.25 W): Sol-
der the resistor to the pins 2 and 3 of an XLR plug
and connect the plug to the DMX output.
4) To be able to operate the TWIST-252 from a light
control unit, the DMX start address for the first
DMX channel must be adjusted. If e.g. the ad-
dress 17 is provided on the control unit for the
control of the rotation of the panning head, adjust
the start address 17 at the TWIST-252.
a) Press the button MENU (9) once so that
(address) is displayed.
b) Press the button ENTER (11). The display
flashes.
c) With the button DOWN or UP (10) adjust the
corresponding address (1–497).
d) To memorize, press the button ENTER. The
display shows for some seconds. Then
the selected start address is displayed again.
If the button ENTER is not actuated within
8 seconds, the unit switches back to the pre-
vious address.
After adjusting the start address for the first chan-
nel, the channels 2 to 16 are assigned to the fol-
lowing addresses. Example:
start address 17 = channel for the rotation of the
panning head
address 18 = channel for the tilting of the panning
head
address 19 = channel for the speed
...
address 31 = channel for the selection of the pre-
programmed light beam patterns
address 32 = channel for reset
5) After adjusting the start address, it is possible to
operate the TWIST-252 via the connected control
unit. The adjusted start address is always dis-
played as soon as control signals are received
from the DMX control unit. In addition, the red
LED DMX (12) lights up.
6.4 Changing the operating parameters
By calling the menu, the following parameters can
be changed. The order shown here corresponds to
the order of the menu items.
Adjustment of the start address
(chapter 6.3)
. . .
Show mode (chapter 6.1)
Show 1
Show 2
Slave mode (chapter 6.1.1)
normal
2 light show
Blackout mode
blackout on (yes blackout)
If no DMX control signal is
present at the jack DMX IN
(14), the panning head goes
to the initial position and the
iris is closed.
blackout off (no blackout)
A music control only by the
microphone (17) is possible.
Colour mode
single-coloured (normal)
The colour disk locks into
place exactly at one colour.
bicoloured (split colour)
An interim position between
two colours is possible.
Rotation of panning head (pan)
normal
opposite rotation
Tilting of panning head (tilt)
normal
opposite movement
Display presentation
normal
turned by 180°
(for ceiling suspension)
Switch over the adjustment with the but-
ton ENTER. The display flashes for
8 seconds. Then the menu is extin-
guished.
8
GB
D
A
CH

feste Schwenkkopfposition
Der Schwenkkopf lässt sich auf fünf ver-
schiedene Positionen fest einstellen:
nach oben (unten), vorne, links, hinten
oder rechts zeigend. Durch mehrfaches
Drücken der Taste ENTER die Festposi-
tion anwählen. Zum Zurückschalten auf
den vorherigen Betriebsmodus die Tas-
te MENU drücken. Der nächste Menü-
punkt blinkt 8 Sekunden lang. Danach
blendet sich das Menü aus.
Selbsttest
Nach dem Drücken der Taste ENTER
läuft ein Selbsttest ab. Zum Beenden
die Taste MENU drücken. Der nächste
Menüpunkt blinkt 8 Sekunden lang. Da-
nach blendet sich das Menü aus.
Betriebsstundenzähler (Fixture Hours)
Nach dem Drücken der Taste ENTER
zeigt das Display die Betriebsstunden
an. Zum Zurückschalten auf den vorhe-
rigen Betriebsmodus die Taste MENU
drücken. Der nächste Menüpunkt blinkt
8 Sekunden lang. Danach blendet sich
das Menü aus.
Reset
Durch Drücken der Taste ENTER erfolgt
eine Rückstellung: Der Schwenkkopf
fährt kurz in die Ausgangsstellung und
der Lichtstrahl wird abgeblendet. Da-
nach schaltet das Gerät in den vorheri-
gen Betriebsmodus zurück.
Bedienschritte
1) Die Taste MENU (9) so oft drücken, bis die ent-
sprechende Anzeige im Display erscheint.
2) Bei den ersten sieben Menüpunkten (
Startadresse bis Schwenkkopfneigung)
mit der Taste ENTER (11) die Auswahl bestäti-
gen. Dann mit der Taste DOWN oder UP (10) die
Einstellung vornehmen und diese mit der Taste
ENTER innerhalb von 8 Sekunden speichern.
Bei dem Menüpunkt Displaydarstellung
wird mit der Taste ENTER sofort die Einstellung
geändert und bei den letzten vier Menüpunkten
( feste Schwenkkopfposition bis
Reset) die gewählte Funktion aktiviert.
3) Um zum nächsten Menüpunkt zu springen, die
Taste MENU drücken.
4) Wird bei einem angewählten Menüpunkt inner-
halb von 8 Sekunden keine weitere Taste ge-
drückt, blendet sich das Menü aus.
7 Reinigung der Optik
Die Linse und die Farbscheibe sollten in regelmäßi-
gen Abständen, je nach Verschmutzung durch
Staub, Rauch oder andere Partikel, gereinigt wer-
den. Nur dann kann das Licht in maximaler
Helligkeit abgestrahlt werden. Vor dem Öffnen des
Gerätes den Stecker aus der Steckdose ziehen und
das Gerät 15 Minuten abkühlen lassen.
Zur Reinigung ein weiches, sauberes Tuch und
ein handelsübliches Glasreinigungsmittel verwen-
den. Anschließend die Teile vorsichtig trocken
wischen.
8Technische Daten
Stromversorgung: . . . . . . . . 230V~/50Hz
Leistungsaufnahme: . . . . . . 510VA
Leuchtmittel: . . . . . . . . . . . . 1 x Entladungslampe
Typ MSD 250W mit
Sockel GY9,5
Abstrahlwinkel: . . . . . . . . . . . 13°
Drehwinkel/-geschwindigkeit
senkrechte Achse (Pan): . 540° in 2,8s
waagerechte Achse (Tilt): . 270° in 1,6s
Einsatztemperatur: . . . . . . . . 0–40°C
Abmessungen: . . . . . . . . . . . 400 x 500 x 360mm
Gewicht: . . . . . . . . . . . . . . . . 26kg
Laut Angaben des Herstellers.
Änderungen vorbehalten.
Fixed panning head position
The panning head can be fixed to five
different positions: upwards (down-
wards), pointing to the front, right, back,
or left. Select the fixed position by press-
ing the button ENTER several times. To
switch back to the previous operating
mode, press the button MENU. The next
menu item flashes for 8 seconds. Then
the menu is extinguished.
Self-test
After pressing the button ENTER, a self-
test is performed. To stop it, press the
button MENU. The next menu item
flashes for 8 seconds. Then the menu is
extinguished.
Working hour meter (fixture hours)
After pressing the button ENTER, the
display shows the working hours. To
switch back to the previous operating
mode, press the button MENU. The next
menu item flashes for 8 seconds. Then
the menu is extinguished.
Reset
By pressing the button ENTER, the unit
is reset: The panning head shortly goes
to the initial position and the light beam
is stopped down. Then the unit switches
back to the previous operating mode.
Operating steps
1) Press the button MENU (9) so many times until
the corresponding display is shown.
2) In case of the first seven menu items ( start
address to tilting of panning head) confirm
the selection with the button ENTER (11). Then
make the adjustment with the button DOWN or
UP (10) and memorize it with the button ENTER
within 8 seconds.
For the menu item of display presenta-
tion, the adjustment is immediately changed with
the button ENTER and the selected function is
activated for the last four menu items(
fixed position of panning head to reset).
3) To go to the next menu item, press the button
MENU.
4) If no further button is pressed within 8 seconds in
case of a selected menu item, the menu is extin-
guished.
7 Cleaning of the Optical System
The lens and the colour disk should be cleaned at
regular intervals, depending on impurities caused by
dust, smoke, or other particles. Only then the light
can be radiated in maximum brightness. Prior to
opening the unit disconnect the plug from the mains
socket and let the unit cool down for 15 minutes.
For cleaning use a soft, clean cloth and a com-
mercial detergent for glass. Then carefully wipe the
parts dry.
8 Specifications
Power supply: . . . . . . . . . . . 230V~/50Hz
Power consumption: . . . . . . 510VA
Lamp: . . . . . . . . . . . . . . . . . . 1 x discharge lamp,
type MSD 250W with
base GY9,5
Radiation angle: . . . . . . . . . . 13°
Rotating angle/speed
vertical axis (pan): . . . . . . 540° in 2.8s
horizontal axis (tilt): . . . . . 270° in 1.6s
Ambient temperature: . . . . . 0–40°C
Dimensions: . . . . . . . . . . . . . 400 x 500 x 360mm
Weight: . . . . . . . . . . . . . . . . . 26kg
According to the manufacturer.
Subject to change.
9
GB
D
A
CH
Diese Bedienungsanleitung ist urheberrechtlich für MONACOR
®
INTERNATIONAL GmbH & Co. KG
geschützt. Eine Reproduktion für eigene kommerzielle Zwecke – auch auszugsweise – ist untersagt.
All rights reserved by MONACOR
®
INTERNATIONAL GmbH & Co. KG. No part of this instruction manual
may be reproduced in any form or by any means for any commercial use.
Seite wird geladen ...
Seite wird geladen ...
Seite wird geladen ...

activée, la LED à côté de la touche brille. La tête
se met dans la position initiale et le diaphragme
est fermé.
5) Avec la touche MODE (20), sélectionnez le mode
de fonctionnement :
1. Mode Show 1 (la LED à côté de la touche ne
brille pas)
2. Mode Slow (la LED brille tout le temps)
3. Mode Show 2 (la LED clignote)
a) en mode Show 1 (angle de rotation autour de
l’axe horizontal 210° max.) et en mode show 2
(angle de rotation 90° max.), le mouvement du
faisceau lumineux et le changement des cou-
leurs et des gobos s’effectuent selon la musi-
que. En maintenant la touche FUNCTION (19)
enfoncée, on peut activer un des trois effets
stroboscope :
1. effet stroboscope avec couleurs et gobos
changeants
2. effet stroboscope avec lumière blanche ;
dans les appareils auxiliaires, l’effet est
synchrone.
3. effet stroboscope avec lumière blanche ;
dans les appareils auxiliaires, l’effet est
opposé.
Par une nouvelle pression sur la touche FUNC-
TION, le prochain effet stroboscope est respec-
tivement activé.
b) en mode Slow, seul le mouvement du fais-
ceau lumineux est géré par la musique. Le
changement des couleurs et des gobos se fait
via la touche FUNCTION. A chaque pression
sur la touche, on passe à la couleur suivante.
Une fois que les 10 couleurs sont passées, on
sélectionne avec une nouvelle pression sur la
touche, le gobo suivant.
6.3 Utilisation via un contrôleur
La TWIST-252 dispose de 16 canaux DMX pour être
utilisée via un contrôleur. Le tableau (fig. 3) présente
les fonctions et valeurs DMX correspondantes.
5) Con il tasto MODE (20) selezionare la modalità:
1. modalità Show 1 (il LED vicino al tasto non è
acceso)
2. modalità Slow (il LED rimane acceso)
3. modalità Show 2 (il LED lampeggia)
a) Nella modalità Show 1 (angolo di rotazione
intorno all’asse orizzontale max. 210°) e nella
modalità Show 2 (angolo di rotazione max.
90°), i movimenti del raggio di luce nonché il
cambio dei disegni e dei colori avvengono
seguendo la musica. Tenendo premuto il tasto
FUNCTION (19), viene attivato uno dei tre
effetti stroboscopici:
1. effetto stroboscopico con cambio fra colori
e disegni
2. effetto stroboscopico con luce bianca; negli
apparecchi secondari, l’effetto è sincroniz-
zato
3. effetto stroboscopico con luce bianca; negli
apparecchi secondari, l’effetto è opposto.
Premendo di nuovo il tasto FUNCTION, si passa
all’effetto stroboscopico successivo.
b) Nella modalità Slow, solo il movimento del
raggio di luce viene comandato dalla musica.
Per cambiare il colore e il disegno, azionare il
tasto FUNCTION. Con ogni pressione del
tasto si passa al colore successivo. Dopo aver
scorso tutti e 10 i colori, una nuova pressione
del tasto chiama il disegno successivo.
6.3 Funzionamento tramite unità di comando
luce
Per il funzionamento tramite un’unità di comando
luce, la TWIST-252 è equipaggiata con sedici canali
DMX. La tabella fig. 3 indica le funzioni e i rispettivi
valori DMX.
13
I
F
B
CH
Canal Fonction Valeur DMX
1
rotation tête (Pan) 540°
000 – 255
2
inclinaison tête (Tilt) 270°
000 – 255
3
vitesse pan/tilt
rapide
→
lent
000 – 255
4
Dimmer
sombre
→
clair
000 – 255
5
aucun effet
stroboscope lent
→
rapide
effet scintillement lent
→
rapide
000 – 015
016 – 135
136 – 255
6
couleur
1)
blanc
bleu
orange
vert
bleu clair
rouge
rose
violet UV
jaune
vert clair
changement continu des couleurs
lent
→
rapide
000 – 012
013 – 025
026 – 038
039 – 051
052 – 063
064 – 076
077 – 089
090 – 102
103 – 115
116 – 127
128 – 255
8
Reset
2)
255
7
aucune fonction
—
Canal Fonction Valeur DMX
11
prisme éteint
prisme allumé
000 – 127
128 – 255
10
rotation gobo
arrêt
rotation droite lent
→
rapide
arrêt
rotation gauche lent
→
rapide
arrêt
000 – 009
010 – 120
121 – 134
135 – 245
246 – 255
12
rotation prisme
arrêt
rotation droite lent
→
rapide
arrêt
rotation gauche lent
→
rapide
arrêt
000 – 009
010 – 120
121 – 134
135 – 245
246 – 255
13
réglage focus
000 – 255
14
déroulement Show préprogrammé
aucun déroulement Show, gestion DMX
Show 1, déroulement automatique
Show 2, déroulement automatique
Show 1, géré par la musique
Show 2, géré par la musique
000 – 031
032 – 127
128 – 223
224 – 239
240 – 255
16
Reset
2)
255
15
gobo faisceau lumineux prépro-
grammé pour la séquence sélectionné
via le canal 14
uniquement changement automatique
de couleur et de gobo
rotation gobo
stroboscope
effet scintillement
prisme
rotation prisme
stroboscope + Rotation prisme
000 – 047
048 – 095
096 – 143
144 – 191
192 – 207
208 – 239
240 – 255
9
Gobo
aucun
Gobo
Gobo A
Gobo B
Gobo C
Gobo D
Gobo E
Gobo F
Gobo G
changement continu
lent
→
rapide
000 – 015
016 – 031
032 – 047
048 – 063
064 – 079
080 – 095
096 – 111
112 – 127
128 – 255
Canale Funzione Valore DMX
1 Rotazione testa orientabile (Pan) 540° 000 – 255
2 Inclinazione testa orientabile (Tilt) 270° 000 – 255
3
Velocità Pan e Tilt
veloce → lento
000 – 255
4
Dimmer
scuro → chiaro
000 – 255
5
nessun effetto
Stroboscopui lento → veloce
Effetto oscillazione lento → veloce
000 – 015
016 – 135
136 – 255
6
Colore
1)
bianco
blu
arancione
verde
azzurro
rosso
rosa
viola UV
giallo
verde chiaro
cambio colore continuo
lento → veloce
000 – 012
013 – 025
026 – 038
039 – 051
052 – 063
064 – 076
077 – 089
090 – 102
103 – 115
116 – 127
128 – 255
8
Reset
2)
255
7 nessuna funzione
—
9
Gobo
nessun gobo
Gobo A
Gobo B
Gobo C
Gobo D
Gobo E
Gobo F
Gobo G
cambio continuo
lento → veloce
000 – 015
016 – 031
032 – 047
048 – 063
064 – 079
080 – 095
096 – 111
112 – 127
128 – 255
Canale Funzione Valore DMX
11
Prisma off
Prisma on
000 – 127
128 – 255
10
Rotazione gobo
Stop
rotazione a destra veloce → lento
Stop
rotazione a sinistra lento → veloce
Stop
000 – 009
010 – 120
121 – 134
135 – 245
246 – 255
12
Rotazione prisma
Stop
rotazione a destra veloce → lento
Stop
rotazione a sinistra lento → veloce
Stop
000 – 009
010 – 120
121 – 134
135 – 245
246 – 255
13 Impostazione fuoco 000 – 255
14
Svolgimento Show preprogrammato
nessuno svolgimento Show, comando
DMX
Show 1, svolgimento automatico
Show 2, svolgimento automatico
Show 1, comandato dalla musica
Show 2, comandato dalla musica
000 – 031
032 – 127
128 – 223
224 – 239
240 – 255
16
Reset
2)
255
15
Disegni dei raggi di luce preprogram-
mati per lo svolgimento selezionato tra-
mite il canale 14
cambio colore e gobo solo automatico
Rotazione gobo
Stroboscopio
Effetto oscillazione
Prisma
Rotazione prisma
Stroboscopio + Rotazione prisma
000 – 047
048 – 095
096 – 143
144 – 191
192 – 207
208 – 239
240 – 255
➂
Configuration des canaux DMX
1)
Les valeurs DMX indiquées pour la sélection de couleur se rapportent
au mode couleur “une couleur”. Pour le réglage “deux couleurs” (voir
chap. 6.4), un réglage intermédiaire avec deux couleurs est possible.
2)
Pour activer la fonction Reset, réglez le canal 8 et le canal 16 sur la
valeur DMX 255.
➂
Assegnazione dei canali DMX
1)
I valori DMS indicati per la selezione dei colori si riferiscono alla moda-
lità colore “monocolore”. Nell’impostazione “bicolore” (vedi cap. 6.4) è
possibile anche una posizione intermedia con due colori.
2)
Per attivare la funzione Reset, impostare per il canale 8 e il canale 16 il
valore DMX 255.
Seite wird geladen ...
Seite wird geladen ...
Seite wird geladen ...
Seite wird geladen ...
Seite wird geladen ...

stuk 6.1.1), om ze met de afstandsbediening syn-
chroon met het centrale apparaat te besturen.
4) Met de toets STAND BY (18) kunt u de functie
Blackout in- en uitschakelen. Bij ingeschakelde
functie licht de LED naast de toets op. De zwenk-
kop wordt in de uitgangspositie gebracht en het
paneel wordt gesloten.
5) Selecteer met de toets MODE (20) de bedrijfs-
modus:
1. modus Show 1 (LED naast de toets licht niet
op)
2. modus Slow (LED licht continu op)
3. modus Show 2 (LED knippert)
a) In de modus Show 1 (rotatiehoek rond de hori-
zontale as max. 210°) en modus Show 2 (rota-
tiehoek max. 90°) gebeurt het bewegen van de
lichtbundel evenals het wisselen van de kleuren
en patronen muziekgestuurd. Door de toets
FUNCTION (19) ingedrukt te houden, kunt u
een van de drie stroboscoop-effecten activeren:
1. Strobo-effect met wisselende kleuren en
patronen
2. Strobo-effect met wit licht; bij de randappa-
raten is het effect synchroon
3. Strobo-effect met wit licht; bij de randappa-
raten is het effect tegengesteld
Door opnieuw op de toets te drukken, is tel-
kens het volgende strobo-effect geactiveerd.
b) In de modus Slow wordt alleen de beweging
van de lichtbundel muziekgestuurd. Het wisse-
len van de kleuren en patronen gebeurt met de
toets FUNCTION. Telkens u op de toets drukt,
wordt naar de volgende kleur geschakeld.
Nadat alle 10 kleuren aan bod zijn geweest,
wordt bij de volgende keer drukken op de toets
naar het volgende patroon geschakeld.
6.3 Bediening via een lichtregelaar
Voor de bediening via een lichtregelaar beschikt de
TWIST-252 over 16 DMX-kanalen. In de tabel in
figuur 3 worden de functies en de bijbehorende
DMX-waarden weergegeven
cabeza se pone en posición inicial y el diafragma
se cierra.
5) Con la tecla MODE (20), seleccione el modo de
funcionamiento:
1. Modo Show 1 (el LED al lado de la tecla no
brilla)
2. Modo Slow (el LED brilla en permanencia)
3. Modo Show 2 (el LED parpadea)
a) En modo Show 1 (ángulo de rotación alrede-
dor del eje horizontal 210° max.) y en modo
Show 2 (ángulo de rotación 90° max.), el
movimiento del haz luminoso y el cambio de
los colores y de los gobos se efectúan según
el ritmo de la música. Si mantiene la tecla
FUNCTION (19) pulsada, puede activar uno
de los tres efectos estroboscópicos:
1. efecto estroboscópico con colores y gobos
que cambian
2. efecto estroboscópico con luz blanca; para
los aparatos auxiliares, el efecto está sin-
cronizado
3. efecto estroboscópico con luz blanca; para
los aparatos auxiliares, el efecto está
opuesto
Si pulsa de nuevo la tecla FUNCTION, el pró-
ximo efecto estroboscópico se activa respec-
tivamente.
b) En modo Slow, solo el movimiento del haz
luminoso se controla mediante música. El
cambio de colores y gobos se efectúa via la
tecla FUNCTION. A cada presion en la tecla,
cambia para el color siguiente. Una vez que
los 10 colores hayan desfilado, si pulsa la
tecla otra vez, selecciona el gobo siguiente.
6.3 Utilización mediante un controlador
La TWIST-252 dispone de 16 canales DMX, para la
utilización mediante un controlador. La tabela es-
quema 3 presenta las funciones y los valores DMX
correspondientes.
19
E
NL
B
Kanaal Functie DMX-waarde
1 Zwenkkopdraaiing (Pan) 540° 000 – 255
2 Zwenkkopkanteling (Tilt) 270° 000 – 255
3
Pan/Tilt-snelheid
snel → langzaam
000 – 255
4
Dimmer
donker → licht
000 – 255
5
geen effect
stroboscoop langzaam → snel
waggeleffect langzaam → snel
000 – 015
016 – 135
136 – 255
6
Kleur
1)
Wit
Blauw
Oranje
Groen
Lichtblauw
Rood
Roze
UV-violet
Geel
Lichtgroen
permanente kleurafwisseling
langzaam → snel
000 – 012
013 – 025
026 – 038
039 – 051
052 – 063
064 – 076
077 – 089
090 – 102
103 – 115
116 – 127
128 – 255
8
Reset
2)
255
7 geen werking
—
Kanaal Functie DMX-waarde
11
prisma uit
prisma aan
000 – 127
128 – 255
10
Gobo-rotatie
Stop
rotatie naar rechts snel → langzaam
Stop
rotatie naar links langzaam → snel
Stop
000 – 009
010 – 120
121 – 134
135 – 245
246 – 255
12
prismarotatie
Stop
rotatie naar rechts snel → langzaam
Stop
rotatie naar links langzaam → snel
Stop
000 – 009
010 – 120
121 – 134
135 – 245
246 – 255
13 focusinstelling 000 – 255
14
voorgeprogrammeerd showverloop
geen showverloop, DMX-sturing
Show 1, automatisch verloop
Show 2, automatisch verloop
Show 1, muziekgestuurd
Show 2, muziekgestuurd
000 – 031
032 – 127
128 – 223
224 – 239
240 – 255
16
Reset
2)
255
15
voorgeprogrammeerd lichtbundelpa-
troon voor het via kanaal 14 geselec-
teerde verloop
alleen autom. wisselen van kleur en gobo
Gobo-rotatie
stroboscoop
waggeleffect
prisma
prismarotatie
stroboscoop + prismarotatie
000 – 047
048 – 095
096 – 143
144 – 191
192 – 207
208 – 239
240 – 255
9
Gobo
geen Gobo
Gobo A
Gobo B
Gobo C
Gobo D
Gobo E
Gobo F
Gobo G
voortdurend wisselend
langzaam → snel
000 – 015
016 – 031
032 – 047
048 – 063
064 – 079
080 – 095
096 – 111
112 – 127
128 – 255
Canal Función Valor DMX
1 rotación cabeza (Pan) 540° 000 – 255
2 inclinación cabeza (Tilt) 270° 000 – 255
3
velocidad pan/tilt
rápido → lento
000 – 255
4
dimmer
oscuro → claro
000 – 255
5
ningún efecto
estroboscopio lento → rápido
efecto centelleo lento → rápido
000 – 015
016 – 135
136 – 255
6
color
1)
blanco
azul
naranja
verde
azul claro
rojo
rosa
violeta UV
amarillo
verde claro
cambio continuo de colores
lento → rápido
000 – 012
013 – 025
026 – 038
039 – 051
052 – 063
064 – 076
077 – 089
090 – 102
103 – 115
116 – 127
128 – 255
8
reset
2)
255
7 ninguna función
—
9
gobo
ningún gobo
gobo A
gobo B
gobo C
gobo D
gobo E
gobo F
gobo G
cambio continuo
lento → rápido
000 – 015
016 – 031
032 – 047
048 – 063
064 – 079
080 – 095
096 – 111
112 – 127
128 – 255
Canal Función Valor DMX
11
prisma apagado
prisma encendido
000 – 127
128 – 255
10
rotación gobo
paro
rotación derecha lento → rápido
paro
rotación izquierda lento → rápido
paro
000 – 009
010 – 120
121 – 134
135 – 245
246 – 255
12
rotación prisma
paro
rotación derecha lento → rápido
paro
rotación izquierda lento → rápido
paro
000 – 009
010 – 120
121 – 134
135 – 245
246 – 255
13 reglaje enfoque 000 – 255
14
desarrollo Show preprogramado
ningún desarrollo Show, control DMX
Show 1, desarrollo automático
Show 2, desarrollo automático
Show 1, controlado por la música
Show 2, controlado por la música
000 – 031
032 – 127
128 – 223
224 – 239
240 – 255
16
reset
2)
255
15
gobo haz luminoso preprogramado
para la secuencia seleccionada via el
canal 14
únicamente cambio automático de color y
de gobo
rotación gobo
estroboscopio
efecto centelleo
prisma
rotación prisma
estroboscopio + rotación prisma
000 – 047
048 – 095
096 – 143
144 – 191
192 – 207
208 – 239
240 – 255
➂
Bezetting van de DMX-kanalen
1)
De vermelde DMX-waarden voor het selecteren van de kleuren hebben
betrekking op de kleurmodus “eenkleurig”. Bij de instelling “tweekleurig”
(zie hoofdstuk 6.4) is ook een stand tussen twee kleuren mogelijk.
2)
Om de functie Reset te activeren, stelt u kanaal 8 en kanaal 16 in op de
DMX-waarde 255.
➂
Configuración de los canales DMX
1)
Los valores DMX indicados para la selección de color se relacionan con
el modo color “un color”. Para el reglaje “dos colores” (vea capítulo 6.4),
un reglaje intermediario con dos colores es posible.
2)
Para activar la función Reset, regule el canal 8 y el canal 16 sobre el
valor DMX 255.
Seite wird geladen ...
Seite wird geladen ...
Seite wird geladen ...
Seite wird geladen ...

6.4 Zmiana parametrów pracy
Za pomocą menu można zmieniać następujące
parametry. Podana kolejność odpowiada kole-
jność pozycji menu.
Regulacja adresu startowego
(rozdział 6.3)
. . .
Tryb Show (rozdział 6.1)
Show 1
Show 2
Tryb Slave (rozdział 6.1.1)
normalny
2 light show
Tryb Blackout
blackout on
(funkcja blackout włączona)
Jeżeli na wejściu DMX IN (14)
nie ma sygnału DMX, głowica
ustawia się w pozycji wyjścio-
wej, a przesłona jest zam-
knięta.
Blackout desactivado
(funkcja blackout wyłączona)
Możliwa jedynie kontrola za
pomocą zintegrowanego mi-
krofonu (17).
Tryb kolorów
pojedynczy kolor (normal)
Dysk z kolorami zatrzymuje
się w miejscu na jednym kon-
kretnym kolorze.
wiele kolorów (split colour)
Możliwe są pozycje przejś-
ciowe pomiędzy kolorami.
Obroty głowicy (Pan)
normalne
rotacja przeciwna
Odchylenie głowicy (Tilt)
normalne
odchylenie przeciwne
Tryb Wyświetlania
normalny
odwrócony o 180°
(przy montażu sufitowym)
Włączenie ustawienia za pomocą przy-
cisku ENTER. Wyświetlacz miga przez
8 sekund, a następnie wygasza się.
Ustalona pozycja głowicy
Głowica może być ustawiana w pięciu
różnych pozycjach: w górę (w dół),
skierowana do przodu, w prawo oraz w
lewo. Należy wybrać ustaloną pozycją
wciskając kilkukrotnie przycisk ENTER.
Aby włączyć poprzedni tryb pracy na-
leży wcisnąć przycisk MENU. Kolejna
opcja menu będzie migać przez 8 se-
kund. Następnie manu się wyłączy.
Self-test
Po przyciśnięciu przycisku ENTER ur-
ządzenie rozpoczyna testowanie. Aby
zatrzymać testowanie należy wcisnąć
przycisk MENU. Następna pozycja
menu miga przez 8 sekund, a nas-
tępnie się wygasza.
Licznik czasu pracy (Fixture Hours)
Po wciśnięciu przycisku ENTER, wyś-
wietlacz pokazuje czas pracy. Aby po-
wrócić do poprzedniego wskazania na-
leży wcisnąć przycisk MENU. Następny
element menu świeci się przez 8 se-
kund, a następnie się wygasza.
Reset
Urządzenie kasuje się po wciśnięciu
przycisku ENTER: Głowica obrotowa
powoli ustawia się w pozycji wyjścio-
wej. Następnie urządzenie włacza się
poprzednim trybie pracy.
Sposób poruszania się po menu
1) Wcisnąć przycisk MENU (9) tyle razy, ile potr-
zeba, aby pokazała się odpowiednia opcja.
2) W przypadku pierwszych siedmiu pozycji menu
( adres startowy do odchylenie się
głowicy), wybór potwierdza się za pomocą przy-
cisku ENTER (11). Następnie ustawia się wy-
brany parametr za pomocą przycisku DOWN,
lub UP (10) i zatwierdza się przyciskiem ENTER
w przeciągu 8 sekund.
W przypadku pozycji menu wskazanie
wyświetlacza, ustawienie zmienia się w momen-
cie wciśnięcia przycisku ENTER. Ostatnie cztery
parametry menu są aktywowane za pomocą
przycisku ENTER ( ustalona pozycja
głowicy do reset).
3) Aby przejść do kolejnej opcji menu, należy wcis-
nąć przycisk MENU.
4) Jeżeli przez 8 sekund nie jest wciskany żaden
przycisk, menu się wygasza.
7 Czyszczenie optyki
Obiektyw i kolorowy dysk powinny być czyszczone
w regularnych odstępach czasu zależnie od stopnia
zanieczyszczenia. Tylko wtedy światło może być
emitowane z maksymalną jasnością. Przed otwar-
ciem urządzenia należy odłączyć urządzenie od
zasilania i pozwolić mu ostygnąć przez 15 minut.
Do czyszczenia używać delikatnego, czystego
kawałka materiału oraz detergentów przeznac-
zonych do czyszczenia obiektywów. Następnie
należy wszystko delikatnie zetrzeć.
8 Dane Techniczne
Zasilanie: . . . . . . . . . . . . . . . 230 V~/50Hz
Pobór mocy: . . . . . . . . . . . . 510 VA
Lampa: . . . . . . . . . . . . . . . . . 1 x lampa wyłado-
wcza,
typ MSD 250 W na
bazie GY 9,5
Kąt pokrycia: . . . . . . . . . . . . 13°
Kąt obrotu/prędkość
oś pionowa (obrót): . . . . . 540° w 2,8 s
oś pozioma (wychylenie): 270° w 1,6 s
Dopuszczalna temperatura
otoczenia pracy: . . . . . . . . . 0 – 40 °C
Rozmiary: . . . . . . . . . . . . . . . 400 x 500 x 360 mm
Waga: . . . . . . . . . . . . . . . . . . 26 kg
Zgodnie z danymi producenta.
Rzeczywiste parametry mogą odbiegać od podan-
ych przez producenta.
24
PL
Instrukcje obsługi są chronione prawem copyright for MONACOR
®
INTERNATIONAL GmbH & Co. KG.
Przetwarzanie całości lub części instrukcji dla osobistych korzyści finansowych jest zabronione.
Kanał Funkcja Wartość DMX
1
rotacja głowicy (obrót) 540°
000 – 255
2
odchylenie głowicy (wychył) 270°
000 – 255
3
prędkość obrotu i wychylenia
szybko → powoli
000 – 255
4
przełącznik światła
ciemne → jasne
000 – 255
5
brak efektu
stroboskop powoli → szybko
efekt drgania powoli → szybko
000 – 015
016 – 135
136 – 255
6
kolor
1)
biały
niebieski
pomarańczowy
zielony
jasnoniebieski
czerwony
różowy
ultrafiolet
żółty
jasnozielony
ciągła zmiana kolorów
powoli → szybko
000 – 012
013 – 025
026 – 038
039 – 051
052 – 063
064 – 076
077 – 089
090 – 102
103 – 115
116 – 127
128 – 255
8
reset
2)
255
7
bez funkcji
—
9
gobo
bez gobo
gobo A
gobo B
gobo C
gobo D
gobo E
gobo F
gobo G
zmiana ciągła
szybko → powoli
000 – 015
016 – 031
032 – 047
048 – 063
064 – 079
080 – 095
096 – 111
112 – 127
128 – 255
➂
Konfiguracja kanałów DMX
1)
Wyszczególnione wartości DMX dla sekcji kolorów odnoszą się do trybu
jednokolorowego. Dla trybu wielokolorowego możliwe są również ustawie-
nia pośrednie kolorów (patrz rozdział 6.4).
2)
Aby włączyć funkcję reset należy ustawić kanału 8 i 16 w wartości
DMX 255.
Kanał Funkcja Wartość DMX
11
pryzmat wyłączony
pryzmat włączony
000 – 127
128 – 255
10
rotacja gobo
stop
rotacja w prawo szybko → powoli
stop
rotacja w lewo powoli → szybko
stop
000 – 009
010 – 120
121 – 134
135 – 245
246 – 255
12
rotacja pryzmatu
stop
rotacja w prawo szybko → powoli
stop
rotacja w lewo powoli → szybko
stop
000 – 009
010 – 120
121 – 134
135 – 245
246 – 255
13
regulacja ostrości
000 – 255
14
zaprogramowana sekwencja
bez zaprogramowanej sekwencji,
sterowanie DMX
Show 1, sekwencja automatyczna
Show 2, sekwencja automatyczna
Show 1, sterowanie dźwiękiem
Show 2, sterowanie dźwiękiem
000 – 031
032 – 127
128 – 223
224 – 239
240 – 255
16
reset
2)
255
15
zaprogramowane wzory świetlne
dla sekwencji wybranej za pomocą
kanału 14
tylko automatyczna zmiana kolorów i
efektu gobo
rotacja gobo
stroboskop
efekt drgania
pryzmat
rotacja pryzmatu
stroboskop + rotacja pryzmatu
000 – 047
048 – 095
096 – 143
144 – 191
192 – 207
208 – 239
240 – 255
Seite wird geladen ...

Lyseffektenhed TWIST-252
Læs nedenstående sikkerhedsoplysninger opmærk-
somt igennem før ibrugtagning af enheden. Bortset
fra sikkerhedsoplysningerne henvises til den engel-
ske, tyske, franske eller italienske tekst.
Vigtige sikkerhedsoplysninger
Enheden overholder EU-direktivet vedrørende elek-
tromagnetisk kompatibilitet 89/336/EØF og lav-
spændingsdirektivet 73/23/EØF.
Vær altid opmærksom på følgende:
●
Enheden er kun beregnet til indendørs brug. Beskyt
den mod vanddråber og -stænk, høj luftfugtighed
og varme (tilladt omgivelsestemperatur 0–40°C).
●
Under brug bliver panoreringshovedet (1) meget
varmt, undgå at røre hovedet (1) under brug. Lad
det køle i nogle minutter efter brug, før berøring.
●
Undlad at indføre noget i kabinettets ventilations-
huller! Dette kan forårsage fare for elektrisk stød.
●
Tag ikke enheden i brug og tag straks stikket ud af
stikkontakten i følgende tilfælde:
1. hvis der er synlig skade på enheden, f.eks.
kabinettet, linsen, UV-filtret eller netkablet.
2. hvis der kan være opstået skade, efter at
enheden er tabt eller lignende.
3. hvis der forekommer fejlfunktion.
●
Tag aldrig stikket ud af stikkontakten ved at
trække i kablet, tag fat i selve stikket.
●
Ved transport af enheden, skal håndtagene (3)
benyttes. Enheden må aldrig bæres i rammen (2)
eller hovedet (1).
●
Til rengøring af huset må kun benyttes en tør, blød
klud; der må under ingen omstændigheder benyt-
tes kemikalier eller vand. Til rengøring af linsen
kan der benyttes almindelig vindues-/skærmrens.
●
Hvis enheden benyttes til andre formål, end den
oprindeligt er beregnet til, hvis den monteres eller
betjenes forkert, eller hvis den ikke repareres af
autoriseret personel, omfattes eventuelle skader
ikke af garantien.
●
Hvis enheden skal tages ud af drift for bestandigt,
skal den bringes til en lokal genbrugsstation for
bortskaffelse.
Installering af lampen
Lyseffekten leveres uden lyskilde. Der skal brubes
en udladningspære af typen MSD 250W med sok-
kel GY9,5.
Andre typer lyskilder må under ingen om-
stændigheder benyttes!
Følgende lyskilder fra “img Stage Line” kan be-
nyttes:
Rør aldrig ved lyskilden med fingrene. Fingeraftryk
reducerer lyset, brænder ind u glasset og nedsætter
lyskildens levetid væsentligt.
●
Lyskilderne indeholder skadelige stoffer (f.eks.
kviksølv), som kan skade miljøet, og skal derfor
afleveres på en genbrugsstation.
●
Lamperne skal senest udskiftes efter at den gen-
nemsnitlige levetid er overskredet med 25%, da
der eller ved fortsat brug er fare for eksplosion
som følge af forhøjede strukturændringer i quartz-
glasset.
Enheden er forsynet med en levetidstæller.
Denne bruges til at bestemme levetiden på lyskil-
den. Noter tælleren når lyskilden udskiftes – se
kapitel 6.4 i det engelske afsnit under “Changing
the operation parameters”, menupunkt “Working
hour meter”.
●
Hvis en lampe eksploderer under drift skal de
umiddelbare omgivelser hvori lampen er monteret
forlades med det samme, for at undgå sundheds-
fare der opstår som følge af kviksølvdampe; en
god udluftning af lokalet er påkrævet.
Montering
Enheden kan stilles på en jævn overflade. Skru evt.
monteringspladen (4) af. Der er også mulighed for at
montere enheden på hovedet i en traverse ved at
bruge monteringspladen. Til monteringen skal der
bruges monteringbeslag. Skru beslaget godt fast til
de lange huller i monteringspladen og derefter til
traversen. Monteringsstedet skal være stabilt og
kunne bære mindst 30kg per enhet.
Vigtigt!
1. For at undgå ophobning af varme i enheden
skal monteringsstedet vælges således, at der
sikres tilstrækkelig luftcirkulation under drift. Stil
enheden mindst 1m fra andre overflader. Kabi-
nettets ventilationshuller må ikke tildækkes.
2. Det er ab solut nødvendigt at sikre tilstrækkelig
afstand til materialer, som er let antændelige og
følsomme over for varme.
3. Hvis enheden bliver monteret over et sted, hvor
der kan opholde sig personer, skal denne sikres
yderligere (f.eks med et sikkerhedsreb). Skru
den medfølgende sikkerhedslås fast i den mid-
terste bøsning på undersiden af enheden og
fastgør et sikkerhedsreb til den. Sikkerheds-
rebet skal have en længde, så enheden højest
kan falde 20cm.
Vigtigt!
1. Før lyskilden installeres af enheden, skal stikket
under alle omstændigheder tages ud af stikkon-
takten!
2. Da halogenlamper bliver meget varme under
drift, skal de have lov til at køle ned efter brug af
enheden, før de udskiftes (nedkølingstiden er
mindst 15 minutter).
3. Kig aldrig direkte på lyskilden, når enheden er
åben. Det kraftige lys og UV-strålerne kan være
farlige for øjnene.
Forsigtig!
Enheden benytter livsfarlig netspænding (230V~).
Ved usagligt udførte reparationer kan der opstå
betydelig fare for brugeren. Enheden skal altid
repareres af autoriseret personel.
Ljuseffektenhet TWIST-252
Innan enheten tas i bruk, läs först igenom säkerhets-
föreskrifterna. Om ytterligare information önskas,
läs igenom den tyska, engelska, franska eller den
italienska texten som medföljer.
Säkerhetsföreskrifter
Enheten uppfyller EG-direktiv 89/336/EWG av-
seende elektromagnetiska störfält samt EG-direktiv
73/23/EWG avseende lågspänningsapplikationer.
Ge ovillkorligen även akt på följande:
●
Enheten är endast avsedda för inomhusbruk.
Skydda enheten mot vätskor, hög luftfuktighet
och hög värme (tillåten omgivningstemperatur
0–40°C).
●
Vid användning blir det vridbara huvudet (1)
mycket varmt. För att undvika brännskador bör
inte panoreringshuvudet vidröras under gång,
samt tillåtas att kallna i flera minuter efter avslutad
användning.
●
Stoppa aldrig något i kylhålen på chassiet! Detta
kan ge elektriska skador på person och materiel.
●
Använd inte enheten och ta omedelbart kontakten
ur elurtaget om något av följande fel uppstår:
1. Om det finns synliga skador på enheten, chas-
siet, linsen, UV-filtret eller elsladden.
2. Enheten är skadad av fall e.d.
3. Enheten har andra felfunktioner.
●
Drag aldrig ut kontakten genom att dra i sladden
utan ta tag i kontaktkroppen.
●
Lyft i handtaget (3) endast då enheten skall trans-
porteras. Lyft aldrig i panoreringshuvudet (1) eller
i fästet (2) som häller denna.
●
Rengör endast med en mjuk och torr trasa, an-
vänd aldrig kemikalier eller vatten vid rengöring.
Linsen kan rengöras med vanligt fönsterputs-
medel.
●
Om enheten används för andra ändamål än
avsett, om den monteras eller används på fel sätt
eller inte repareras av auktoriserad personal upp-
hör alla garantier att gälla. I dessa fall tas inget
ansvar för uppkommen skada på person eller
materiel.
●
Om enheten skall kasseras bör de lämnas in till
återvinning.
Montering av lampa
Ljuseffektenheten levereras utan lampa. En urladd-
ningsbar lampa av typ MSD 250W behövs.
Lampor av annan typ får under inga omständig-
heter användas.
Följande lampor från “img Stage Line” produkt
område kan användas.
Rör aldrig vid glödlampan, fingeravtryck ger försäm-
rad belysning och även inbränning av smuts på lam-
pan.
●
Lamporna som anvisas innehåller små mängder
skadligt material, främst kvicksilver, som kan
skada miljön och måste därför kasseras på ett
betryggande sätt enligt föreskrifter i respektive
land där dessa används.
●
Lamporna måste bytas ut senast efter 1,25 gån-
ger medellivslängden eftersom risken för en ex-
plosion därefter stiger avservärt p.g.a. struktur-
förändringar i kvartsglaset.
Enheten är försedd med en arbetstidsmätare.
Denna kan användas för avläsning av lampans
glödtid. Skriv ner tidgivningen vid byte av lampa –
se kapitel 6.4 “Changing the operation para-
meters” under punkten “Working hour meter”.
●
Om en lampexplosion skett då lampan varit i drift
skall rummet där apparaten finns, för säkerhets
skull utrymmas, för att fullständigt kunna utesluta
hälsovådlig kvicksilverånga. Sörj för god venitaltion.
Montering
TWIST-252 kan monteras på en fast och jämn yta.
Om så behövs, skruva loss monteringsplattan (4).
Det är också möjligt att montera enheten upp och
ner på en travers med hjälp av monteringsplattan.
För fastsättning behövs fästbultar. Skruva bultarna
genom de långa hålen i fästplattan och i traversen.
Monteringsplatsen måste ha tillräcklig för att bära
30Kilo minimum.
Viktigt!
1. För att undvika överhettning av enheten skall
den monteras så att luften kan cirkulera fritt runt
den. Placera enheten minst 1m från materialet
som skall belysas. Enheten får inte heller täckas
över då detta medför risk för brand.
2. Det är mycket viktigt att hålla avstånd från
brännbart eller värme känsligt material då lam-
pan blir mycket varm vid användning.
3. Om enheten monteras hängande över perso-
ner, måste den även säkras med en vajer till tra-
versen. Skruva fast den medföljande fästöglan i
mitten av den undre sidan av enheten och
anslut vajern i öglan. Vajern skall tillåta max.
20cm fritt fall innan enheten stoppas.
Viktigt!
1. All montering/demontering av lampa skall ske
endast om kontakten är uttagen ur elurtaget!
2. Då halogenlampor blir mycket varma vid an-
vändning, låt först lampan kallna en stund
(minst 15 min.) innan byte sker för att undvika
brännskador.
3. Titta aldrig direkt in i blixtlampan när den är i
funktion. Det skarpa ljuset och UV-ljuset kan
orsaka permanenta ögonskador.
OBS!
Enheten använder livsfarligt hög spänning
internt (230V~). Felatigt utförda reparationer kan
leda till personskador. Enheten skall alltid lagas
på verkstad av utbildad personal.
26
S
DK
Type Best. Nr. Gns. levetid
HLO-250MSD 05.0005 3000h
Föremål
Order
nummer
Genomsnittlig
livslängd
HLO-250MSD 05.0005 3000h

Valoefektilaite TWIST-252
Ole hyvä ja huomioi aina seuraavat turvallisuutta
koskevat ohjeet ennen laitteen käyttöön ottoa. Katso
käyttöön liittyviä ohjeita Saksan, Englannin, Rans-
kan tai Italian kielisistä ohjeista, jos tarvitset lisää tie-
toa laitteen käytöstä.
Turvallisuudesta
Tämä laite vastaa direktiiviä 89/336/EEC sähkö-
magneettisesta yhteensopivuudesta sekä matala-
jännitedirektiiviä 73/23/EEC.
●
Tämä laite soveltuu vain sisätilakäyttöön. Suojele
laitetta kosteudelta, vedeltä ja kuumuudelta (sal-
littu ympäröivä lämpötila 0–40°C).
●
Käytön aikana laitteen liikkuva kääntöpää (1) kuu-
menee voimakkaasti. Välttääksesi palovammoja
älä koske kääntöpäähän laitteen ollessa
toiminnassa, ja sammuttamisen jälkeenkin anna
laitteen jäähtyä muutamia minuutteja ennen
koskettamista.
●
Älä työnnä mitään esinettä tuuletusaukosta si-
sään! Sähköiskun vaara.
●
Irrota virtajohto pistorasiasta, äläkä käynnistä
laitetta, jos:
1. laitteessa on näkyviä vaurioita esim. ulko-
kuoressa, linsseissä, UV-filtterissä tai virtajoh-
dossa
2. putoaminen tai muu vastaava vahinko on saat-
tanut aiheuttaa vaurion
3. laitteessa esiintyy toimintahäiriöitä
●
Älä koskaan irrota virtajohtoa pistorasiasta joh-
dosta vetämällä.
●
Kanna ja liikuta laitetta ainoastaan sen kahvoista
(3). Älä milloinkaan kanna laitetta sen kään-
töpäästä (1) tai kääntöpään aisasta (2).
●
Käytä laitteen ulkopuoliseen puhdistamiseen aino-
astaan kuivaa, pehmeää kangasta. Älä milloin-
kaan käytä vettä tai kemikaaleja. Linssin puhdista-
misessa voidaan käyttää markkinoilla olevia, tähän
käyttöön tarkoitettuja lasilinssinpuhdistusaineita.
●
Laitteen takuu raukeaa, eikä valmistaja, maahan-
tuoja tai myyjä ota vastuuta mahdollisista välittö-
mistä tai välillisistä vahingoista, jos laitetta on
käytetty muuhun kuin alkuperäiseen käyttötarkoi-
tukseen, laitetta on taitamattomasti käytetty tai
asennettu, tai jos laitetta on huollettu muussa kuin
valtuutetussa huollossa.
●
Kun laite poistetaan lopullisesti käytösta, vie se pai-
kalliseen kierrätyskeskukseen jälkikäsittelyä varten.
Lampun asennus
Valoefektilaite toimitetaan ilman polttimoa. Laitteessa
tulee käyttää MSD 250WGY9,5 -purkauspolttimoa.
Muuntyyppistä polttimoa ei saa käyttää missään
tapauksessa!
Seuraavia “img Stage Line” -tuoteryhmän polttimoita
voidaan käyttää:
Älä koske sormilla polttimon lasiin! Sormenjäljet
vähentävät polttimon valotehoa ja lyhentävät polt-
timon elinikää.
●
Tässä luetellut polttimot sisältävät pieniä määriä
haitallisiksi luokiteltuja aineita (esim. elohopeaa),
joten polttimoiden käytössä tulee noudattaa varo-
vaisuutta ja hävitettäessä polttimot tulee toimittaa
ongelmajätekeräykseen.
●
Polttimot on vaihdettava viimeistään, kun niitä on
poltettu 1,25-kertaisen keskimääräisen polttoiän
verran. Enemmän käytettäessä räjähtämisriski
huomattavasti kasvaa johtuen kvartsilasin liitos-
kohdissa tapahtuvista muutoksista.
Laitteessa on polttimon käyttöaikalaskuri, joka
auttaa ajoittamaan polttimon vaihtoa. Polttimoa
vaihtaessasi muista nollata laskuri – katso luku 6.4.
●
Käytössä tapahtuneen polttimon räjähdyksen jäl-
keen tulisi varovaisuussyistä poistua valoefektin
välittömästä läheisyydestä, jotta täysin vältyttäi-
siin vapautuneen elohopeahöyryn terveydelle hai-
tallisilta vaikutuksilta. Huolehdi tilan tehokkaasta,
tuuletuksesta.
Kiinnitys
Laite tulee asentaa tukevalle, tasaiselle pinnalle.
Näin käytettynä laitteen pohjassa sijaitseva asennus-
levy (4) voidaan irroittaa. Laite voidaan myös ripustaa
ylösalaisin riippumaan esim. trussirakenteeseen, jota
tarkoitusta varten laitteen pohjan asennuslevyssä on
tukevat kiinnitysreiät. Kiinnitä laite pohjalevyineen
trussirakenteeseen. Varmista että kiinnityskohde on
riittävän tukevaa tekoa, ja että se pystyy kantamaan
vähintään 30kg:n painon laitetta kohti.
Tärkeää!
1. Jotta lämmön kertyminen laitteeseen voitaisiin
estää, tulee asennuspaikka valita siten, että riit-
tävä ilmanvaihto varmistetaan toiminnan
aikana. Sijoita laite niin, että ympäröiviin pintoi-
hin jää vähintään 1 metrin välimatka. Laitteen
tuuletusaukkoja ei saa peittää (esim. kankailla,
verhoilla tms.).
2. Ehdottoman tärkeää on säilyttää riittävä etäisyys
syttyviin tai lämmönarkoihin materiaaleihin.
3. Varmista kiinnitys turvavaijerilla putoamisen
estämiseksi, erityisesti jos laitteen alapuolella
edes hetkellisesti oleilee ihmisiä. Kiinnitä lait-
teen mukana toimitettava silmukkapultti laitteen
rungossa olevaan naaraskierteeseen, ja kiinnitä
vaijeri silmukkapulttiin. Mitoita vaijeri niin, että
kuviteltua putoamismatkaa jää enintään 20cm.
Tärkeää!
1. Ennen lamppujen vaihtoa tai asennusta tulee
virtajohto irrottaa pistorasiasta!
2. Koska halogeenilamput kuumenevat käytön
aikana kovasti, anna niiden jäähtyä käytön jäl-
keen (jäähtymisaika ainakin 15 minuuttia).
3. Älä koskaan katso sytytettyyn purkauslamp-
puun laitteen ollessa avattuna. Lampun kirkkaus
ja UV-säteily saattavat aiheuttaa silmävaurion.
Huomio!
Tämä laite toimii hengenvaarallisella jännitteellä
(230V~). Jos laite ei toimi kunnolla, saattaa oiko-
sulun vaara olla olemassa. Laite täytyy korjaut-
taa valtuutetussa huoltoliikkeessä.
27
FIN
Tuote Tilausnumero Käyttöikä keskimäärin
HLO-250MSD 05.0005 3000h

Copyright
©
by MONACOR INTERNATIONAL GmbH & Co. KG, Bremen, Germany. All rights reserved. A-0214.99.01.04.2004
®
-
 1
1
-
 2
2
-
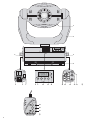 3
3
-
 4
4
-
 5
5
-
 6
6
-
 7
7
-
 8
8
-
 9
9
-
 10
10
-
 11
11
-
 12
12
-
 13
13
-
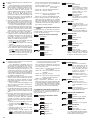 14
14
-
 15
15
-
 16
16
-
 17
17
-
 18
18
-
 19
19
-
 20
20
-
 21
21
-
 22
22
-
 23
23
-
 24
24
-
 25
25
-
 26
26
-
 27
27
-
 28
28


IMG Stage Line TWIST-252 Bedienungsanleitung
- Kategorie
- Stroboskope
- Typ
- Bedienungsanleitung
in anderen Sprachen
- English: IMG Stage Line TWIST-252 Owner's manual
- français: IMG Stage Line TWIST-252 Le manuel du propriétaire
- español: IMG Stage Line TWIST-252 El manual del propietario
- italiano: IMG Stage Line TWIST-252 Manuale del proprietario
- Nederlands: IMG Stage Line TWIST-252 de handleiding
- polski: IMG Stage Line TWIST-252 Instrukcja obsługi
Verwandte Artikel
Andere Dokumente
-
Monacor LSX-40SG Benutzerhandbuch
-
EuroLite TMH XB-280 Benutzerhandbuch
-
EuroLite LED KLS-3002 NEXT Benutzerhandbuch
-
BEGLEC iMove 5S-HID Bedienungsanleitung
-
-
-
-
 Lumina Daphine Cloe Benutzerhandbuch
-
 Lumina Flo Lounge Benutzerhandbuch
-
 Lumina Flo Grommet Benutzerhandbuch


